Hamilton/Buhl HDV5200-1 User manual

Instruction Manual
HDV5200-1
™

1
We appreciate your purchase of HD5200-1 (HD Digital Video Camera).
Prior to usage, please make sure to review this instruction manual carefully
and store the manual for future references.
Safety Information
Before using the DVC (Digital Video Camera), please ensure that you
have read and understood the following safety precautions.
·Don’t try to open the crust of the DVC (Digital Video Camera) or
change the DVC (Digital Video Camera) in any way. Only authorized
maintenance personnel are allowed to maintain the DVC (Digital Video Camera).
·Keep the DVC (Digital Video Camera) far away from water and other
liquids when in use. Don’t use the DVC (Digital Video Camera) with
wet hands. Never use the DVC (Digital Video Camera) in rain or snow.
Moisture will easily cause electric shock.
·Use the recommended power supply and accessories only. It will cause overheat,
deformation, fire and electric shock if non-recommended power supply is used.

2
1. Components of the Video Camera
1. Display Menu/On/Off Button
2. LED Light On/Off Button
3. Mode Selection (Movie/Picture/Playback) Button
4. Power On/Off Button
5. Menu Button
6. Recording On/Off Button
7. Zoom-In / Up Arrow Button
8. OK Button
9. Function Indicating Light
10. Mini HDMI Interface
11. SD Card Slot
12. Shutter Button
13. USB Interface
14. AV Interface
15. TFT-LCD Screen
16
.
Built-In Speaker
17. Left Arrow Button
18. Zoom-Out / Down Arrow Button
19. Right Arrow / Self-Timer Button
20. Wrist Strap Hole
22. Battery Compartment Cover
21. Tripod Mounting Hole

3
23. Self-Timer Indicating Light
24. Lens
25. Built-in LED Light
26. Microphone
2. Preparations before operating the camcorder
Charging the Battery
1. Make sure lithium battery is properly inserted in the battery compartment
2. Fully charge the camcorder via USB charger prior to use

4
Installing the memory card
There is no built-in memory in this camera. A compatible external
memory card is required to take or save pictures and movies. If you want
to shoot and save the files, please use a proper SD or MMC card.
Before inserting or taking out the card, please turn off the unit first to
avoid any damages. Before inserting the card, please ensure to insert in the
correct direction. If you feel resistance, please do not forcibly insert the
card. The memory card is equipped with a write protection switch to
avoid any unintentional data deletions. Therefore, if you want to save or
delete files, please place the write protection in “Off” position.
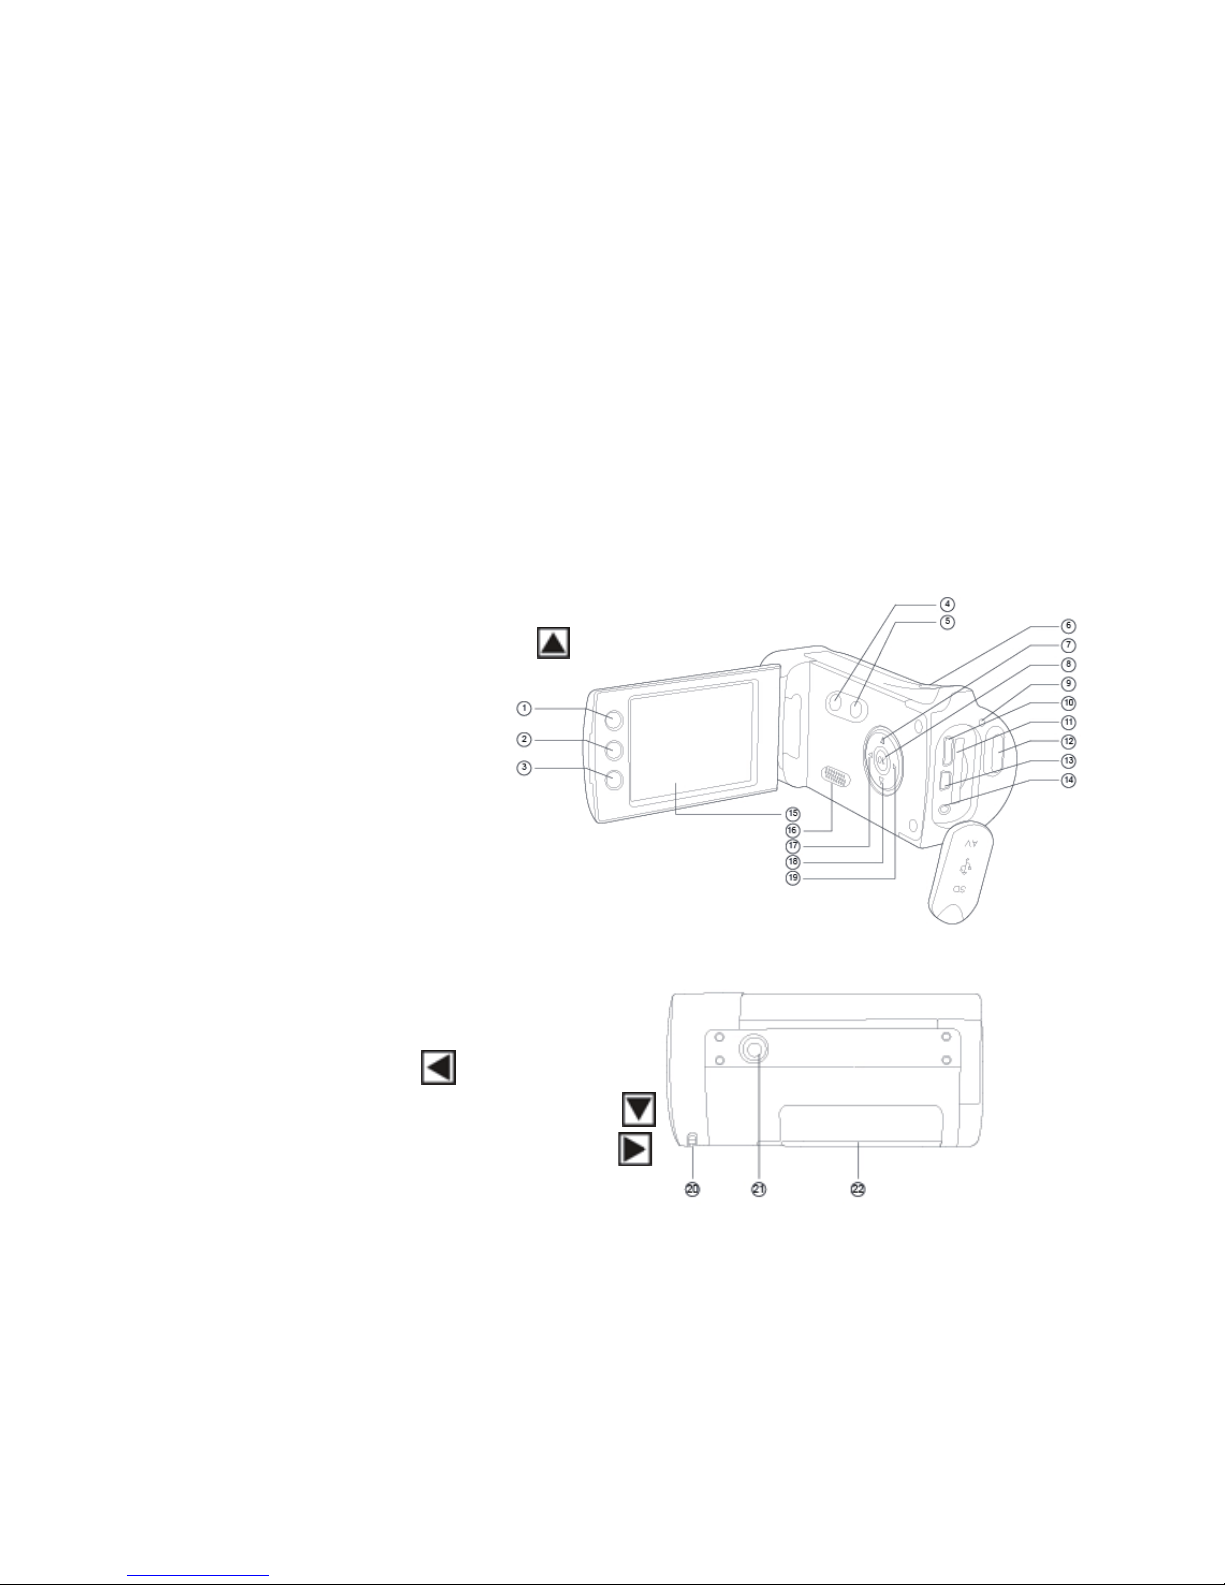
1. Make sure to turn off the camcorder.
2. At the end of the camera, there is a rubber cover for SD card, open this
cover you will see the SD card slot.
3. Insert the memory card as shown in the sketch.
4. Close the SD rubber cover.
* To take out the memory card, slightly press
the edge of the memory card, then release,
the card will be ejected.

5
Format Memory Card
All the data in the Memory Card (including the protected files) will be
deleted when the Memory Card is formatted. Therefore, please back up
the important files before formatting.
1. Power on the DVC, to show the setting menu.
2. Press the Up or Down button, select Format, then press the OK button
to enter into the submenu under this option.
3. Press the Up or Down button, select Yes, then press the OK button to
format.
Setting of Languages
When using the DVC the first time after purchasing it, please set proper
language before using the DVC.
1. Power on the DVC, to show the setting menu.
2. Press the Up or Down button, select Language, then press the OK
button to enter into the submenu under language option.
3. Press the Up or Down button to select the language you need, then
press the OK button to confirm.
4. At last, press the Menu button to quit the setting interface.

6
LCD Display
Video Recording Mode
Video File Size
FHD 1920X1080
HD 1280X720
D1 848X480
640 640X480
Remaining Time
Memory Card
Video Recording
Mode
Battery Level

7
PhotographyMode
Image Size
12MP 4000X3000
8MP 3264X2448
5MP 2592X1944
3MP 2048X1536
1MP 1280X960
Exposure Compensation Value
White Balance
Auto
Daylight
Cloudy
Fluorescent
Tungsten
Photography Mode
Battery Level
Memory Card
Photos Available

8
Playback Mode
3. Basic Operation
Power on or off the DVC
1. Turn on the LCD screen, and press the On/Off button to power on the
DVC.
2. Press the On/Off button to power off the DVC when the DVC is in the
status of power-on.
In order the save power, the DVC will power off automatically within a
certain time after implementing the final operation. You can press the
On/Off button again to power on the DVC. You can set the time of auto
power-off resorting to the function of Auto Power-off.
Playback Mode
File Lock Icon
Voice Memo
File Format
Sequential Number of
Current File/
Total Number of
Recorded Files
Memory Card
Video file
Image file

9
Mode Switch
1. Press the On/Off button to power on the DVC.
2. Press the Mode button to change the working mode of the DVC.
Pressing the Mode button each time, the mode of the DVC will be
changed once.
Icon Mode Description
Video Recording Mode Record video file
Photography Mode Shoot static picture
Playback Mode Browse recorded files
Video Recording
1. Power on the DVC, and set the mode of the DVC into Video Recording
Mode .
2. Press the Video button to begin video recording, and press the Video
button again to stop recording. The DVC will stop video recording
automatically if the memory of the Memory Card is full.
Taking Photos
1. Power on the DVC, and set the mode of the DVC into Photography Mode
。
2. Find a view for the image you want through the LCD screen, and
press the Shutter button to take photos.

10
·The number shown on the LCD screen will be lessened by one
automatically after a photo is taken. For example: if the number
shown on the LCD screen is 018, the number on the LCD screen will
become 017 after a photo is taken, and the LCD screen will show
“Insufficient Space” if the memory of the Memory Card is full.
·Don’t hide the lens with your fingers or wristlet when taking photos.
·Press the LED Switch button to turn on the LED light when the light is
insufficient.
How to Use the Self-Timer and Burst Functions
Use Self-Timer to set the delay time after pressing the Shutter and
before taking a photo.
1. Power on the DVC, and set the mode of the DVC into Photography
Mode.
2. Press the Menu button to show the menu for photography.
3. Press the Up or Down button to select the Shooting Mode, then press
the OK button to enter into the submenu.
Disable: no delay, normal shooting.
2 seconds of self-timer: delay of shutter release in 2 seconds.
10 seconds of self-timer: delay of shutter release in 10 seconds.
Burst: three photos will be taken when pressing the Shutter once.
4. Press the Up or Down button to select the photography mode which
you want.

11
5. Press the OK button to confirm the setting, and press the Menu button
to quit.
6. Press the Shutter button to take photos.
4. Setting of the DVC
When menu option is shown, use Up, Down, Left and Right button to
set the option.
Menu in PhotographyMode
1. Power on the DVC, and set the mode of the DVC into Photography Mode.
2. Press the Menu button to show the menu in the Photography Mode.
3. Press the Up or Down button to select an option to set.
4. Press the OK button to enter into the submenu under this option.
5. Press the Up or Down button to set, and press the OK button to confirm.
6. Press the Menu button to quit.
Menu in Video Recording Mode
1. Press the Menu button in the Video Recording Mode to show the video
menu.
2. Press the Up or Down button to select an option, then press OK button to
enter into the submenu under this option.
3. Press the Up or Down button to set, then press the OK button to confirm
the setting.
4. Press the Menu button to quit.

12
Menu Option Available Options and Functions
Video Format Selecting the small size will enable a prolonged
recordingwhen the memory space is the same. There
are two options:
1920X1080/1280X720/ X480/640X480
Metering
Mode
There are three metering modes:
Central Metering: conduct metering to the light in the
central part.
Multi-Metering: conduct metering to multiple spots
and make comprehensive judgment.
Spot Metering: make judgment only after conducting
metering to the central part.
White
Balance
AdjustWhite Balance to apply to various light
sources.There are five options in White Balance:
Auto / Daylight / Cloudy / Fluorescent / Tungsten.
Effect Select a sort of Effect to enhance special effect of
pictures. Normal / B&W / Sepia / Negative / Red /
Green / Blue
Date & Time Add current date and time into the shot files, and
there are three modes:
Disable: not displayed.
Date: show date only.
Date and Time: show date and time.

13
Menu in Photography Mode
Menu Option Available Options and Functions
Image Size Set the size of pictures, and there are five options
available for selection: 12M[4000X3000] /
8M[3264X2448] /5M[2592X1944] /3M[2048×1536]/
1M[1280X960]
Image Quality Selecting a lower image quality may reduce the space
occupied by images, so as to take more pictures.
There are three options in Image Quality: Super / Good
/ Normal.
Metering
Mode
There are three metering modes:
Central Metering: conduct metering to the light in the
central part.
Multi-Metering: conduct metering to multiple spots
and make comprehensive judgment.
Spot Metering: make judgment only after conducting
metering to the central part.
White
Balance
AdjustWhite Balance to apply to variouslight
sources.There are five options in WhiteBalance:
Auto / Daylight / Cloudy / Fluorescent / Tungsten.

14
Exposure Manually set Exposure Compensation Value, so as to
conduct compensation under special conditions such
as in indoor light condition, back light condition or
strong light condition. The scope of Exposure
Compensation is from -2.0 to 2.0.
Photography
Mode
The DVC has four photography modes: [Disable] /
[2s Self-Timber] / [10s Self-Timber] / [Burst]
Effect Select a sort of Effect to enhance special effect of
pictures.
Normal / B&W / Sepia / Negative / Red / Green /
Blue
Date & Time Add current date and time into the shot files, and
there are three modes:
Disable: not displayed.
Date: show date only.
Date and Time: show date and time.
Setting Menu
You may set system options through Setting Menu.

15
1. Power on the DVC, and press the Menu button to show the menu.
2. Press the Right button to select .
3. Press the Up or Down button to select the option you want to set.
4. Press the OK button or enter into the submenu under this option.
5. Press the OK button to confirm, and press the Menu button to quit the
menu.
Setting Menu
Menu Option Available Options and Functions
Sound The function has four options:
[Shutter]: Press the Right button to enable or disable
shutter sound.
[Startup Sound]: Press the Right button to set startup
sound. There are four options: [1] / [2] / [3] / [None].
[Key Sound]: Press the Right button to enable or
disable key sound.
[Volume]: Press the Right button to set volume of
sound. There are four options: [0] / [1] / [2] / [3].
Auto Playback OFF/1S/3S
Power
Frequency
Power Frequency shall be set as 60HZ or 50HZ
according to the area where you stay.

16
Auto
Power-off
In order to save power, the DVC will power off
automatically after a period of idle time.
The function has four options: 1 minute / 3 miniutes /
5 minutes / disable.
Date and Time Set date and time, month/date/year/hour: minute.
Language Select one language from the following languages to
show menu and other information:
[English]: English, [S.chinese]: Simplified Chinese.
TV The images shown on the display screen of the DVC
can also be shown on the screen of TV. The output of
TV shall be set as NTSC or PAL according to the
area where you stay.
[NTSC]: US, Japan or others.
[PAL]: China, Europe or others.
Format Formatting will permanently delete all the data in the
Memory Card or the built-in Memorizer, including
locked files. Back-up shall be made for important
files before formatting. [Yes] / [No].
Restore
Default Setting
Enable the whole menu and button setting to restore
to the initial setting state. [Yes] / [No].

17
5. Playback
Playback of Video
1. Set the DVC into the Playback Mode.
2. Press the Left or Right button to select the video file you want to play.
3. Press the OK button to begin playing. Press the OK button to pause
playing, and press the OK button again to continue playing. Press the
Right button to fast forward played video, and press the Left button to
fast backward the played video. Press the Menu button to stop
playing.
Playback of Photos
1. Set the DVC into the Playback Mode. The finally shot file will be
shown on the LCD screen, and the LCD screen will show “No Files”
if there are no files in the Memory Card.
2. Press the Left or Right button to browse the previous or next image.
Other Functions under Playback Mode
Use Thumbnail
Press the Down button in the Playback Mode to enter into the
Thumbnail File Browse Mode. Press the UP/Down/Left/Right button to
select files. Press the OK button the browse files on full screen.
Delete Files
Delete files through the deletion function in the playback menu.

18
1. Press the Menu button in the Playback Mode to enter into the menu
interface.
2. Press the Up or Down button to select File Deletion.
3. Press the OK button to enter into the submenu:
[Delete Single]: delete the current file; [Delete All]: delete all files.
4. Press the Up or Down button to select the option you want.
5. Press the OK button to enter into the corresponding deletion dialog
box, and press the Up or Down button to select Yes.
6. Press the OK button to confirm deletion.
Menu in Playback Mode
1. Press the Menu button in the Playback Mode to shown the playback
menu.
2. Press the Up or Down button to select the options you need and
conduct setting.
3. Press the OK button to enter into the submenu under this option.
4. Press the OK button to confirm setting.
5. Press the Menu button to quit.
Menu Option Available Options and Functions
File Locking Use this function to prevent accidental deletion of files.
[Lock/Unlock Single]: lock or unlock the current file.
[Lock All]: lock all files
[Unlock All]: unlock all locked files.

19
File Deletion Refer to pages of file deletion for details.
Slide Show Use this function to automatically play files.
[Start]: start playing after setting the playing direction
of screen sheet and time interval. Press the Right button
to set the time interval of playing between two files.
[Interval]: 1s-10s.
[Cycle]: Press the Right button to enable or disable
Cycle.
Voice Memo Use this function to add Voice Memo for photos.
[Add]: press the OK button to start sound recording,
and press the Shutter button to end recording.
[Delete]: press the OK button to delete Voice Memo.
6. Connection
Connect the DVC to TV
Connect the DVC to TV, the LCD screen of the DVC will be shut off, and
the TV is equal to the LCD screen of the DVC.
1.Connect the DVC to TV with the AV wire.
2.Power on the DVC and turn on the TV, and set the mode of the TV as
AV Mode.
3.When the DVC is set as Photography/Video Recording Mode, you can
browse the shot objects on the TV.
Other manuals for HDV5200-1
2
Table of contents
Other Hamilton/Buhl Camcorder manuals