Hamilton/Buhl CAM17SV User manual

ActionPro
FHD Digital Video Camera
Instruction Manual
Model #: CAM17SV
Never-Ending Learning Innovation
ActionPro
FHD Digital Video Camera
24MP
Max /2.7”TFT

2
ActionPro™ Digital Video Camera
1. About ........................................4
1a. System Requirements ........................4
1b. Camcorder Description .......................4
1c. Button Functions/Descriptions .................5
2. Using Your Camcorder ...........................6
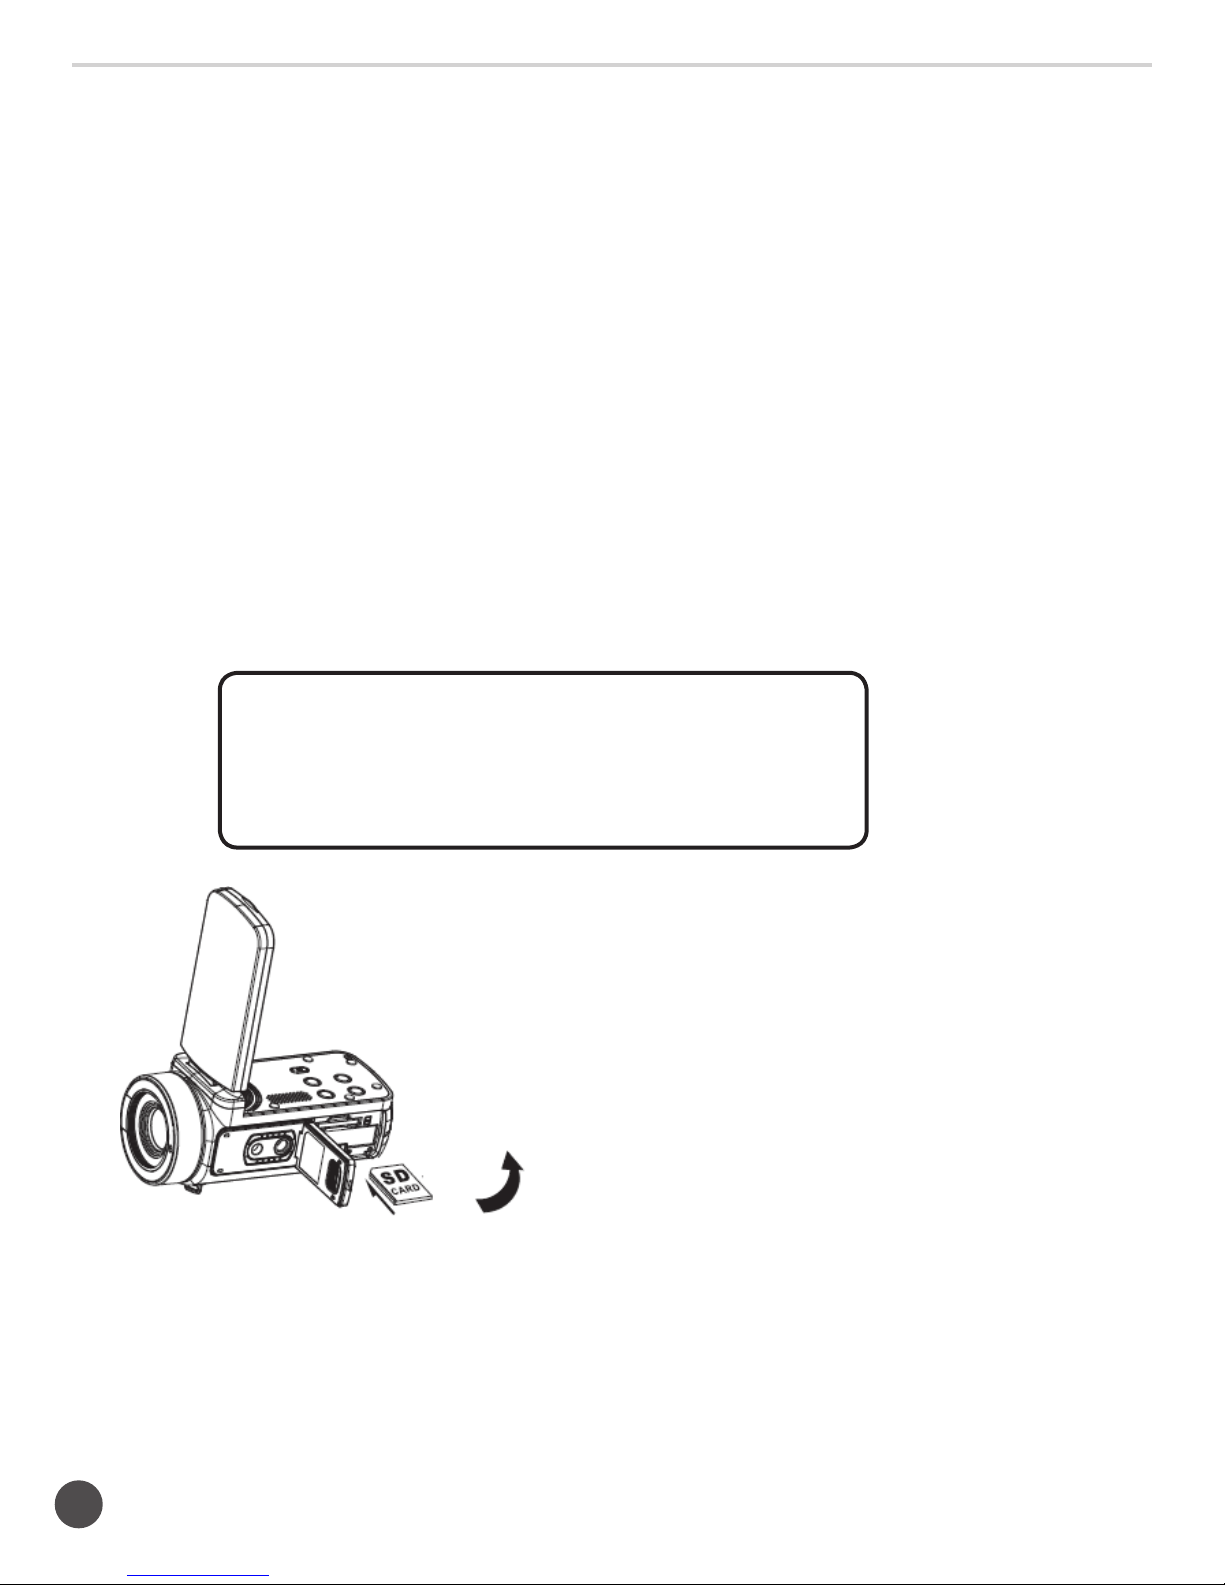
2a. Inserting Memory Card .......................6
2b. Installing Battery ............................7
2c. Charging Battery ...........................7
2d. Turning On/Off Camcorder....................7
2e. Changing Modes ...........................8
2f. Connecting to a Computer ....................8
2g. Connecting to a Television ....................8
2h. Video Recording Mode .......................9
2i. Camera Mode .............................9
2j. Zoom Function ............................10
2k. Using LED Light ...........................10
3. Shooting Video and Settings ....................10
3a. Video Size Settings .........................10
3b. Mode Settings ............................11
3c. Beauty Face Settings ........................11
3d. White Balance Settings ......................11
3e. Exposure Settings . . . . . . . . . . . . . . . . . . . . . . . . . . 11
3f. ISO Settings ..............................12
3g. Anti-Shake Function ........................12
4. Menu Settings.................................12
5. Playback Mode ................................12
5a. Viewing Photos/Videos......................12
5b. Deleting Photos/Videos .....................13
5c. Protecting Photos/Videos ....................13
5d. Rotating Photos ...........................13
5e. Cropping Photos (Not Videos).................14
5f. Making a Slideshow Presentation from Photos ....14
5g. Printing Photos ............................14

3
ActionPro™ Digital Video Camera
5h. Playing Video .............................14
5i. Deleting Video Files ........................15
5j. Protecting Video Files .......................15
6. Shooting Photos (Camera Mode) .................15
6a. Resolution Settings .........................16
6b. Camera Mode Settings (Timer) ................16
6c. Mode Settings ............................16
6d. Beauty Face Settings ........................16
6e. Face Detect Function .......................17
6f. Smile Capture Function......................17
6g. White Balance Settings ......................17
6h. Exposure Settings (EV Values) .................17
6i. Adjusting Photo Sensitivity (ISO) ...............18
6j. Photo Quality Settings ......................18
6k. Sharpness Settings .........................18
6l. Effect Settings.............................18
6m. Saturation Settings .........................19
6n. Anti-Shake Settings ........................19
6o. Metering Functions.........................19
6p. Date and Time Stamp .......................19
7. Menu Settings ................................20
7a. Language Settings .........................20
7b. Date and Time Settings......................20
7c. Auto Power-Off Settings .....................20
7d. Beep Settings .............................21
7e. Light Frequency Settings (Commercial Power) .....21
7f. TV Output Settings .........................21
7g. Formatting (Deleting All Files on Memory Card) ...21
7h. Default Settings ...........................22
8. Appendix ....................................23
8a. Technical Specifications......................23
8b. Troubleshooting ...........................24

4
ActionPro™ Digital Video Camera
1. About Your Camcorder
1a. System Requirements
• Pentium processor 2.0 GHz or higher
• Windows XP Operation System (or later version)
• 2 GB memory, available 40 GB disk space
• USB interface
• CD-ROM drive (Optional)
• Display card 1 GB or higher
• Screen resolution of 1024x768 pixel or higher
1b. Camcorder Description Diagrams:

5
ActionPro™ Digital Video Camera
Icon Button/Key Description
Power/LED Light Power on/off or LED light
charge/discharge
Menu Access Menu Mode
Mode/Enter Switch modes or select function
in Menu settings:
Camera Mode
Video Recording Mode
Playback Mode
Page Up In playback mode:
• Cursor will move up to select
desired photo or video file
• Increase volume while playing
a video file
Page Down In playback mode:
• Cursor will move down to select
desired photo or video file
• Increase volume while playing
a video file
Shutter Takes photo in photo
shooting mode
Rec/Stop To Stop/Record video in video
recording mode
Zoom In/Out • Zoom in and out in Camera
Mode/Video Recording Mode;
• Shrink, magnify or move
photos in playback mode
1c. Button Functions/Descriptions

6
ActionPro™ Digital Video Camera
2. Using Your Camcorder
2a. Inserting a Memory Card
Insert a memory card to store videos and photos. Information stored
on a card will not be lost if you physically lock the card.
Insert the memory card according to the following steps:
1. Open the battery door (on the bottom) by pulling the lever –
the door should pop open.
2. Metal contact part should go in first facing up, away from the
battery. Insert and push the card in until it clicks into place.
Close the door, making sure it is fully locked. A memory card
can only be inserted in the proper direction. DO NOT FORCE
THE CARD INTO THE SLOT.
Attention!
Format your memory card before using. Do not take
memory card out while recording as it will damage
the card and may result in lost data. Please check the
compatibility of the memory card before using.
!
1. Open the battery cover in the direction as shown
3. Close the battery cover as shown
2. Insert the memory card in the direction as shown
To ensure proper recording and playback of larger video files,
it is suggested you purchase an additional Class 10 SD card.

7
ActionPro™ Digital Video Camera
2b. Installing the Battery
Install the rechargeable lithium battery in the battery slot. A battery
can only be installed in one specific direction. Do not force or push
down hard on the battery. It will install easily if inserted correctly.
Make sure the pins are inserted first, facing up.
1. Open the battery cover in the direction as shown
3. Close the battery cover as shown
2. Insert the battery into the cabin in the direction as shown
Attention!
Please install the battery correctly or it may cause
damage to the camera or other damage. Do not use
non-standard charger. The power adapter for the
camera is AC 100V-240V/50-60Hz.
!
2c. Charging the Battery
Connect a standard USB plug to a wall outlet and the other end
of mini-connector to the camcorder to properly charge. Make sure
the shape of the mini-connector matches the charging jack on the
camcorder. The charging jack can be found under the HDMI jack on
the back of the unit.
2d. Turning On/Off the Camcorder
Press the ‘Power’ button to turn on the camcorder. Press and hold
the ‘Power’ button for 2 seconds to turn off the camcorder. If
battery power is running out, a ‘Low Power’ message will appear on
the screen and the unit will turn itself off within a few seconds.

8
ActionPro™ Digital Video Camera
2e. Changing Modes
Press the ‘Mode’ button to change modes. Modes are: video recording,
camera and playback mode. Each mode’s icon will appear in the top
left corner of the screen, when selected.
2f. Connecting to a Computer
In order to view videos and photos on your computer, connect the
standard USB charging cable to your computer’s USB terminal. The
computer will recognize the camcorder as a removable drive; you will
find your video and photo files in the subfolders.
2g. Connecting to a Standard Television
The camcorder can be connected to a TV to display video or photo
files, as shown.

9
ActionPro™ Digital Video Camera
2h. Video Recording Mode
Press the ‘Mode’ button to select video shooting mode.
Options on the display are:
2i. Camera Mode (for Photos)
Press the ’MODE’ button to select Camera mode.
Options on the display are:
1. Recording mode 6. Memory card 11. Video quality
2. Video resolution ratio 7. Zoom 12. White balance
3. Scene mode 8. Battery
4. LED light 9. Rec. affect
5. Recording time 10. Exposure
1. Shooting 7. Zoom 13. Exposure
2. Photo resolution 8. Battery 14. Sensitivity
3. Scene mode 9. Smile face capture 15. Photo quality
4. LED light 10. Face detection 16. White balance
5. Remaining Number 11. Anti-shake 17. EVD
6. Memory card 12. Video effect
Camera mode

10
ActionPro™ Digital Video Camera
2j. Zoom Function
Zoom in by tilting the ‘Zoom’ lever to the right. Zoom out by tilting the
‘Zoom’ button to the left.
2k. Using LED Light
The camcorder has a built-in LED light. It can compensate for a dark
environment and help reduce shadows. In video recording or camera
mode, press the ‘Power’ button to turn LED Light On/Off. The icon will
show on the screen.
LED fill light can be used in camera mode or video shooting mode, operating the
same way as the zoom function.
!
3. Shooting Video and Settings
Press the ‘Mode’ button to select video shooting mode. The movie
camcorder icon will appear on the top left corner of the display screen.
You cannot take video without a memory card.
1. Refer to the viewing screen to see the video to be taken. Hold the
camcorder and press ‘Record/Stop’ button to start recording.
2. When recording, the red circle icon will flash. Press the ‘Shutter’
button to pause/shoot. Press the ‘Record/Stop’ button again to end
recording and save to memory.
3. The recorded files will autosave to the external memory card. You
should set parameters of the video mode before shooting.
3a. Video Size Settings
Different video resolutions options are: FHD, HD, VGA or Cancel. In
higher resolution settings, the video image will be clearer and the file size
will increase as well.
1. From ‘Video Mode’, press ‘Menu’ and then press the ‘Up/Down’
buttons to select the ‘Video Size‘ option. Press OK to enter sub-
menu.
2. Press the ‘Up/Down’ buttons to select: FHD, HD, VGA or Cancel.
3. Press OK to save and return to video shooting mode.

11
ActionPro™ Digital Video Camera
3b.Mode Settings
The camcorder has multi-modes. Use Auto for general purpose filming.
1. From the ‘Video Mode’, press ‘Menu’ then press the ‘Up/Down’
buttons to select the ‘Mode Set’ option. Press OK to enter the
sub-menu.
2. Press the ‘Up/Down’ buttons to select: Auto, Sport, Night, Portrait,
Landscape, Backlight, Party, Beach, High Sensitivity or Cancel.
3. Press OK to save and return to video shooting mode.
3c. Beauty Face Settings
This function adjusts skin tones and may make a person’s skin appear
more natural, adjusting skin lightness and complexion.
1. From ‘Video Mode’, press ‘Menu’ then press the ‘Up/Down’ buttons
to select the ‘Beauty Face’ option. Press OK to enter the sub-menu.
2. Press the ‘Up/Down’ buttons to select: Off, On or Cancel.
3. Press OK to save and return to video shooting mode.
3d.White Balance Settings
Adjust color deviations of the video you are taking according to different
source conditions. Use ‘Auto’ for general purpose use.
1. From ‘Video Mode’, press ‘Menu’ then press the Up/Down buttons
and select ‘White Balance’. Press OK to enter the sub-menu.
2. Press the Up/Down buttons to select Auto, Daylight, Cloudy,
Tungsten, Fluorescent or Cancel. Press OK to save and return to
video shooting mode.
3e. Exposure Settings (adjust EV value)
You can adjust exposure depending on conditions (by deliberately
under- or overexposing).
1. From ‘Video Mode’, press ‘Menu’ then press the Up /Down buttons
to select ‘Exposure’ option. Press OK for the sub-menu.
2. Press the Up/Down buttons to select EV value from +3 to -3 or
Cancel. A setting of ‘0’ is a normal exposure.
3. Press ‘OK’ to save and return to video shooting mode.

12
ActionPro™ Digital Video Camera
3f. Adjusting Photo Sensitivity (ISO)
The recommended setting is ‘Auto.’
1. From ‘Video Mode’, press ‘Menu’, then press the Up/Down buttons
to select the ‘ISO’. Press OK to enter sub-menu.
2. Press Up/Down buttons to select Auto, 100, 200, 400 or Cancel.
3. Press ‘OK’ to save and return to video shooting mode.
3.7 Anti-Shake Function
Turn on the anti-shake function to reduce fuzziness/blur caused by
hand-shaking.
1. From “Video Mode’, press ‘Menu’, then press the Up/Down buttons
to select the ‘Anti-Shake’ option. Press ‘OK’ to enter the sub-menu.
2. Press the Up/Down buttons to select Off, On or Cancel.
3. Press ‘OK’ to return to video shooting mode.
4. Menu Settings
User can set the language, date, time and frequency in the Menu.
Please refer to the operating method under camera mode.
5. Playback Mode
Playback photos or watch videos on the camcorder screen.
You can write protect or delete files and use pict-Bridge interface
to print photos.
5a. Viewing Photos or Videos
From Video or Photo Mode press ‘Mode’ to enter ‘Playback.’
An arrow icon will appear in the upper left corner. You can zoom
in or out on still photos and use the various keys to navigate
through thumbnail files. Zooming out completely will display all
of the thumbnails. Press ‘OK’ to view one file at a time. You can
zoom in on a still photo. The zoom feature is not available for videos.
1. When zooming in or out, left zooms out and right zooms in. Zoom
out completely to get back to thumbnail display.
2. Press Up/Down keys to navigate through thumbnails. Press ‘OK’ to
view a single photo or video.

13
ActionPro™ Digital Video Camera
3. Since the .jpeg is quite large, you can move within the photo to
examine parts of it by zooming in, then pushing ‘OK’ to activate
up or down and left or right navigation. Press Up or Down
buttons to go up or down within the photo and press the zoom
buttons to go left or right.
4. To exit from thumbnails, push shutter or ‘OK’ to return to normal
view/camcorder use.
5b. Deleting Photos or Videos
This function deletes one photo or deletes all photos at once.
1. From ‘Playback Mode’, press ‘Menu’ then press Up/Down
buttons and select the ‘Delete ‘option. Press OK to enter the
sub-menu.
2. Press Up/Down buttons to select ‘This Image’, ‘All’ or ‘Cancel’.
Press ‘OK’ to confirm this operation. You will be asked to
confirm again, as a precaution.
5c. Protecting Photos or Videos
This function protects photos so they are not accidentally deleted
while in camcorder memory.
1. From ‘Playback Mode’ press ‘Menu’, then press Up/Down
buttons to select ‘Protect.’ Press ‘OK’ to enter the sub-menu.
2. Press the Up/Down buttons to select ‘Lock This’, ‘Unlock This’,
‘Lock All’, ‘Unlock All’ or ‘Cancel’. Press ‘OK’ to confirm.
3. Once locked, you will see a red key at the top of the image
or video.
5d. Rotating Photos
1. You can rotate a chosen photo (Not for Videos).
2. From ‘Display Mode’, press ‘Menu’ while viewing a .jpeg photo,
then press the Up/Down buttons to select ‘Rotate.’ Press ‘OK’ for the
sub-menu.
3. Press the Up/Down buttons to select 90º, 180º, 270ºor Cancel. Press
‘OK’ to confirm operation.

14
ActionPro™ Digital Video Camera
5e. Cropping Photos (Not for Videos)
1. From ‘Display Mode’ while viewing a jpeg photo, press ‘Menu’
then press the Up/Down buttons to select ‘Crop Image’ option.
Press OK to select the sub-menu.
2. Press Up/Down buttons to select Crop or Cancel.
3. Press OK to enter ‘Crop’ mode. Use the ‘Zoom’ to select the new
area of the image, then press OK move within the frame to show
the newly-cropped image. Use zoom to move left or right and up
or down to move vertically. Press OK to confirm.
5. Press ‘Shutter’ again to ‘cut’ or create and save the new image.
5f. Slideshow Presentation for Photos (Not for Videos)
Plays photos in a slideshow by automatic playback.
1. From ‘Display Mode’ while viewing a jpeg, press ‘Menu’ then press
the Up/Down buttons and select ‘Slide’ option. Press ‘OK’ to enter
sub-menu.
2. Press Up/Down buttons to select 3, 5, 10 Seconds or Cancel.
3. Press ‘OK’ to display the slideshow; press again to quit.
5g. Printing Photos (Not for Videos)
1. From ‘Display Mode’ press ‘Menu’, then press the Up/Down
buttons to select the ‘Print’ option. Press ‘OK’ to enter sub-menu.
2. Press the Up/Down buttons to select ‘Execute’ or ‘Cancel’.
A prompt will appear to connect a printer.
3. Connect the camcorder to a compatible printer via a USB cable,
then press OK to print.
5h. Playing Videos
All recorded video files can be viewed, protected or deleted
from Display Mode.
1. From Display Mode, press the Up/Down buttons to select a video
file that you wish to display.
2. Press ‘Record/Stop’ to play. If viewing thumbnails, you need to
press ‘OK’ first to go into that video and then press ‘Record/Stop’.
3. Press ‘OK’ to pause/continue playing. Press ‘Record/Stop’ to stop
playing.

15
ActionPro™ Digital Video Camera
5i. Deleting Video Files
1. From Display Mode, select the video file you wish to delete then
press ‘Menu’.
2. Press the Up/Down buttons to select ‘Delete’. Other operations
work the same way as in camera mode. Go to ‘Menu’, then the
sub-menu and select and confirm to delete.
Note: Protected files cannot be deleted.
5j. Protecting Video Files (Protects video files from accidental deletion
when in camcorder memory)
1. From ‘Display Mode’ while viewing a video, press ‘Menu’ then
press the Up/Down buttons to select ‘Protect’, then follow the
same procedure as when protecting photos.
2. Once protected, you will see a red key icon in a box in the upper
area of the display.
6. Shooting Photos
Turn on the camcorder and press the ‘Mode’ button to switch to
camera mode (a camera icon appears).
• A preview is displayed on the screen.
• Hold the camcorder still and press the shutter to take a photo.
• The number of photos remaining to be taken in each resolution
ratio is shown in the top right corner of the screen.
• ‘No card’ will show on the screen if there’s no SD card in the
camcorder. ‘Card Full ‘will show on the screen when the SD card is
full. You will need to replace the card to continue taking photos.
• The number of photos remaining that can be saved is determined
by the space left on the SD card and the chosen resolution ratio.
The higher the photo quality, the more memory is used. In camera
mode, some parameters can be changed before shooting which
will also affect the number of photos you may save.

16
ActionPro™ Digital Video Camera
6a. Resolution Settings
You may set photo resolution as follows:
1. From camera mode, Press the ‘Menu’ button, then select
‘Resolution’ (use Up/Down buttons to get to this option).
2. Press ‘OK’ to enter the sub-menu.
3. Press Up/Down buttons to choose the photo size that you need.
Options are 24M, 20M, 12M, 8M, 5M, 3M, FHD or Cancel.
4. Press OK to save and back to camera mode.
6b. Camera Mode Settings (Timer)
This delays the photo from being shot for 2 or 10 seconds after you
press the button (self-timer). Choices in this mode are: single, 2 secs,
10 secs or continuous.
1. From camera mode, press ‘Menu’, then use the Up/Down buttons
to select the ‘Shooting Mode.’ Press ‘OK’ to enter the sub-menu.
2. Press the Up/Down buttons to select: Single, 2 sec, 10 sec or
Continuous. Press ‘OK’ to save and go back to camera mode.
3. Select ‘10 secs’ if you want to use the self-timer function.
4. Select ‘Continuous’ to take rapidly repeated shots.
6c. Mode Settings
There are several preset multi-scene modes. Use ‘Auto’ for general use.
1. From camera mode, press ‘Menu’, then press the Up/Down
buttons to select ‘Mode Set’ option.
2. Press ‘OK’ to enter sub-menu.
3. Press Up/Down to select the mode that you need. Options are:
Auto, Sport, Night, Portrait, Landscape, Backlight, Party, Beach, High
Sensitivity and Cancel. Make your selection, then press ‘OK’ to save
and return to camera mode.
6d. Beauty Face
This function helps enhance the look of skin.
1. From camera mode press ‘Menu’, then use Up/Down buttons to
select ‘Beauty Face’. Press ‘OK’ to enter sub-menu.
2. Press the Up/Down buttons to turn On/Off or Cancel. Press ‘OK’ to
save and return to camera mode.

17
ActionPro™ Digital Video Camera
6e. Face Detect Function
This function can detect the faces of people on the viewfinder.
It’s similar to taking a portrait shot on an older SLR camcorder
using film and a 125mm lens.
1. From camera mode, press ‘Menu’, then press Up/Down buttons
and select ‘Face Detect.’ Press ‘OK’ to enter the sub-menu.
2. Press the Up/Down buttons to select: Off, on or Cancel. Press ‘OK’
to save and back to camera mode.
6f. Smile Capture Function
This function will shoot photos automatically when it detects a smile.
1. From camera mode, press ‘Menu’, then press Up/Down buttons
and select ‘Smile Capture‘. Press ‘OK’ to enter the sub-menu.
2. Press the Up/Down buttons to select: Off, On, or Cancel.
3. Press ‘OK’ to save and go back to camera mode.
6g. White Balance Setting
This function adjusts the color deviation of a photo according
to different source conditions. Use ‘Auto’ for general purpose.
1. From camera mode press ‘Menu’, then press Up/Down buttons and
select ‘White Balance.’ Press ‘OK’ to enter the sub-menu.
2. Press the Up/Down buttons to select: Auto, Daylight, Cloudy,
Tungsten, Fluorescent or Cancel. Press ‘OK’ to save and return to
camera mode.
6h.Exposure Settings (adjust EV value)
To manually over- or under-expose a picture.
1. From camera mode press ‘Menu’, then press Up/Down buttons
and select ‘Exposure’.
2. Press ‘OK’ to enter the sub-menu.
3. Press the Up/Down buttons to select required exposure value from
the menu: EV values are from +3 to -3.
4. Press ‘OK’ to save and return to camera mode.

18
ActionPro™ Digital Video Camera
6i. Adjusting Photo Sensitivity (ISO)
You can manually adjust photo sensitivity with this function,
however we recommend you use ‘Auto’ mode. ASA 100
Daylight ASA 400 low light (old film settings available on camcorder).
1. From camera mode, press ‘Menu’ and then press Up/Down buttons
to select photo ‘ISO’.
2. Press ‘OK’ to enter sub-menu.
3. Press Up/Down buttons and select: Auto, 100, 200, 400 or cancel
from the Menu, then press OK to save and return to camera mode.
6j. Photo Quality Settings
This function sets the quality of your photo. Higher quality will take
up more space on your memory card.
1. From camera mode, press ‘Menu’ and the press the Up/Down
buttons to select photo ‘Quality’.
2. Press ‘OK’ to enter sub-menu.
3. Press the Up/Down buttons to select: Fine, Super Fine, Normal or
Cancel. Press ‘OK’ to save and return to camera mode.
6k. Sharpness Settings
Adjust the sharpness for clearer or softer edges.
1. From camera mode, press ‘Menu’ then press the Up/Down buttons
to select ‘Sharpness’. Press ‘OK’ to enter sub-menu.
2. Press the Up/Down buttons to select: Soft, Normal, Sharp or Cancel.
Press ‘OK’ to save and return to camera mode.
6l. Effect Settings
User can set the photo effect by the item listed in the Menu.
1. From camera mode, press ‘Menu’ then press the Up/Down
buttons to select ‘Effect’.
2. Press ‘OK’ to enter sub-menu.
3. Press the Up/Down buttons to select photo effect you want: Normal,
B&W, Sepia, Red, Green, Blue Sunset, Warm, Cool, Over Exposure,
IR, Binary, Vivid, Undertone, Dog Eye, Albao, Gothic, Japan Style,
LOMO, Negative or Cancel. Press OK to save and return to camera
mode.

19
ActionPro™ Digital Video Camera
6m.Saturation Settings
Use this feature to affect the vividness of the color.
1. From camera mode, press ‘Menu’ then press the Up/Down but-
tons to select ‘Saturation’.
2. Press ‘OK’ to enter sub-menu.
3. Press the Up/Down buttons to select: High, Normal, Low or Cancel.
Press ‘OK’ to save and return to camera mode.
6n. Anti-Shake Function
Use the anti-shake function to reduce the fuzziness/blur caused
by hand shaking.
1. From camera mode, press ‘Menu’ then press the Up/Down
buttons to select ‘Anti-shake’.
2. Press ‘OK’ to enter sub-menu.
3. Press the Up/Down buttons to select: ‘Off’, ‘On’ or ‘Cancel’.
Press ‘OK’ to save and return back to camera mode.
6o. Metering Function
Determines from what part of the frame the camcorder measures
the light.
1. From camera mode, press ‘Menu’ then press the Up/Down
buttons to select ‘Metering’ option.
2. Press ‘OK’ to enter sub-menu.
3. Press the Up/Down Buttons to select: Center, Multi, Spot or
Cancel. Press ‘OK’ to save and return to camera mode.
a. Center – measures center of frame.
b. Spot – measures where you focus.
c. Multi – measures average amount of light.
6p.Date and Time Stamp
The date and time can be marked on the photo.
1. From camera mode, press ‘Menu’ then press the Up/Down
buttons to select ‘Date Stamp’.
2. Press ‘OK’ to enter the sub-menu.
3. Press Up/Down buttons to select: Off, Date, Date and Time or
Cancel. Press ‘OK’ to save and return to camera mode.

20
ActionPro™ Digital Video Camera
7. Menu Settings (Setup)
You can set the Time/Date, Language and other options from
the ‘Setup Menu.’
7a. Language Settings
This unit supports English and a number of other languages.
1. From camera mode, press ‘Menu’ then press the Up/Down
buttons to select the ‘Setup’ option. Press ‘OK’ to enter
sub-menu.
2. Press the Up/Down buttons to select from many language
options for English, Chinese,German, French, Spanish,
Portuguese and more. Press ‘OK’ to save and return to
camera mode.
7b. Date and Time Settings
User can set the date and time for the camcorder:
1. From camera mode, press ‘Menu’ then press the Up/Down
buttons to select the ‘Setup’ option.
2. Press ‘OK’ to enter sub-menu.
3. Press the Up/Down buttons to select ‘Set Date.’ Note that in
‘Set Date’ it does not say ‘Set Time’ but each time you press
‘OK’ you will be prompted to change something else. First,
the date settings and then the time. Press ‘OK’ to proceed to
the next parameter. When done, save and you’ll return to the
Camera Mode. If no changes are needed then keep pressing
‘OK’ until you return to camera mode.
7c. Auto Power Off Settings
This option will automatically power off the unit, after the set
amount of time, to save power.
1. From camera mode, press ‘Menu’ then press the Up/Down
buttons to select ‘Setup.’
2. Press ‘OK’ to go to the sub-menu.
3. Press the Up/Down buttons to select ‘Power Save’ and select
between 1 and 10 minutes – when to power off.
4. Press ‘OK’ to save and return to camera mode.
Other manuals for CAM17SV
1
Table of contents
Other Hamilton/Buhl Camcorder manuals