Hansa ZIM676H User manual

OPERATING
INSTRUCTIONS
EN
THE OPERATING INSTRUCTIONS
ZIM676H

INSTALL THE APPLIANCE
INSTALL THE APPLIANCE IN A CABINET
5
CONTENTS


4

5
Manufacturer’s Declaration
The manufacturer hereby declares that this product meets the re-
quirements of the following European directives:
• Low Voltage Directive 2014/35/EC
• Electromagnetic Compatibility (EMC) Directive 2014/30/EC
• ErP Directive 2009/125/EC
• Directive RoHS 2011/65/EC
and has thus been marked with the symbol and been issued with
a declaration of compliance made available to market regulators.
Carefully read the operating instructions before plugging dishwasher to a
power outlet and using the appliance. Operating instruction include tips
that will help you avoid the risk of injury and damage to the appliance.
Keep dishwasher documentation in a safe place for possible future use.
These operating instructions have been prepared for a range of applianc-
es and some features described herein may not apply to your appliance.

Before you install the
appliance
Check the appliance for transport
damage. Never install or use a dam-
aged appliance. If in doubt, contact
your seller.
Before rst use See installation notes (below).
Refer the grounding system instal-
lation to a qualied electrician.
The manufacturer shall not be liable
for any damage arising from the use
of a non-grounded appliance.
Before using the appliance, verify
that the data given on the rating
plate matches that of local power
outlets.
Do not plug in the appliance before
and during installation.
Always use the original plug that
came with the appliance.
Do not use an extension cord to con-
nect the appliance to the wall outlet.
Extension cords are not suciently
safe (e.g. they may overheat).
Make sure the plug is easily acces-
sible after installing the appliance.
Before rst use This appliance can be used by
children aged 8 years and older
or persons with physical, mental
or sensory handicaps, or those
who are inexperienced or unfa-
miliar with the appliance, provided
they are supervised or have been
instructed how to safely use the
appliance and are familiar with
the associated risks. Ensure that
children do not play with the ap-
pliance. Children should not be
allowed to clean or maintain the
appliance.
Children less than 3 years of age
shall be kept away unless con-
tinuously supervised.
Child safety Do not allow children to play with
the appliance.
Dishwashing detergents can
be caustic and irritate the eyes,
mouth and throat. Read the
safety notes from detergent
manufacturer.
Never leave children unsuper-
vised when the appliance is open.
It can contain residue detergent.

Child safety Dishwasher water is not suitable
for drinking. Danger of injury from
the caustic chemicals.
When you open the door during a
programme, be careful as water
temperature is high.
To avoid injury always place long
and sharp/pointed items (e.g.
forks, knives) in the cutlery bas-
ket, pointing down, or at on the
top basket.
Daily maintenance Use the appliance for household
dishwashing only.
Do not use solvents in the appli-
ance as there is a risk of explo-
sion.
Do not sit or stand on the open
door and do not place any objects
on it. The device may overturn.
Do not open the door when the
appliance is operating. Hot water
or steam can be released.
Do not leave the door open, be-
cause they it can pose a hazard.
Washing tableware in a house-
hold dishwasher usually uses less
energy and water than washing
up by hand.
9
In case of problems Refer repair and modications of
the appliance to qualied techni-
cians only.
In the event of problems or repairs,
unplug the appliance from the wall
outlet:
Unplug the appliance by pulling the
plug,
Turn o the circuit breaker.
Do not pull the power cord, pull the
plug only. Close the water supply.
Recommendations Loading the dishwasher to the
capacity indicated by the manufac-
turer will save energy and water.
To save energy and water, rinse
food residue of the dishes before
loading the dishes into the dish-
washer. Run the dishwasher with
full load.
Do not put dishes with food leftovers
in the appliance.
Use pre-wash programme only
when needed.
Load bowls, cups and mugs bottom
facing up.
Do not load in the appliance any
dishes that are not dishwasher safe
and do not load too many dishes.
It is not recommended to pre-rinse
the tableware, as this leads to an
increase in water and energy con-
sumption.
Dishes and utensils that
are not suitable for
dishwashers.
Ashtrays, candles, cleaning
pastes, paints, chemicals, ferro-
alloys;
Forks, spoons and knives with a
handle made of wood, ivory or
Nacre, glued items, items con-
taminated with abrasive powders,
acid or base
Plastic dishes that are not resist-
ant to high temperature, contain-
ers made of copper or tin;
Aluminium and silver items (may
be stained or loose lustre)
Some delicate types of glass,
porcelain with decorative prints,
as prints may fade even after the
rst wash; some crystal dishes as
they may lose their transparency,
glued silverware sensitive to high
temperatures, lead crystal glass,
chopping boards, items made
with synthetic bres;
Absorbent objects such as a
sponge or kitchen cloths are not
suitable for the dishwasher.
Before buying dishes in the future
make sure they are dishwasher
safe.

UNPACKING
During transportation, protective
packaging was used to protect the
appliance against any damage. Af-
ter unpacking, please dispose of all
elements of packaging in a way that
will not cause damage to the environ-
ment.
All materials used for packaging the appliance are
environmentally friendly; they are 100% recyclable
and are marked with the appropriate symbol.
Important! Packaging materials (bags, polyethyl-
ene, polystyrene, etc.) should be kept away from
children during unpacking.

DISPOSAL OF OLD
APPLIANCE
In accordance with European Directive
2012/19/EU and local legislation re-
garding used electrical and electronic
goods, this appliance is marked with
the symbol of the crossed-out waste
container. This marking indicates that
the appliance must not be disposed
of together with other household waste after it has
been used.
The user is obliged to hand it over to waste collec-
tion centre collecting used electrical and electron-
ic goods. The collectors, including local collection
points, shops and local authority departments pro-
vide recycling schemes.
Proper handling of used electrical and electronic
goods helps avoid environmental and health haz-
ards resulting from the presence of dangerous com-
ponents and the inappropriate storage and process-
ing of such goods.
When choosing the place of installation, make sure you will be able to easily load and remove
dishes and utensils from the dishwasher.
Do not place the appliance in a room where the temperature can fall below 0°C.
Before installing unpack the appliance following the instructions on the packaging.
When you move the appliance do not handle it by the door or control panel.
Leave some room on all sides to have convenient access to the dishwasher when cleaning.
Make sure that when you set the dishwasher you do not crush the water supply and drain hose.
Also, make sure that the appliance is not places on the power cord.
Level the appliance using the adjustable legs. Proper level ensures trouble-free opening and clos-
ing the dishwasher doors.
If the dishwasher door will not close properly, check that the appliance stands rmly on the oor, if
not, adjust using the adjustable legs.
Make sure that domestic water supply system is suitable for the dishwasher. It is recommended to
install a lter in the water supply line to avoid damage to the appliance due to impurities (such as
sand, clay, rust, etc.) that occasionally occur in water. This will also prevent accumulation of sedi-
ment after dishwashing.
Do not use the water supply hose from the old dishwasher. Use the new water supply
hose provided with the appliance. Before connecting, rinse the hose with water. Connect
the water supply hose directly to the water feed valve. The domestic water system pres-
sure should be at least 0.03 MPa and up to 1 MPa. If the water pressure exceeds 1 MPa,
install pressure reducing valve.
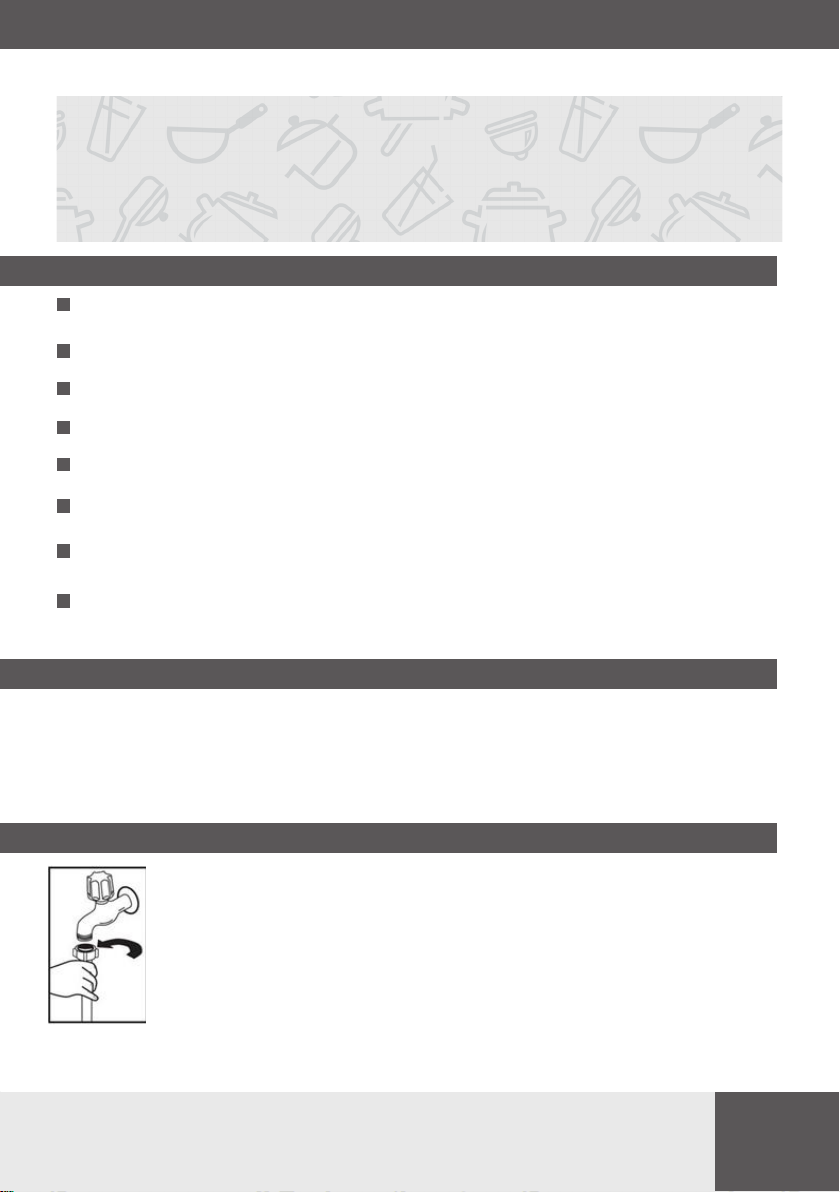
When the connection is ready, open the valve completely and check for leaks.
For safety reasons, close the water supply tap after every wash.
INSTALL THE APPLIANCE
PLACE YOUR APPLIANCE
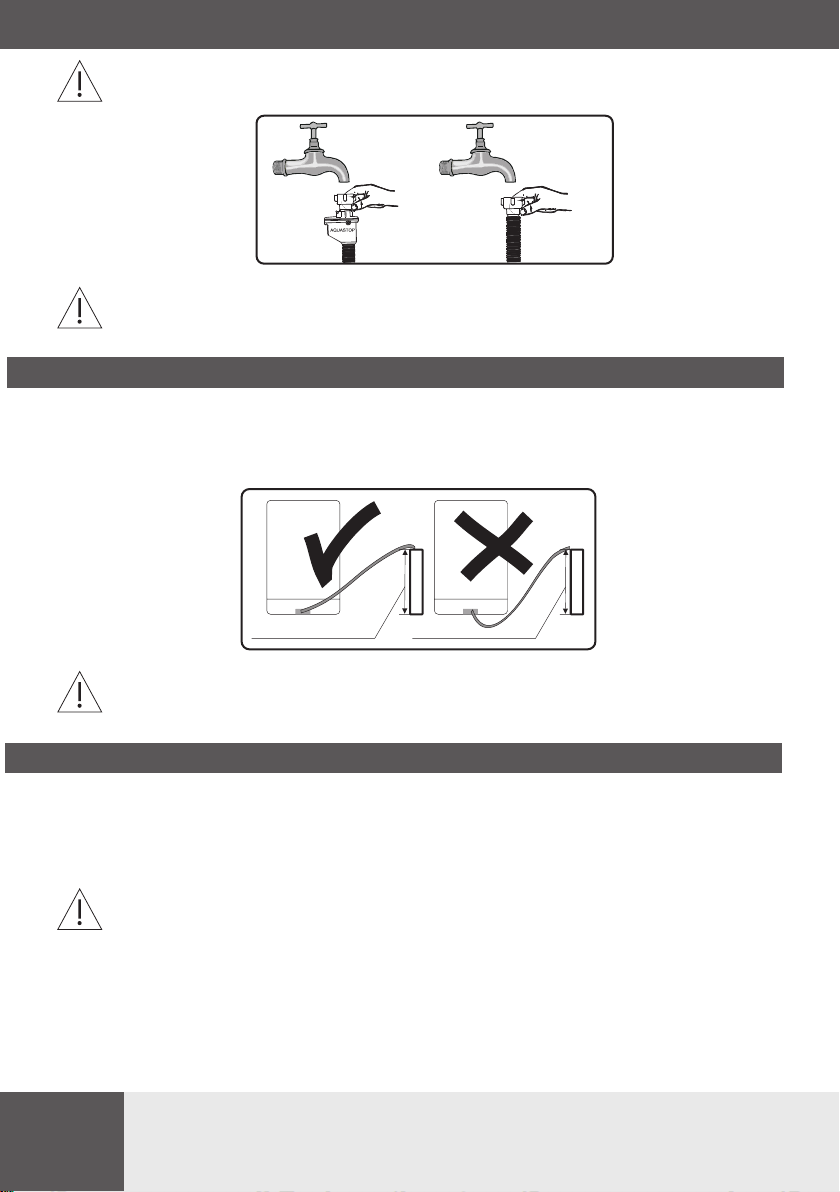
NOTE: Aquastop water supply is used in some dishwasher models. Dangerous voltage could
occur with Aquastop. Do not cut the Aquastop water supply. Do not allow it to bend or twist
Note:
For safety reasons, close the water tap after every wash
The drain hose can be connected directly to a water drain or kitchen sink stub pipe. You can also drain
the water directly into the sink using the special bracket (if available), placing the drain hose outlet on
the kitchen sink edge. The drain hose connection should be made at least 50 cm and up to 110 cm from
the oor.
min 50cm/max 110cm min 50cm/max 110cm
If the drain hose is longer than 4 m, dishes may not be washed properly. The manufacturer will
not be held responsible.
ELECTRICAL CONNECTION
Grounded plug must be connected to a grounded power outlet with a proper voltage. If there is no
grounding, refer this to a qualied electrician. If you operate the appliance without proper grounding,
the manufacturer does not assume any liability for the possible resulting damage.
Domestic electrical system must be protected with a 10-16A fuse.
The appliance must be supplied with 220-240 V AC. If the supply voltage is 110 V, use 3000W,
110/220 V set-up transformer to connect the appliance. Do not connect the appliance during
installation.

Always use the plug provided with the appliance. When you operate the appliance at lower
voltage the dishwashing eciency will deteriorate and may damage the appliance.
The power cord may only be replaced by authorized service or a qualied electrician. Failure to
comply with these rules may lead to an accident.
For safety reasons, you should always unplug the appliance after you have nished using it.
In order not to avoid electric shock, do not remove the plug from the wall outlet with wet
hands.
When you unplug the appliance from the wall outlet, always pull the plug. Never pull the power
cord.

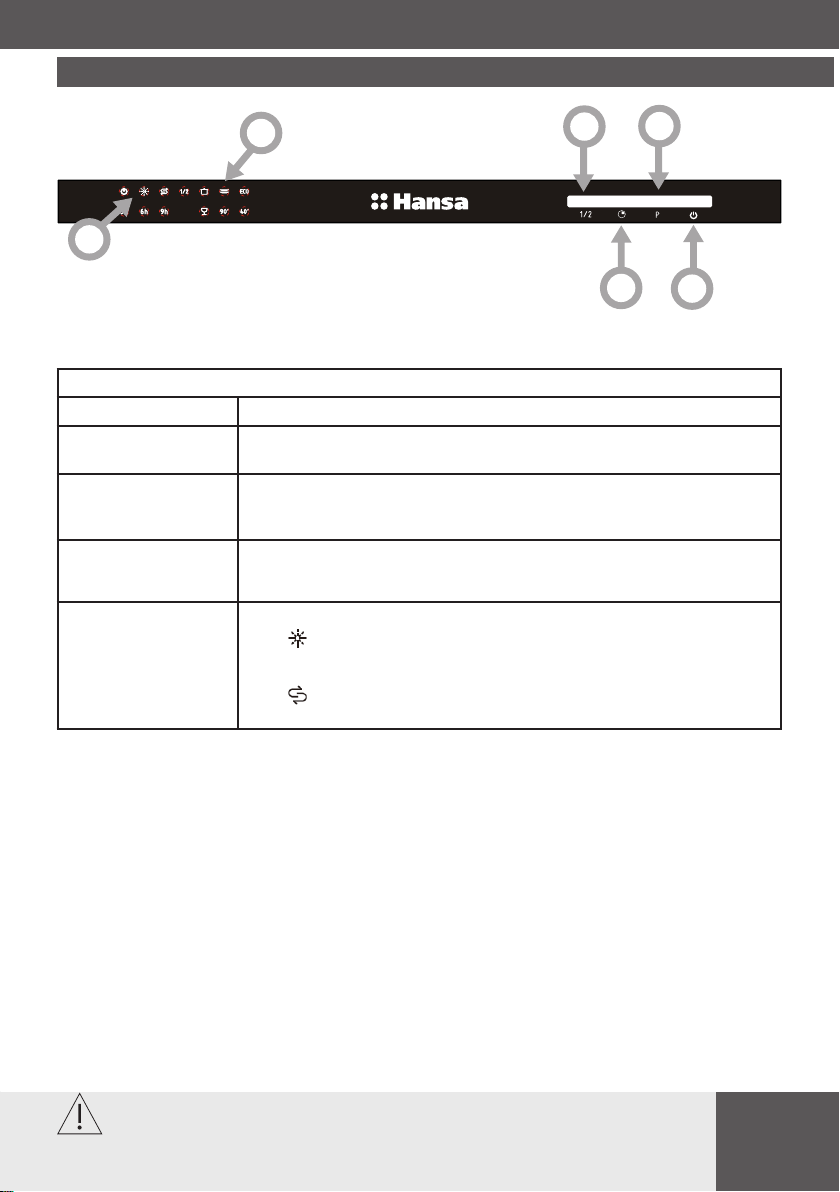
The features and components of the appliance (g. 1):
NOTE:
NOTE:
Operation (Button)
1. Power Press this button to turn on your dishwasher, the screen lights up.
2. Program Press this button to select the appropriate washing program, the
selected program indicator will be lit.
3. Delay Press this button to set the delayed hours for washing. You can
delay the start of washing up to 3/6/9 hours. One press on this
button delays the start of washing by three hour.
4. Half load When you have about or less than half of full place settings
dishware to wash, you can choose this function to save energy and water.
(It can only be used with Hygiene, 1 hour and ECO).
5. Warning
indicator
Rinse aid
If the indicator is lit, it means the dishwasher is low on dishwasher rinse
aid and requires a rell.
Salt
If the indicator is lit, it means the dishwasher is low on dishwasher salt
and needs to be relled.
1
2
3
4
5
6

6. Program
indicator
ECO

Before using the appliance, verify that the data given on the rating plate matches that
of local power outlets.
Remove all packing materials from inside of the appliance.
Prepare special salt (water softener).
Pour water into the special salt dispenser and then add about 1.5 kg of special salt
(dishwasher salt).
Pour rinse aid into the dispenser.
A dishwasher requires soft water (with low calcium content) to operate eciently. Other-
wise, white residue main remain on the dishes and inside the appliance. This has a negative
impact on the quality of dishwashing, rinsing and drying. When the water ows through
the softener, ions responsible for the water hardness are removed, and the water becomes
soft, for best dishwashing results. Depending on the degree of water hardness, the ions
responsible for water hardness accumulate quickly inside the water softener. Therefore,
the water softener must be regenerated to operate with the same eciency during the
next wash. This is why special salt is used in the dishwasher.
The importance of water descaling
Only use special salt intended for dishwashers.
Fill with special salt before running the washing programme.
Add special salt
Use only the special salt intended for dishwashers!
1. Remove the lower basket from the appliance and unscrew the special salt dispenser cap.
2. Place the end of the funnel (included) in the hole and pour about 1.5 kg of salt.
3. Pour water into the dispenser until full. It is normal that a small amount of water spills out
of the special salt dispenser.
4. After you ll the dispenser, screw the cap on.
5. When you l the dispenser with special salt, the add salt indicator goes out.
6. Start the washing programme immediately after lling the dispenser with special salt
(the quick wash is recommended). Otherwise, salty water can damage the lters, the pump
or other important appliance components This is not covered by the warranty.
NOTE:
Fill the special salt dispenser when the special salt indicator on the control panel lights
up. Depending on the rate of salt dissolution, the special salt indicator may still be on even
after lling the dispenser.
If there is no special salt indicator on the control panel (on some models), you can estimate
when to top up the dispenser based on the number of wash cycles performed.
If some special salt spills, run the soaking programme or a quick wash programme.

4
The test strip
The dishwashing eectiveness is linked to water hardness. Therefore, the appliance is
equipped with a system to reduce the hardness of the water supply. The dishwashing
eectiveness is improved when the system is set correctly. To check water hardness
contact the municipal water company or determined the water hardness using test strip
(if available).
Table of contents
Other Hansa Dishwasher manuals

Hansa
Hansa ZIM647TH User manual

Hansa
Hansa ZIM656PH User manual

Hansa
Hansa ZIM 434 B User manual

Hansa
Hansa ZIM635PH User manual

Hansa
Hansa ZIM 676 H User manual

Hansa
Hansa ZIM669ELH User manual

Hansa
Hansa ZWM426EH User manual

Hansa
Hansa ZWM 615 SB.1 User manual

Hansa
Hansa ZIM635PH User manual

Hansa
Hansa ZIM 608 EH User manual

Hansa
Hansa ZIM647TH User manual

Hansa
Hansa ZIM667ELH User manual

Hansa
Hansa ZWM 428IEH User manual

Hansa
Hansa ZIM466ELH User manual

Hansa
Hansa ZWM 627 WEA User manual

Hansa
Hansa ZIM655H User manual

Hansa
Hansa ZWM 615 WB User manual

Hansa
Hansa ZIG 645B User manual

Hansa
Hansa ZIM 476 EH User manual

Hansa
Hansa ZWM 415WB User manual


