Hanwha Techwin Wisenet SKY Bridge/CMVR User manual

Camera Manufacturer Notes
Hanwha Techwin: Must be powered on after the Bridge/CMVR in order to
be discovered.
Axis: An ONVIF admin account must be created via the camera’s web interface
or using Axis Camera Tools. Any login to an Axis camera via its web interface
when at factory default or after factory reset will disable ONVIF which is
required. A lock symbol will appear on the Dashboard.
Hikvision: If Hikvision’s Illegal Lock is enabled the username and password
of the camera must be entered into the Wisenet SKY Password Locker prior to
placing the camera on the same network as the bridge or the illegal lock will
be activated. We recommend disabling Hikvision’s illegal lock on all cameras
on the CamLAN.
Camera Setup: Configure Hikvision cameras using a seperate network within
the subnet of the camera’s default static IP. Check Hikvision documentation
for Firmware and default IP address.
Sony: The second stream must be enabled to deliver JPEG images for the
preview stream.
If one of your cameras is not supported, request support for it. Click the email
icon and fill out the form. You must leave the camera on the same network with
the Bridge/CMVR and leave them both powered up until the camera support
file is created.
Version 20210315
500 FrankW Burr Blvd Suite 43,Teaneck, NJ 07666
877-213-1222
For a complete list of compatible cameras:
https://www.hanwhasecurity.com/wisenet-sky-camera-compatibility-list
Wisenet SKY Support
Phone: 877-213-1222
Email: support@hanwhasecurity.com
www.WisenetSky.com
Quickstart Guide
Bridge/CMVR
©2021 Hanwha Techwin Co., Ltd. and Eagle Eye Networks, Inc. All rights reserved. Use of this product and this manual is subject to license.
DESIGN AND SPECIFICATIONS ARE SUBJECT TO CHANGEWITHOUT NOTICE. Under no circumstances, this document shall be reproduced,
distributed or changed, partially or wholly, without formal authorization of Hanwha Techwin Co., Ltd. And Eagle Eye Networks, Inc.
5Add Wisenet SKY Bridge/CMVR to Your Account
The Wisenet SKY Bridge/CMVR may have already been added to your account (it will
appear at the top of the Dashboard page). If so, you can skip to the next step. Otherwise,
click“Add Bridge”and enter the attached 16-digit Wisenet SKY Attach ID (case sensitive
with three dashes).
Install Bridge/CMVR
1. Place the Wisenet SKY Bridge/CMVR in a secure location. Mount it, if needed.
2. Connect an ethernet cable from your network switch to the WAN port on the back of
the Wisenet SKY Bridge/CMVR. Do NOT connect the CamLAN port into your local network.
The CamLAN is designed for cameras only and serves DHCP.
3. Connect the power cord of external power supply to Wisenet SKY Bridge/CMVR.
4. Connect the power cord to a power source.
5. The Bridge/CMVR should power up automatically. If powered off, push the power
button to turn on the Bridge/CMVR. Press the power button to power down the
Bridge/CMVR, if needed.
1
Configure IP Address and Network Settings
By default the Wisenet SKY Bridge obtains a DHCP address from your network/router.
If you require a static IP address please follow these instructions:
1. Connect the monitor and keyboard to the Wisenet SKY Bridge/CMVR.
2. Login to the Administrative Console:
• Login: admin
• Password: <last 5 digits of the Bridge/CMVR serial number>
3. Select “Configure Wired Network” and configure the IP Address, Subnet Mask, Default
Gateway, Primary DNS Server and Secondary DNS Server as appropriate for your network.
2
4Login to Your Account
Using a web browser, go to Wisenetsky.com. Login using your email address and password. If
you have never logged in before, you will need to verify your email address. Call Wisenet SKY
Support if you need an account.
Go to https://support.hanwhasecurity.
com/ if you need the destination IP
addresses.
Open Firewall Ports
If your Wisenet SKY Bridge/CMVR
is located behind a highly secure
corporate firewall, open the following
outbound ports on your firewall:
3Port Direction TCP UDP Usage
80 Out Yes No Secure Video Connection
443 Out Yes No Secure Video Connection
773 Out Yes No Secure Video Connection
8081 Out Yes No Secure Video Connection
8082 Out No Yes Secure Video Connection
50k-60k Out Yes No Management Connection
Setup Cameras
Before adding cameras to the Wisenet SKY Bridge/CMVR we strongly recommend
setting up the cameras. Cameras should:
1. Be plugged in and powered on (via POE or power supply).
2. Be reset to factory default if not a new camera.
3. Be configured to use DHCP IP addresses (or have non-conflicting
Static IP addresses).
4. Obtain ONVIF user credentials or create them if it is not the default.
6
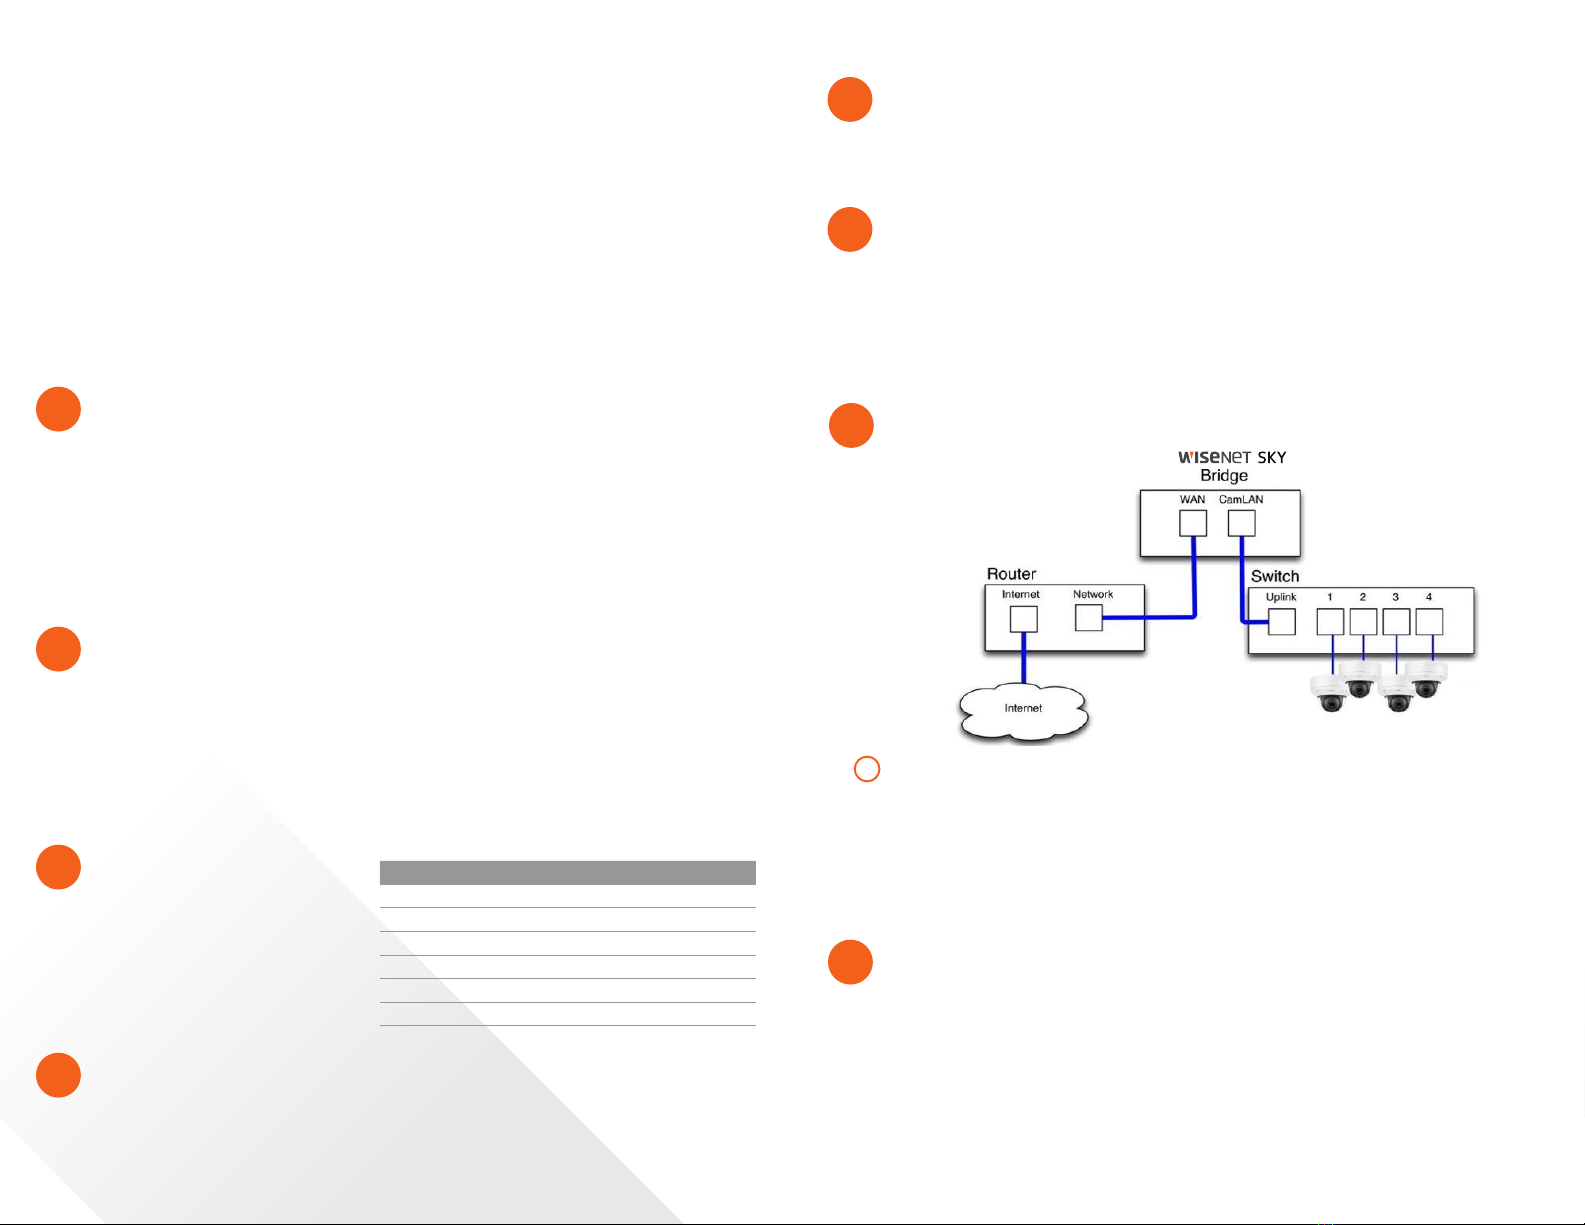
Connect IP Cameras via Ethernet
We recommend putting your camera on a physically separate network called the
CamLAN. The Wisenet SKY Bridge/CMVR provides DHCP addresses on the CamLAN by
default. Alternatively, cameras can be connected to the same network as the Bridge/
CMVR WAN, but it is not as secure.
Cameras that have a valid IP address (either DHCP or static) appear in the Wisenet SKY
Dashboard, provided ONVIF is enabled, and can be added to your Account.
7a
The Wisenet SKY Bridge/CMVR is a smart device that connects to your security cameras,
records the video, and transmits it to the Wisenet SKY Cloud securely. You can access
your video and manage your cameras either from your web browser or mobile device.
The Wisenet SKY Bridge/CMVR is physically installed on your network and assigned an
IP address. We recommend reading these instructions fully before starting.
You will need the following: Wisenet SKY Bridge/CMVR (supplied), AC Power Cord
(supplied), Ethernet Cables (not included), PoE Switch (not included)
If you require a static IP address on the Bridge/CMVR, you will also need:
HDMI Monitor & Cable, USB Keyboard OR Mobile device and cable, Wisenet SKY Mobile App.
8Add Cameras to Your Wisenet SKY Account
Go to your Dashboard and select the + sign next to the cameras you want to add to your
account. Enter the camera ONVIF username and password if needed. See manufacturer notes
for more details.
Add Tags and Configure Cameras
From the Dashboard select the gear icon and adjust the settings of your camera.
Create tags on your cameras to organize them into groups.
View Video on Mobile via Phone or Tablet
Download our application in the Apple App Store or the Google Play Store.
Search“Wisenet SKY” to find it.
The recommended setup framework is shown in Figure 1.
Figure 1
Suggested Connection
7
This manual suits for next models
1


