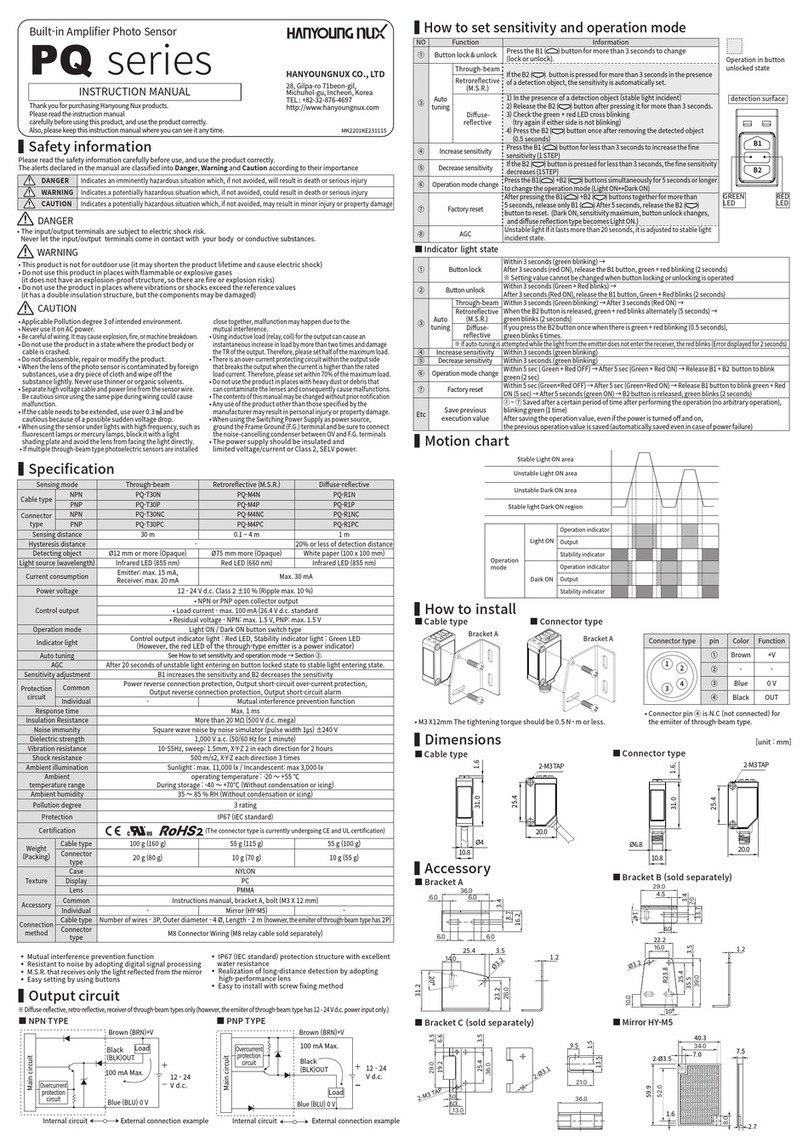
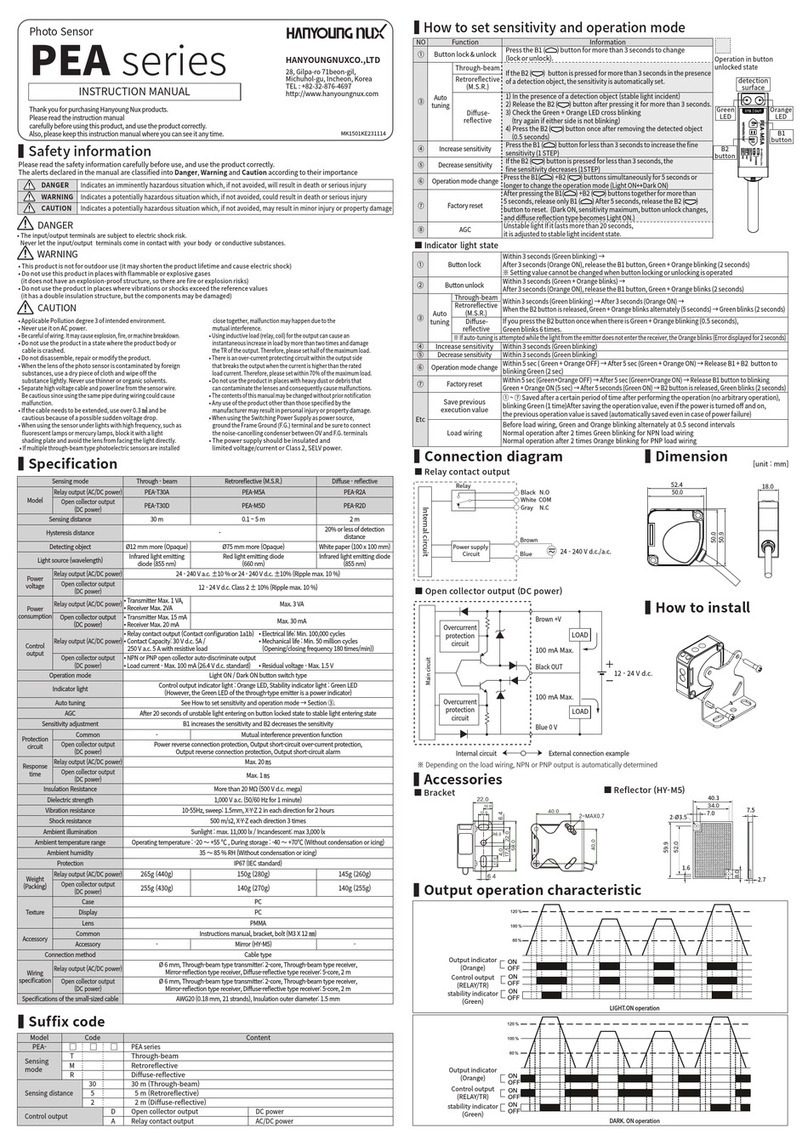
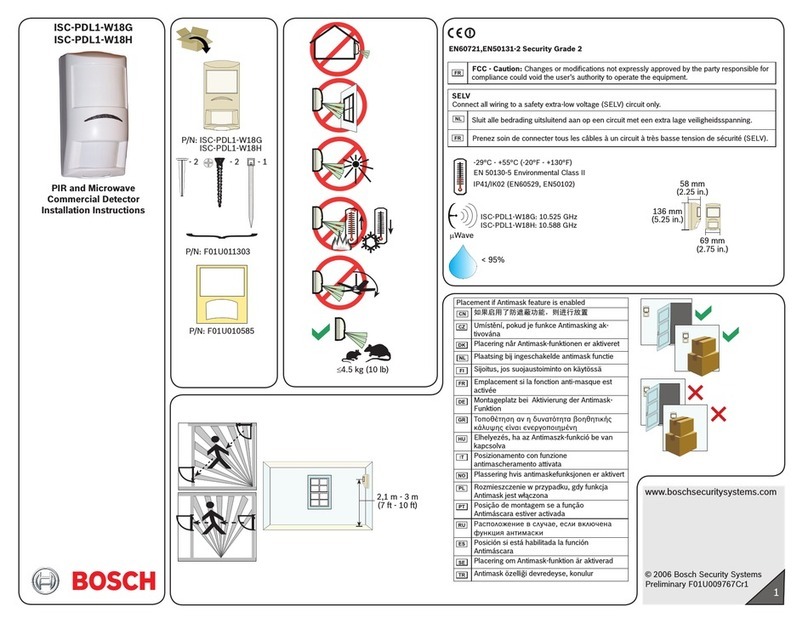
HANYOUNG NUX PY Series User manual

Please read the safety information carefully before the use, and use the product correctly.
The alerts declared in the manual are classified into Danger, Warning and Caution according
to their importance
•Do not touch or contact the input/output terminals because they may cause electric shock.
WARNING
CAUTION
Frame
SMPS
C(0.01㎌-0.1㎌/500 V)
- noise-cancelling
condenser -
Photo
Sensor
Slim type Photo Sensor
Thank you for purchasing Hanyoung Nux products. Please read the
instruction manual carefully before using this product, and use the
product correctly. Also, please keep this manual where you can view it
any time.
INSTRUCTION MANUAL
Safety information Suffix code
Specification
DANGER
Indicates an imminently hazardous situation which,
if not avoided, will result in death or serious injury
WARNING
Indicates a potentially hazardous situation which,
if not avoided, could result in death or serious injury
CAUTION
Indicates a potentially hazardous situation which,
if not avoided, may result in minor iinjury or property damage
Model Number Contents
PY- ☐ ☐ ☐ Slim type Photo Sensor
Sensing mode T Through-beam
Sensing distance 3 3 m
Control output N NPN open collector output
P PNP open collector output
DANGER
Model
NPN PY-T3N
PNP PY-T3P
Sensing mode
Through - beam
Sensing distance 3 m
Sensing object Ø5 mm min. opaque object
Min. sensing object Ø2 mm min. opaque object (3 m standard)
Hysteresis distance None
Power voltage 12 - 24 V d.c. ± 10%
Current consumption Emitter: 10 mA max. , Receiver: 15 mA max.
Control output NPN or PNP open collector output
Load current: 100 mA max. (26.4 V d.c. standard)
Residual voltage - NPN: 1V max. , PNP: 1V max.
Operation mode Light ON / Dark ON mode switching selection by control wire (receiver only)
Response time 1 ㎳ max.
Light source
(wavelength) Infrared LED (850 nm)
LED
Red LED: control output, green LED: stability indication
(However, emitter red LED: power indication)
Protecting circuit
Power reverse connection protecting circuit and
output break overcurrent protecting circuit.
Output break (note 1), output reverse connection protection circuit
Ambient illumination Sunlight : 11,000 Lux max. , Incandescent lamp : 3,000 Lux max.
Ambient temperature -20 ~ 60
℃
(storage ambient temperature : -25 ~ 70
℃
)
Ambient humidity 35 ~ 85 % RH (without condensation)
Protection rating IP 67 (IEC)
Insulation resistance 20 MΩ min. (500 V d.c. mega standard)
Noise immunity Square wave noise by noise simulator (pulse width: 1 μs) ± 240 V
Dielectric strength 1,000 V a.c. (50/60 ㎐ for 1 minute)
Vibration resistance 10 - 55 ㎐, double amplitude: 1.5 ㎜, for 2 hours in X, Y ,Z directions
Shock resistance 500 ㎨, 3 times in each X, Y,Z directions
Certifications
Connection method Wire extended type
Connection
specifications Ø3 mm, 4-core, 2 m (emitter: Ø3 mm, 2-core, 2 m)
Materials Case : PC, Lens : PC
Weight approx. 66g
(Note 1) Red LED turns off and repeats for 38.4 ms after red LED turns on for 192 ㎲
during light ON
PY series
•This product is not for outdoor use (it may shorten the product lifetime and cause electric shock)
•Do not use this product in places with flammable or explosive gases (it does not have
an explosion-proof structure, so there are fire or explosion risks)
•Do not use the product in places where vibrations or shocks exceed the reference values
(it has a double insulation structure, but the components may be damaged)
• When the lens of the photo sensor is contaminated by foreign substances, use a dry
piece of cloth and wipe off the substance lightly. Never use thinner or organic solvents.
•Separate high voltage cable and power line from the sensor wire. Be cautious since using the
same pipe during wiring could cause malfunction.
•This product has IP67 protection rating , which means that it is partially waterproof, but it
cannot be used in places that are constantly flooded.
• If the cable needs to be extended, use over 0.3 ㎟ and be cautious because of a
possible sudden voltage drop.
•When using the sensor under lights with high frequency, such as fluorescent lamps or mercury
lamps, block it with a light shading plate and avoid the lens from facing the light directly.
•Malfunction can occur due to mutual interference when using more than 2 pairs of through-
beam type photo sensors. Therefore, leave enough space for the mutual separation
distance and install the light emitters and the light receivers in alternating positions.
• Using inductive load (relay, coil) for the output can cause an instantaneous increase in
load by more than two times and damage the TR of the output. Therefore, please set
half of the maximum load.
• There is an over-current protecting circuit within the output side that breaks the output when the
current is higher than the rated load current. Therefore, please set within 70% of the maximum load.
• Do not use the product in places with heavy dust or debris that can contaminate the
lenses and consequently cause malfunctions.
•
The contents of this manual may be changed without prior notification
• Any use of the product other than those specified by the manufacturer may result in
personal injury or property damage.
• When using the Switching Power Supply as power source, ground the Frame
Ground (F.G.)terminal and be sure to connect the noise-cancelling condenser
between OV and F.G. terminals
• Be sure to observe the safety precautions mentioned above as cautions to prevent product
malfunctions.
HEAD OFFICE
HANYOUNGNUX CO.,LTD
28, Gilpa-ro 71beon-gil, Nam-gu, Incheon, Korea
TEL : (82-32)876-4697
FAX : (82-32)876-4696 http://www.hynux.com
MK0901KE180213
MK0901KE171124_PYseries.indd 3 18. 2. 13. 오후 8:11

Output circuit
[Unit : mm]
LED (indicator)
Connection diagram
Dimension
●
PNP
28
2.3
17.1
7.5
0.6
3
12
16
Optical
axis
LOAD
LOAD
Control Line WHT
Control Line WHT
●
NPN open collector output
●
PNP open collector output
LOAD
LOAD
Control Line WHT
Control Line WHT
●
NPN
1. Operation indicator (red LED) and stability indicator (green LED) indicate the operation level.
2. After completing the optical axis adjustment or sensitivity adjustment, repeat the
L.ON/D.ON operation (operation which depends on the sensing object) and
check whether they are in the area of stable L.ON/D.ON area.
3. Setting as a stable area will provide the high reliability regarding
the environmental changes or etc after setting up is completed.
4. When using the selecting switch as L.ON, the red LED will be lighted once
the light is turned ON. When using the selecting switch as D.ON, the red LED will
be lighted once the light is turned OFF.
(Note) Light ON / Dark ON mode selection wiring method
Light ON : Control line open
Dark ON : Connect control line to 0 V
(Note) Light ON / Dark ON mode selection wiring method
Light ON : Control line open
Dark ON : Connect control line to 0 V
Operation chart
LOAD
LOAD
Control Line WHT
Control Line WHT
LOAD
LOAD
Control Line WHT
Control Line WHT
(Note 1) Red LED turns off and repeats for 38.4 ms after red LED turns on for 192 ㎲
during light ON
Indication light 1 Indication light 2
※
Indicator 1 : Stable light indicator (STA) for the receiver, power light indicator (Power) for the emitter,
Indicator 2 : Control light indicator (OUT) for the receiver, power light indicator(Power) for the emitter
Sensing Status
Light On TR output and Light ON indicator
(red LED)
Dark On TR output and Light ON indicator
(red LED)
Stability indicator
(green LED) - emitter excluded -
Operation level
Dark ON
Stability level
ON Operation
OFF Operation
ON Operation
OFF Operation
ON Operation
OFF Operation
PY-TR3N
PY-TR3P
PY-TL3
Emitter
PY-TL3
Emitter
Receiver
Receiver
MK0901KE171124_PYseries.indd 4 18. 2. 13. 오후 8:11

사 양
PY series 사용설명서
(주)한영넉스의 제품을 구입하여 주셔서 대단히 감사합니다.
본 제품을 사용하시기 전에 사용설명서를 잘 읽은 후에 올바르게 사용해 주십시오.
또한, 사용설명서는 언제라도 볼 수 있는 곳에 반드시 보관해 주십시오.
MK0901KE180213
박형 포토센서
(주)한영넉스
인천광역시 남구 길파로 71번길 28
TEL:(032)867-0941 FAX:(032)868-5899
고객지원센터 TEL:1577-1047 http://www.hynux.com
본사/공장
형 명 형 번 내 용
PY- ☐☐☐박형 포토센서
검출방법 T 투과형 (Through-beam)
검출거리 3 3 m
제어출력 N NPN 오픈콜렉터 출력
P PNP 오픈콜렉터 출력
형 명 NPN PY-T3N
PNP PY-T3P
검 출 방 법 투과형 (Through - beam)
검 출 거 리 3 m
검 출 물 체 Ø5 mm 이상 불투명체
최소검출물체 Ø2 mm 이상 불투명체 (3 m 기준)
응차거리 해당사항 없음
전 원 전 압 12 - 24 V d.c. ± 10%
소 비 전 류 투광기 : 10mA 이하, 수광기 : 15mA 이하
제어출력
NPN 또는 PNP 오픈 콜렉터 출력
부하전류 - 100mA 이하 (26.4 V d.c 기준)
잔류전압 - NPN : 1V 이하, PNP : 1V 이하
동작모드
제어 선에 의한 입광/차광 (Light ON / Dark ON) 모드 전환 선택 (수광기에 한함)
응 답 시 간 1 ㎳ 이하
광 원 ( 파 장 ) 적외광 LED (850nm)
표 시 등 적색 LED : 제어 출력, 녹색 LED : 안정 표시
(단, 투광기의 적색 LED는 전원 표시)
보 호 회 로 전원 역접속 보호회로, 출력 단락 과전류 보호회로,
출력 단락 알림 회로 (주1), 출력역접속 보호회로
사 용 주 위 조 도 태양광 : 11,000 Lux 이하, 백열등 : 3,000 Lux 이하
사 용 주 위 온 도 -20 ~ 60 ℃ (보관 주위 온도 : -25 ~ 70 ℃)
사 용 주 위 습 도 35 ~ 85 % RH (단, 결로하지 않을 것)
보 호 구 조 IP 67 (IEC)
절 연 저 항 20 MΩ 이상 (500 V d.c. 메가 기준)
내노이즈 노이즈 시뮬레이터에 의한 방형파 노이즈 (펄스폭 1㎲) ±240V
내 전 압 1,000 V a.c. (50/60 ㎐ 1분간)
내 진 동 10 - 55 ㎐, 복진폭 : 1.5 ㎜, X, Y, Z 각방향 2시간
내 충 격 500 ㎨, X, Y, Z 각방향 3회
획득규격
접속방식 배선인출형
배선사양 Ø3 mm, 4심, 2 m (단, 투광기는 : Ø3 mm, 2심, 2 m)
재질 케이스 : PC, 렌즈 : PC
중 량 약 66 g
형명구성
(주1) 입광시 192㎲ 동안 적색 LED ON 후 38.4㎳ 동안 적색 LED OFF, 반복
•실외에서 사용하지 마십시오. (제품의 수명이 짧아지는 원인이 되며 감전의 우려가 있습니다.)
•인화성 폭발성 가스환경에서 사용하지 마십시오. (방폭 구조가 아니므로 화재 및 폭발의
우려가 있습니다.)
•기준치 이상의 진동이나 충격이 많은 곳에는 사용하지 마십시오. (이중절연 구조이지만
부품이 손상될 수 있습니다.)
경 고
프레임
전원공급기
(SMPS) C(0.01㎌-0.1㎌/500 V)
- Noise제거용 콘덴서 -
포토센서
✽ 상기 안전상 주의사항에 명기된 내용은 제품 고장 방지를 위해 반드시 지켜주십시요.
사용전에 안전에 관한 주의사항을 잘 읽어 주시고 올바르게 사용하여 주십시요.
설명서에 표시된 주의사항은 중요도에 따라 위험, 경고, 주의 심벌로 구분하고 있습니다.
안전상 주의사항
•포토 센서의 렌즈면이 이물질에 의해 오염 되었을 경우에는 마른 헝겁으로 가볍게 닦아
내도록 하고, 신나나 유기용제 등은 절대 사용하지 마십시오.
•고압선이나 동력선과 센서 배선은 필히 분리하여 주십시오. 배선을 동일 배관으로 처리
하시면 오동작의 원인이 되므로 주의 하십시오.
•이 제품은 방침구조(IP67)로 되어 있어 부분 방수가 가능하지만 상시 침수되는 장소에서는
사용하지 마십시오.
•케이블을 길게 연장하여 사용할 경우는 (0.3 ㎟이상)을 사용하시고, 이 경우에는
전압 강하가 일어나므로 주의 하십시오.
•형광등이나 수은등등 고주파 성분을 갖고 있는 불빛 아래에 센서를 사용할 경우는 차광판
등으로 가려 주시고, 렌즈면이 불빛에 정면으로 향하지 않도록 하여주십시오.
•투과형 포토 센서를 2조 이상 사용할 경우 상호 간섭으로 오동작 할 수 있으므로 상호 이격
거리를 충분히 띄워 주시고 투광기와 수광기의 위치를 엇갈리게 설치하여 주십시오.
•출력에 유도성 부하(릴레이, 코일)를 사용 할 경우에는 순간 부하가 2배이상 증가 하므로
출력측 TR을 파괴 할 수 있으므로 최대 부하의 1/2로 설정하여 사용 하십시오.
•출력측은 과전류 보호 회로가 내장되어 있어 정격 부하전류보다 높을 경우 출력을
차단하므로 최대 부하의 70 %이내에서 설정하여 사용하십시오.
•먼지나 이물질이 심한 곳에서는 렌즈에 오염을 유발하여 오동작의 우려가 있으므로 사용을
피하여 주십시오.
•사용설명서의 내용은 사전에 예고없이 변경될 수 있습니다.
•제조자가 지정한 방법 이외로 사용시에는 상해를 입거나 재산상의 손실이 발생할 수
있습니다.
•Switching Power Supply 를 전원으로 사용 할 경우는 Frame Ground(FG)단자를 접지
시키시고 0 V 와 FG단자 사이에 노이즈 제거용 콘덴서를 필히 접속 하여 주십시오.
주 의
지키지 않을 경우, 사망 또는 중상에 이르는 결과를 낳는 절박한 위험
상황을 표시하고 있습니다.
지키지 않을 경우, 사망 또는 중상이 발생할 가능성이 예상되는 내용을
표시하고 있습니다.
지키지 않을 경우, 경미한 상해나 재산상의 손해가 발생할 가능성이
예상되는 내용을 표시하고 있습니다.
위 험
경 고
주 의
•입•출력 단자는 감전의 위험이 있으니 신체 및 통전물이 절대로 접촉 되지 않도록 하십시오.
위 험
MK0901KE171124_PYseries.indd 1 18. 2. 13. 오후 8:10

검출상태
Light On
(입광 동작)
TR출력 및
입광표시등
(적색LED)
Dark On
(차광 동작)
TR출력 및
입광표시등
(적색LED)
안정표시 (녹색LED)
(단, 투광기는 제외)
출력회로
[ 단위: ㎜ ]
표 시 등
동작차트
접 속 도외형치수
●
PNP
28
2.3
17.1
7.5
0.6
3
12
16
●
NPN 오픈콜렉터 출력
●
PNP 오픈콜렉터 출력
●
NPN
1. 동작표시등(적색LED), 안정표시등(녹색LED)은 그림의 레벨을 표시하고 있습니다.
2. 광축조정이나 감도조정 완료후에 검출물체에 따른 입/차광을 반복해서, 안정입/차광의
영역에 있는지를 확인하여 주십시오.
3. 안정영역으로 설정하면 설정후의 환경변화나 기타 이상에 대해서, 보다 신뢰성이
높아집니다.
형 명 형 번 내 용
PY- ☐☐☐박형 포토센서
검출방법 T 투과형 (Through-beam)
검출거리 3 3 m
제어출력 N NPN 오픈콜렉터 출력
P PNP 오픈콜렉터 출력
(주) Light ON / Dark ON 모드선택 결선법
Light ON : Control 선을 open
Dark ON : Control 선을 0 V에 결선
(주) Light ON / Dark ON 모드선택 결선법
Light ON : Control 선을 open
Dark ON : Control 선을 0 V에 결선
(주1) 입광시 192㎲ 동안 적색 LED ON 후 38.4㎳ 동안 적색 LED OFF, 반복
표시등 1 표시등 2
※ 표시등 1 : 수광기일 경우 안정 표시등 (STA), 투광기일 경우 전원 표시등(Power)
표시등 2 :
수광기일 경우 제어 표시등 (OUT), 투광기일 경우 전원 표시등(Power)
PY-TL3
(투광기)
PY-TR3P
(수광기)
PY-TL3
(투광기)
PY-TR3N
(수광기)
동작레벨
차광
안정레벨
ON 동작
OFF 동작
ON 동작
OFF 동작
ON 동작
OFF 동작
MK0901KE171124_PYseries.indd 2 18. 2. 13. 오후 8:11
This manual suits for next models
2
Other HANYOUNG NUX Security Sensor manuals
Popular Security Sensor manuals by other brands

PCB
PCB 2302-01A Installation and operating manual
KRATOS SAFETY
KRATOS SAFETY FA 10 201 00 manual
B.E.G.
B.E.G. LUXOMAT net PD4N-LTMS-RR Installation and operating instruction
Jula
Jula 400-235 operating instructions
Alarmtech
Alarmtech AD 700 installation manual
Inficon
Inficon HLD6000 Original operating instructions
