Happy Puzzle Clock Kit User manual
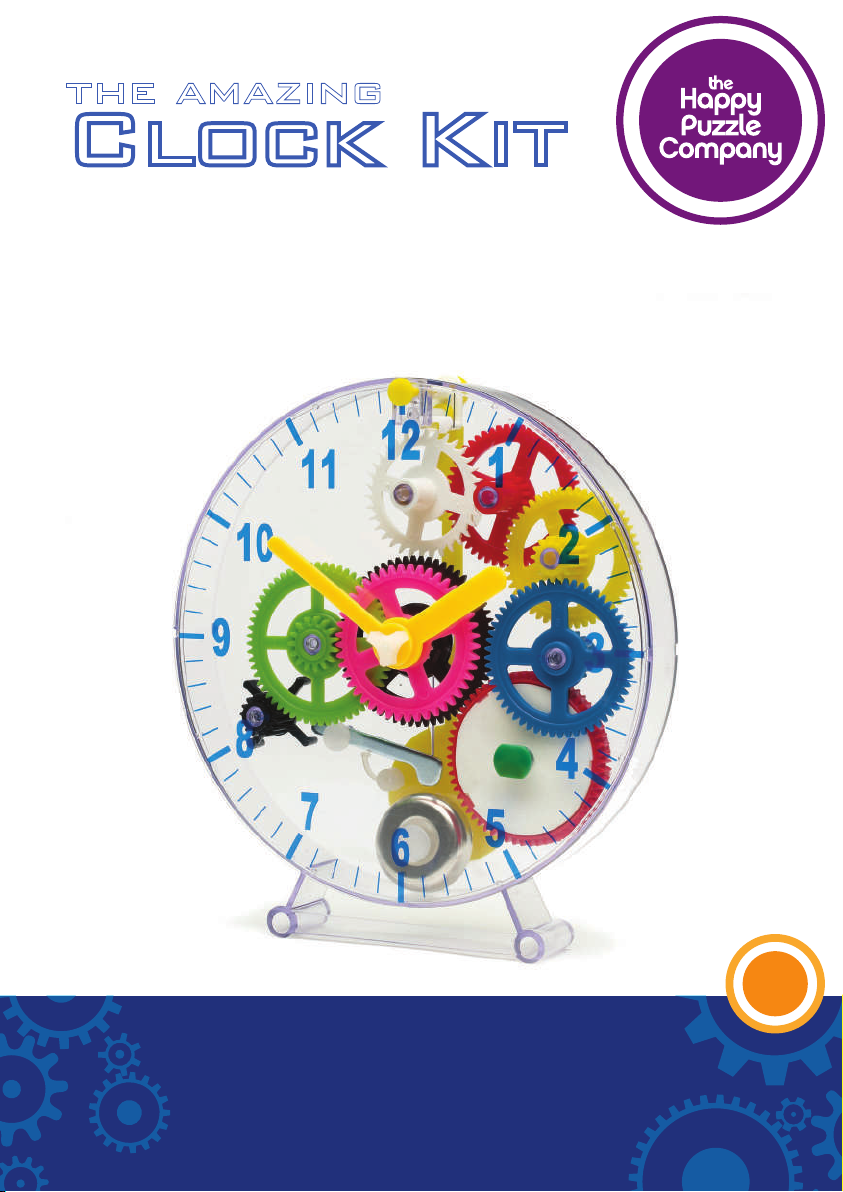
the amazing
Clock Kit
Libretto di istruzioni
Instruction manual
UN SORPRENDENTE
OROLOGIO DA MONTARE
5+
2
Il Kit orologio da costruire ti dà il benvenuto. Questo libretto ti guiderà
nella costruzione di un orologio. Come con tutti i kit di montaggio, è importante
avere a disposizione un'area di lavoro sgombra e piana. Seguendo le istruzioni,
sarà facile montare i pezzi tra loro correttamente, ma controlla
regolarmente se stai usando i pezzi giusti e li stai mettendo nel
posto e nel verso giusto!
Inoltre, tieni il kit lontano dalla portata dei bambini di età
inferiore ai 36 mesi, perché le parti piccole costituiscono
un potenziale rischio di soffocamento.
È importante ricordare che questo è un kit istruttivo,
ideato per insegnare a bambini e ragazzi da 5 a 15
anni come funziona un orologio a carica manuale.
Una carica completa farà funzionare l'orologio per
circa sei ore. Il prodotto non è uno strumento
segnatempo.
Per i bambini più piccoli è richiesta l’assistenza
di un adulto per il montaggio dell’orologio.
Come funziona l'orologio
Quando l'orologio è carico, la molla è tesa.
Man mano che la molla allenta la tensione,
trasferisce la sua energia agli ingranaggi
che cominciano a girare e fanno funzionare
l'orologio. Il pendolo controlla la velocità di
rilascio dell'energia e fa in modo che l'orologio
tenga il tempo, regolando la velocità di rotazione
degli ingranaggi e di allentamento della molla.
Quando la molla si sarà allentata completamente,
non avrà più energia da trasferire agli ingranaggi e
l'orologio dovrà essere ricaricato.
E ora costruiamo l'orologio! A pagina 4 e 5 sono
riportate tutte le parti contenute nel kit. Prima di cominciare,
impara a conoscerle e controlla di avere tutto a portata di
mano! A partire da pagina 6, troverai le istruzioni dettagliate per il
montaggio dell'orologio.
INTRODUZIONE
3
Welcome to The Amazing Clock Kit. This booklet will guide you through
building your clock. As with any self-assembly kit, it is important to ensure that you
use an appropriate working area with a clear, flat surface. All pieces will fit
together simply and in accordance with the instructions. Please always
check that you are using the correct piece and that you are putting it
into place the right way round!
Please also ensure that you keep the pieces of the kit away
from children under the age of 36 months, as the small
pieces present a potential chocking hazard.
It is important to remember that this is an educational
kit, designed to help children aged from 5 to 15
understand how a wind-up clock works.
When fully wound, the clock should run for around
six hours. It is not intended to be a long-term time
piece.
Some younger children may benefit from adult
assistance in constructing the clock.
How the clock works:
When the clock is wound, the clock’s spring is
tightened. As the spring gradually releases its
tension, it transfers the energy that makes the
clock run, and one by one, the cogwheels turn.
The pendulum controls the speed with which
the energy is released and in so doing, it helps
the clock to keep time and regulates the speed at
which the cogwheels turn and the spring loosens.
Eventually, when the spring has unwound, it will
have no energy left to transfer to the cogwheels, and
so the mechanism will need to be rewound to start the
process again.
So now, let’s build the clock! We’ll start on page 4
with showing you the different pieces in the kit. Before you start,
familiarise yourself with the pieces and check to make sure you
have all of them to hand! Then, from page 6, you will be able to see a
step-by-step guide to building the clock. Good luck!
INTRODUCTION
4
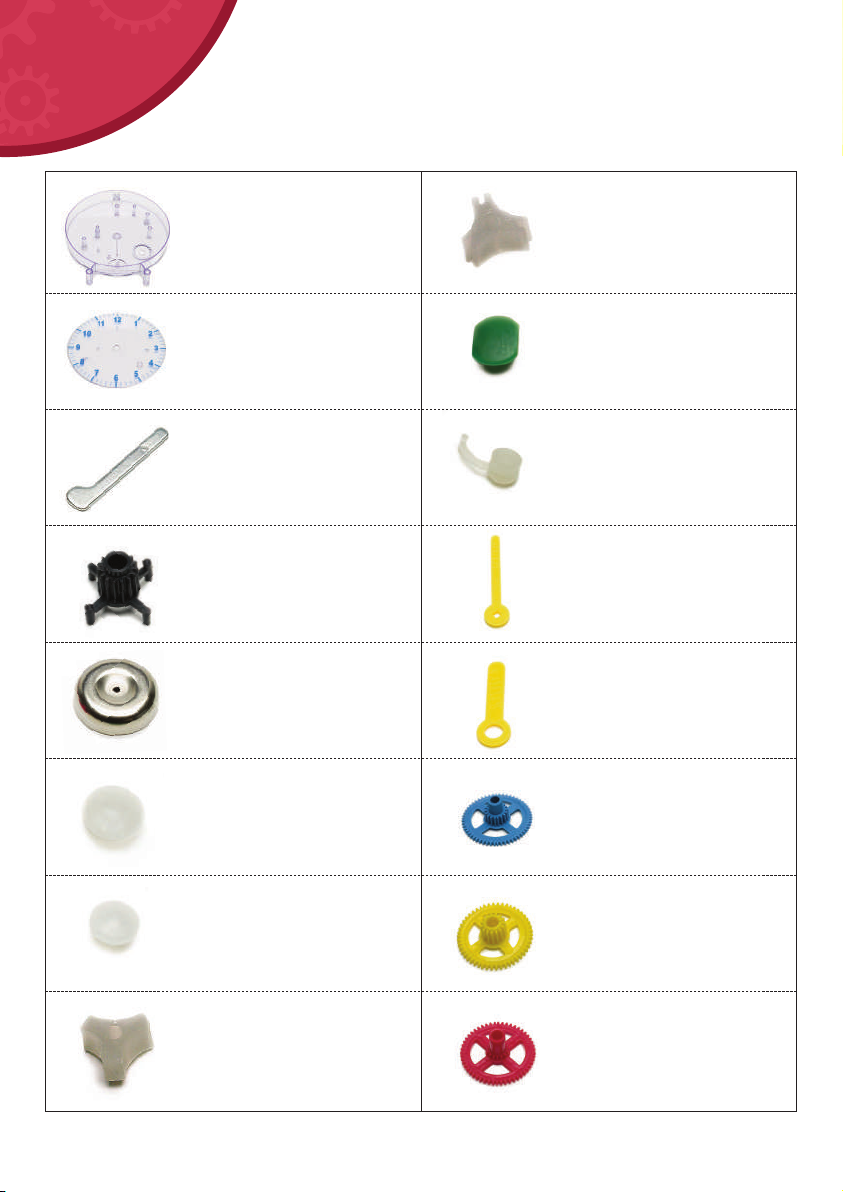
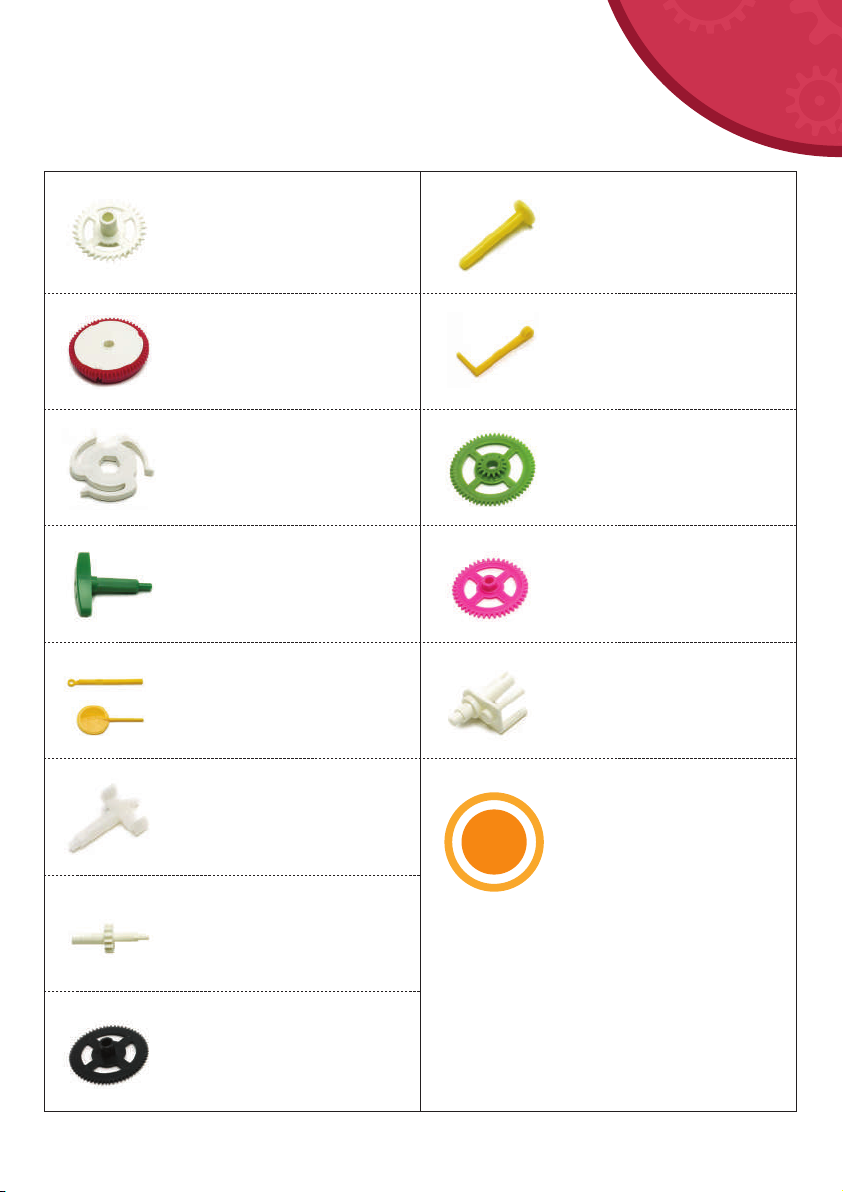
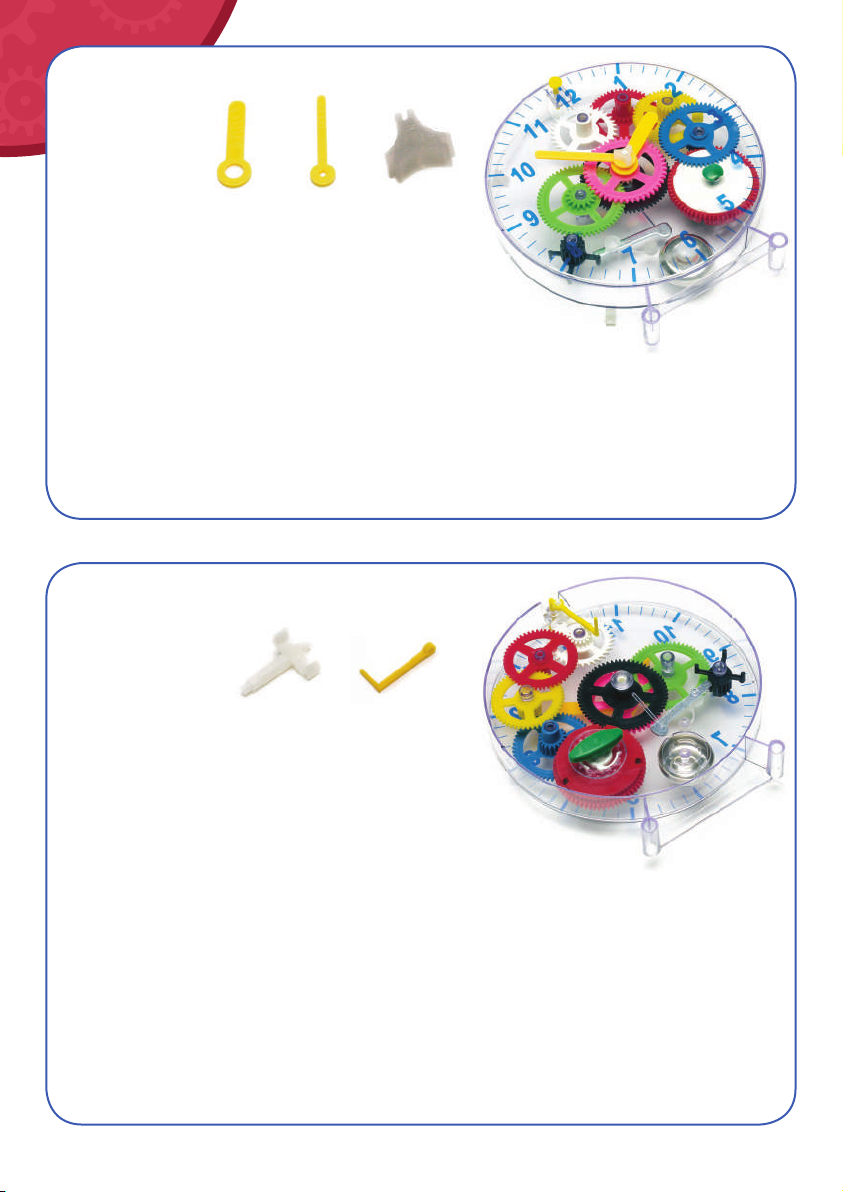
CONTENUTO
1. Base dell’orologio
Clock Base
2. Quadrante dell’orologio
Clock Face
3. Martello argento
Silver Hammer
4. Ingranaggio nero
con quattro gambe
Black Cog With Four Legs
5. Campanello argento
Silver Bell
6. Tappo trasparente grande (x 2)
Large Clear Stopper x2
7. Tappo trasparente piccolo
Small Clear Stopper
8. Tappo triangolare trasparente
con estremità lisce
Clear Triangular Stopper With
Solid Ends
9. Tappo triangolare
trasparente con estremità
scanalate
Clear Triangular Stopper
With Grooved Ends
10. Tappo verde
Green Stopper
11. Disco trasparente
con codina
Clear Circle With Tail
12. Lancetta dei minuti
Minute Hand
13. Lancetta delle ore
Hour Hand
14. Ingranaggio blu
Blue Wheel
15. Ingranaggio giallo
Yellow Wheel
16. Ingranaggio rosso
Red Wheel
5
CONTENTS
5+
Per i bambini più piccoli è richiesta
l’assistenza di un adulto per il montaggio
dell’orologio.
Some younger children may benefit from
adult assistance in constructing the clock.
17. Ingranaggio bianco
White Wheel
18. Ingranaggio
rosso e bianco/Molla
Red & White Wheel /Spring
19. Cricchetto bianco
White Ratchet Wheel
20. Manovella verde per la ricarica
Green Wind-Up Crank
21. Pendolo giallo (alto/basso)
Yellow Pendulum
(Top/Bottom)
22. Forcella trasparente
Clear Fork
23. Ruota dentata bianca
White Gear
24. Ingranaggio nero
Black Wheel
25. Perno giallo
Yellow Pin
26. Leva gialla
Yellow Lever
27. Ingranaggio verde
Green Wheel
28. Ingranaggio rosa
Pink Wheel
29. Supporto bianco
White Stool
6
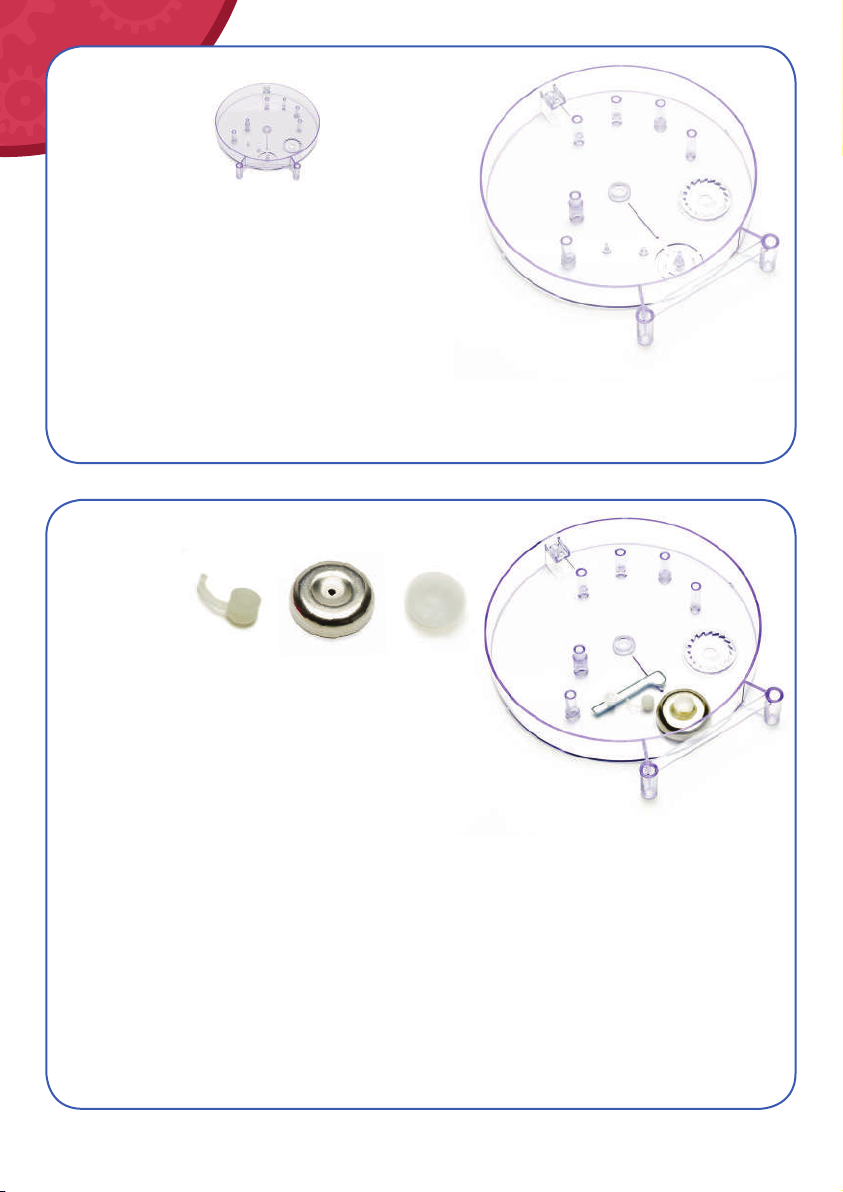
Appoggia la base dell'orologio
su una superficie piana.
Place the base of the clock on a flat surface.
Posiziona il disco trasparente con la codina
(n. 11) sul supporto, come illustrato, quindi colloca il campanello
argento (n. 5) e un tappo trasparente grande (n. 6) sul supporto, subito
sotto il disco trasparente con la codina.
Monta il martello argento (n. 3) sul supporto a sinistra del disco
trasparente con la codina e fissalo con il secondo tappo trasparente grande.
Position the clear circle with tail (No. 11) on the small pillar as pictured.
Then place the silver bell (No. 5) and the large clear stopper (No. 6)
on the pillar directly underneath the clear circle with tail.
Now attach the silver hammer (No. 3) on the pillar to the left of the clear
circle with tail and secure with the second large clear stopper.
Fase
Step 1
Fase
Step 2
7
Inserisci la manovella verde per la ricarica
(n. 20) dal retro dell’orologio (a destra del
martello argento).
Posiziona il cricchetto bianco (n. 19) sopra la
manovella verde per la ricarica, spingendo il più
possibile verso il basso per fissarlo bene.
N.B.: il lato piatto del cricchetto bianco deve essere
rivolto verso l’alto.
Place the green wind-up crank (No. 20) through the back of the clock (to the
right of the silver hammer).
Then position the white ratchet wheel (No. 19) on top of the green wind-up
crank pushing it down as far as it can go until the piece is secure.
Please note the white ratchet wheel must have the flat side facing
upwards.
Posiziona gli ingranaggi rosso (n. 16), bianco
(n. 17) e giallo (n. 15) in quest’ordine, come
illustrato.
Place the red wheel (No. 16), white wheel
(No. 17) and yellow wheel (No. 5) in this
order as pictured.
Fase
Step 3
Fase
Step 4
8
Collega l’estremità più spessa della ruota
dentata bianca (n. 23) all’estremità piatta
dell’ingranaggio nero (n. 24) quindi appoggia
quest’ultimo al centro della base dell’orologio,
con l’estremità sottile dell’ingranaggio bianco
rivolta verso l’alto.
Posiziona l’ingranaggio nero con quattro gambe (n. 4)
sul supporto a sinistra del martello argento.
Connect the thicker end of the white gear (No. 23) through the flat end of the
black wheel (No. 24).
Then place this in the middle of the base of the clock with the thin end of the
white gear facing upwards.
Position the black cog with four legs (No. 4) on the pillar to the left of the silver
hammer.
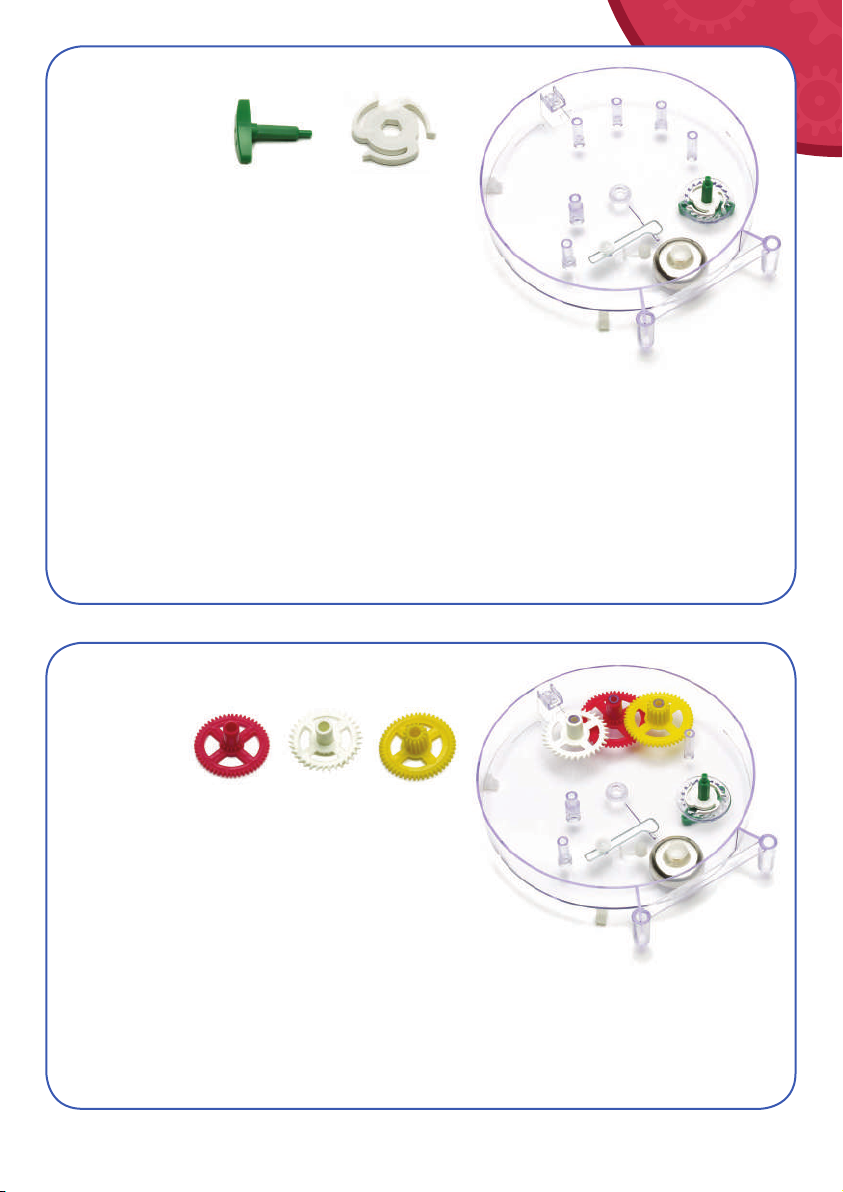
Posiziona l’ingranaggio verde (n. 27) sul supporto
a sinistra dell’ingranaggio nero.
Assicurati che l’ingranaggio verde sia collegato
a entrambi i pezzi neri.
Inserisci l’ingranaggio rosa (n. 28) attraverso la ruota
dentata bianca collegata all’ingranaggio nero.
Position the green wheel (No. 27) on the pillar to the left of the black wheel.
Make sure the green wheel is interlocked with both the black pieces.
Place the pink wheel (No. 28) through the white gear that is connected to the black
wheel.
Fase
Step 5
Fase
Step 6

9
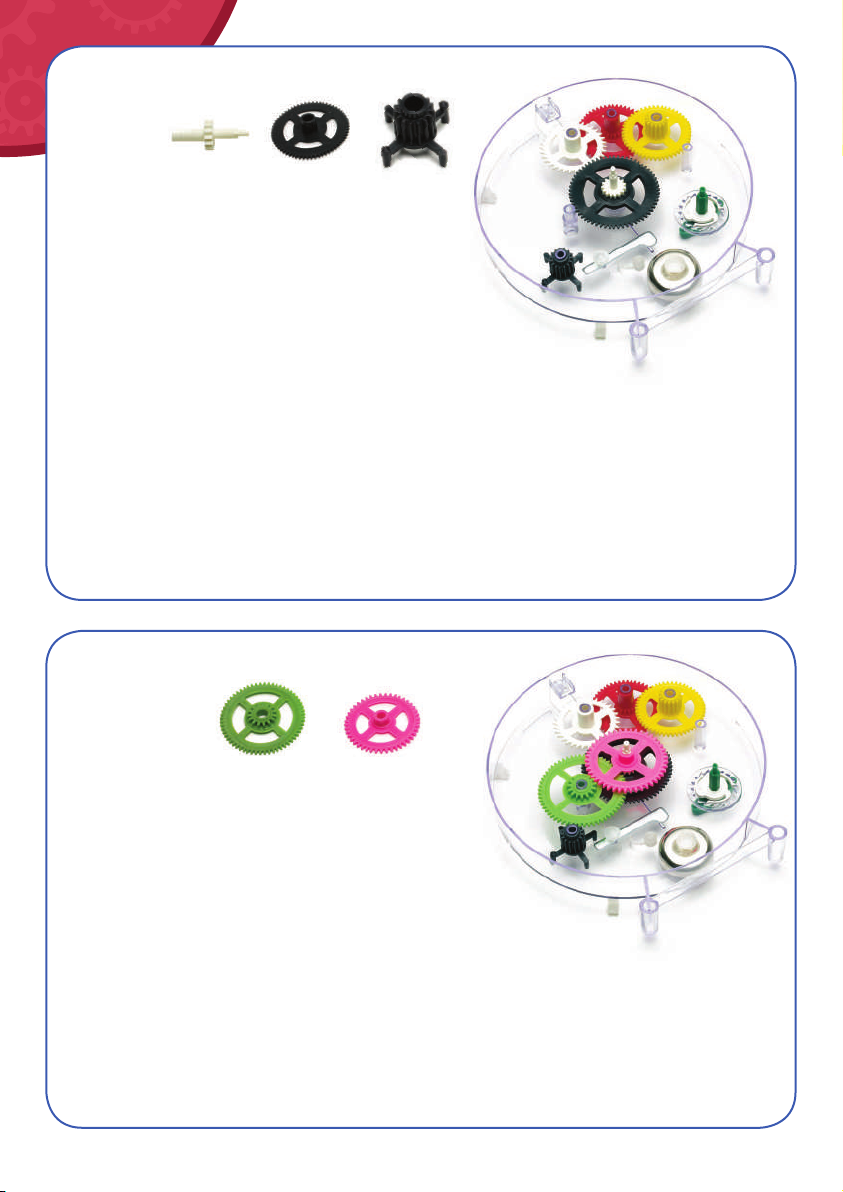
Posiziona l’ingranaggio rosso e bianco/molla
(n. 18) attraverso la manovella verde
per la ricarica.
Assicurati che il cricchetto bianco sia ben fissato.
Colloca l’ingranaggio blu (n. 14) sull’ultimo supporto.
Assicurati che l’ingranaggio blu sia sovrapposto
all’ingranaggio rosso e bianco/molla e sia collegato
all’ingranaggio giallo.
Position the red and white wheel/spring (No. 18) through the green wind-up crank.
Make sure the white ratchet wheel is still secure.
Place the blue wheel (No. 14) on the last remaining pillar.
Make sure the blue wheel overlaps the red and white wheel/spring and
interlocks with the yellow wheel.
Posiziona il quadrante dell’orologio sulla base.
Fissa il tutto inserendo il perno giallo (n. 25)
nel foro posto sopra il numero 12 sul quadrante
e il tappo verde (n. 10) nel foro tra i numeri 4 e 5.
Attach the face of the clock on top of the base of the clock.
Secure by putting the yellow pin (No. 25) through the hole
that is situated above the No. 12 on the clock, and by putting the green
stopper (No. 10) through the hole between numbers 4 and 5 on the clock.
Fase
Step 7
Fase
Step 8
10
Posiziona la lancetta delle ore (n. 13) sopra
l’ingranaggio rosa al centro dell’orologio, quindi
inserisci la lancetta dei minuti (n. 12) sopra quella delle ore.
Il tappo triangolare trasparente con estremità scanalate (n. 9)
andrà quindi fissato sopra le due lancette per bloccarle in posizione.
Place the hour hand (No. 13) over the pink wheel in the middle of the clock.
Then put the minute hand (No. 12) over the hour hand. The clear triangular
stopper with grooved ends (No. 9) is then placed over the two hands to
secure them into position.
Fase
Step 9
Rovescia l’orologio.
Collega la forcella trasparente (n. 22) e la leva
gialla (n. 26) premendo finché scattano in posizione.
Una volta montate insieme, dovrebbero formare una Z,
con le braccia della forcella trasparente rivolte verso il basso.
Inserisci la forcella trasparente nel foro nella parte superiore
dell’orologio, subito sotto il perno giallo che tiene insieme la base e il quadrante.
Now flip the clock over.
Connect the clear fork (No. 22) and the yellow lever (No. 26) together making
sure it clicks into place.
Once together, the shape should look like a Z with the arms of the clear fork
facing downwards. Put the clear fork through the hole at the top of the clock
situated directly below the yellow pin holding the face and the base together.
Fase
Step 10

11
Colloca il supporto bianco (n. 29) sopra
la forcella trasparente e la leva gialla e attraverso
il perno giallo, per bloccare il meccanismo in
posizione.
Place the white stool (No. 29) over the clear fork
and yellow lever and through the yellow pin so
that the mechanism is secure.
Fase
Step 11
Collega la parte superiore e inferiore
del pendolo giallo (n. 21) incastrando le due
estremità scanalate.
Appoggia il pendolo montato sul supporto bianco
e la leva gialla, con la scritta “+ fast and - slow”
(+ veloce e - lento) rivolta verso l’esterno.
Inserisci il tappo triangolare trasparente con estremità lisce
(n. 8) sull’estremità del supporto bianco per tenere in posizione la parte superiore
del pendolo. Quindi fissa il tappo trasparente piccolo (n. 7) sopra la leva gialla.
Connect the top and the bottom of the yellow pendulum (No. 21) by locking the
ridged edges together.
Place the completed pendulum on top of the white stool and the yellow lever
making sure the print ‘+fast and -slow’ is facing you.
Put the clear triangular stopper with solid ends (No. 8) over the end of the white
stool to hold the top of the pendulum in place. Then attach the small clear stopper
(No. 7) on top of the yellow lever.
Fase
Step 12

L’orologio è pronto. Per farlo
funzionare, è sufficiente caricare
la manovella posta sul retro ed
eccolo fare tic-tac...
The clock is now complete. In
order for the clock to start working
just wind-up the green crank at the
back of the clock and tick-tock –
let it rock!!!
Fase
Step 13
Manufactured by:
THE HAPPY PUZZLE COMPANY LTD.
Unit 1, Lismarrine Ind. Park,
Elstree, Herts. WD6 3XY - U.K.
www.happypuzzle.co.uk
Imported by:
SELEGIOCHI SRL
Via Molino Nuovo, 9/a
20082 Binasco (Mi) IT
selegiochi.com Made in China
HZ36905
AVVERTENZA! Non adatto a bambini di età inferiore a 36 mesi.
Contiene piccole parti. Rischio di soffocamento.
WARNING! Not suitable for children under 36 months.
Contains small parts. Choking hazard.
Con uno speciale ringraziamento a Luke Charlwood e Talia
Schlagman per il loro aiuto nella stesura di questo libretto.
With special thanks to Luke Charwood and Talia Schlagman
for their assistance in compiling this manual.
©2009/2019 The Happy Puzzle Company Ltd.
Tutti i diritti riservati. All right reserved.
Other Happy Puzzle Toy manuals


