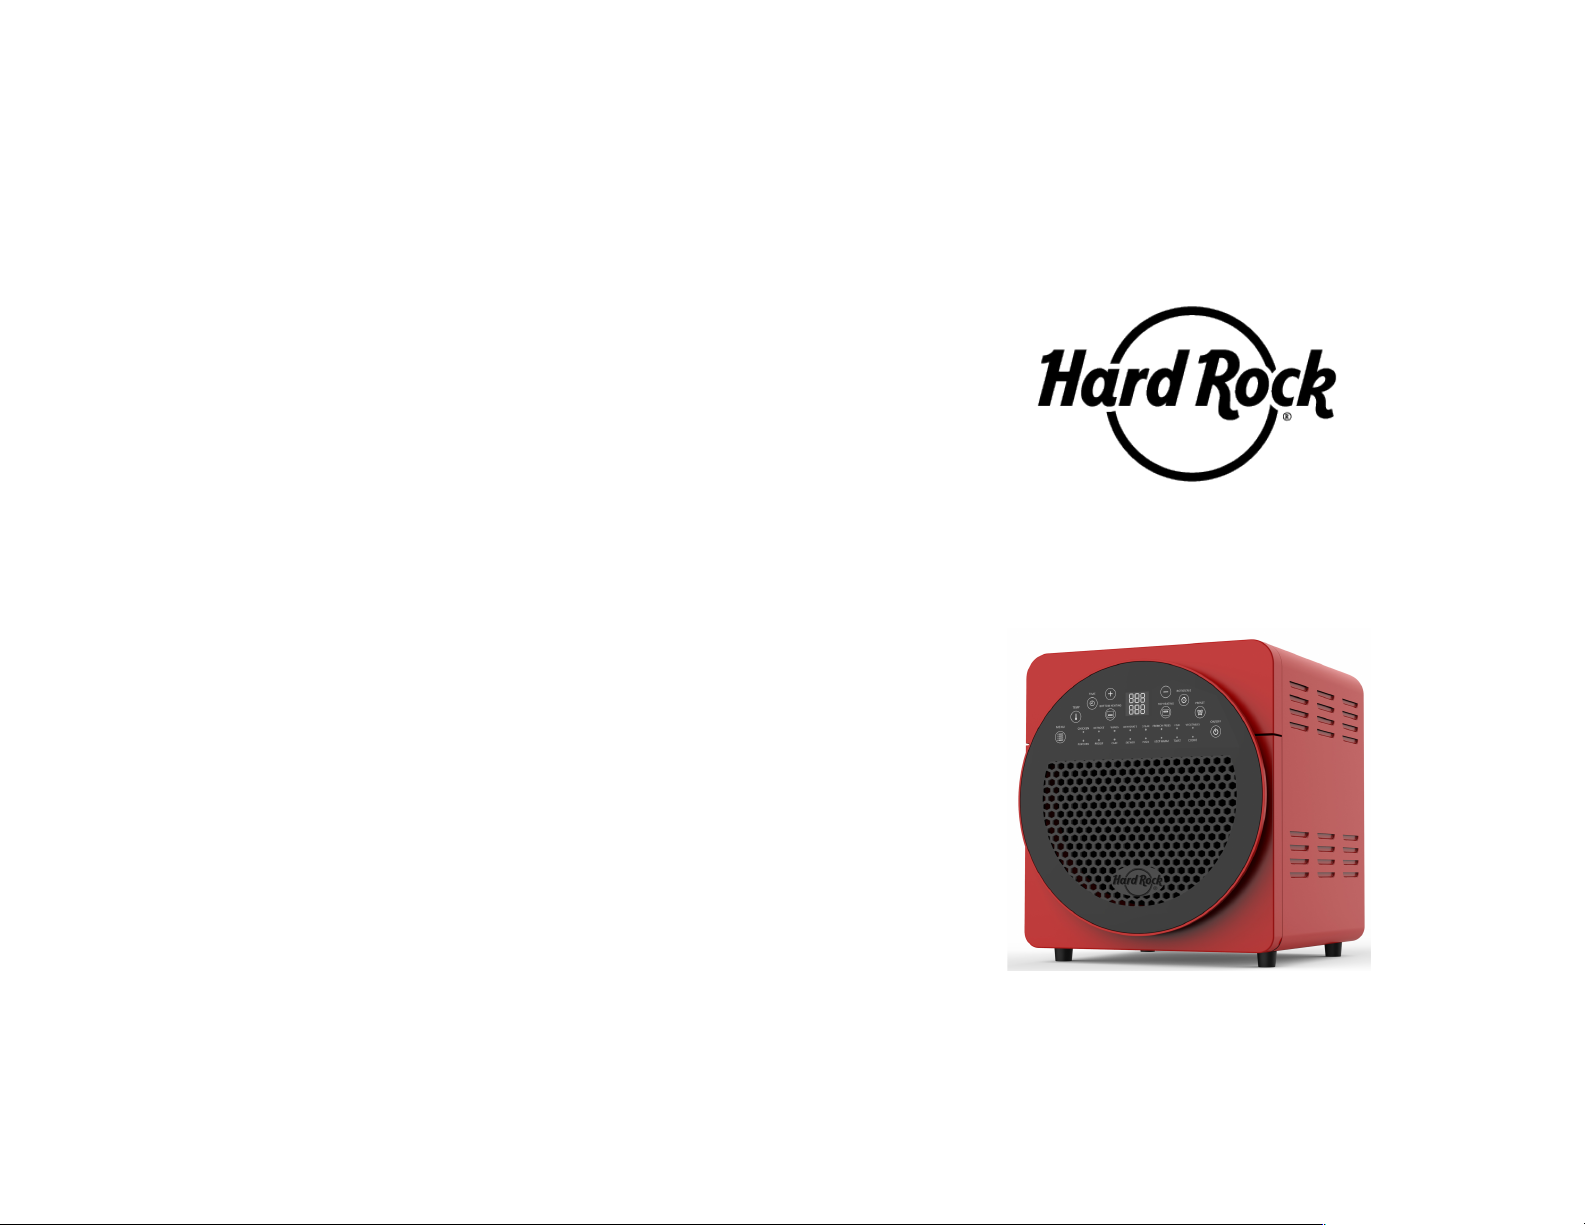
Hard Rock B421725 User manual
1 YEAR LIMITED WARRANTY
Course Housewares, LLC warrants this product to be free from manufacturer defect for up to
365 days from the original date of purchase. If a defect is found to exist, Course Housewares
will, at its option, either repair or replace the product or the defective component, including
labor. Replacement will be made with a new or rebuilt product or components. This warranty
does NOT cover (a) ordinary wear and tear (such as scratches, chips or stains), (b) impact
damage or breakage, (c) heat discoloration, minor imperfections and slight color variations in
the silicone or metals, which are a normal part of the craftsmanship, (d) extreme temperature
or resulting damage to the product (e) improper cleaning methods causing scratches or
damage, or (f) accessories, even if sold with the product, (g) any unit that has been tampered
with, (h) damages incurred through improper use and care and (i) faulty packaging by you or
mishandling by any common carrier. Failure to follow the accompanying Care and Use
instructions or commercial use will void this warranty.
Course Housewares’ sole obligation and your exclusive remedy under this warranty is limited
to repair or replacement, at its option, of the defective product. You will be responsible for any
shipping and handling fees. Products returned to us that are not found to be defective in
material or workmanship will be returned to you. If your particular product is found defective
but is no longer available and cannot be repaired, a comparable product, at our discretion, will
be sent as a replacement. This warranty extends only to the product’s original purchaser, US
residents only and does not cover damage caused by improper use or accidental damage.
This warranty covers the Hard RockÒ Air Fryer only.
COURSE HOUSEWARES, LLC MAKES NO OTHER WARRANTIES, EITHER EXPRESSED
OR IMPLIED, REGARDING THE PRODUCT OR RELATING TO ITS QUALITY.
PERFORMANCE, MERCHANTABILITY, OR FITNESS FOR A PARTICULAR PURPOSE,
COURSE HOUSEWARES, LLC SHALL NOT BE LIABLE FOR INDIRECT,
CONSEQUENTIAL OR SPECIAL DAMAGES WHETHER A CLAIM IS BASED ON
CONTRACT, TORT, WARRANTY OR OTHERWISE, IN NO EVENT WILL LIABILITY
EXCEED THE ORIGINAL PURCHASE PRICE OFTHE PRODUCT. THE DURATION OF ANY
IMPLIED WARRANTY WHATSOEVER, INCLUDING BUT NOT LIMITED TO THE
WARRANTIES OF MERCHANTABILITY AND FITNESS FOR A PARTICULAR PURPOSE,
SHALL BE LIMITED TO THE DURATION OF THE EXPRESS WARRANTY PROVIDED
HEREIN. COURSE HOUSEWARES SHALL NOT BE LIABLE FOR ANY INCIDENTAL OR
CONSEQUENTIAL DAMAGES WHATSOEVER.
Some states do not allow limitations on how long an implied warranty lasts or the exclusion or
limitation of incidental or consequential damages, so the above limitation or exclusion may not
apply to you. This warranty gives you specific legal rights, and you may have other legal
rights, which vary from State to State.
To process a claim:
Do not return the product to the retailer from which it was purchased. Your retailer has no
liability for this warranty. Please contact the Course Housewares customer service
department for assistance and to ensure the fastest possible resolution to the problem.
Please have your purchase information available to speed this process.
OR
Send your name, physical address, phone number, original purchase receipt and the safely
packaged item prepaid to:
Course Housewares, LLC
1715 Lake Drive West
Chanhassen, MN 55317
(866) 325-1659
Return shipping and handling charges may apply.
MADE IN CHINA
MODEL: B421725
1700W
14.5L Air Fryer

PLEASE READ BEFORE USE AND SAVE THESE INSTRUCTIONS
Thank you for purchasing the Hard Rock
Ò
Air Fryer. Your items will perform best when
used as intended. To ensure the best performance of your product, please consistently
follow these instructions.
!
YOUR SET INCLUDES:
CONTROL PANEL:
SAFETY PRECAUTIONS
•
Read all instructions carefully before use.
•
Do not immerse the power cord or body of the Air Fryer in water/other liquids.
•
Do not block the vent of your item.
•
Always use oven mitts/pot holders when handling the Air Fryer or its
accessories. These will reach high temperatures during operation and take
between 30-45 minutes to cool down.
•
Do not use your item if there is any damage to the power cord, body, or any of
the accessories.
•
Do not let the power cord hang over any sharp edges.
•
Dry your hands well before plugging in the power cord or operating the control
panel.
•
Do not use any external power cords that were not originally included with this
item.
•
Never place any plastic materials inside of your device. The inner case will reach
high temperatures while in operation.
•
Place the Air Fryer only on flat, stable surfaces. Do not place the item on any
flammable, easy-wear or plastic areas. Do not use your item near any
combustible materials.
•
Do not place the item against walls or other surfaces. Make sure to give at least
4 inches of space on each side of the Air Fryer away from objects.
•
Do not place objects on top of the Air Fryer at any time.
•
Please note that your item is intended for household and indoor use only.
•
Do not leave the Air Fryer unattended while in use.
•
While in use, hot steam will blow out of the vent. Make sure to keep your hands
and face at a safe distance. Also, be careful of the hot air/steam released when
in operation and opening the door of your Air Fryer.
•
In the case you smell burning food or smoke while using the Air Fryer, turn off the
unit immediately.
•
Make sure to turn off the Air Fryer by pressing “ON/OFF” button before
unplugging the power cord. Avoid pulling the power cord out of outlet forcefully.
•
Keep all food ingredients on or inside the compatible accessories to prevent any
contact with the heating elements of the Air Fryer. Do not overfill baskets.
•
Keep cords away from hot surfaces.
Control
Panel
Power Cord
Body
Inner Case
Door
Front Panel
Lifting Tong
Rotisserie Fork
Wire Rack x3
Mesh Rack x2
Drip Pan
5.8 qt
Basket with
Handle
Press to use
rotisserie
function
Press to
select
desired
preset
Press to adjust time
and temperature
Press to
turn on
and off
power
Press to
choose time
Press to
choose
temperature
Press to set
delayed
cooking
time
Press to turn on bottom heating
Press to turn on top heating
ACCESSORIES
•
Please make sure to use oven mitts whenever you are using the Air Fryer and its
accessories. Always use caution as the accessories and interior of Air Fryer will
become very hot during and after operation.
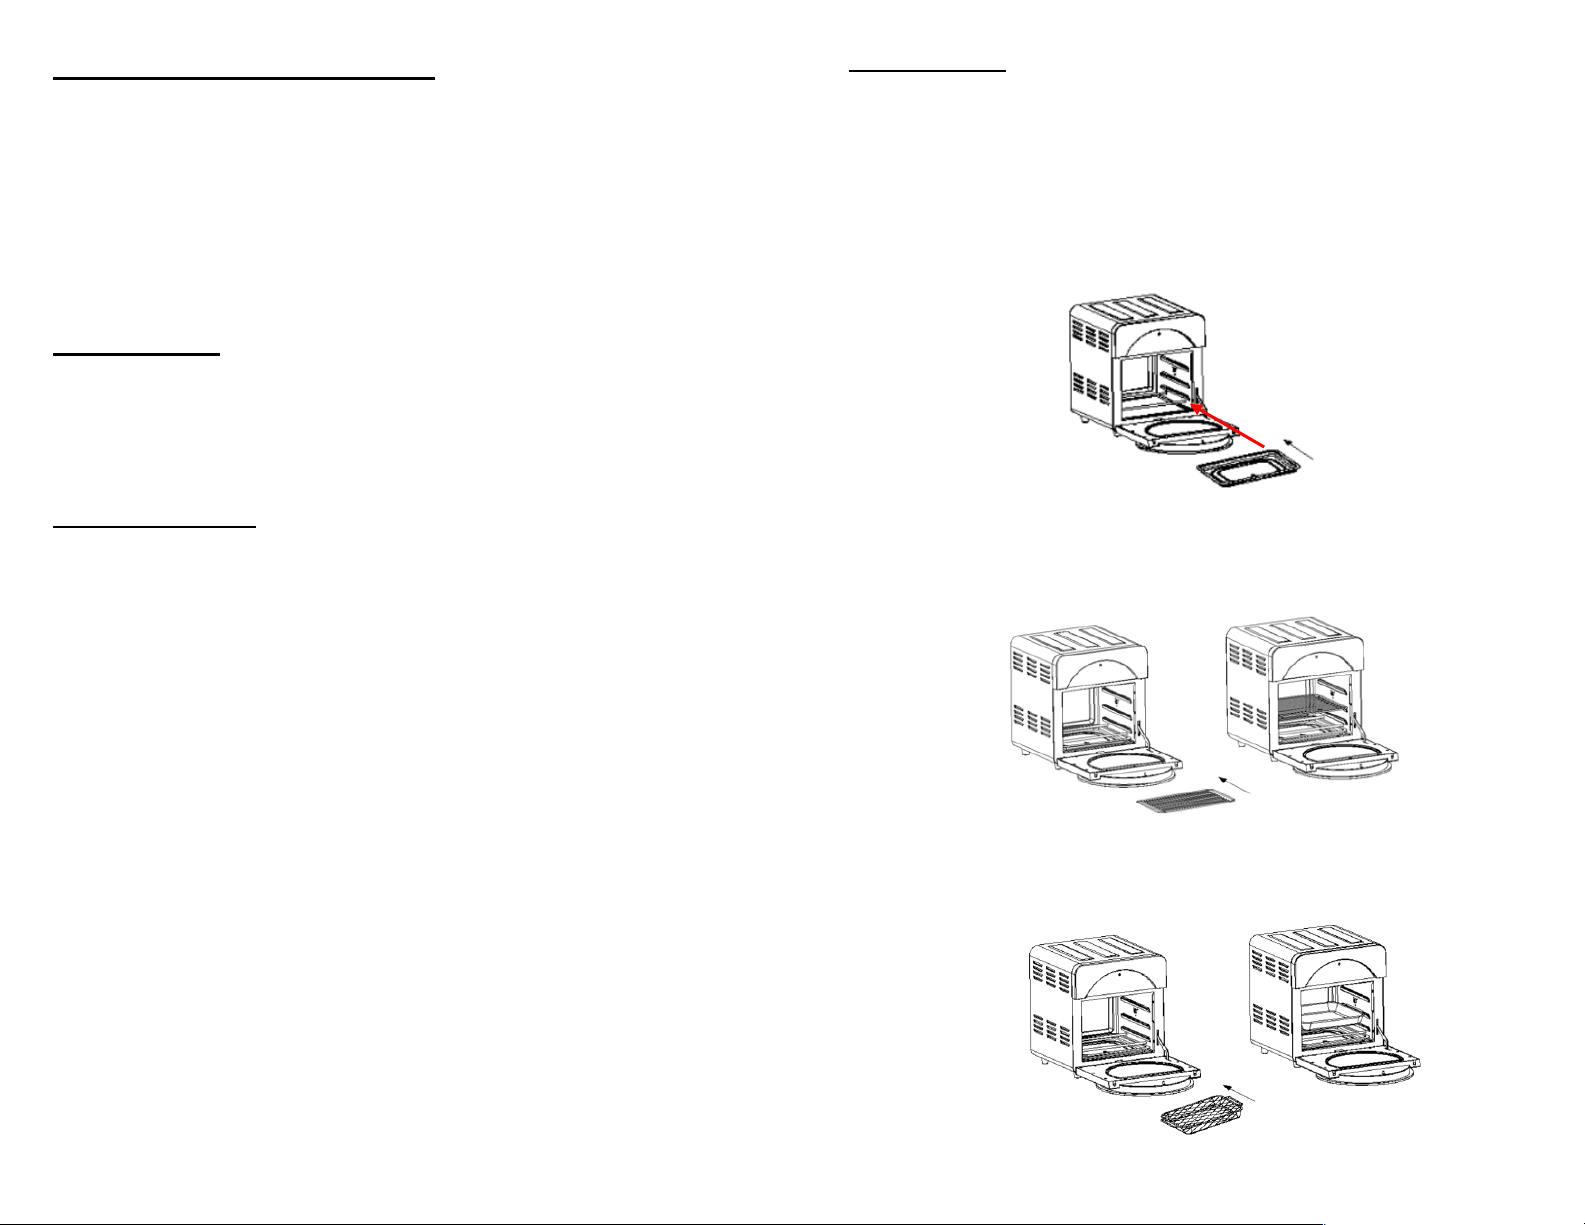
Drip Pan
•
Put the drip pan in the bottom of the Air Fryer. The drip pan should be inserted
below the lowest metal ridge. The drip pan should remain inside of the unit during
any time of use and be kept clean/empty.
Wire Rack
•
Make sure the drip pan has been installed before use. Open the door and insert
the wire rack on top of one of the 3 metal ridges within Air Fryer. (You can insert up
to 3 wire racks within the item at a time.)
Mesh Basket
•
Make sure the drip pan has been installed before use. Open the Air Fryer door and
place the mesh basket on top of one of the 3 metallic ridges as shown below. You
can use both of your mesh baskets to cook in the Air Fryer at one time.
SAFETY PRECAUTIONS CONTINUED
•
Unplug the device from the outlet when not in use or before cleaning. Let the device
cool completely before cleaning.
•
For safety reasons, only use accessories included with the Hard Rock
Ò
Air Fryer or
in separate accessory sets made for this item.
•
Wash and dry the Air Fryer’s accessories well before use.
•
Keep your item out of reach from children at all times.
COMPATIBILITY
•
Your Air Fryer requires a voltage of 110 to 120V. Please make sure that your outlet
is compatible before using with this product.
•
Do not plug the Air Fryer into any outlet that is not the standard U.S. outlet.
GETTING STARTED
•
Place your item on a flat, stable surface. Keep at least 4 inches of empty space
open on each side. Make sure to keep the device away from any curtains, wall
coverings or combustible materials.
•
Remove all packaging materials, stickers and labels before use.
•
Clean the basket and all other accessories using hot water, a non-abrasive sponge
and dish washing liquid before use. Wipe the interior and exterior of the Air Fryer
with a damp cloth.

5.8 qt Basket
•
Make sure the drip pan is inserted before using the basket. When using the basket,
attach the removable basket handle for taking the basket in and out of the unit. The
metal locking hook needs to be locked before lifting the basket as you can see in
the below image.
•
To insert the basket in the Air Fryer, squeeze the silicone handle together in the
open position and attach the handle to the basket with the hooks facing down.
Once the handle is securely in place, you can lock the metal locking hook. Use
handle to lift and insert the basket along the lowest metal ridge inside of the Air
Fryer. Squeeze the handle, unlock the metal locking hook and detach the handle
from your basket so you can close the door for cooking. Repeat the same process
when removing the basket from your Air Fryer.
Lifting Tong
•
Use the lifting tong to insert the wire rack, rotisserie fork and mesh basket into the
Air Fryer. The ends of the lifting tongs will hook onto the edges of the wire rack and
mesh basket. Detach the lifting tongs from accessories before cooking.
jhhhhhhhhhhhhhhhhhhhhhh
USING YOUR AIR FRYER
•
Place your item on a stable, flat surface. Your item should be at least 4 inches
away from other objects on each side.
•
Insert the drip pan in the very bottom level of the Air Fryer as directed in the
“Accessories” section of this manual.
•
Plug the unit’s power cord into a standard U.S. outlet in your home.
Rotisserie Fork
•
Make sure the drip pan is installed before use. The rotisserie fork main rod should
go through the center of the meat. The rotisserie fork prongs will skewer the meat
on the sides to secure placement while cooking.
•
Please note that the total weight of meat should not exceed 2.7 pounds to be used
with the rotisserie fork. If the meat is above 2.7 pounds, you should use the basket
instead.
•
To insert the rotisserie fork inside the Air Fryer, we recommend using the lifting tong
as well as always wearing oven mitts. The curved ends of the lifting tong should
face upward to support the ends of the rotisserie fork from below. Make sure that
the single notched end of the rotisserie fork is to your right while the double notched
end is to the left as shown below.
•
Using the lifting tongs, insert the rotisserie fork’s single notched end first into the Air
Fryer. The single notched end of the rotisserie fork should be inserted into the
circular opening in the right-center of the Air Fryer interior wall. Next, raise the
double notched end slightly while keeping the right side in place. Hook the double
notched end over the U-shaped platform in the left-center of the interior wall.
Unhook the lifting tong from the rotisserie fork by lowering it vertically and close the
Air Fryer door.
•
Choose the “Rotisserie” preset cooking function. Adjust the Air Fryer to your
required temperature and cooking time. Press the “Rotisserie” button to start
rotation for cooking.
Hooks
facing down
Squeeze
handle
Double notch
Single notch
Lifting Tong
Prongs
Single notched
end to the right
Open
position
Locked
position

USING YOUR AIR FRYER CONTINUED
•
Place ingredients inside/on top of the Air Fryer accessory you would like to use.
Insert the accessory in Air Fryer as directed in the “Accessories” section. (If you are
using the basket, remove the handle after sliding the basket inside of the Air Fryer.)
Take care not to overfill/overload any of the accessories with food.
•
Close the door of the Air Fryer. Please note the item will not begin operation until
the door is closed completely.
•
Turn the Air Fryer power on by pressing the “ON/OFF” button once. To begin
cooking, choose one of the 16 preset functions by pressing “Menu” repeatedly until
you reach your desired setting.
•
Press “Time” and use the “+” and “- ” buttons to adjust the time for which you would
like to cook your food. (With every short click, time will increase by 1 minute. If you
press and hold “+” or “-”, time will increase by 10 minutes.) To adjust the
temperature, press “Temp” and then use the “+” and “- ” buttons. You can choose
between 31 different temperature settings. (130, 140, 150, 160, 170, 180, 190, 200,
210, 220, 230, 240, 250, 260, 270, 280, 290, 300, 310, 320, 330, 340, 350, 360,
370, 380, 390, 400, 410, 420, 430°F)
•
In default mode, “Chicken”, “Keep Warm” and “Dehydrate” preset functions are
programmed to use “Top Heating” exclusively. All other preset functions are set to
use both top and bottom heating. Please note that you can change “Top Heating”,
“Bottom Heating”, 29 temperature options, and time for any of the preset functions
using the control panel.
•
The “Proof” preset cooking function is meant to be used for the final rise of the
shaped bread dough before baking. This preset function is not meant for the full
baking process. To bake your bread, please use “Cookie” or “Cake” preset function
and adjust temperature and cooking time according to your needs.
•
Please note that you should never cook microwave popcorn in the Air Fryer.
•
To cook food items that are not specifically named in the preset functions, you
should choose the preset function that closest resembles your food type and set
the temperature, time, top/bottom heating accordingly.
•
To select your top and bottom heating settings, press “Top Heating” and/or “Bottom
Heating” after setting the preset cooking function, temperature and cooking time.
Ensure that the “Top Heating” and/or “Bottom Heating” icons are lit up where you
want the heating to be on. To turn off top/bottom heating, you should press the
button once more to turn the light off. Once you have selected all of your cooking
options, press “ON/OFF” to start cooking.
USING YOUR AIR FRYER CONTINUED
•
If you want to set your Air Fryer to start cooking after a certain period of time, you
can use the “Delay” button. Press “Delay” after turning on the power and you will
be shown a default reservation time of one-hour. To adjust the delay time, toggle
the “+” and “-” buttons. (With every short click, time will increase by 1 minute. If
you press and hold “+” or “-”, time will increase by 10 minutes.) You can choose a
delay time from a minimum of 1 minute to a maximum of 9 hours 59 minutes.
•
Please note:
you will pause the Air Fryer’s operation if you open the door while
heating. If you leave the air fryer door open for 10 minutes, it will automatically turn
off.
•
Once your cooking time has ended, you will hear 5 “beep” sounds and the
cooking will stop automatically. Please note that you will still see the interior light
remain on for 1 minute while the fan continues to operate. After the fan stops, you
will hear a single “beep” sound and the unit will turn off.
•
Open the door and remove your cooking accessory from the Air Fryer carefully
using oven mitts. If the frying basket was used, make sure to attach your basket
handle to ensure safe removal from the unit as explained in the “Accessories”
section.
•
Pour cooked food on the plate or a heat-resistant storage container.
•
Make sure the unit is powered off and unplug the power cord from your outlet.
MAINTENANCE AND CLEANING
•
Make sure that your item is unplugged from the outlet and completely cooled
before you clean it.
•
After each use, clean the Air Fryer accessories well using water, soft
cloth/sponge, and dish washing soap.
•
Wipe the Air Fryer interior and exterior with a soft, damp cloth and be sure to dry
completely.
•
Do not immerse the power cord, plug or Air Fryer in water/other liquids to avoid
damaging the appliance.
•
After drying the item and its accessories, store in a dry, clean and safe space.

PRESET COOKING FUNCTIONS:
Food
Temp (F°)
Adjustable
Temperature
Range (F°)
Time
(Minutes)
Adjustable
Time Range
(Minutes)
Chicken
(Default
Rotisserie)
430
130-430
30
1-60
Defrost
180
130-430
10
1-60
Wings
400
130-430
15
1-60
Dehydrate
160
120-160
8 hours
1 minute-8
hours
Steak
(Default
Rotisserie)
360
130-430
12
1-60
French Fries
(Default
Rotisserie)
430
130-430
20
1-60
Fish
360
130-430
15
1-60
Vegetables
360
130-430
12
1-60
Popcorn
(Default
Rotisserie)
430
130-430
8
1-60
Proof
100
Locked at 100
90
Locked at 90
Cake
360
130-430
30
1-60
Skewer
(Default
Rotisserie)
400
130-430
15
1-60
Pizza
360
130-430
10
1-60
Keep Warm
180
130-430
30
1-60
Toast
430
130-430
6
1-60
Cookie
360
130-430
12
1-60
**Please note that these settings are recommendations only. Since ingredients differ in
size and shape, you should adjust temperature and time based on your preference.

!
! !
! !
! ! !
!
!
!!!!!!!!!!!!!!!!!!!!!!!!!!!!!!!
!
!
!
!
!
RECIPE IDEAS
Spicy Chicken Wings
(Servings: 4)
Ingredients:
Chicken wings – 2 pounds
Kosher salt – 1 teaspoon
Peanut oil – 2 tablespoons
Butter – 1 stick
Cayenne pepper – 1/8 teaspoon
Hot sauce – 5 oz
Directions:
1.
Cut each of the chicken wings at the joint to separate the
wingette and drumette.
2. Prepare a small saucepan. Place butter and hot sauce inside at
low-heat and wait until the butter melts. Keep the pan’s contents
warm on the stovetop.
3. Wash the chicken wings and place them in a dry bowl. Rub oil,
salt and cayenne pepper into the wings. Make sure to coat the
wings with the spices thoroughly.
4. Put 8 wings inside the basket. Insert the basket into the Air
Fryer, using the removeable basket handle. Close the door and
set Air Fryer to “Chicken” preset function.
5. Adjust the temperature to 390 F° and the timer to 27-28
minutes. Use the basket handle to shake the chicken
occasionally while cooking. Spritz evenly with oil once in the
middle of cooking.
6. When the cooking time is complete, open the door and place
the wings in a serving plate. When removing, we recommend
using a slotted spoon.
7. Repeat the steps 4 through 6 for the remaining chicken wings.
French Fries
(Servings: 3)
Ingredients:
Russet potatoes - 2
Vegetable oil – 2 tablespoons
Sea salt – preferred amount
Black pepper – preferred amount
Directions:
1.
Peel the skin of the potatoes and cut them into thin strips in the forms of
French fries.
2.
Soak the potatoes in ice water for 15 to 20 minutes inside of a medium
sized bowl.
3. Spread the potatoes out in the bottom of the Air Fryer basket so that they
do not overlap. Insert the basket into the Air Fryer, using the removable
basket handle. Close the Air Fryer door.
4. You should use the “French Fries” preset function for this recipe. Set the
air fryer temperature to 320 F° and the timer to 10 minutes. During this
step, you are removing any excess water from the potatoes.
5. Take the basket out of the Air Fryer and spray the tops of the potatoes
with vegetable oil. Place the basket back inside of Air Fryer. Sprinkle
evenly with salt and pepper and close the Air Fryer door.
6. Change the temperature setting to 410 F° and the timer to 10 minutes.
7. Shake the basket occasionally while cooking and spray additional oil as
required.
8. Once cooking time has ended, French fries are ready to serve. Make
sure that they have reached a golden color.

!
!
!
!
!
!
!
!
!
!
!
Chocolate Chip Cookies
(Servings: 12)
Ingredients:
Chopped walnut – 1 cup
Unsalted butter – 20 tablespoons
Sugar – ½ cup
Vanilla oil – 1 ½ teaspoons
Large egg – 1
Large egg yolk – 1
All-purpose flour – 2 cups
Baking powder – 1 teaspoon
Baking soda – 1 teaspoon
Salt – 1 teaspoon
Rolled oats – 1 cup
Semi-sweet chocolate chips – 3 cups
Directions:
1. Place the rolled oats in a food processor and grind until a fine, powder-
like consistency is achieved. Preheat your Air Fryer to 320 °F for 10
minutes on the “Cookie” preset function.
2. While preheating, place the walnuts in a medium sized skillet over
medium heat for 3 to 5 minutes. Remove from skillet and allow to cool.
3. Use your electric mixer to stir the butter and sugar together until well
blended. Continue until you see it become a fluffy, light yellow mixture.
Add vanilla and stir together gently.
4. Add egg and egg yolk into mixture and stir until well-blended. Make
sure you do not over-beat the cookie dough at this stage.
5. Prepare a separate bowl. Stir in the flour, baking powder, baking soda
and salt. Once thoroughly mixed, pour the wet batter in. Mix until
blended.
6. Stir in the oats, chocolate chips and walnuts.
7. Place large spoonfulls of cookie dough onto a parchment lined wire
rack 3 inches apart from each other. The wire rack should be placed on
the medium level of your Air Fryer.
8. Bake only one sheet of parchment paper with cookie dough at a time
for 13 to 15 minutes each.
9. Allow cookies to sit on the parchment to cool for 3 minutes after
removing from the Air Fryer. Allow to cool for 5 minutes.
10. Repeat steps 8 to 10 until remaining cookie dough is baked.
Fried Chicken
(Servings: 4)
Ingredients:
Skinless chicken breast – 2 ½lb
Self-rising flour – 2 cups
Olive oil – 2 tablespoons
Hot sauce – 1 cup
Large egg – 3
Salt – preferred amount
Pepper – preferred amount
Directions:
1. Cut the chicken into bite-size pieces on your cutting board. Place the chicken
pieces in a medium-sized bowl.
2.
Season the chicken using salt, pepper and any other desired seasonings. We
recommend using your hands to rub the spices into the meat.
3.
Place the flour in a separate bowl to the side. Prepare another separate bowl to
break eggs into and stir well.
4.
Pick up a piece of chicken and dip it into the bowl containing the eggs. Cover
the chicken with the egg all around. Next, dip the chicken in the flour to create a
second layer around the chicken. Repeat until all chicken pieces are double-
coated with egg and flour.
5.
Line the frying basket with parchment paper. Spray the tops of the chicken
pieces with olive oil and place inside the basket. Make sure that chicken pieces
do not overlap one another before cooking.
6.
Place the basket inside of the Air Fryer using the detachable basket handle.
7.
Change the Air Fryer to the “Chicken” preset function and set the temperature
to 360 °F. Set the timer for 15 minutes and press “ON/OFF” button to start
cooking.
8.
Once cooking time is over, take basket out of Air Fryer. Turn the chicken pieces
over. Spray with oil again evenly.
9.
Close the door and set the temperature to 410 °F. Set the timer for 6 minutes.
10.
Once cooking time ends and chicken has reached the internal temperature of
165 degrees, you will remove it to a serving plate. Cover to keep the food warm.
Repeat steps 8 through 10 for the remaining pieces of chicken.

!
!
!
!
!
!
!
!
New York Strip
(Servings: 2)
Ingredients:
2-inch thick New York strip steak – 2
Salt – 1 teaspoon
Extra virgin olive oil – ½ tablespoon
Ground black pepper – ½ teaspoon
Montreal steak seasoning - 1 teaspoon
Directions:
1. Take the steak out of the refrigerator and allow to sit on your cutting
board for half an hour in room temperature.
2.
Rub the salt into the steak on both sides. Let the steak sit for another 5
minutes.
3.
Set the Air Fryer to the “Steak” preset function and the temperature to
410 °F. Preheat your Air Fryer for a minimum of 5 minutes before placing
the steak inside.
4.
Rub the steaks well with oil, pepper and seasoning using hands.
5.
Place the steak on the drip tray on the top rack of Air Fryer.
6.
Cook for 8 to 10 minutes on each side of the steak.
7.
Allow to sit on the cutting board for 5 minutes before serving.
Toasted Cheese Sandwich
(Servings: 2)
Ingredients:
Brioche bread – 4 slices
Mayonnaise – 1 tablespoon
Emmental cheese – 4 slices
Cheddar cheese – 4 slices
Directions:
1. Preheat the Air Fryer for 10 minutes using the “Toast” preset function’s
original settings.
2. Place the drip pan on the bottom metal ridge of the Air Fryer
3. Line your cutting board with baking parchment. Spread a thin layer of
mayonnaise on one side each of the two pieces of bread.
4. Lay the mayonnaise side downwards on the parchment paper for both
pieces of bread.
5. Top the two pieces of the bread with 2 pieces of emmental cheese and
2 pieces of cheddar on each. Place the left-over slices of bread
(mayonnaise side up) on top of the cheese to create two sandwiches.
6. Place the parchment paper with bread on the wire rack. Set the rack in
middle level of the Air Fryer to cook for 4 minutes with “Toast” preset
function. Please make sure to insert drip tray in the bottom level while
cooking.
7. Turn the sandwiches over and cook for another 4 minutes. You can
cook for longer depending on your preference.
8. Let rest for 5 minutes before cutting.

Buffalo Chicken Taquitos
(Servings: 1)
Ingredients:
Cream cheese – 8 oz
Buffalo sauce– 1/8 cup
Cooked and shredded chicken – 2 cups
Small corn tortillas – 12
Fat free ranch dressing – preferred amount
Olive oil – preferred amount
Directions:
1. Prepare a medium sized bowl and pour in cream cheese and buffalo
sauce. Mix until well blended.
2. Add in chicken and mix well.
3. Spread 2 to 3 tablespoons of the mixture in a thin line at the center of
the corn tortilla. Use a spoon/fork for spreading.
4. Fold the tortilla in half. Repeat the process until you have used up all of
the chicken mixture.
5. Use a paper towel to spread olive oil on the interior of the fryer basket.
Coat the interior sides of the basket evenly.
6. Place the taquitos inside the basket so that they do not overlap and are
lying flat.
7. Set your Air Fryer to 410 °F, using the “Chicken” preset function.
8. Cook for 13 to 14 minutes or until the taquitos turn golden brown and
crispy.
9. Add ranch dressing before serving.
Crispy Bacon
(Servings: 2)
Ingredients:
Bacon strips - 4
Directions:
1. Cut bacon pieces in half.
2. Set the Air Fryer to “Chicken” preset function and the temperature to
370 °F. Preheat for 2 minutes.
3. Place the bacon halves on wire rack. Spread out the bacon strips so they
do not overlap. Cook for 5 to 8 minutes inside Air Fryer. Make sure to
insert the drip pan at the bottom level while cooking the bacon.
4. Use the basket handle to remove the basket from the Air Fryer.
5. Place bacon strips on top of a paper towel to absorb the extra grease.
6. Ready to serve.

!
Crispy Quesadilla
(Servings: 1)
Ingredients:
6-inch flour tortilla – 2
Cooking spray
Shredded cheddar cheese -1/2 cup
Shredded chicken or protein of your choice, cooked – ½ cup
Chopped spinach – ¼ cup
Directions:
1. Preheat the Air Fryer to 410 °F for 10 minutes using “Chicken” preset
function.
2. Spray one side of the tortilla with cooking spray. Lay the sprayed side
facing down in the bottom of the frying basket. Make sure to insert the
drip pan in the bottom of the Air Fryer before cooking.
3. Spread half of the shredded cheddar cheese over the tortilla. On top of
cheese layer, place shredded chicken and spinach evenly spread out.
4. Spread the rest of the cheese over the top.
5. Place the second tortilla over all the fillings.
6. Put the basket with quesadilla inside of the Air Fryer using removeable
basket handle.
7. Cook for 9 minutes or until the cheese is melted and the tortillas are
crispy.
Table of contents


