Harmonic Drive LSA-10A-30-D-130 Technical manual

Galvanometer Scanner System
LSA-10A-30-D-130 Technical Document
(Scanner: LSA-10A-30/Driver: PSM-130)
●We thank you for purchasing the Galvanometer Scanner LSA Series
System.
●Any mishandling or misuse of this product may result in unexpected
accidents and shorten the life of the product. Please read this
document thoroughly and use accordingly to ensure safe prolonged
use.
●Product specifications are subject to change without notice for
improvement purposes.
●Keep this manual in a convenient location and refer to it whenever
necessary in operating or maintaining the units.
●The end user of the actuator should have a copy of this manual.
ISO14001
ISO9001

LSA-10A-30-D-130 Technical Document
-2-
Warning: Indicate anything that may cause
loss of human life or serious
physical injury if mishandled.
Warning
Warning
Warning
Warning
For Safe Use of the
LSA and PSM Series Servo Systems
Caution: Indicate anything that may cause
serious physical injury or cause
physical damage to the product if
mishandled.
Limitation of Applications:
The equipment listed in this document may not be used for the following applications:
*Space equipment *Aircraft & Aircraft Equipment *Nuclear Equipment *Household Apparatus *Vacuum equipment *Automobiles &
Automotive Parts *Game Machines *Machines or Devices effecting directly the human body *Machines or devices to transport people
*Instruments or Apparatus for special environments.
Please consult us if you intend to use the products in one of the areas mentioned above.
* If these products are used in equipment that may cause serious physical injury or loss of human life, please ensure adequate safeguards are in
place to prevent accidents in case the output cannot be controlled due to damage of the product.
Precautions when Using the Scanner/Driver
Please ensure proper protections from interference of noise and adequate installation.
● Interference of noise on the signal line may cause vibrations and malfunctions. Please ensure the following conditions.
* Please separate from a power cable.
* Please use the possible shortest cables for the LSA and PSM.
* Please connect the ground terminals of the scanner and driver to a Type 3 ground at one point.
Caution
Warning
Precautions for Designing Please read this Technical Document before designing.
Please utilize in the following defined environment.
● The scanner is not sealed and must therefore only be used indoors, where the following conditions are provided:
*Ambient OperatingTemperature: 0°C to 40°C *Ambient Operating Humidity: 20% to 85% RH (non-condensing)
* Vibration: Under 24.5 m/s
2
* No contamination by water, oil, or foreign matter * No corrosive, inflammable, or explosive gas
If light beam such as lasers, etc. that may cause physical injury are used, please ensure adequate
safeguards are in place to prevent accidents in case the scanner/driver becomes uncontrollable.
Warning
Operating Precautions Please read this Technical Document before operating.
Disposal
Caution
Please dispose as industrial wastes.
● All products or parts have to be disposed as industrial wastes.
Please do not directly connect the scanner’s
motor and sensor wires to the outlet.
●Please ensure that this
equipment is not directly
connected to a commercial power source. The scann
er
may breakdown and cause a fire.
Caution
Caution
Please protect the scanner
from impacting and
shocking.
●
Please do not bump the scanner as the sensor is directly
connected to the scanner.
●
The operation of the scanner cannot be assured if the sensor
t b k d th t f t l
Please do not pull the wire lead.
●
Pulling the wire lead may damage the connected
component and the scanner may run out of control.
Caution
Please do notapply excessive force to the output shaft.
●When attaching a mirror to the output shaft
, please be
careful not to apply excessive force to the output shaft.
●Accuracy cannot be guaranteed if the output shaft
collapses
due to applying excessive force.
Caution
Please do not apply a voltage to the scanner exce
eding
specifications.
●
Applying an abnormal voltage or faulty wiring may cause the scanner
to burnout or malfunction.
Please do not change wiring while still plugged in.
●
Please ensure that the power is off before removing
wiring and disconnecting plug. There is a
risk of shock
and running out of control.
Caution
Please do not conduct withstand voltage tests.
●Please do not conduct mega or withstand voltage tests.
Doing so
may damage the control circuits of the driver.
Please do not apply a voltage to the driver
exceeding specifications.
● Applying an abnormal voltage or faulty wiring may cause
the driver to burnout or malfunction.
Caution
Please do not touch the circuits inside the
equipment while plugged in. Electric shock
may occur.
Please do not touch the attached heat sink
while plugged in or
within five minutes after disconnecting the power.
●There is a risk of burns as the heat sink becomes hot.
Caution
Caution

LSA-10A-30-D-130 Technical Document
-3-
Table of Contents
Chapter 1 Overview of LSA Series .........................................................................................................................4
1-1 Main Characteristics.....................................................................................................................4
1-2 Example of Equipment Configuration ...........................................................................................4
1-3 Scanner System LSA Series Model..............................................................................................5
1-4 Scanner Model.............................................................................................................................5
1-5 Driver Model.................................................................................................................................5
Chapter 2 System Specifications ...........................................................................................................................6
2-1 System Configuration...................................................................................................................6
2-2 Main Specifications.......................................................................................................................7
2-3 Response Characteristics.............................................................................................................7
2-3-1 Response during Rectangular Wave Drive...............................................................................................8
2-3-2 Triangular Wave Drive Response .............................................................................................................9
2-3-2 Triangular Wave Drive Response ...........................................................................................................10
2-4 Optical Scanner Operating conditions Form ...............................................................................13
2-4-1 Supplementary Explanation of Optical Scanner Operating conditions Form..........................................14
Chapter 3 Scanner Specifications........................................................................................................................15
3-1 Main Specifications.....................................................................................................................15
3-2 Connector Specifications............................................................................................................15
3-3 Dimensions (Third Angle Method)...............................................................................................16
3-4 Environment Specifications ........................................................................................................16
3-5 Output Shaft Precision................................................................................................................17
3-6 Stopper Mechanism....................................................................................................................17
3-7 Caution Regarding Scanner Equipment......................................................................................17
3-7-1 Structure of Output Shaft.........................................................................................................................17
3-7-2 Scanner Cable ........................................................................................................................................17
3-7-3 Caution When Attaching Scanner and Load Equipment.........................................................................18
Chapter 4 Driver Specifications............................................................................................................................19
4-1 Main Specifications.....................................................................................................................19
4-2 Protection Functions...................................................................................................................19
4-3 Dimensions (Third Angle Method)...............................................................................................20
4-4 Environment Specifications ........................................................................................................20
4-5 Connector Specifications............................................................................................................21
4-5-1 Input Power Source Connector (CN1) ....................................................................................................21
4-5-2 Scanner Connector (CN2).......................................................................................................................21
4-5-3 Input/Output Signal Connector (CN3).....................................................................................................21
4-6 Input/Output Interface Specifications..........................................................................................22
4-6-1 Positioning Command Signal Input [SIG IN(+)/SIG IN(-)].......................................................................22
4-6-2 Enable Input (ENABLE) ..........................................................................................................................23
4-6-3 Positioning Command Signal Monitor Output (IN-MON)........................................................................24
4-6-4 Positioning Sensor Signal Monitor Output (POS-OUT)..........................................................................24
4-6-5 Positioning Error Signal Monitor Output (POS-ERR)..............................................................................24
4-6-6 Alarm Output (ALM)................................................................................................................................25
4-7 Trimmer Function and Adjustable Range....................................................................................26
4-8 Status Display.............................................................................................................................27
4-9 The Check Pin on the Board.......................................................................................................27
4-10 Power Source Connection........................................................................................................28
4-10-1 Measures to Avoid Voltage Drop in Power............................................................................................28
4-10-2 Selection of Power Capacity.................................................................................................................28
4-10-3 Caution When Connecting Power Source ............................................................................................28
4-11 Caution Regarding Driver Installation........................................................................................29
4-12 Driver Accessories....................................................................................................................30
4-13 Driver Labels and Descriptions.................................................................................................30
Chapter 5 Options..................................................................................................................................................31
5-1 Extension cable..........................................................................................................................31
Chapter 6 Packaging..............................................................................................................................................31
Chapter 7 Warranty................................................................................................................................................32
7-1 Warranty Period..........................................................................................................................32
7-2 Warranty Terms..........................................................................................................................32

LSA-10A-30-D-130 Technical Document
-4-
Chapter 1 Overview of LSA Series
The LSA and PSM series are Galvanometer Scanner systems that can optically scan with quick response
and high accuracy. Main characteristics of the systems based on compact motor technology and
independently developed optical sensor technology, so the following applications are available:
measurement devices, laser processing equipment, laser displays, shutters, laser markers, etc.
1-1 Main Characteristics
♦Quick Response and High Torque/Inertia Ratio
The motor component of the scanner is a moving magnet system and the stator utilizes a core and coil
configuration. This allows for a heavy load/quick response. The LSA and PSM devices are available
for a wide torque range applications.
♦Low Heat Generation (Low Drift)
The temperature rise caused by the quick-response/high-frequency scanner operation is minimal and
results in low drift.
♦High Accuracy/Environmentally Strong Scanner
The sensor component of the scanner can position with high accuracy (system positioning repeatability:
within ± 5μrad [1”]) as it utilizes an optical potentiometer independently developed by our company.
In addition, this sensor is strong against external electrical noise (increased S/N ratio) and is not affected
by the exterior atmospheric environment.
♦Adjustable Functions with Broad Ranging Applications
The driver maximizes the capacity of the combined scanner and possesses numerous adjustment
functions to adjust to customers’ usage conditions.
In addition, we will adjust the drive if necessary based on the study of customer’s operating conditions and
specifications.
1-2 Example of Equipment Configuration
Reference Example: Summary of Laser Marker System
Y
Axis Driver
X Axis Driver
Y Axis LSA
X Axis LSA
* Laser Oscillator
*DC Power Source
* f θ Lens
* Target workpiece
The items marked with “*” should
be prepared by the client
* Miror
*External analogue
command signal
LSA-10A-30-D-130 Technical Document
-5-
1-3 Scanner System LSA Series Model
The model name and symbols of the Galvanometer Scanner System are as follows.
1-4 Scanner Model
The model name and symbols of the LSA Series Galvanometer Scanner are as follows.
1-5 Driver Model
The LSA Series Galvanometer Scanner is combined with the PSM series driver.
The model name and symbols of the PSM series driver are as follows.
LSA - 10 A - 30 -
□□
Model: Galvanometer Scanner System
LSA Series
Maximum Torque
10: 0.1 Nm
Version Symbol
Maximum Swing Angle
30: ±15° (mechanical angle)
Specification Symbol
No Symbol: Standard Specification Product
SP: Special Specification Product
PSM – 1 30 -
□□
Model: Optical Scanner Driver
PSM Series
Version Symbol
Specification Symbol
No Symbol: Standard Specification Product
SP: Special Specification Product
Analogue Command Type
LSA-10A-30 - D - 130 -
□□
Scanner Model
System Notation
Combined Driver Model
Specification Symbol
No Symbol: Standard Specification
Product
SP: Special Specification Product

LSA-10A-30-D-130 Technical Document
-6-
Chapter 2 System Specifications
The specifications of the LSA-10A-30-D-130 scanner system are as follows. The angles within these
specifications are all “mechanical angles”, unless specified otherwise.
2-1 System Configuration
The product configuration of the LSA-10A-30-D-130 is as follows.
Product Configuration Model Units Remarks
Scanner LSA-10A-30 1
Driver PSM-130 1 With accessories.
Load Device -1 Load device for adjustment
Our Galvanometer Scanner System can provide maximum response performance as it can be
appropriately adjusted for our customer’s actual load device (such as mirror, etc.) and operating conditions.
Our drivers are adjusted with the combination of scanner : driver (including adjustment specifications) :
load device=1 : 1 : 1. Please utilize properly adjusted combinations.
Please refer to “Driver Labels and Seal Details” (4-13) to distinguish properly adjusted combinations.
♦Caution when Using Driver
The driver needs to be adjusted for the actual load device attaching to the scanner (mirror, etc.) or for an
artificial load device identical to the actual load device. The customer is responsible for preparing the load
device.
Although we can evaluate and provide data for our load device for testing during the advanced testing
stage, during the product shipment stage, the customer will be responsible for supplying the actual load
device. They will be shipped after adjustment with the actual load device.
If the load device conditions (shape, moment of inertia, material, etc.) are changed, the adjustments of the
driver’s internal constant needs to be changed. In this case, please provide us with details of any
changes.
We will review the adjustment specifications. (There will be a charge for any adjustments after the
product has been shipped.)
If there are big changes to the fixed adjustment conditions (even when there is no load on the drive) of the
load device or the drive command, the scanner may oscillate unexpectedly.In this case, refer to the Over
Position Alarm Output (4-4-6) and configure the sequence to turn off “Enable”.
If the scanner oscillates unexpectedly, the driver resistance may
generate abnormal amounts of heat and start to smoke. In this case,
immediately cut the power source.
Caution

LSA-10A-30-D-130 Technical Document
-7-
2-2 Main Specifications
No. Items Specifications
1
Repeatability of Positioning
*1
[μrad]
±5
Testing Conditions
Positioning seven times from arbitrary forward and backward positions respectively, and
take the maximum deviation. Divide this by half and place a ± sign.
Utilize an auto-collimator and measure in a room temperature environment.
Waiting Time (including positioning time): within tens of seconds
2 Temperature
Drift
Offset Drift
[μrad / °C]
30
Scale Drift
[% / °C]
0.01
3 Response Characteristics
Response characteristics based on the customer’s
operating conditions will be confirmed on actual equipment
during the advanced testing stage, as deemed necessary.
The results will be presented as adjustment specifications*2
.
Representative characteristics are listed in Response
Characteristics (2-3).
*1 Repeatability of Positioning refers to a value at a certain temperature and a short period of time,
excluding drift.
*2 The selections of the applicable models may change in accordance with the customer’s operating
conditions. Therefore, please fill-in the “Optical Scanner Drive Form” (2-4) and contact
our company before manufacturing the load devices or mounting parts.
2-3 Response Characteristics
By specifying the operating conditions and adjusting appropriately the driver according to the conditions,
the scanner system can provide an optimal performance for the focused characteristics. Therefore, the
response characteristics are different for adjustments emphasizing on accuracy and adjustments
emphasizing on response. In addition, if different conditions from adjusted operating conditions are
utilized, the operation of the drive may become unstable.
Our scanner system is appropriately adjusted to the customer’s operating conditions and is fundamentally
provided as a system. The explanation of the response characteristics of the rectangular and triangular
wave drives are on the following pages Using this as reference, please fill out the your usage conditions
in the “Optical Scanner Drive Form” (2-4) and submit this document to an agent or to our sales
representative.

LSA-10A-30-D-130 Technical Document
-8-
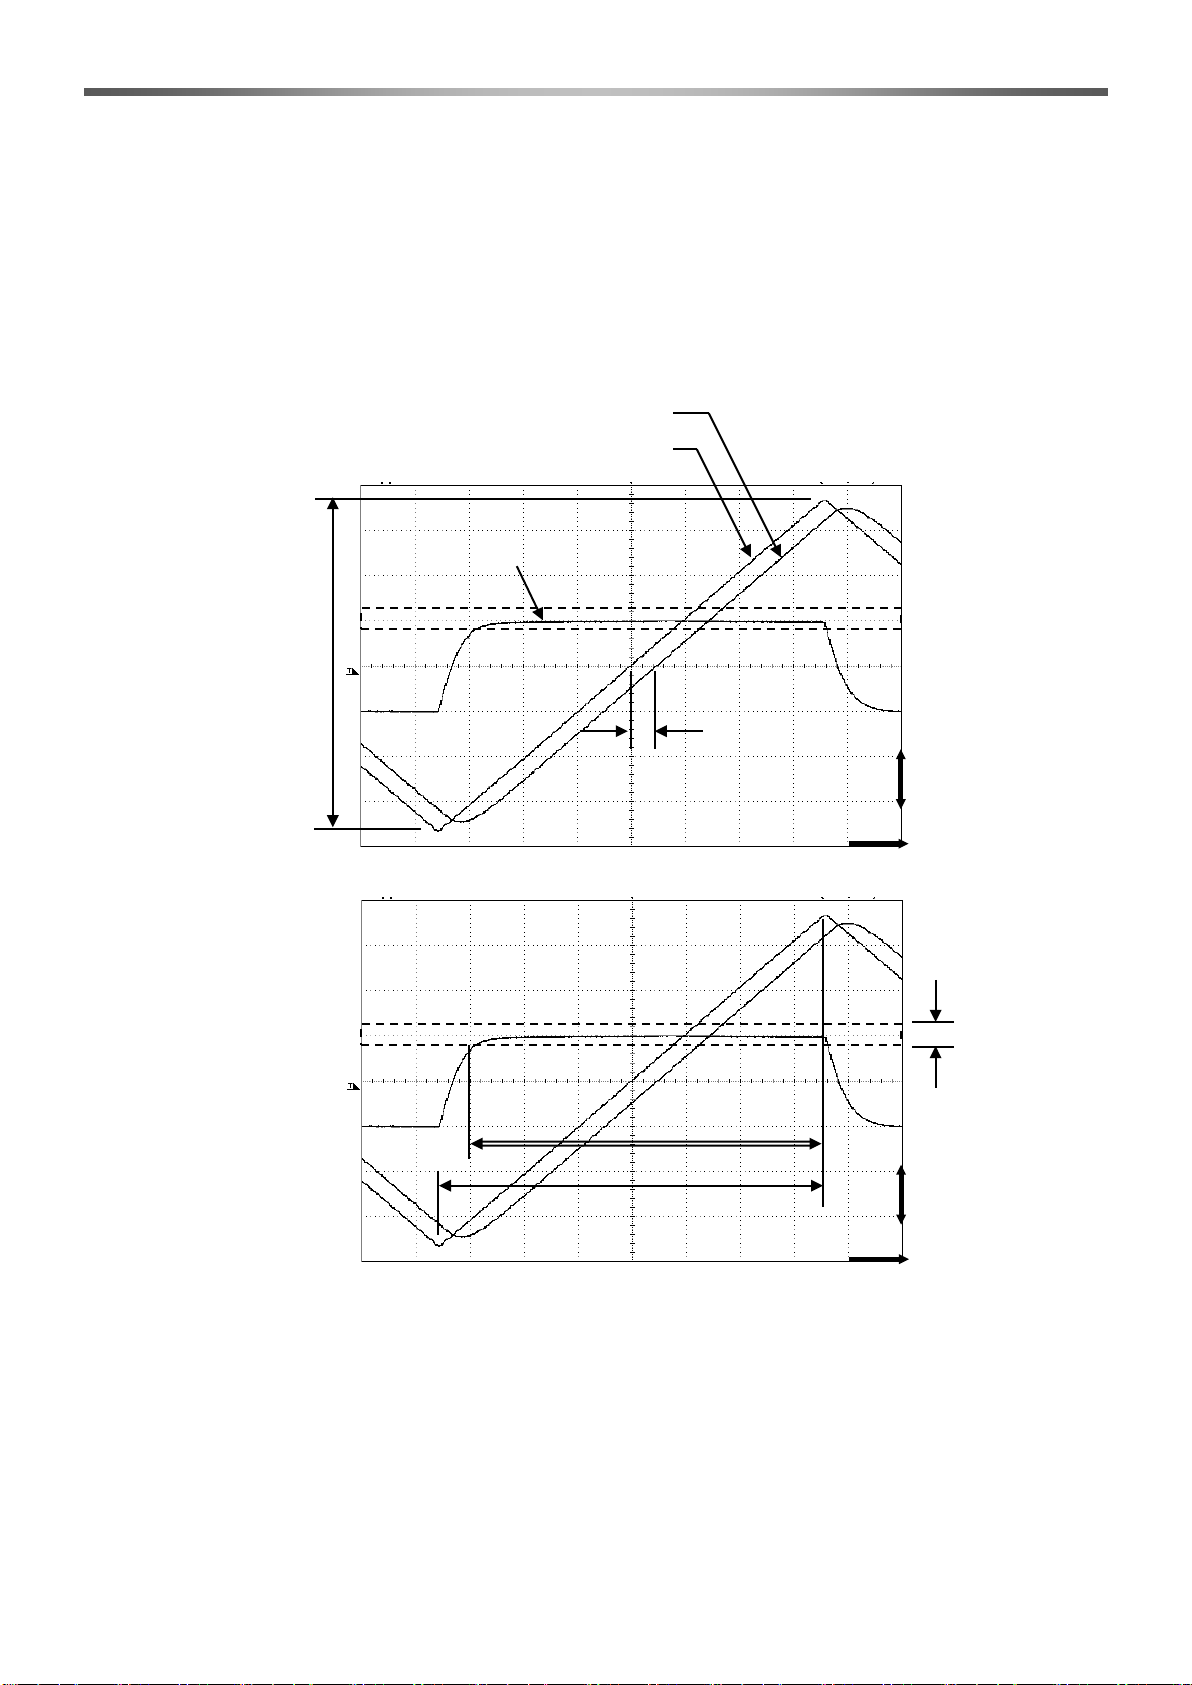
2-3-1 Response during Rectangular Wave Drive
The responses of the rectangular or trapezoid wave operations are important for utilizing the positioning
operation. Generally, the trapezoid wave drive settles easier and is better for applications of fluctuating
amplitudes, than the rectangular wave drive.
Rectangular wave drive is showed as an example as follows, and the conditions need to be considered are
discussed.
♦Rectangular Wave Drive Step Response Characteristic (example observed by oscilloscope)
[1] Emphasized Adjustment Amplitude (Unit: [°])
This indicates the optimally adjusted amplitudes during adjustment. Generally, the amplitudes with the
most often used frequency are taken as the emphasized adjustment amplitudes. In case of large
amplitude operation, the command waves of step inputs (stacking small amplitudes) or trapezoid wave
inputs, etc. are utilized
・Response and stability are well balanced and optimal when the actual drive amplitude is equal to the
adjustment amplitude.
・The gain can be raised and the Settling Time decreases as the size of the emphasized adjustment
amplitude decreases.
・If the amplitudes are not constant, the largest amplitude has to be the emphasized adjustment
amplitude.
・If a command with an amplitude larger than the emphasized adjustment amplitude is input, longer time
is necessary for setting after reaching the command position. On the other hand, when a command with
an amplitude smaller than the emphasized adjustment amplitude is input, the setting time will be
identical to the setting time when the emphasized adjustment amplitude is input.
[2] Convergence Criteria (Unit: [°] or [arc-sec])
This indicates the width of the allowable positioning error that is for setting judgment for the commanded
position. Generally, necessary and sufficient conditions of positioning accuracy are considered as
convergence criteria. The device is adjusted to the shortest Settling Time as conditions are satisfied.
・For quick-response operation, the convergence criteria are set broadly and the gain is adjusted high.
Although response increases, longer time is necessary till the device matches the commanded
position.
・During accurate positioning operation, the convergence criteria are set narrowly and the gain is
adjusted low. Although response decreases, the device matches the commanded position in a short
amount of time.
・If the Settling Time is the same, the convergence criteria can be narrowed as the size of the
Positioning Command Signal
Positioning Sensor Signal
Positioning Error Signal
[2] Convergence Criteria
[3] Settling Time
Time
Position
[1] Emphasized Adjustment
Amplitude

LSA-10A-30-D-130 Technical Document
-9-
emphasized adjustment amplitude decreases.
[3] Settling Time (Unit: [ms] or [μs])
A completion of positioning is judged by the positioning error signal that is within the range of the
convergence criteria. The Settling Time is the time from a command input to a completion of positioning
Generally, adjustments are made ensuring the shortest Settling Time being satisfied within the other
operating conditions .
[4] Drive Frequency (Unit: [Hz])
This indicates the actual drive frequency.
Please refer to “Supplementary Explanation of Optical Scanner Operating conditions Form” (2-4-1) for other
features.
♦Rectangular Wave Drive Response Characteristics (Settling Time for amplitudes with load moment of
inertia as the parameter)
0.0
0.5
1.0
1.5
2.0
2.5
3.0
3.5
4.0
4.5
5.0
0.01 0.1 1 10
振幅 [°]
整定時間 [ms]
J
L
=3.5 g-cm2
2.2
1.0
Load (JL): Mirror for Our Test Equipment (1.0g-cm2,2.2g-cm2,3.5g-cm2)
Convergence Criteria: 0.005° (amplitude less than 0.5° )/0.01° (amplitude higher
than 0.51° )
Power Source Capacity: ±24V, 240W
Amplitude [°]
Settling Time [ms]
LSA-10A-30-D-130 Technical Document
-10-
2-3-2 Triangular Wave Drive Response
Dynamic characteristics of keeping positioning error within the definite range are important for scanning
operations. In the operations, the response characteristics of the saw-tooth wave drive or the triangular
wave drive are important. It is necessary to adjust the conditions during the steep section of saw-tooth
wave drive.
Here, the triangular wave drive is shown as a typical example, indicating conditions that need to be
examined.
♦Triangular Wave Drive Perspective of Response Characteristics (observed by oscilloscope)
[5] Emphasized Adjustment Amplitude (Unit: [°])
This indicates the optimally adjusted amplitudes during adjustment.
・Response and stability are well balanced and optimal when the actual amplitude is equal to the
adjustment amplitude.
・The gain can be raised and the range of the constant speed is increased as the size of the emphasized
adjustment amplitude decreases.
・If the amplitudes are not constant, the largest amplitude has to be the emphasized adjustment
amplitude.
[6] Convergence criteria (Unit: [°] or [arc-sec])
[5] Emphasized Adjustment
Amplitude
Positioning Command Signal
Positioning Sensor Signal
Position
Positioning Error Signal
Time
[6] Convergence
Criteria
[7] Constant Speed Interval
Command Interval
Time
Position
[8] Position Delay

LSA-10A-30-D-130 Technical Document
-11-
This indicates the width of the allowable positioning error for following the positioning command signal.
Generally, necessary and sufficient conditions of positioning accuracy are considered convergence criteria.
The device is adjusted to the conditions that a range of constant speed is maximized.
・In case of quick operation, set the convergence criteria broadly and adjust the gain for extending the
range of constant speed. In case of high accuracy operation, set convergence criteria narrowly.
・If the range of constant speed is the same, the convergence criteria can be narrowed as the size of the
emphasized adjustment amplitude decreases.
[7] Range of Constant Speed (Unit: [%])
Assuming that the positioning command signal is a constant slope, the portion of the positioning error
signal being kept within the convergence criteria is a constant speed range. The proportion of the
constant speed interval and the command interval is the constant speed range [%].
As the shaft rotates inverse direction in the triangular wave drive, positioning error immediately after
inversion is large.
[8] Position Delay (Unit: [ms] or [μs])
This indicates time delays between positioning sensor signals and positioning command signals.
Normally, position delay is measured at the position of the sensor origin point. (There may be fluctuations
based on measurement positions.)
[9] Drive Frequency (Unit: [Hz])
This indicates the actual drive frequency.
As the frequency increases, the range of constant speed decreases.
Please refer to “Supplementary Explanation of Optical Scanner Operating conditions Form” (2-4-1) for other
features.
♦Triangular Wave Drive Response Characteristics Example 1 (range of constant speeds vs.
frequencies with amplitude as the parameter)
50
60
70
80
90
100
0 20 40 60 80 100 120 140 160 180 200 220 240 260 280
周波数 [Hz]
等速範囲 [%]
Amplitude: 30°5°10°20°
Load (JL): Mirror for Our Test Equipment (2.2g-cm2)
Convergence Criteria: 0.2% Amplitude/Power Source Capacity: ±24V, 240W
Heat Radiation Conditions During Continuous Drive:
Driver 150x150x6mm Aluminum Heat Sink + Air Cooling Fan (8W)
Clamp the entire surface of the scanner mount surface
Constant Speed Range [%]
Frequency [Hz]

LSA-10A-30-D-130 Technical Document
-12-
50
60
70
80
90
100
0 20 40 60 80 100 120 140 160
周波数 [Hz]
等速範囲 [%]
♦Triangular Wave Drive Response Characteristics Example 2 (range of constant speeds vs.
frequencies with moment of inertia as the parameter)
♦Triangular Wave Drive Response Characteristics Example 3 (comparison of constant speed ranges
vs. frequencies for continuous and short-time operation)
3.5 2.2 J
L
=1.0g-cm2
Load (J
L
): Mirror for Our Test Equipment (1.0g-cm2,2.2g-cm2,3.5g-cm2)/Amplitude: 30°
Convergence Criteria: 0.06° (0.2% Amplitude)/Power Source Capacity: ±24V, 240W
Heat Radiation Conditions During Continuous Drive:
Driver 150x150x6mm Aluminum Heat Sink + Air Cooling Fan (8W)
Clamp the entire surface of the scanner mount surface
50
60
70
80
90
100
0 20 40 60 80 100 120 140 160
周波数 [Hz]
等速範囲 [%]
Short Time
Continuous
Load (J
L
): Mirror for Our Test Equipment(2.2g-cm2)/Amplitude: 30°
Convergence Criteria: 0.06° (0.2% Amplitude)/Power Source Capacity: ±24V, 240W
Heat Radiation Conditions During Continuous Drive:
Driver 150x150x6mm Aluminum Heat Sink + Air Cooling Fan (8W)
Clamp the entire surface of the scanner mount surface
Frequency [Hz]
Constant Speed Range [%]
Frequency [Hz]
Constant Speed Range [%]

LSA-10A-30-D-130 Technical Document
-13-
2-4 Optical Scanner Operating conditions Form Requested Date:
Company Name
Position/Title
Name
Address
TEL/FAX
TEL:/FAX:
E-mail
Applications
Please check the
appropriate classification.
In addition, please enter
specific details.
Classifications
Laser Processing
Measurements
Image Processing
Laser Display
Other
Details
Please refer to the technical data in 2-3 and 2-4-1 and enter the operating conditions. Based on these conditions
we will submit the adjustment specifications, including the model selection. If necessary operating conditions are
not indicated, the appropriate adjustment specifications may not be submitted.
Operating conditions
No.
Items Specifications
Supplementary ([ ] refers to the
technical data in 2-3 and 2-4-1)
(1)
Input Command Wave (Basic
Waves)
Rectangular Wave
Trapezoid Wave
Saw-Tooth Wave Triangular Wave
Sine Wave
If the wave has a slope, please
attach the slope data.
(2) Emphasized Adjustment Amplitude [°]
[1] [5] Sine Wave Conditions
(3) Drive Frequency [Hz]
[4] [9] Sine Wave Conditions
(4)
Convergence criteria (positioning
accuracy)
[°] or [arc-sec]
[2] [6]
(5) Settling Time [ms] or [μs]
[3] Time after the input becomes
constant during trapezoid wave
drive.
(6) Range of Constant Speed [%]
[7] Please also list targeted slope
during saw-tooth drive.
(7) Position Delay [ms] or [μs]
[8] Sine Wave Conditions
(8) Amplitude Error [%]
Output/Input Amplitude Error, Sine
Wave Conditions
(9) Load Moment of Inertia (GD2/4) [g-cm2]
[10] May attach diagram (material)
as a replacement
(10)
Maximum Amplitude [°]
[11]
(11)
Voltage at Full Scale
Input Voltage: Amplitude during [Vp
-p]: [°] [12]
(12)
Extended Cable Distance Between
Scanner and Driver
[m]
[14] No extension when blank.
(13)
Power Capacity (perfo
rmance or
capacity-emphasized) [W]
[15] 240W when blank. Enter
either performance or power
capacity-emphasized.
(14)
Priority Characteristics
Please enter items to be
emphasized.
(15)
Work (Optical Scanning) Range [mm]
Reference Value
(16)
Distance of Work and Mirror [mm]
Reference Value
(17)
Cable Length Between Power
Source and Driver
[mm]
Reference Value
(18)
Others (including details of
adjusted stamped labels)
If the entry space is insufficient,
please attach as separate pages.
* Please list all angles as mechanical angles. * Please enter data on the copy of this form.
Space to be filled in by our company:
(Management No.: )(Sales Branch: )(Sales Representative:)

LSA-10A-30-D-130 Technical Document
-14-
2-4-1 Supplementary Explanation of Optical Scanner Operating conditions Form
[10] Load Moment of Inertia (Unit: [g-cm2])
This indicates the moment of inertia of the load device attached to the output shaft of the mirror, shutter,
etc.
・The possibility of reducing settling time increases as the load moment of inertia decreases.
Caution: If the rigidity of the load device is too low, the resonant frequency decreases. When the
resonantfrequency decreases correspond to the control zone, the response characteristics
may be affected adversely. Please take into consideration moment of inertia and rigidity
when designing the load device.
[11] Maximum Amplitude (Unit: [°])
This indicates the maximum range of movement while in use, including offset.
・The control range of LSA-10A is ±15° centered on the origin of the scanner (the position when input is
0V).
[12] Full Scale Voltage (Unit: [V])
This indicates the ratio between the input command voltage and the swing angle of the output shaft.
・If there is nothing specifically specified, the other conditions are taken into consideration and
adjustments are made according to one of the following.
a) Input Command Voltage: Positioning command signal (IN-MON) at 20Vp-p is 8.25V (corresponds
to 30°) ± 5%
b) Input Command Voltage: Positioning command signal (IN-MON) at 20Vp-p is 5.5V (corresponds
to 20°) ± 5%
・Please refer to “Trimmer Function and Adjustable Range” (4-7) regarding adjustable range.
・Values change according to the scanner (angle sensitivity). a) and b) above are the values of
LSA-10A-30.
[13] Offset Position (Unit: [V])
This indicates the offset of the origin of the scanner and the electric origin of the position command input.
・If there is nothing specifically specified, the command signal during 0V input is adjusted to 0V ±5mV
(corresponding to ±0.018°).
(LSA-10A Angle Sensitivity: if 0.275V/°)
[14] Extended Cable Distance Between Scanner and Driver (Unit: [meter])
This indicates the length of cable between the scanner and driver.
When extending the length, please use cable thickness over AWG22 for both the motor and sensor wiring.
(As an option, a Extension cable [refer to 5-1] has been included.) If there is nothing specifically specified,
make adjustments without utilizing the extension cable.
・If a Extension cable exceeding 2m is utilized between the scanner and driver, adjustments must be
made with the Extension cable attached in advance.
・The allowed cable length of the sensor lead wire utilized with this scanner is 10m.
・Increasing the length of the sensor lead wire may increase noise, increasing the possibility that the
scanner malfunction.
[15] Power Capacity (Unit: [W])
If power capacity is limited, please notify us of the power capacity used.
In addition, please notify us of whether the device is performance or power capacity-emphasized.
・The power source used in our adjustments is ±24V and 240W (AD240-24: COSEL).
(We will select a power source closest to the expected power capacity among those available to our
company and we will assess the device.)
・The cable length between the power source and the driver during our adjustments is 1m.

LSA-10A-30-D-130 Technical Document
-15-
Chapter 3 Scanner Specifications
The specifications of the scanner (LSA-10A-30) are as follows.
3-1 Main Specifications
No.
Items
Specifications
1 Maximum Swing Angle (Control Range) (*1) [°] ±15
2 Output Shaft Rotation Range (Stopper Range) [°] 40
3 Rotor moment of inertia [g-cm2] 1.9
4
Torque Constant
[Nm/A]
0.0077
5 Coil Resistance [Ω] 0.28±10% at 20℃
6 Coil Inductance [mH] 0.098±10%
7
Sensor Linearity
[%]
±0.06 (Full Scale)
8
Sensor Angle Sensitivity
[V/°]
0.275±5%
9 Sensor Power Source Voltage [V] +5±5%
-15±5%
10 Sensor
Consumption
Current
+5V ±5% [mA] 90 Max
-15V ±5% [mA] 120 Max
11 Insulation
Resistance (*2)
Motor Coil - Case [MΩ] 100 (DC500V Mega)
Sensor Power Source
Common - Case
[MΩ] 100 (DC500V Mega)
12 Dielectric
Strength (*2)
Motor Coil - Case
[V]/1min
AC500
Sensor Power Source
Common - Case
[V]/1min AC500
13 Offset Drift [μrad/°C] 25
14
Scale Drift
[%/°C]
0.005
15 Mass [g] 180
*1 The origin (0°) position of the control range is the position when the sensor output voltage is at 0[V].
*2 Please do not conduct insulation tests on the sensor power source common - case.
3-2 Connector Specifications
Connectors Connected to Driver [Scanner Connector Model: DF18-10DS-2.5RC (Hirose)]
Pin.No.
Functions
Wire Color
Pin.No.
Functions
Wire Color
1
Motor (-)
Black
6
N.C.
-
2
Motor (+)
Red
7
Case Ground
Yellow
3
Power Source Common
(*1)
Green
8
Sensor (-)
Brown
4
-
15V
Black
9
Sensor (+)
White
5
+
5V
Red
10
Shield (*2)
Shield
*1 Power source common is connected to the case ground through the capacitor(voltage endurance:
50V).
*2 The shield is not connected to the case.

LSA-10A-30-D-130 Technical Document
-16-
Note 2
3-3 Dimensions (Third Angle Method)
The dimensions of the LSA-10A-30 are as follows.
Note 1: Please confirm the details of the dimension with the supplied specification diagram published by
our company.
Note 2: When attaching the customer’s load device, the screw may directly press against and scratch the
output shaft during our adjustments. In this case, the precision of scratched section may be
below the precision of the specifications.
3-4 Environmental conditions
The environmental conditions of the LSA-10A-30 are as follows.
No. Items Specifications Remarks
1 Operating Temperature [°C] 0 ~40
2 Humidity [%RH] 20 ~85 No condensation
3 Storage Temperature [°C] -10 ~70
4 Humidity [%RH] 20 ~90 No condensation
5 Vibration
Resistance
(*1)
Vibration
Acceleration [m/s
2
]
24.5
Testing Conditions
Frequency: 10→1000→10 [Hz]
Time: 1 Cycle 20 [min]
No. of Times: 3 times each in x, y,
and z directions.
6 Shock
Resistance
(*1)
Vibration
Acceleration [m/s
2
]
294
Testing Conditions Shock Time: 11 [ms]
No. of Times: 3 times each in x, y,
and z directions.
*1 The vibration/shock resistance tests are to ensure there is no degradation in performance during
non-operation period, but they do not guarantee the performance while operating.
Furthermore, please avoid applying shock directly to the output shaft.
Unit: mm
Unifying Tube
2 Locations

LSA-10A-30-D-130 Technical Document
-17-
3-5 Output Shaft Precision
The output shaft precision of the LSA-10A-30 is as follows.
Measurement
Point
Precision [mm] Remarks
A 0.004
Output shaft run-out
(range of maximum
swing angle: ±15°)
(Estimated value from a whole rotation
measurements)
B φ0.03
Parallelism of attachment area (φ30) and
output shaft
C 0.05 Perpendicular of a
ttachment face and
output shaft
3-6 Stopper Mechanism
For protection during malfunctions, a stopper mechanism has been
installed to restrict the rotation angle of the output shaft.
The angle of the output shaft starts to contact the stopper mechanism at
a range of about 40°. The final shutdown angle by snap action is at a
range of about 45°. The allowable torque of the stopper mechanism is
1.5[Nm]. If the strength exceeds the allowable torque, the attached
stopper may become damaged and displaced. The control range
(±15°) then may not be maintained.
The stopper mechanism is a protection mechanism during malfunctions.
Refer to the over position alarm output (4-6-6) and configure the circuit to
enable off(4-6-2).Ensure that stopper pin of the output shaft is not
contacted to the stopper during normal operation.
3-7 Caution Regarding Scanner Installation
3-7-1 Structure of Output Shaft
As the output shaft is not an airtight structure, please take measures to ensure that dust does not penetrate
the device. (Please take special caution when attaching the output shaft in an upright position.)
3-7-2 Scanner Cable
Please do not pull on the scanner cable with excessive force (exceeding 20[N]). The connector or and
cable may become damaged. Please ensure there is sufficient length to the cable when connecting the
device and ensure there is no tension on the cable. In addition, please ensure a sufficient bending radius
(exceeding r=40 mm) when repeatedly bending the cable.
Stopper
Stopper Pin
Output
Shaft
(Top View)
Stopper

LSA-10A-30-D-130 Technical Document
-18-
Clamp
Load Device
A
3-7-3 Caution When Attaching Scanner and Load Equipment
If the attachments to the scanner device or to the output shaft of the mirror’s load device are inappropriate,
the scanner will not sufficiently perform and may cause the device to malfunction. Please be cautious
when attaching this device to the equipment.
♦Attachting the Scanner Body to an equipment
Secure the clamp to Side A in the diagram on the right, when attaching
with clamp. Please ensure that the clamp strength is under 500[N].
Please ensure that the screw does not directly come in contact with Side
A when using other methods of securing attachments. Deformations,
etc. may affect accuracy.
♦Attaching the Load Device to the Output Shaft
For the driver combined with the customer’s load device and adjusted by our company, please ensure the
servo is turned on after installing the load device. Without a load, the Output Shaft will start to oscillate
unexpectedly when the servo is turned on.
If the scanner starts to oscillate unexpectedly, the driver resistance
may generate abnormal amounts of heat and start to smoke.
In this case, immediately cut the power source.
♦Attachment Order to the Output Shaft of the Load Device
The following order is recommended when attaching the load device and
deciding the position of the attachment.
(1) Secure the load device to the output shaft at a rough position with
the stopper pin of the output shaft as a guide.
(2) Temporarily secure to the device and turn the servo on (input
command: 0V)
(3) Determine the position by turning the scanner body while observing
the device’s laser light or image, then secure the equipment.
♦Lubrication of the Scanner’s Roller Bearing
Attention must be paid to the lubrication of the scanner’s roller bearing during continuous small amplitude
movement in the same location. The lubrication of the roller bearing can be more adequately maintained
by periodical large amplitude moving(ideally, slow triangular waves) for lubrication. It is strongly
recommended that the device is lubricated to the extent that it does not affect usage conditions.
Caution

LSA-10A-30-D-130 Technical Document
-19-
Chapter 4 Driver Specifications
The specifications of the driver (PSM-130) are as follows.
4-1 Main Specifications
No.
Items
Specifications
1 Power Source Voltage [V] DC ±24±10%
2 Continuous Output
Current
[A] 5
3
Instantaneous
Maximum Output
Current
[A] 25
4 Input Signal - Position command input (±10V, differential input,
impedance: 10kΩ)
- Enable
5 Output Signal
- Monitor Output (positioning command signal,
positioning sensor signal, positioning error signal)
- Alarm
6 Protection Functions - Protection when Enable OFF → ON
- Protection when Power OFF
- Prevents Power IC from overheating
7
Insulation Resistance
(*1)
[Ω] 100M (DC500V)
8 Offset Drift [μrad/°C] 5
9 Scale Drift [%/°C] 0.005
10 Mass [g] 160
*1 Please do not conduct insulation tests.
4-2 Protection Functions
No. Name Functions
1 Protection when Enable Off → ON
(*1)
Prevents unstable operation when Enable OFF → ON
(Controls swing angle within ±10° when Enable OFF →
ON)
2 Protection when Power Off Prevents unstable operation when Power ON → OFF
(Controls swing angle within ±10° when Power ON →
OFF)
3 Power IC O
verheating Protection
(*2)
Stops supplying power (shut down) to the scanner when
the internal temperature of the Power IC is over
Typ.160°C (surface temperature: Typ.130°C) and prevents
further overheating.
As the temperature of the Power IC decreases an
d falls
below the threshold, the power is supplied again (auto
return).
*1 Please do not turn the power on when Enable is on.
*2 The Power IC Overheating Protection is to protect against damage due to the heat from the driver.
Intermittent instability may occur during beginning of shutdown and auto return.
Refer to Overheat Alarm Output (4-6-6) to form the sequence configuration of Enable OFF before
operating the Power IC Overheating Protection.

LSA-10A-30-D-130 Technical Document
-20-
Product
Label
Adjustment
Label
4-3 Dimensions (Third Angle Method)
The dimensions of the PSM-130 are as follows.
Note: Please confirm the details of the dimension with the supplied specification diagram issued by our
company.
4-4 Environmental Specifications
The environmental specifications of the PSM-130 are as follows.
No. Items Specifications Remarks
1 Operating Temperature [°C] 0 ~40
2 Humidity [%RH] 20 ~85 No condensation
3 Storage Temperature [°C] -10 ~70
4 Humidity [%RH] 20 ~90 No condensation
5 Vibration
Resistance
(*1)
Vibration
Acceleration [m/s
2
]
24.5
Testing Conditions
Frequency: 10→1000→10 [Hz]
Time: 1 Cycle 20 [min]
No. of Times: 3 times each in x, y,
and z directions.
6 Shock
Resistance
(*1)
Vibration
Acceleration [m/s
2
]
294
Testing Conditions Shock Time: 11 [ms]
No. of Times: 3 times each in x, y,
and z directions.
*1 The vibration/shock resistance tests are to ensure there is no degradation in performance during
non-operation period, but they do not guarantee the performance while operating.
Unit: mm
Heat Release
Fin
Table of contents


