HART Expert HART Communicator User manual
HARTCOM-W2 User Manual
4/2/2018 Designed and Produced under Page 1 of 71
ISO 9001:2008 Certification
Table of Contents
Table of Contents..............................................................................................................................................................1
Quick Start Guide..............................................................................................................................................................4
Step 1: Turn on the HART Communicator.....................................................................................................................4
Step 2: For wired HART devices (skip this step for HART-IP and WirelessHART devices).............................................4
a) Connect the Bluetooth HART Modem to the HART device/network ...............................................................4
b) Turn on the Bluetooth HART Modem (BT-BAT-ER) to your PC.........................................................................5
Step 3: Open the HART Communicator software “DevCom2000” ...............................................................................5
Step 4: Discovering connected HART Device(s)............................................................................................................6
a) For wired (4-20mA) HART devices connected via the Bluetooth HART Modem..............................................6
b) For HART-IP or WirelessHART devices ..............................................................................................................7
c) For HART Server................................................................................................................................................7
Step 5: Reviewing / configuring HART devices .............................................................................................................8
Step 6: Modifying the HART Device's Configuration.....................................................................................................8
Step 7: Performing Maintenance and Testing the HART Device ..................................................................................9
Step 8: Exit ....................................................................................................................................................................9
1 INTRODUCTION .........................................................................................................................................................10
1.1 Acronyms and Definitions ...................................................................................................................................10
1.2 Conventions Used in This Manual.......................................................................................................................10
1.3 Document Organization ......................................................................................................................................10
1.4 Getting Help ........................................................................................................................................................11
2 OVERVIEW OF HART COMMUNICATOR (HARTCOM-W2).........................................................................................12
3 USING HART Communicator HARTCOM-W2.............................................................................................................13
3.1 Charging the HART Communicator HARTCOM-W2 and the Bluetooth HART Modem.......................................13
3.1.1 Recharging the HART Communicator ............................................................................................................13
3.1.2 Recharging the Bluetooth HART Modem.......................................................................................................13
3.2 Starting the HART Communicator HARTCOM-W2 ..............................................................................................14
HART Communicator
Windows Tablet
(HARTCOM-W2)
User Manual

HARTCOM-W2 User Manual
4/2/2018 Designed and Produced under Page 2 of 71
ISO 9001:2008 Certification
3.3 Connecting to HART devices .................................................................................................................................14
3.3.1 For wired HART devices (skip this step for HART-IP and WirelessHART devices)..........................................14
3.4 Open the HART Communicator software “DevCom2000” ...................................................................................15
3.5: Discovering connected HART Device(s) ...............................................................................................................16
3.6 DevCom2000 Explorer Window............................................................................................................................18
3.7 Getting Familiarised with DevCom2000 Explorer...............................................................................................18
3.7.1 Using the Menus .........................................................................................................................................18
3.7.2 Using the Toolbar ........................................................................................................................................19
3.7.3 Familiarising with Icons...............................................................................................................................20
4 FUNCTIONS AND BASIC OPERATIONS ........................................................................................................................21
4.1 Overview .............................................................................................................................................................21
Variable ...................................................................................................................................................................21
Edit Display..............................................................................................................................................................21
Method / Standard Operating Procedure (SOP).....................................................................................................21
4.2 Viewing Device Configuration (typical, actual view may change based on DD).................................................21
4.3 Configuring Device Information..........................................................................................................................22
4.3.1 Overview .....................................................................................................................................................22
4.3.2 Variable .......................................................................................................................................................23
4.3.3 Edit Display..................................................................................................................................................25
4.3.4 Executing Methods or Standard Operating Procedures .............................................................................27
4.4 Calibrating HART Field Devices............................................................................................................................28
4.5 Viewing the Device Status...................................................................................................................................28
4.6 Viewing the Communication Log ........................................................................................................................29
4.7 Viewing the Event-Status Log..............................................................................................................................30
4.8 Saving Device Configuration to Disk....................................................................................................................31
4.9 Download Configuration to Device.....................................................................................................................33
4.10 Customizing PDF File Output.............................................................................................................................34
4.11 License File Transfers ........................................................................................................................................36
4.11.1 Check-In......................................................................................................................................................36
4.12 Options Menu ...................................................................................................................................................37
4.12.1 Options →Basic.........................................................................................................................................37
4.12.3 Options →Search ......................................................................................................................................42
4.12.4 Options →Advanced .................................................................................................................................46
4.13 Trending ............................................................................................................................................................52
4.13.1 Define Trend...............................................................................................................................................52
4.13.2 View Current Trend....................................................................................................................................53
4.13.3 View Past Trends........................................................................................................................................56

HARTCOM-W2 User Manual
4/2/2018 Designed and Produced under Page 3 of 71
ISO 9001:2008 Certification
4.13.4 Stop Current Trend.....................................................................................................................................59
4.14 DD Functions .....................................................................................................................................................60
4.14.1 Adding a DD................................................................................................................................................60
4.14.2 Updating a DD Label...................................................................................................................................61
4.15 HART-IP Communication.....................................................................................................................................63
Specifications (HARTCOM-W2 Software): ......................................................................................................................67
Specifications (Bluetooth HART Modem HM-BT-BAT-ER): .............................................................................................68
Appendix A......................................................................................................................................................................69
Troubleshooting Guide ...............................................................................................................................................69
Problem: Will not communicate.............................................................................................................................69
Problem: Get the message “Error opening COMx” ................................................................................................69
Problem: No data in the Communication Log.........................................................................................................69
Problem: Active Windows not shown in Windows drop down list ........................................................................70
Problem: When using HART Server for WirelessHART the device selection screen doesn’t appear .....................70
Appendix B......................................................................................................................................................................71
Contact Information for HART Expert Ltd...................................................................................................................71
Contact Information for ProComSol Ltd .....................................................................................................................71
HARTCOM-W2 User Manual
4/2/2018 Designed and Produced under Page 4 of 71
ISO 9001:2008 Certification
Quick Start Guide
The following steps will allow you to quickly begin using your HART Communicator (HARTCOM-W2). This quick start
guide is for experienced HART users, full instructions are provided later in this manual for non-experienced users.
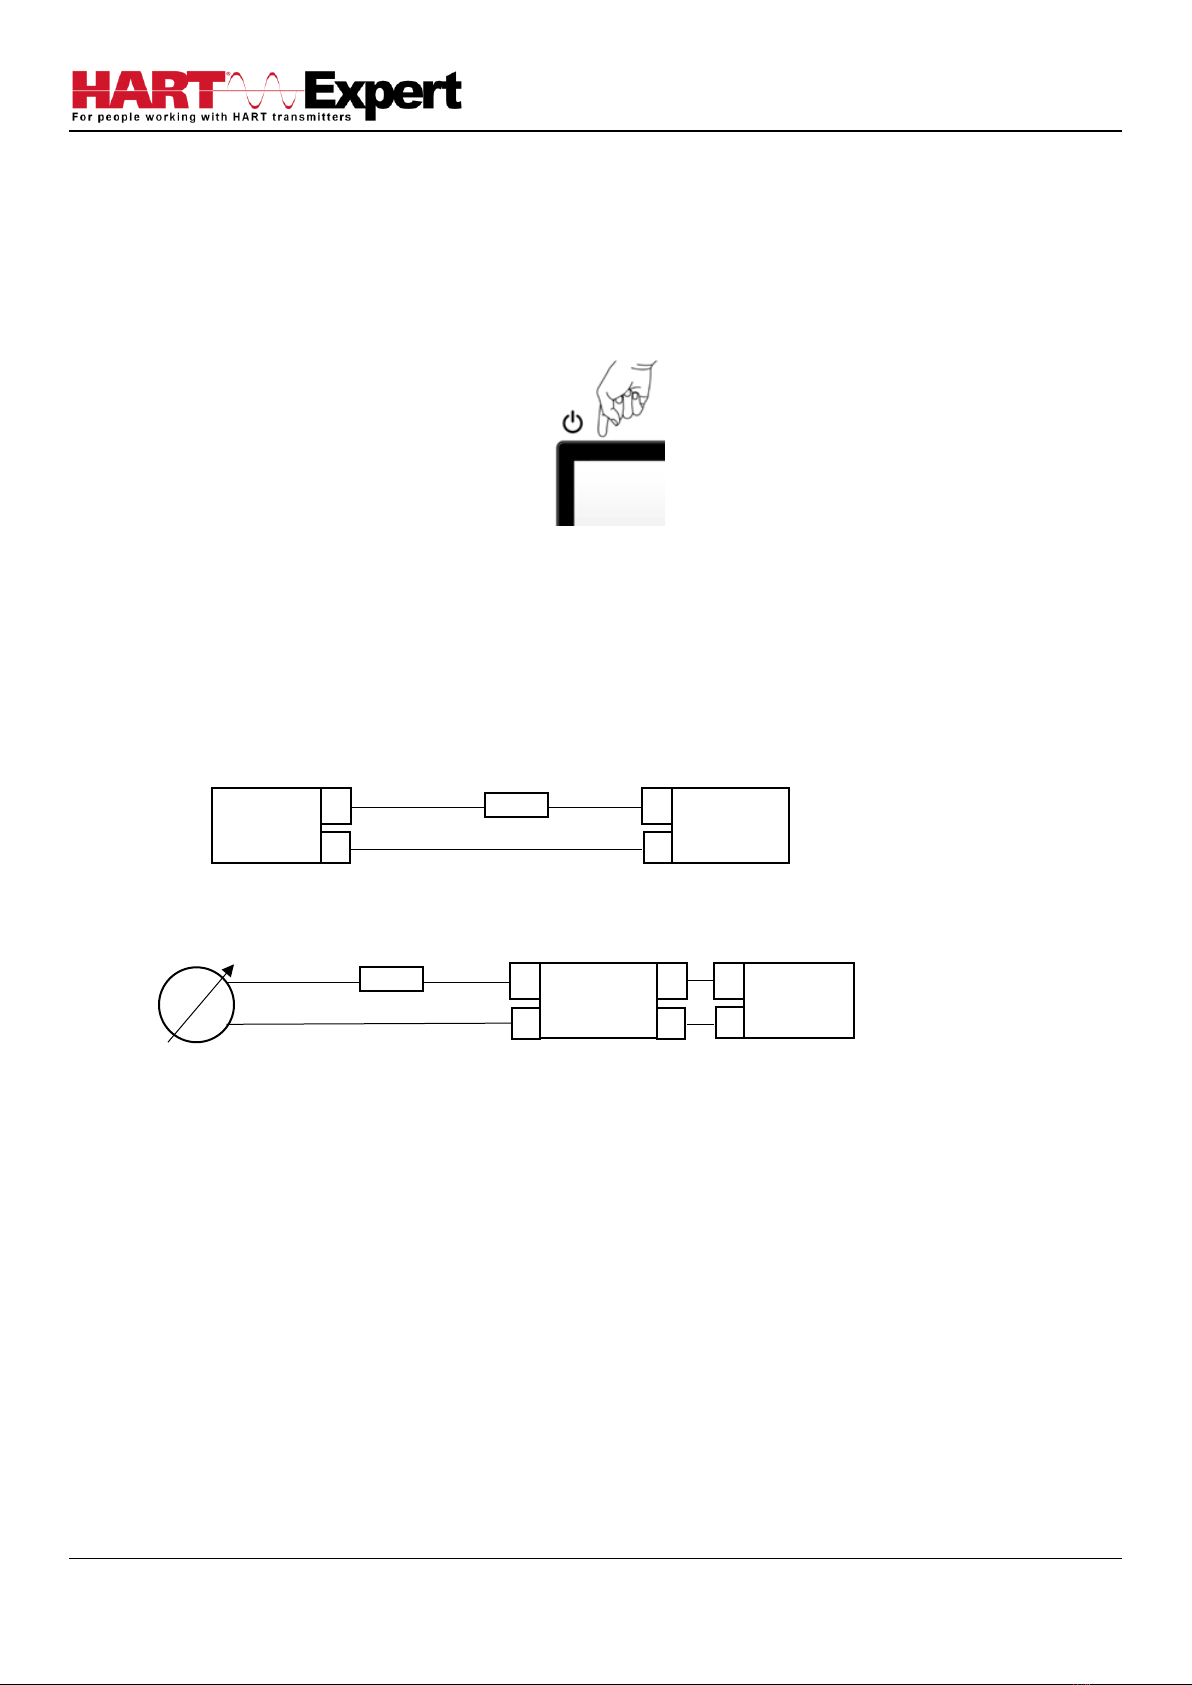
Step 1: Turn on the HART Communicator
Press and hold for 4 seconds the power button (top left corner of the tablet). The tablet will boot up Windows.
Step 2: For wired HART devices (skip this step for HART-IP and WirelessHART devices)
a) Connect the Bluetooth HART Modem to the HART device/network
For communication with wired (4-20mA based) HART devices you must have a suitable load resistance, or a 250Ω
Shunt/Loop resistor (supplied) must be placed in series with the device. Using the clips of the HART Modem connect
either: across the loop load resistor (A –B), or across the HART transmitter terminals (C –D). See the relevant Figure
1a, 1b or 1c below.
Figure 1a. Loop Powered HART Transmitter Connection
Figure 1b. 4-Wire HART Transmitter Connection
Loop
Power
Supply
+
-
HART
Transmitter
+
-
Loop Resistor
A
B
C
D
Loop Resistor
C
A
Power
Supply
+
-
HART
Transmitter
+
-
+
-
D
A
B

HARTCOM-W2 User Manual
4/2/2018 Designed and Produced under Page 5 of 71
ISO 9001:2008 Certification
Figure 1c. Multi-drop HART Transmitter Connection
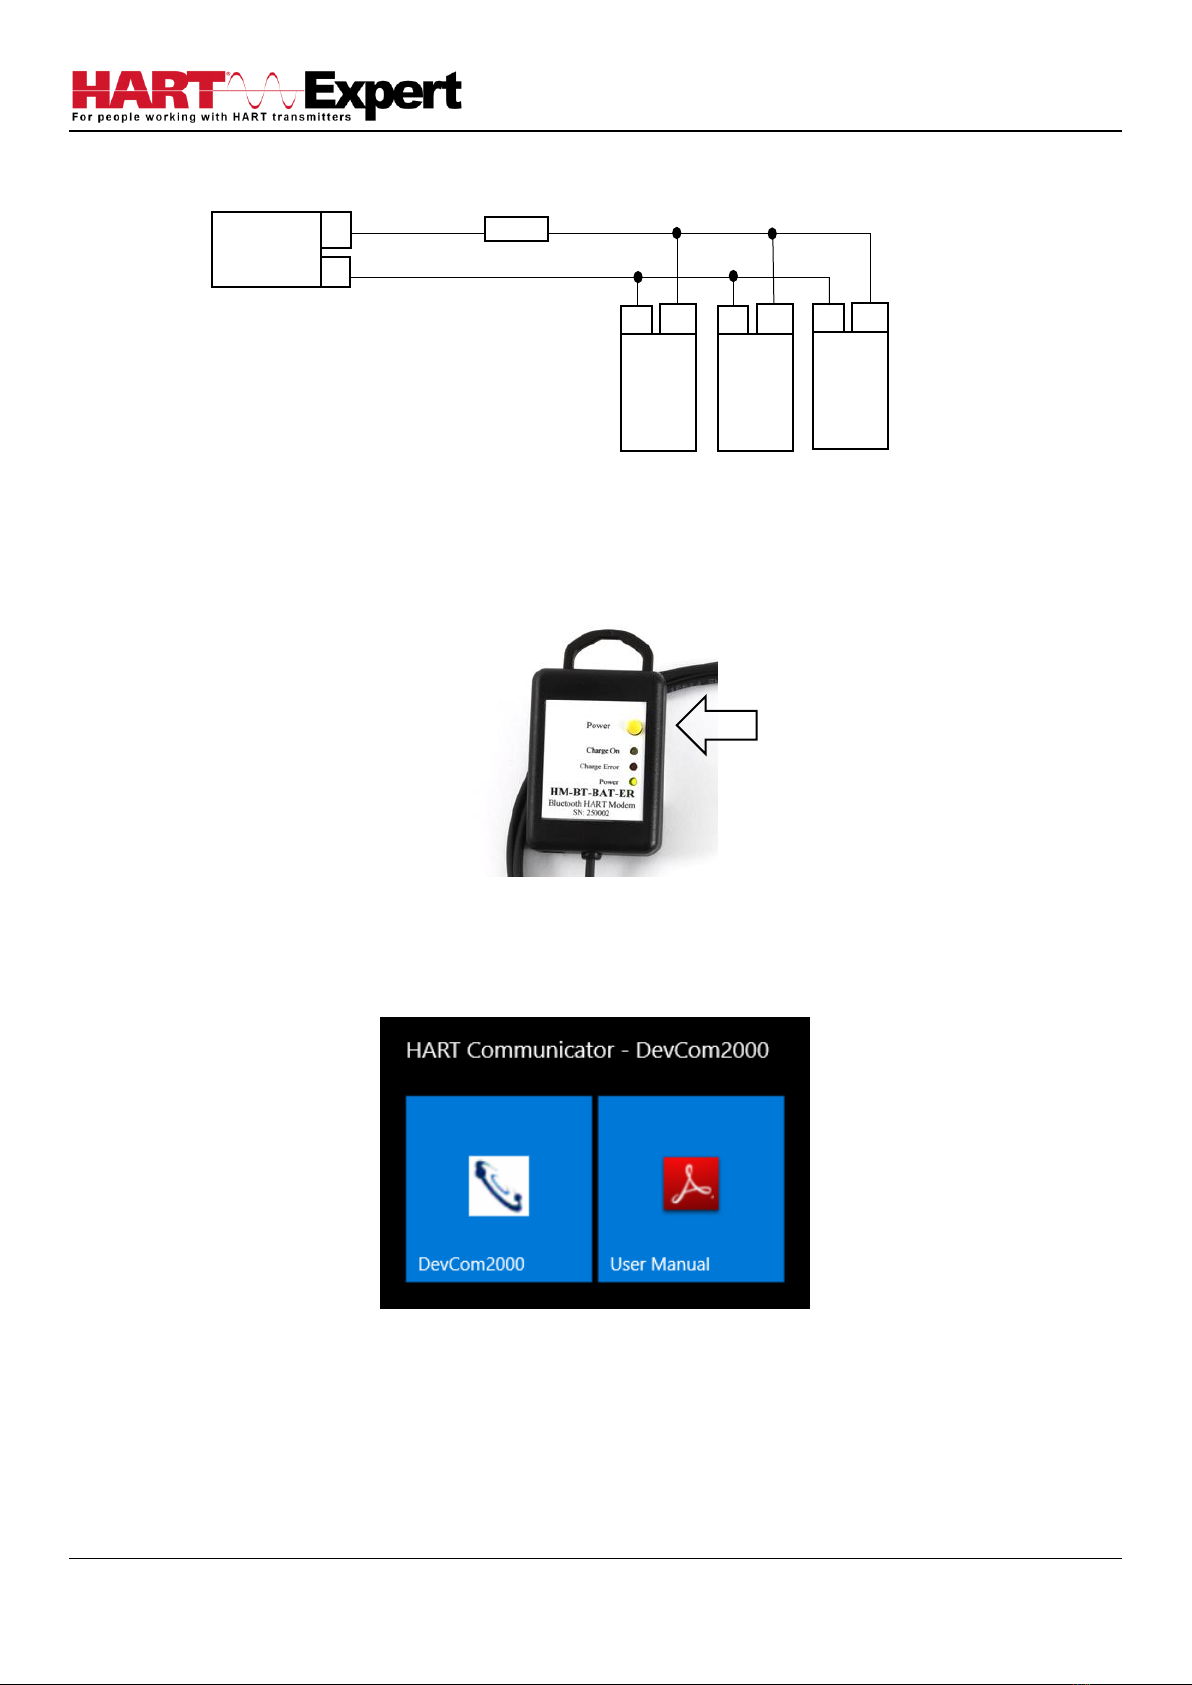
b) Turn on the Bluetooth HART Modem (BT-BAT-ER) to your PC
Press the Yellow “Power” button, the “Power” LED will illuminate.
Step 3: Open the HART Communicator software “DevCom2000”
On the HART Communicator Windows Tablet touchscreen, single tap on the HART Communicator Icon
“DevCom2000” as pictured below. Windows will then ask you if you want to allow this program to run, say yes.
Loop
Power
Supply
+
-
HART
Transmitter
+
-
Loop Resistor
B
C
A
D
HART
Transmitter
+
-
HART
Transmitter
+
-

HARTCOM-W2 User Manual
4/2/2018 Designed and Produced under Page 6 of 71
ISO 9001:2008 Certification
Step 4: Discovering connected HART Device(s)
a) For wired (4-20mA) HART devices connected via the Bluetooth HART Modem
When the HART Communicator software (DevCom2000) is opened, by default, it will automatically check for HART
devices of address 0 connected to the Bluetooth HART Modem, if found it will display the “Explorer” window (go to
Step5). If you have previously told it to connect to HART-IP / WirelessHART devices, or if you want to check for
devices other than address 0, you will need to change the option within the HART Communicator software
(DevCom2000). Go to “Options →Basic” and make sure “Use TCP/IP…” checkbox isn’t selected, see screenshot
below.
Then click on the “Search By” Tab and select the desired option (see screenshot below) and then press OK.
HARTCOM-W2 User Manual
4/2/2018 Designed and Produced under Page 7 of 71
ISO 9001:2008 Certification
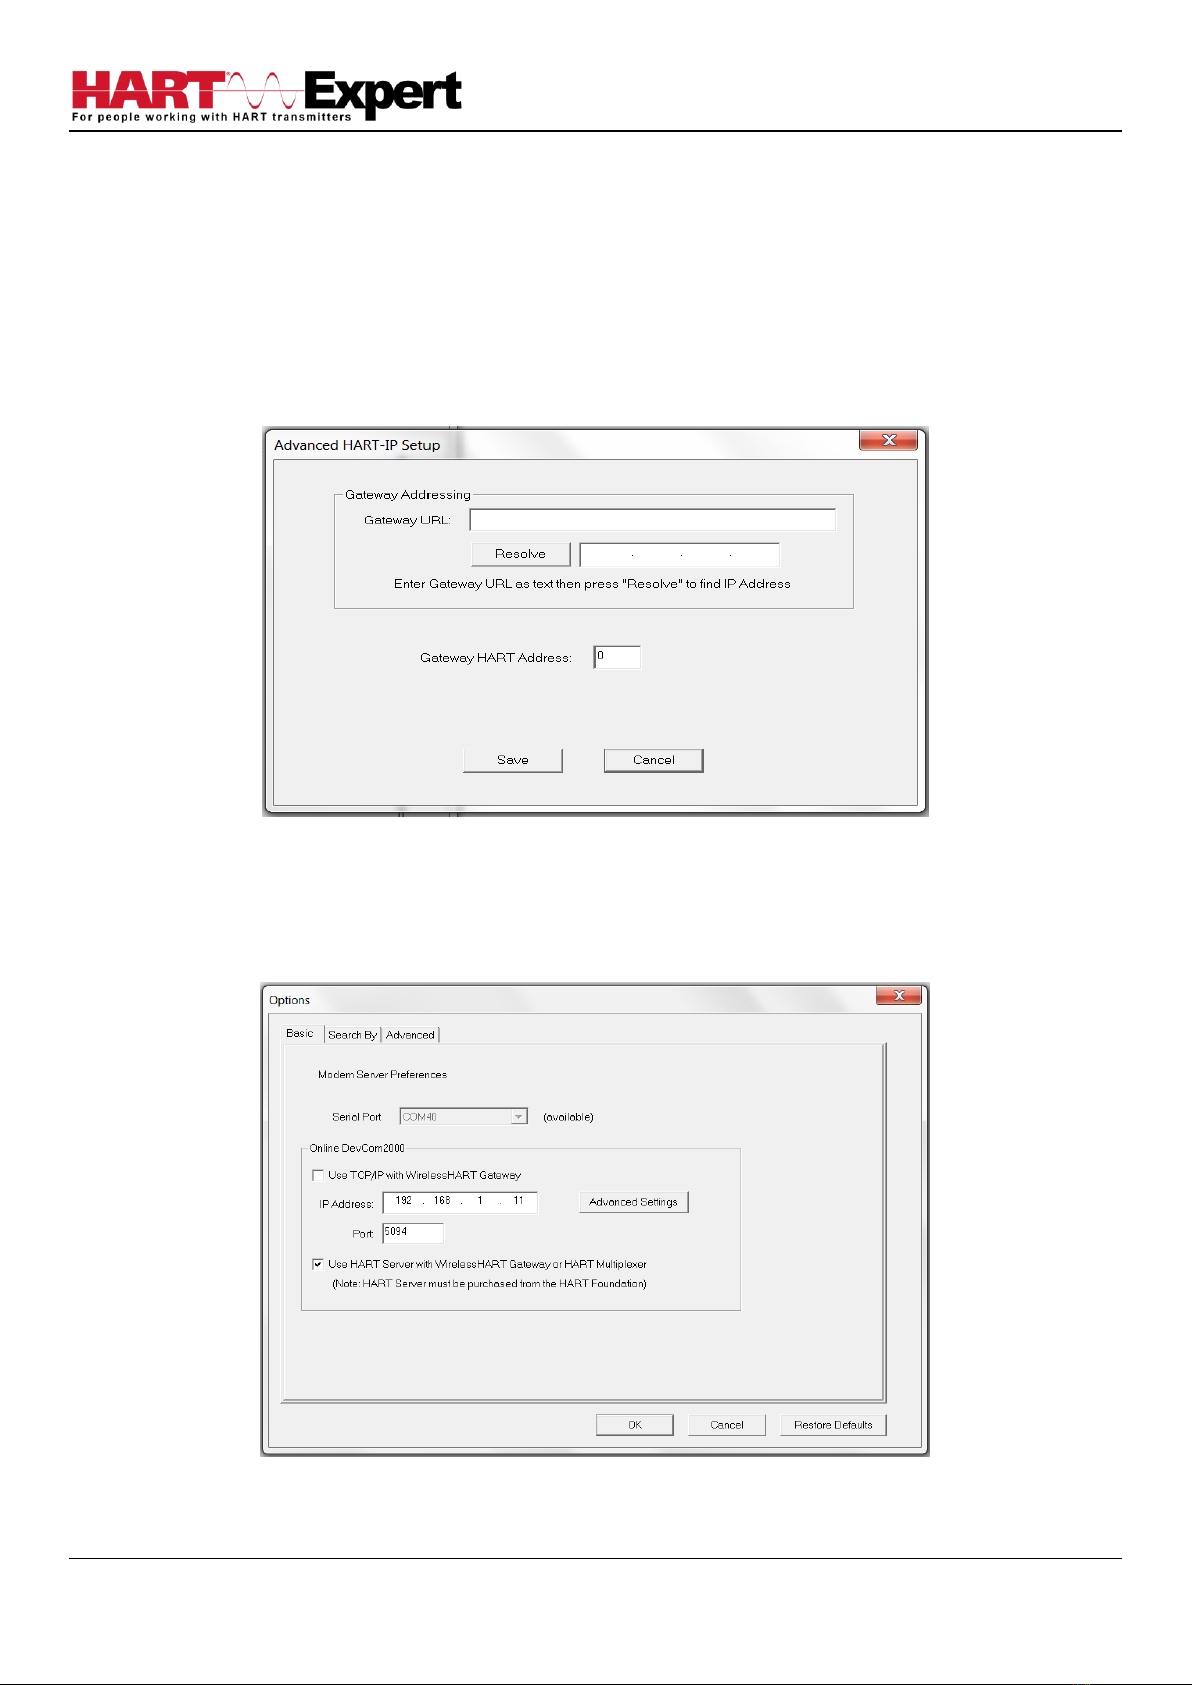
b) For HART-IP or WirelessHART devices
First you must configure the Tablets WiFi connection and connect to your networks Access Point (AP). Now we must
configure the HART Communicator software (DevCom2000) to connect to a HART-IP / WirelessHART device instead
of the default wired 4-20mA based HART device connected to the Bluetooth HART Modem. From the HART
Communicator software (DevCom2000) menu select “Options →Basic” and tick the option “Use TCP/IP…” and set
the IP address and port number (it is typically 5094) of the HART-IP device (Remote I/O, Multiplexer, WirelessHART
Gateway), see screenshots above. If your WirelessHART gateway does not use the default address of 0, or if you only
know its URL, click the “Advanced” tab. You can now enter the URL and/or change the Gateway HART address, see
the screenshot below. Press “Save” and then “OK”.
c) For HART Server
If you are using HART Server, from the HART Communicator software (DevCom2000) menu select “Options →Basic”
and tick the option “Use HART Server with….”, see screenshot below, press OK. You must then restart the
DevCom2000 software for the change to be effective.
HARTCOM-W2 User Manual
4/2/2018 Designed and Produced under Page 8 of 71
ISO 9001:2008 Certification
Step 5: Reviewing / configuring HART devices
You are now able to browse/configure/audit/etc the discovered HART device(s) as detailed in this user manual. In
summary, DevCom2000 will open the “Explorer” window when it discovers a connected HART device, see the
screenshot below.
The organization of the data in this explorer-style window is dictated by the device DD. The left hand tree-pane of
this window shows the logical groups of field device data. These are called "Menus". The right hand data-pane
shows the data, any sub-groups and any standard operating procedures found on a given menu.
You can browse through the field device data by expanding (click "+" symbol) or collapsing (click the "-" symbol) the
menus in the tree-pane. You can also double-click the folder symbol when seen on the data-pane, e.g. in the
screenshot below we have selected the “Overview” sub-group.
Step 6: Modifying the HART Device's Configuration
The “Explorer” window allows access to all of the data exactly as described by the product's manufacturer’s DD.
When you find elements of the field device's configuration you want to change, simply double-click and edit the
data. Once you have changed the configuration to suit your needs, press the Send icon to commit the data and
transfer it to the field device.

HARTCOM-W2 User Manual
4/2/2018 Designed and Produced under Page 9 of 71
ISO 9001:2008 Certification
Step 7: Performing Maintenance and Testing the HART Device
Many devices perform Methods or Standard Operating Procedures (SOPs) that may need to be performed to ensure
the device is in peak condition. These Methods may include calibrating the loop current, trimming the transducer
values or performing some diagnostic test on the field device. Methods appear in the data-pane just like data does.
click on the Method and it will start running in a separate window. The Method will guide you through the process
ensuring the procedure is completely and consistently performed. When the Method is complete the window will
disappear.
Step 8: Exit
When you are through working on the field device simply exit DevCom2000. Once the program exits, you can then
turn off the Bluetooth HART Modem, and turn off the HART Communicator Windows Tablet by shutting down
Windows 10 in the normal way.
This is the end of the quick start guide, the rest of this manual describes in detail the use of the HART Communicator
Software and Bluetooth HART Modem. If you have any questions please do contact HART Expert Ltd, advice and
support is free.
HART Expert Ltd
14 St Patricks Court
Brockworth
Gloucestershire
GL3 4NT
United Kingdom
Telephone: +44(0)7966233639
Email: info@hart-expert.co.uk
Web: www.hart-expert.co.uk

HARTCOM-W2 User Manual
4/2/2018 Designed and Produced under Page 10 of 71
ISO 9001:2008 Certification
1 INTRODUCTION
This HART Communicator Windows Tablet (HARTCOM-W2) allows access to and management of HART devices. This
manual provides the information about the Hardware setup, communication with HART devices, and functions of
our HART Communicator software (DevCom2000).
DevCom2000 uses Device Description files (DDs) to access data stored in the memory of the HART field device.
DevCom2000 is unique in that it uses the DD of the connected device to determine what information to display,
what variables are available for edit, and what procedures to follow for calibration, setup, and maintenance.
These DDs are developed by device manufacturers for their products and, in turn, distributed by the HART®
Communication Foundation (HCF) worldwide. The latest DDs are included with HARTCOM-W2 and you are
automatically sent new DD releases for the first year. At any time (e.g. after the automatic updates have ceased) you
can download new DD files from the HCF website (www.hartcomm.org).
1.1 Acronyms and Definitions
Acronym
Definition
DD
Device Description file, this contains the device information
DDL
Device Description Language
HCF
HART Communication Foundation
DevCom2000
HART Device Communicator Software used by our HART Communicator
(HARTCOM-W2)
1.2 Conventions Used in This Manual
Following formatting conventions are used in this guide:
Convention
Description
Words in bold type
Field names including buttons in the display, or important phrases
→Arrow
Windows pull down menus and their options are separated by →
For example, click Device →New Device to connect to a new device
Courier font
Information that you type, parts of the code quoted for explanations or as
examples
UPPERCASE
Acronyms
UPPERCASE within angle
brackets
Command keys
For example, press <ENTER>
1.3 Document Organization
HART Communicator HARTCOM-W2 user manual is organized into the following sections:
Section 1
Describes the scope and objective of the HART Communicator user manual along
with the organization of the remaining part of the manual

HARTCOM-W2 User Manual
4/2/2018 Designed and Produced under Page 11 of 71
ISO 9001:2008 Certification
Section 2
Provides an overview of the HART Communicator software (DevCom2000)
application and its architecture
Section 3
Provides the steps to start the HART Communicator software (DevCom2000)
application and connecting to field devices
Section 4
This section explains different aspects of the HART Communicator software
(DevCom2000) application and its functionalities
1.4 Getting Help
If you need help or encounter problems when using the HART Communicator or this guide, please contact HART
Expert Ltd. See Appendix B for contact information. Please provide the following information.
Create a text description of the problem. If possible, provide the text in event sequence, which will enable the
duplication of the problem. Provide information about the system. This information must include:
• DevCom2000 version and License ID (visible under the menu options “About”and “License”)
• Device information: make, model, and device revision
• Point of contact: complete mailing address, telephone number, and e-mail address,
• The date and time of the problem occurrence

HARTCOM-W2 User Manual
4/2/2018 Designed and Produced under Page 12 of 71
ISO 9001:2008 Certification
2 OVERVIEW OF HART COMMUNICATOR (HARTCOM-W2)
Field devices such as flow, pressure, level, temperature transmitters, and valve positioners provide the physical
connection to the process. These devices allow the control system to monitor and manipulate process conditions.
HART devices maintain a real-time database of process, configuration, identification, and diagnostic information.
This information can be accessed using the HART Field Communications Protocol.
HART devices are capable of providing functions and features far beyond the basic task of providing a process input
or accepting a control output to manipulate process conditions. Many HART compatible device manufactures create
a DD (Device Description) describing all of these functions and features specific to that device. The DD also provides
information essential to the successful configuration and calibration of the device.
HART Communicator (HARTCOM-W2) uses these DD’s to access the data stored in a device, providing full
configuration and setup support for all registered HART DD’s.
HART Communicator (HARTCOM-W2) accesses and presents field device data based solely on its DD. No other files,
information or custom drivers are required to view and modify field device parameters. Using the device’s DD, HART
Communicator (HARTCOM-W2) can perform various tests to verify the proper operation of the HART device.
Currently there are three recognised categories of HART devices:
1) The original 4-20mA wired HART device
2) HART-IP devices (i.e. Remote I/Os and Multiplexers)
3) WirelessHART devices
HART Communicator HARTCOM-W2 supports all three technologies allowing you to configure HART devices whether
they are connected via HART Modem, HART-IP device, or WirelessHART Gateway.
HARTCOM-W2 User Manual
4/2/2018 Designed and Produced under Page 13 of 71
ISO 9001:2008 Certification
3 USING HART Communicator HARTCOM-W2
3.1 Charging the HART Communicator HARTCOM-W2 and the Bluetooth HART Modem
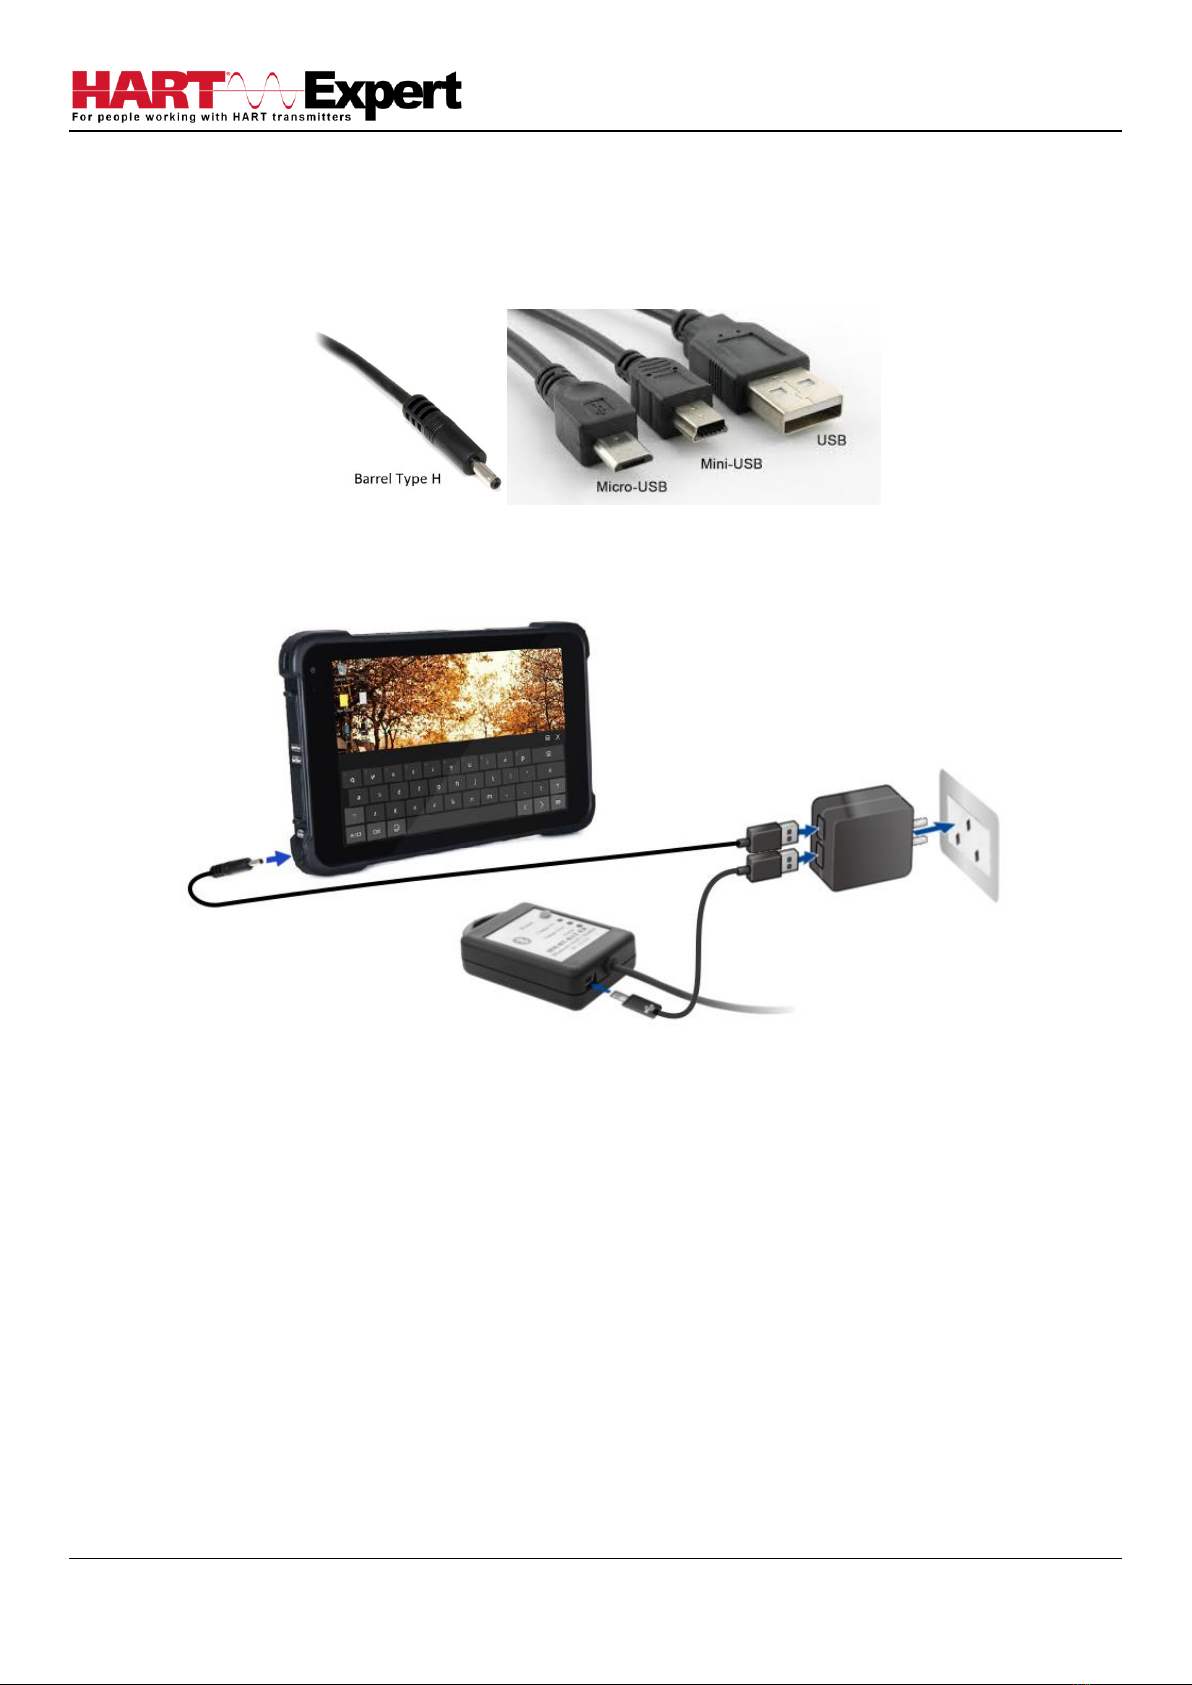
Note: the HART Communicator has a “Barrel” connector, whereas the Bluetooth HART modem has a “Mini-USB”
connector. Hence the supplied USB leads have different connectors on them as shown below.
Using the supplied 4 port USB wall charger, the HART Communicator and Bluetooth HART modem can either be
charged separately, or together as shown below.
3.1.1 Recharging the HART Communicator
The HART Communicator Windows Tablet can be recharged at any time, whilst turned on or turned off. If turned off
the charging progress is indicated by the Windows Operating system in the bottom right hand corner of the display.
If the tablet is turned off (shutdown) it will show the current charging status when the charge lead is first plugged in.
3.1.2 Recharging the Bluetooth HART Modem
The Bluetooth HART Modem can be recharged at any time, whilst turned on, or turned off. While actively charging
the “Charge On” LED will illuminate, when completely charged the LED will turn off. When the battery is almost full
the “Charge On” LED may blink. If the “Charge Error” LED illuminates, disconnect the Bluetooth HART Modem and
allow it to cool down. The normal cause for “Charge Error” is an excessively hot battery. If when you connect the
modem the “Charge On” LED blinks once and then stays off, the battery is already fully charged.
Rechargeable Lithium Ion batteries are very reliable so long as they are not abused. They maintain charge very well,
after 1 year of storage they typically have 75% of the charge remaining. Hence you can use and recharge them
without worries associated with many other battery technologies, e.g. Lithium Ion batteries do not suffer from
battery memory. As an engineer you may be interested in how to optimise battery life/performance, if so all the
normal recommendations for lithium batteries (Li-Ion, Li-Po) apply:

HARTCOM-W2 User Manual
4/2/2018 Designed and Produced under Page 14 of 71
ISO 9001:2008 Certification
1) Do not expose to flames or excessive heat (>85 deg.c)
2) Do not charge by any method other than that described above
3) Lithium Batteries do not have a “memory” therefore they can be partially used and partially charged at any time,
in fact they prefer partial charge/discharge. Unlike NiCad batteries, you do not need to fully discharge and then fully
charge Lithium based rechargeables. Lithium batteries have a longer life if you only partially discharge them.
4) Do not leave Lithium batteries permanently plugged in on a trickle or standby charge. Once they are charged
disconnect them from the power source.
5) Store away from heat sources. A cool room (10 –20 deg.c) is ideal, but do not store Lithium batteries at fridge or
freezer temperatures!
6) Do not leave lithium batteries fully discharged for long periods of time (weeks/months). If they are fully
discharged they should be recharged as soon as possible.
3.2 Starting the HART Communicator HARTCOM-W2
Press and hold for 4 seconds the power button (top left corner of the tablet).
If the tablet was previously shut down it will boot up Windows. If the tablet was previously asleep it will immediately
reawaken. If the Tablet does not respond the battery may be too low.
3.3 Connecting to HART devices
3.3.1 For wired HART devices (skip this step for HART-IP and WirelessHART devices)
a) Connect the Bluetooth HART Modem to the HART device/network
For communication with wired (4-20mA based) HART devices you must have a suitable load resistance, or a 250Ω
Shunt/Loop resistor (supplied) must be placed in series with the device. Using the clips of the HART Modem connect
either: across the loop load resistor (A –B), or across the HART transmitter terminals (C –D). See the relevant Figure
1a, 1b or 1c below.
Figure 1a. Loop Powered HART Transmitter Connection
Figure 1b. 4-Wire HART Transmitter Connection
Loop
Power
Supply
+
-
HART
Transmitter
+
-
Loop Resistor
A
B
C
D
Loop Resistor
C
A
Power
Supply
+
-
HART
Transmitter
+
-
+
-
D
A
B
HARTCOM-W2 User Manual
4/2/2018 Designed and Produced under Page 15 of 71
ISO 9001:2008 Certification
Figure 1c. Multi-drop HART Transmitter Connection
b) Turn on the Bluetooth HART Modem (BT-BAT-ER) to your PC
Press the Yellow “Power” button, the “Power” LED will illuminate.
3.4 Open the HART Communicator software “DevCom2000”
On the HART Communicator Windows Tablet touchscreen, single tap on the HART Communicator Icon
“DevCom2000” as pictured below. Windows will then ask you if you want to allow this program to run, say yes.
Loop
Power
Supply
+
-
HART
Transmitter
+
-
Loop Resistor
B
C
A
D
HART
Transmitter
+
-
HART
Transmitter
+
-

HARTCOM-W2 User Manual
4/2/2018 Designed and Produced under Page 16 of 71
ISO 9001:2008 Certification
3.5: Discovering connected HART Device(s)
a) For wired (4-20mA) HART devices connected via the Bluetooth HART Modem
When the HART Communicator software (DevCom2000) is opened, by default, it will automatically check for HART
devices of address 0 connected to the Bluetooth HART Modem, if found it will display the “Explorer” window (go to
Step5). If you have previously told it to connect to HART-IP / WirelessHART devices, or if you want to check for
devices other than address 0, you will need to change the option within the HART Communicator software
(DevCom2000). Go to “Options →Basic”and make sure “Use TCP/IP…” checkbox isn’t selected, see screenshot
below.
Then click on the “Search By” Tab and select the desired option (see screenshot below) and then press OK.
HARTCOM-W2 User Manual
4/2/2018 Designed and Produced under Page 17 of 71
ISO 9001:2008 Certification
b) For HART-IP or WirelessHART devices
First you must configure the Tablets WiFi connection and connect to your networks Access Point (AP). Now we must
configure the HART Communicator software (DevCom2000) to connect to a HART-IP / WirelessHART device instead
of the default wired 4-20mA based HART device connected to the Bluetooth HART Modem. From the HART
Communicator software (DevCom2000) menu select “Options →Basic” and tick the option “Use TCP/IP…” and set
the IP address and port number (it is typically 5094) of the HART-IP device (Remote I/O, Multiplexer, WirelessHART
Gateway), see screenshots above. If your WirelessHART gateway does not use the default address of 0, or if you only
know its URL, click the “Advanced” tab. You can now enter the URL and/or change the Gateway HART address, see
the screenshot below. Press “Save” and then “OK”.
c) For HART Server
If you are using HART Server, from the HART Communicator software (DevCom2000) menu select “Options →Basic”
and tick the option “Use HART Server with….”, see screenshot below, press OK. You must then restart the
DevCom2000 software for the change to be effective.
HARTCOM-W2 User Manual
4/2/2018 Designed and Produced under Page 18 of 71
ISO 9001:2008 Certification
3.6 DevCom2000 Explorer Window
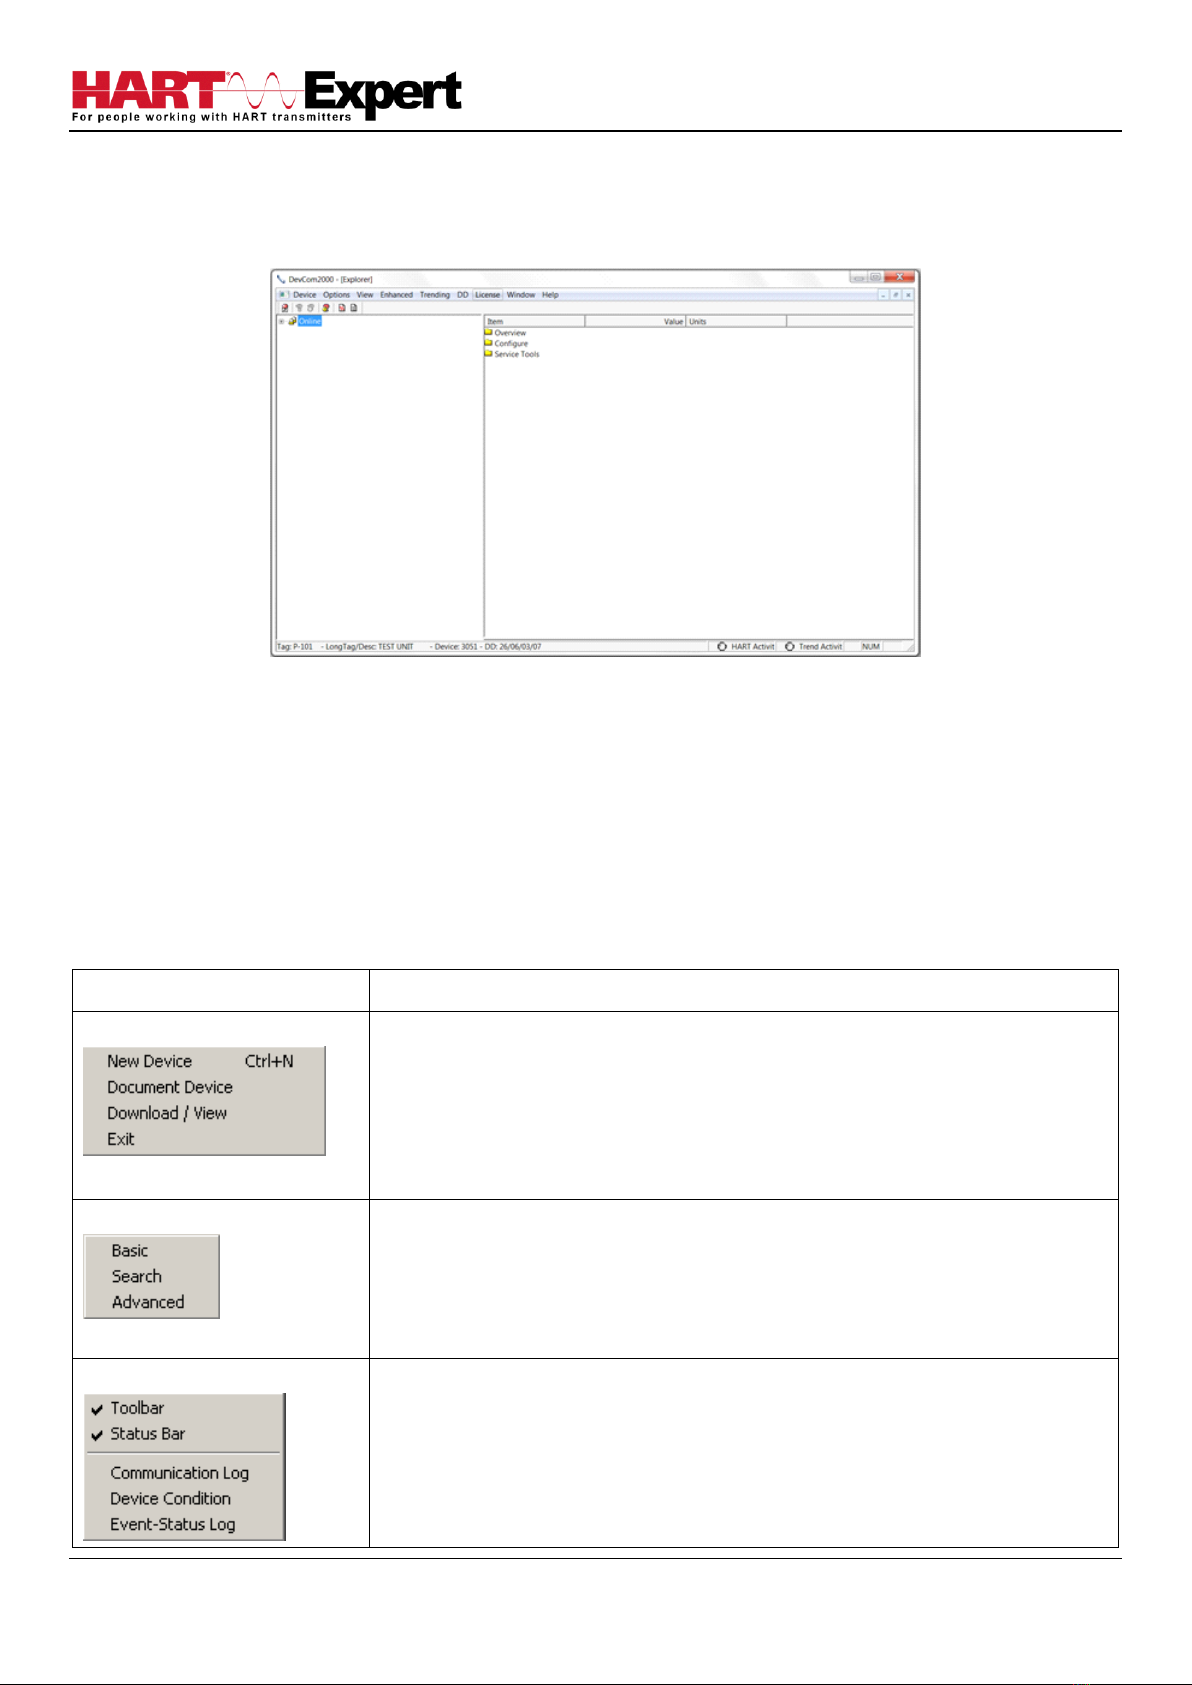
When DevCom2000 is connected to a HART device the browser window appears with online (i.e. root menu)
selected, as shown below.
The left pane of the window shows the menu structure and the right pane of the window displays corresponding
parameters of the menu selected. The DevCom2000 screens shown in this document are only an example of what
you may see when connected to your field device. What you see is actually controlled by the devices DD file and the
device. Hence, the menus, data, status and configurations displayed are specified by the field device's manufacturer
when they release the devices DD file.
3.7 Getting Familiarised with DevCom2000 Explorer
3.7.1 Using the Menus
DevCom2000 Explorer provides visual representation and structure of the application window.
Menu
Explanation
Device Menu
The Device Menu offers the following sub-menu options:
New Device - Connect to a new device or reconnect to the same device.
Document Device –Brings up the Document Device dialog box.
Download / View –Brings up the Download dialog box which provides
Configuration File features.
Exit - Exit DevCom2000.
Options Menu
The Options Menu offers the followings sub-menu options:
Basic- Select what COM port the device is connected to and use
WirelessHART gateway.
Search- Search by Poll Address, Long or Short Tag.
Advanced- Select HART Master, Language, and DD Startup
View Menu
The View Menu offers the following sub-menu options:
Toolbar - Hide or show the Tool Bar.
Status Bar - Hide or show the Status Bar.
Communication Log –Open the Communication Log window.
Device Condition –View detailed device status.
Event-Status Log –View log of events and status changes

HARTCOM-W2 User Manual
4/2/2018 Designed and Produced under Page 19 of 71
ISO 9001:2008 Certification
Menu
Explanation
Example of an available
Enhanced Menu
Example of an unavailable
Enhanced Menu
The Enhanced Menu offers enhanced device menus. Some devices do not
have enhanced menus, this is controlled by the device manufacturer and
is specified in the devices DD file. If a device does not have an enhanced
menu, this menu will only say “Enhanced View Below (if available)”. To
the left are two examples, first a device with enhanced menus, second a
device without enhanced menus.
Trending Menu
The Trending Menu offers the following sub-menu options: Define Trend
–Brings up the Define Trend dialog box where a trend is started.
View Current Trend –Brings up a real time graph of values currently being
trended.
View Past Trends –Brings up the View Trend dialog which contains past
trend files. Selected trend files can then be graphed.
Stop Current Trend –Stops the current log in process.
DD Menu
The DD Menu offers the following sub-menu options:
Add DD –Brings up the dialog that adds a DD to the library. Also used to
give labels to non-standard library DDs.
Available DDs –Brings up a browser of all the DDs installed in the library.
DTM Menu
The DTM Menu offers the following sub-menu options:
Launch FDT Frame–launches the FDT Frame program.
Help Menu
The Help Menu offers the following sub-menu options:
DevCom2000 Help –Brings up Help information for the DevCom2000
application.
Com Troubleshooter –Brings up the DevCom2000 Com Troubleshooter.
Device Help –Brings up help information for the connected device (if
available).
About DevCom2000 –Shows copyright information, support information,
and application Version Number.
3.7.2 Using the Toolbar
When you start the application, by default, the toolbar buttons appears on the main window. If it fails to display,
click View →Toolbar option from the menu bar to bring up the toolbar.
Following are the buttons available in the DevCom2000 application toolbar to perform the necessary tasks:
Button
Description
Corresponding Menu Option
Connect to a new device
Device →New Device
Send parameter changes to the device
Cancel parameter changes

HARTCOM-W2 User Manual
4/2/2018 Designed and Produced under Page 20 of 71
ISO 9001:2008 Certification
View more status on Device and
Communication (Command 48 status)
View →Device Condition
View Communication log
View →Communication log
View Event log
View →Event-Status log
Launch FDT Frame (Future)
DTM →Launch FDT Frame
3.7.3 Familiarising with Icons
DevCom2000 application uses different icons to represent different elements of the application. The following table
lists the icons and their meanings:
Icon
Meaning
Indicates a menu or submenu in the navigation tree
Indicates a currently selected menu or submenu in the navigation tree
Online menu icon. The actual DD menu comes under this.
Indicates a “Variable” item
Indicates a “Method” (Standard Operating Procedure) item
Indicates an “Edit Display” item
This manual suits for next models
1
Table of contents


