Hartke ACR5 User manual
Owner's Manual
ACR5 Acoustic Guitar Amplifier

2
Important Safety Information
WARNING: TO REDUCE THE RISK OF ELECTRIC SHOCK, DO NOT REMOVE COVER (OR BACK)
AS THERE ARE NO USER-SERVICEABLE PARTS INSIDE. REFER SERVICING TO QUALIFIED
SERVICE PERSONNEL.
This lightning flash with arrowhead symbol within an equilateral triangle
is intended to alert the user to the presence of non-insulated “dangerous
voltage” within the product’s enclosure that may be of sufficient magni-
tude to constitute a risk of electric shock.
The exclamation point within an equilateral triangle is intended to alert
the user to the presence of important operating and maintenance in-
structions in the literature accompanying the appliance.
ATTENTION
RISQUE DE CHOC ÉLECTRONIQUE -
NE PAS OUVRIR
FCC Notice
This device complies with part 15 of the FCC Rules. Operation is subject to the following two
conditions: (1)this device may not cause harmful interference,and (2)this device must accept any
interference received, including interference that may cause undesired operation.
Changes or modifications not expressly approved by the party responsible for compliance could void
the user’s authority to operate the equipment.
NOTE: This equipment has been tested and found to comply with the limits for a Class B digital
device, pursuant to Part 15 of the FCC Rules. These limits are designed to provide reasonable
protection against harmful interference in a residential installation. This equipment generates,
uses and can radiate radio frequency energy and, if not installed and used in accordance with
the instructions, may cause harmful interference to radio communications. However, there is no
guarantee that interference will not occur in a particular installation. If this equipment does cause
harmful interference to radio or television reception, which can be determined by turning the
equipment off and on, the user is encouraged to try to correct the interference by one or more of
the following measures:
• Reorient or relocate the receiving antenna.
• Increase the separation between the equipment and receiver.
• Connect the equipment into an outlet on a circuit different from that to which the receiver is
connected.
• Consult the dealer or an experienced radio/TV technician for help.
CAUTION
To prevent electric shock hazard, do not connect to mains power supply
while grille is removed.
Samson Technologies Corp.
©2016, V1.2
45 Gilpin Avenue
Hauppauge, New York 11788-8816
Phone: 1-800-3-SAMSON (1-800-372-6766)
Fax: 631-784-2201
www.samsontech.com

ACR5 Acoustic Guitar Amplifier 3
1. Read these instructions.
2. Keep these instructions.
3. Heed all warnings.
4. Follow all instructions.
5. Do not use this apparatus near water.
6. Clean only with dry cloth.
7. Do not block any ventilation openings.
Install in accordance with the manufactur-
er’s instructions.
8. Do not install near any heat sources such
as radiators, heat registers, stoves, or
other apparatus (including amplifiers) that
produce heat.
9. The apparatus shall be connected to a
mains socket outlet with a protective
earthing connection.
10. The mains plug or an appliance coupler is
used as the disconnect device, the discon-
nect device shall remain readily operable.
11. Do not defeat the safety purpose of the
polarized or grounding type plug. A polar-
ized plug has two blades with one wider
than the other. A grounding type plug has
two blades and a third grounding prong.
The wide blade or the third prong are pro-
vided for your safety. If the provided plug
does not fit into your outlet, consult an
electrician for replacement of the obsolete
outlet.
12. Protect the power cord from being walked
on or pinched particularly at the plugs,
convenience receptacles, and at the point
where they exit from the apparatus.
13. Only use attachments/accessories speci-
fied by the manufacturer.
14. Use only with the cart, stand, tripod,
bracket, or table specified by the manu-
facturer, or sold with the
apparatus. When a cart is
used, use caution when
moving the cart/appara-
tus combination to avoid
injury from tip-over.
15. Unplug the apparatus during lightening
storms or when unused for long periods
of time.
16. Refer all servicing to qualified personnel.
Service is required when the apparatus has
been damaged in any way, such as power
supply cord or plug is damaged, liquid has
been spilled or objects have fallen into
the apparatus has been exposed to rain
or moisture, does not operate normally, or
has been dropped.
17. This appliance shall not be exposed to
dripping or splashing water and that no
object filled with liquid such as vases shall
be placed on the apparatus.
18. Caution-to prevent electrical shock, match
wide blade plug wide slot fully insert.
19. Please keep a good ventilation environ-
ment around the entire unit.
20. To prevent injury, this apparatus must be
securely attached to the stand in accor-
dance with the installation instructions.
21. WARNING: The battery (battery or batter-
ies or battery pack) shall not be exposed
to excessive heat such as sunshine, fire or
the like.
22. CAUTION: Danger of explosion if battery is
incorrectly replaced. Replace only with the
same or equivalent type.
Important Safety Information
If you want to dispose this product, do not mix it with general household waste. There is a
separate collection system for used electronic products in accordance with legislation that
requires proper treatment, recovery and recycling.
Private household in the 28 member states of the EU, in Switzerland and Norway may
return their used electronic products free of charge to designated collection facilities or to a retailer
(if you purchase a similar new one).
For Countries not mentioned above, please contact your local authorities for a correct method of
disposal.
By doing so you will ensure that your disposed product undergoes the necessary treatment, recovery
and recycling and thus prevent potential negative effects on the environment and human health.

4
Introduction
Congratulations on your purchase of the Hartke ACR5 Acoustic Guitar Amplifier.
The Hartke ACR5 series faithfully reproduces the natural sound of the any
acoustic instrument, while providing versatility for practice and performance. The
ACR5 is a lightweight combo featuring a 50 watt power amplifier section with a
6.5” woofer and 1” soft dome tweeter. The ACR5 has two independent channels,
each with a 3-band EQ, independent reverb and chorus controls, for connecting
acoustic electric instruments, microphones or line level devices. Additionally,
the ACR5 has a variable notch filter to help reduce feedback, a built-in tuner,
and an XLR direct out to connect to the front of house for larger performances.
The ACR5 is the perfect solution for electric acoustic guitars, and also, for multi
instrumentalists who play electric violin, mandolin, Dobro and other acoustic
electric instruments too. While the ACR5 is packed with all the features
demanded by the most discerning acoustic artists, what makes the amplifier
special is the unmatched sonic performance. The result is sound reproduction
that is totally true to the sound of the instrument it is amplifying. Simply put, the
amp sound like your instrument, only louder.
In these pages, you’ll find a description of the many features of your ACR5
Acoustic Guitar Amplifier, instructions for setting up and using the amp, plus
full specifications. If you purchased the amplifier in the United States you will
also find a warranty card enclosed—please follow the instructions so that you can
receive technical support and so we can send you updated information about this
and other Hartke products in the future. Also, be sure to check out our website
(www.hartke.com) for complete information about our full product line.
We recommend you keep the following records for reference, as well as a copy
of your sales receipt.
Serial number: ____________________________________________
Date of purchase: __________________________________________
Dealer name: _____________________________________________
With proper care and maintenance, your ACR5 Acoustic Guitar Amplifier will
operate trouble-free for many years. Should the product ever require servicing, a
Return Authorization (RA) number must be obtained before shipping your unit to
Samson. Without this number, the unit will not be accepted. Please call Samson
at 1-800-3SAMSON for an RA number prior to shipping your unit. Please retain
the original packing materials and, if possible, return the unit in its original
carton. If your ACR5 was purchased outside of the United States, contact your
local distributor for warranty details and service information.

ACR5 Acoustic Guitar Amplifier 5
Features
The Hartke ACR5 Acoustic Guitar Amplifier employs the
most advanced electronic and speaker design concepts in
acoustic instrument amplification. Here are some of their
main features:
• Lightweight acoustic guitar amplifier that weighs just
under 25lb
• 50 watts of power
• 6.5” woofer with butyl surround and 1” soft dome
tweeter
• Dual-channel design ideal for singer-
songwriters
• 3-band EQ with chorus and reverb
effects on each channel
• Variable Notch filter for feedback
control
• Contour EQ circuit for using the
ACR5 with electric guitars and basses
• Balanced XLR direct output for recording 1/4” (Guitar) and XLR/1/4” (Mic/
Line) combo inputs
• Stereo 1/4” and 1/8” Aux inputs for line level devices1/4” headphone output
• Chromatic tuner mutes the outputs for silent tuning
• Footswitch jack for controlling the reverb and chorus effects
• Molded strap carry handle
6
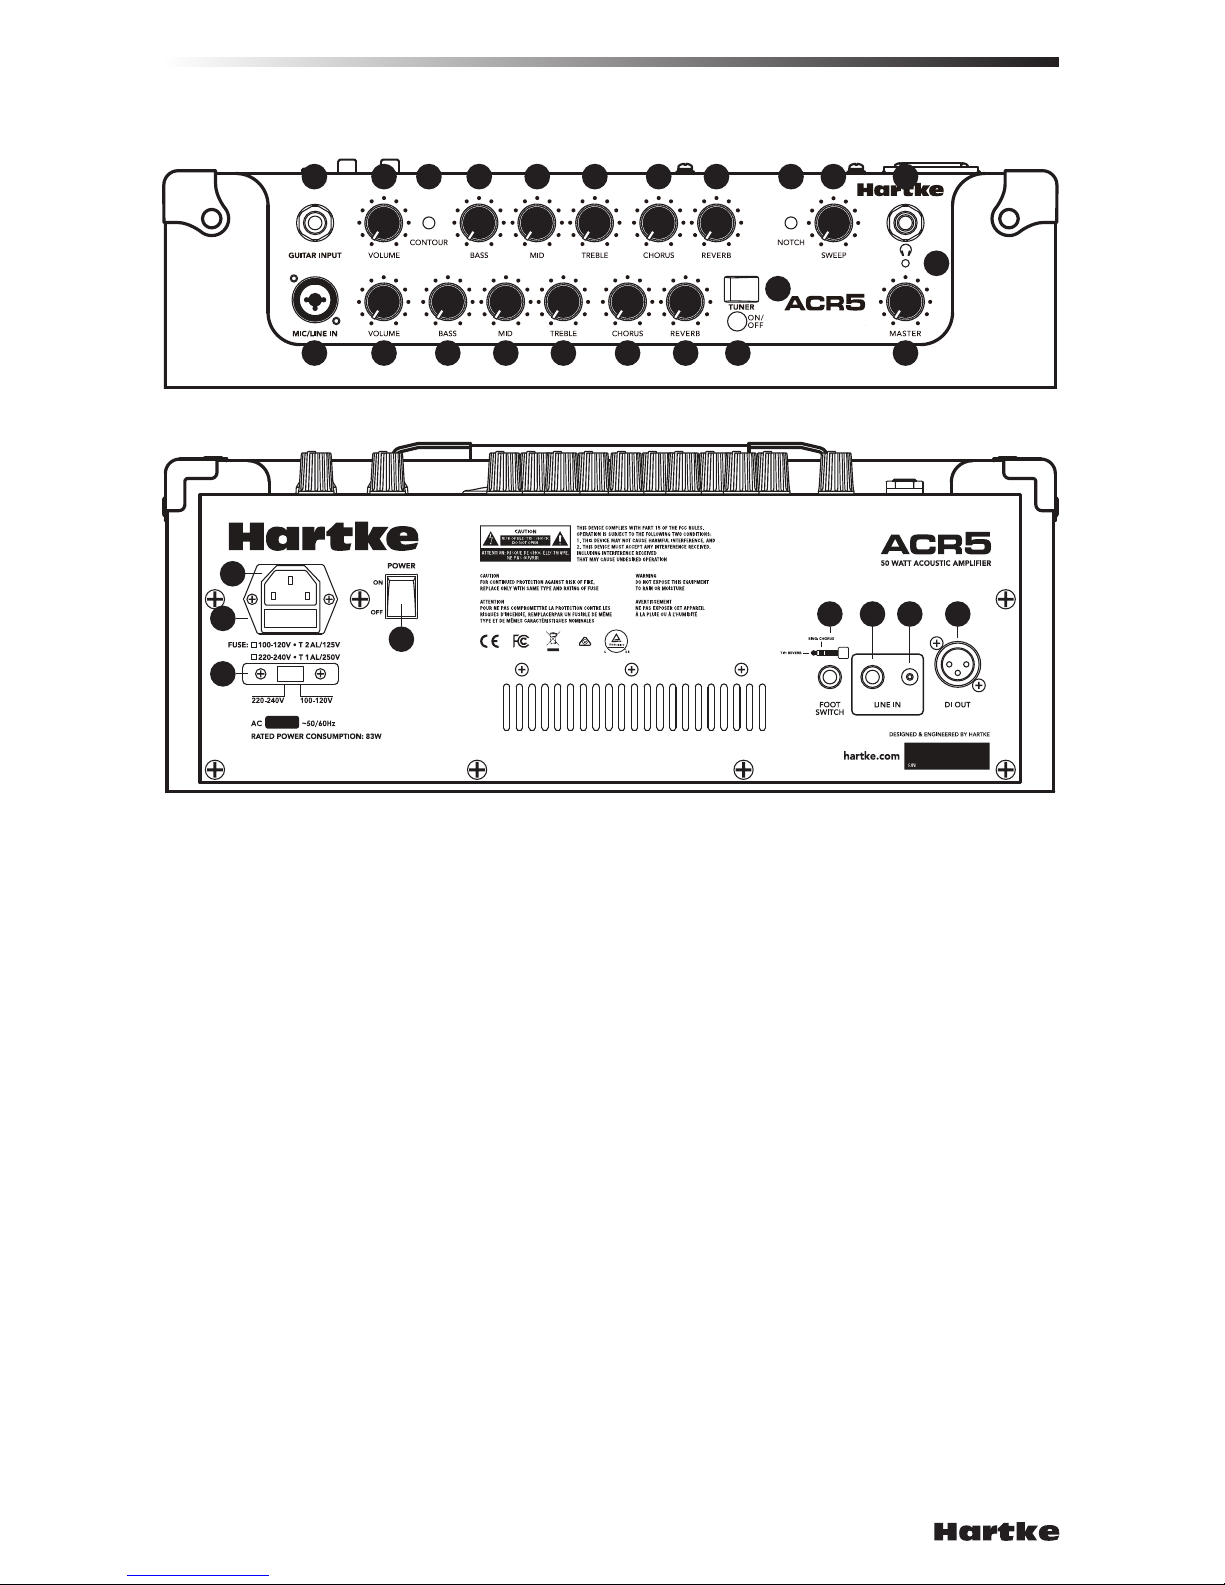
ACR5 Callouts
1. GUITAR INPUT - 1/4” phone jack for connecting instruments with passive or active
pickups.
2. Guitar VOLUME - Control knob is used to control the overall level of the GUITAR
INPUT channel.
3. MIC/LINE IN - XLR+1/4” combo input connector for connecting a low impedance
microphone or line level device.
4. MIC/LINE VOLUME - Control knob is used to control the overall level of the MIC/LINE
IN channel.
5. CONTOUR Switch - Pressing this switch engages a mid scoop curve to the Guitar
channel which makes the amplifier sound more natural when plugging an electric
instrument to the ACR5, or allows an acoustic guitar to cut through the mix by
suppressing the mids and accentuating the highs.
6. BASS Control - This control is used to adjust the low frequency response. As it is
turned clockwise the frequency area is boosted; as it is turned counterclockwise the
frequency area is attenuated.
7. MID Control - This control is used to adjust the mid frequency response.
8. TREBLE Control - This control is used to adjust the high frequency response. As it is
turned clockwise the frequency area is boosted; as it is turned counterclockwise the
frequency area is attenuated.
9. CHORUS Send - Control knob used to set the amount of chorus effect on a channel
that is mixed with the channel’s input signal. As the control is rotated clockwise,
the amount of the effect is increased.
1 2
3 4
5 6 7 8
6 7 8 9 10
910 13
11
14
12 16
17
15
18
21
22 23 24 25
20
19
TOP PANEL
REAR PANEL

ACR5 Acoustic Guitar Amplifier 7
ACR5 Callouts
10. REVERB Send - Control knob used to set the amount of reverb effect on a channel
that is mixed with the channel’s input signal. As the control is rotated clockwise,
the amount of the effect is increased.
11. TUNER - Chromatic tuner for tuning your instrument connected to the GUITAR IN-
PUT channel. When the tuner is engaged, all of the outputs are muted.
12. Tuner ON/OFF Button - Press and hold to activate the tuner. A short press with turn
the tuner off and pass signal to the ACR5 outputs.
13. NOTCH Switch - Pressing this switch engages the Notch Filter.
14. SWEEP - Used to set the center frequency for the Notch Filter.
15. Headphone Output - Connect any standard headphones to this 1/4” jack. When a
plug is inserted into the headphone jack, the speaker output is disconnected, allow-
ing you to use your ACR5 as a practice amplifier. The level of the signal sent to the
headphones is determined by the setting of the VOLUME knob.
Note: Because the amplifier is capable of generating extremely high headphone
signal levels, always start with the Volume knob at minimum and then slowly turn it
up.
16. MASTER Volume - Control knob used to control the overall level of the ACR5.
17. Power Indicator - This red LED illuminates when the ACR5 is powered on.
18. AC Inlet - Attach the grounded AC power cord here to connect your amplifier to
mains power. This cord comes supplied with the appropriate plug for your geograph-
ic area.
CAUTION: Do not use an adapter to defeat the third grounding pin on this plug or
severe electric shock may result!
19. Fuse Holder - The fuse holder comes from the factory with the appropriately rated
fuse for your model. If you need to change this fuse for any reason, replace it with
one that has the same exact rating.
20. Voltage Selection Switch - This switch is used to select the amplifiers operating
voltage
NOTE: Before using your speaker, be sure the voltage selection switch is set to
the correct voltage for your country. Be sure to install the properly rated fuse when
changing the operating voltage.
21. Power Switch - Use this to power the amplifier on or off.
22. FOOTSWITCH Jack - Connect a two button momentary footswitch to switch the reverb
and chorus effects on and off. The tip controls the reverb effect and the ring con-
trols the chorus effect.
23. 1/4” Line Input - 1/4” input for connecting an external line level signal like that from
a Drum Machine, CD or MP3 player.
24. 1/8” Line Input - 1/8” input for connecting an external line level signal like that from
a Drum Machine, CD or MP3 player.
25. DI OUT - This connector carries the Balanced signal from the ACR5’s main output
and can be used to connect to the input of a PA mixer.

8
Quick Start
Here are some basic steps for setting up and get started playing your Hartke
ACR5 Acoustic Guitar Amplifier. Setting up your amplifier is a simple procedure
which takes only a few minutes:
1. Remove all packing materials (save them in case of need for future service)
and decide where the amplifier is to be physically placed. To avoid potential
overheating problems, be sure that the rear panel is unobstructed and that
there is good ventilation around the entire unit.
2. Connect the 3-pin AC plug into any grounded AC socket. Don’t turn the
amplifier on just yet, though.
3. Use a standard 1/4” instrument cable to connect your acoustic guitar, or
other electric acoustic instrument to the GUITAR Input jack on the top panel.
4. Before turning the amplifier on turn, set the ACR5 controls to the default
setting for getting good sound quickly. On the Guitar Input channel set the
VOLUME knob to the nine o’clock position and set BASS, MID and TREBLE
controls to the twelve o’clock position. On the MIC/LINE IN channel, set the
GAIN knob to the fully counter-clockwise position. Set the MASTER volume
control to the fully counterclockwise position.
5. Press the rear panel POWER switch to the ON position in order to turn on
the amplifier.
6. Set the output of your acoustic to about 3/4’s the way up and then, while
playing, slowly turn the master VOLUME control up until the desired level
is achieved. If you hear distortion even at low MASTER volume settings,
back off the output of your acoustic guitar (or check for a faulty cable).
Note: As a “rule of thumb”, always try to keep the MASTER volume control
to a higher setting than the input channel VOLUME controls in order to get
the cleanest output.
7. For tonal control, the ACR5 features BASS, MID and TREBLE equalizer
controls. The BASS control is a shelving EQ, affecting low frequencies
around 80Hz, is used to fill out the sound of guitar when playing solo or
thin it up when playing with an ensemble. The MID control is a peaking
EQ, affecting frequencies around 1.8kHz, which when boosted can help
the guitar to cut through to the front of the mix. The TREBLE control is a
shelving EQ affecting high frequencies around 15kHz, which can bring out
the air or sparkle of the guitar. Setting the BASS, MID and TREBLE knobs to
the twelve o’clock position produces a flat frequency response.
8. You can add a splash of chorus or gallons of lush reverb to either input
channel using the ACR5’s on-board, 24-bit digital effects, by rotating the
CHORUS and REVERB send knobs on each input channel clockwise.

ACR5 Acoustic Guitar Amplifier 9
Quick Start
Using the Mic Input
The second channel includes an XLR microphone input that you can use for
miking your acoustic instrument, or for connecting a low impedance vocal
microphone. The ACR5 is great for using as a small PA or can make a great vocal
monitor thanks to the flat and natural response of its built-in speaker system.
Follow these steps for connecting a microphone to the ACR5:
1. Start by turning the MASTER volume all the way down. Connect a low
impedance microphone to the MIC/LINE IN jack with a standard XLR mic.
2. Next, raise the MASTER volume to the 12 o’clock position.
3. Now, slowly raise the microphone channel VOLUME control until you add the
desired amount of the microphone with your acoustic guitar. Keep in mind
that you may need to adjust the acoustic guitar and microphone VOLUME
controls to get the best blend between the two channels.
4. For tonal control, the ACR5 features BASS, MID and TREBLE equalizer
controls. The BASS control is a shelving EQ, affecting low frequencies
around 80Hz, is used to fill out the sound of guitar when playing solo or
thin it up when playing with an ensemble. The MID control is a peaking
EQ, affecting frequencies around 1.8kHz, which when boosted can help
the guitar to cut through to the front of the mix. The TREBLE control is a
shelving EQ affecting high frequencies around 15kHz, which can bring out
the air or sparkle of the guitar. Setting the BASS, MID and TREBLE knobs to
the twelve o’clock position produces a flat frequency response.
5. You can add a splash of chorus or gallons of lush reverb to either input
channel using the ACR5’s on-board, 24-bit digital effects, by rotating the
CHORUS and REVERB send knobs on each input channel clockwise.
10
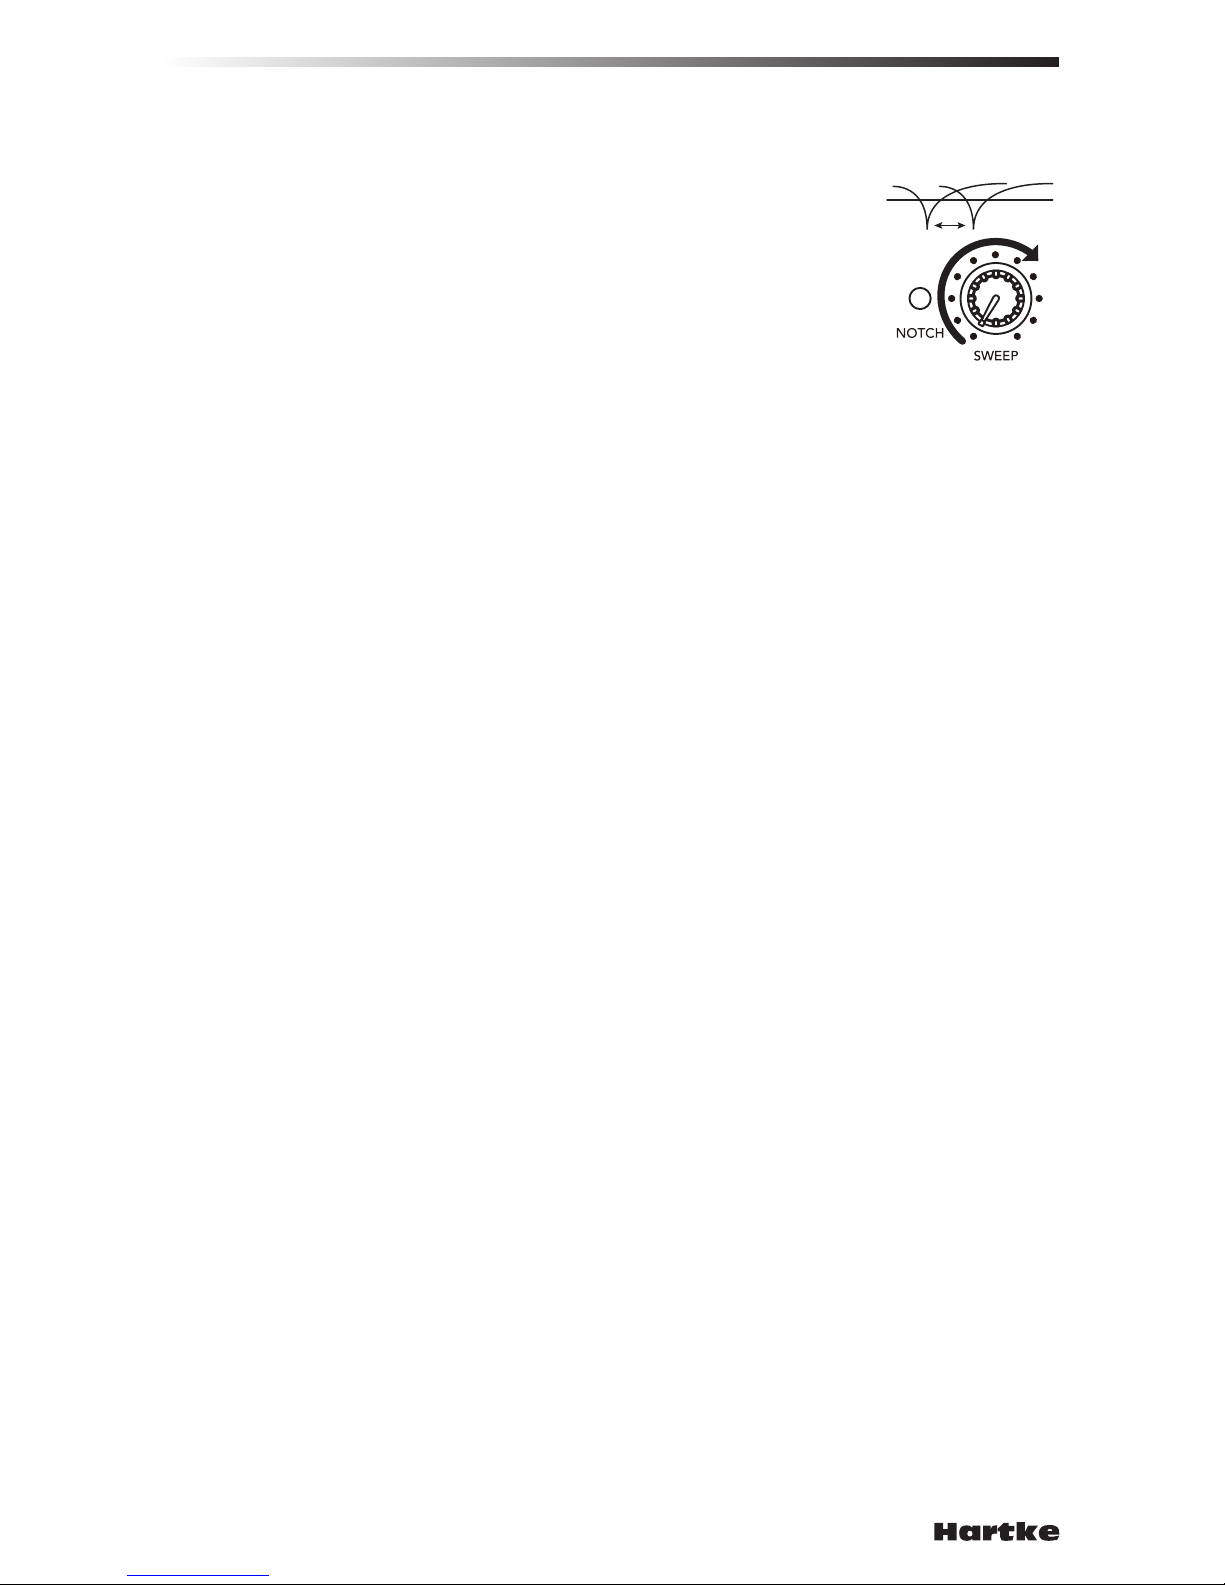
Setting the Notch Filter
The ACR5 Notch Filter is a tool to help you remove feedback.
Feedback is that annoying howling sound that you get when
the sound from a loudspeaker is picked up by a microphone
connected to the speaker, re-amplified, pick-up again,
re-amplified… and so on, so that an acoustical loop is created.
The same phenomenon can happen with your electric acoustic
since the pick-up system and wood of the instrument become
a transducer themselves like a microphone.
The Notch Filter is a “cut only” equalizer that attenuates a narrow band of
frequencies. When you set the Notch Filter to the feedback frequency, you can
cut that frequency to eliminate the feedback. And, since the bandwidth is narrow,
the cut has little effect on the tone of your instrument. By using the Notch Filter
you can get the maximum level out of your amplifier without feedback.
The SWEEP control is used to set the specific frequency that the filter will cut
from 50Hz to 720Hz.
To set the Notch Filter, connect your acoustic electric guitar to the GUITAR
INPUT, turn the amplifier up by raising the MASTER volume and the channel
VOLUME control to a level right as feedback just occurs.
Now, turn the Notch filter on by pressing the NOTCH button. Turn the Notch
Filter FREQUENCY knob slowly and stop as soon as you dial in the feedback
frequency.
If you hear the feedback get lower in volume but not go all the way off, lower the
volume of the acoustic guitar. If the amplifier isn’t feeding-back and you have
enough volume, you’re done.

ACR5 Acoustic Guitar Amplifier 11
Specifications
Rated Output Power 50Watts
SPL @ 1 watt/1 meter 106dB SPL
Frequency Response 50-20kHz (-3dB)
Power Consumption 88Watts max
Woofer 6.5” paper cone with butyl surround
Tweeter 1” soft dome
Input impedance
Guitar Channel 2.2MΩ
MIC IN Channel 2kΩ
Line IN Channel 20kΩ
1/4” Aux Input 14.3kΩ
1/8” Aux Input 21kΩ
Tone Controls
Low ±10 dB @ 80Hz (shelving)
Mid ±10 dB @ 1.8kHz (peaking)
High ±10 dB @ 15kHz (shelving)
DI Output Balanced XLR
Direct Output Impedance 100Ω balanced, line level
Phantom power tolerant, ground isolated
Dimensions (LxWxH) 9.8” x 16.5” x 12”
250mm x 420mm x 306mm
Weight 24.9lb
11.27kg
At Hartke, we are continually improving our products, therefore specifications and
images are subject to change without notice.

Hartke
45 Gilpin Avenue
Hauppauge, New York 11788-8816
Phone: 1-800-3-SAMSON (1-800-372-6766)
Fax: 631-784-2201
www.samsontech.com
Table of contents
Other Hartke Musical Instrument Amplifier manuals

Hartke
Hartke LX8500 User manual

Hartke
Hartke A25 User manual

Hartke
Hartke TX600 User manual

Hartke
Hartke G10 User manual

Hartke
Hartke Transient Attack 1400 User manual

Hartke
Hartke G15 User manual

Hartke
Hartke B90 User manual

Hartke
Hartke GT60 User manual

Hartke
Hartke KM200 User manual

Hartke
Hartke GT100 User manual


