HASWING Cayman B GPS Series User manual

User Manual for:
50736 Cayman B GPS 55lbs
50737 Cayman B GPS 80lbs
50738 Cayman B GPS 101lbs
Version: V01 Printed in China
Cayman B GPS series
OWNER’S MANUAL
Should your motor be defective or a technical issue
arise, please contact the local Haswing distributor
for assistance. Visit www.haswing.com for the list
of country distributors.
Yatai Electric Appliances Co., Ltd
No. 4 Xinlong Street, NanLong Industrial Park
SanXiang, ZhongShan, GuangDong Province, China
Postcode: 528463
Tel: +86 760 86692666
Fax: +86 760 86692996
WWW.HASWING.COM
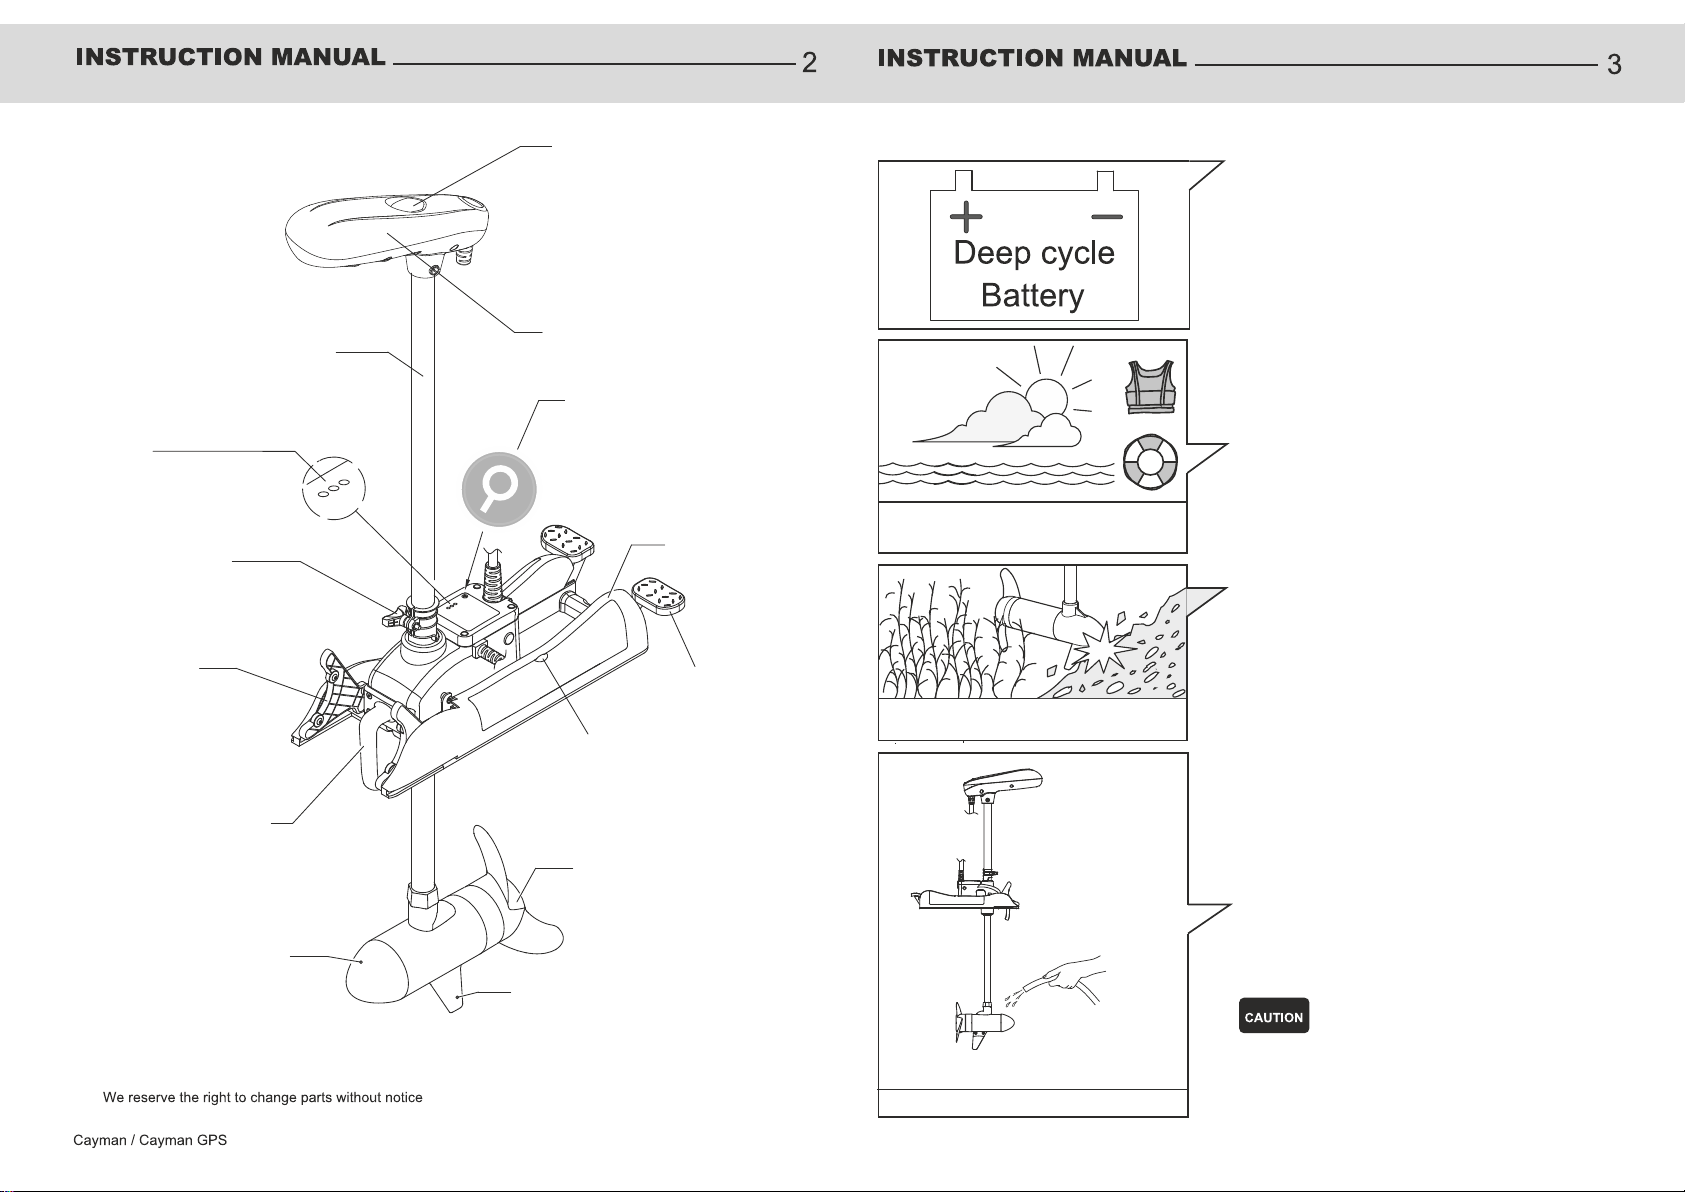
Battery status display
Motor transportation
retainer
Adjustable depth
collar
Motor shaft
Boat controller (Cayman B
GPS model only
Pairing button
Mounting base
Stow/deploy pedal
Access panel
Propeller
Motor lift handle
Durable DC motor
Replaceable fin
(skeg)
Indicator lights (Cayman B
GPS model only
Product features
Product features
Before operating the motor
Only use deep cycle battery or batteries to power the
motor. Incorrect or improper use, or connection of the
battery could cause damage to the motor.
Disconnect the battery when stowing the boat or not
using for an extended period.
Always wear an approved life vest or PFD (personal
flotation device) and comply with local boating
regulations.
When motoring with the electric trolling motor in
shallow water or around obstacles, reduce speed.
Raise or retract the motor when in shallow water. Be
aware of swimmers in close proximity to your vessel.
Before operating the motor
Wash down motor
with fresh water after
using in saltwater
Wash motor after use
Be aware of underwater obstacles
Be mindful of weather conditions
Remove any debris from around the propeller or
propeller drive shaft. Wash with freshwater after
using in saltwater.
IP63 waterproof level for all but the motor
IP68 waterproof level for the motor
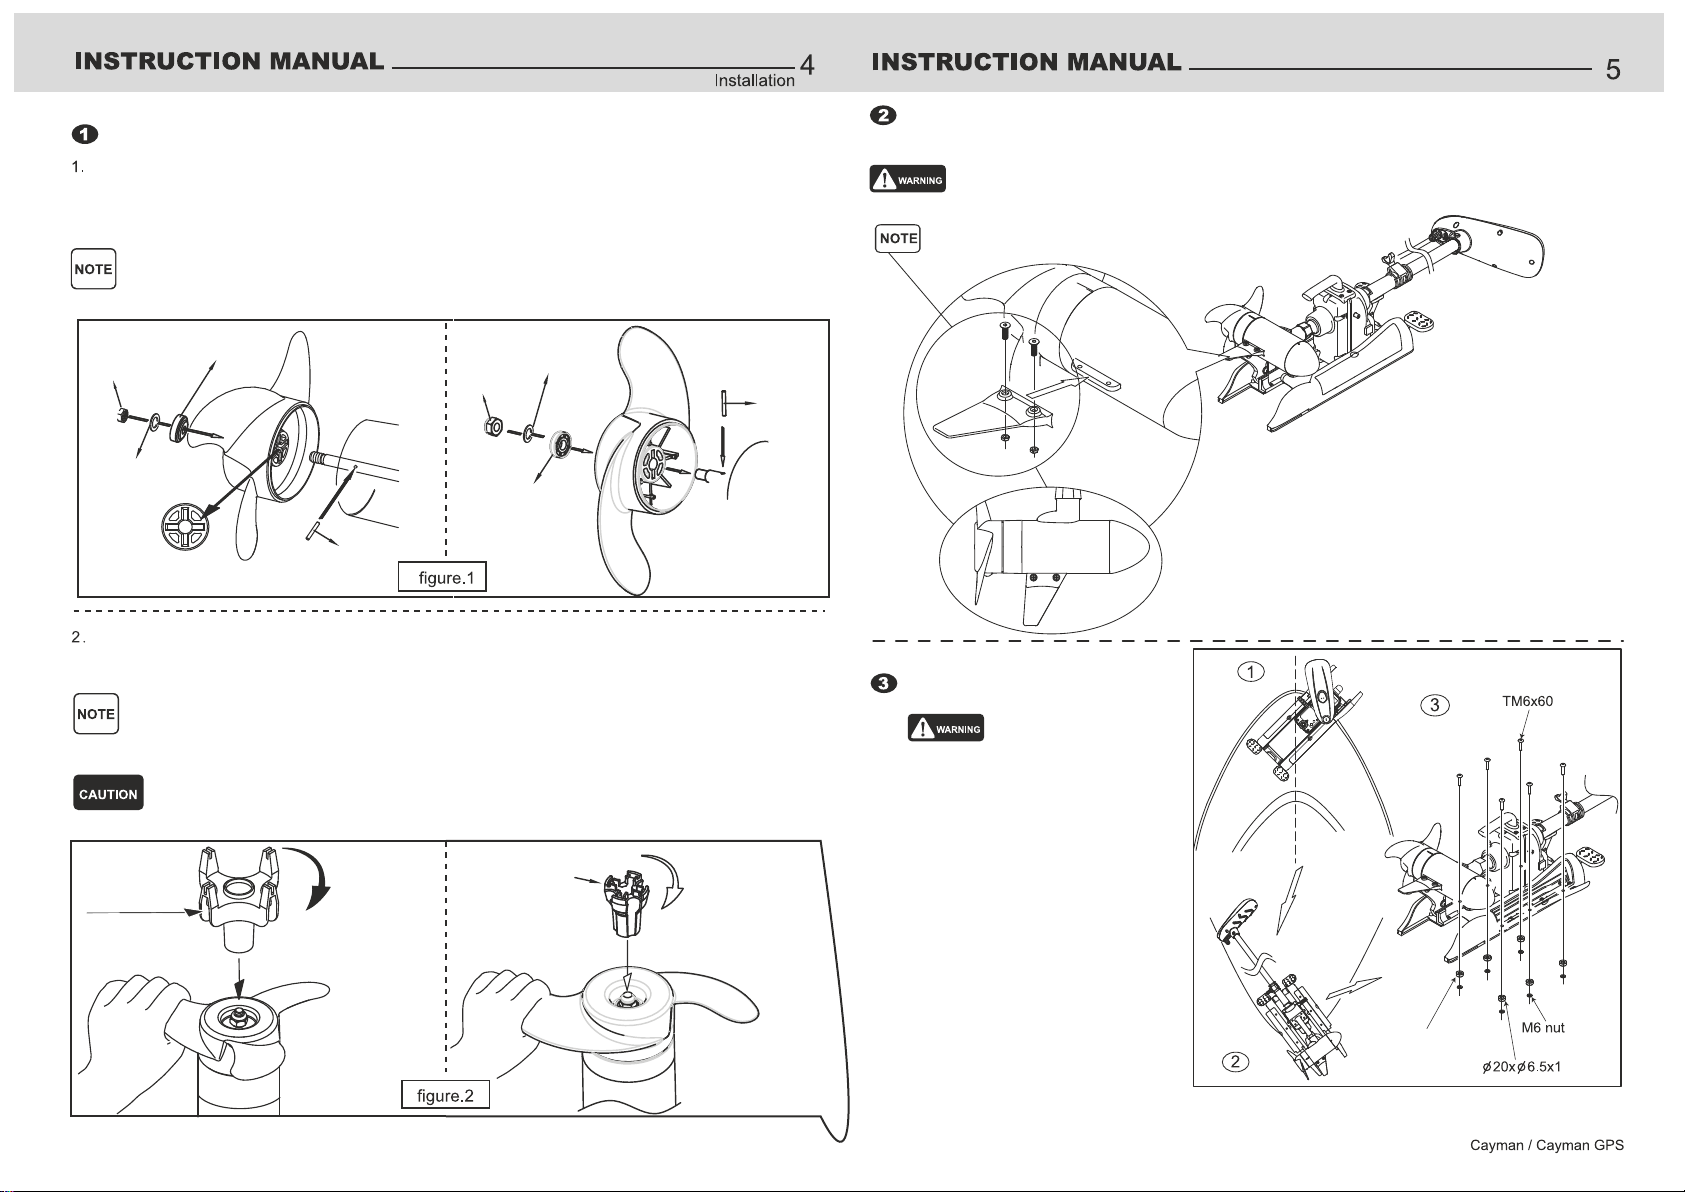
Propeller installation
Install the drive pin (drive pin and cross-shaped slot in the propeller must align in order to
correctly fit the propeller to the motor), anode, washer and self-locking nut onto the drive
shaft. (Fig. 1)
The cross-shaped slot (2 slots) allow the user to re-assemble the propeller if one slot is worn.
55lbs thrust motor
Self-locking nut
Stainless steel
washer
Drive pin
Sacrificial anode
Cross-shaped
slot
80-101lbs thrust
motors
Drive pin
Stainless steel
washer
Sacrificial anode
Self-locking
nut
Hold the propeller to prevent it from rotating and use the propeller wrench to tighten the
propeller nut until firm. Do not over-tighten. (Fig. 2)
Only use the supplied propeller wrench to tighten, other tools may cause over-tightening
resulting in damage. TIP: Keep this hand wrench in your boat in the event that you get debris
such as fishing line around the propeller shaft.
Tighten the nut ¼ turn past the ‘snug’ point. Over-tightening can cause damage to the
propeller.
Propeller wrench
Propeller wrench
55lbs thrust motor 80-101lbs thrust
motors
Ensure that the battery is not
connected when initially installing or
when mounting the motor using the
Quick Release Bracket. If not using
the motor for extended period or
when storing the vessel, disconnect
the battery.
The motor can be bolted directly to
the boat OR if using the Quick
Release Bracket, bolt the puck to the
boat. It is recommended to mount
the motor so it is longitudinal with
the boat or on a slight angle. This
will also depend whether your boat
has an electric motor mounting plate.
Installation method
Anti-slip spacers
Installing the lift handle and fin
Ensure that the motor is disconnected from the battery before installing components.
Nuts, bolts and fin supplied in plastic bag.
Fig. 4
Align the fin on the bottom of the motor, note correct
direction before tightening nuts and bolts.
Mounting the motor
Fig. 5
Installation
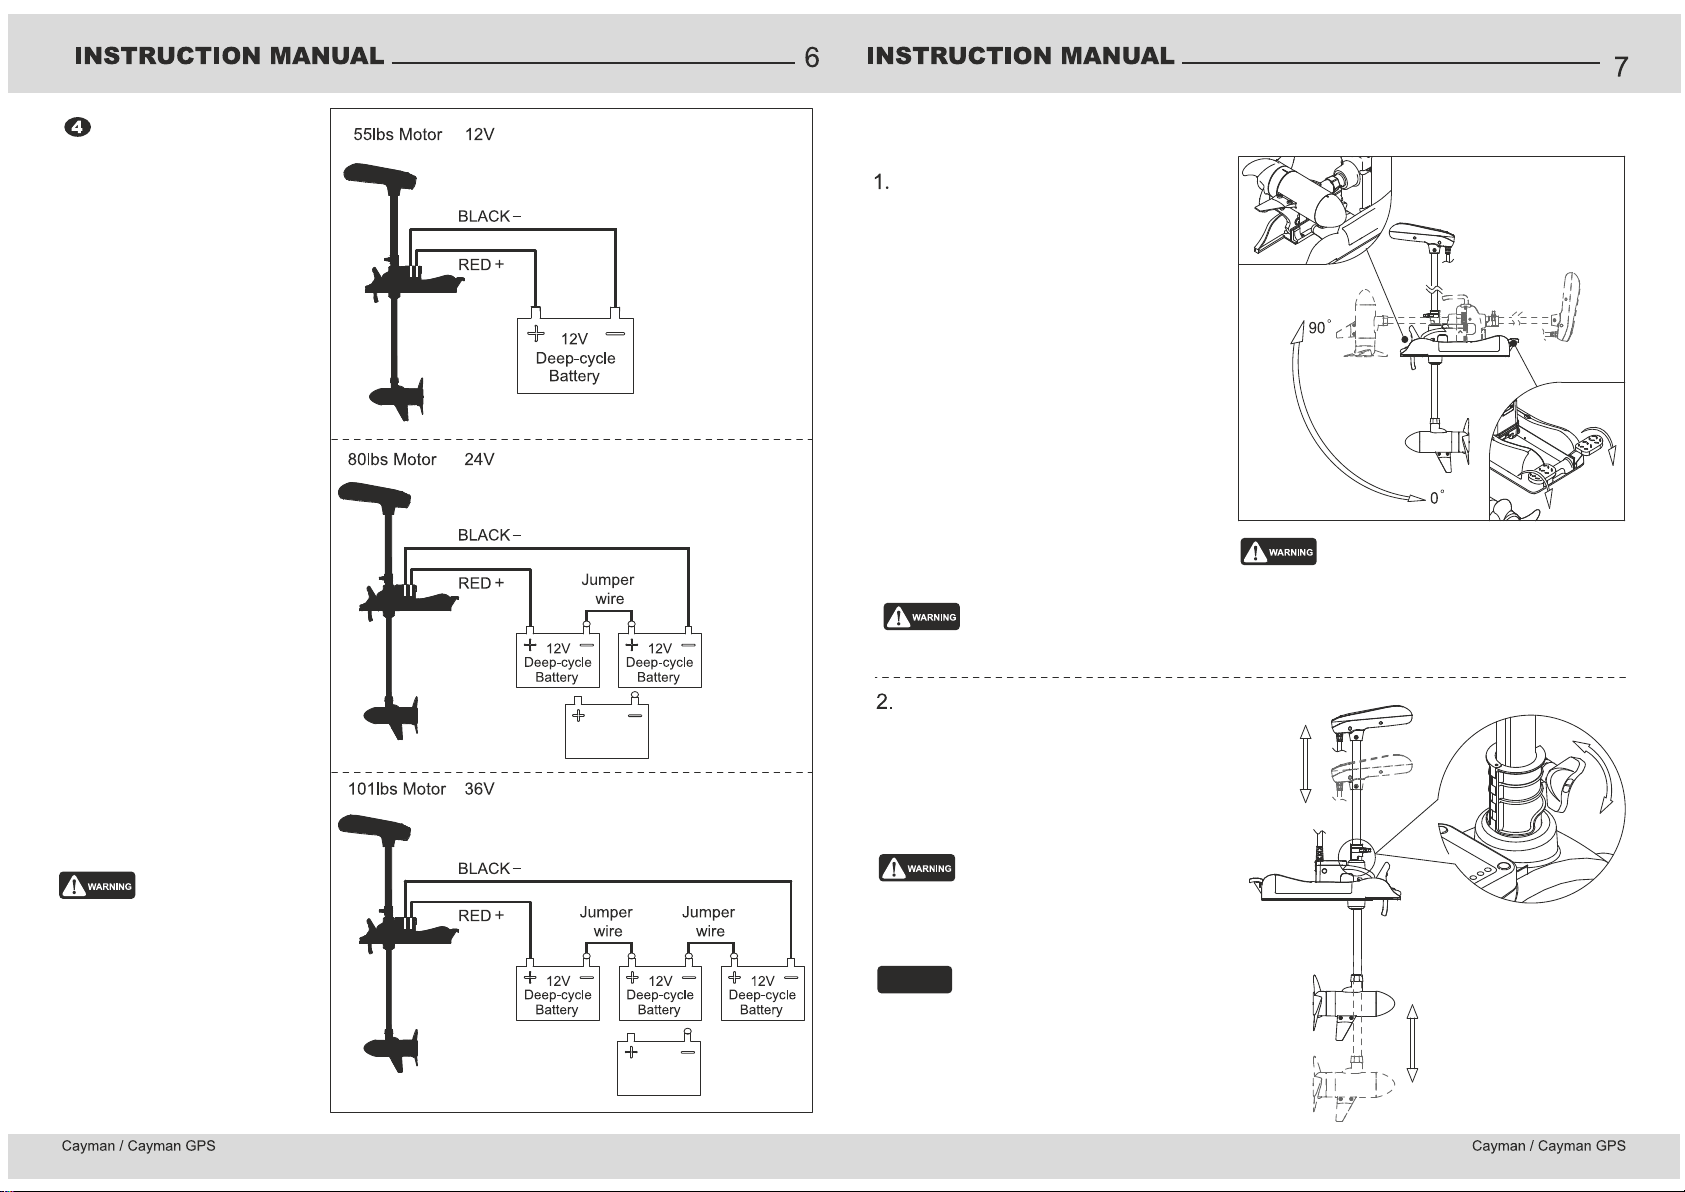
24V
Or 1 x Deep Cycle
Lithium
36V
Deep Cycle
Lithium
Or 1 x
Connect the battery (+) to the
positive (red) terminal, (-) to the
negative (black) terminal. The
ring connector should always be
in the bottom most location
with any washer sitting above
the ring connector and then the
nut. (Fig. 6)
Always make sure that the
battery or batteries are secured
and free from contact with
metal objects to prevent
shorting out. A battery box is
recommended. Lead acid
technology batteries such as
AGM may require ventilation.
Fig. 6
Battery connection
Only use a deep cycle battery of
the correct voltage for the
motor. Lead acid technology
and lithium technology batteries
are both suitable. Incorrect
battery voltage or connection
could damage the motor’s
electronics.
Always disconnect the motor
from the battery when
recharging the battery. Failure
to do so could damage the
motor’s electronics.
Correct operation of the motor
Deploying and stowing
the motor
Deploying the motor
Press the stow/deploy foot pedal and gently
lower the motor taking care to align the lower
part of the Depth Collar with the Steering
Collar. (Fig. 7)
Stowing the motor
Press the stow/deploy foot pedal, grab the
handle, head or shaft of the motor, lift and
retract , sliding back horizontally until the
motor clicks into the cradle.
The shaft of the Cayman slides smoothly making it easy to deploy and stow. Do
NOT let the motor free-fall when deploying, but gently lower into position,
otherwise damage can occur to the Steering Collar.
When raising or lowering, keep fingers
clear of all hinges and pivot points.
Fig. 7
Adjusting the motor’s depth
Whilst holding the motor by the shaft to
prevent it from accidentally sliding, loosen
the nut on the Depth Collar and lower the
motor to the required depth. Tighten the
nut to secure. (Fig. 8)
When first using the motor, find the correct
depth for general fishing conditions and using
a permanent marker, place at mark at the top
of the Depth Collar so you can easily set the
depth when you next go fishing.
Fig. 8
SUGGESTION
When towing the boat with the trolling motor in
place, ALWAYS lock the Depth Collar against the
gearbox and support the shaft near the head.
Correct operation of the motor
Battery connection
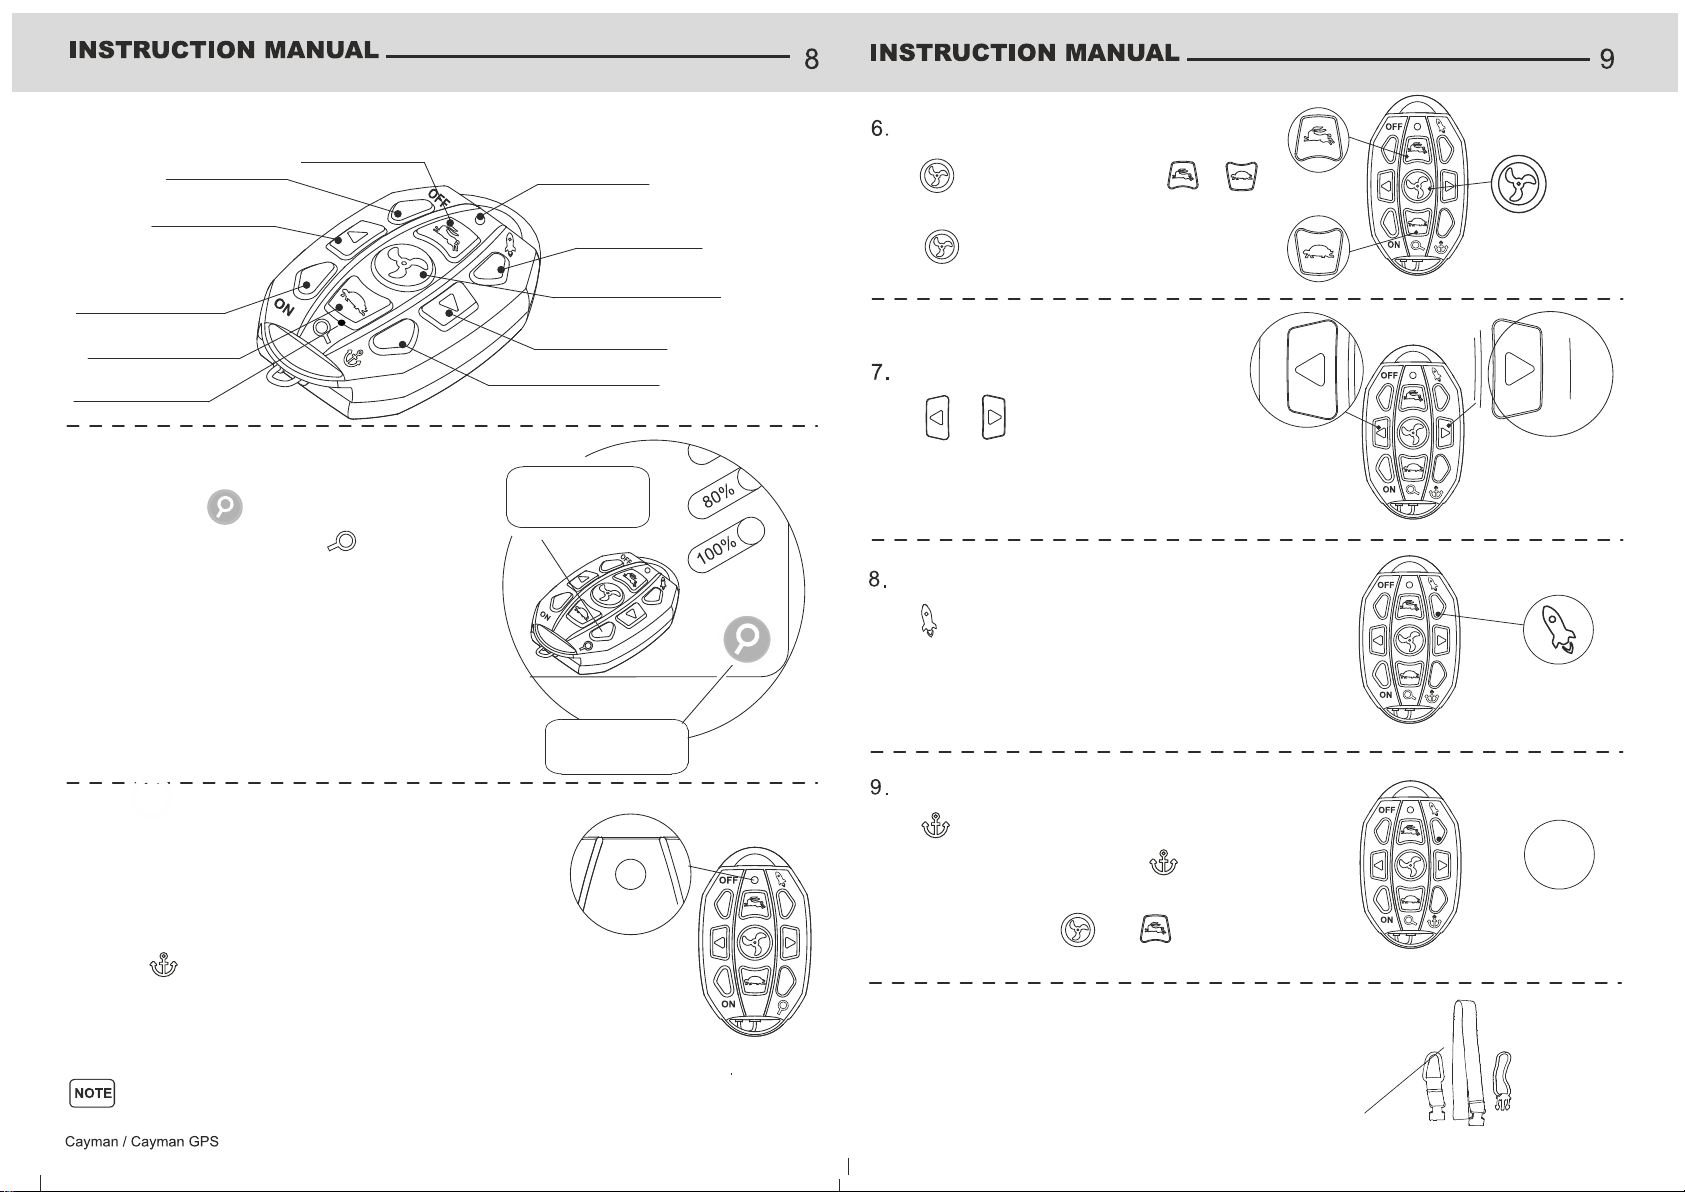
3. Remote control buttons
Power off
Faster
Slower
Power on
Steer left
Steer right
Motor On/Off
Full speed
Mode signal light
Pairing Anchor
3. Pairing remote to motor
Press and hold below the battery status
lights on the motor (fig. 9) and (also the
Slower button) on the remote at the same time
for three (3) seconds or until you hear 3 beeps
indicating that connection has been made and
the remote and motor are paired. Release
fingers from both buttons.
Pairing button
Pairing button Fig. 9
4. Mode signal light
1. Press the ‘ON’ button, indicator light is on solid or flashes,
remote control is on ‘standby’ state.
2. Press any button on the remote control, red indicator light
flashes, indicating signal is sending.
3. Select button, light is two-tone pink/purple, indicating
motor is in the anchor mode.
4. Press ‘OFF’ button to turn of remote control. Light is now off.
(Fig. 10)
Fig. 10
If your press the ‘ON’ button and there is no indicator light or is solid
red, please recharge the remote control as the battery is flat.
Remote control
Speed control
Press to activate the motor. Press or
to adjust the motor’s speed. To stop the motor,
press to cancel. (Fig. 11)
Steering control
Press or to steer the motor direction
left or right. (Fig. 12)
Fig. 12
Fig. 11
Fig. 13
Full speed
Press to select full speed (turbo mode). Press
again to return to the prior speed setting. (Fig. 13)
Spot lock (anchor mode)
10. Lanyard
For your convenience the lanyard can be configured to suit
your preference ie around the neck or use the carabiner to clip
to a belt loop. (Fig. 15) Fig. 15
Press to select spot lock (anchor) function
to anchor the boat in position. Press again to
disengage anchor function, will return the motor
to the stop mode. Press and to select
speed. (Fig. 14)
Fig. 14
Using the remote
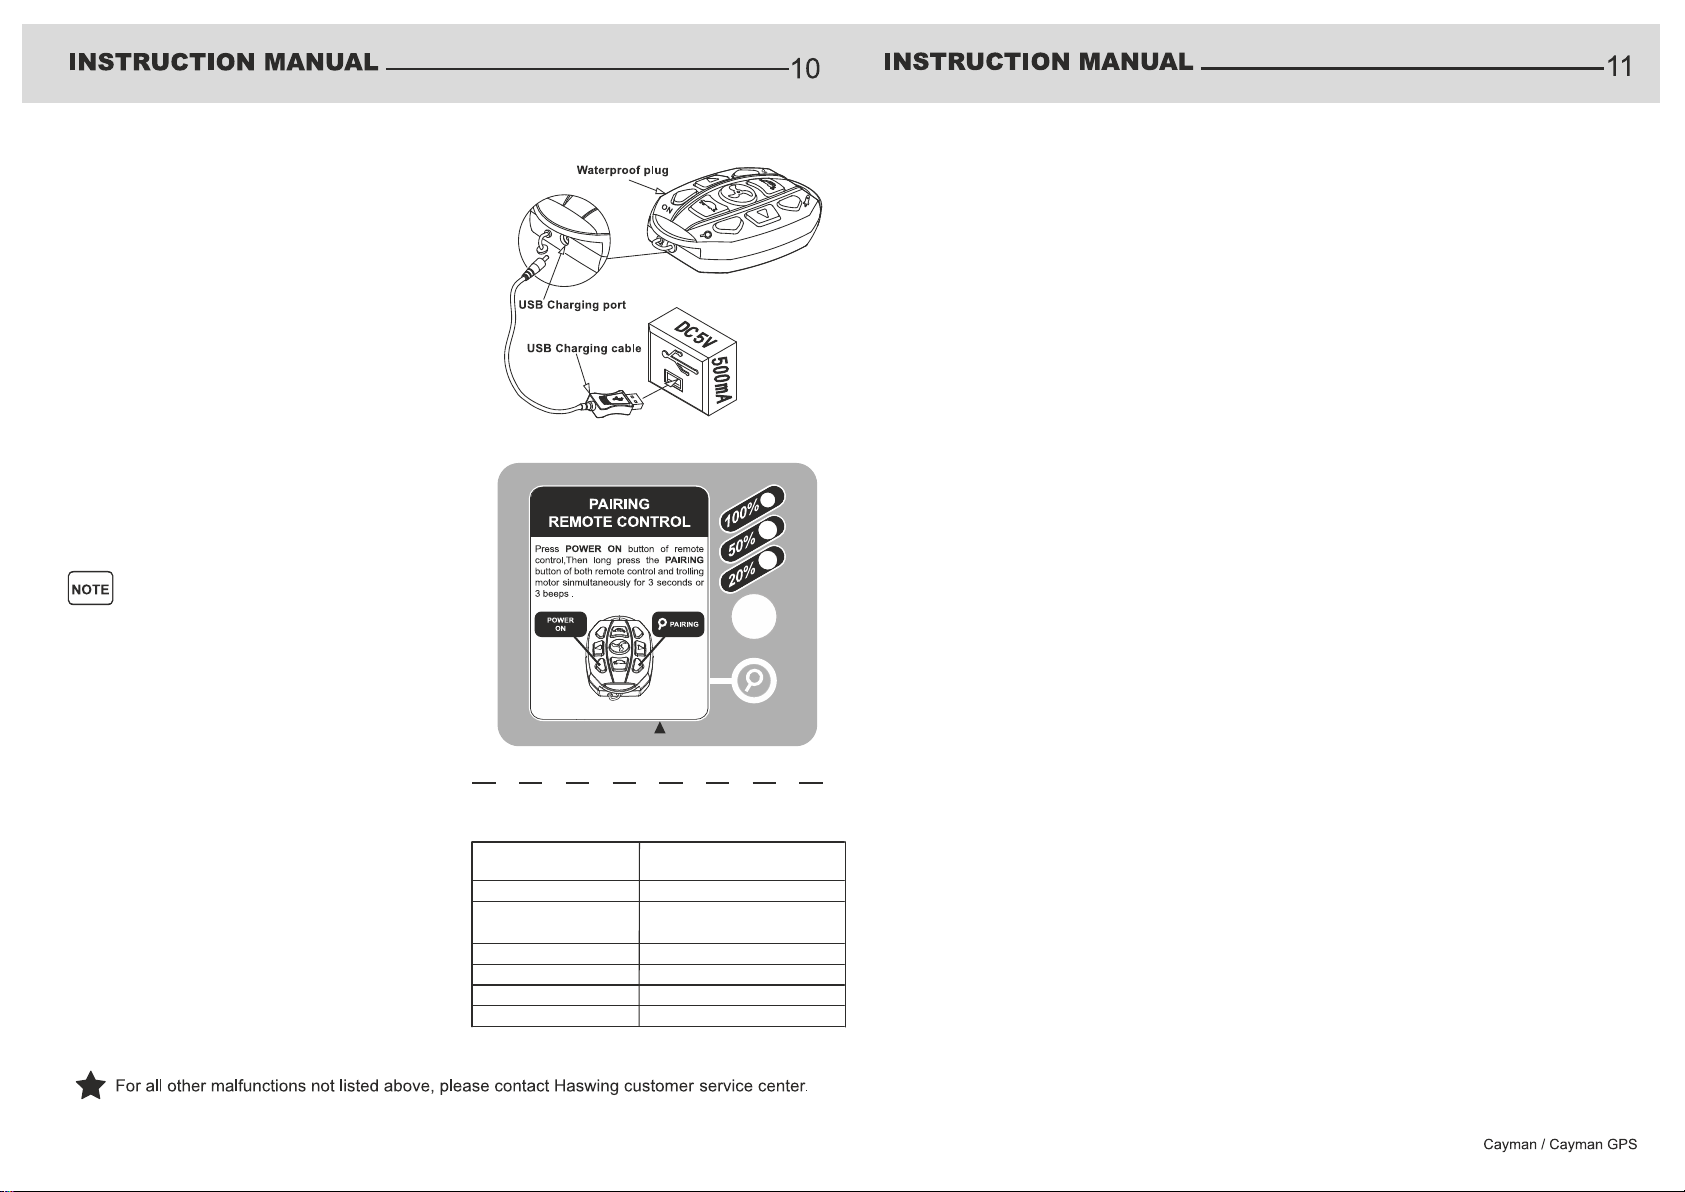
1. To charge the remote, remove the waterproof plug,
connect the USB charging cable. The USB end of the
cable has a charging status light - red light indicates
charging, green light indicates charged.
NOTE: When charging the hand remote for the first
time, the light will turn green fairly quickly, leave it
charging overnight or for several hours. Only ever use
the charging cable supplied with the remote, use of
an incorrect cable can damage the battery and
electronics of the remote.
2. The hand remote can on average be used
continuously for 48 hours. You can have the remote
plugged into a USB charging port (if your vessel has
one fitted) and still use the remote to command the
Cayman motor. (Fig. 16)
In order to maximise the life of the battery in the
remote, please charge the remote every 3 months if
the motor is not being used for extended periods.
Figure 16
Remote charging, pairing & audio signal
11. Charging the remote
12. Battery Status Display
The motor has a Battery Status Display (3 LED
lights) to show the charge status of the battery
being used to power the Cayman motor. As the
voltage of the battery discharges, the status light
percentage will decline accordingly. It is highly
recommended that you recharge the battery once
it reaches 20% for lead acid technology batteries.
Lithium batteries contain a BMS (battery
management system) that actively manages the
battery and when it reaches its maximum depth of
discharge (DoD) the battery will automatically shut
off. (Fig. 17)
NOTE When used with lithium batteries the battery
status display is not entirely accurate due to the
nature of discharge of lithium battery technology.
One (1) beep
Two (2) beeps
Three (3) beeps
Five (5) beeps
Continuous
Continuous long beep Current overload
Low battery warning
Pairing successful
System ready
Function terminated or
returned to the original setting
Operation signal
AUDIO
PATTERN STATUS
Fig. 17
Audio Warning Pattern
Make sure that the power cable from the battery
is connected correctly.
Check that the terminals are clean and
corrosion free.
Make sure that the battery is full. If flat or low
voltage, please recharge.
Make sure that there is no fishing line or weeds
caught up in the propeller. Please detach and
clean up the propeller if there is debris got
caught up inside the propeller. Warning - Make
sure the motor is disconnected from the battery.
Make sure that the propeller drive pin is in good
condition.
Make sure that the propeller is installed
correctly. Inspect the propeller and the
drive/shear pin condition and if necessary,
replace worn or faulty part.
Disconnect the battery cable and examine the
motor by manually turning the propeller. The
propeller should turn freely with some magnetic
resistance. If there is strong resistance, there
may be internal damage. If locked up or
excessive resistance, please contact our
customer service or the dealer.
Troubleshooting
Troubleshooting
A continuous beep indicates a power output
overload. It can happen if the motor is trying to
propel a vessel of too greater weight capacity
or has weed or fishing line has caught up under
the propeller around the propeller or drive
spline.
When the voltage of the battery is too low, the
motor will shut off automatically to help protect
1. Motor fails to run or lack of power
2. Motor vibration
3. Operation error warning signal
This manual suits for next models
6
Table of contents
Other HASWING Outboard Motor manuals


