Haverhill HHE1500M1 User manual


2
TABLE OF CONTENTS
Table of Contents ������������������������������������������������������������������������������������������������������� 2
Important Safety Instrucons ������������������������������������������������������������������������������������ 3
Safety Precauons �������������������������������������������������������������������������������������������������� 3
Safety Warnings ������������������������������������������������������������������������������������������������������ 4
Specicaons ������������������������������������������������������������������������������������������������������������� 5
Installaon Instrucons ��������������������������������������������������������������������������������������������� 6
Freestanding Installaon ���������������������������������������������������������������������������������������� 6
Handle Installaon �������������������������������������������������������������������������������������������������� 6
Wall-Mounng Installaon ������������������������������������������������������������������������������������� 7
Operang Instrucons ����������������������������������������������������������������������������������������������� 8
Using the Micathermic Heater ������������������������������������������������������������������������������� 8
Touch Panel ������������������������������������������������������������������������������������������������������������ 8
Remote Control ������������������������������������������������������������������������������������������������������ 8
Timer Seng ���������������������������������������������������������������������������������������������������������� 9
Temperature Seng ����������������������������������������������������������������������������������������������� 9
Automac Shut-O Protecon ������������������������������������������������������������������������������� 9
Care and Maintenance �������������������������������������������������������������������������������������������� 10
Troubleshoong ������������������������������������������������������������������������������������������������������� 10
Warranty������������������������������������������������������������������������������������������������������������������� 11
Limited Warranty��������������������������������������������������������������������������������������������������� 11
Limitaons of Remedies and Exclusions���������������������������������������������������������������� 11

3
Safety Precauons
WARNING
To reduce the risk of re, electric shock, or serious personal injury, please read and save all instruc-
ons before using the Micathermic Heater.
When using this or any other electrical appliance, basic safety precauons should be observed,
including the following:
1� READ ALL INSTRUCTIONS BEFORE USE.
2� Before using the appliance for the rst me, check if the voltage of the appliance corresponds to
the voltage in your home. The heater must not be placed below a xed socket.
3� Check that neither the appliance nor the power cord has been damaged during shipping or transit�
4� ALWAYS assemble the appliance completely before plugging the heater into an electrical outlet�
DO NOT begin operang this appliance unl it is properly assembled.
5� ALWAYS ensure the appliance is unplugged from the electrical outlet and it has cooled down
completely before assembling, disassembling, relocang or cleaning the unit. Unplug the unit
from the electrical outlet when not in use�
6� Use the heater only as described in the user manual� Any other use not indicated by the
manufacturer may cause re, electrical shock or injury.
7� The temperature of accessible surfaces may be hot when the appliance is operang.
8� The heater generates heat. DO NOT touch hot surfaces. DO NOT let bare skin touch hot surfaces
of the unit. Grab the heater using the plasc handle located at the rear to move the heater
when necessary�
9� Keep all ammable materials such as furniture, pillows, bedding, clothing, curtains, and objects
at least 3 feet from the front, top and sides of the heater.
10� To prevent possible re, keep the heater clear from any obstrucons. DO NOT use the heater
on so surfaces, such as a bed, where the openings may become blocked. Always use on a dry,
level surface. Only use the heater on the oor.
11� DO NOT cover the heater or cooling net during operaon in order to prevent short circuing and
avoid possible overheang and the risk of re or injury.
12� DO NOT use on an overloaded electrical circuit.
13� Defecve electrical outlets must be replaced before using the heater. Plugging the heater into
a worn or damaged outlet may result in overheang of the power cord or may cause risk of
electrical shock or re.
14� DO NOT operate the appliance with a damaged power cord, aer faulty operaon or when it has
been dropped or damaged in any way�
15� DO NOT plug or unplug the heater into or from the electrical outlet with a wet hand.
16� Make sure the plug is fully inserted into the electrical outlet� Wall outlets may deteriorate in
me, so check the plug periodically for signs of overheang.
17� An excessively hot or deformed plug or power cord is not normal and may be the result of a
defecve electrical outlet.
18� DO NOT run the power cord under carpeng. DO NOT cover the cord with throw rugs, runners
or similar coverings. Keep the power cord away from any place where it could be tripped over.
IMPORTANT SAFETY INSTRUCTIONS

4
19� To completely turn the appliance OFF, push the power buon and then unplug the heater. Pull
rmly on the plug, DO NOT unplug the appliance by pulling on the power cord. DO NOT put
any stress on the power cord where it connects to the heater, as the power cord could fray and
break�
20� ALWAYS disconnect the plug from the electrical outlet when the unit is not in use�
21� DO NOT use the heater with an extension cord or outlet strip. Connect the appliance directly to
a properly grounded electrical outlet�
22� DO NOT use the heater with an automac power ON/OFF programmer, mer or any other types
of installaons.
23� DO NOT wrap the power cord around the unit immediately aer use.
24� DO NOT posion the heater where it may come in contact with water, such as bathrooms, sinks
and indoor pools�
25� DO NOT use the heater in areas where gasoline, paint and other ammable liquids or gas are
used or stored�
26� DO NOT insert foreign objects into the heater or cooling net, as this may cause electrical shock,
re or damage to the unit.
27� DO NOT leave the heater unaended while it is in use. Always unplug the heater from the
electrical outlet when not in use. Properly store the heater in a well-venlated, dry place and
packed to keep the heater free from dust�
28� Close supervision is necessary when the heater is used near incapacitated persons, children or
pets�
29� Keep the heater out of the reach of children and pets� This appliance is not intended for use by
children or incapacitated persons�
30� DO NOT aempt to repair or adjust any electrical or mechanical malfuncon of the heater.
Return the appliance to an authorized service center for examinaon, repair or adjustment. The
heater has no user serviceable parts. DO NOT aempt to examine or repair this appliance yourself.
Only qualied service personnel should perform any servicing.
31� DO NOT use this appliance for purposes other than its intended use.
32� This appliance is intended for household use only. DO NOT use the appliance outdoors or for any
other purpose�
SAVE THESE INSTRUCTIONS FOR FUTURE REFERENCE
Safety Warnings
• Although the appliance is easy to operate, the warnings below must be followed for your safety:
• DO NOT immerse the cord, plug, or any poron of the heater in water or any other liquid.
• DO NOT use the heater on an unstable surface.
• DO NOT unplug the heater by pulling on the power supply cord.
• The heater must be unplugged and cooled down completely before any cleaning or maintenance
dues.
• If the heater appears to be faulty, it must be unplugged.
5
SPECIFICATIONS
Model Number HHE1500M1
Voltage Rang 110-120 V AC, 60 Hz
Power Rang 1500 Was
Coverage Area 269.1 sq. .
(25 sq. m)
Baeries AAA (Quanty: 2)
Product Dimensions 33.1” x 20.9” x 9.1” [W x H x D]
(840 mm x 530 mm x 230 mm [An x Al x P])
Net Weight 12�1 Lbs�
(5.5 kg)

6
Freestanding Installaon
1� Gently lay the heater on a table or countertop. The front of the heater should be facing up, with
its base hanging over the edge of the table or countertop.
2� Clip the le and right feet to the base of the heater by aligning the seams of the feet to the
respecve slots shown on the base. Using a downward moon (i.e. top to boom), slide the feet
onto the base unl they lock into place.
3� Gently turn the heater right-side up and place it onto the ground�
NOTE: The feet can only be installed to the heater using one direcon; they are not interchangeable.
Handle Installaon
1� Locate the 2 cylindrical grooves on each of the upper corners from the rear of the heater. These
grooves are adjacent to the wall-mounng slots.
2� Insert one end of the handle into the groove, and then pinch the arms of the handle together
when inserng the other end into its respecve groove.
3� Repeat Step 2 for the remaining handle�
4� The handles are now xed to the rear of the heater.
INSTALLATION INSTRUCTIONS
a cb d
a. Cylindrical groove for handle
b. Wall mounng slot
c. Wall mounng slot
d. Cylindrical groove for handle
Rear of the Heater

7
Wall-Mounted Installaon
1� The mounng locaon should be at least 6 inches (15cm) above the oor and 20 inches (50cm)
below the ceiling�
2� Prior to drilling, locate the studs behind the drywall and measure out the distance for the 4
holes. The diameter and depth of the holes should be 8mm and 35mm, respecvely. You can
nd the distance between the 4 holes using the diagram below. Ensure the alignment is
leveled and double-check the measurements with the distance between the 2 slots near the
back handles from the rear of the heater� Use a power drill to create the 4 holes into the wall�
3� Insert the plasc drywall anchors into the drilled holes�
Fasten the screws through the wall-mounng hooks
and through the openings of the drywall anchors�
Adjust and ghten the wall-mounng hooks onto
the wall. Ax the 2 rubber pads onto the back of the
heater using the 2 smaller screws�
4� Locate the 2 slots from the rear of the heater and ax
them onto the wall-mounng hooks on the wall. Do
this by aligning the 2 slots from the rear of the heater
above the respecve wall-mounng hooks. Move the
heater downward unl the wall-mounng hooks slide
through the slots, then shi the heater to the le
so that the slots lock into place with the respecve
hooks. Once the hooks are locked into place, carefully
lower the heater. Ensure the heater is stable and
securely mounted to the wall�
NOTE: DO NOT ax the feet and handles to the heater
when using the wall-mount installaon. The feet and handles
are used for freestanding installaon only.
Wall-Mounng Hook
a. Slot for Wall-Mounng Hook
b. Screws for Wall-Mounng Hook
c. Wall-Mounng Hook
d� Rubber Pad
e� Small Screw
24 mm 24 mm
505 mm
a b c
Rear of the Heater
d e
19�88”
0�94” 0�94”
8
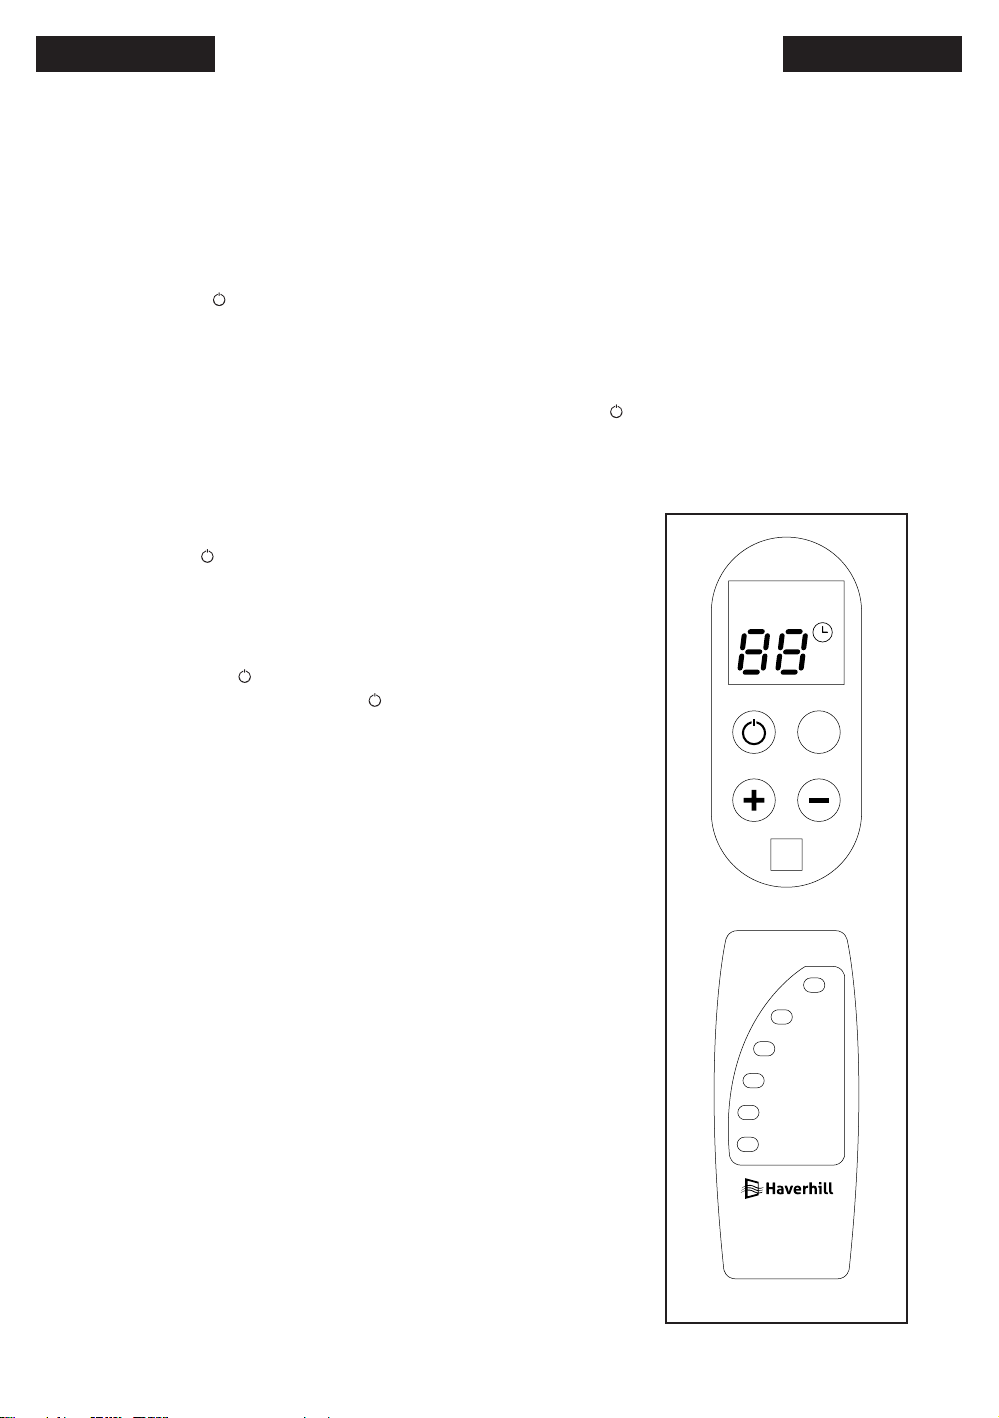
Touch Panel
1� POWER ( ): When turning the power to OFF, the heater
and its touch panel indicator lights and temperature display
are inacve. When turning the power to ON, the heater and
its touch panel indicator lights and temperature display are
acvated. Toggle between the 3 dierent power modes by
pressing the ( ) buon on the touch panel. The sequence
of modes when pressing the ( ) buon is: START - HIGH (H)
- MEDIUM (M) - LOW (L) - OFF.
2� HIGH (H): When selecng this mode, the (H) indicator light
on the touch panel will acvate. The heater will rst operate
at a power of 1200 was for approximately 2 minutes and
then at a maximum power of 1500 was.
3� MEDIUM (M): When selecng this mode, the (M) indicator
light on the touch panel will acvate. The heater will operate
at a power of 1000 was.
4� LOW (L): When selecng this mode, the (L) indicator light
on the touch panel will acvate. The heater will operate at a
power of 500 was.
Remote Control
1� The remote control features 6 buons: ON/OFF, MODE, TIMER,
TEMP, + and –
2� When the heater is turned o, pressing the (ON/OFF) buon will
start up the heater using the MEDIUM (M) mode. When the heater
is acve, pressing the (ON/OFF) buon will turn o the heater.
3� Toggle between the 3 dierent power modes (HIGH, MEDIUM,
LOW) of the heater by pressing the MODE buon.
4� When the heater is acve, pressing the TIMER buon will start
the mer mode. Use the + and – buons to set the mer using
1-hour increments up to 24 hours�
Using the Micathermic Heater
Plug the power cord into a 110-120V AC/60Hz electrical outlet. Only operate the heater in an upright
posion.
1� Plug the heater into an electrical outlet, and ip the master switch on the back of the heater. An
audible beep will sound to conrm acvaon; the heater is now ready for use.
2� Press the ( ) buon on the touch panel�
3� The heater will automacally begin operang under the MEDIUM (M) power seng for
approximately 2 minutes. No adjustments can be made at this me. Aerwards, the seng can
be switched to HIGH (H) to operate the heater at full power.
4� Toggle between the 3 dierent power modes by pressing the ( ) buon on the touch panel.
5� Toggle between the mer and temperature sengs on the touch panel by pressing the MODE
buon.
OPERATING INSTRUCTIONS
ON/OFF
MODE
TIMER
TEMP
-
+
°F
H M L
MODE
Touch Panel
Remote Control

9
Automac Shut-O Protecon
The heater features a built-in p-over switch. The heater will automacally shut-o whenever the
heater lts over.
Timer Seng
1� The heater ulizes a 24-hour mer and can be programmed using 1-hour increments.
2� Use the + and – buons to adjust the mer.
3� Pressing the MODE buon will display the remaining me.
4� The heater will automacally turn the power to OFF when the me expires.
Temperature Seng
1� Pressing the MODE buon will switch from the mer seng to the temperature seng.
2� The temperature can be adjusted from 59°F to 95°F and can be programmed using 1°F increments.
3� During operaon, if the room temperature is higher than the seng temperature, the heater
will automacally turn the power to OFF. If the room temperature is lower than the seng
temperature, the heater will automacally turn the power to ON.
5� When the heater is acve, pressing the TEMP buon will start the temperature mode. Use the +
and – buons to adjust the temperature seng using 1°F increments.
6� An audible beep will sound when pressing the buons on the remote control to conrm suc-
cessful acvaon of the feature.
7� The remote control is programmed to work for this heater and model only� Make sure the
distance between the heater and the remote control is less than 16.4 feet (5m), and the angle is
less than 45°.
10
CARE AND MAINTENANCE
• It is recommended to clean the heater once every 3 months and before extended storage
• Be sure to only use a so, dry cloth to gently clean the external surfaces of the heater
• DO NOT use any chemical soluons or abrasive cleaning products to clean the unit
TROUBLESHOOTING
Problem Possible Soluon
Remote control does not work • Check to see if the baeries are inserted correctly
• Replace worn-out baeries
The unit is loud when operang • The heater is not placed on a at, level surface
The unit keeps shung-o aer
pressing the Power buon
• The fuse is not working
• The electrical circuit is overloaded
• The electricity is o
NOTE: If none of the above can be resolved, please contact customer service.

11
WARRANTY CONDITIONS
Limited Warranty
Haverhill warrants each new Micathermic Heater to be free from defects in material and
workmanship and agrees to remedy any such defect or to furnish a new part(s) (at the company’s
opon) for any part(s) of the unit that has failed during the warranty period. Parts and labor
expenses are covered on this unit for a period of one year aer the date of purchase. A copy of the
dated sales receipt/invoice is required to receive warranty service, replacement or refund.
This warranty covers appliances in use within the conguous United States, Alaska, Hawaii and
Puerto Rico. The warranty does not cover the following:
• Damages due to shipping damage or improper installaon
• Damages due to misuse or abuse
•Content losses due to failure of the unit
• Repairs performed by unauthorized service agents
• Unauthorized service calls
• Replacement or reseng of house fuses or circuit breakers
•Failure of this product if used in ways other than its intended purpose
• Disposal costs for any failed unit(s) not returned to our factory
• Any delivery or installaon costs incurred as the result of a unit that fails to perform as specied
• Expenses for travel and transportaon for product service if your appliance is located in a
remote area where service by an authorized service technician is not available
• The removal and reinstallaon of your appliance if it is installed in an inaccessible locaon or is
not installed in accordance with published installaon instrucons
•Refunds for non-repairable products are limited to the price paid for the unit per the sales
receipt�
•This warranty is non-transferable� This warranty applies only to the original purchaser and does
not extend to any subsequent owner(s).
Limitaons of Remedies and Exclusions
Product repair in accordance with the terms herein, is your sole and exclusive remedy under this
limited warranty. Any and all implied warranes including merchantability and tness for a parcular
purpose are hereby limited to one year or the shortest period allowed by law. Haverhill is not liable
for incidental or consequenal damages and no representave or person is authorized to assume
for us any other liability in connecon with the sale of this product. Under no circumstances is the
consumer permied to return this unit to the factory without the prior wrien consent of Haverhill.
Some states prohibit the exclusion or limitaon of incidental or consequenal damages, or
limitaons on implied warranes. This warranty gives you specic legal rights, and you may also have
other rights which vary from state to state.
Model Parts & Labor Type of Service
HHE1500M1 One Year Carry-In
For service or assistance, please call 770-224-7069, or visit us on the web
at www.haverhillproducts.com to request warranty service or order parts.

12
Índice
Índice ����������������������������������������������������������������������������������������������������������������������� 12
Instrucciones importantes de seguridad ����������������������������������������������������������������� 13
Precauciones de seguridad ����������������������������������������������������������������������������������� 13
Advertencias de seguridad ����������������������������������������������������������������������������������� 14
Especicaciones ������������������������������������������������������������������������������������������������������� 16
Instrucciones de instalación ������������������������������������������������������������������������������������ 17
Instalación como unidad de pie ���������������������������������������������������������������������������� 17
Colocación de la manija ���������������������������������������������������������������������������������������� 17
Empotramiento del equipo ���������������������������������������������������������������������������������� 18
Instrucciones de operación ������������������������������������������������������������������������������������� 19
Uso del calentador térmico mica �������������������������������������������������������������������������� 19
Panel tácl ������������������������������������������������������������������������������������������������������������ 19
Control remoto ����������������������������������������������������������������������������������������������������� 19
Conguración del mer (temporizador) ��������������������������������������������������������������� 20
Conguración de la temperatura �������������������������������������������������������������������������� 20
Apagado automáco de seguridad ����������������������������������������������������������������������� 20
Cuidado y mantenimiento ��������������������������������������������������������������������������������������� 21
Resolución de problemas ����������������������������������������������������������������������������������������� 21
Condiciones de la garana ��������������������������������������������������������������������������������������� 22
Garana limitada��������������������������������������������������������������������������������������������������� 22
Limitaciones de recursos y exclusiones ����������������������������������������������������������������� 22
13
Precauciones de seguridad
ADVERTENCIA
Para reducir el riesgo de incendio, descarga eléctrica o lesiones personales graves, leer y guardar
estas instrucciones completas antes de ulizar el calentador térmico mica.
Cuando se uliza éste o cualquier otro electrodomésco, siempre se deben respetar las precauciones
básicas de seguridad, como las que se detallan a connuación:
1� LEER TODAS LAS INSTRUCCIONES ANTES DE UTILIZAR EL EQUIPO.
2� Antes de usar el equipo por primera vez, vericar que la tensión del mismo coincida con la tensión
disponible en su hogar. El calefactor no debe instalarse debajo de una toma ja.
3� Vericar que ni el equipo ni el cable de alimentación se hayan dañado durante el envío.
4� SIEMPRE armar el calefactor completo antes de enchufarlo a un tomacorriente. NO poner en
funcionamiento este equipo hasta que esté correctamente armado.
5� SIEMPRE asegurarse de que el equipo esté desenchufado del tomacorriente y de que se haya
enfriado totalmente antes de armarlo, desarmarlo, cambiarlo de ubicación o limpiarlo.
Desenchufar el equipo del tomacorriente cuando no se lo esté ulizando.
6� Emplear el calefactor tal y como se describe en el manual del usuario. Todo otro uso no indicado
por el fabricante podría provocar incendios, descargas eléctricas o lesiones.
7� Cuando el equipo está en funcionamiento, las supercies accesibles podrían estar calientes.
8� El calefactor genera calor. NO tocar las supercies calientes. NO permir que la piel desnuda se
ponga en contacto con las supercies calientes del equipo. Cuando sea necesario trasladar el
calefactor, tomarlo por la manija plásca que se encuentra en la parte trasera.
9� Todo material inamable, como por ejemplo mobiliario, almohadas, ropa de cama, prendas de
vesr, cornas y demás objetos deberá mantenerse al menos a 3 pies de distancia de la parte
frontal, la parte superior y los laterales del calefactor.
10� Para evitar incendios, evitar todo po de obstrucción del calefactor. NO ulizar el calefactor
sobre supercies blandas, como una cama, porque se podrían obstruir las aberturas. Ulizar
siempre sobre una supercie seca y pareja. Ulizar siempre el calefactor sobre el piso.
11� NO cubrir el calefactor ni la malla de enfriamiento mientras el equipo está en funcionamiento,
para prevenir cortocircuitos y la posibilidad de sobrecalentamiento, incendio o lesiones.
12� NO ulizar en un circuito eléctrico con sobrecarga.
13� Antes de ulizar el calefactor se deberá reemplazar todo tomacorriente defectuoso. Enchufar el
calefactor en un tomacorriente gastado o dañado podría sobrecalentar el cable de alimentación
o causar una descarga eléctrica o un incendio�
14� NO ulizar el equipo si el cable de alimentación está dañado, luego de alguna falla durante la
operación o si el equipo se cayó o sufrió cualquier po de daño.
15� NO enchufar o desenchufar el calefactor del tomacorriente con las manos mojadas.
16� Asegurarse de que el enchufe esté completamente introducido en el tomacorriente. Los
tomacorrientes pueden deteriorarse con el paso del empo, por lo que se los debe revisar
periódicamente para detectar signos de sobrecalentamiento�
17� No es normal que el cable de alimentación o el enchufe estén deformados o excesivamente
calientes; esto podría ser consecuencia de un tomacorriente defectuoso.
Instrucciones importantes de seguridad

14
18� NO tender el cable de alimentación bajo una alfombra. NO cubrir el cable con tapetes o
cubiertas similares. Mantener el cable de alimentación alejado de cualquier área en la que
pueda provocar tropiezos.
19� Para APAGAR el equipo por completo, presionar el botón de encendido y luego desenchufarlo.
Tirar rmemente del enchufe, NO desenchufar el equipo rando del cable de alimentación. NO
tensar el cable de alimentación en la zona en que este se conecta con el calefactor, ya que el
cable podría deshilacharse y romperse.
20� SIEMPRE desenchufar el equipo del tomacorriente cuando no se lo esté ulizando.
21� NO ulizar el calefactor con un cable prolongador ni con una toma múlple (zapalla). Conectar
el equipo directamente a un tomacorriente con puesta a erra adecuada.
22� NO ulizar el calefactor con un programador automáco de ENCENDIDO/APAGADO, con un
mer (temporizador) ni con ningún otro po de instalación.
23� NO enrollar el cable de alimentación alrededor del equipo inmediatamente después de ulizarlo.
24� NO ubicar el calefactor en áreas donde podría mojarse, como por ejemplo en baños, lavamanos
o piscinas cubiertas�
25� NO ulizar el calefactor en áreas donde se use o se almacene gasolina, pintura u otros líquidos o
gases inamables.
26� NO introducir cuerpos extraños en el calefactor o en la malla de enfriamiento, ya que se podría
producir una descarga eléctrica, un incendio o se podría dañar el equipo.
27� Mientras esté en funcionamiento, NO dejar el calefactor sin supervisión. Siempre desenchufar el
calefactor del tomacorriente cuando no se lo esté ulizando. Guardar el calefactor adecuadamente
en un lugar seco y bien venlado, embalado para mantenerlo libre de polvo.
28� Es preciso supervisar estrechamente el equipo cuando se lo está ulizando cerca de personas
discapacitadas, niños o mascotas.
29� Mantener el calefactor fuera del alcance de niños y mascotas. Este equipo no es apto para su
empleo por parte de niños o personas discapacitadas.
30� NO intentar reparar ni ajustar ninguna falla eléctrica o mecánica del calefactor. Para revisión,
reparación o ajustes, llevar el equipo a un centro autorizado de reparaciones. El calefactor no
posee partes que puedan ser reparadas por el usuario. NO intente revisar o reparar este equipo
usted mismo� Toda reparación debe ser realizada por personal debidamente capacitado�
31� NO emplear este equipo para ningún otro propósito disnto a su uso previsto.
32� Este equipo fue diseñado para uso hogareño exclusivamente. NO ulizar este equipo al aire libre
ni para ningún otro propósito.
GUARDAR ESTAS INSTRUCCIONES
PARA FUTURAS CONSULTAS
Advertencias de seguridad
• Si bien este equipo es fácil de operar, por razones de seguridad es indispensable tener en cuenta
las advertencias que se indican a connuación:
• NO sumergir el cable, el enchufe ni ningún otro componente del calefactor en agua ni en ningún
otro líquido.

15
• NO ulizar el calefactor sobre supercies inestables.
• NO desenchufar el calefactor rando del cable de alimentación.
• Antes de realizar tareas de limpieza o de mantenimiento en el equipo, se deberá desenchufar el
calefactor y se deberá esperar a que se enfríe por completo.
• Si el calefactor aparenta tener alguna falla, es imprescindible desenchufarlo.

16
Especicaciones
Número de modelo HHE1500M1
Tensión nominal 110-120 V CA, 60 Hz
Potencia nominal 1500 Was
Área de cobertura 25 sq. m
(269.1 sq. .)
Pilas AAA (Candad: 2)
Dimensiones del equipo 840 mm x 530 mm x 230 mm [An x Al x P]
(33.1” x 20.9” x 9.1” [W x H x D])
Peso neto 5�5 kg
(12.1 Lbs.)

17
Instalación como unidad de pie
1� Colocar suavemente el calefactor sobre una mesa o una mesada. La parte frontal del calefactor
debería mirar hacia arriba, y la base debería sobresalir del borde de la mesa o de la mesada.
2� Insertar la pata izquierda y la pata derecha a la base del calefactor alineando los bordes de las patas
con las respecvas ranuras que se encuentran en la base. Con un movimiento descendente (es decir,
de arriba hacia abajo) deslizar las patas en la base hasta que se traben en su posición correcta.
3� Con suavidad girar el calefactor de modo que el lado derecho quede mirando hacia arriba y
depositarlo en el piso�
NOTA: Las patas solo pueden instalarse en el calefactor en una dirección; no son intercambiables.
Handle Installaon
1� Idencar las dos ranuras cilíndricas en cada una de las esquinas superiores en la parte trasera del
calefactor. Dichas ranuras son adyacentes a las que se ulizan para empotrar el equipo en la pared.
2� Insertar un extremo de la manija en la ranura, y luego acercar los brazos de la manija para
juntarlos al insertar el otro extremo de la manija en su ranura correspondiente.
3� Reper el paso 2 para la otra manija.
4� Ahora las manijas se encuentran jas a la parte trasera del equipo.
Instrucciones de instalación
a cb d
a. Ranura cilíndrica para la manija
b� Ranura para empotramiento
c� Ranura para empotramiento
d. Ranura cilíndrica para la manija
Parte trasera del calefactor

18
Empotramiento del equipo
1� La ubicación donde se empotrará el equipo deberá estar al menos 6 pulgadas (15 cm) por
encima del piso y 20 pulgadas (50 cm) por debajo del cielorraso.
2� Antes de realizar las perforaciones, localizar los travesaños detrás de los paneles de yeso y medir
la distancia para los 4 agujeros. Los agujeros deberán tener un diámetro de 8 mm y una profundidad
de 35 mm. Para encontrar la distancia entre los 4 agujeros se puede ulizar el diagrama que
se encuentra a connuación. Se debe asegurar de que la alineación esté nivelada y se deben
volver a comprobar las mediciones con la distancia entre las dos ranuras cercanas a las manijas
traseras en la parte trasera del calefactor. Con un taladro eléctrico, perforar los 4 agujeros en la
pared�
3� Insertar los tarugos de plásco en los agujeros
perforados. Apretar los tornillos a través de los ganchos
de empotramiento y a través de las aberturas de los
anclajes. Apretar y tensar los ganchos de empotramiento
en la pared. Fijar las almohadillas de goma a la parte
trasera del equipo, ulizando los 2 tornillos más pequeños.
4� Localizar las 2 ranuras en la parte trasera del calefactor
y jarlas a los ganchos de empotramiento colocados en
la pared. Esto se realiza alineando las 2 ranuras de la
parte trasera del calefactor por encima de los respecvos
ganchos de empotramiento. Deslizar el calefactor hacia
abajo hasta que los ganchos de empotramiento se
deslicen dentro de las ranuras y desplazar el calefactor
hacia la izquierda de modo que las ranuras se traben
en posición con los respecvos ganchos. Una vez que
los ganchos están trabados en su lugar, deslizar
cuidadosamente el calefactor hacia abajo. Asegurarse
de que el equipo esté estable y rmemente empotrado
en la pared�
NOTA: Cuando se instale el calefactor en la pared, NO se
deben jar las patas ni las manijas a la unidad. Estas piezas
sólo se emplean cuando el calefactor se uliza de pie.
Gancho para empotramiento
a� Ranura para gancho de
empotramiento
b� Tornillos para gancho de
empotramiento
c� Gancho de empotramiento
d� Almohadilla de goma
e. Tornillo pequeño
24 mm 24 mm
505 mm
a b c
Parte trasera del
calefactor
d e
19�88”
0�94” 0�94”

19
Panel tácl
1� POWER ( ) (POTENCIA): Cuando el equipo se coloca en OFF,
se apagarán el equipo, las luces indicadoras de su panel tácl
y la pantalla de temperatura. Cuando el equipo se coloca en
ON, se encenderán el equipo, las luces indicadoras de su panel
tácl y la pantalla de temperatura. Para alternar entre las 3
conguraciones de potencia posibles presionar el botón
( ) en el panel tácl. La secuencia de modos al pulsar el
botón ( ) es: START - HIGH (H) - MEDIUM (M) - LOW (L) - OFF.
2� HIGH (H) (Alta): Cuando se seleccione este modo se encenderá
la luz indicadora (H) en el panel tácl. Al principio, el calefactor
operará a 1200 Was durante aproximadamente 2 minutos,
para luego operar a la máxima potencia, 1500 Was.
3� MEDIUM (M) (Media): Cuando se seleccione este modo se
encenderá la luz indicadora (M) en el panel tácl. El equipo
operará a una potencia de 1000 Was.
4� LOW (L) (Baja): Cuando se seleccione este modo se encenderá
la luz indicadora (L) en el panel tácl. El equipo operará a una
potencia de 500 Was.
Uso del calentador térmico mica
Enchufar el cable de alimentación en un tomacorriente de 110-120 V CA/60 Hz. Operar el calefactor
únicamente en posición erguida.
1� Enchufar el calefactor en el tomacorriente y acvar el interruptor principal en la parte trasera
del equipo. Como conrmación de la acvación se escuchará una señal sonora; el equipo está
listo para comenzar a operar�
2� Presionar el botón ( ) en el panel tácl�
3� El calefactor automácamente comenzará a operar en la conguración de potencia MEDIUM
(M) (media) durante cerca de 2 minutos. Durante este período no se pueden realizar cambios. A
connuación, se puede cambiar la conguración a HIGH (H) (alta) para que el equipo funcione a
plena potencia�
4� Para alternar entre las 3 conguraciones de potencia posibles presionar el botón ( ) en el panel
tácl.
5� Para alternar entre las disntas conguraciones de temperatura y del mer (temporizador)
presionar el botón MODE (Modo) en el panel tácl.
Instrucciones de operación
Control remoto
1� El control remoto cuenta con 6 botones: ON/OFF (Encendido/
Apagado), MODE (Modo), TIMER (Temporizador), TEMP
(Temperatura), + y -
2� Cuando el calefactor está apagado, si se presiona el botón (ON/
OFF) el equipo se encenderá en modo MEDIUM (M). Cuando el
calefactor está encendido, si se presiona el botón (ON/OFF) el
equipo se apaga.
3� Para alternar entre los 3 modos de potencia de que dispone el
ON/OFF
MODE
TIMER
TEMP
-
+
°F
H M L
MODE
Panel tácl
Control remoto

20
Apagado automáco de seguridad
El calefactor cuenta con un interruptor anvuelco incorporado. Cada vez que se incline el equipo, se
apagará automácamente.
calefactor (HIGH, MEDIUM, LOW), presionar el botón MODE.
4� Cuando el calefactor está encendido, si se presiona el botón TIMER el equipo entra en modo
temporizador. Con los botones + y - se congura el mer por medio de incrementos de 1 hora
hasta 24 horas�
5� Cuando el calefactor está encendido, si se presiona el botón TEMP el equipo se coloca en modo
de conguración de temperatura. Los botones + y - permiten cambiar la temperatura congurada,
con incrementos de 1°F.
6� Al presionar cualquier botón del control remoto, se escuchará una señal sonora que conrma la
acvación exitosa del comando en cuesón.
7� El control remoto ha sido programado para funcionar solamente
Conguración del mer (temporizador)
1� El calefactor cuenta con un mer de 24 horas y se puede programar en incrementos de 1 hora.
2� Para congurar el mer, ulizar los botones + y - .
3� Al presionar el botón MODE, se puede visualizar el empo restante.
4� Cuando se acabe el empo programado el equipo se apagará automácamente.
Conguración de la temperatura
1� Al presionar el botón MODE, se pasa de la conguración del mer a la conguración de la
temperatura�
2� Se puede modicar la temperatura entre 59°F y 95°F, y los valores se pueden programar en
incrementos de 1°F.
3� Durante la operación, si la temperatura ambiente es más elevada que la temperatura
programada, el calefactor se apagará automácamente. Si la temperatura ambiente es menor
que la temperatura programada, el calefactor se encenderá automácamente.
Table of contents
Languages:


