HBM HBM 50(24) BOUWDROGER User manual

P.02 Gelieve te lezen en voor later gebruik bewaren
P.12 Veuillez lire et conserver pour consultation ultérieure
P.22 Please read and keep for future reference
FR
EN
NL
HANDLEIDING - MODE D’EMPLOI - MANUAL
Bouwdroger
Déshumidicateur
Dehumidier
9731
HBM 50(24) BOUWDROGER
9009
HBM 70(24) BOUWDROGER
9732
HBM 90(24) BOUWDROGER
HBM Machines B.V
Grote Esch 1010 2841 MJ Moordrecht The Netherlands
www.hbm-machines.com
9731 9009 9732
230V - 50Hz
900W
700 CM³/h
70 l/24 h
1/kW h
1 - 40°C
35 ~ 95%
85W
5m
56 dB(A)
555 x 820 x 480mm
40.5 kg
230V - 50Hz
500W
600 CM³/h
50 l/24 h
1/kW h
1 - 40°C
35 ~ 95%
85W
5m
56 dB(A)
555 x 700 x 520mm
39.5 kg
230V - 50Hz
1300W
850 CM³/h
90 l/24 h
1/kW h
1 - 40°C
35 ~ 95%
85W
5m
56 dB(A)
555 x 820 x 480mm
43.0 kg

3
NL
• Afvoerpomp met automatische of manuele bediening.
• Als de stroomtoevoer onderbroken wordt, zal het toestel terug herstarten zodra er opnieuw spanning is.
• Milieuvriendelijk R410A koelmiddel.
• Zelf-besturingssysteem.
Hoe werkt uw bouwdroger?
De ontvochtiger maakt gebruik van zijn ingebouwde hygrostaat, om de gewenste vochtigheidsgraad te behouden, of werkt
manueel met de On/Off toetsen. De lucht wordt aangezogen en door een verdamping spoel geleid. Daar de spoel kouder
is dan het dauwpunt van de lucht, verandert de waterdamp in vloeibare condensatie. De lucht wordt vervolgens door de
condensor opgewarmd en terug in de kamer verspreid.
3 Installatie
AANDACHT! 120 volts AC kunnen zware letsels door een elektrische schok veroorzaken.
• Trek de stekker uit het stopcontact alvorens aan het toestel te werken.
• Het toestel mag enkel aan een geaarde installatie aangesloten worden.
• Gebruik geen verlengkabel.
• Gebruik geen adapter.
• Stroomvoeding : 230 V, 50 Hz, AC een fase.
• Uitgang: 3 pinnen, GFI.
• Beveiliging: Vertraging zekering 15 A of stroomonderbreker.
• U kunt de manuele bediening gebruiken, voor een werking onafhankelijk van de luchtvochtigheid.
• Plaats het toestel op de gewenste locatie. De uitgang van het apparaat moet zich tenminste 30 cm ver van obstakels
bevinden.
• Als de bouwdroger horizontaal vervoerd werd, laat deze gedurende minstens 30 minuten rechtop staan voor gebruik.
AANDACHT! Het wordt aanbevolen om plaatsen met agressieve materialen, of materialen met
een hoog VOC gehalte te vermijden.
Overzicht van het toestel
Voorkant
-3-
※ Unit Overview ※
※ Front View
Handle
Wheel
※ Rear View
Control panel
Front cover
Air iutlet
Power Cord Input
Hose and
Cord Rack
Drain Tube
Connection
Air Intake
Air Intake Door Latch
Rear cover
-2-
How Your Armored Dehumidifier Works
The Refine Armored Series Dehumidifier utilizes either its integral humidistat to monitor
the conditioned space or a manual on/off control to energize the compressor when needed.
Air is drawn across an evaporator coil. The evaporator coil is cooler than the dew point of the
air so water vapor will turn into liquid condensation. Air is then reheated through the
condenser coil and distributed back into the room.
Installation:
120 Volts AC may cause serious injury from electric shock.
WARNING!
1. Disconnect electrical power before servicing
2. Only plug unit into grounded electrical outlet
3. Do not use extension cord
4. Do not use plug adapter
Power Supply: 220V, 50 Hz AC Only 1 Phase
Outlet Requirement: 3-Prong, GFI
Circuit Protector: 15 Amp Time Delay Fuse or Circuit Breaker
Alternatively, you can manually control unit to operate independent of space conditions.
Place unit in desired location. The inlet of unit should be at least 8”from any obstructions.
If unit is transported in the horizontal position, allow it to sit in upright position for at least 30
minutes before operating.
It is recommended that the unit be removed from any location where corrosive or high
VOC content materials are applied.
WARNING!
Achterkant
Voorpaneel
Luchtingang
Luchtuitgang
Handgreep
Vergrendeling
Wiel
Slang- en
kabelhouder
Achterpaneel
Aansluiting
afvoerslang
Bedienings-
paneel
Aansluiting
voedingskabel
Luchtingang

CONTROLEPANEEL
A. ON/OFF: Druk de ON/OFF knop in om de unit AAN of UIT te zetten.
B. PURGE: Druk de PURGE knop om water uit de pomp reservoir te legen.
Gedurende normale werking zuivert de pomp automatisch wanneer het reservoir vol
is. Gebruik 'Purge" voor het bewegen van de machine om water lekkage te
voorkomen. De pomp sluit automatisch na veertig seconden achter elkaar in
operatie te zijn.
C. en :
Druk en knoppen om luchtvochtigheid in te stellen of aan te passen
tussen 26% en 90%. Wanneer de luchtvochtigheid onder de 26% komt zal ''CO'' op
het display verschijnen.
D. TIME: Laat de huidige en totaal gewerkte uren zien. Na het aanzetten van de
operatie, kan het de luchtvochtigheid instellen (links) en huidige luchtvochtigheid
laten zien (rechts), luchtvochtigheid kan worden aangepast door de ''omhoog en
omlaag'' knoppen te gebruiken, voor de huige tijd, en de tijdseenheid is gebaseerd
op minuten, ter voorbeeld: als op het display staat ''0000:50'', betekend dit dat het
ditmaal voor 50 minuten gewerkt heeft. Als je de totaal gewerkte tijd wilt zien, druk
je nogmaal op ''T'', en het laat dit automatisch 10s zien en geeft daarna weer het
normale working display aan. Als je ''T'' indrukt voor deze 10s om zijn, gaat het
scherm ook weer terug naar normaal display.
Als de unit aanstaat maar niet in operatie is, zal het LED display niets laten zien en
in deze stand laat het scherm de laatst gewerkte tijd zien voor 10s als er een keer
op ''T'' gedrukt word. Als binnen deze 10s nogmaals op ''T'' gedrukt word, laat de
unit de totaal gewerkte tijd zien, wederom voor 10s. Als er binnen deze 10s geen
actie plaatsvind, gaat het LED scherm weer uit. Als ''T'' wel wordt ingedrukt wanneer
de LED display de totaal gewerkte tijd laat zien, gaat het LED scherm direct uit. De
huidig gewerkte tijd wordt gedelete door '"T'' voor 5s ingedrukt te houden. De
huidige gewerkte tijd wordt dan gereset maar de gedeletete tijd wordt wel
toegevoegd aan de totaal gewerkte tijd.
E. Ontdooi Indicator
De unit begint te ontdooien wanneer de ontdooi indicator oplicht: de unit stopt met
ontdooien wanneer de ontdooi indicator weer uit gaat. Wanneer het ontdooien
afgelopen is, begint de unit automatisch weer met ontvochtigen.
Let op: De totaal gewerkte tijd kan niet worden verwijderd, als de gewerkte tijd
dusdanig lang is dat het niet meer op het LED scherm ter display kan worden
aangetoont, zal het worden verwijderd en herstarten vanaf start.
4
NL
-5-
(3)The LCD interface shows two lines of data. The first line displays the room
temperature and humidity. On the second line, Job T(working time) and Humidity Setpoint are
displayed on an alternating basis.
Inlet 32℃ 7 6 %
The contents of the second line alternateevery 10 sec.
-4-
Humidity Setting:Adjust the humidity setpoint
※Operating instructions※
※Control Panel Operation
OK
M
P
Menu
up button Down Button LCD Monitor
On/Off
Select/OK Drain Pump
1. ON/Off Button
Press this button, and the machine will start running. Press this key again and the machine
will stop running. The display will show room humidity levels except while you’re pressing
another button. NOTE: When unit is turned off, the fan will run for 1 minute prior to shutting
off. In addition the condensate pump will pump for approximately 14 seconds to drain the
pump reservoir after unit is powered off.
2. Pump Button P
For extended storage or movement of the machine, press the “Pump” bottom to
remove water from the integral pump’s reservoir.
3. Menu Button M
Pressing the Menu (M) button, gives you the options to select between two different
control modes as well as adjust the temperature measurement units. Continue pressing the M
button until you get to your desired selection. Press the Select (OK) key to confirm that
selection and move to a submenu.
After you’ve completed your task select“R”thenpress the select (OK) button to
moveback to Previous Menu, or wait for 10 S for automatically returning to main screen.
Four selections are available:

BEDIENINGSINSTRUCTIES
A. Bediening voor algemeen gebruik:
I. Druk de ON/OFF knop om de unit aan te zetten, het zal automatisch in werk modus
opstarten.
II. Na gebruik, druk ON/OFF knop in om de unit uit te schakelen. De pomp zal nog
automatisch 40 seconden doorgaan met de rest van het water weg te laten lopen en
daarna automatisch uit gaan.
Let op:
Waarschuwing:
DOE NIET de stroom UIT door de hoofdstekker eruit te trekken.
Om water lekkage te voorkomen; NIET de dehumidifier bewegen of verplaatsen voor
minimaal drie minuten na de stroom UIT gezet te hebben.
B. Sleutelvergrendelingsfunctie
Als de knoppen “T” en “P” beiden 2s tegelijkertijd worden ingedrukt, zal het RUNNING
lichtknopje branden op de snelheid van 50Hz en alle knoppen op het controle panel
zullen op slot gaan, maar kunnen ontgrendeld worden door hetzelfde commando weer
uit te voeren.
C. Pipe-functie
Gebruik voor een veel nattere ruimte een plastic buis met een diameter groter dan 6, 7
inch en bind de buis aan de kap, deze zal veel sneller en effectiever zijn om droog te
maken.
Afvoerslang De sluitpin wordt ingezet en bevestigd
6
NL
6. LCD monitor
When the unit is running, the LCD monitor will go dark if no buttons are pushed. Push any
button once to light monitor.
7. LCD display function
(1)Show Power On when the machine has already connected but not started.
Po w e r on
n
Unit O
(2)Show UnitOn when the machine in working status(This display will disappear in 2
Use to confirm a selection.
4. Select/OK Button OK
These buttons are used for adjusting humidity or timer settings.
5. UP Botton Down Botton
Timer setting:Timing for the start/Timing Shutdown/Cycle Timing
Temperature Scale Switch:Degrees Celsius or Fahrenheit selection
Return:Return to display the main page
NOTE: See Section 8 for more detailed programming instructions.
-4-
Humidity Setting:Adjust the humidity setpoint
※Operating instructions※
※Control Panel Operation
OK
M
P
Menu
up button Down Button LCD Monitor
On/Off
Select/OK Drain Pump
1. ON/Off Button
Press this button, and the machine will start running. Press this key again and the machine
will stop running. The display will show room humidity levels except while you’re pressing
another button. NOTE: When unit is turned off, the fan will run for 1 minute prior to shutting
off. In addition the condensate pump will pump for approximately 14 seconds to drain the
pump reservoir after unit is powered off.
2. Pump Button P
For extended storage or movement of the machine, press the “Pump” bottom to
remove water from the integral pump’s reservoir.
3. Menu Button M
Pressing the Menu (M) button, gives you the options to select between two different
control modes as well as adjust the temperature measurement units. Continue pressing the M
button until you get to your desired selection. Press the Select (OK) key to confirm that
selection and move to a submenu.
After you’ve completed your task select“R”thenpress the select (OK) button to
moveback to Previous Menu, or wait for 10 S for automatically returning to main screen.
Four selections are available:
5
5
R
R
g
b. Press the M button until “Humid” is flashing. Press “OK” to select this option.The
Note: As long as the machine is plugged into power, the settings can be changed. The unit does not
d. Press the menu key until the humidity level (bottom left of display) is flashing (it will
either say “Co” for continuous or a number for a specific percentage).
e. Use theUpor Down buttons to set the machine to your desired level.Press the OK
Buttonwhen finished.The cursor automatically moves toR which will be flashing.Press OK to
confirm or wait 10 seconds and you will automatically return to main screen.
This selection allows you to set a timer for the unit to turn on or turn off. You can also set up cycle
timing, which allows you to set up and repeating cycle of specific on and off durations.
a. Press the menu key several times unit the Timer button is flashing. Press OK button to
-7-
Humid Timer
TempU R
Humid
R
Set t ing
35%
( 1 ) The Humidity Setting (Humid)
a. Press the Menu (M) button.The screen shows:
b. Press the M button until “Humid” is flashing. Press “OK” to select this option.The
screen shows:
8. Operation and Display
Note: As long as the machine is plugged into power, the settings can be changed. The unit does not
have to be operating to change setup.
d. Press the menu key until the humidity level (bottom left of display) is flashing (it will
either say “Co” for continuous or a number for a specific percentage).
e. Use theUpor Down buttons to set the machine to your desired level.Press the OK
Buttonwhen finished.The cursor automatically moves toR which will be flashing.Press OK to
confirm or wait 10 seconds and you will automatically return to main screen.
( 2 ) Timer Settings (Timer)
This selection allows you to set a timer for the unit to turn on or turn off. You can also set up cycle
timing, which allows you to set up and repeating cycle of specific on and off durations.
a. Press the menu key several times unit the Timer button is flashing. Press OK button to
confirm this option.
-6-
or
Job. T 0 0 0 5
Humi.s e t 50 %
(5) .
Show Draining when the pump is draining in both automatic and manual modes
Inlet 32℃ 7 6 %
Draining
Once the pump reservoir is drained, the contents second linein turn show job hours and total hours
alternating every 10 seconds for approximately 1 minute while the fan completes its final cycle. At this
point.
Job. T 0 0 0 5
0 8 9L fe
i.0H
or
Show Defrosting when the machine is in defrosting mode.If both Defrosting and Draining
are occurring simultaneously, Defrosting is the display priority.
Inlet 32℃ 7 6 %
Dig
ft
en
ro s
(6) .
Second line of display will rotate through several screens depending on setup
f f
Unit O
(4)When you press the Power Offbutton, two lines of data will be displayed. The top
line will read “Unit Off”. The bottom line will read “DRAINING” for approximately 14
seconds while the pump is emptied.
f f
Unit O
Draining
Second screen display options:
Job. T 0 0 0 5
0 8 9L fe
i.0H
or
5
5
R
R
g
b. Press the M button until “Humid” is flashing. Press “OK” to select this option.The
Note: As long as the machine is plugged into power, the settings can be changed. The unit does not
d. Press the menu key until the humidity level (bottom left of display) is flashing (it will
either say “Co” for continuous or a number for a specific percentage).
e. Use theUpor Down buttons to set the machine to your desired level.Press the OK
Buttonwhen finished.The cursor automatically moves toR which will be flashing.Press OK to
confirm or wait 10 seconds and you will automatically return to main screen.
This selection allows you to set a timer for the unit to turn on or turn off. You can also set up cycle
timing, which allows you to set up and repeating cycle of specific on and off durations.
a. Press the menu key several times unit the Timer button is flashing. Press OK button to
5
5
R
R
g
b. Press the M button until “Humid” is flashing. Press “OK” to select this option.The
Note: As long as the machine is plugged into power, the settings can be changed. The unit does not
d. Press the menu key until the humidity level (bottom left of display) is flashing (it will
either say “Co” for continuous or a number for a specific percentage).
e. Use theUpor Down buttons to set the machine to your desired level.Press the OK
Buttonwhen finished.The cursor automatically moves toR which will be flashing.Press OK to
confirm or wait 10 seconds and you will automatically return to main screen.
This selection allows you to set a timer for the unit to turn on or turn off. You can also set up cycle
timing, which allows you to set up and repeating cycle of specific on and off durations.
a. Press the menu key several times unit the Timer button is flashing. Press OK button to
-7-
Humid Timer
TempU R
Humid
R
Set t ing
35%
( 1 ) The Humidity Setting (Humid)
a. Press the Menu (M) button.The screen shows:
b. Press the M button until “Humid” is flashing. Press “OK” to select this option.The
screen shows:
have to be operating to change setup.
d. Press the menu key until the humidity level (bottom left of display) is flashing (it will
either say “Co” for continuous or a number for a specific percentage).
e. Use theUpor Down buttons to set the machine to your desired level.Press the OK
Buttonwhen finished.The cursor automatically moves toR which will be flashing.Press OK to
confirm or wait 10 seconds and you will automatically return to main screen.
( 2 ) Timer Settings (Timer)
This selection allows you to set a timer for the unit to turn on or turn off. You can also set up cycle
timing, which allows you to set up and repeating cycle of specific on and off durations.
a. Press the menu key several times unit the Timer button is flashing. Press OK button to
confirm this option.
-6-
or
Job. T 0 0 0 5
Humi.s e t 50 %
(5) .
Show Draining when the pump is draining in both automatic and manual modes
Inlet 32℃ 7 6 %
Draining
Once the pump reservoir is drained, the contents second linein turn show job hours and total hours
alternating every 10 seconds for approximately 1 minute while the fan completes its final cycle. At this
point.
Job. T 0 0 0 5
0 8 9L fe
i.0H
or
Show Defrosting when the machine is in defrosting mode.If both Defrosting and Draining
are occurring simultaneously, Defrosting is the display priority.
Inlet 32℃ 7 6 %
Dig
ft
en
ro s
(6) .
Second line of display will rotate through several screens depending on setup
f f
Unit O
(4)When you press the Power Offbutton, two lines of data will be displayed. The top
line will read “Unit Off”. The bottom line will read “DRAINING” for approximately 14
seconds while the pump is emptied.
f f
Unit O
Draining
Second screen display options:
Job. T 0 0 0 5
0 8 9L fe
i.0H
or
-7-
Humid Timer
TempU R
Humid
R
Set t ing
35%
( 1 ) The Humidity Setting (Humid)
a. Press the Menu (M) button.The screen shows:
b. Press the M button until “Humid” is flashing. Press “OK” to select this option.The
screen shows:
Note: As long as the machine is plugged into power, the settings can be changed. The unit does not
have to be operating to change setup.
d. Press the menu key until the humidity level (bottom left of display) is flashing (it will
either say “Co” for continuous or a number for a specific percentage).
e. Use theUpor Down buttons to set the machine to your desired level.Press the OK
Buttonwhen finished.The cursor automatically moves toR which will be flashing.Press OK to
confirm or wait 10 seconds and you will automatically return to main screen.
( 2 ) Timer Settings (Timer)
This selection allows you to set a timer for the unit to turn on or turn off. You can also set up cycle
timing, which allows you to set up and repeating cycle of specific on and off durations.
a. Press the menu key several times unit the Timer button is flashing. Press OK button to
confirm this option.
-6-
or
Job. T 0 0 0 5
Humi.s e t 50 %
(5) .
Show Draining when the pump is draining in both automatic and manual modes
Inlet 32℃ 7 6 %
Draining
Once the pump reservoir is drained, the contents second linein turn show job hours and total hours
alternating every 10 seconds for approximately 1 minute while the fan completes its final cycle. At this
point.
Job. T 0 0 0 5
0 8 9L fe
i.0H
or
Show Defrosting when the machine is in defrosting mode.If both Defrosting and Draining
are occurring simultaneously, Defrosting is the display priority.
Inlet 32℃ 7 6 %
Dig
ft
en
ro s
(6) .
Second line of display will rotate through several screens depending on setup
f f
Unit O
(4)When you press the Power Offbutton, two lines of data will be displayed. The top
line will read “Unit Off”. The bottom line will read “DRAINING” for approximately 14
seconds while the pump is emptied.
f f
Unit O
Draining
Second screen display options:
Job. T 0 0 0 5
0 8 9L fe
i.0H
or

7
NL
5 Voorbereiding van het toestel voor gebruik
1. Installeer de ontvochtiger met minstens 30 cm afstand tussen de mur en de voor- en achterkant. De voorkant van het toestel
naar de te drogen plaats gericht worden.
Als het toestel in horizontale positie vervoerd werd, laat het in verticale positie gedurende minstens 30 minuten voor
gebruik staan.
2. De meegeleverde afvoerslang wordt door een snelkoppeling aan de onderkant van het toestel aangesloten. De afvoerslang
moet naar een geschikte evacuatie, of naar buiten geleid worden. Dankzij de pomp, kan de slang tot 45 cm verticaal
lopen alvorens de denitieve afvoerplaats te bereiken.
the unit features an integral drain pump, drain line may go vertically up 18’prior to
reaching final drain location.
The quick connector into
the socket on the connector
Quick connection to draining tube
(
( 4 ) Set unit control as desired and energize.
3 ) Firmly insert power cord into socket on top back of unit.
a. Remove the inlet grille to access the filter
※Maintenance and Repair※
1. Exterior Cleaning
Use a soft, slightly damp cloth to wipe the plastic body.
2. Filter cleaning
-11--10-
Discharge Ducting
10.Handlebar Mounting
Handle rotates 180 °, after aligning with locating pin holes will be fixed.
The locating pin is inserted and fixed
※Preparing the Unit for Use※
( 1 ) Position the machine for a minimum 8” clearance on back and sides. Front should
be positioned for maximum discharge distance or directly to specific location for spot drying.
If the unit was moved in such a manner that the compressor didn’t remain in a vertical
orientation, wait a minimum of 30 minutes before turning the unit“on.”
( 2 ) The included drain line attaches to the unit via a quick connection type fitting located
on the base of the unit.The drain line should be routed to a suitable drain or outside. Because
3. Steek de voedingskabel stevig in de verbinding, bovenaan aan de achterkant van het toestel.
4. Plaats het toestel op de gewenste locatie, en steek de stekker in het stopcontact.
6 Onderhoud en reparatie
6.1 Reiniging van de buitenkant
Gebruik een licht vochtig doek om de kunststof behuizing schoon te maken.
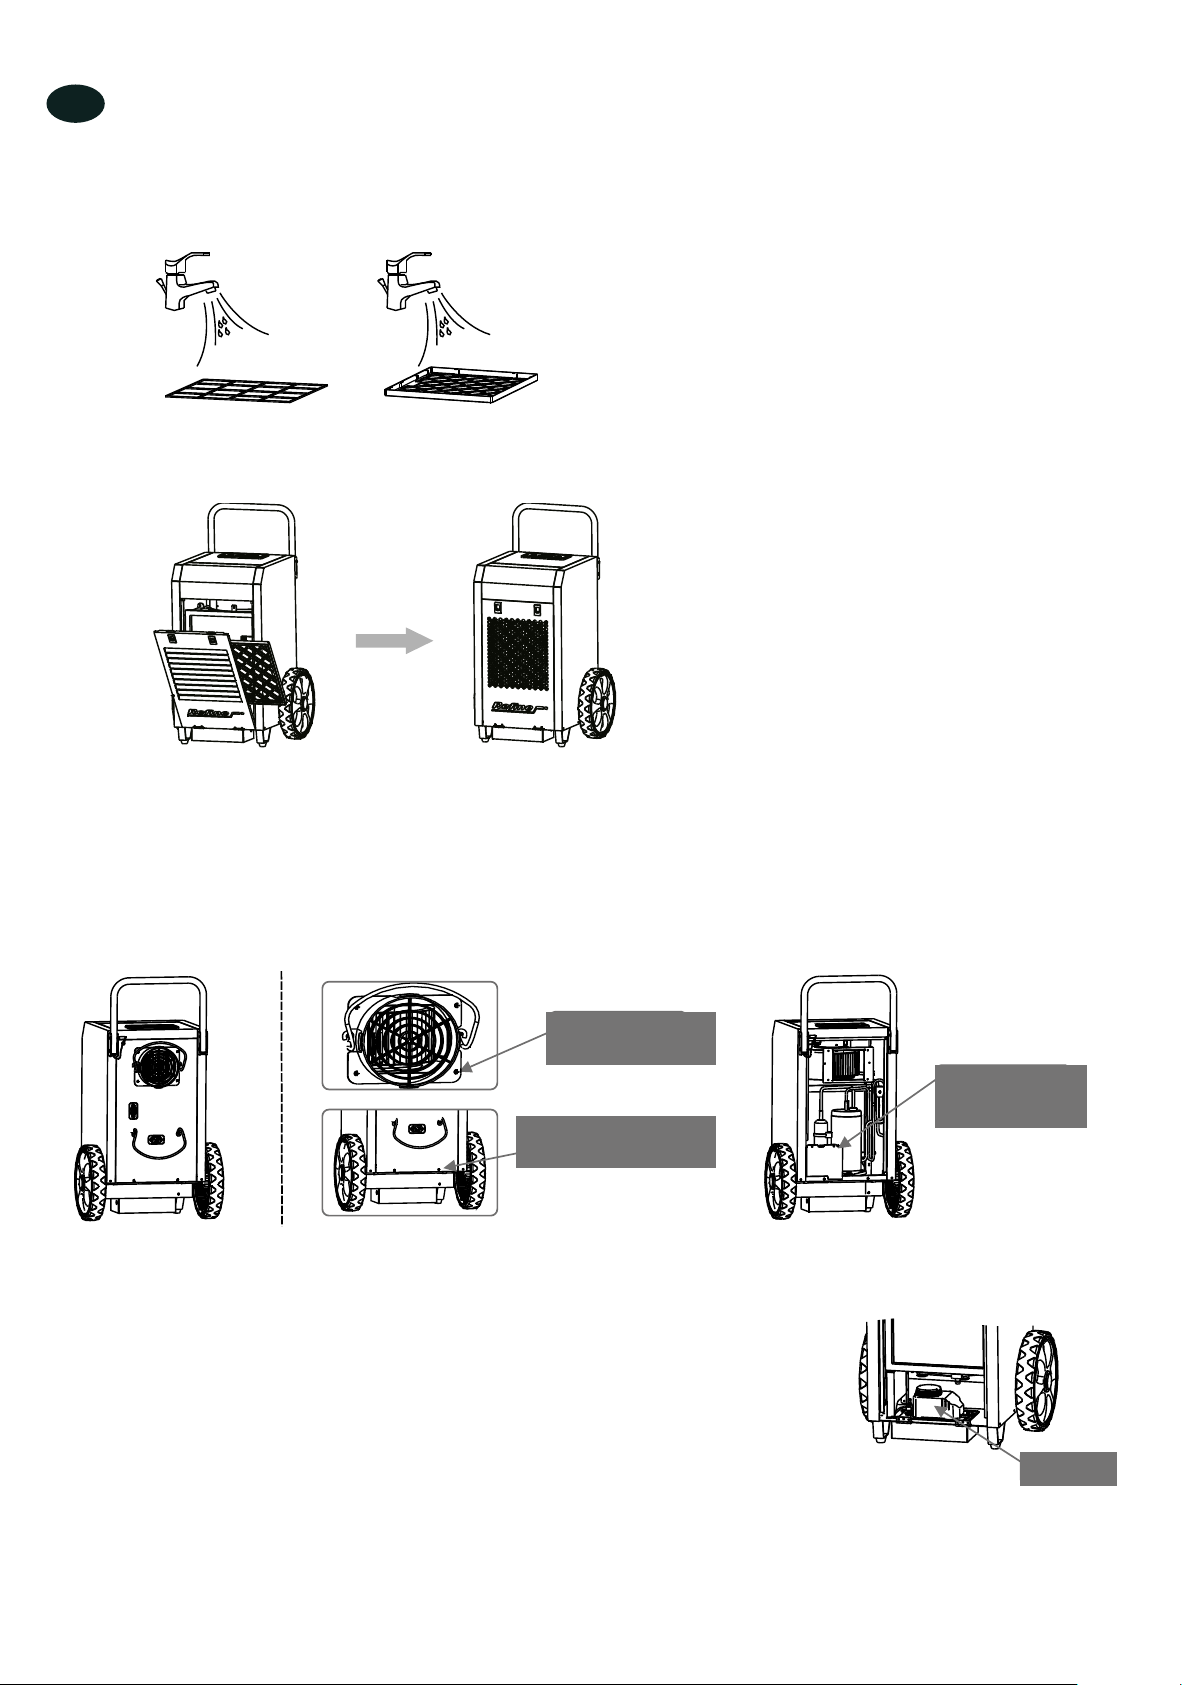
6.2 Reiniging van de lter
1. Verwijder de ingangsrooster om de lter te kunnen bereiken.
-13-
Your Refine Armored is equipped with an integral
condensate pump designed to pump condensate from
your dehumidifier out to the desired drain. This pump
requires routine maintenance that is not covered by your
1. Electronic Control Maintenance
a. To release screws on the rear cover removed
2. Water Pump Maintenance
The pump is designed with quick connection construction. If service is required,
condensate tube, float switch connections, and the main
power cord to pump can easily be disconnected. The
pump can be removed from reservoir by using a flat
screwdriver to gently pry pump assembly from reservoir.
Release these
4 Screws
b. Open the cover and remove
the Electrical box cove
Pump
-12-
b. Filter may be cleaned by vacuuming or by washing with warm water (no soap or solvents). Insure
filter is dry prior to restarting unit.
Press and hold the button pressed down
the door opened and pulled out of the filter
c. Reinstall Filter into Unit
The filter insert the filter box then close the wind panel
※Maintenance
WARNING – ALWAYS UNPLUG UNIT PRIOR TO PERFORMING ANY
MAITENANCE
Release these 2 Screws
Release these
2 Screws
Open the rear cover and
pull the pump out
Snelkoppeling voor afvoerslang Snelkoppeling in de verbinding
in de aansluiting
Druk de knop naar beneden en houd deze
ingedrukt om de deur te openen en de lter
te nemen
8
NL
-13-
Your Refine Armored is equipped with an integral
condensate pump designed to pump condensate from
your dehumidifier out to the desired drain. This pump
requires routine maintenance that is not covered by your
1. Electronic Control Maintenance
2. Water Pump Maintenance
The pump is designed with quick connection construction. If service is required,
condensate tube, float switch connections, and the main
power cord to pump can easily be disconnected. The
pump can be removed from reservoir by using a flat
screwdriver to gently pry pump assembly from reservoir.
Release these
4 Screws
b. Open the cover and remove
the Electrical box cove
Pump
-12-
b. Filter may be cleaned by vacuuming or by washing with warm water (no soap or solvents). Insure
filter is dry prior to restarting unit.
Press and hold the button pressed down
the door opened and pulled out of the filter
c. Reinstall Filter into Unit
The filter insert the filter box then close the wind panel
※Maintenance
WARNING – ALWAYS UNPLUG UNIT PRIOR TO PERFORMING ANY
MAITENANCE
Release these 2 Screws
Release these
2 Screws
Open the rear cover and
pull the pump out
-13-
Your Refine Armored is equipped with an integral
condensate pump designed to pump condensate from
your dehumidifier out to the desired drain. This pump
requires routine maintenance that is not covered by your
1. Electronic Control Maintenance
a. To release screws on the rear cover removed
2. Water Pump Maintenance
The pump is designed with quick connection construction. If service is required,
condensate tube, float switch connections, and the main
power cord to pump can easily be disconnected. The
pump can be removed from reservoir by using a flat
screwdriver to gently pry pump assembly from reservoir.
Release these
4 Screws
b. Open the cover and remove
the Electrical box cove
Pump
-12-
b. Filter may be cleaned by vacuuming or by washing with warm water (no soap or solvents). Insure
filter is dry prior to restarting unit.
Press and hold the button pressed down
the door opened and pulled out of the filter
c. Reinstall Filter into Unit
The filter insert the filter box then close the wind panel
※Maintenance
WARNING – ALWAYS UNPLUG UNIT PRIOR TO PERFORMING ANY
MAITENANCE
Release these 2 Screws
Release these
2 Screws
Open the rear cover and
pull the pump out
-13-
Your Refine Armored is equipped with an integral
condensate pump designed to pump condensate from
your dehumidifier out to the desired drain. This pump
requires routine maintenance that is not covered by your
2. Water Pump Maintenance
The pump is designed with quick connection construction. If service is required,
condensate tube, float switch connections, and the main
power cord to pump can easily be disconnected. The
pump can be removed from reservoir by using a flat
screwdriver to gently pry pump assembly from reservoir.
Release these
4 Screws
b. Open the cover and remove
the Electrical box cove
Pump
-12-
b. Filter may be cleaned by vacuuming or by washing with warm water (no soap or solvents). Insure
filter is dry prior to restarting unit.
Press and hold the button pressed down
the door opened and pulled out of the filter
c. Reinstall Filter into Unit
The filter insert the filter box then close the wind panel
※Maintenance
WARNING – ALWAYS UNPLUG UNIT PRIOR TO PERFORMING ANY
MAITENANCE
Release these 2 Screws
Release these
2 Screws
Open the rear cover and
pull the pump out
2. De lter kan met een stofzuiger gereinigd worden, of met warm water (geen wasmiddel of oplosmiddel). Maak zeker dat de
lter volledig droog is, alvorens het toestel opnieuw in te schakelen.
3. Steek de lter opnieuw in het toestel.
Zet de lterdoos in en sluit het paneel.
6.3 Onderhoud elektronische bediening
1. Draai de schroeven van het achterpaneel los.
2. Open het paneel en verwijder de deksel van de elektrische doos.
6.4 Onderhoud pomp
De pomp is van een snelkoppeling voorzien. In geval van reparatie, kunnen de
condensaatslang, de aansluitingen van de vlotterschakelaars en de voedingskabel
gemakkelijk ontkoppeld worden. De pomp kan opgeheven worden met behulp van een
platte schroevendraaier, gebruikt om de pomp voorzichtig uit de tank te trekken. Uw
bouwdroger is met een geïntegreerde pomp uitgerust, om condensaat van het toestel naar
de gewenste evacuatie te pompen. Deze pomp vereist regelmatig onderhoud, dat niet door
de garantie gedekt wordt. Alleen een defecte pomp zal worden gerepareerd of vervangen
tijdens de garantieperiode. Open het achterpaneel en
neem de pomp uit
Verwijder die 4
schroeven
Verwijder die 2
schroeven
Verwijder die 2
schroeven
Pomp

9
NL
6.5 Preventief onderhoud
Zoals voor alle pompen, is een regelmatig onderhoud nodig, om storingen te voorkomen als gevolg van vuil of modder die in
het afvoersysteem ophoopt - met inbegrip van de opvangbak, de condensaatslang, het pompreservoir, de pompkop, de vlotter
en de afvoerslang.
6.6 Reiniging van de pomp, eenmaal per jaar
Basis reiniging:
1. Druk op de toets P, om het water van het reservoir af te voeren.
2. Trek de stekker uit het stopcontact.
3. Bereid een oplossing voor op basis van 450 ml water en 30 ml bleekwater, of 360 ml water en 120 ml azijn. Giet deze
oplossing in de opvangbak, aan de onderkant van de spoelen.
Nota: Als er reinigingsmiddel op de spoelen is, spoel met water.
4. Laat gedurende 15 minuten inweken.
5. Sluit de ontvochtiger opnieuw aan.
6. Herhaal de
7. Vul het reservoir in, en spoel deze door de pomp minstens 2 keer te laten werken.
8. Herhaal deze operatie indien nodig.
Grondige reiniging:
1. a. Druk op de toets P, om het water van het reservoir af te voeren.
1. b. Ontkoppel het toestel van de stroomtoevoer, en open het paneel om toegang te krijgen tot de pomp.
c. De pomp kop kan verwijderd worden door de bevestigingen in te drukken.
d. Gebruik een vloeistofzuiger of doeken om het resterende water uit het reservoir te verwijderen.
2. Vul het pompreservoir in met een reinigingmiddel (450 ml water en 30 ml bleekwater, of 360 ml en 120 ml azijn).
3. Monteer de pomp opnieuw en gebruik de knop voor manuele bediening, om de slang met de oplossing te spoelen.
4. Dezelfde oplossing kan langzaam in de afvoertank aan de onderkant van de spoel gegoten worden, om de slang tussen
de tank en de pomp te reinigen. Dit proces kan gestopt worden als de pomp eenmaal gewerkt heeft.
Nota: Als er reinigingsmiddel op de spoelen is, spoel met water.
5. Giet genoeg schoon water in de afvoertank, zodat de pomp een tweede keer werkt.
6. Monteer het toestel opnieuw, dat opnieuw gebruiksklaar is.
Spoelen:
Indien nodig maak de spoelen schoon met een stofzuiger of een speciek reinigingsmiddel.
7 De bouwdroger opslaan
Als de bouwdroger voor een lange periode opgeslagen moet worden:
1. Schakel het toestel uit en laat het drogen.
2. Maak het reservoir met de manuele bediening leeg.
3. Wikkel en beveilig de voedingskabel.
4. Maak het gaas van de lter schoon.
5. Sla het toestel in een schone en droge plaats op.

10
NL
8 Storingen
Storing Oorzaak Oplossing
Het toestel werkt niet / Geen
weergave op de display Stroomuitval of verkeerde aansluiting. Controleer de elektrische uitrusting.
Controleer dat beide uiteinden van de
kabel correct aangesloten zijn.
Le kamertemperatuur ligt buiten het
werkbereik. Fout HI of LO. Zorg voor een kamertemperatuur tussen
0 en 38 °C.
De ontvochtiger kan niet
ingeschakeld worden Het gaas van de lter is verstopt. Reinig de lter.
De luchtingang of -uitgang is
belemmerd. Maak de ingang en de uitgang vrij.
Geen luchtstroom Filter verstopt. Reinig de lter.
Het toestel is niet correct geïnstalleerd. Zet het toestel in verticale positie op een
vlakke ondergrond.
Sterk / ongewoon geluid De pomp is niet goed geplaatst. Plaats de pomp correct in de tank.
Foutmelding: E1 Defecte of verkeerd aangesloten
vochtsensor. Controleer de aansluiting van de
sensorkabel, of vervang de sensor.
Foutmelding: E3 Defecte of verkeerd aangesloten
temperatuursensor. Controleer de aansluiting van de
sensorkabel, of vervang de sensor.
Foutmelding: E4 De pomp detecteert een te hoog niveau
in het reservoir (zie onderstaande
nota’s).
Controleer dat de afvoerslang niet
verstopt is.
Controleer dat de pomp correct werkt,
repareer indien nodig.
Vervang de pomp indien nodig.
Foutmelding: L0 Het toestel detecteert een
kamertemperatuur lager dan 0 °C. Verhoog de kamertemperatuur.
Controleer de sensor.
Controleer de aansluitingskabel van de
sensor.
Foutmelding: HI Het toestel detecteert een
kamertemperatuur hoger dan 38 °C. Verlaag de kamertemperatuur.
Controleer de sensor.
Controleer de aansluitingskabel van de
sensor.
Foutmelding: E1, L0, HI De display toont E1, L0, HI tegelijkertijd.
Dit betekent een verkeerde aansluiting,
een slechte kabel of een defecte sensor.
Controleer de aansluiting.
Vervang de kabel.
Vervang de sensor.
Pomp alarm - foutmelding E4
Als de pomp alarm op de display weergegeven wordt:
1. Wis de foutmelding door de stekker uit het stopcontact te trekken, en opnieuw aan te sluiten.
Nota: Het toestel zal niet werken totdat de foutmelding gewist wordt.
2. Controleer manueel of de pomp werkt. Druk op de toets P, en kijk of de pomp correct opstart en stopt, en of het water
afgevoerd wordt. Als u de pomp niet onlangs heeft gereinigd, controleer of de slangen niet verstopt zijn, en reinig de
pomp volgens de bovenstaande instructies.
3. Vervang de slangen of de pomp als het probleem niet opgelost is.

9731 9009 9732
230V - 50Hz
900W
700 CM³/h
70 l/24 h
1/kW h
1 - 40°C
35 ~ 95%
85W
5m
56 dB(A)
555 x 820 x 480mm
40.5 kg
230V - 50Hz
500W
600 CM³/h
50 l/24 h
1/kW h
1 - 40°C
35 ~ 95%
85W
5m
56 dB(A)
555 x 700 x 520mm
39.5 kg
230V - 50Hz
1300W
850 CM³/h
90 l/24 h
1/kW h
1 - 40°C
35 ~ 95%
85W
5m
56 dB(A)
555 x 820 x 480mm
43.0 kg
11

12
FR
• Si l’arrivée de courant est interrompue, l’appareil de remettra en marche quand le courant revient.
• Réfrigérant R410A écologique.
• Système d’auto-contrôle.
Comment fonctionne votre déshumidicateur ?
Le déshumidicateur utilise son humidistat intégré pour maintenir le taux d’humidité souhaité, ou il fonctionne manuellement
avec la commande on/off. L’air est aspiré et conduit à travers un serpentin d’évaporation. Le serpentin d’évaporation étant plus
froid que le point de rosée de l’air, la vapeur d’eau se transforme en liquide. L’air est ensuite réchauffé par le condenseur et
redistribué dans la pièce.
3 Installation
ATTENTION ! 120 volts AC peuvent provoquer des sérieuses blessures dues à une électrocution.
• Débranchez le câble d’alimentation avant de travailler sur l’appareil.
• Ne branchez l’appareil que sur une installation avec prise de terre.
• N’utilisez pas de rallonge.
• N’utilisez pas d’adaptateur.
• Alimentation électrique : 230 V, 50 Hz, AC monophasé.
• Sortie : 3 broches, GFI.
•Protection : Fusible de temporisation 15 A ou disjoncteur.
•Vous pouvez utiliser la commande manuelle pour un fonctionnement indépendant de l’humidité ambiante.
•Placez l’appareil à l’endroit souhaité. La sortie de l’appareil doit se trouver à au moins 30 cm de tout obstacle.
• Si l’appareil a été transporté en position horizontale, laissez-le en position verticale pendant au moins 30 min. avant
utilisation.
ATTENTION ! Il est recommandé d’éviter les endroits avec des matériaux corrosifs ou à haute
teneur en COV.
Aperçu de l’appareil
Avant
-3-
※ Unit Overview ※
※ Front View
Handle
Wheel
※ Rear View
Control panel
Front cover
Air iutlet
Power Cord Input
Hose and
Cord Rack
Drain Tube
Connection
Air Intake
Air Intake Door Latch
Rear cover
-2-
How Your Armored Dehumidifier Works
The Refine Armored Series Dehumidifier utilizes either its integral humidistat to monitor
the conditioned space or a manual on/off control to energize the compressor when needed.
Air is drawn across an evaporator coil. The evaporator coil is cooler than the dew point of the
air so water vapor will turn into liquid condensation. Air is then reheated through the
condenser coil and distributed back into the room.
Installation:
120 Volts AC may cause serious injury from electric shock.
WARNING!
1. Disconnect electrical power before servicing
2. Only plug unit into grounded electrical outlet
3. Do not use extension cord
4. Do not use plug adapter
Power Supply: 220V, 50 Hz AC Only 1 Phase
Outlet Requirement: 3-Prong, GFI
Circuit Protector: 15 Amp Time Delay Fuse or Circuit Breaker
Alternatively, you can manually control unit to operate independent of space conditions.
Place unit in desired location. The inlet of unit should be at least 8”from any obstructions.
If unit is transported in the horizontal position, allow it to sit in upright position for at least 30
minutes before operating.
It is recommended that the unit be removed from any location where corrosive or high
VOC content materials are applied.
WARNING!
Arrière
Panneau
avant
Entrée d’air
Sortie d’air
Poignée
Loquet porte
Roue
Support tuyau
et câble
Panneau
arrière
Raccord tuyau
de vidange
Panneau de
commande
Raccord câble
d’alimentation
Entrée d’air

PANNEAU DE CONTROLE
A. ON / OFF : Appuyez sur la touche ON / OFF pour allumer ou éteindre
l'appareil.
B. PURGE: Appuyez sur la touche PURGE pour vider l'eau du réservoir de la
pompe. En fonctionnement normal, la pompe se purge automatiquement lorsque le
réservoir est plein. Utilisez «PURGE» avant de déplacer la machine pour éviter les
déversements d'eau. La pompe se fermera automatiquement après quarante
secondes de fonctionnement continu.
C. et :
Appuyez sur la touche et pour régler l'humidité dans une plage
comprise entre 26% et 90%. Lorsque l'humidité ambiante est inférieure à 26%, «CO»
s'affiche.
D. HEURE: Afficher les heures de travail et le temps de travail total. Après avoir
activé le fonctionnement, il peut afficher le réglage de l'humidité (à gauche) et de
l'humidité actuelle (à droite), et l'humidité peut être modifiée en appuyant sur «Haut et
Bas», pour l'heure actuelle, l'unité de temps est basée sur les minutes, par exemple,
si elle affiche «0000: 50», cela signifie qu'elle a fonctionné pendant 50 minutes cette
fois. Si vous souhaitez afficher le temps de travail total, veuillez appuyer sur "T" une
fois de plus, il s'affichera pendant 10 secondes et reviendra automatiquement à
l'affichage de travail d'origine. Si vous appuyez sur "T" avant qu'il n'ait duré 10
secondes, il peut également revenir à l'affichage de travail d'origine.
Si l'unité est sous tension mais ne fonctionne pas, la LED n'affiche rien, et dans cet
état, les heures de travail de la dernière fois seront affichées pendant 10s si "T" est
pressé une fois. Mais dans les 10 secondes, si vous appuyez à nouveau sur «T», le
temps de travail total s'affichera également pendant 10 secondes, et dans les 10
secondes, s'il n'y a aucune action, la LED s'éteindra automatiquement. De plus, si
vous appuyez à nouveau sur «T» lorsque la LED affiche le temps de travail total, la
LED s'éteint immédiatement. De plus, le temps de travail actuel sera supprimé en
appuyant sur "T" pendant 5 secondes en continu, et le temps sera recompté, mais le
temps supprimé sera ajouté au temps de travail total.
E. Indicateur de dégivrage
L'unité commence à dégivrer lorsque le voyant de dégivrage s'allume; l'unité arrête le
dégivrage lorsque l'indicateur de dégivrage est éteint. Une fois le dégivrage terminé,
l'unité recommence à se déshumidifier automatiquement.
Remarque: Le temps de travail total ne peut pas être supprimé, si le temps est
au-delà de laplage de la LED indiquant l'heure, ilsera supprimé et recompté depuis le
début.
13
FR
When the unit is running, the LCD monitor will go dark if no buttons are pushed. Push any
Show Power On when the machine has already connected but not started.
Show UnitOn when the machine in working status(This display will disappear in 2
The LCD interface shows two lines of data. The first line displays the room
temperature and humidity. On the second line, Job T(working time) and Humidity Setpoint are
-5-
(3)The LCD interface shows two lines of data. The first line displays the room
temperature and humidity. On the second line, Job T(working time) and Humidity Setpoint are
displayed on an alternating basis.
Inlet 32℃ 7 6 %
The contents of the second line alternateevery 10 sec.
-4-
Humidity Setting:Adjust the humidity setpoint
※Operating instructions※
※Control Panel Operation
OK
M
P
Menu
up button Down Button LCD Monitor
On/Off
Select/OK Drain Pump
1. ON/Off Button
Press this button, and the machine will start running. Press this key again and the machine
will stop running. The display will show room humidity levels except while you’re pressing
another button. NOTE: When unit is turned off, the fan will run for 1 minute prior to shutting
off. In addition the condensate pump will pump for approximately 14 seconds to drain the
pump reservoir after unit is powered off.
2. Pump Button P
For extended storage or movement of the machine, press the “Pump” bottom to
remove water from the integral pump’s reservoir.
3. Menu Button M
Pressing the Menu (M) button, gives you the options to select between two different
control modes as well as adjust the temperature measurement units. Continue pressing the M
button until you get to your desired selection. Press the Select (OK) key to confirm that
selection and move to a submenu.
After you’ve completed your task select“R”thenpress the select (OK) button to
moveback to Previous Menu, or wait for 10 S for automatically returning to main screen.
Four selections are available:

MODE D'EMPLOI
A. Fonctionnement à usage général:
I. Appuyez sur la touche ON / OFF pour allumer l'appareil, il se mettra automatiquement
en mode de travail.
II. Après utilisation, appuyez sur la touche ON / OFF pour éteindre l'appareil, tandis que la
pompe à eau se met en marche automatiquement pendant 40 secondes pour vidanger
l'eau, et s'éteint automatiquement.
Remarque:
Attention:
NE PAS couper l'alimentation OFF en débranchant la prise de courant.
Pour éviter les déversements d'eau ; NE PAS déplacer le déshumidificateur pendant au
moins trois minutes après avoir mis l'appareil hors tension OFF.
B. Fonction de verrouillage des touches
Si les touches «T» et «P» sont enfoncées pendant 2 secondes en même temps, le voyant
RUNNING continuera de briller à la vitesse de 50 Hz,et toutes les touches du panneau de
commande seront verrouillées, mais elles pourront être déverrouillées par la même action
à nouveau.
C. Fonction du tuyau
En ce qui concerne un espace beaucoup plus humide, utilisez un tuyau en plastique de
diamètre supérieur à 6,7 pouces et attachez le tuyau à la hotte, il sera beaucoup plus
rapide et plus efficace de le sécher.
Afvoerslang De sluitpin wordt ingezet en bevestigd
14
FR
6. LCD monitor
When the unit is running, the LCD monitor will go dark if no buttons are pushed. Push any
button once to light monitor.
7. LCD display function
(1)Show Power On when the machine has already connected but not started.
Po w e r on
(2)Show UnitOn when the machine in working status(This display will disappear in 2
Use to confirm a selection.
4. Select/OK Button OK
These buttons are used for adjusting humidity or timer settings.
5. UP Botton Down Botton
Timer setting:Timing for the start/Timing Shutdown/Cycle Timing
Temperature Scale Switch:Degrees Celsius or Fahrenheit selection
Return:Return to display the main page
NOTE: See Section 8 for more detailed programming instructions.
-4-
Humidity Setting:Adjust the humidity setpoint
※Operating instructions※
※Control Panel Operation
OK
M
P
Menu
up button Down Button LCD Monitor
On/Off
Select/OK Drain Pump
1. ON/Off Button
Press this button, and the machine will start running. Press this key again and the machine
will stop running. The display will show room humidity levels except while you’re pressing
another button. NOTE: When unit is turned off, the fan will run for 1 minute prior to shutting
off. In addition the condensate pump will pump for approximately 14 seconds to drain the
pump reservoir after unit is powered off.
2. Pump Button P
For extended storage or movement of the machine, press the “Pump” bottom to
remove water from the integral pump’s reservoir.
3. Menu Button M
Pressing the Menu (M) button, gives you the options to select between two different
control modes as well as adjust the temperature measurement units. Continue pressing the M
button until you get to your desired selection. Press the Select (OK) key to confirm that
selection and move to a submenu.
After you’ve completed your task select“R”thenpress the select (OK) button to
moveback to Previous Menu, or wait for 10 S for automatically returning to main screen.
Four selections are available:
5
5
R
R
g
b. Press the M button until “Humid” is flashing. Press “OK” to select this option.The
Note: As long as the machine is plugged into power, the settings can be changed. The unit does not
d. Press the menu key until the humidity level (bottom left of display) is flashing (it will
either say “Co” for continuous or a number for a specific percentage).
e. Use theUpor Down buttons to set the machine to your desired level.Press the OK
Buttonwhen finished.The cursor automatically moves toR which will be flashing.Press OK to
confirm or wait 10 seconds and you will automatically return to main screen.
This selection allows you to set a timer for the unit to turn on or turn off. You can also set up cycle
timing, which allows you to set up and repeating cycle of specific on and off durations.
a. Press the menu key several times unit the Timer button is flashing. Press OK button to
-7-
Humid Timer
TempU R
Humid
R
Set t ing
35%
( 1 ) The Humidity Setting (Humid)
a. Press the Menu (M) button.The screen shows:
b. Press the M button until “Humid” is flashing. Press “OK” to select this option.The
screen shows:
p p y
Note: As long as the machine is plugged into power, the settings can be changed. The unit does not
have to be operating to change setup.
d. Press the menu key until the humidity level (bottom left of display) is flashing (it will
either say “Co” for continuous or a number for a specific percentage).
e. Use theUpor Down buttons to set the machine to your desired level.Press the OK
Buttonwhen finished.The cursor automatically moves toR which will be flashing.Press OK to
confirm or wait 10 seconds and you will automatically return to main screen.
( 2 ) Timer Settings (Timer)
This selection allows you to set a timer for the unit to turn on or turn off. You can also set up cycle
timing, which allows you to set up and repeating cycle of specific on and off durations.
a. Press the menu key several times unit the Timer button is flashing. Press OK button to
confirm this option.
-6-
or
Job. T 0 0 0 5
Humi.s e t 50 %
(5) .
Show Draining when the pump is draining in both automatic and manual modes
Inlet 32℃ 7 6 %
Draining
Once the pump reservoir is drained, the contents second linein turn show job hours and total hours
alternating every 10 seconds for approximately 1 minute while the fan completes its final cycle. At this
point.
Job. T 0 0 0 5
0 8 9L fe
i.0H
or
Show Defrosting when the machine is in defrosting mode.If both Defrosting and Draining
are occurring simultaneously, Defrosting is the display priority.
Inlet 32℃ 7 6 %
Dig
ft
en
ro s
(6) .
Second line of display will rotate through several screens depending on setup
f f
Unit O
(4)When you press the Power Offbutton, two lines of data will be displayed. The top
line will read “Unit Off”. The bottom line will read “DRAINING” for approximately 14
seconds while the pump is emptied.
f f
Unit O
Draining
Second screen display options:
Job. T 0 0 0 5
0 8 9L fe
i.0H
or
5
5
R
R
g
b. Press the M button until “Humid” is flashing. Press “OK” to select this option.The
Note: As long as the machine is plugged into power, the settings can be changed. The unit does not
d. Press the menu key until the humidity level (bottom left of display) is flashing (it will
either say “Co” for continuous or a number for a specific percentage).
e. Use theUpor Down buttons to set the machine to your desired level.Press the OK
Buttonwhen finished.The cursor automatically moves toR which will be flashing.Press OK to
confirm or wait 10 seconds and you will automatically return to main screen.
This selection allows you to set a timer for the unit to turn on or turn off. You can also set up cycle
timing, which allows you to set up and repeating cycle of specific on and off durations.
a. Press the menu key several times unit the Timer button is flashing. Press OK button to
5
5
R
R
g
b. Press the M button until “Humid” is flashing. Press “OK” to select this option.The
Note: As long as the machine is plugged into power, the settings can be changed. The unit does not
d. Press the menu key until the humidity level (bottom left of display) is flashing (it will
either say “Co” for continuous or a number for a specific percentage).
e. Use theUpor Down buttons to set the machine to your desired level.Press the OK
Buttonwhen finished.The cursor automatically moves toR which will be flashing.Press OK to
confirm or wait 10 seconds and you will automatically return to main screen.
This selection allows you to set a timer for the unit to turn on or turn off. You can also set up cycle
timing, which allows you to set up and repeating cycle of specific on and off durations.
a. Press the menu key several times unit the Timer button is flashing. Press OK button to
-7-
Humid Timer
TempU R
Humid
R
Set t ing
35%
( 1 ) The Humidity Setting (Humid)
a. Press the Menu (M) button.The screen shows:
b. Press the M button until “Humid” is flashing. Press “OK” to select this option.The
screen shows:
have to be operating to change setup.
d. Press the menu key until the humidity level (bottom left of display) is flashing (it will
either say “Co” for continuous or a number for a specific percentage).
e. Use theUpor Down buttons to set the machine to your desired level.Press the OK
Buttonwhen finished.The cursor automatically moves toR which will be flashing.Press OK to
confirm or wait 10 seconds and you will automatically return to main screen.
( 2 ) Timer Settings (Timer)
This selection allows you to set a timer for the unit to turn on or turn off. You can also set up cycle
timing, which allows you to set up and repeating cycle of specific on and off durations.
a. Press the menu key several times unit the Timer button is flashing. Press OK button to
confirm this option.
-6-
or
Job. T 0 0 0 5
Humi.s e t 50 %
(5) .
Show Draining when the pump is draining in both automatic and manual modes
Inlet 32℃ 7 6 %
Draining
Once the pump reservoir is drained, the contents second linein turn show job hours and total hours
alternating every 10 seconds for approximately 1 minute while the fan completes its final cycle. At this
point.
Job. T 0 0 0 5
0 8 9L fe
i.0H
or
Show Defrosting when the machine is in defrosting mode.If both Defrosting and Draining
are occurring simultaneously, Defrosting is the display priority.
Inlet 32℃ 7 6 %
Dig
ft
en
ro s
(6) .
Second line of display will rotate through several screens depending on setup
f f
Unit O
(4)When you press the Power Offbutton, two lines of data will be displayed. The top
line will read “Unit Off”. The bottom line will read “DRAINING” for approximately 14
seconds while the pump is emptied.
f f
Unit O
Draining
Second screen display options:
Job. T 0 0 0 5
0 8 9L fe
i.0H
or
-7-
Humid Timer
TempU R
Humid
R
Set t ing
35%
( 1 ) The Humidity Setting (Humid)
a. Press the Menu (M) button.The screen shows:
b. Press the M button until “Humid” is flashing. Press “OK” to select this option.The
screen shows:
Note: As long as the machine is plugged into power, the settings can be changed. The unit does not
have to be operating to change setup.
d. Press the menu key until the humidity level (bottom left of display) is flashing (it will
either say “Co” for continuous or a number for a specific percentage).
e. Use theUpor Down buttons to set the machine to your desired level.Press the OK
Buttonwhen finished.The cursor automatically moves toR which will be flashing.Press OK to
confirm or wait 10 seconds and you will automatically return to main screen.
( 2 ) Timer Settings (Timer)
This selection allows you to set a timer for the unit to turn on or turn off. You can also set up cycle
timing, which allows you to set up and repeating cycle of specific on and off durations.
a. Press the menu key several times unit the Timer button is flashing. Press OK button to
confirm this option.
-6-
or
Job. T 0 0 0 5
Humi.s e t 50 %
(5) .
Show Draining when the pump is draining in both automatic and manual modes
Inlet 32℃ 7 6 %
Draining
Once the pump reservoir is drained, the contents second linein turn show job hours and total hours
alternating every 10 seconds for approximately 1 minute while the fan completes its final cycle. At this
point.
Job. T 0 0 0 5
0 8 9L fe
i.0H
or
Show Defrosting when the machine is in defrosting mode.If both Defrosting and Draining
are occurring simultaneously, Defrosting is the display priority.
Inlet 32℃ 7 6 %
Dig
ft
en
ro s
(6) .
Second line of display will rotate through several screens depending on setup
f f
Unit O
(4)When you press the Power Offbutton, two lines of data will be displayed. The top
line will read “Unit Off”. The bottom line will read “DRAINING” for approximately 14
seconds while the pump is emptied.
f f
Unit O
Draining
Second screen display options:
Job. T 0 0 0 5
0 8 9L fe
i.0H
or

15
FR
5 Préparation de l’appareil avant utilisation
1. Placez l’appareil avec un écart d’au moins 30 cm entre le mur et l’avant et l’arrière. L’avant de l’appareil doit être dirigé
vers l’endroit à sécher.
Si l’appareil a été déplacé en position horizontale, laissez-le en position verticale pendant au moins 30 minutes avant de
l’allumer.
2. Le tuyau de vidange fourni se xe via une connexion rapide à la base de l’appareil. Le tuyau de vidange doit être conduit
vers une évacuation adaptée, ou vers l’extérieur. Grâce à la pompe, le tuyau peut monter jusqu’à 45 cm avant d’atteindre
l’endroit d’évacuation.
the unit features an integral drain pump, drain line may go vertically up 18’prior to
reaching final drain location.
The quick connector into
the socket on the connector
Quick connection to draining tube
(
( 4 ) Set unit control as desired and energize.
3 ) Firmly insert power cord into socket on top back of unit.
a. Remove the inlet grille to access the filter
※Maintenance and Repair※
1. Exterior Cleaning
Use a soft, slightly damp cloth to wipe the plastic body.
2. Filter cleaning
-11--10-
Discharge Ducting
10.Handlebar Mounting
Handle rotates 180 °, after aligning with locating pin holes will be fixed.
The locating pin is inserted and fixed
※Preparing the Unit for Use※
( 1 ) Position the machine for a minimum 8” clearance on back and sides. Front should
be positioned for maximum discharge distance or directly to specific location for spot drying.
If the unit was moved in such a manner that the compressor didn’t remain in a vertical
orientation, wait a minimum of 30 minutes before turning the unit“on.”
( 2 ) The included drain line attaches to the unit via a quick connection type fitting located
on the base of the unit.The drain line should be routed to a suitable drain or outside. Because
3. Insérez fermement le câble d’alimentation dans la connexion, en haut à l’arrière de l’appareil.
4. Placez l’appareil à l’endroit souhaité et branchez-le.
6 Entretien et réparation
6.1 Nettoyage extérieur
Utilisez un chiffon légèrement humide pour nettoyer le châssis en plastique.
6.2 Nettoyage du ltre
1. Enlevez la grille d’entrée pour accéder au ltre.
-13-
Your Refine Armored is equipped with an integral
condensate pump designed to pump condensate from
your dehumidifier out to the desired drain. This pump
requires routine maintenance that is not covered by your
1. Electronic Control Maintenance
a. To release screws on the rear cover removed
2. Water Pump Maintenance
The pump is designed with quick connection construction. If service is required,
condensate tube, float switch connections, and the main
power cord to pump can easily be disconnected. The
pump can be removed from reservoir by using a flat
screwdriver to gently pry pump assembly from reservoir.
Release these
4 Screws
b. Open the cover and remove
the Electrical box cove
Pump
-12-
b. Filter may be cleaned by vacuuming or by washing with warm water (no soap or solvents). Insure
filter is dry prior to restarting unit.
Press and hold the button pressed down
the door opened and pulled out of the filter
c. Reinstall Filter into Unit
The filter insert the filter box then close the wind panel
※Maintenance
WARNING – ALWAYS UNPLUG UNIT PRIOR TO PERFORMING ANY
MAITENANCE
Release these 2 Screws
Release these
2 Screws
Open the rear cover and
pull the pump out
Raccord rapide pour le tuyau de
vidange
Raccord rapide dans la
connexion dans le raccord
Pressez le bouton vers le bas et laissez-le
enfoncé pour ouvrir la porte et sortir le ltre
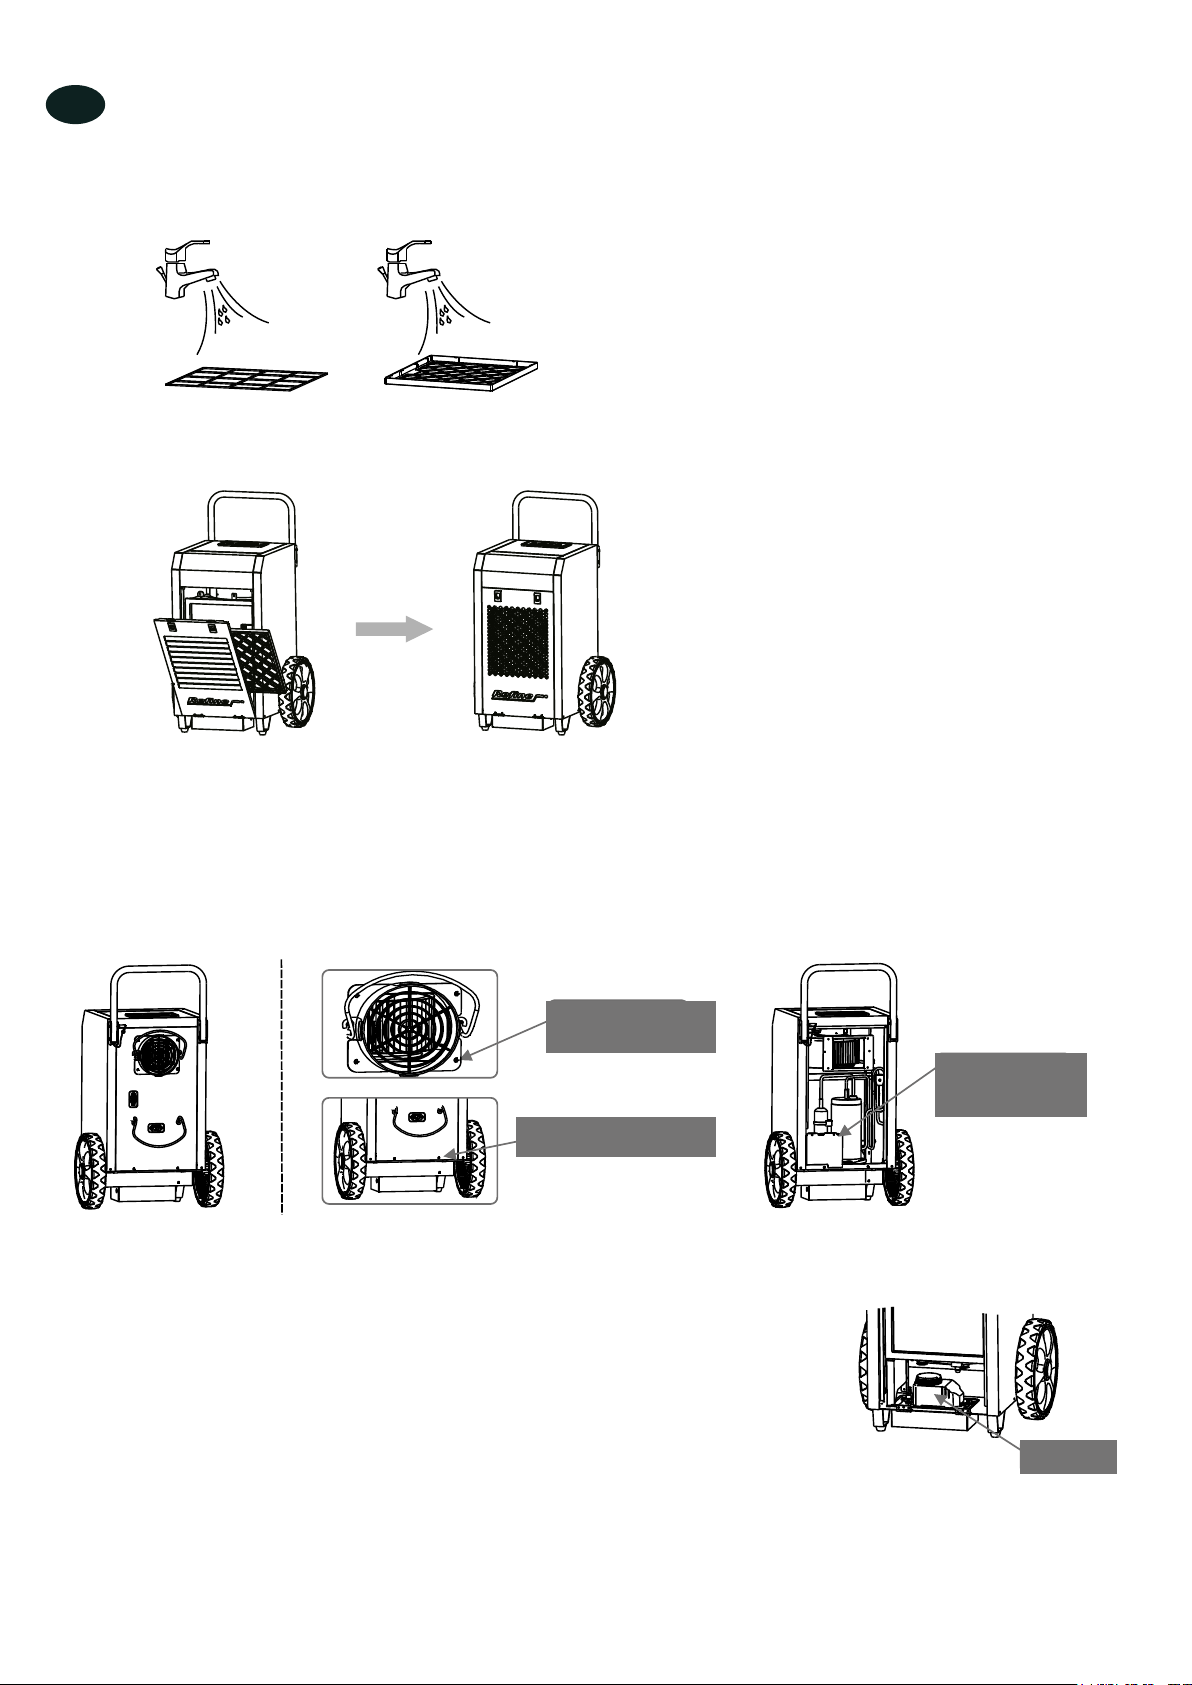
16
FR
-13-
Your Refine Armored is equipped with an integral
condensate pump designed to pump condensate from
your dehumidifier out to the desired drain. This pump
requires routine maintenance that is not covered by your
1. Electronic Control Maintenance
a. To release screws on the rear cover removed
2. Water Pump Maintenance
The pump is designed with quick connection construction. If service is required,
condensate tube, float switch connections, and the main
power cord to pump can easily be disconnected. The
pump can be removed from reservoir by using a flat
screwdriver to gently pry pump assembly from reservoir.
Release these
4 Screws
b. Open the cover and remove
the Electrical box cove
Pump
-12-
b. Filter may be cleaned by vacuuming or by washing with warm water (no soap or solvents). Insure
filter is dry prior to restarting unit.
Press and hold the button pressed down
the door opened and pulled out of the filter
c. Reinstall Filter into Unit
The filter insert the filter box then close the wind panel
※Maintenance
WARNING – ALWAYS UNPLUG UNIT PRIOR TO PERFORMING ANY
MAITENANCE
Release these 2 Screws
Release these
2 Screws
Open the rear cover and
pull the pump out
-13-
Your Refine Armored is equipped with an integral
condensate pump designed to pump condensate from
your dehumidifier out to the desired drain. This pump
requires routine maintenance that is not covered by your
1. Electronic Control Maintenance
2. Water Pump Maintenance
The pump is designed with quick connection construction. If service is required,
condensate tube, float switch connections, and the main
power cord to pump can easily be disconnected. The
pump can be removed from reservoir by using a flat
screwdriver to gently pry pump assembly from reservoir.
Release these
4 Screws
b. Open the cover and remove
the Electrical box cove
Pump
-12-
b. Filter may be cleaned by vacuuming or by washing with warm water (no soap or solvents). Insure
filter is dry prior to restarting unit.
Press and hold the button pressed down
the door opened and pulled out of the filter
c. Reinstall Filter into Unit
The filter insert the filter box then close the wind panel
※Maintenance
WARNING – ALWAYS UNPLUG UNIT PRIOR TO PERFORMING ANY
MAITENANCE
Release these 2 Screws
Release these
2 Screws
Open the rear cover and
pull the pump out
2. Le ltre peut être nettoyé avec un aspirateur ou lavé à l’eau chaude (sans savon ni solvant). Assurez-vous que le ltre est
bien sec avant de rallumer l’appareil.
3. Remettez le ltre dans l’appareil.
Insérez le boîtier du ltre et fermez le panneau.
6.3 Entretien de la commande électronique
1. Dévissez les vis du panneau arrière.
2. Ouvrez le panneau et enlevez le couvercle du boîtier électrique.
6.4 Entretien de la pompe
La pompe est équipée d’un raccord rapide. Si une réparation est nécessaire, le tuyau
de condensation, les connections des interrupteurs à otteur et le câble d’alimentation
peuvent être facilement débranchés. La pompe peut être sortie au moyen d’un tournevis
plat utilisé pour détacher délicatement la pompe du réservoir. Votre déshumidicateur est
équipé d’une pompe intégrale conçue pour pomper la condensation depuis l’appareil vers
l’endroit d’évacuation souhaité. Cette pompe nécessite un entretien régulier, qui n’est pas
couvert par la garantie sur les pièces détachées. Seule une pompe défectueuse pourra être
remplacée ou réparée pendant la période de garantie. Ouvrez le panneau arrière et
sortez la pompe
Enlevez ces 4 vis
Enlevez ces 2 vis
Enlevez ces 2 vis
Pompe

17
FR
6.5 Entretien préventif
Comme avec toutes les pompes, un entretien préventif est nécessaire pour éviter les pannes dues à la saleté ou à la boue qui
peuvent s’accumuler dans le système d’évacuation - y compris le bac de vidange, le tuyau à condensation, le réservoir de la
pompe, la tête de la pompe, le otteur et le tuyau de vidange.
6.6 Nettoyage de la pompe, une fois par an
Nettoyage de base :
1. Pressez le bouton de la pompe (P) pour vider l’eau du réservoir.
2. Débranchez l’appareil.
3. Préparez une solution à base de 450 ml d’eau et 30 ml d’eau de Javel, ou 360 ml d’eau et 120 ml de vinaigre. Versez
cette solution dans la cuve de vidange à la base des serpentins.
4. Remarque : S’il y a du produit de nettoyage sur les serpentins, rincez à l’eau.
5. Laissez agir pendant 15 minutes.
6. Rebranchez le déshumidicateur.
7. Remplissez le réservoir et rincez en faisant fonctionner la pompe au moins 2 fois.
8. Répétez l’opération si nécessaire.
Nettoyage approfondi :
1. a. Utilisez le bouton P pour vider l’eau du réservoir.
b. Débranchez le déshumidicateur et ouvrez le panneau pour accéder à la pompe.
c. La tête de la pompe peut être enlevée par une pression sur les attaches.
d. Un aspirateur de liquides ou des torchons peuvent être utiliser pour enlever l’eau qui reste dans le réservoir.
2. Remplissez le réservoir de la pompe avec une solution de nettoyage (450 ml d’eau et 30 ml d’eau de Javel, ou 360 ml
d’eau et 120 ml de vinaigre).
3. Remontez la pompe et utilisez le bouton de fonctionnement manuel pour faire circuler le produit dans le tuyau.
4. La même solution de nettoyage peut être versée lentement dans la cuve de vidange sous le serpentin, pour nettoyer le tuyau
qui va de la cuve dans la pompe. Ce processus peut être stoppé quand la pompe a fonctionné 1 fois.
Remarque : S’il y a un mélange d’eau et d’eau de Javel sur le serpentin, rincez à l’eau.
5. Versez sufsamment d’eau claire dans la cuve de vidange pour que la pompe fonctionne une deuxième fois.
6. Remontez l’appareil et il est prêt à fonctionner à nouveau.
Serpentin :
Si nécessaire, nettoyez les serpentins avec un aspirateur ou un nettoyant spécial pour serpentins.
7 Rangement de l’appareil
Si le déshumidicateur doit être rangé pendant une longue période :
1. Éteignez-le et laissez-le sécher.
2. Effectuez une vidange manuelle du réservoir.
3. Enroulez et sécurisez le câble d’alimentation.
4. Nettoyez les mailles du ltre.
5. Rangez l’appareil dans un endroit propre et sec.

18
FR
8 Résolution des problèmes
Panne Cause Solution
La machine ne fonctionne pas /
L’écran est vide Écran vide. Panne de courant ou
mauvais branchement. Vériez l’installation électrique.
Vériez si les deux extrémités du câble
sont bien branchées.
La température ambiante est en dehors
de la plage de fonctionnement. Erreur
HI ou LO.
Modiez les conditions entre 0 et 38
°C.
Vous ne pouvez pas allumer le
déshumidicateur
Les mailles du ltre sont bouchées. Nettoyez le ltre.
L’entrée ou la sortie d’air est obstruée. Dégagez l’entrée et la sortie d’air.
Pas de ux d’air Filtre bouché. Nettoyez le ltre.
L’appareil n’est pas bien placé. Placez l’appareil en position verticale
sur un sol bien plat.
Bruit fort/inhabituel La pompe n’est pas bien placée dans
son logement. Placez la pompe convenablement si
nécessaire.
Code d’erreur : E1 Sonde d’humidité défectueuse ou mal
branchée. Vériez le branchement du câble de la
sonde, ou remplacez la sonde.
Code d’erreur : E3 Sonde de température défectueuse ou
mal branchée. Vériez le branchement du câble de la
sonde, ou remplacez la sonde.
Code d’erreur : E4 La pompe détecte un niveau d’eau
élevé dans le réservoir (voir remarques
ci-dessous.
Vériez si les tuyaux de vidange ne sont
pas bouchés.
Vériez le fonctionnement de la pompe,
réparez si nécessaire.
Remplacez la pompe si nécessaire.
Code d’erreur : L0 L’appareil détecte un température
ambiante inférieure à 0 °C.
Augmentez la température ambiante.
Vériez la sonde.
Vériez le câble de la sonde.
Code d’erreur : HI L’appareil détecte une température
ambiante supérieure à 38 °C.
Diminuez la température ambiante.
Vériez la sonde.
Vériez le câble de la sonde.
Code d’erreur : E1, L0, HI Afche E1, L0, HI en même temps, ceci
indique un mauvais branchement, un
mauvais câble ou une mauvaise sonde.
Vériez le branchement.
Remplacez le câble.
Remplacez la sonde.
Alarme pompe - code d’erreur E4
Si l’alarme pompe s’afche à l’écran :
1. Effacez le code d’erreur en débranchant le câble d’alimentation, puis en le rebranchant.
Remarque : L’appareil ne fonctionnera pas tant que le code d’erreur sera effacé.
2. Testez manuellement si la pompe fonctionne. Pressez le bouton P et voyez si la pompe se met en marche et s’arrête
correctement, et si l’eau est vidangée. Si vous n’avez pas effectué un nettoyage récemment, vériez si les tuyaux ne sont
pas bouchés et nettoyez la pompe selon des instructions ci-dessus.
3. Remplacez les tuyaux ou la pompe si le problème persiste.
9731 9009 9732
230V - 50Hz
900W
700 CM³/h
70 l/24 h
1/kW h
1 - 40°C
35 ~ 95%
85W
5m
56 dB(A)
555 x 820 x 480mm
40.5 kg
230V - 50Hz
500W
600 CM³/h
50 l/24 h
1/kW h
1 - 40°C
35 ~ 95%
85W
5m
56 dB(A)
555 x 700 x 520mm
39.5 kg
230V - 50Hz
1300W
850 CM³/h
90 l/24 h
1/kW h
1 - 40°C
35 ~ 95%
85W
5m
56 dB(A)
555 x 820 x 480mm
43.0 kg
19

20
EN
If power is interrupted during operation, the unit will automatically restart when power is restored.
Eco-friendly R410A refrigerant.
Self monitoring system.
How your dehumidier works
The dehumidier utilizes either its integral humidistat to monitor the conditioned space or a manual on/off control to energize
the compressor when needed. Air is drawn across an evaporator coil. The evaporator coil is cooler than the dew point of the
air so water vapour will turn into liquid condensation. Air is then reheated through the condenser coil and distributed back into
the room.
3 Installation
WARNING! 120 volts AC may cause serious injury from electric shock.
• Disconnect electrical power before servicing.
• Only plug unit into grounded electrical outlet.
• Do not use extension cord.
• Do not use plug adapter.
• Power supply: 230 V, 50 Hz, AC only 1 phase.
•Outlet requirement: 3-Prong, GFI
•Circuit Protector: 15 Amp time delay fuse or circuit breaker.
• Alternatively, you can manually control unit to operate independent of space conditions.
•Place unit in desired location. The inlet of unit should be at least 12” (30 cm) from any obstructions.
• If unit is transported in the horizontal position, allow it to sit in upright position for at least 30 minutes before operating.
WARNING! It is recommended that the unit be removed from any location where corrosive or high
VOC content materials are applied.
Unit overview
Front view
-3-
※ Unit Overview ※
※ Front View
Handle
Wheel
※ Rear View
Control panel
Front cover
Air iutlet
Power Cord Input
Hose and
Cord Rack
Drain Tube
Connection
Air Intake
Air Intake Door Latch
Rear cover
-2-
How Your Armored Dehumidifier Works
The Refine Armored Series Dehumidifier utilizes either its integral humidistat to monitor
the conditioned space or a manual on/off control to energize the compressor when needed.
Air is drawn across an evaporator coil. The evaporator coil is cooler than the dew point of the
air so water vapor will turn into liquid condensation. Air is then reheated through the
condenser coil and distributed back into the room.
Installation:
120 Volts AC may cause serious injury from electric shock.
WARNING!
1. Disconnect electrical power before servicing
2. Only plug unit into grounded electrical outlet
3. Do not use extension cord
4. Do not use plug adapter
Power Supply: 220V, 50 Hz AC Only 1 Phase
Outlet Requirement: 3-Prong, GFI
Circuit Protector: 15 Amp Time Delay Fuse or Circuit Breaker
Alternatively, you can manually control unit to operate independent of space conditions.
Place unit in desired location. The inlet of unit should be at least 8”from any obstructions.
If unit is transported in the horizontal position, allow it to sit in upright position for at least 30
minutes before operating.
It is recommended that the unit be removed from any location where corrosive or high
VOC content materials are applied.
WARNING!
Rear view

21
-5-
(3)The LCD interface shows two lines of data. The first line displays the room
temperature and humidity. On the second line, Job T(working time) and Humidity Setpoint are
displayed on an alternating basis.
Inlet 32℃ 7 6 %
The contents of the second line alternateevery 10 sec.
-4-
Humidity Setting:Adjust the humidity setpoint
※Operating instructions※
※Control Panel Operation
OK
M
P
Menu
up button Down Button LCD Monitor
On/Off
Select/OK Drain Pump
1. ON/Off Button
Press this button, and the machine will start running. Press this key again and the machine
will stop running. The display will show room humidity levels except while you’re pressing
another button. NOTE: When unit is turned off, the fan will run for 1 minute prior to shutting
off. In addition the condensate pump will pump for approximately 14 seconds to drain the
pump reservoir after unit is powered off.
2. Pump Button P
For extended storage or movement of the machine, press the “Pump” bottom to
remove water from the integral pump’s reservoir.
3. Menu Button M
Pressing the Menu (M) button, gives you the options to select between two different
control modes as well as adjust the temperature measurement units. Continue pressing the M
button until you get to your desired selection. Press the Select (OK) key to confirm that
selection and move to a submenu.
After you’ve completed your task select“R”thenpress the select (OK) button to
moveback to Previous Menu, or wait for 10 S for automatically returning to main screen.
Four selections are available:
p y g y g g
This manual suits for next models
5
Table of contents
Languages:


