HEADRUSH MX5 User manual

1
User Guide
(English)
Manual Version 1.2

2
Table of Contents
Introduction ............................................................................................4
Box Contents.......................................................................................4
Support ................................................................................................4
Features .................................................................................................5
Top Panel.............................................................................................5
Rear Panel ...........................................................................................6
Setup ......................................................................................................7
Operation................................................................................................8
Main Screen.........................................................................................8
Overview............................................................................................................................ 8
Basic Operations .............................................................................................................. 8
Reverb/Delay Tail Spillover.............................................................................................10
Signal Path.........................................................................................................................11
Stereo vs. Mono ..............................................................................................................12
Footswitch Modes............................................................................. 13
Rigs .................................................................................................... 14
Creating a New Rig .........................................................................................................14
Optimizing Your Signal Chain.........................................................................................14
Saving a Rig......................................................................................................................15
Deleting a Rig ...................................................................................................................15

3
Adjusting Settings ............................................................................. 16
Overview...........................................................................................................................16
Parameters....................................................................................................................... 17
Saving a Block Preset.................................................................................................... 20
Hardware Assign............................................................................... 21
Footswitches ..................................................................................................................22
Scenes .............................................................................................................................22
Expression Pedal............................................................................................................23
Setlists .............................................................................................. 24
Hands-Free Mode ............................................................................ 25
Tuner/Tempo .................................................................................... 25
Looper .............................................................................................. 26
External MIDI Control ....................................................................... 28
Global Settings ................................................................................. 29
USB ................................................................................................... 32
Recording ........................................................................................................................32
Reamping ........................................................................................................................33
Transferring Files & Settings .........................................................................................34
Screen Lock ....................................................................................................................35
Firmware Update Instructions...................................................................................... 36
Appendix ..............................................................................................37
Technical Specifications .................................................................. 37
Trademarks & Licenses ................................................................... 37

4
Introduction
Box Contents
HeadRush MX5
USB Cable
(2) 1/8” (3.5mm) to MIDI Adapters
Power Adapter
Software Download Card
Quickstart Guide
Safety & Warranty Manual
Support
For the latest information about this product (documentation, technical specifications, system requirements,
compatibility information, etc.) and product registration, visit headrushfx.com.
For additional product support, visit headrushfx.com/support.

5
Features
Top Panel
1
3
4
56
2
1. Display: This full-color multi-touch display shows information relevant to HeadRush MX5’s current operation.
Touch the display (and use the hardware controls) to control the interface. See Operation to learn how it
works.
2. Main Volume: Turn this knob to adjust the volume level of the outputs.
3. Encoder: Turn this encoder to scroll through the available menu options or adjust the parameter values of the
selected field in the display. Push the encoder to confirm your selection.
4. Footswitch Indicators: These lights indicate whether the stomp, rig, or scene assigned to each footswitch is
on (brightly lit) or off (dimly lit).
5. Footswitches: Press these footswitches to activate or deactivate the assigned model or scene, or to load the
assigned rig.
6. Expression Pedal: Use this pedal to adjust the assigned parameter/parameters. See Operation >Hardware
Assign >Expression Pedal for more information.

6
Rear Panel
13
45
6
27
8
9
10
11 12
13
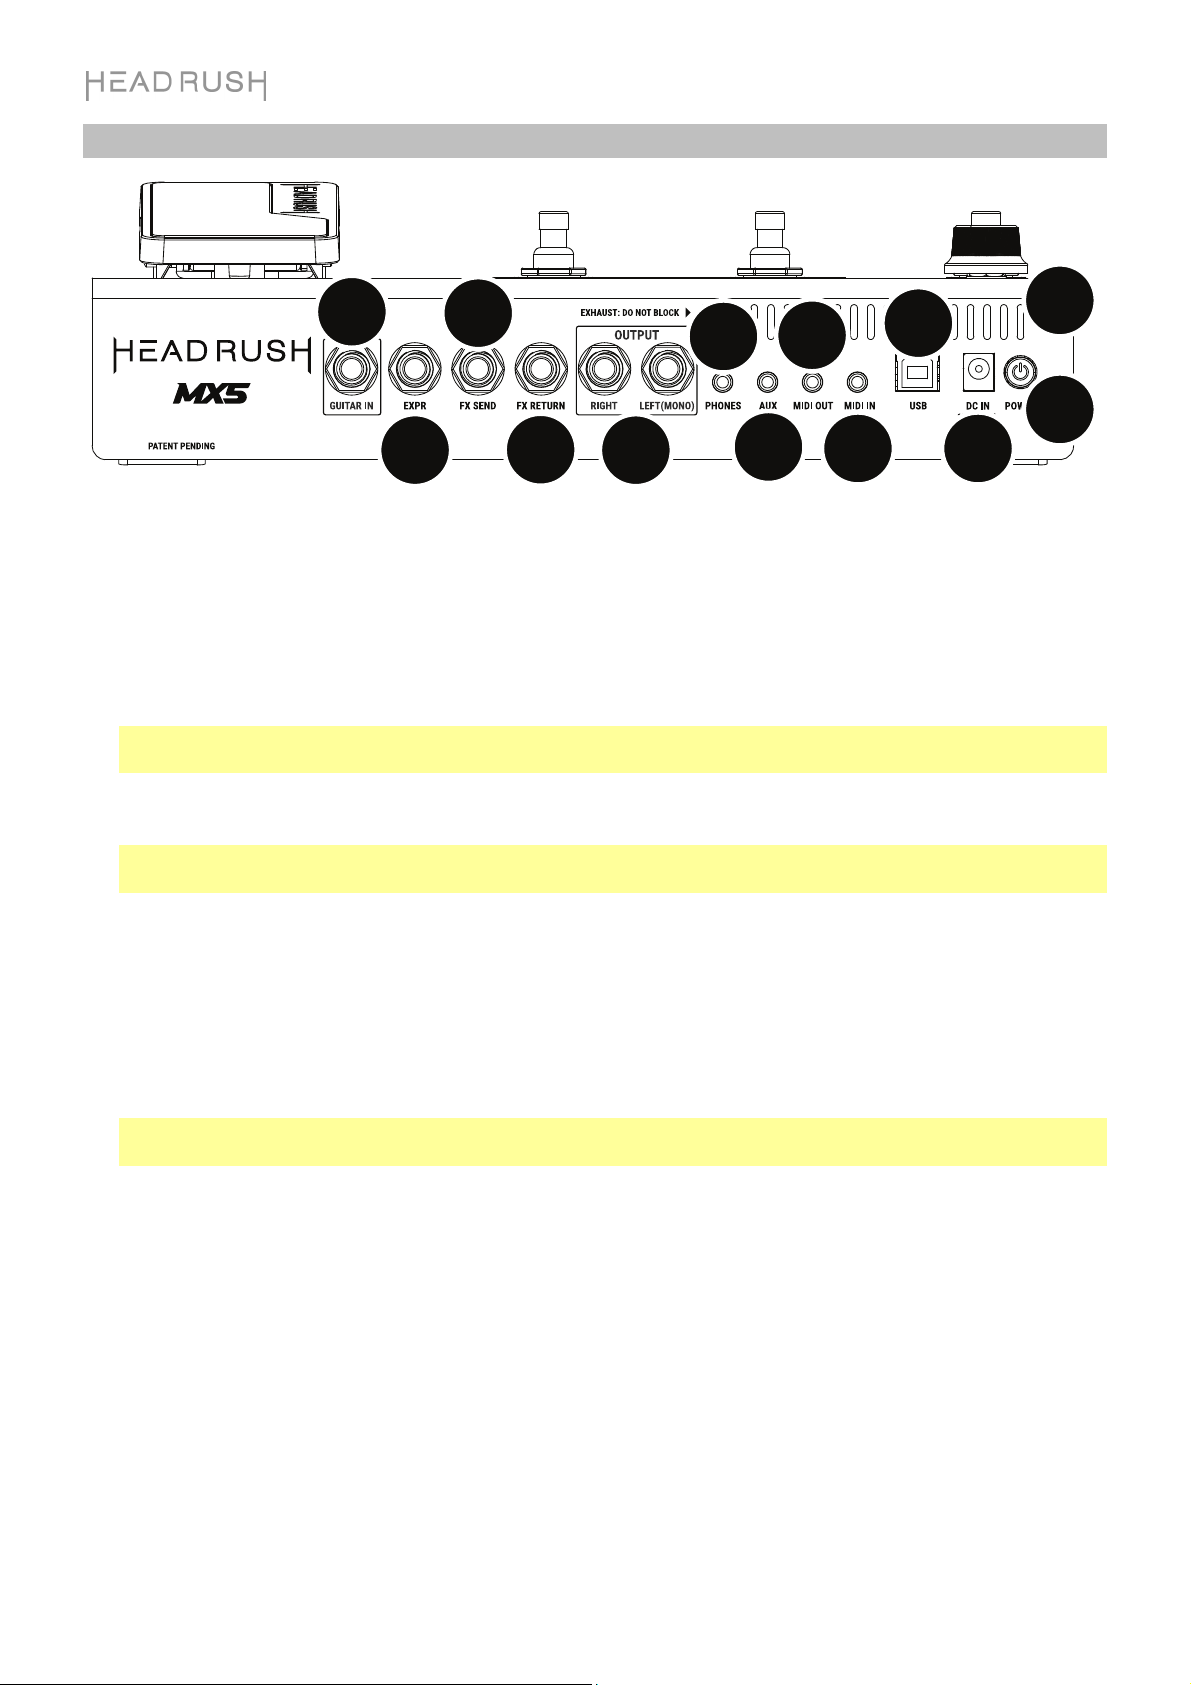
1. Guitar Input (1/4”/6.35 mm, mono): Connect your guitar to this input using a standard instrument cable.
2. Expression Pedal Input (1/4”/6.35 mm, TRS): Connect an optional additional expression pedal to this input
using a standard 1/4" (6.35 mm) TRS cable.
3. FX Send Output (1/4”/6.35 mm, stereo): Connect this output to the input of another effects module, an effect
pedal, or the effects loop return of an amplifier.
4. FX Return Input (1/4”/6.35 mm, stereo): Connect this input to the output of another effects module, an effect
pedal, or the effects loop send of an amplifier.
Note: You can set the FX Return Input to receive signal at rack level or stomp level (default) in the Global
Settings Menu.
5. Outputs (1/4”/6.35 mm, balanced): Connect these outputs to the inputs of your amplifier, audio interface, etc.
If you only need to use one output, use the one labeled Left/Mono.
Note: You can set these outputs to send signal at amp level or line level (default) in the Global Settings
Menu.
6. Phones Output (1/8”/3.5 mm, stereo): Connect standard 1/8” (3.5 mm) stereo headphones to this output.
7. Aux Input (1/8”/3.5 mm, stereo): Connect an optional audio source (e.g., smartphone, tablet, etc.) to this
input using an 1/8”/3.5 mm stereo cable.
8. MIDI Output (1/8”/3.5 mm): Use the included 1/8"-to-MIDI adapter and a standard MIDI cable (not included)
to connect this output to the MIDI input of an optional external MIDI device.
9. MIDI Input (1/8”/3.5 mm): Use the included 1/8"-to-MIDI adapter and a standard MIDI cable (not included) to
connect this input to the MIDI output of an optional external MIDI device.
Important: Do not connect audio devices (e.g., headphones, monitors, etc.) to the MIDI Output or MIDI
Input. Use the included 1/8”-to-5-pin adapters to connect MIDI devices only.
10. USB Port: Connect this USB port to a computer using a standard USB cable. This connection allows
HeadRush MX5 to send and receive the digital audio signal to and from your computer. You can also use this
connection to import or export rigs, model presets, setlists and impulse responses.
11. Power Input: Connect this input to a power outlet using the included power adapter.
12. Power Switch: Press this button to turn HeadRush MX5’s power on. Press and hold this button to turn
HeadRush MX5’s power off.
13. Vent: Make sure this vent is unobstructed while using HeadRush MX5.

7
Setup
Items not listed under Introduction >Box Contents are sold separately.
IMPORTANT! In the Global Settings Menu, make sure you set the Outputs to send signal at amp level if you are
using a traditional guitar amplifier, or line level (default) if you are using a full-range flat-response amplifier, mixer,
PA speaker or audio interface.
Full-range, flat-response amplifier or
traditional guitar amplifier
External effect
stompboxes,
modules, etc.
Expression
pedal
Power
outlet
Guitar
Computer

8
Operation
This chapter describes some of HeadRush MX5’s basic functions.
Main Screen
Overview
Basic Operations
Important: The sequence of models in your signal chain is not necessarily reflected in the footswitches. You can
freely assign models to available footswitches without changing your signal chain at all—and vice versa. See
Hardware Assign to learn about this.
To assign a model (amp, cab, impulse response, or effect) to an empty slot, tap it ()
and then use the list that appears. See Rigs >Creating a New Rig to learn about this.
To rearrange the models in your signal chain, tap and drag a model to another slot or
between two other models (the ones after that position will shift one slot further down
the signal chain).
To activate or deactivate a model, press the footswitch assigned to it, or tap the
model and then tap the On/Off button that appears in the top right corner.
To switch an amp and/or cab between a dual and single configuration, tap the model
and then tap the X 2 button that appears in the top right corner.
To show a model’s settings screen, double-tap it.
Tap and drag this bar downward to view list of rigs.
Rig name.
Turn encoder to move
through selectable
items onscreen or to
adjust parameters.
Press encoder as an
Enter command.
Tap its footswitch to
activate or deactivate it.
Tap to view setlists.
Double-tap a model,
In, or Out to show its
parameters.
Tap to save rig.
These three blocks show the current
function of the three footswitches.
This button enables or
disables reverb and delay
tails when switching to
another rig.
This button toggles
between the different
routing options for a rig.

9
To load another rig (preset):
•Tap the name of the rig on the screen and then turn the encoder.
•Press footswitches 1 and 2 (), or footswitches 2 and 3 () simultaneously when MX5 is in Stomp
Mode.
•Press a footswitch assigned to a preset when MX5 is in Rig Mode.
•Press a footswitch assigned to Prev Rig or Next Rig when MX5 is in Hybrid Mode.
To create a new rig, tap the button in the upper-right corner, and then tap New Rig.
To rename the current rig, double tap the rig name, or tap the button in the upper-right corner, and then tap
Edit Rig Name.
To delete the current rig, tap the button in the upper-right corner, and then tap Delete Rig, and then tap Yes to
continue or No to cancel.
To show a list of available rigs on your HeadRush MX5, tap
the rig name and drag downward. On this list you can tap a
rig’s name to load it.
To hide this list, tap the current rig name and drag upward.
Note: If you have not selected a setlist, all rigs on your
HeadRush will be shown on this rig list. If you have selected a
setlist, only the rigs from that setlist will appear on this rig list.
To search for a rig on your HeadRush, tap the magnifying-
glass icon in the upper-left corner and use the virtual keyboard
that appears to enter a search term (e.g., part of the rig name).
The results will appear below. Tap a result to load that rig.

10
Reverb/Delay Tail Spillover
The MX5 features two types of Reverb/Delay Tail Spillover:
•If you have reverb and/or delay effect(s) active on your rig and then switch to a different rig, the effect(s)
will continue to decay after switching to the second rig.
•If you have a reverb or delay effect active on your rig and then bypass this effect, it will continue to decay
after it is bypassed.
To enable or disable this feature for the current rig, tap Tail on the Main
Screen.
Note: This feature will not work if you are using the FX Loop or USB Audio
features.
To enable or disable Reverb/Delay Tail Spillover for an individual effect,
first double tap the effect on the Main Screen.Then, use the Tails
parameter to toggle the feature On or Off.
Note: Adjusting this parameter will not impact the Reverb/Delay Tail Spillover
setting for the whole rig.

11
Signal Path
You can easily reconfigure the path of your signal chain to split, which will create more complex routings.
To reconfigure the signal path, tap toward the top right of the main screen. The icon will change to
match one three possible signal paths (as shown below).
This straight signal path is the
default and the most common.
This signal path splits in the middle
and rejoins near the end. This
configuration is useful if you want to
use two types of effects (or chains of
effects) but want to keep their signals
separate.
See Adjusting Settings >
P
arameters > Mix to learn how to
mix the split paths together.
This signal path splits immediately
from the source and rejoins near the
end. Like the second configuration,
this one is useful for using two types
of effects (or chains of effects
independently, but it allows for more
models in the split paths and the
rejoined one).
See Adjusting Settings >
P
arameters > Mix to learn how to
mix the split paths together.

12
Stereo vs. Mono
The outgoing signal from the HeadRush MX5 can be mono or stereo, depending on the
models in your rig, the signal path, and which outputs you are using. An indicator near the
end of the signal path indicates the current configuration.
The signal will be stereo if you do any one of the following:
•Use any stereo effect model in your signal chain. Even if you have placed mono effect models after it.
(This is possible because the mono effect is simply applied identically to both channels and not summed).
•Use a split signal path, even if the split paths rejoin before the output.
•Use a double-amp and/or double-cab configuration (i.e., if 2X is on).
The signal will be mono if you do all of the following:
•Use no stereo effect models in your signal chain.
•Use the linear (not split) signal path.
•Use only single-amp and single-cab configurations, if you use an amp or cab model at all.
Alternatively, the signal will be mono if you do any one of the following:
•Use only the L/Mono output (of a stereo pair) on the rear panel.
•Reduce the Rig Width output setting to 0%.
To adjust the width of the stereo field, tap the Out icon at the end of your signal path, and turn the third
parameter knob to adjust the Rig Width output setting. This affects stereo signals only, not mono signals.
100% uses the full stereo field, while 0% produces a mono signal.

13
Footswitch Modes
The three footswitches can be used to activate or bypass
models (amps, cabs, impulse responses, or effects) as well as
select scenes, rigs, or setlists. These footswitches are always
in one of four modes: Stomp, Rig, Hybrid, or Setlist.
To change the mode, hold footswitch 1, then:
•To select Stomp mode, press footswitch 1
•To select Rig mode, press footswitch 2
•To select Hybrid mode, press footswitch 3
•To select Setlist mode, hold footswitch 2
Stomp Mode
Footswitches 1-3 correspond to models (amps, cabs, or effects)
in your signal chain. Press a footswitch to activate or deactivate
its model.
To load the next rig, press footswitches 1 and 2 () simultaneously.
To load the previous rig, press footswitches 2 and 3 () simultaneously.
Rig Mode
Footswitches 1-3 correspond to rigs you have previously saved.
Press a footswitch to load its rig.
To show the next bank of three rigs, press footswitches 1 and 2 () simultaneously.
To show the previous bank of three rigs, press footswitches 2 and 3 () simultaneously.
Hybrid Mode
The first footswitch can be assigned to activate/deactivate a
model or to select a scene in the currently selected rig.
To switch to the previous rig, press footswitch 2.
To switch to the next rig, press footswitch 3.
Setlist Mode
To enter the currently shown setlist, press footswitch 1.
To show the previous setlist, press footswitch 2.
To show the next setlist, press footswitch 3.
To enter the All Rigs setlist, press and hold footswitch 1.

14
Rigs
While using HeadRush MX5, a rig is a preset: the combination of assigned models—the amps, cabs, impulse
responses, and effects—and the parameter settings of each of them. You can create, edit, save, and load rigs,
making it easy to recall the perfect sound for each part of your performance.
Each rig has 11 slots, each of which can have one model (amp, cab, or effect) assigned to it. Assigned slots will
show graphical representations of the models, and empty slots will show a symbol.
Creating a New Rig
To create a new rig, tap the button in the upper-right
corner of the screen, and tap New Rig.
To assign a model (amp, cab, or effect) to an empty slot:
1. Tap the empty slot ().
2. In the list that appears, tap the type of model you want to
assign: Amp, Cab, IR (impulse response),or effect
(Distortion, Dynamics/EQ, Modulation, Reverb/Delay, FX-
Loop, or Expression).
3. In the list that appears, tap the model you want to assign.
4. In the next list that appears, tap the preset you want to
load for that model.
If you load an amp or cab to a slot with an empty adjacent slot, a
matching amp or cab will be loaded automatically to the other
slot. After that, you can configure them independently: you can
separate them in the signal chain, you can change the type of
the amp or cab, and you can delete each model separately.
Optimizing Your Signal Chain
The signal chain is the path that the audio signal follows from your guitar through your selected models and ends
at the outputs of HeadRush MX5. You can use the touchscreen to arrange your selected models in any sequence,
but you may find that some configurations will sound better than others.
Here are some common model placement suggestions for creating tones with HeadRush MX5:
•Dynamics (e.g., compressors), filters (e.g., wah, pitch shifters), and volume pedals generally are placed at
the beginning of the signal chain. Alternatively, you can place volume pedals at the end of the signal chain to
provide a slight variance in functionality.
•Gain-based effects (e.g., overdrive/distortion, fuzz) usually come next.
•Equalization (EQ) is often used to shape the tonal characteristics of overdrive/distortion and fuzz effects, so
put an EQ after them. Alternatively, place it before them to shape the guitar’s general tone—cutting
unwanted frequencies—before the gain pedals.
•Modulation effects like flangers, phasers, and chorus are typically placed next.
•Time-based effects like delays and reverbs are generally placed near the end of the signal chain.
•An amp and a cab (or an amp and impulse response) are often placed at the very end of the signal chain,
although you can place it wherever you want.

15
Saving a Rig
If you have made certain changes to the rig at all since loading it, you
will see an asterisk () next to its name at the top of the screen. You
will see an asterisk if you have done any of the following:
•Assigned a model to the rig
•Deleted a model from the rig
•Moved a model in the signal chain
•Changed a model’s preset (see Adjusting Settings to learn more)
•Made any change in the Hardware Assign screen (see Hardware Assign to learn more)
Activating or deactivating a model or using the expression pedal on any screen will not cause the asterisk to
appear.
You can save these changes to this rig, save these changes as another rig, or discard them altogether.
To save a rig, tap Save in the upper-right corner. The prompt
shown left will appear.
To save your changes to the current rig, tap Save.
To save your changes as a new rig, tap Save New Rig, use the
keyboard that appears to enter a name, and then tap Save.
To return to the previous screen without saving, tap Cancel
at any time.
To discard any changes you’ve made to the rig, tap the
button in the upper-right corner, and tap Discard Changes.
If the asterisk is shown and you try to load a different rig, you
will be asked to select one of these options:
•Cancel: This option returns to the previous screen
without saving the current rig or loading a new rig.
•Save as a New Rig: This option lets you save the
current rig as a new rig. In the screen that appears, use
the keyboard that appears to enter a name, and then
tap Save. That rig will be saved, and the new rig will
load.
•Save: This option saves any changes you made to the
rig and then loads the new rig.
•Discard Changes: This option loads a new rig without
saving any changes to the previous rig.
Deleting a Rig
To delete the current rig, tap the button in the upper-
right corner, tap Delete Rig, and then tap Yes to continue or
No to cancel.
Note: Select Do not show this dialog again in the message to
disable these confirmation messages. You can re-enable them
in the Global Settings screen.

16
Adjusting Settings
To adjust the settings of an item in your rig, double-tap it to open its settings screen. You can adjust the settings
of any model (amp, cab, or effect), the input (the In/Lock icon), the output (the Out icon), or mix (the Mix icon).
Overview
Tap the Preset menu to select a preset. See Saving a Block Preset.
Tap this button and tap Discard Changes to discard
any changes you’ve made since opening this screen.
Tap Delete to
unassign the model
from the slot.
Tap a color to assign it to this model. That
color will be shown on the main screen, in
the Hardware Assign screen, and in the
footswitch indicator for this model.
Tap Cancel to return to discard your
changes and return to the main screen.
Tap the model name
to assign a different
model to this slot.
Turn encoder to move
through selectable
items onscreen or to
adjust parameters.
Press encoder as an
Ente
r
command.
Tap to return to retain your changes
and return to the main screen.
Tap an Off/On
parameter button to
change the parameter's
setting accordingly.
Tap and drag a slider
left and right to adjust
the parameter's
settings. Alternatively,
tap the slider and use
the encoder for fine
adjustments.

17
Parameters
These are some of the parameters that you can adjust for each type of rig item. The types include amps, cabs,
effects, input settings, output settings, and mix settings (if you are using a split signal path). See Saving a Block
Preset to learn how to save your preset after adjusting its parameters.
Amp
The Amp category is a list of popular guitar amplifiers.
Preset: This is the current amp preset, which includes the
model, all its settings, and its color assignment.
Model: This is the amp model.
Amp Settings: These are the settings for the selected amp
model (different models may have more or fewer settings).
Cab Link: This setting determines whether a specific cab
and microphone are associated with the amp. When set
to Off, any cab and microphone used in the current rig
will be completely independent of the amp you select.
When set to On, a specific cab and microphone
combination will be used if you change the amp’s Preset
setting or if you load a new amp to the rig. You can still
change the cab and microphone manually afterward by
adjusting the parameters of the cab model.
Color: This is the assigned color, which will appear in the Hardware Assign screen and the switch indicator if
the amp is assigned to a switch.
Cab
The Cab category is a list of popular amp cabinets, which
contain the speakers. The HeadRush MX5 recreates not only
the sound of the cabinet but also the type of microphone
recording it.
Preset: This is the current cab preset, which includes the
model, all its settings, and its color assignment.
Cab Type: This is the cab type. Numbers notated as _X__
indicate the number of speakers it has and the size of
each speaker (e.g., 2X12 denotes a cab with two 12-inch
speakers, 4X10 denotes a cab with four 10-inch
speakers). Numbers notated as __W indicate the
emulated wattage (output power) of the speaker.
Mic Type: This is the type of microphone being used on the cab. You can select different models of dynamic
(Dyn), condenser (Cond), or ribbon (Ribbon) microphones.
Mic Settings: These are the settings for the microphone:
Break Up: This determines the amount of speaker “breakup”—the natural distortion that occurs when the
audio signal overdrives the speaker.
On-Axis: This determines the microphone position relative to the cab. On-axis placement (On) positions
the microphone at the center of the speaker, usually resulting in a brighter sound with more definition. Off-
axis placement (Off) is slightly offset at and angle from the center of the speaker and often sounds darker
in tone.
Out Gain: This is the cab’s output gain level.
Color: This is the assigned color, which will appear in the Hardware Assign screen and the switch indicator if
the cab is assigned to a switch.

18
IR
The IR category contains factory-loaded and user-loaded impulse response files. The HeadRush MX5 supports all
.WAV format impulse response files with sample rates up to 192 kHz, bit depths up to 32-bit, and sample lengths
up to 2,048 samples.
Preset: This is the current IR preset, which includes the
impulse response, all its settings, and its color
assignment.
Folder: This is the folder containing your IR files. IRs can be
organized into folders by creating a folder on your Mac or
PC while using the USB Transfer Mode. IRs generally
have a very small file size, so the MX5 can store
thousands of IRs at once.
IR File: Once you have selected a folder above, you can
select a specific IR file here.
Gain: Adjusts the overall volume level of the IR.
HiCut and LoCut: These settings adjust the high-end and
low-end of the IR tone, respectively.
Mix: This setting adjusts the mix of between the incoming
signal and the IR.
Note: While using the model selector to add a block, you can load a full 2,048 sample impulse response by
selecting IR, or a truncated 1,024 sample IR by selecting IR 1024. For the highest quality sound, use the 2,048
sample IR type. To save DSP power for adding more effects to your rig, use the 1,024 sample IR type.
Effects
There are several types of available effects. Their adjustable
settings depend on the type of effect.

19
In
These input settings control the signal into the models of your
rig:
Preset: This is the current input preset, which includes its
settings on the right edge of the display and its locked/
unlocked state.
Parameters: This menu determines whether these input
settings are locked or unlocked.
When unlocked, the settings will change to the new
rig’s input settings each time you load a new rig. The
lock icon on the main screen will be grey.
When locked, the settings will be retained as “global”
input settings, regardless of the rig. The lock icon on
the main screen will be red.
Rig Input: This setting determines whether the rig’s input signal is taken from the guitar input (Guitar) or the
left (L) return input (FX Ret L). This menu is shown only when Rig Input is set to Per Rig in the global
settings (see Global Settings to learn about this).
Input Level Meter: This level meter indicates the current level of your input signal before the input controls
shown on this screen.
Gain: This setting controls the gain level of the signal sent from your guitar into your rig. The available range is
-60.0 to 12.0 dB.
Gate Thrsh (Threshold): This setting controls the signal level required to open the noise gate, enabling the
guitar signal to be sent to the rig. The available range is -120.0 to 0.0 dB. The threshold is represented by a
white line on the input level meter.
Gate Rel (Release): This setting controls the amount of time it will take for the noise gate to close once the
incoming guitar signal stops. The available range is 1–3000 ms.
USB Level: This setting controls the level of the audio signal sent from your computer to the HeadRush MX5
over a USB connection. The available range is -60.0 to 12.0 dB.
Out
These output settings control the signal sent to the HeadRush
MX5 outputs:
Preset: This is the current output preset, which includes its
settings on the right edge of the display.
Rig Output: This level meter indicates the current level of
your output signal after the output controls shown on
this screen. You can set which outputs will send this
signal in the Global Settings screen.
Alternate Output: This level meter indicates the current
level of your output signal. You can set which outputs
will send this signal in the Global Settings screen. The
To Amp Gain settings controls the level of this signal
unless the Alternate Output source is set to Rig Input.
Rig Vol (Volume): This setting controls the level of the audio signal sent from the outputs. The available
range is -60.0 to 36.0 dB.
To Amp Gain: This setting controls the gain level of the signal for the Alternate Output, unless the Alternate
Output source is set to Rig Input. See Global Settings to learn about this. The available range is -60.0 to 12.0
dB.
Rig Width: This setting controls how much of the stereo field the output signal uses. 100% uses the full
stereo field, while 0% produces a mono signal. This affects stereo signals only, not mono signals. See Main
Screen > Stereo vs. Mono to learn how the HeadRush MX5 handles stereo and mono signals.

20
Mix
These settings control mix of a split signal path. This is available
only for rigs with split signal paths (see Main Screen > Signal
Path to learn more):
Preset: This is the current mix preset, which includes its
settings on the right edge of the display.
A Lev / B Lev (Level): These settings control the volume
levels the upper (A) and lower (B) branches of the signal
path. The range is -60.0 dB to +12.0 dB.
A Pan / B Pan: These settings control the panning (position in
the stereo field) the upper (A) and lower (B) branches of the
signal path. The range is -100% to +100%.
A/B Delay: This setting controls a timing offset between the upper (A) and lower (B) branches of the signal
path. The range is -30000μs to +30000μs. If the value is negative (-), the A branch is delayed. If the value is
positive (+), the B branch is delayed.
Saving a Block Preset
To save a block preset, tap Save in the upper-right corner.
To save your changes to the current block preset, tap Save.
To save your changes as a new preset, tap Save New Preset,
use the keyboard that appears to enter a name, and then tap
Save.
To return to the previous screen without saving, tap Cancel at any time.
Other manuals for MX5
2
Table of contents
Other HEADRUSH Music Equipment manuals
Popular Music Equipment manuals by other brands

Rane
Rane FMM 42 Operating and service manual

Propellerhead
Propellerhead PULSAR Operation manual

Rockford Fosgate
Rockford Fosgate Punch SD4-X owner's manual

Rega
Rega FONO MINI A2D MK2 manual

Soundstream
Soundstream Large Mouth Bass Control installation instructions

Roland
Roland V-studio VS-2480 supplementary guide