Singular Sound BeatBuddy User manual

MIDI Controls

Table Of Contents
MIDI Commands
Program Change (CC) summary
MIDI Settings
MIDI-IN
Channel (1-16)
Sync
Start
Stop
Note On
Note Off
Tempo (MSB:106 LSB:107)
Mix-Vol (CC-108)
HP-Vol (CC-109)
Accent-Hit (CC-110)
Pause/Unpause (CC-111)
Drum Fill (CC-112)
Transition (CC-113)
Outro (CC-115)
Tap-Tempo (CC-117):
MIDI-OUT
Output Type:
Channel (1-16)
Sync
Start:
Stop
Notes
Next Part (CC102)
Time Signature
Folder/Song Select
Tempo control

Overview of MIDI
What is MIDI Sync?
MIDI (short for Musical Instrument Digital Interface) is the digital
language that musical equipment use to talk to one another. This
section is about using MIDI Commands in order to allow your BeatBuddy
to talk to other devices which allows for other devices to control your
BeatBuddy (BeatBuddy is called “Slave”) and for your BeatBuddy to
control other devices (BeatBuddy is called “Master”), making it a very
powerful tool for live performance and recording.
How do I connect my BeatBuddy with MIDI?
On the output side of the BeatBuddy there is a “MIDI Sync” port. In order
to keep the BeatBuddy in a compact single pedal format while still
accommodating both IN and OUT MIDI, a special MIDI Sync breakout
cable (sold separately) is required to convert the BeatBuddy’s PS/2 MIDI
Sync port into 2 standard full size 5-pin MIDI ports for MIDI IN and MIDI
OUT. You will still need a normal 5-pin MIDI cable to connect the MIDI
Sync Cable to your other MIDI device.
When BeatBuddy is Master: Connect the BeatBuddy’s MIDI Sync OUT to
the other device’s IN port.
When BeatBuddy is Slave: Connect the BeatBuddy’s MIDI Sync IN to the
other device’s OUT port.
What can I use MIDI for?
BeatBuddy is “Master” (MIDI OUT):

1. Sync your looper to the BeatBuddy:
MIDI Sync is a powerful tool to integrate the BeatBuddy with your other
MIDI enabled devices, such as MIDI Sync enabled loopers and effects, to
create a powerful performance or recording system.
For example, when the BeatBuddy is synced with a MIDI Sync enabled
looper (such as the Ditto X4, Pigtronix Infinity, Boomerang III, TC-Helicon
VoiceLive 3 or Boss RC-300 -- most other loopers do not have MIDI Sync
capabilities), the looper can complete the loops exactly on the beat, so
that the recorded loop stays in sync with the drums. If you use a looper
without MIDI sync with the BeatBuddy, you will most likely make the
guitar loop a little bit longer or shorter than the drum loop and they will
become out of sync. The BeatBuddy also sends out Start and Stop
commands so that the looper start and stops at the same time the
BeatBuddy does (though not all loopers follow these commands, some
just work with the sync). You have full control of which commands
BeatBuddy sends and reacts to in the MIDI settings, as explained below.
Pause during MIDI Sync
When using MIDI Sync, BeatBuddy’s pause feature can operate in two
modes:
Normal Pause: When the BeatBuddy is paused, MIDI Stop command is
sent by the BeatBuddy to stop all synced devices. When unpaused, MIDI
Start is sent to restart all synced devices. The beat is restarted at the
beginning of the measure to keep in time with other devices. This
behavior is more appropriate when BeatBuddy is acting as Master in
MIDI Sync.
Mute Pause - When the BeatBuddy is paused, no MIDI control
commands are sent to other devices, allowing them to effectively
continue playing, while BeatBuddy only mutes its own sound, and

continues playing the beat in time. When unpaused, the BeatBuddy
unmutes and continues playing drums. This behaviour is recommended
when the BeatBuddy is acting as Slave in MIDI Sync.
Mute pause can be set at Settings > Main Pedal > Mute Pause
2. Sync effects to the BeatBuddy’s drums:
Some effects can be timed to the BeatBuddy’s tempo. For example, if a
MIDI Sync enabled delay effect is used, it will time the length of the
delay to the speed of the beat, so it sounds perfectly in sync with the
drums. Some excellent MIDI sync capable effects are provided by the
Eventide H9 and TC-Helicon VoiceLive 3.
3. Record your BeatBuddy’s MIDI notes in your DAW:
The BeatBuddy has the capability to stream out the MIDI notes it is
playing. You can connect the BeatBuddy to your computer to record the
MIDI notes as the BeatBuddy is playing, so you can have the ease of
playing the BeatBuddy to lay down the beat, but also keep the powerful
capabilities of working with MIDI notes.
BeatBuddy is “Slave” (MIDI IN):
1. Quick song selection: You have 3,000 songs in your repertoire and
you play gigs where you get random song requests from the
audience. Though you have already figured out which BeatBuddy
beats go with which songs in your repertoire (or used our handy
Song Matching Tool), you don’t want to have to search through all
of the BeatBuddy’s folders for the right beat when you get a song

request. With MIDI, you can use an iPad app such as Onsong,
which has your song database of lyrics and chord charts so that
when you pull up the chord chart to a song on Onsong, it will
change to a certain BeatBuddy song which matches it.
2. Additional control with external MIDI fooswitch. Some users want a
footswitch for every function (drum fill, transition, outro, tap tempo,
etc.). So we have created a special ‘CC’ MIDI command for practically
every function the BeatBuddy has, so you can control the BeatBuddy
from another device.
3. Trigger the BeatBuddy’s super awesome drum sounds with an
electronic drum set: So you have a cheap electronic drum set and you
hate the way it sounds. You can connect the MIDI OUT from the drum
set to the MIDI IN on the BeatBuddy and when you play on the electronic
drum set, it will play the BeatBuddy’s award winning super high quality
sounds! This is also useful when you’re composing beats in your DAW
and want to test how they will sound on the BeatBuddy -- no need to
load the MIDI files to into the BeatBuddy -- just stream the MIDI notes!
MIDI Settings
MIDI-IN
These settings control what the BeatBuddy does when it receives MIDI
commands from an external device.

Channel (1-16)
●[1-16]: Sets which channel the MIDI commands are received from.
It’s important that the BeatBuddy is receiving MIDI commands on
the same channel that your external device is sending them.
●All (Omni): This mode can be chosen if you want to receive MIDI
messages on all the possible channels.
Sync
●Enable: The BeatBuddy sets its own tempo based on the tempo
(MIDI Clock) that it receives.
●Disable: BeatBuddy ignores any tempo sent to it.
Start
●Enable: BeatBuddy starts playing upon receiving the Start MIDI
command from an external device.
●Disable: BeatBuddy ignores all Start commands it receives.
Stop
●Enable: BeatBuddy stops playing upon receiving the Stop MIDI
command from an external device.
●Disable: BeatBuddy ignores all Stop commands it receives.

Note On
●Enable: When the BeatBuddy receives MIDI notes, it will play the
corresponding sounds on the BeatBuddy drum sets. This is very
useful if you want to play an electronic drum set but hear the high
quality BeatBuddy sounds. Connect the electronic drum set’s MIDI
OUT to the BeatBuddy’s MIDI-IN and as you play on the electronic
drum set, the BeatBuddy will produce its famous award winning
sound to your playing!
●Disable: BeatBuddy ignores all MIDI notes it receives.
Note Off
●Enable: When the BeatBuddy receives the MIDI note off command,
it will stop playing the sound in the drum set that corresponds
with that note. This is used mostly for long note sounds, such as
bass or piano in custom made drum sets that include these
instrument sounds. However, this sometimes can cause issues
with sound playback, depending on the type of device that is used.
So unless you have a drum set with other instrument sounds other
than drums, it’s best to leave this disabled.
●Disable: BeatBuddy ignores all note off commands it receives.
Tempo (MSB:106 LSB:107)
●Enable: You can control the tempo of the Beatbuddy using MIDI
MSB/LSB system as well as using the MIDI INC/DEC messages. For
more details regarding this, See Below [LINK to tempo section]
●Disable: BeatBuddy ignores all Tempo change commands it
receives

Mix-Vol (CC-108)
●Enable: Mixer volume (main volume knob that controls only the
drum sound volume) can be controlled by sending the MIDI
message with a value ranging from 0 to 100.
●Disable: BeatBuddy ignores all mixer volume commands it
receives.
HP-Vol (CC-109)
●Enable: Headphone volume can be controlled by sending the MIDI
message with a value ranging from 0 to 100.
●Disable: BeatBuddy ignores all mixer volume commands it
receives.
Accent-Hit (CC-110)
●Enable: The Beatbuddy will play the current song part accent hit
each time it receives the Accent-Hit MIDI message. You can control
the volume of the accent hit by changing the value of the message
ranging from 0 to 127.
●Disable: BeatBuddy ignores all Accent-Hit commands it receives.
Pause/Unpause (CC-111)
●Enable: The BeatBuddy will Pause the current song when a
Pause/Unpause message is received. The second time this
message is received, the Beatbuddy will unpause the current song.
●Disable: The BeatBuddy ignores all Pause/Unpause commands it
receives
Drum Fill (CC-112)
●Enable: The BeatBuddy will trigger a drum-fill when a Drum Fill
message is received.
●Disable: The BeatBuddy ignores all Drum Fill message it receives.


Transition (CC-113)
●Enable: The BeatBuddy will triggers a transition when a custom
transition message is received. You can select which part to go
after the transition by setting the value of the command to the
index of the part you want to jump. The transition will continue
playing in a loop until the value is changed to 0.
○Value 1 → Part 1
○Value 2 → Part 2
○Value 3 → Part 3
○Value 127 → Next Part
○Value 0 →BeatBuddy ends transition and goes to the
selected song part as specified in the original value, as
specified above.
●Disable: The BeatBuddy ignores all Transition Fill message it
receives.
Outro (CC-115)
●Enable: The BeatBuddy will trigger the outro of the song when a
Outro message is received.
●Disable: The BeatBuddy ignores all Outro message it receives.
Tap-Tempo (CC-117)
●Enable: When the BeatBuddy receives the CC-117 MIDI command,
it enters Tap Tempo mode. This is a useful way to enter Tap
Tempo mode hands free if you have an external device that can
send this command (such as the Guitar Wing). Sending out the
CC-117 MIDI command multiple times is like tapping out the tempo
with the pedal.
●Disable: BeatBuddy ignores all CC-117 commands it receives.

MIDI-OUT
Output Type
●MIDI-OUT: BeatBuddy ignores all incoming MIDI messages sent to
the BeatBuddy’s MIDI-IN port and just sends out BeatBuddy
generated MIDI commands through the MIDI-OUT port.
●MIDI-MERGE: BeatBuddy combines any MIDI commands it receives
in the MIDI-IN port with its own generated commands and sends
both commands to the MIDI-OUT port.
●MIDI-THRU: BeatBuddy only sends out MIDI commands that it has
received through the MIDI-IN port.
Channel (1-16)
●[1-16]: Sets on which channel the MIDI commands are sent out to.
It’s important that the BeatBuddy is sending out MIDI commands
on the same channel that your external device is receiving them.
Sync
●Always On: BeatBuddy always sends out the MIDI tempo clock
even when it is not playing. This is useful for when you want your
MIDI tempo based devices such as loopers or delay, to play to a
certain tempo but you don’t want to have drums playing while you
do it.
●While Playing: BeatBuddy only sends out MIDI tempo clock while
it is playing drums. This is good for when you want your other
devices to only follow the BeatBuddy’s tempo while the drums are
playing.
●Disable: BeatBuddy never sends out MIDI tempo clock.

Start
●Intro: BeatBuddy sends out the MIDI Start command at the
beginning of the intro. Please note that if the intro is less than a
full bar long, this setting may confuse your other devices and
cause them to play out of time.
●Main Beat: BeatBuddy sends out the MIDI Start command when
the main beat starts playing after the intro has finished.
●Disable: BeatBuddy never sends out the MIDI Start command.
Stop
●Pause Only: BeatBuddy sends out the MIDI Stop command when
BeatBuddy has been paused.
●Pause and End: BeatBuddy sends out the MIDI Stop command
when BeatBuddy has been paused and when the outro ends.
●End Only: BeatBuddy sends out the MIDI Stop command only when
the outro ends.
●Disable: BeatBuddy never sends out the MIDI Stop command.
Notes
●Enable: BeatBuddy sends out the MIDI notes that it is currently
playing. This can trigger sounds in another device such as your
computer or another synthesizer.
●Disable: BeatBuddy does not send out any MIDI notes. Some
devices (such as the Pigtronic Infinity looper) get confused and do
not operate properly when they receive MIDI notes.
Next Part (CC102)
●Enable: BeatBuddy sends out the CC102 MIDI command when the
transition has completed and the next part starts.

●Disable: BeatBuddy does not send out the CC102 command. Some
devices (such as the Eventide Timeline) get confused when they
receive this command and do not operate properly.
Time Signature
●Enable: BeatBuddy sends out Time Signature information. This is
useful for some devices (such as the Pigtronix Infinity Looper) so
that they can play in time with the BeatBuddy even as the time
signature changes.
●Disable: BeatBuddy does not send out the Time Signature
information. Some devices get confused and don't operate
properly when they receive this signal.
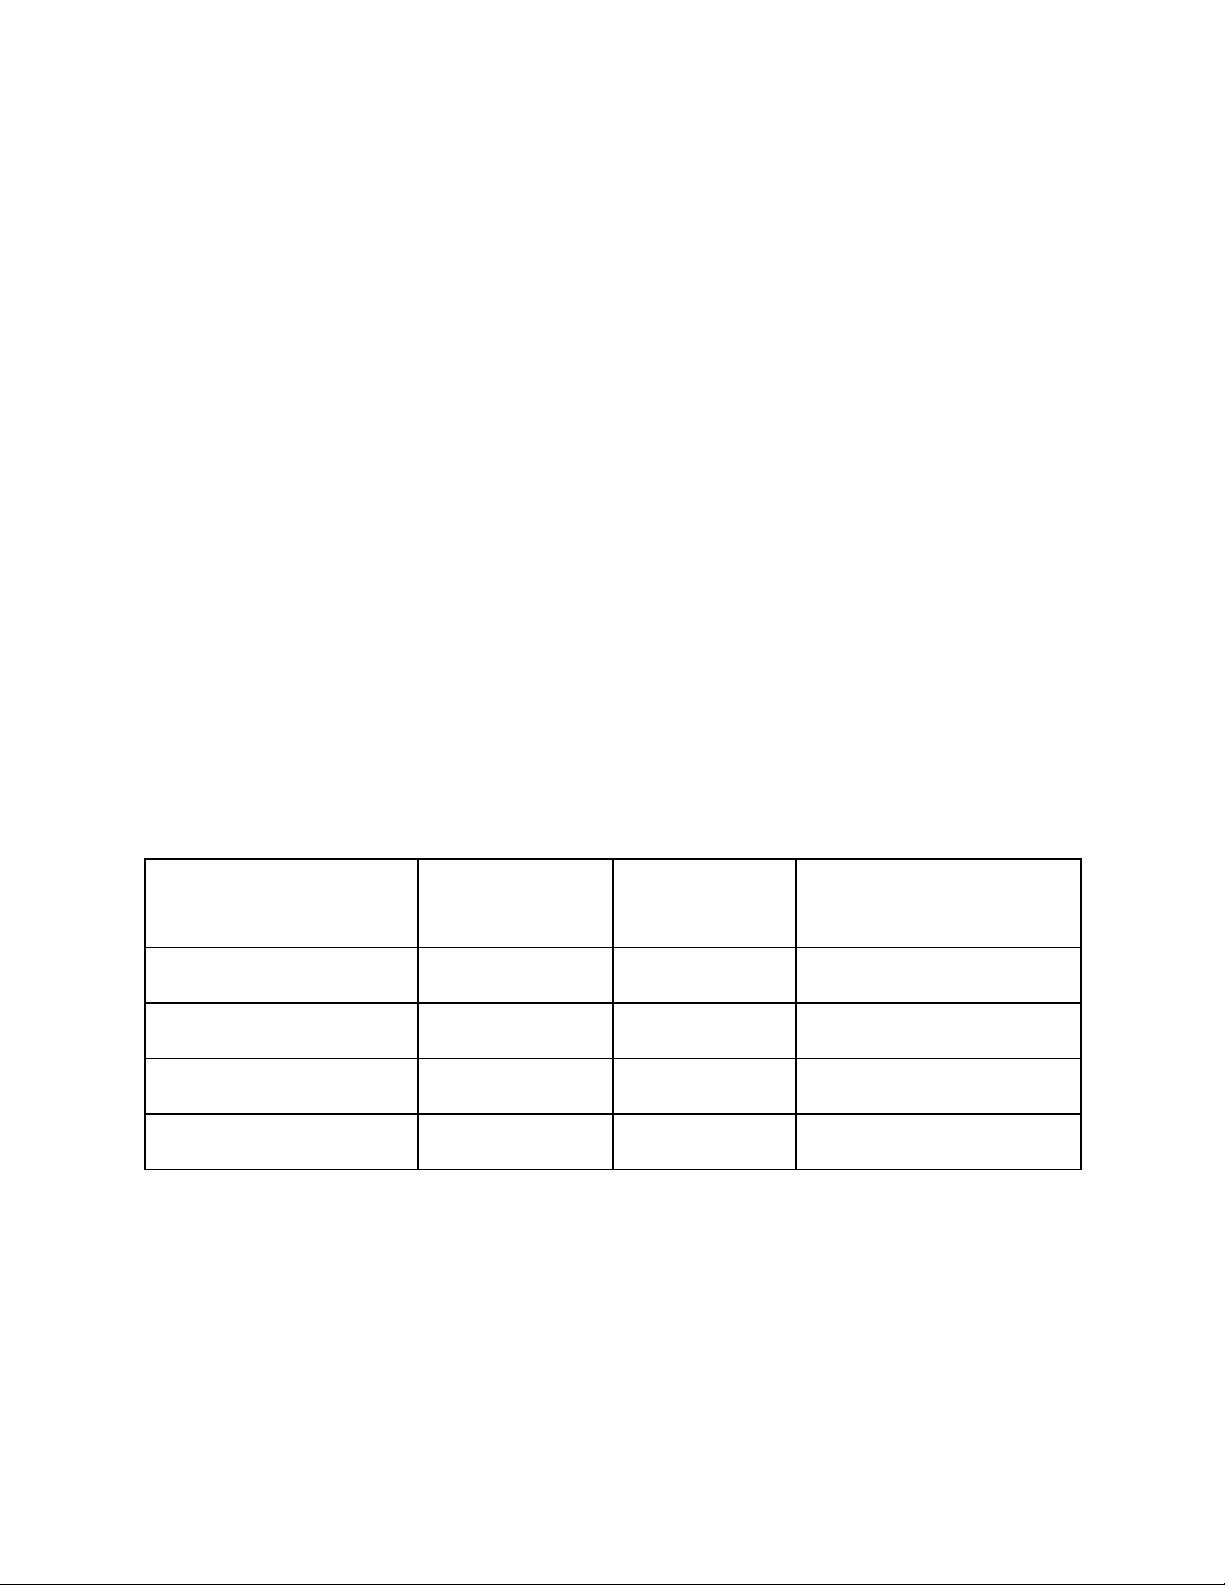
Folder/Song Select
You can select a BeatBuddy folder and song with the MIDI Bank Select
and Program Change messages. The folder is selected with the Bank
Select Message (Bank MSB and LSB) and the song is selected with the
Program change. Each of the 128 values of Bank MSB value can have 128
folders as selected by the value of Bank LSB. This gives a potential of
128 MSB x 128 LSB = 16,384 different folders with 128 songs each.
The order of the folders / songs are sorted by the BeatBuddy Manager.
The order of the folders / songs corresponds to the number used by the
MIDI messages +1. This means that Program Change Message must have
a value of 0 to play the first song in the menu. We know this is
confusing -- but MIDI was designed by computer nerds, not normal
people like us, and computer nerds like to start with 0 instead of 1.
Example:
Folder/Song
BANK MSB
(CC-0)
BANK LSB
(CC-32)
Program Change
Folder 1 - Song 1
0
0
0
Folder 1 - Song 2
0
0
1
Folder 3 - Song 3
0
2
2
Folder 129 - Song 4
1
1
3
Please note that the BeatBuddy’s song does not change until the
Program Change message is received, i.e. bank messages alone are
not enough to change a program.

Tempo control
Since the BeatBuddy’s tempo ranges from 40BPM - 300BPM, we can’t
use just one CC command to cover the whole range because a CC
command can only have 128 values. There are two ways of changing the
tempo. With INC/DEC (increase/decrease) messages which adjust the
tempo up or down by 1 BPM, or by skipping directly to a specific tempo
BPM using the MSB/LSB system, like in the Song Selection system
(Program Change). However, it’s a bit more complicated because unlike
the Song Selection system where
INC/DEC (see. https://www.midi.org/specifications)
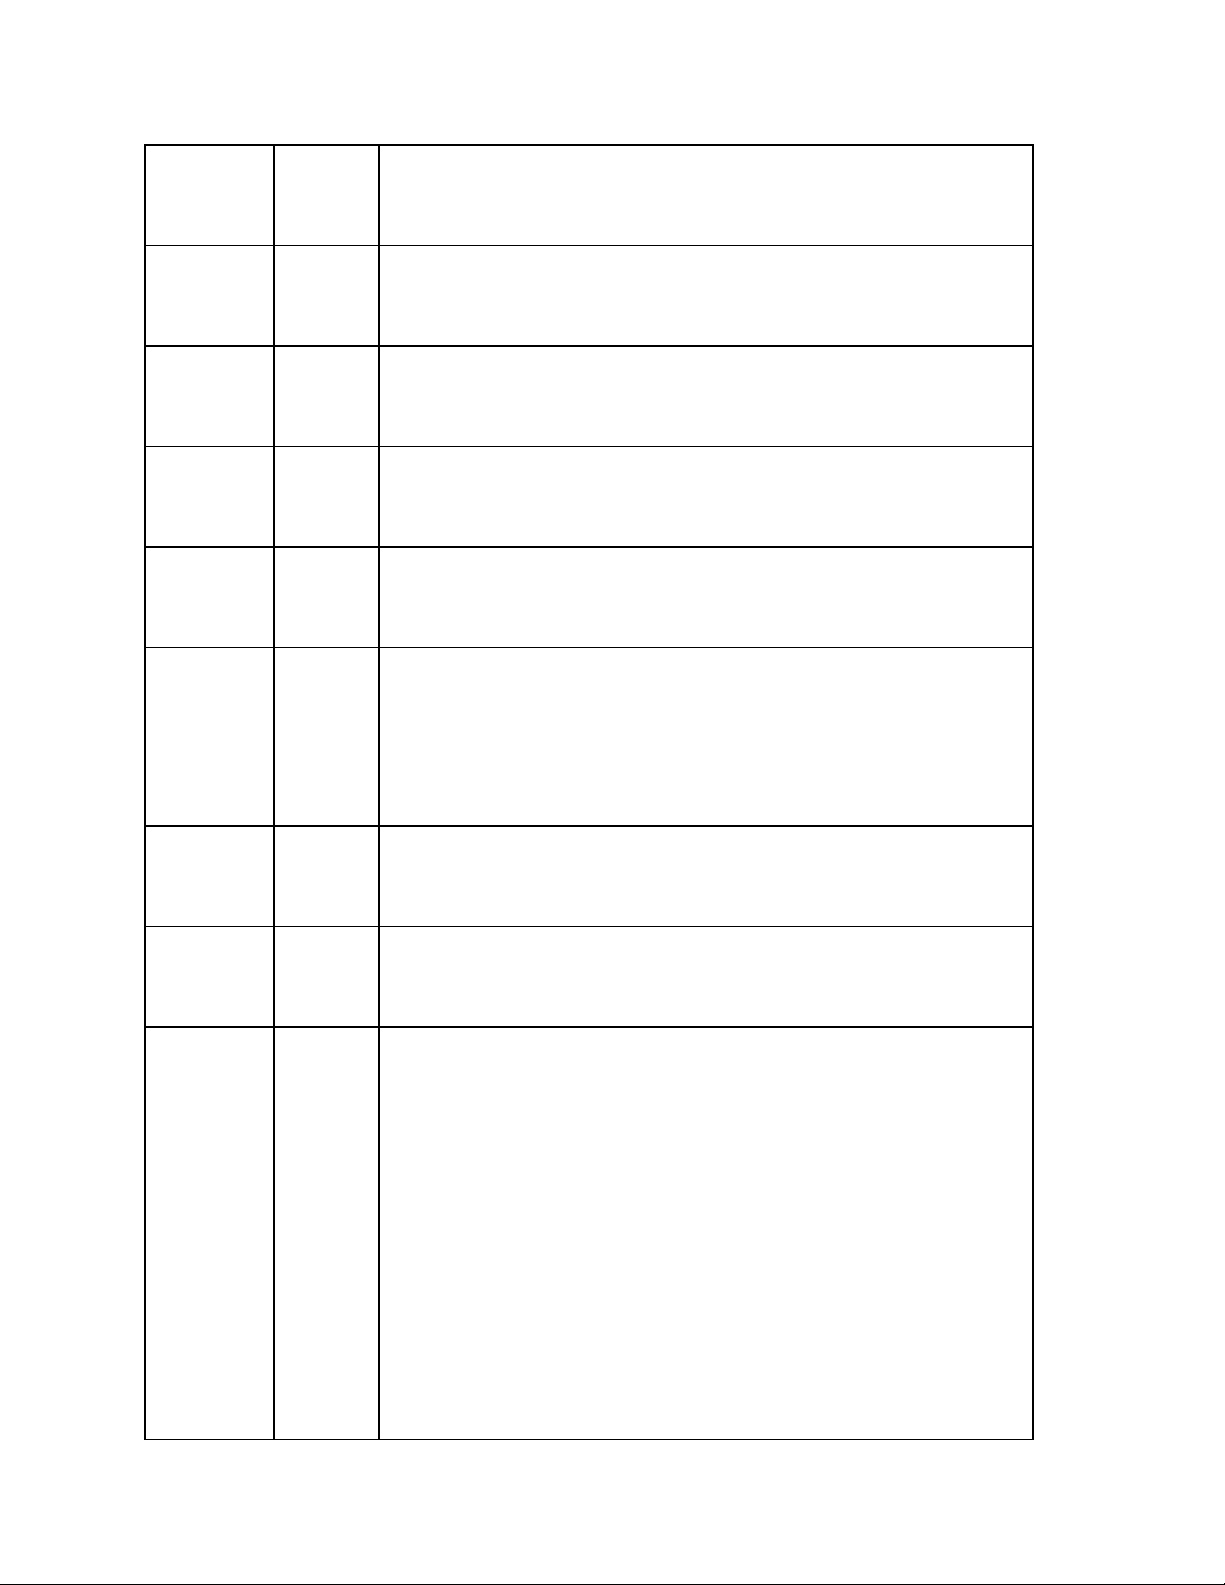
Here are the common steps to do to control the BeatBuddy’s tempo. It
follows the Data INC/DEC specification of the MIDI protocol:
Step to increment tempo
Step
s
Message
Details
1*
CC–99 / 106
Set the NRPN MSB register to Tempo MSB
2*
CC–98 / 107
Set the NRPN LSB register to Tempo LSB
3
CC–96 / 1
Increment the tempo by one
4*
CC–99 / 127
Clear the NRPN MSB register
5*
CC–98 / 127
Clears the NRPN LSB register
Step to decrement tempo
Step
s
Message
Details
1*
CC–99 / 106
Set the NRPN MSB register to Tempo MSB

2*
CC–98 /107
Set the NRPN LSB register to Tempo LSB
3
CC–97 / 1
Decrement the tempo by one
4*
CC–99 / 127
Clear the NRPN MSB register
5*
CC–98 / 127
Clears the NRPN LSB register
Steps with a * are optional if the only value control by Inc/Dec is the
Tempo. By default, the Beatbuddy will increment / decrement the tempo
when receiving a INC/DEC message.
Tempo MSB & Tempo LSB
To directly set the tempo to a specific BPM, we need to use the Tempo
MSB and Tempo LSB. The Beatbuddy will update its current tempo only
when receiving the LSB message. So the order of the message should
be:
1. MSB value
2. LSB value
Don’t forget, the value of the Tempo can only be set with both MSB
(CC-106) and LSB (CC-107).
Here are a few examples of Midi message combination.
MSB
(CC-10
6)
LSB
(CC-10
7)
Temp
o
0
25
40
0
40
40
0
127
127
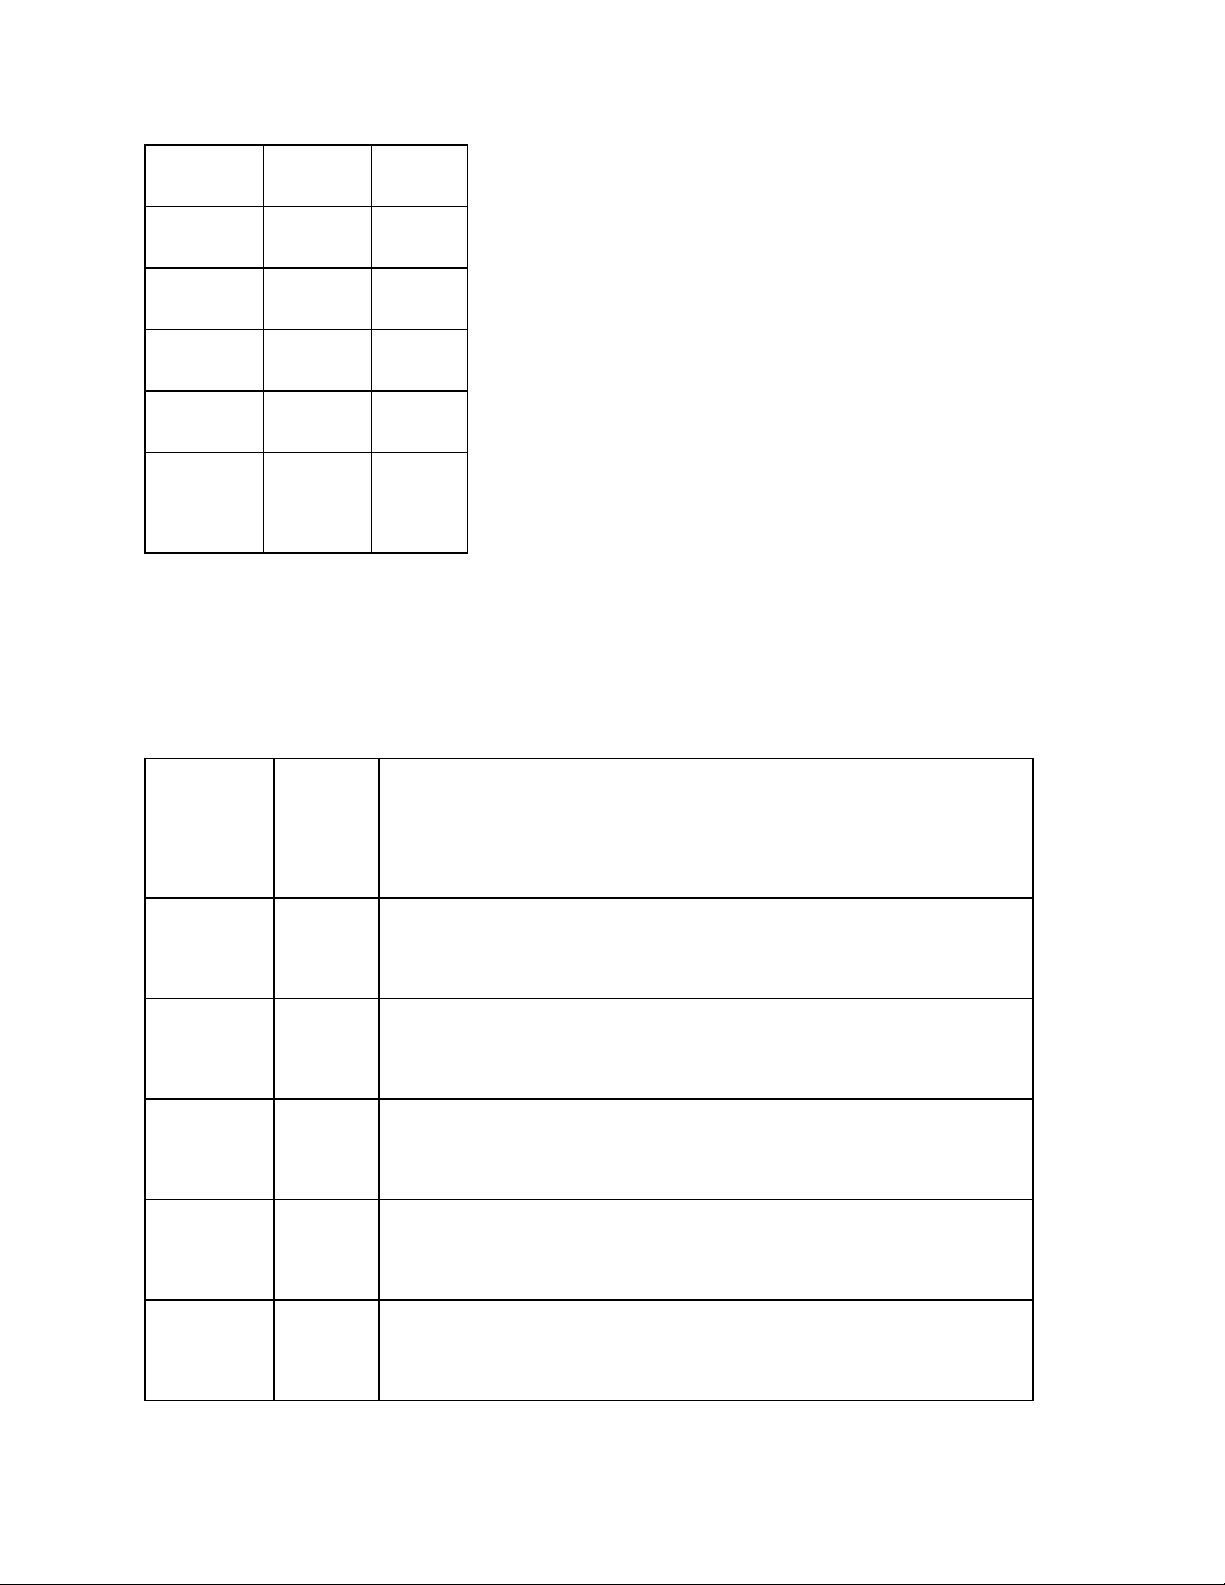
1
0
128
1
25
153
1
50
178
2
0
256
2
44
300
2
45
300
MIDI Commands
Program Change (CC) summary
CC
Numbe
r
Value
Action
CC-0
[0-12
7]
Bank (Song folder) Select MSB
CC-32
[0-12
7]
Bank (Song folder) Select LSB
CC-96
[1-127
]
Data increment (+1) – INC
CC-97
[1-127
]
Data decrement (-1) – DEC
CC-98
[0-12
7]
NRPN_LSB
CC-99
[0-12
7]
NRPN_MSB
CC-106
[0-12
7]
Tempo MSB
CC-107
[0-12
7]
Tempo LSB
CC-108
[0-10
0]
Change the Mixer Volume (Main Volume knob)
CC-109
[0-10
0]
Change the Headphone Volume
CC-110
[0-12
7]
Triggers an accent hit with a volume from the
value 0 (mute) to 100 (original recorded volume)
to 127 (amplified more than the original recorded
volume)
CC-111
[1-127
]
Pause / Unpause the current song
CC-112
[1-127
]
Triggers a drum fill
CC-113
[1-127
]
Starts song transition
(Selects the next part)
1: Starts transition, will jump to Part 1 on exit
2: Starts transition, will jump to Part 2 on exit
3: Starts transition, will jump to Part 3 on exit
127: Starts transition, will jump to next part on
exit
Transition will continue looping until value is
changed to 0.
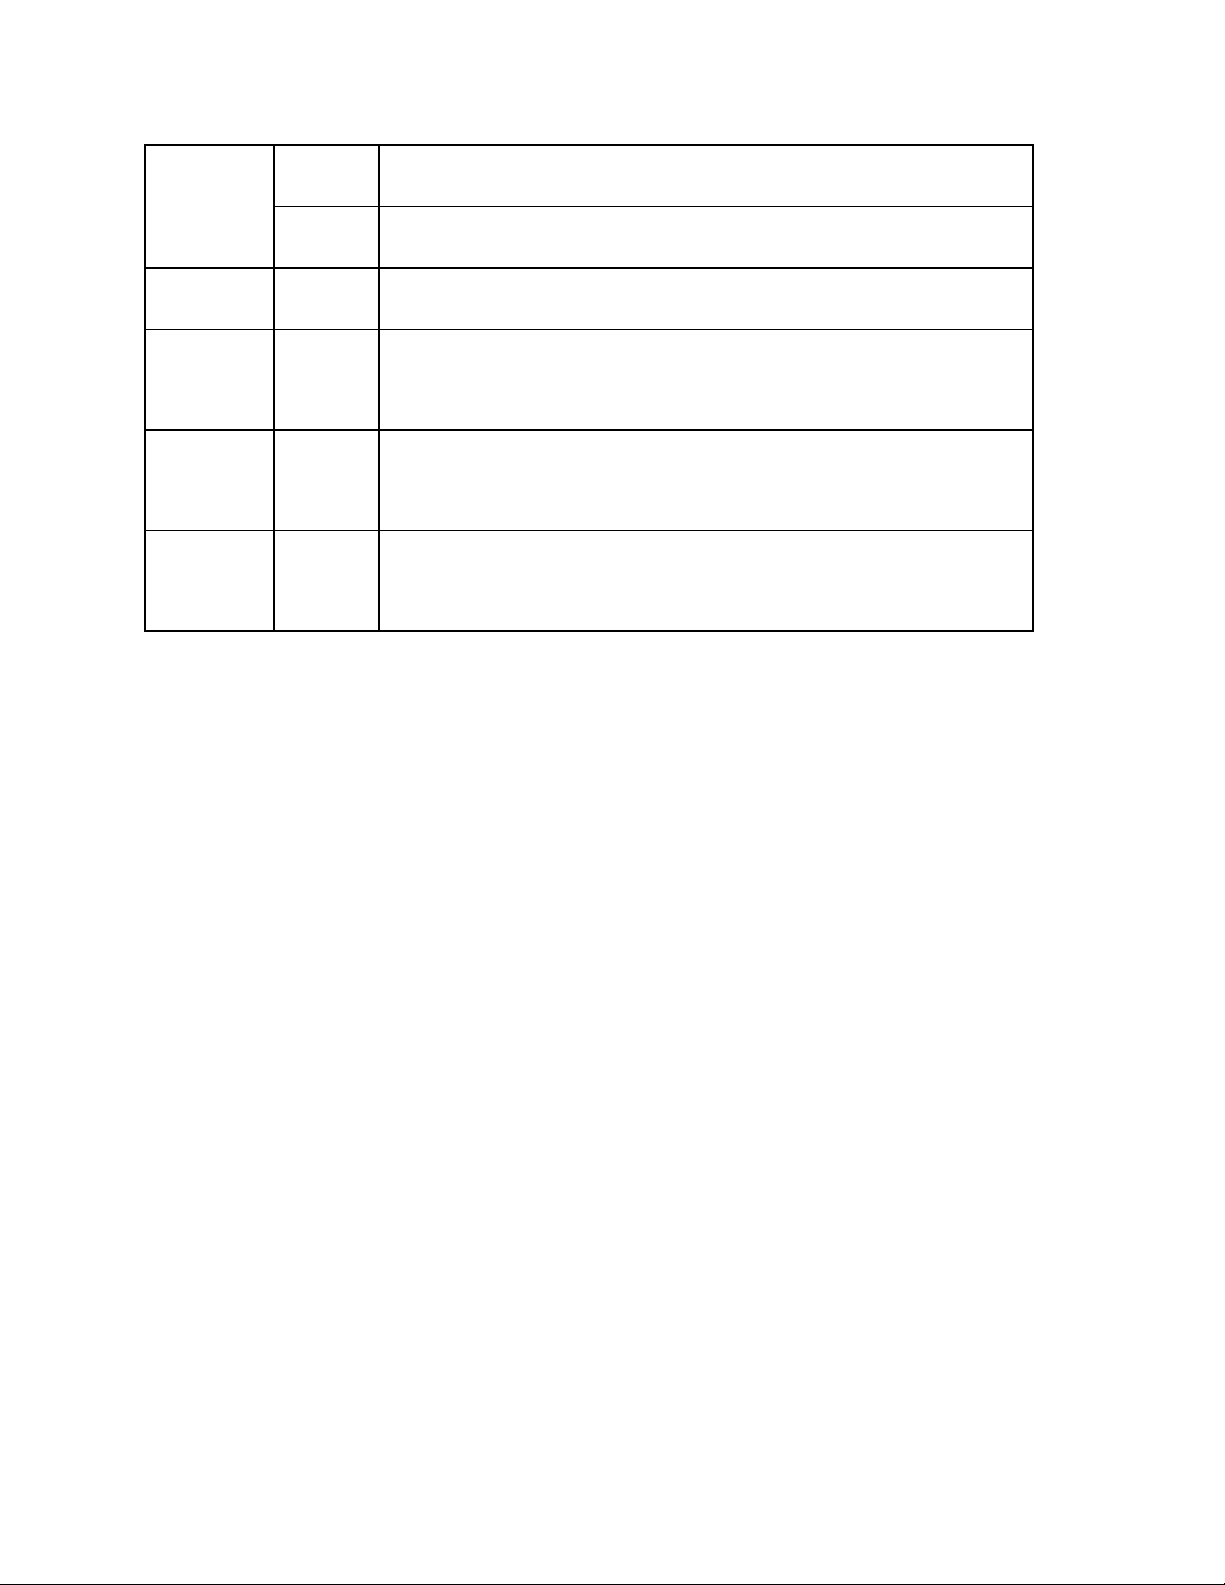
It is possible to start a song with a transition.
0
Quits the transition and go to specified part
CC-114
>0
Starts the playback of the current song
CC-115
[1-127
]
Triggers the outro of the song
CC-116
[1-127
]
Selects a specific drumset
CC-117
Not
used
Enters Tap Tempo mode and generate Tap Event
Other manuals for BeatBuddy
6
Other Singular Sound Music Equipment manuals


