HEADRUSH Gigboard User manual

Quickstart Guide English (2–18)
Guía de inicio rápido Español (19–35)
Guide d’utilisation rapide Français (36–52)
Guida rapida Italiano (53–69)
Schnellstart-Anleitung Deutsch (70–86)
Appendix English (87)

2
Quickstart Guide (English)
Introduction
Box Contents
HeadRush Gigboard
USB Cable
Power Adapter
Software Download Card
Quickstart Guide
Safety & Warranty Manual
Important: Visit headrushfx.com to download the complete user guide.
Support
For the latest information about this product (documentation, technical specifications, system requirements,
compatibility information, etc.) and product registration, visit headrushfx.com.
For additional product support, visit headrushfx.com/support.

3
Features
Top Panel
1
2
3
4
5
1. Display: This full-color multi-touch display shows information relevant to HeadRush Gigboard’s current
operation. Touch the display (and use the hardware controls) to control the interface. See Basic Operation to
learn how it works.
2. Encoder: Turn this encoder to scroll through the available menu options or adjust the parameter values of the
selected field in the display. Push the encoder to confirm your selection.
3. Footswitch Indicators: These lights indicate whether the stomp, rig, or scene assigned to each footswitch is
on (brightly lit) or off (dimly lit).
4. Footswitches: Press these footswitches to activate or deactivate the assigned model or scene, or to load the
assigned rig.
5. Master Volume: Turn this knob to adjust the volume level of the outputs.

4
Rear Panel
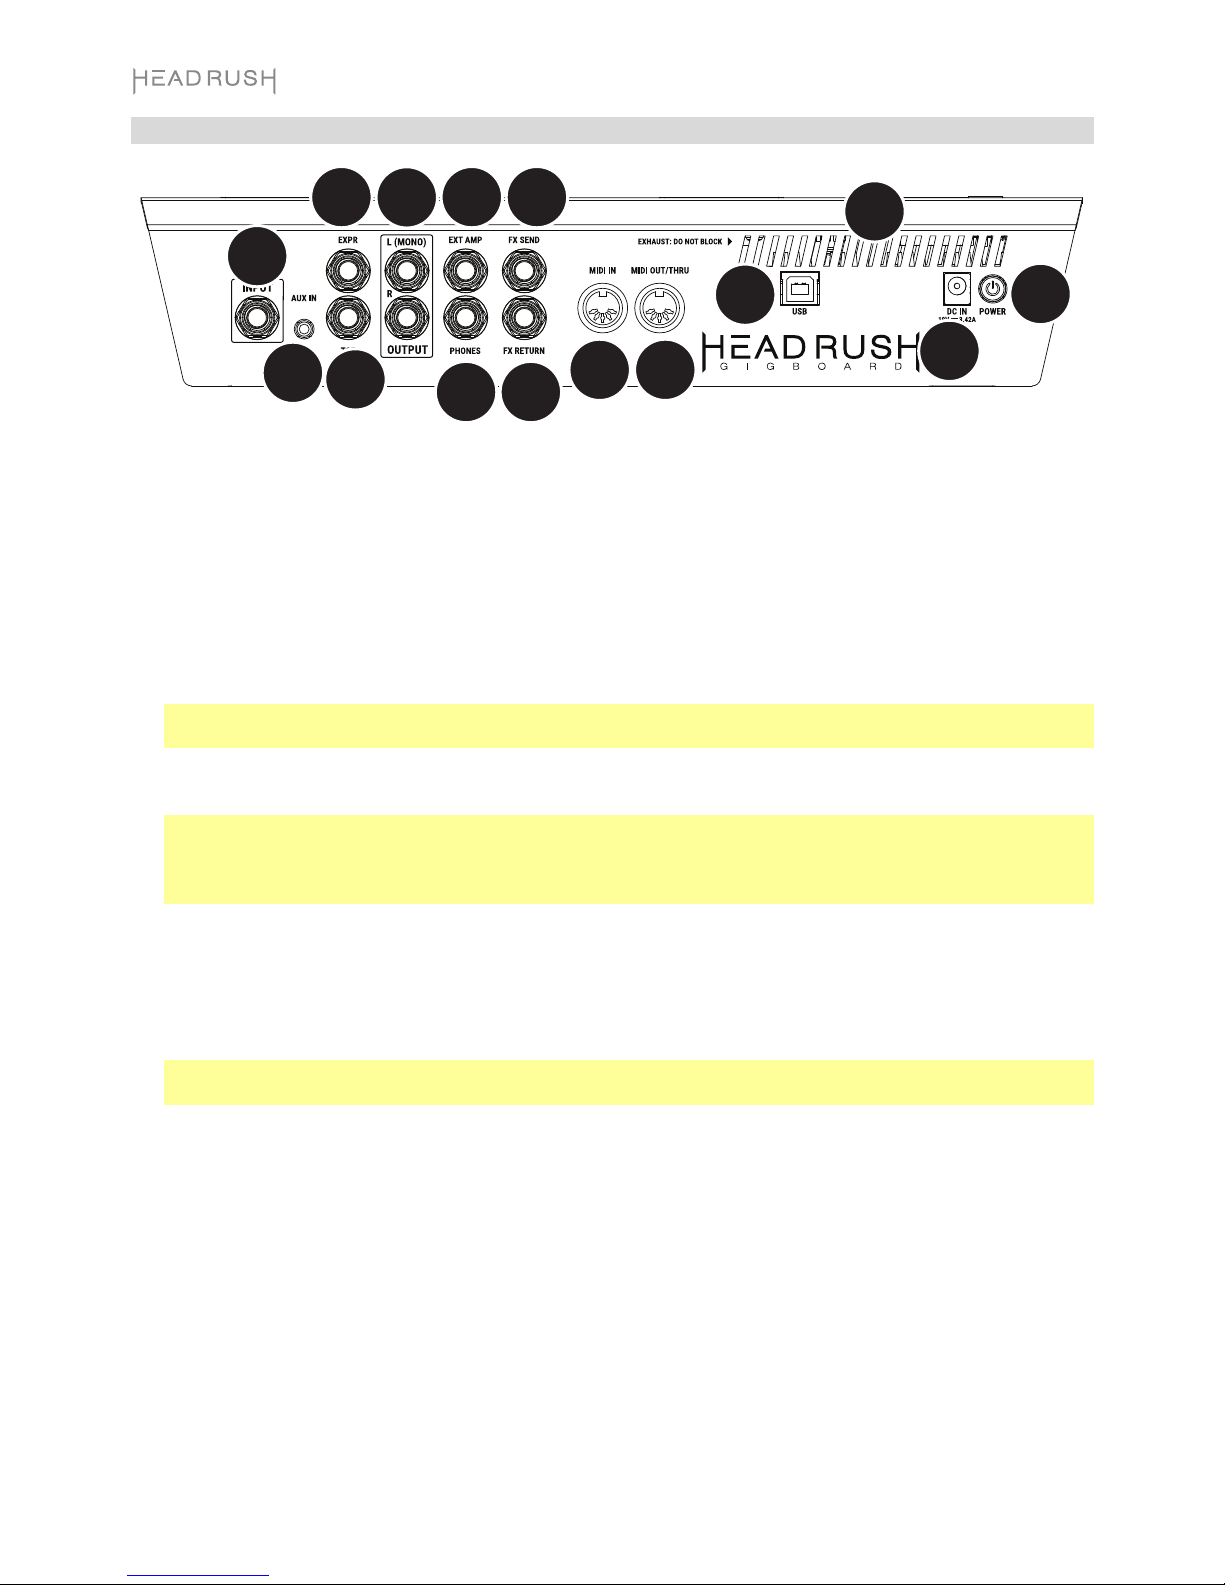
1. Guitar Input (1/4”/6.35 mm, TS): Connect your guitar to this input using a standard instrument cable.
2. Aux Input (1/8”/3.5 mm, TRS): Connect an optional audio source (e.g., smartphone, tablet, etc.) to this input
using an 1/8”/3.5 mm stereo cable.
3. Expression Pedal Input (1/4”/6.35 mm, TRS): Connect an optional expression pedal to this input using a
standard 1/4" (6.35 mm) TRS cable.
4. Expression Pedal Toe Switch Input (1/4”/6.35 mm, TS): Connect the toe switch output of your optional
expression pedal to this input using a standard 1/4" (6.35 mm) TS cable.
5. Outputs (1/4”/6.35 mm, TRS): Connect these outputs to the inputs of your amplifier, audio interface, etc. If
you only need to use one output, use the one labeled L/Mono.
Note: You can set these outputs to send signal at amp level or line level (default) in the Global Settings
Menu.
6. External Amp Footswitch Output (1/4”/6.35 mm, TRS):Connect this output to the footswitch input of an
external guitar amplifier to toggle channels or turn reverb on and off on the amplifier using the Gigboard.
IMPORTANT! Only connect this output to amplifiers that have a "short-to-sleeve" footswitch input. If you
connect this output to any other type of footswitch input, you may cause permanent damage to your
equipment. If you are unsure if your amplifier has a "short-to-sleeve" footswitch input, please consult the
amplifier's manual or manufacturer to confirm before attempting.
7. Phones Output (1/4”/6.35 mm, TRS): Connect standard 1/4” (6.35 mm) stereo headphones to this output.
8. FX Send Output (1/4”/6.35 mm, TRS): Connect these outputs to the inputs of another effects module, an
effect pedal, or the effects loop return of an amplifier.
9. FX Return Input (1/4”/6.35 mm, TRS): Connect these inputs to the outputs of another effects module, an
effect pedal, or the effects loop send of an amplifier.
Note: You can set the FX Return Input to receive signal at rack level or stomp level (default) in the Global
Settings Menu.
10. MIDI Input (5-pin DIN): Use a standard MIDI cable to connect this input to the MIDI output of an optional
external MIDI device.
11. MIDI Output (5-pin DIN): Use a standard MIDI cable to connect this output to the MIDI input of an optional
external MIDI device.
12. USB Port: Connect this USB port to a computer using a standard USB cable. This connection allows
HeadRush Gigboard to send and receive the digital audio signal to and from your computer. You can also use
this connection to import or export rigs, model presets, and setlists.
13. Vent: Make sure this vent is unobstructed while using HeadRush Gigboard.
14. Power Input: Connect this input to a power outlet using the included power cable.
15. Power Switch: Press this button to turn HeadRush Gigboard’s power on. Press and hold this button to turn
HeadRush Gigboard’s power off.
1
2
3
4
56
7
8
910 11
12
13
14
15

5
Setup
Items not listed under Introduction >Box Contents are sold separately.
IMPORTANT! In the Global Settings Menu, make sure you set the Outputs to send signal at amp level if you are
using a traditional guitar amplifier, or line level (default) if you are using a full-range flat-response amplifier, mixer,
PA speaker or audio interface.
Guitar
Full-range, flat-response amplifier or
traditional guitar amplifier
External effect stompboxes,
modules, etc.
Computer
Power
outlet
Expression
pedal
Amp Footswitch Input
IMPORTANT! Only connect this output to amplifiers that have a
"short-to-sleeve" footswitch input. If you connect this output to
any other type of footswitch input, you may cause permanent
damage to your equipment. If you are unsure if your amplifier
has a "short-to-sleeve" footswitch input, please consult the
amplifier's manual or manufacturer to confirm before attempting.

6
Basic Operation
This chapter describes some of HeadRush Gigboard’s basic functions. You can visit headrushfx.com to
download the complete user guide for even more information.
Main Screen
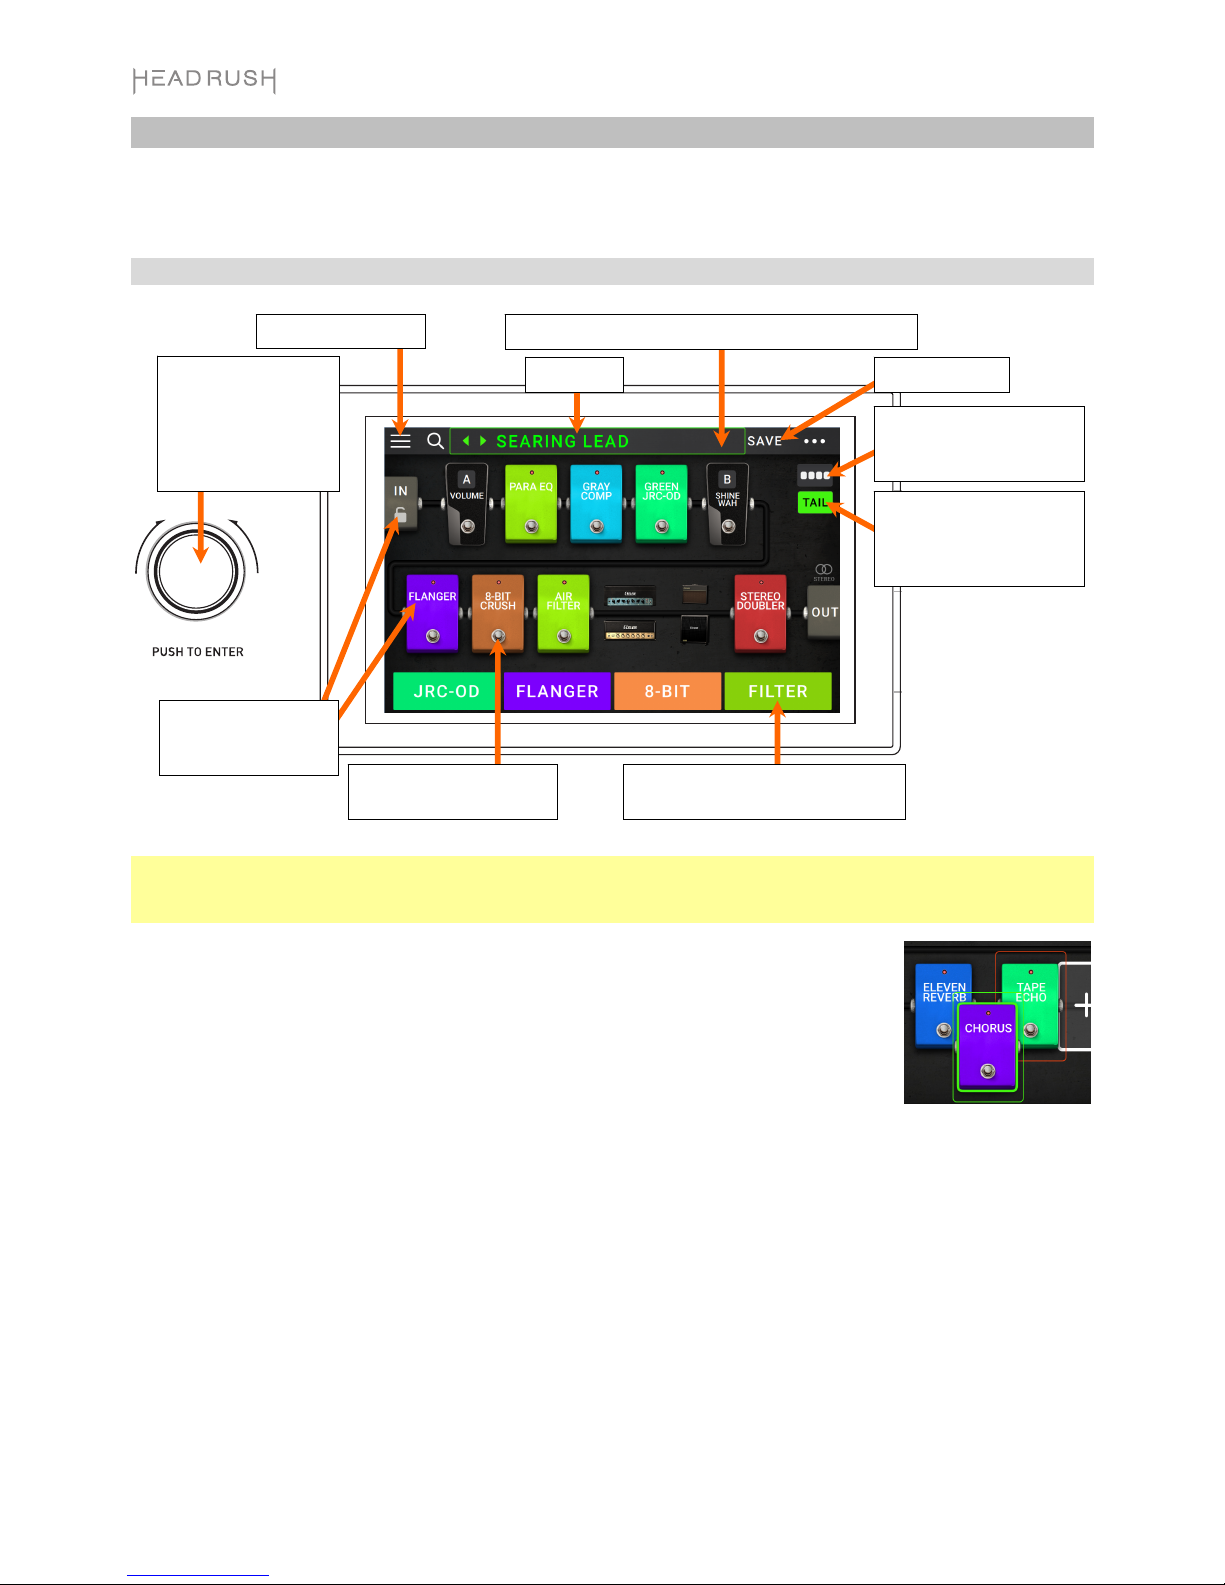
Important: The sequence of models in your signal chain is not necessarily reflected in the footswitches. You can
freely assign models to available footswitches without changing your signal chain at all—and vice versa. See
Hardware Assign to learn about this.
To assign a model (amp, cab, or effect) to an empty slot, tap it () and then use the list
that appears. See Rigs >Creating a Rig to learn about this.
To show a model’s settings screen, double-tap it. Its settings screen will appear with
its preset menu, parameters, and assigned color.
To activate or deactivate a model, press the footswitch assigned to it, or tap the
model’s footswitch in the display.
To load another rig (preset):
•Tap the or next to the name of the current rig on the screen.
•Tap the name of the rig on the screen and then turn the encoder.
•Press a footswitch assigned to a preset when Gigboard is in Rig View.
•Press a footswitch assigned to Prev Rig or Next Rig when Gigboard is in Hybrid
View.
To view other options, tap the button in the upper-right corner, and then tap an option.
To rearrange the
models in your signal
chain, tap and drag a
model to another slot
or between two other
models (the ones after
that position will shift
one slot further down
the signal chain).
Tap and drag this bar downward to view list of rigs.
Rig name.
Turn encode
r
to move
through selectable
items onscreen or to
adjust parameters.
Press encoder as an
Enter command.
Tap its footswitch to
activate or deactivate it.
Tap to view setlists.
Double-tap a model,
In, or Out to show its
parameters.
Tap to save rig.
These four blocks show the current
function of the 4 footswitches.
This button enables or
disables reverb and delay
tails when switching to
another rig.
This button toggles
between the different
routing options for a rig.

7
Views
HeadRush Gigboard’s four footswitches can be used to
activate or bypass models (amps, cabs, or effects) as well as
select scenes, rigs or setlists. These footswitches are always in
one of four modes: Stomp View, Rig View, Hybrid View, and
Setlist.
To change the view:
1. Press and hold footswitch 1. Then select from the four
footswitches which correspond to the four views: Stomp,
Rig, Hybrid, and Setlist.
2. Press a footswitch to enter that view.
Stomp View
Footswitches 1-4 correspond to models (amps, cabs, or effects)
or scenes in your rig. Press a footswitch to activate or deactivate
its model.
Rig View
The first 2 footswitches correspond to rigs you have saved.
Press a footswitch to load its rig.
To show the previous bank of two rigs, press footswitch 3.
To show the next bank of two rigs, press footswitch 4.
Hybrid View
The first 2 footswitches can be assigned to activate or
deactivate a model, or select a scene in the currently selected
rig.
To switch to the previous rig, press footswitch 3.
To switch to the next rig, press footswitch 4.
Setlist View
To enter the All Rigs setlist, press footswitch 1.
To enter the currently shown setlist, press footswitch 2.
To show the previous setlist, press footswitch 3.
To show the next setlist, press footswitch 4.

8
Rigs
While using HeadRush Gigboard, a rig is a preset: the combination of assigned models—the amps, cabs, and
effects—and the parameter settings of each of them. You can create, edit, save, and load rigs, making it easy to
recall the perfect sound for each part of your performance.
Each rig has 11 slots, each of which can have one model (amp, cab, or effect) assigned to it. Assigned slots will
show graphical representations of the models, and empty slots will show a symbol.
Creating a New Rig
To create a new rig, tap the button in the upper-right
corner of the screen, and tap New Rig.
To assign a model (amp, cab, or effect) to an empty slot:
1. Tap the empty slot ().
2. In the list that appears, tap the type of model you want to
assign: Amp, Cab, or effect (Distortion, Dynamics/EQ,
Modulation, Reverb/Delay, FX-Loop, or Expression).
3. In the list that appears, tap the model you want to assign.
4. In the next list that appears, tap the preset you want to load
for that model.
If you load an amp or cab to a slot with an empty adjacent slot, a
matching amp or cab will be loaded automatically to the other
slot. After that, you can configure them independently: you can
separate them in the signal chain, you can change the type of the
amp or cab, and you can delete each model separately.
Optimizing Your Signal Chain
The signal chain is the path that the audio signal follows from your guitar through your selected models and ends
at the outputs of HeadRush Gigboard. You can use the touchscreen to arrange your selected models in any
sequence, but you may find that some configurations will sound better than others.
Here are some common model placement suggestions for creating tones with HeadRush Gigboard:
•Dynamics (e.g., compressors), filters (e.g., wah, pitch shifters), and volume pedals generally are placed
at the beginning of the signal chain. Alternatively, you can place volume pedals at the end of the signal
chain to provide a slight variance in functionality.
•Gain-based effects (e.g., overdrive/distortion, fuzz) usually come next.
•Equalization (EQ) is often used to shape the tonal characteristics of overdrive/distortion and fuzz effects, so
put an EQ after them. Alternatively, place it before them to shape the guitar’s general tone—cutting
unwanted frequencies—before the gain pedals.
•Modulation effects like flangers, phasers, and chorus are typically placed next.
•Time-based effects like delays and reverbs are generally placed near the end of the signal chain.
•An amp and a cab are often placed at the very end of the signal chain, although you can place it wherever
you want.
Model types: amps,
cabs & effects
A
vailable models
for each type.
A
vailable presets
for each model.

9
Saving a Rig
If you have changed the rig at all since loading it, you will see an asterisk () next to its name at the top of the
screen. You can save these changes to this rig, save these changes as another rig, or discard them altogether.
To save a rig, tap Save in the upper-right corner.
To save your changes to the current rig, tap Save.
To save your changes as a new rig, tap Save New Rig, use the
keyboard that appears to enter a name, and then tap Save.
To return to the previous screen without saving, tap Cancel at
any time.
To discard any changes you’ve made to the rig, tap the button in the upper-right corner, and tap Discard
Changes.
Adjusting Settings
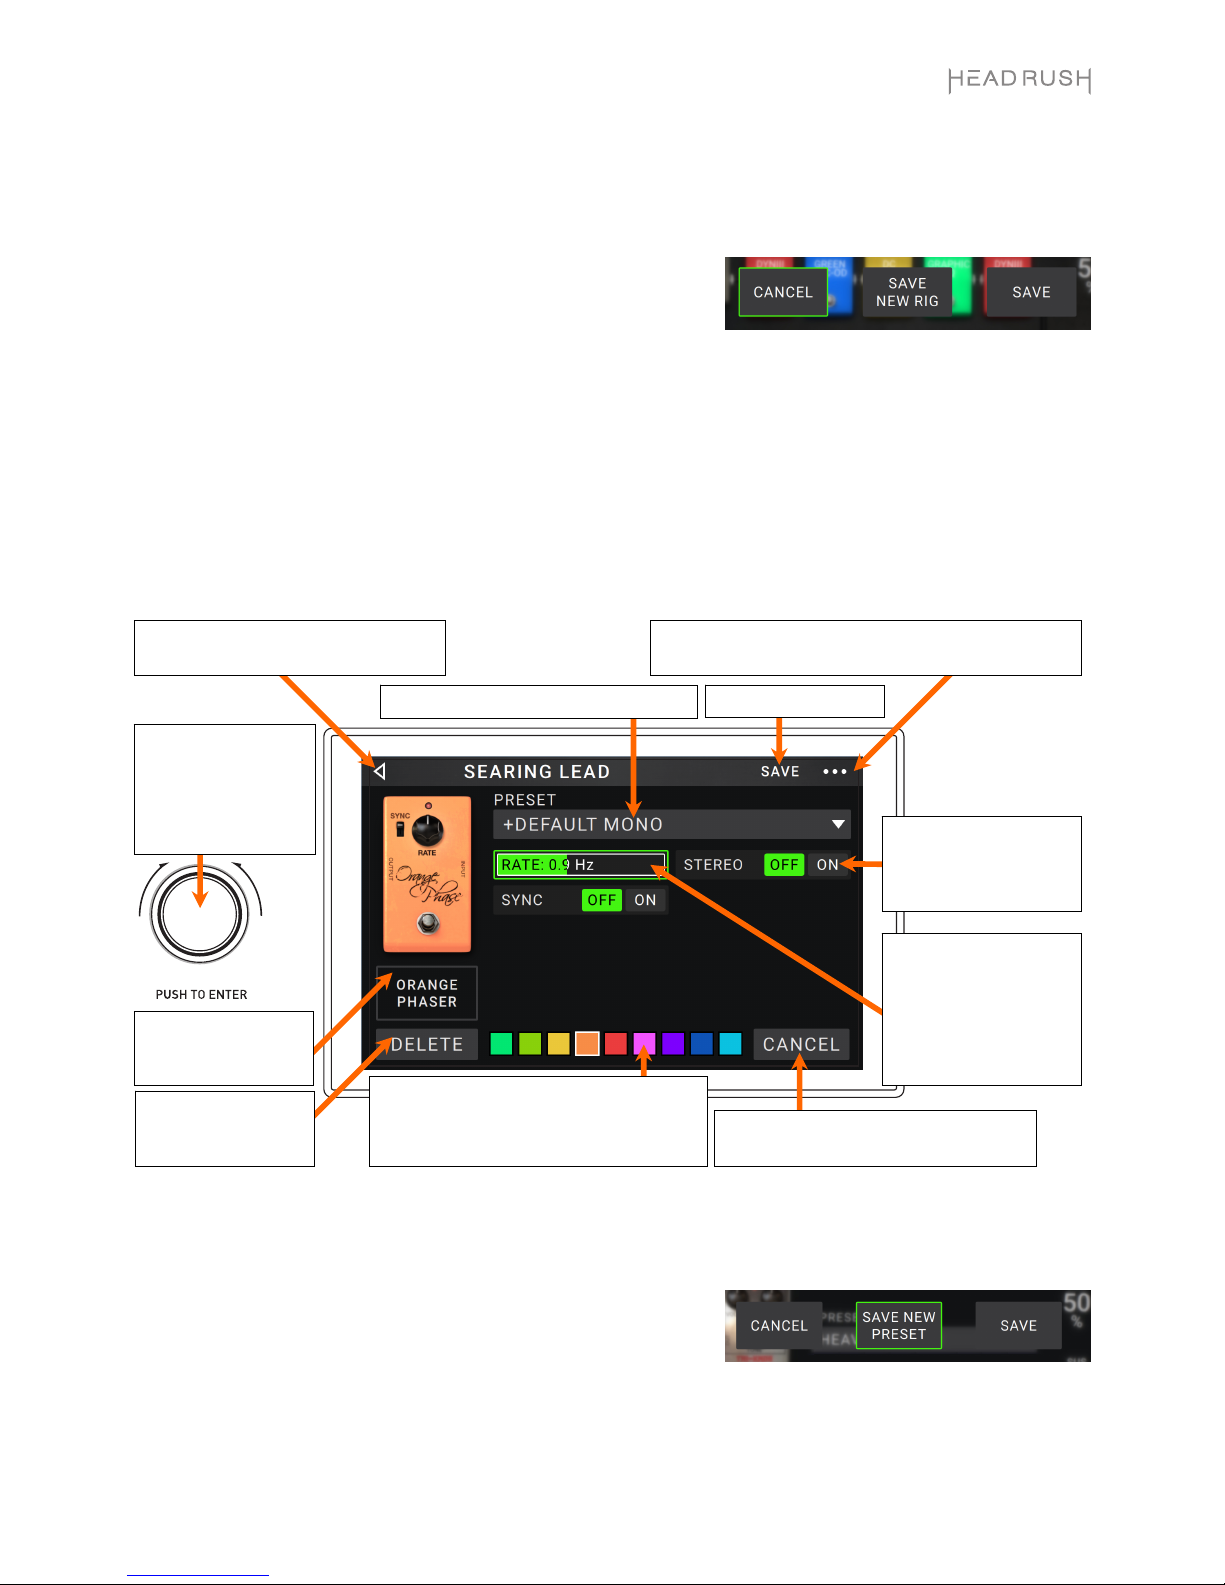
To adjust the settings of a model in your rig, double-tap it to open its settings screen.
Saving a Preset
To save a preset, tap Save in the upper-right corner.
To save your changes to the current preset, tap Save.
To save your changes as a new preset, tap Save New Preset, use
the keyboard that appears to enter a name, and then tap Save.
To return to the previous screen without saving, tap Cancel at
any time.
Tap the Preset menu to select a preset. See Savin
g
a Preset.
Tap this button and tap Discard Changes to discard
any changes you’ve made since opening this screen.
Tap Delete to
unassign the model
from the slot.
Tap a color to assign it to this model. That
color will be shown on the main screen, in
the Hardware Assign screen, and in the
f
oo
t
s
wit
c
h in
d
i
ca
t
o
r f
o
r thi
s
m
ode
l.
Tap Cancel to return to discard your
changes and return to the main screen.
Tap the model name
to assign a different
model to this slot.
Turn encoder to move
through selectable
items onscreen or to
adjust parameters.
Press encoder as an
Ente
r
command.
Tap to return to retain your changes
and return to the main screen.
Tap an Off/On
parameter button to
change the parameter's
setting accordingly.
Tap and drag a slider
left and right to adjust
the parameter's
settings. Alternatively,
tap the slider and use
the encoder for fine
adjustments.

10
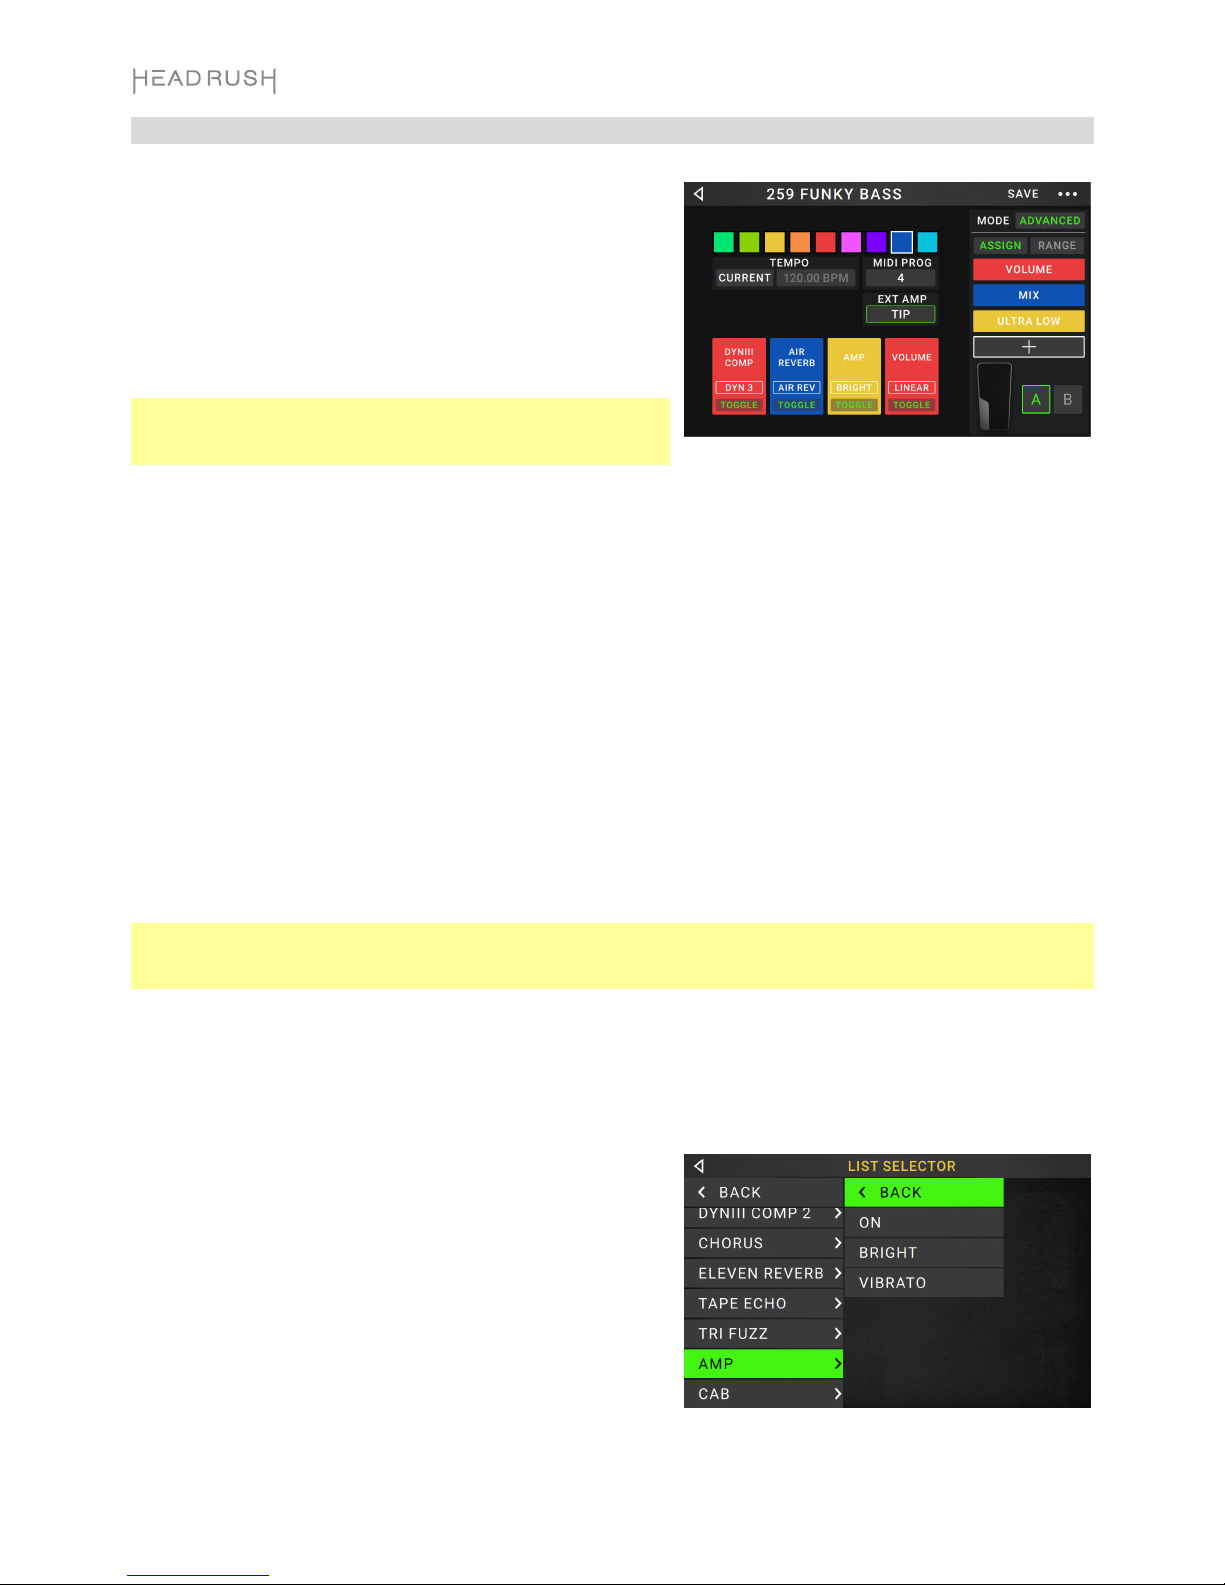
Hardware Assign
The Hardware Assign screen enables you to customize how
HeadRush Gigboard’s footswitches and an expression pedal
control each rig.
To open the Hardware Assign screen, tap the button in
the upper-right corner of the main screen, and then tap
Hardware Assign.
To return to the main screen, tap the button in the upper-
left corner.
Important: The Hardware Assign settings are all part of the
overall rig, so remember to save your changes you want to
keep.
To set the color associated with the rig, tap it in the upper-left part of the screen. This color will appear next to
the rig name when you view a list of all available rigs or when you view and create setlists. It will also be the color
of the corresponding footswitch indicator when HeadRush Gigboard is in Rig View.
To set the tempo of the rig’s time-based effects (delays, modulation, etc.), tap the button under Tempo to
select Current or Fixed.
•Current: The rig will use the last-used tempo or the one set by the Tempo footswitch.
To set the tempo, press the Tempo footswitch at the desired tempo 3–8 times to set the new tempo in beats
per minute (BPM).
•Fixed: The rig will use a tempo that you set here.
To set the tempo, turn the encoder to set the desired tempo in beats per minute (BPM). You can set the
tempo only in this Hardware Assign screen.
To load a rig when a MIDI program change is received from an optional external MIDI device, or to send a
MIDI program change message when a rig is loaded, tap the button under MIDI, and then turn the encoder to
select a MIDI program change number. You can adjust whether MIDI program changes are received and/or sent
in the Global Settings menu.
Note: If a rig is using a number, that number will be unavailable and cannot be assigned to another rig.
Additionally, saving a rig with a new name will save the rig but without the program change number to prevent
rigs from sharing the same number.
Footswitches
The 4 boxes in the lower-left corner represent the 4 footswitches of HeadRush Gigboard. You can assign any
switch-based parameters (ones with only two states) to any of the footswitches—regardless of their location in
the signal chain.
To assign a parameter to a footswitch:
1. Tap a box. indicates an empty box.
2. In the list that appears, tap the model with the parameter
you want to assign.
3. In the list that appears, tap the parameter you want to
assign. Usually, the parameter will simply be On (to activate
or deactivate it).
Tap Unassigned to unassign that footswitch.
To swap two assignments, tap and drag one of them over the
other, and then release it.

11
Ext. Amp
You can assign a switch to send a signal to your amplifier’s
footswitch input by using the external amp output. You can
use this feature to do things like change from the clean to dirty
channel, or turn reverb on and off on your amplifier.
To use this feature when switching to a rig, tap the button
under Ext Amp on the hardware assign page, and then select
Tip, Ring, or Both. If you are unsure of which setting to use,
please consult the amplifier's manual or manufacturer to
confirm.
This feature can also be assigned to a footswitch on the Model
Selector page that appears when you are assigning a
footswitch’s function.
This function can also be assigned to a scene by adjusting the parameter on the Scene Editor screen.
IMPORTANT! Only connect this output to amplifiers that have a "short-to-sleeve" footswitch input. If you connect
this output to any other type of footswitch input, you may cause permanent damage to your equipment. If you are
unsure if your amplifier has a “short-to-sleeve” footswitch input, please consult the amplifier’s manual or
manufacturer to confirm.
Scenes
The Scene feature allows you to turn multiple models on or off in each rig. When you press the footswitch
assigned to that scene, all models included in that scene will turn on or off, depending on how you assign them.
This is a great way to create multiple tones in the same rig. For instance, you may want a particular reverb model
to be on anytime a particular distortion model is also on. Alternatively, you may want to turn one delay model off
when you turn another one on. Scenes enable you to do this with only one footswitch press.
To create and edit a scene:
1. On the Hardware Assign screen, tap Toggle/Scene for the
desired footswitch to cycle through the available options, and
select Scene.
2. On that model, tap Edit. The Scene Editor will appear,
which shows all models in your rig.
3. For each model in the rig, tap it to cycle through the
available options:
•On: This model will turn on when you turn the scene on.
•Off: This model will turn off when you turn the scene on.
•No Change: This model will remain unaffected when
you turn the scene on.
4. Tap a color at the bottom of the touchscreen to select a
color for the scene.
5. Tap the button in the upper-left corner to return to the
Hardware Assign screen.
To rename a scene (which appears in the footswitch
indicators), tap the text in the box below Edit on the model,
use the virtual keyboard that appears to enter a name, and
then tap anywhere other than the text field.

12
Expression Pedal
You can connect an optional expression pedal (sold separately) to control two parameters (in Classic Mode) or
two sets of parameters (in Advanced Mode). If your expression pedal has a toe switch, you can use the toe switch
to switch between them—Expression Pedal A or B.
The column of four boxes represents the expression pedal settings. You can
assign one or more continuously adjustable parameters (ones with a range of
values) to the expression pedal.
To set the expression pedal mode, tap the button above Range in the
upper-right corner to select Classic or Advanced.
•Classic: You can assign one parameter to each expressional pedal (A
and B). Using the toe switch will select the other expression pedal and
deactivate (bypass) the current expression pedal’s parameter. For
instance, if you assign a wah pedal to Expression Pedal A and a volume
pedal to Expression Pedal B, only one of them will be active at any time;
when you are controlling the wah pedal, the volume pedal will be
bypassed, and vice versa.
•Advanced: You can assign up to four parameters to each expression pedal (Aand B). Moving the pedal
will adjust all of its assigned parameters simultaneously. Using the toe switch will select the other
expression pedal and leave the current pedal’s parameters active and at their maximum values.
To assign a parameter to an expression pedal:
1. If the Assign button is not on, tap it.
2. Tap a box under the Assign button. indicates an empty box.
3. In the list that appears, tap the model with the parameter you
want to assign.
4. In the list that appears, tap the parameter you want to
assign.
Tap Unassigned to unassign that box.
To swap two assignments (while in Advanced Mode), tap and
drag one of them over the other, and then release it.
To set the range of an assigned parameter:
1. If the Range button is not on, tap it.
2. Tap a value under the Range button.
3. Turn the encoder to set the desired value as a percentage of the parameter’s entire range.
Press the encoder or tap elsewhere to confirm the value.

13
Setlists
You can use setlists to organize your rigs. A setlist is a saved collection of rigs, which you can save and recall at a
later time. This is useful, for instance, if you only need some of your rigs for a performance; you can save a setlist
of just those rigs so you don’t have to spend time searching through all of your rigs before playing the next song.
To view your setlists, tap the ≡button in the upper-left corner of the main screen. The Setlists screen will appear.
To return to the main screen, tap the button in the upper-left corner.
To create a setlist:
1. Tap New in the upper-right corner.
2. In the screen that appears, the left half is a list of all available rigs,
and the right half is the list of rigs in the setlist.
To add a rig to the setlist, tap it to add it to the end of the list.
Alternatively, tap and hold it, and then drag it to the desired location
in the list. You can add the same rig to a setlist more than once.
The [Empty ] rig in the lower-left corner is a slot to use as a
placeholder to make rearranging the setlist easier; it will not be
available as a selectable rig when moving through rigs in the setlist.
To rearrange the setlist, tap and hold a rig in the list on the right
half, and then drag it to the desired location in the list.
To remove a rig from the setlist, tap the on its right edge.
To save a setlist, tap Save in the upper-right corner.
To save your changes to the current setlist, tap Save.
To save your changes as a new setlist, tap Save New Setlist,
use the keyboard that appears to enter a name, and then tap Save.
(At any time) To return to the previous screen without saving, tap
Cancel.
To discard any changes you’ve made to the setlist, tap the button
in the upper-left corner, and tap Discard Changes.
To load a setlist:
1. While viewing the main screen, tap the ≡button in the upper-left
corner to view the Setlists screen. Each setlist will show the number
of rigs in parentheses (including multiple instances of the same rig).
2. Tap the desired setlist. The first rig of that setlist will load
immediately. Tap All Rigs to view all rigs instead of a specific setlist.
To edit a setlist, tap the button on its left side, and then tap the
pencil icon. You will see the same screen you used to create the setlist,
where you can edit and save it.
To delete a setlist, tap the button on its left side, and then tap the
trash can icon. Tap Yes to confirm the deletion or Cancel to return to
the Setlists screen without deleting it.

14
Hands-Free Mode
Hands-Free Mode enables you to adjust any of the settings on
your models by using just the footswitches and/or an optional
expression pedal. (sold separately).
To enter Hands-Free Mode, press and hold footswitch 2 for
over one second. While in Hands-Free Mode, the screen will
show a single parameter and its currently selected value.
To change the value, press footswitch 1 (down) or
footswitch 2 (up). You can also change this by moving an
external expression pedal.
To access the next available parameter, press footswitch 3.
To access the previous available parameter, press and hold
footswitch 3.
To access the next available block in your rig, press
footswitch 4.
To exit Hands-Free Mode, press and hold footswitch 4.
Tuner/Tempo
You can use the Tuner/Tempo page to tune your guitar and set
a tempo for time-based effects.
To enter Tuner/Tempo mode, press and hold footswitch 4
for over one second. While in Tuner/Tempo Mode, the screen
to the right is shown.
To change the tuner reference pitch, tap the parameter and
then turn the encoder.
To unmute your signal while tuning, press footswitch 1.
To enter a tempo via tapping a footswitch, press footswitch
3 at the desired tempo 3–8 times to set the tempo in beats per
minute (BPM).
To exit this page, press footswitch 4.

15
Looper
The HeadRush Gigboard has a built-in looper that you can use to layer your performances. While the looper’s
operation is shown in the display, you can control most of it conveniently with the footswitches.
The looper can hold up to 20 minutes of audio at a time across a maximum of 100 layers.
To record the first layer of a loop, press the Record footswitch. Recording will begin immediately and the
footswitch indicator will light red. Press the Record footswitch again to stop recording and start loop playback.
The footswitch is now called Overdub and the footswitch indicator is yellow.
To record additional layers onto the loop (overdub), press the Overdub footswitch. Overdubbing will begin
immediately and the footswitch indicator will light red. Press the Overdub footswitch again to stop overdubbing
and continue playback.
To erase the top-most (last-added) layer of the loop, press the Peel footswitch. The top-most layer of the loop
will be erased immediately. This process is destructive, so you can’t re-add it later.
To clear the full loop, press and hold the Clear footswitch. This process will stop playback and is destructive, so
you can't re-add it later.
To halve or double the length of the loop, tap the button next to the Length field and then turn the encoder.
The halving process is non-destructive, so you can restore your original loop and its content by by doubling the
length of the loop.
To halve or double the speed of the looper, tap the button next to the Speed field and then turn the encoder.
Tip: Use this to create low bass lines or ultra-high guitar parts that you couldn’t ordinarily play.
Rig name.
This controls how much
of the looper’s signal you
hear in the outputs.
This controls how much
of the looper’s signal is
routed back through it
when recording another
layer.
This meter indicates
your current
location in the loop
during recording or
playback.
This indicates the
current speed of the
loop as a multiple or
fraction of the
ori
g
inal.
This indicates how
many layers are
playing in the
current loop,
including the
ori
g
inal.
This indicates the direction
of playback.
This indicates whether the looper is
located before (Pre) or after (Post) your
signal chain. Moving the looper to the
Pre position enables you to edit your
rig without having to play the same riff
over and over again.
This indicates the length
of the current loop.

16
To reverse looper playback, tap the button next to the Playback field and then turn the encoder.
Tip: Create eerie effects by recording layers in reverse then switching back to normal playback.
To set the looper’s location, tap the button next to the Playback field and then turn the encoder to place it
before (Pre) or after (Post) the signal chain. Moving the looper to the Pre position enables you to edit your rig
without having to play the same riff over and over again
To exit the looper and return to the main screen, press the Exit footswitch. If the looper is playing, playback
will continue.
To re-enter the looper, press the Looper footswitch again.
Tip: Use this feature to create different effect configurations (adjust parameters, activate/deactivate models, etc.)
for each layer, creating a multi-textured performance. You can also switch rigs while using the looper and use a
different rig for each layer.
Global Settings
Use the global settings to configure the HeadRush Gigboard’s
overall operation.
To show the global settings, tap the button in the
upper-right corner of the screen, and tap Global Settings.
To select each page of the global settings, tap the
number at the bottom edge of the screen.
LCD Brightness: This setting determines the brightness of the
main display. Tap this field, turn the encoder to select 1(dim)
through 5(bright), and then press the encoder.
Audio Configuration:
Main Out Level: This setting determines the signal level sent to the main Outputs (1/4"/6.35 mm, TRS). When
set to Line, the output level will be +18 dBu. Use this setting if you are connecting the HeadRush Gigboard
to a full-range, flat-response amplifier, PA speaker, mixer, or audio interface. When set to Amp, the output
level will be +6 dBu. Use this setting if you are connecting the HeadRush Gigboard to a traditional guitar
amplifier.
FX Return Level: This setting determines the signal level received by the FX Return Input (1/4"/6.35 mm,
TRS). When set to Rack, the output level will be line level, +18 dBu. Use this setting if you are connecting a
rack effects processor in the HeadRush Gigboard's FX-Loop. When set to Stomp, the output level will be
+6 dBu. Use this setting if you are connecting a traditional guitar pedal ("stompbox") in the FX-Loop.
USB Audio Settings:
Note: Please download the full HeadRush Gigboard User Guide at headrushfx.com to learn how to configure
your DAW.
Important note for Windows users: Before connecting the Headrush Gigboard to your computer, download and
install the necessary drivers from headrushfx.com/support.
Sample Rate: This setting determines the sample rate of the USB audio signal: 44.1 kHz, 48.0 kHz or 96.0 kHz.
Remember to select the same sample rate as the one in your DAW. Also, set it before opening your DAW.
USB Audio: This setting determines whether or not HeadRush Gigboard is sending a USB audio signal over a
USB connection. Tap On to enable sending of the USB audio signal with the selected Sample Rate. Tap
Off to disable the USB audio signal. (To change the Sample Rate, set USB Audio to Off first, select the
correct sample rate, set USB Audio to On again, and restart your DAW.)

17
USB Mode: This setting determines how the HeadRush Gigboard sends its audio signal over the USB
connection and how its outputs function while doing so:
•Live: The audio signal will be sent to your computer as well as to the HeadRush Gigboard’s outputs.
•DAW: The audio signal will be sent to your computer only. The HeadRush Gigboard’s outputs will be
disabled to prevent any latency while monitoring.
•Reamp: Your computer will send an audio signal to the HeadRush Gigboard, which will process it
through the current rig and send it back to your computer. The HeadRush Gigboard’s outputs will be
disabled to prevent any latency while monitoring.
MIDI Settings: These settings determine how the HeadRush Gigboard sends and receives MIDI information to
and from external devices. These settings affect only the HeadRush Gigboard’s MIDI input or MIDI output.
MIDI Thru: Tap On to use the MIDI output as a MIDI throughput; any MIDI information sent to the HeadRush
Gigboard’s MIDI input will be sent directly to the MIDI output. Tap Off to use the HeadRush Gigboard’s
MIDI output normally; the HeadRush Gigboard will be able to send its own MIDI information out of the MIDI
output.
Recv MIDI Clock: Tap On to enable the HeadRush Gigboard to receive MIDI clock information. Tap Off to
use the HeadRush Gigboard’s own internal MIDI clock (which will not be sent out).
Prog Change: Tap Send to enable or disable the HeadRush Gigboard’s transmission of MIDI program change
messages when you load a rig. Tap Recv to enable or disable the HeadRush Gigboard’s reception of MIDI
program change messages from an external MIDI device.
MIDI Channel: This setting determines the MIDI channel(s) that the HeadRush Gigboard will send and receive
MIDI messages. Tap this field, turn the encoder to select all channels (Omni), or 1–16, and then press the
encoder.
Reminders:
Confirm Unsaved: This setting determines whether or
not you will see a confirmation message if you change
the rig while there are unsaved changes on the current
one. Tap On to enable these messages or Off to
disable them.
Alternatively, tap Do not show this dialog again in the
message itself to disable them.
Assignments:
Auto Assign: This setting determines how models are assigned to the switches. Tap On if you want models to
be automatically assigned to the next available switch when you load them. Tap Off if you want models to load
without being assigned to a switch; you will have to assign them manually in the Hardware Assign screen.

18
Global EQ:
These settings on Page 2 determine if/how equalization is
applied for your outputs. This equalizer is a four-band
parametric equalizer.
Tip: These settings are especially useful when a venue, rehearsal
space, etc. has different acoustic characteristics than the room
where you originally created your presets (e.g., the venue may
sound “boomier,” or a rehearsal space with soundproofing may
deaden some of the high end). This page lets you quickly apply
some additional equalization to all of your presets without
permanently saving them.
EQ On: This setting determines whether equalization is
enabled (On) or disabled (Off) for the outputs.
Level: This setting determines if/how much the outputs’ audio signal level is boosted or cut. This value is
applied the level set by the Master knob.
Low Band & High Band: These settings determine what type of equalization is applied to the lowest-
frequency band (Low Band) and to the highest-frequency band (High Band): Shelf or Cut.
Low, Low Mid, High & High Mid: The three settings for each of these four frequency bands determine the
shape of the equalization:
The first setting (Hz) determines the center frequency of the low-frequency band, low-mid-frequency
band, high-frequency band, or high-mid-frequency band.
The second setting (dB) determines how much the equalizer boosts or cuts the signal at the
corresponding frequency band.
The third setting (Q) determines the width of the frequency band. The higher the setting, the wider the
band will be around the center frequency (the first setting). This setting is applied whether Low Band or
High Band is set to Shelf or Cut.

19
Guía de inicio rápido (Español)
Introducción
Contenido de la caja
HeadRush Gigboard
Cable USB
Cable de corriente
Tarjeta de descarga de software
Guía de inicio rápido
Manual sobre la seguridad y garantía
Importante: Visite headrushfx.com para descargar la guía del usuario completa.
Soporte
Para obtener la información más reciente acerca de este producto (documentación, especificaciones técnicas,
requisitos de sistema, información de compatibilidad, etc.) y registrarlo, visite headrushfx.com.
Para obtener soporte adicional del producto, visite headrushfx.com/support.

20
Características
Panel superior
1
2
3
4
5
1. Pantalla: Esta pantalla multitáctil a todo color muestra información relevante para la operación actual de la
HeadRush Gigboard. Toque la pantalla (y utilice los controles de hardware) para controlar la interfaz. Consulte
Funcionamiento básico para aprender cómo funciona.
2. Codificador: Utilice este codificador para desplazarse por las opciones de menú disponibles o ajustar los
valores de los parámetros del campo seleccionado en la pantalla. Pulse el codificador para introducir su
selección.
3. Indicadores de los interruptores de pedal: Estas luces indican si el pedal de percusión rítmica,
configuración o escena asignada a cada interruptor de pedal se encuentra encendido (con luz fuerte) o
apagado (con luz tenue).
4. Interruptores de pedal: Pulse estos interruptores de pedal para activar o desactivar el modelo o escena
asignada o para cargar la configuración asignada.
5. Volumen principal: Gire esta perilla para ajustar el volumen de las salidas.
Other manuals for Gigboard
3
Table of contents
Languages:
Other HEADRUSH Music Pedal manuals