Heatit JH-EWH100 User manual
INTELLIGENT TEMPERATURE
CONTROL WHOLE ROOM HEATER
JH-EWH100
www.heatitcable.com
info@heatitcable.com

Cleaning
Warranty
Important Safety Instructions 01
06
08
10
12
13
14
15
16
Safety Features
Controls
How to Use
Cleaning
Storage
Reset Heater
Troubleshooting
Warranty
CONTENTS

IMPORTANT SAFETY INSTRUCTIONS
The owner's guide and any additional inserts are integral components of the product,
containing crucial details about safety, usage, and proper disposal. Prior to using the
product, we urge you to acquaint yourself with all operational and safety instructions.
We kindly request that you retain all documents for future reference and pass them on,
along with the product, to any future owner. For the latest version of this owner's guide,
please visit our website, where you can view, download, and print it.
INTENDED USE
This product is designed solely for heating and circulating indoor air in residential living
spaces. It is not intended for use in commercial or industrial settings. Additionally, please
note that this heater should not be used in bathrooms, laundry areas, or similarly damp
environments. The manufacturer bears no responsibility for any damage or injuries
resulting from unauthorized use or product modifications. It's crucial to adhere to these
guidelines, as failure to do so will result in the voiding of the product warranty. Lastly,
please be aware that this product is intended for floor use exclusively.
01 02
Important SafetyInstructions Safety Features Controls How to Use Cleaning Storage Reset Heater Troubleshooting Warranty
Important SafetyInstructions Safety Features Controls How to Use Cleaning Storage Reset Heater Troubleshooting Warranty
This heater contains hot components and parts that may arc or spark. Avoid using
it in locations where gasoline, paint, or flammable liquids are present or stored.
where gasoline, paint, or flammable liquids are used or stored.
Additionally, refrain from using this heater in recreational vehicles (RVs), boats, or
any situation where battery power is being converted into AC powerpower is con-
verted to AC power.
In order to minimize the risk of a potential fire, refrain from positioning the heater on
soft surfaces, such as a bed, which could obstruct air intakes or exhaust in any way.
Do not alter the product by adding any aftermarket accessories.
To minimize the risk of fire, electrical shock, and harm to individuals, please adhere
to the following guidelines:
WARNING:
PLEASE READ AND SAVE ALL
INSTRUCTIONS BEFORE USING THIS
HEATER.
Please carefully review and retain all instructions before operating this heater.
When using electrical appliances, it is essential to adhere to fundamental safety prec-
autions to minimize the risk of fire, electric shock, and injury to individuals. This includes
the following:
Exercise extreme caution during the installation, operation, cleaning, and maintenance
of this product, especially when children aged 12 or younger are present, as well as
individuals with reduced physical, sensory, or mental capabilities. Additionally, exercise
caution when the heater is in operation and unattended.
Ensure that children are under supervision to prevent them from playing with the appliance,
its components, or packaging materials.
-INSTALLATION WARNING
The appliance, power supply, power cord, and plug must not be exposed to water.
Avoid using this product on wet surfaces, in a bathtub or shower, or in a location
where it could potentially fall into a bathtub, laundry, swimming pool, or any
water-containing vessel. Additionally, refrain from using this product outdoors or
subjecting it to adverse weather conditions or elements.
Avoid utilizing this product on an elevated surface like a window, shelf, or desktop.
It should only be operated when positioned on the floor and should be used exclu-
sively in the upright position.
This heater generates heat when operational. To prevent burns, refrain from
alloing exposed skin to come into contact with hot surfaces. If handles are provid-
ed, utilize them when relocating the heater. Maintain a minimum distance of 3 feet
(0.9 meters) between combustible materials, such as furniture, pillows, bedding,
papers, clothing, and curtains, and the front of the heater. Ensure that these mate-
rials are also kept away from the sides and rear of the heater.
None of the components of this product, including the appliance itself, the power
cord, the plug, or the packaging, should be positioned in close proximity to furnac-
es, fireplaces, stoves, or other heat sources with high temperatures.
Avoid running the cord beneath carpets or concealing it with throw rugs, runners, or
similar materials. Do not route it underneath furniture or appliances. Arrange the
cord in a way that keeps it clear of high-traffic areas and prevents tripping hazards.
Ensure the cord doesn't dangle over the edges of counters or get caught in doors.
When positioning the appliance, place it near a readily accessible outlet so that it can
be easily unplugged in case of an emergency.

Always disconnect the heater from the power source when it is not in use.
Use this heater exclusively in accordance with the instructions provided in this manual.
Any other usage not explicitly endorsed by the manufacturer may result in the risk
of fire, electric shock, or personal injury.
Exercise extreme caution whenever the heater is in operation. It is strongly advised
not to leave the heater unattended or unsupervised while in use.
Do not operate the heater if the cord or plug is damaged, or if the heater malfunctions,
has been dropped, or sustained any form of damage. Dispose of the heater or
return it to an authorized service facility for inspection and potential repair.
Inspect the connections of your heater's cord and plug regularly. A loosely fitting
outlet can result in the plug overheating or causing a fire. Ensure that the plug
fits snugly in the outlet. Continuously monitor the plug and outlet for excessive
heat during use. If you notice either becoming hot, cease using the heater
immediately and enlist the services of a qualified electrician to replace the outlet.
Always connect heaters directly to a wall outlet or receptacle. Never utilize an
extension cord or a relocatable power tap (outlet/power strip) with them.
Avoid using this heater with a surge-protected unit or a Ground Fault Circuit Interrupter
(GFCI) outlet. Ensure that you connect it exclusively to properly grounded outlets.
Before plugging the power cord into an electrical outlet, verify that all electrical specifi-
cations on the rating label, including voltage, are compatible with your outlet's power
supply.power supply.
03 04
Important SafetyInstructions Safety Features Controls How to Use Cleaning Storage Reset Heater Troubleshooting Warranty
Important SafetyInstructions Safety Features Controls How to Use Cleaning Storage Reset Heater Troubleshooting Warranty
Additionally, avoid using this heater with a timer designed to automatically turn the unit
on or off, as this may unintentionally disable the heater's thermal cutout safety feature.
Fire hazard warning: Do not use any heater with a damaged cord or plug or after
the heater has malfunctioned, been dropped, or suffered any form of damage. Either
dispose of the heater or return it to our service center for inspection and potential
repair.
Additionally, do not sit or stand on the product.
Never employ the cord as a handle or subject it to any pulling, straining, or stretching.
To minimize the chances of fire, electrical shock, and harm to individuals, adhere to
the following guidelines:
Important Note: Heaters draw more current compared to small appliances,
which means overheating of the outlet may occur, even if it hasn't happened
with other appliances before.
This heater may be equipped with an audible or visual alarm designed to alert you
when certain parts of the heater become excessively hot. If the alarm activates
(or flashes), promptly switch off the heater and check for any objects on or near
the heater that could be causing elevated temperatures. UNDER NO CIRCUM-
STANCES SHOULD YOU CONTINUE OPERATING THE HEATER WHILE THE
ALARM IS SOUNDING (OR FLASHING).
Never disregard signs of an electrical issue, such as warm outlet cover plates,
sparks during plugging in or operation, or flickering/dimming lights while the
appliance is in use. If you observe any of these issues, immediately power off
and unplug the appliance. Contact a qualified electrician to investigate potential
causes before using the appliance again.
This appliance features a polarized plug, with one blade wider than the other.
This design reduces the risk of electrical shock and is intended to fit into a
polarized outlet in only one orientation. If the plug doesn't fit fully into the outlet,
reverse the plug. If it still doesn't fit, consult a qualified electrician. Do not attempt
to bypass this safety feature.
-SAFE USE WARNING
To minimize the risk of circuit overload, fire, and electric shock, refrain from using a
solid-state speed control device, such as a dimmer switch, to operate this appliance.
It is not recommended to use this appliance on the same electrical circuit as another
high-energy-consuming device, such as a vacuum cleaner, blender, variable speed
fan, or circular saw.
Furthermore, do not insert foreign objects into any ventilation or exhaust opening,
as doing so could lead to electric shock, fire, or harm to the heater.

Important SafetyInstructions Safety Features Controls How to Use Cleaning Storage Reset Heater Troubleshooting Warranty
05 06
Important SafetyInstructions Controls How to Use Cleaning Storage Reset Heater Troubleshooting Warranty
SAFETY FEATURES
COOL-TOUCH CASING
Remains safe to touch,
even when set to high heat.
FINGER-FRIENDLY
DESIGN
Resists curious fingers.
AUTOMATIC SAFETY
SHUT-OFF SYSTEM
In the event of blocked airflow, the
heater's power is automatically cut
off to prevent overheating.
When moving, repositioning, servicing, cleaning, or when the product is not in use,
use the product's controls to turn off the power and then unplug it. To disconnect
from the outlet, grip and pull the plug only. Additionally, power off and unplug the
product if it will be left unattended for an extended period or during electrical storms.
Hyperthermia can be fatal. Symptoms of hyperthermia encompass elevated body
temperature, headaches, nausea, vomiting, fatigue, dizziness, fainting, and a rapid
pulse. If you start to exhibit signs of hyperthermia, such as those mentioned, imm-
ediately switch off the heater and seek medical attention.
In the event that your heater unexpectedly ceases operation, please note the
following:
This heater is equipped with a thermal cutout safety feature designed to automatically
shut off when it detects overheating. Refer to the instructions
in this manual to understand how to verify and reset the heater.
“RESET HEATER”
If the heater, along with other electrical devices, abruptly stops functioning simul-
taneously, it is possible that your home's circuit breaker or fuse has tripped due to
an overload of electrical power. To address this issue, you may consider the
following actions:
• Operate your heater only on the "low" setting.
• Use only one heater at a time and disconnect all other electrical devices while
the heater is in use.
• Consult with an electrician to install an additional circuit into your home's
electrical system.
To minimize the risk of fire, electrical shock, and harm to individuals, please adhere
to the following precautions:
Clean your product regularly using only the methods outlined in this manual.
Before cleaning, ensure the power to your product is switched off, and unplug it.
Avoid using gasoline, thinners, solvents, ammonias, or any other chemicals for
cleaning. Consult the provided CLEANING instructions for guidance.
Never open the appliance housing while the product is plugged in. To prevent the
risk of electrical shock, all servicing and repairs must be conducted by an authorized
Service Center.
-SERVICING WARNING
To prevent excessively high room temperatures that could lead to hyperthermia,
NEVER leave the product operating unattended in an enclosed area with infants
or individuals who have reduced physical, sensory, or mental capabilities.

07 08
Important SafetyInstructions Controls How to Use Cleaning Storage Reset Heater Troubleshooting Warranty
If heater tips over, safety shut-off system cuts power to heater. Position heater
back in upright position. Press Power button and heater will return to last stored
setting.
TIP-OVER:
AUTOMATIC TIP-OVER
PROTECTION
If the heater is tilted more than
10 degrees in any direction, its
power is automatically disconnected.
POWER CORD
STORAGE
You can securely store any excess
cord on the bottom of the heater.
Important SafetyInstructions Safety Features Controls How to Use Cleaning Storage Reset Heater Troubleshooting Warranty
CONTROLS
-The LED Display illuminates when powered on and as settings are adjusted
then dims after 20 seconds of inactivity.
-To change temperature display from Fahrenheit to Celsius, press and hold (+)
and (Mode) for three seconds.
POWER ON/OFF
POWER INDICATOR
LIGHT
TIMER THERMOSTAT +/-
The red light illuminates to
indicate the heater is On.
MODE
High Heat (1500 watts),
Low Heat (750 watts) ,
or Fan Only.
SAFETY FEATURES
09 10
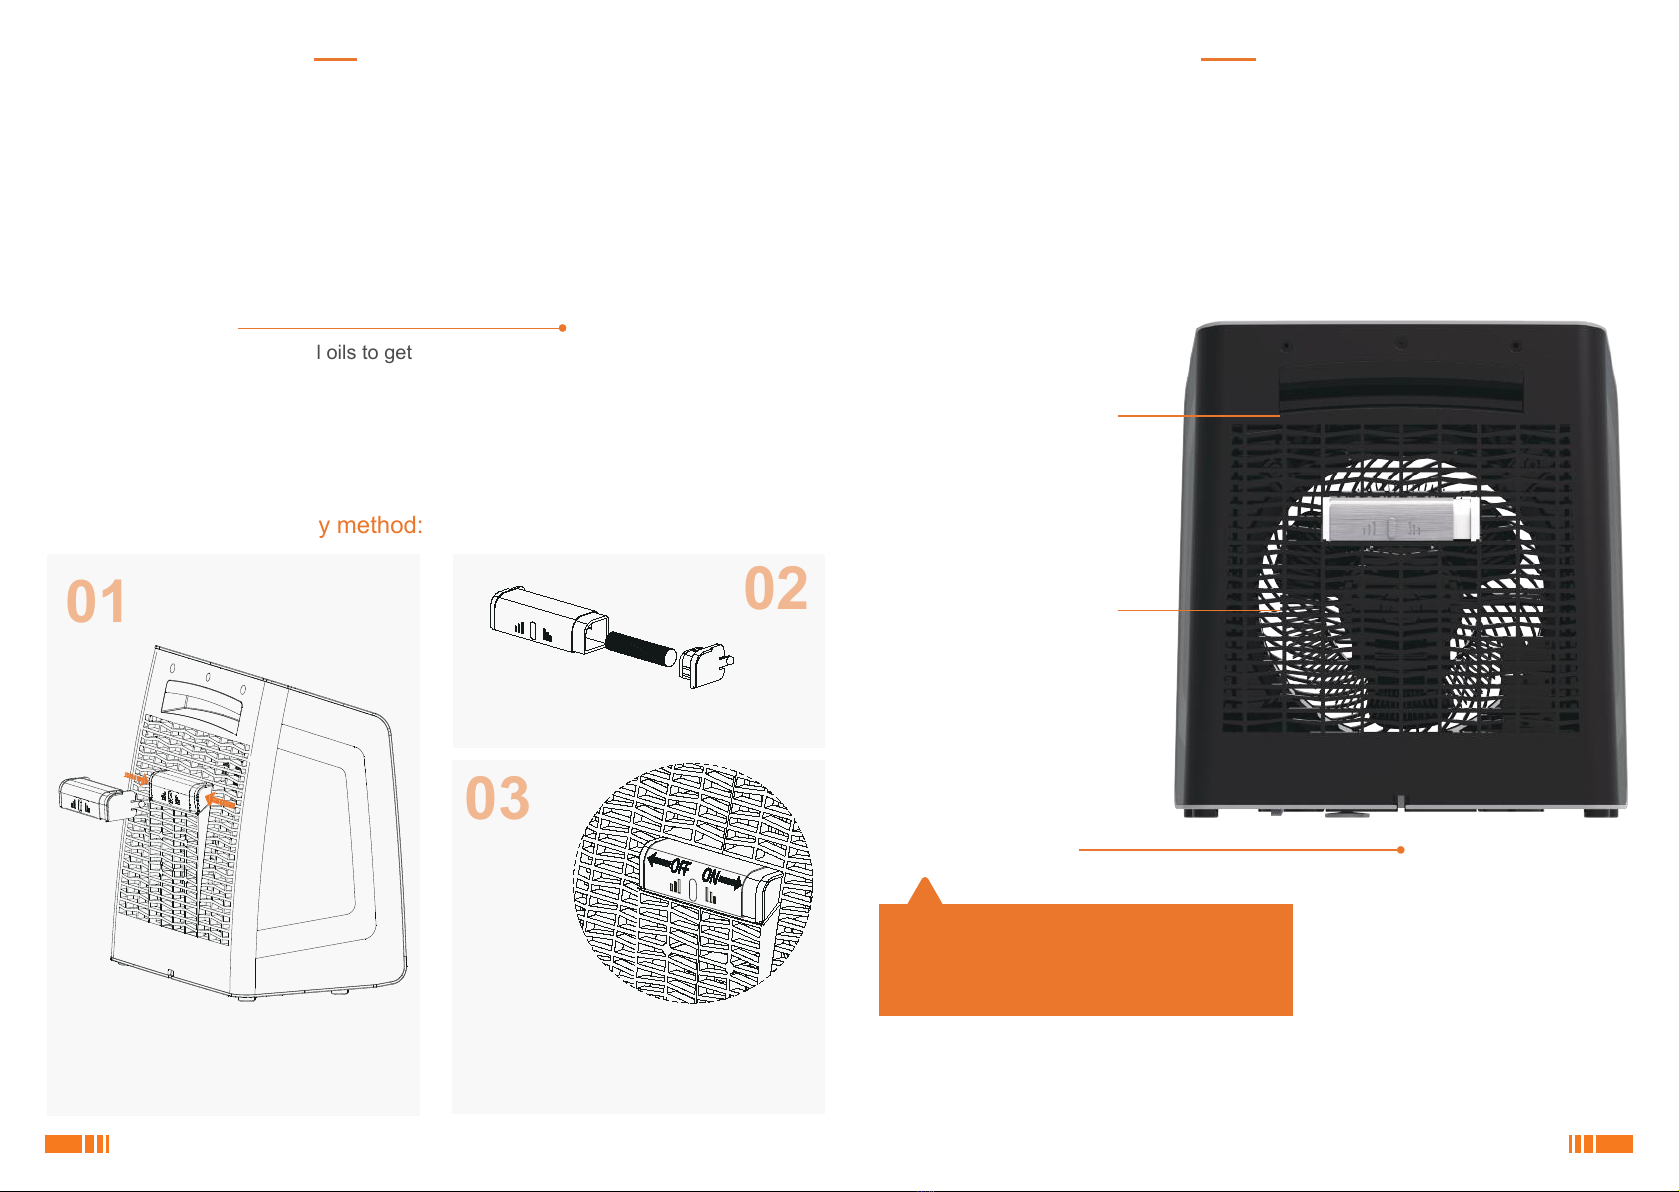
ADDITIONAL FUNCTIONS
Scented box
Change the aromatherapy method:
Add your favorite essential oils to get
the fragrance you want.
Important SafetyInstructions Safety Features Controls How to Use Cleaning Storage Reset Heater Troubleshooting Warranty
HOW TO USE
Before using the appliance, inspect it for any visible damage. If you discover any
signs of damage, DO NOT USE THIS HEATER. Instead, please contact our
service department for assistance.
Utilize the built-in handle
located on the back of the
heater for lifting and carrying.
01
Place the heater in a
position where the airflow
is not blocked.
02
03
Uncoil the power cord from
the base of the heater, and
then plug it into a standard
grounded wall outlet.
TIP: Wrap excess cord inside Cord Storage.
Use notches inside the Cord Storage to
secure power cord in place or adjust length
during use.
Important SafetyInstructions Safety Features Controls How to Use Cleaning Storage Reset Heater Troubleshooting Warranty
Pull out the aromatherapy box by press-
ing on both sides.
01
02
03
Remove the cover from the side and
replace the aromatherapy stick.
Slide the metal cover left and right to
open or close the aromatherapy cover air
intake, and open the air intake to release
the fragrance.

11 12
Important SafetyInstructions Safety Features Controls How to Use Cleaning Storage Reset Heater Troubleshooting Warranty
When you turn off your heater, it initiates an automatic cool-down process. In this
routine, the heating element deactivates, and the fan expels any residual heat. During
the Cool Down phase, the display counts down from ten and subsequently powers
off entirely.
COOL DOWN
To operate the heater, follow these
steps:
• Press the power button and
choose the desired mode.
• Adjust the thermostat to your
preferred temperature using the
-/+ buttons. The "SET" indicator
will light up, and the numbers will
flash on the LED display.
• After selecting the desired tempe-
rature, the display will show "SET"
for 10 seconds, followed by
"ROOM."
• Alternatively, you can select the
"Fan Only" mode by pressing the
Mode button.
Upon initial use, the default settings
will be High Heat with a set tempe-
rature of 75 degrees.
04
To set the timer for automatic shut-off, follow these steps:
• Press the Timer button. The display will show "0" flashing.
• Use the Timer button or the -/+ buttons to select the desired time in one-hour intervals,
up to a maximum of 12 hours.
• To cancel the timer operation, select "0" hours. The timer will be set automatically after
five seconds of making your selection.
Once the timer is in operation, press the Timer button again, and the remaining time before
the unit powers off will flash on the display. If you press the Timer button a second time while
viewing the countdown hours, the timer will be canceled
05
CLEANING
Due to the significant airflow generated by your heater, it is essential to perform
regular cleaning. We recommend cleaning the exterior of the heater on a weekly
basis. If you require servicing, please return your heater to an authorized service
center.
Important SafetyInstructions Safety Features Controls How to Use Cleaning Storage Reset Heater Troubleshooting Warranty
12
Unplug heater before cleaning. Utilize the brush attachment of a
household vacuum cleaner to
remove any accumulated dust from
the air inlets located on the back of
the heater.
Use the brush attachment of a
household vacuum cleaner to
remove any accumulated dust from
the front outlet grill.
Clean the entire heater by gently
wiping it down with a soft, dry cloth.
Please be aware that you should
not make any modifications to this
product by using aftermarket
accessories.
To ensure the heater functions optimally, it is advisable to periodically use pres-
surized air to blow out dust, hair, and debris that may accumulate inside the unit
as it circulates air during use. This practice not only helps maintain the heater's
efficiency but also eliminates any unwanted odors resulting from the buildup of
these particles within the unit.
01
02
03
04
TIP:
LOW HIGH FAN
SET ROOM TIMER
LOW HIGH FAN
SET ROOM TIMER
Low power mode Cold air blast
Press "+""-" to set
the temperature
Timing remaining time
Press "+""-" to set
the time
High power mode

13
Important SafetyInstructions Safety Features Controls How to Use Cleaning Storage Reset Heater Troubleshooting Warranty
14
STORAGE
If you plan to store your heater during the off-season or after extended periods of
non-use, it's essential to follow these instructions to ensure the product's longevity:
Important SafetyInstructions Safety Features Controls How to Use Cleaning Storage Reset Heater Troubleshooting Warranty
RESET HEATER
Your heater is equipped with a multi-level safety shut-off system designed to prevent
overheating. Overheating can occur if the inlets or outlets become obstructed. In such
a case, the safety shut-off system will automatically deactivate the heater, requiring
you to manually reset it.
-
Note: If the safety shut-off system continues to deactivate your heater repeatedly
or if it fails to reset even after following the above procedure, please contact our
service center for assistance.
RESETTING YOUR HEATER
01
Turn off the heater, and
then disconnect the
power cord.
04
Connect the power cord
and position the heater
as desired.
05
Press the Power button to turn the heater on.
Your heater should now operate normally and
revert to the last stored setting.
02
03
Clear away any
obstructions.
Wait for 5-10 minutes to
allow the heater to cool
down.
Disconnect the power cord and
neatly wrap it around the cord
storage located on the bottom of the
heater.
01
Place the heater in a cool and dry
storage area.
03
Cover the heater, or return it to the
retail carton if one is available. This
prevents the accumulation of dust on
the heater over time.
02
Dispose of all packaging materials in an
environmentally conscientious manner.
DISPOSAL
TIP: Cleaning is recommended
before storage.

15 16
Important SafetyInstructions Safety Features Controls How to Use Cleaning Storage Reset Heater Warranty
TROUBLE SHOOTING
COOL DOWN POSSIBLE CAUSE AND SOLUTION
The unit does not
power on
The unit is not plugged in. Plug the power cord into an electrical
outlet.
The household circuit breaker has tripped or a fuse has blown.
Reset the circuit breaker or replace the fuse. Refer to the
IMPORTANT INSTRUCTIONS.
The ground fault circuit interrupter (GFCI) has tripped. GFCIs are
not recommended for use and may cause nuisance tripping. If
tripping occurs, relocate the unit to a standard wall outlet.
The unit has overheated, and the Automatic Safety Shut Off has
activated. SEE RESET HEATER.
The tip-over switch on the bottom of the unit has been triggered,
causing the safety shut-off system to cut power to the heater. Place
the heater on a level surface. SEE SAFETY FEATURES.
The unit is damaged or requires repair. Stop using it and unplug
it. Contact Consumer Service for assistance.
Make sure the unit is set to High Heat and the thermostat is
adjusted to the highest temperature setting.
Close all doors and windows to contain the heat.
Allow the unit sufficient time to circulate heat throughout the
room; this may take several minutes.
Press the Power button to turn the unit off, and then unplug it.
On the bottom of the unit, locate the cylindrical plunger. Depress
it 4-5 times to ensure it is not stuck. Place the unit on a flat surface,
ensuring that the power cord lies completely flat and extends
from the power cord opening on the back of the heater.Plug the
unit back in and press the Power button to turn it on. Set it to the
highest heat setting, and make sure it is not set to the Fan Only
setting.
The unit is not generating an
adequate amount of heat.
The unit is turned on, but it is
not producing any heat.
Important SafetyInstructions Safety Features Controls How to Use Cleaning Storage Reset Heater Troubleshooting
WARRANTY
Product name:
Customer name:
Contact number:
Customer address:
Product model:
Factory number:
Factory date:
Warranty content:
Customer signature:
after-sales:
satisfied not satisfied
01
Warranty content:
Customer signature:
after-sales:
satisfied not satisfied
02
Warranty content:
Customer signature:
after-sales:
satisfied not satisfied
03
Table of contents
Popular Heater manuals by other brands

Rotex
Rotex RKBUHAA6V3 Installation and operation manual

Mondial Designs Limited
Mondial Designs Limited A-08 instruction manual

Clas Ohlson
Clas Ohlson NYQB7 manual

Volvo
Volvo 31373831 installation instructions

HearthRite
HearthRite HR20EN-1 OWNER'S OPERATION AND INSTALLATION MANUAL

ARDES
ARDES AR4B03 Instructions for use


