Heatline Retro-DWS User manual

Patented
LEVITON
WARNING
TOPROTECT AGAINST
ELECTRONICSHOCK TEST
BEFOREEACH USE.
1.PLUG INTO RECEPTACLE.
2.IF LIGHT IS NOTON,
PRESSAND RELEASE
RESETBUTTON - LIGHT
SHOULDCOME ON.
3.PRESS TEST BUTTON -
LIGHTMUST GO OFF
4.PRESS AND RELEASE
RESETBUTTON AGAIN
FORUSE.
DONOT USE IF TEST FAILS
RAINPROOF
DONOT IMMERSE
1L3710
TEST
TEST
RESET
RESET
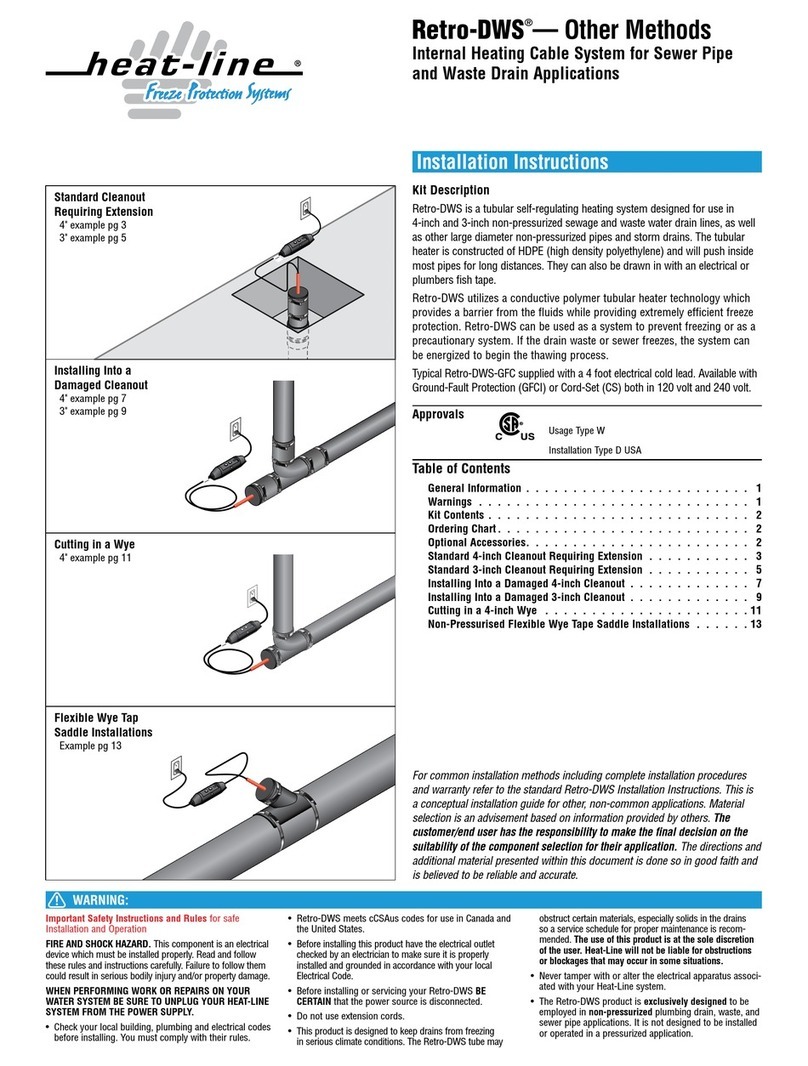
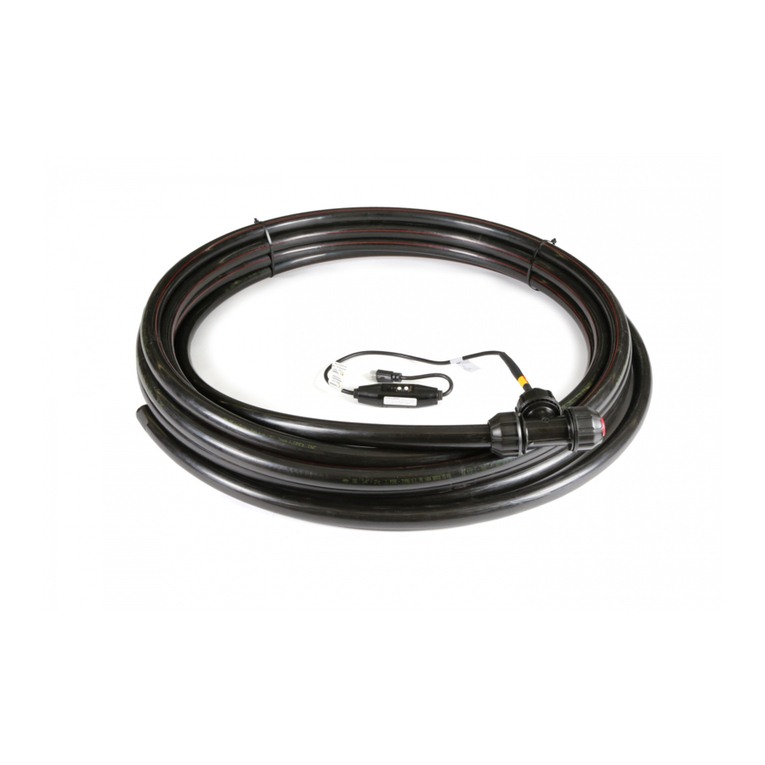
Kit Description
Retro-DWS is a tubular self-regulating heating system designed for use in
4-inch and 3-inch non-pressurized sewage and waste water drain lines, as well
as other large diameter non-pressurized pipes and storm drains. The core tube
is constructed of HDPE (high density polyethylene) and will push inside most
pipes for long distances. They can also be drawn in with a fish tape.
Retro-DWS utilizes a conductive polymer tubular heater technology which
provides a barrier from the fluids while providing extremely efficient freeze
protection. Retro-DWS can be used as a system to prevent freezing or as a
precautionary system. If the drain waste or sewer freezes, the system can be
energized to begin the thawing process.
Retro-DWS is supplied with all of the necessary fittings to fit a 4-inch or 3-inch
pipe at a clean out or other entry point. The Retro-DWS can be easily adapted
to fit larger pipe diameters if required by using readily available, industry stan-
dard components.
Available with Ground-Fault Protection (GFCI) or Cord-Set (CS) both in
120 volt and 240 volt.
For installation of Retro-DWS into other applications refer to Retro-DWS
Other Methods document.
LEVITON
WARNING
TOPROTECTAGAINST
ELECTRONICSHOCKTEST
BEFOREEACHUSE.
1.PLUGINTORECEPTACLE.
2.IFLIGHT IS NOT ON,
PRESSANDRELEASE
RESETBUTTON-LIGHT
SHOULDCOMEON.
3.PRESSTESTBUTTON -
LIGHTMUSTGOOFF
4.PRESSANDRELEASE
RESETBUTTONAGAIN
FORUSE.
DONOTUSE IF TEST FAILS
RAINPROOF
DONOTIMMERSE
1L3710
TEST
TEST
RESET
RESET
Approvals
Usage Type W
Installation Type D USA
Table of Contents
General Information . . . . . . . . . . . . . . . . . . . . . . . . 1
Warnings . . . . . . . . . . . . . . . . . . . . . . . . . . . . . 1
Kit Contents . . . . . . . . . . . . . . . . . . . . . . . . . . . . 2
Ordering Chart. . . . . . . . . . . . . . . . . . . . . . . . . . . 2
Optional Accessories. . . . . . . . . . . . . . . . . . . . . . . . 2
Standard 4-inch Cleanout Instructions . . . . . . . . . . . . . . . 3
Standard 3-inch Cleanout Instructions . . . . . . . . . . . . . . . 5
Control Devices and Insulation Installation . . . . . . . . . . . . . 7
Electrical System Connection . . . . . . . . . . . . . . . . . . . 9
Limited Warranty . . . . . . . . . . . . . . . . . . . . . . . . .10
Extended Warranty Application Form . . . . . . . . . . . . . . . . 11
Important Safety Instructions and Rules for safe
Installation and Operation
FIRE AND SHOCK HAZARD.This component is an electrical
device which must be installed properly. Read and follow
these rules and instructions carefully. Failure to follow them
could result in serious bodily injury and/or property damage.
WHEN PERFORMING WORK OR REPAIRS ON YOUR
WATER SYSTEM BE SURE TO UNPLUG YOUR HEAT-LINE
SYSTEM FROM THE POWER SUPPLY.
• Check your local building, plumbing and electrical codes
before installing. You must comply with their rules.
• Do not force the Retro-DWS into the pipe to the point
where the pipe creases and bends
• Do not install the Retro-DWS interface connection in a
manner which would render it non-serviceable.
• Retro-DWS meets cCSAus codes for use in Canada and
the United States.
• Before installing this product have the electrical outlet
checked by an electrician to make sure it is properly
installed and grounded in accordance with your local
Electrical Code.
• Before installing or servicing your Retro-DWS BE
CERTAIN that the power source is disconnected.
• Do not use extension cords.
• This product is designed to keep drains from freezing
in serious climate conditions. The Retro-DWS tube may
obstruct certain materials, especially solids in the drains
so a service schedule for proper maintenance is recom-
mended. The use of this product is at the sole discretion
of the user. Heat-Line will not be liable for obstructions
or blockages that may occur in some situations.
• Never tamper with or alter the electrical apparatus associ-
ated with your Heat-Line system.
• The Retro-DWS product is exclusively designed to be
employed in non-pressurized plumbing drain, waste, and
sewer pipe applications. It is not designed to be installed
or operated in a pressurized application.
Retro-DWS®
Internal Heating Cable System for
Non-Pressurized Sewer and Waste Drain Pipes
Installation Instructions

Retro-DWS Installation
2of 12
Optional Accessories
HLA-120 General purpose 120V, plug-in thermostat (for GFC models)
GFA-STAT NEMA 4X Ground Fault Protected Adjustable Thermostat
120V/240V 30amp (for CS models)
MA-10 GFCI/ELCI Electrical Equipment Protection Device
(for CS models)
TIMER-120P 120V plug-in timer (for GFC models)
TIMER-240P 240V plug-in timer (for GFC models)
TIMER-CS 120/240V hard wire timer (for CS models)
INSUL-FOIL Aluminum reflective metalized foil bubble insulation
FOIL-TAPE Professional Grade All Weather Foil Tape 2.83 inches x
150 feet (72mm x 46m)
INSUL-3.00 Polyethylene insulation sleeve for 3 inch ID pipe (6 feet
long, 3 1/2 inch ID, ¾ inch thick wall)
INSUL-4.00 Polyethylene insulation sleeve for 4 inch ID pipe (6 feet
long, 4 1/2 inch ID, 1 inch thick wall)
HLP-TAPE Black wrap tape for sealing insulation ends together 2
inches x 100 feet (50.8mm x 3m)
TORQ-60 No hub torque wrench automatic release at 60 IN. LB.
WARRANTY Extended 10 year limited product warranty
Ordering Chart
Example: DWS – 5 – 100 – GFC
Cord-Set Type
GFC Ground Fault Protected CS Cord Connected (No GFCI)
Max length Max length
5 watt / 120 volt 230 ft 270 ft
8 watt / 120 volt 150 ft 200 ft
5 watt / 240 volt 460 ft 540 ft
8 watt / 240 volt 300 ft 400 ft
Length of Heater
Product
DWS 120 volt (100-130 volt) Retro-DWS
DWS2 240 volt (208-277 volt) Retro-DWS
Wattage
5 5 watts self-regulating heater (standard)
8 8 watts self-regulating heater
Retro-DWS | Product Code
Note: Installers must
provide 20 Amp circuit for
Cord Set lengths greater
than maximum lengths set
for GFC
LEVITON
WARNING
TOPROTECT AGAINST
ELECTRONICSHOCK TEST
BEFOREEACH USE.
1.PLUG INTO RECEPTACLE.
2.IF LIGHT IS NOTON,
PRESSAND RELEASE
RESETBUTTON - LIGHT
SHOULDCOME ON.
3.PRESS TEST BUTTON -
LIGHTMUST GO OFF
4.PRESS AND RELEASE
RESETBUTTON AGAIN
FORUSE.
DONOT USE IF TEST FAILS
RAINPROOF
DONOT IMMERSE
1L3710
TEST
TEST
RESET
RESET
Cord-Set Version
Must be protected
with GFCI
(Ground Fault
Circuit Interrupter)
G
A
C
D
B
E
F
Kit Contents
Item Qty Description
A 1 Retro-DWS –Predetermined length (GFC shown)
B 1 Pre-drilled dissolving ballpoint
C 1 4" Flexible pipe coupler
D 1 4" x 3" Flexible pipe reducer
E 1 4" ABS Threaded male adapter SPIG X MIPT
F 1 3" ABS Threaded male adapter SPIG X MIPT
G 1 Optional Cord-Set (CS) power connection
Tools Required
• Standard screwdriver or nut driver • Torque Wrench
• Pipe Cutting Tool for 4" and or 3" ABS • Adjustable Wrench
Additional Materials Required
• Teflon tape or thread sealant

Retro-DWS Installation
3of 12
• Push the pre-drilled dissolving ballpoint onto the
end-seal of the tubular heater making sure it is
firmly in place. Then begin to feed the tubular heat-
ing cable system into the pipe through the installed
flexible coupler.
Note: The pre-drilled dissolving ballpoint is designed
to reduce the friction of the Retro-DWS tubular
heater end-seal during installation. It also aids the
passing of the tubular heater product through and
around fittings located along length the pipe.
Pre-drilled
disolving
ball point
5
1
• Loosen the clamps on
either end of the 4"
flexible pipe coupler,
do not remove the
clamps from their
seated location on the
flexible pipe coupler
body.
• Remove threaded cleanout plug.
CAUTION: Effluent may be present
when threaded cap is removed.
2
• Slide the flexible pipe coupler onto the now exposed spigot
end of the male threaded adapter fitting and tighten the clamp
to 60 inch-lb.
• Apply Teflon tape or thread sealant to the 4" ABS threaded
male adapter SPIG X MIPT.
• Make sure to apply
the Teflon tape in
the direction of the
threads to ensure it
remains tight during
threading of the
fittings.
• Thread the male
adapter into the
clean-out female entry
point.
Standard 4-inch Cleanout
3 4

Retro-DWS Installation
4of 12
• Insert the Retro-DWS pipe core into drain until the bushing
interfaces into the coupling.
Tip: Install using short, close strokes being careful not to use
force which will cause the tube to crease or bend.
LEVITON
WARNING
TOPROTECT AGAINST
ELECTRONICSHOCK TEST
BEFOREEACH USE.
1.PLUG INTO RECEPTACLE.
2.IF LIGHT IS NOT ON,
PRESSAND RELEASE
RESETBUTTON - LIGHT
SHOULDCOME ON.
3.PRESS TEST BUTTON -
LIGHTMUST GO OFF
4.PRESS AND RELEASE
RESETBUTTON AGAIN
FORUSE.
DONOT USE IF TEST FAILS
RAINPROOF
DONOT IMMERSE
1L3710
TEST
TEST
RESET
RESET
6
LEVITON
WARNING
TOPROTECT AGAINST
ELECTRONICSHOCK TEST
BEFOREEACH USE.
1.PLUG INTO RECEPTACLE.
2.IF LIGHT IS NOT ON,
PRESSAND RELEASE
RESETBUTTON - LIGHT
SHOULDCOME ON.
3.PRESS TEST BUTTON -
LIGHTMUST GO OFF
4.PRESS AND RELEASE
RESETBUTTON AGAIN
FORUSE.
DONOT USE IF TEST FAILS
RAINPROOF
DONOT IMMERSE
1L3710
TEST
TEST
RESET
RESET
7
• Tighten clamp around Retro-DWS to 60 inch-lb.
• In accordance with standard industry practices test the
integrity of the seal.
Note: Be sure not to install
the fitting interface and
electrical in a manner which
would render the system
non-serviceable.
LEVITON
WARNING
TOPROTECT AGAINST
ELECTRONICSHOCK TEST
BEFOREEACH USE.
1.PLUG INTO RECEPTACLE.
2.IF LIGHT IS NOT ON,
PRESSAND RELEASE
RESETBUTTON - LIGHT
SHOULDCOME ON.
3.PRESS TEST BUTTON -
LIGHTMUST GO OFF
4.PRESS AND RELEASE
RESETBUTTON AGAIN
FORUSE.
DONOT USE IF TEST FAILS
RAINPROOF
DONOT IMMERSE
1L3710
TEST
TEST
RESET
RESET
Coldest section
of pipe
Thermostat
sensor
Insulation
LEVITON
WARNING
TOPROTECT AGAINST
ELECTRONICSHOCK TEST
BEFOREEACH USE.
1.PLUG INTO RECEPTACLE.
2.IF LIGHT IS NOT ON,
PRESSAND RELEASE
RESETBUTTON - LIGHT
SHOULDCOME ON.
3.PRESS TEST BUTTON -
LIGHTMUST GO OFF
4.PRESS AND RELEASE
RESETBUTTON AGAIN
FORUSE.
DONOT USE IF TEST FAILS
RAINPROOF
DONOT IMMERSE
1L3710
TEST
TEST
RESET
RESET
8 9
After all plumbing fittings have been completely installed.
It is time to energize your Retro-DWS system. Carefully follow
the Electrical System Connection Instructions on page 8 and 9.
Refer to Control Devices and Insulation Installation on page 7
to complete your installation.

Retro-DWS Installation
5of 12
3 4
• Loosen the clamps on either
end of the 4" x 3" flexible
pipe reducer, do not remove
the clamps from their seated
location on the flexible reduc-
er body.
• Slide the 3" adapter side of
flexible pipe reducer onto the
now exposed spigot end of
the male threaded adapter fit-
ting and tighten the clamp to
60 inch-lb.
Pre-drilled
disolving
ball point
5
1
• Push the pre-drilled dissolving ballpoint onto the end-
seal of the tubular heater making sure it is firmly in
place. Then begin to feed the tubular heating cable sys-
tem into the pipe through the installed flexible coupler.
Note: The pre-drilled dissolving ballpoint is designed
to reduce the friction of the Retro-DWS tubular heater
end-seal during installation. It also aids the passing of
the tubular heater product through and around fittings
located along length the pipe.
• Remove threaded cleanout plug.
CAUTION: Effluent may be present
when threaded cap is removed.
2
• Apply Teflon tape or thread sealant to the 3" ABS threaded
male adapter SPIG X MIPT.
• Make sure to apply
the Teflon tape in
the direction of the
threads to ensure it
remains tight during
threading of the fit-
tings.
• Thread the male
adapter into the
clean-out female entry
point.
Standard 3-inch Cleanout

Retro-DWS Installation
6of 12
LEVITON
WARNING
TOPROTECT AGAINST
ELECTRONICSHOCK TEST
BEFOREEACH USE.
1.PLUG INTO RECEPTACLE.
2.IF LIGHT IS NOT ON,
PRESSAND RELEASE
RESETBUTTON - LIGHT
SHOULDCOME ON.
3.PRESS TEST BUTTON -
LIGHTMUST GO OFF
4.PRESS AND RELEASE
RESETBUTTON AGAIN
FORUSE.
DONOT USE IF TEST FAILS
RAINPROOF
DONOT IMMERSE
1L3710
TEST
TEST
RESET
RESET
6
• Insert the Retro-DWS pipe core
into drain until the bushing
interfaces into the coupling.
LEVITON
WARNING
TOPROTECT AGAINST
ELECTRONICSHOCK TEST
BEFOREEACH USE.
1.PLUG INTO RECEPTACLE.
2.IF LIGHT IS NOT ON,
PRESSAND RELEASE
RESETBUTTON - LIGHT
SHOULDCOME ON.
3.PRESS TEST BUTTON -
LIGHTMUST GO OFF
4.PRESS AND RELEASE
RESETBUTTON AGAIN
FORUSE.
DONOT USE IF TEST FAILS
RAINPROOF
DONOT IMMERSE
1L3710
TEST
TEST
RESET
RESET
7
• Tighten clamp around Retro-DWS to 60 inch-lb.
• In accordance with standard industry practices test the
integrity of the seal.
Note: Be sure not to install
the fitting interface and
electrical in a manner which
would render the system
non-serviceable.
LEVITON
WARNING
TOPROTECT AGAINST
ELECTRONICSHOCK TEST
BEFOREEACH USE.
1.PLUG INTO RECEPTACLE.
2.IF LIGHT IS NOT ON,
PRESSAND RELEASE
RESETBUTTON - LIGHT
SHOULDCOME ON.
3.PRESS TEST BUTTON -
LIGHTMUST GO OFF
4.PRESS AND RELEASE
RESETBUTTON AGAIN
FORUSE.
DONOT USE IF TEST FAILS
RAINPROOF
DONOT IMMERSE
1L3710
TEST
TEST
RESET
RESET
Coldest section
of pipe
Thermostat
sensor
Insulation
LEVITON
WARNING
TOPROTECT AGAINST
ELECTRONICSHOCK TEST
BEFOREEACH USE.
1.PLUG INTO RECEPTACLE.
2.IF LIGHT IS NOT ON,
PRESSAND RELEASE
RESETBUTTON - LIGHT
SHOULDCOME ON.
3.PRESS TEST BUTTON -
LIGHTMUST GO OFF
4.PRESS AND RELEASE
RESETBUTTON AGAIN
FORUSE.
DONOT USE IF TEST FAILS
RAINPROOF
DONOT IMMERSE
1L3710
TEST
TEST
RESET
RESET
8 9
After all plumbing fittings have been completely installed.
It is time to energize your Retro-DWS system. Carefully follow
the Electrical System Connection Instructions on page 8 and 9.
Refer to Control Devices and Insulation Installation on page 7
to complete your installation.

Retro-DWS Installation
7of 12
Optional to
extend heating
cable into tank
HLA-120
HE
A
T
°
WE
DAY
PM
Retro-DWS
Waste pipe
Insulation
Septic tank
HLA-120
H
E
A
T
°
WE
DAY
PM
HLA-120
thermostat
Note: Heater into tank is optional
and not required in every install
Thermostat sensor
on coldest section
of pipe
DWS-GFC Installation
with HLA-120 Thermostat
Control Devices and Insulation Installation
Control devices are not required to operate the heating
cable system. They can be added for energy efficiency.
Thermostats are used to duty cycle the system in an on/
off operation saving power consumption and maintain a
certain pipe temperature. A sensor lead must be placed on
the coldest section of pipe.
Timers are used to duty cycle the system in an on/off
operation based on preset time intervals to save on power
consumption.
Insulation is recommended for all new pipe installations,
even where the pipe is to be buried.
For existing pipe applications, insulation is only required
where the pipe is exposed to ambient outdoor tempera-
tures, and/or where the pipe is above the ground. Insulation
aids in heat retention making the heating cable more energy
efficient and providing cold weather reliability.

Retro-DWS Installation
8of 12
Note: GFCI model supplied
may be different than the
one shown.
LEVITON
WARNING
TO PROTECT AGAINST
ELECTRONIC SHOCK TEST
BEFORE EACH USE.
1. PLUG INTO RECEPTACLE.
2. IF LIGHT IS NOT ON,
PRESS AND RELEASE
RESET BUTTON - LIGHT
SHOULD COME ON.
3. PRESS TEST BUTTON -
LIGHT MUST GO OFF
4. PRESS AND RELEASE
RESET BUTTON AGAIN
FOR USE.
DO NOT USE IF TEST FAILS
RAINPROOF
DO NOT IMMERSE
1L3710
TEST
TEST
RESET
RESET
RESET
TEST
Pilot light
(120V 15A
example shown)
LEVITON
WARNING
TOPROTECT AGAINST
ELECTRONICSHOCK TEST
BEFOREEACH USE.
1.PLUG INTO RECEPTACLE.
2.IF LIGHT IS NOT ON,
PRESSAND RELEASE
RESETBUTTON - LIGHT
SHOULDCOME ON.
3.PRESS TEST BUTTON -
LIGHTMUST GO OFF
4.PRESS AND RELEASE
RESETBUTTON AGAIN
FORUSE.
DONOT USE IF TEST FAILS
RAINPROOF
DONOT IMMERSE
1L3710
TEST
TEST
RESET
RESET
Electrical System Connection
Electrical Connection for GFC (Ground Fault Plug-in) Models
A. Unpack the Retro-DWS system plug from its protective package.
B. Plug into your dedicated outlet. 120V 5-15R outlet for 120V
systems or 240V 6-15R outlet for 240V systems.
C. Push reset button on the cord set ground fault device until light
comes ON. If light does not illuminate check power to outlet. Do
not remove or tamper with the cord set. If used with a thermostat
it may be necessary to bypass the thermostat control and plug
directly into receptacle to perform test.
D. Push test button and light will go OFF. This indicates that the
electrical circuit is intact and fully protected.
E. Push reset button again and light will come ON. This indicates
that your Retro-DWS is working.
F. Follow this test procedure before each season and monthly while
in use.
Your Retro-DWS is now fully functional.
If at any time your Retro-DWS system fails to work call your local
electrician or Heat-Line for assistance at 1-800-584-4944.
Unplug when not in use.
Electrical Connection for CS (Cord-Set) Models into Junction Box
Note: The “CS” version is designed to be installed by a qualified
electrician and must be inspected by the governing electrical
authority following completion of installation.
A. Ensure the Retro-DWS system will be operated on a dedicated
ground fault protected circuit with over-current protection
appropriate for the circuit conductor size and heating cable length.
B. Confirm power is disconnected at the power supply prior to
proceeding.
C. Remove approved junction box cover.
D. Route the Retro-DWS cord-set wires into box with the supplied
strain relief fitting.
E. Connect appropriate wires together using approved wire nuts.
Match wires white to white, black to black, and green to green. In
the case of a metal junction box/enclosure, match green to ground
screw and confirm screw is tight and secured afterward.
F. Double check that the wires have been connected correctly and
tight.
G. Install junction box cover.
H. Establish power to the circuit and test/reset the ground fault
device for proper operation.
I. Test the GFCI at the breaker before each season and monthly
while in use.
Your Retro-DWS system is now fully functional.
If at any time your Retro-DWS system fails to work call your local
electrician or Heat-Line for assistance at 1-800-584-4944.
L2/N (white)
L(black)
G(green)
ZSCT
ST
GFP Ground
Fault
Protection
L2/N (white)
L(black)
G(green)
Ground
(green)
Ground
(green)
ZSCT
ST
GFP Ground
Fault
Protection
Enclosure
ground
Non-Metal Junction Box Metal Junction Box

Retro-DWS Installation
9of 12
Electrical Connection for CS models installed with the optional GFA-STAT (FPT-130)
A. Ensure the Retro-DWS system will be operated on a dedicated
circuit with over-current protection appropriate for the circuit
conductor size and heating cable length.
Note: GFA-STAT (FPT-130) includes ground fault protection.
B. Confirm power is disconnected at the power supply prior to
proceeding.
C. Remove front cover of the GFA-STAT.
D. Remove black strain relief from the Retro-DWS power cord.
E. Route the Retro-DWS cord-set wires through strain relief fitting
supplied with the GFA-STAT.
F. Follow electrical guidelines per the GFA-STAT (FPT-130)
manual included with your GFA-STAT unit.
G. Double check that the wires have been connected correctly.
H. Establish power to the circuit and test/reset the ground fault
device for proper operation.
I. Test the GFA-STAT GFCI before each season and monthly while in use.
Your Retro-DWS system is now fully functional.
If at any time your Retro-DWS system fails to work call your local
electrician or Heat-Line for assistance at 1-800-584-4944.
GFA-STAT
Input
power Heating
cable
Temperature
sensor
Alarm
Temperature sensor
Alarm
L2/N (white) L2/N (white)
Input
power
Heating
cable
L(black) L(black)
White
Black
Black
Ground
(green)

Retro-DWS Installation
10 of 12
During the time periods and subject to the conditions hereinafter set
forth. Heat-Line will repair or replace to the original user any portion
of your Retro-DWS product which proves defective in materials or
workmanship of Heat-Line. Contact Heat-Line or your installer for
warranty service.
At all times Heat-Line shall have and possess the sole right and option
to determine whether to repair or replace defective equipment, parts
or components. Damage due to natural events or conditions beyond
the control of Heat-Line are NOT COVERED BY THIS WARRANTY.
STANDARD WARRANTY PERIOD: 60 months from date of purchase or
63 months from date of manufacture, which ever occurs first.
EXTENDED WARRANTY PERIOD: 120 months from date of purchase or
123 months from date of manufacture, which ever occurs first.
ACCESSORIES, COMPONENTS, ELECTRONICS: Not manufactured by
Heat-Line, are warranted only to the extent of original manufacturer’s
warranty.
LABOUR, COSTS, ETC.: Heat-Line shall in NO EVENT be responsible
or liable for the cost of field labour or other charges incurred by any
customer in removing and/or reaffixing any Heat-Line product, part or
component thereof.
THIS WARRANTY WILL NOT APPLY:
(a) to defects or malfunctions resulting from failure to properly
install, operate or maintain the unit in accordance with printed
instructions provided,
(b) to failures resulting from abuse, accident or negligence;
(c) to normal maintenance services and
(d) to parts not used in accordance with applicable local codes, ordi-
nance and good trade practices;
(e) if the unit is moved from its original installation location or
(f) if the unit is used for purposes other than for what it was
designed and manufactured,
(g) to the integral ground fault device and related electronics.
PRODUCT IMPROVEMENTS: Heat-Line reserves the right to change
or improve its products or any component thereof without being obli-
gated to provide such a change or improvement for units sold and/or
shipped prior to such change or improvement.
WARRANTY EXCLUSIONS: As to any Heat-Line product after the expi-
ration of the time period of the warranty applicable thereto as set forth
above. There will be no warranties including any implied warranties of
merchantability or fitness for any particular purpose. No warranties or
representations at any time made by any representative of Heat-Line,
shall vary or expand the provisions hereof.
LIABILITY LIMITATION: In no event shall Heat-Line be liable or respon-
sible for consequential, incidental or special damages resulting from
or related in any manner to any Heat-Line product or parts thereof. In
the absence of suitable proof of the purchase date, the effective date of
this warranty will be based upon the date of manufacture plus 90 days.
Limited Warranty
Heat-Line Freeze Protection Systems
1095 Green Lake Road
Algonquin Highlands, ON Canada
K0M 1J1
Tel: 1-705-754-4545
1-800-584-4944
Fax: 1-705-754-4567
www.heatline.com
Important: All information, including illustrations, is believed to be reliable. Users, however, should
independently evaluate the suitability of each product for their particular application. Heat-Line a Division of
Christopher MacLean Ltd. makes no warranties as to the accuracy or completeness of the information, and
disclaims any liability regarding its use. Heat-Line's only obligations are those in the Heat-Line Standard Terms
and Conditions of Sale for this product, and in no case will Heat-Line be liable for any incidental, indirect, or
consequential damages arising from the sale, resale, use, or misuse of the product. Specifications are subject to
change without notice. In addition, Heat-Line reserves the right to make changes—without notification to Buyer—
to processing or materials that do not affect compliance with any applicable specification.
Heat-Line and Retro-DWS are registered trademarks of Heat-Line Corporation.
© 2019 Heat-Line a division of Christopher MacLean Ltd.09/20

11 of 12
Retro-DWS
Warranty Form
CONGRATULATIONS!
You have just purchased the most advanced internal freeze-protection system available on the market,
backed by the finest warranty offered in the industry. Your Retro-DWS system comes with a standard 5 year
limited warranty with an optional 10 year limited warranty available.
~ The warranty applies only to the original purchaser of the product and is not transferable at any time for any reason.
The warranty form must be filled out and returned to Heat-Line within 6 months of invoice date or unit manufactured date plus
9 months to be eligible for the 10 year extended warranty. ~
OWNER MAILING ADDRESS INSTALLATION ADDRESS (if different than mailing)
Name Name
Address Address
City City
Prov/State Postal/ZIP Prov/State Postal/ZIP
Country
¨Canada ¨Other: Country
¨USA
Home Phone Work/Cell
Email
PRODUCT INFORMATION
Product Cat.#
Installation Type: ¨Sewage
¨Grey water
¨Drain
¨Other:
Serial #
Length
WARRANTY INFORMATION
5 Year Limited Warranty: INCLUDED! ¨10 Year Limited Warranty: $1.75 / foot ($75.00 minimum)
PAYMENT DETAILS FOR 10 YEAR LIMITED WARRANTY
System Length* System Length* = Subtotal
Units 1 to 540 feet = $1.75 per foot OR $75.00 minimum x $ 1.75/ft
* For custom lengths involving inches, round up to the nearest foot
Taxes and Currency
If Canadian Address: Subtotal: If U.S. Address or Other Country:
Provincial Tax %: Tax Due: No Taxes Apply
Total in CDN Currency: Total in US Currency:
PAYMENT METHOD
¨Cheque Credit Card: ¨Mastercardor ¨Visa
Enclose and make out to Heat-Line for full amount
Name on Card:
Card Number: __ __ __ __ __ __ __ __ __ __ __ __ __ __ __ __
Expiration Date: __ __ __ __

12 of 12
LIMITED WARRANTY
During the time periods and subject to the conditions hereinafter set forth.
Heat-Line will repair or replace to the original user any portion of your
Retro-DWS product which proves defective in materials or workmanship
of Heat-Line. Contact Heat-Line or your installer for warranty service.
At all times Heat-Line shall have and possess the sole right and option
to determine whether to repair or replace defective equipment, parts or
components. Damage due to natural events or conditions beyond the
control of Heat-Line are NOT COVERED BY THIS WARRANTY.
STANDARD WARRANTY PERIOD: 60 months from date of purchase or 63
months from date of manufacture, which ever occurs first.
EXTENDED WARRANTY PERIOD: 120 months from date of purchase or 123
months from date of manufacture, which ever occurs first.
ACCESSORIES, COMPONENTS, ELECTRONICS: Not manufactured by
Heat-Line, are warranted only to the extent of original manufacturer’s
warranty.
LABOUR, COSTS, ETC.: Heat-Line shall in NO EVENT be responsible
or liable for the cost of field labour or other charges incurred by any
customer in removing and/or reaffixing any Heat-Line product, part or
component thereof.
THIS WARRANTY WILL NOT APPLY:
(a) to defects or malfunctions resulting from failure to properly install, operate
or maintain the unit in accordance with printed instructions provided,
(b) to failures resulting from abuse, accident or negligence;
(c) to normal maintenance services and
(d) to parts not used in accordance with applicable local codes, ordinance
and good trade practices;
(e) if the unit is moved from its original installation location or
(f) if the unit is used for purposes other than for what it was designed and
manufactured,
(g) to the integral ground fault device and related electronics.
PRODUCT IMPROVEMENTS: Heat-Line reserves the right to change or
improve its products or any component thereof without being obligated
to provide such a change or improvement for units sold and/or shipped
prior to such change or improvement.
WARRANTY EXCLUSIONS: As to any Heat-Line product after the expira-
tion of the time period of the warranty applicable thereto as set forth
above. There will be no warranties including any implied warranties of
merchantability or fitness for any particular purpose. No warranties or
representations at any time made by any representative of Heat-Line, shall
vary or expand the provisions hereof.
LIABILITY LIMITATION: In no event shall Heat-Line be liable or responsible
for consequential, incidental or special damages resulting from or related
in any manner to any Heat-Line product or parts thereof. In the absence of
suitable proof of the purchase date, the effective date of this warranty will
be based upon the date of manufacture plus 90 days.
PROOF OF PURCHASE
If a proof of purchase copy is submitted with this warranty application form, the warranty period will be effective as of invoice date. In the absence of
suitable proof of purchase, the effective date of this warranty will be based upon the date of unit manufacture plus 3 months.
Proof of purchase (invoice) attached: ¨ Yes¨No
By signing below you acknowledge you have read and understand the full limited warranty document.
Signed: Dated:
The warranty form must be filled out and returned to Heat-Line within 6 months of invoice date or
unit manufactured date plus 9 months to be eligible for 10 year extended warranty.
© 2019 Heat-Line a division of Christopher MacLean Ltd.09/20
Heat-Line and Retro-DWS are registered trademarks of Heat-Line Corporation.
Heat-Line Freeze Protection Systems
1095 Green Lake Road /Algonquin Highlands,
ON Canada
/K0M 1J1 /[email protected] /www.heatline.com
Other manuals for Retro-DWS
1
Table of contents
Other Heatline Heating System manuals
