heddier electronic Smallwonder SWA-2X60 User manual

Operating Manual Smallwonder Amp 2X60(C)
Page: 1
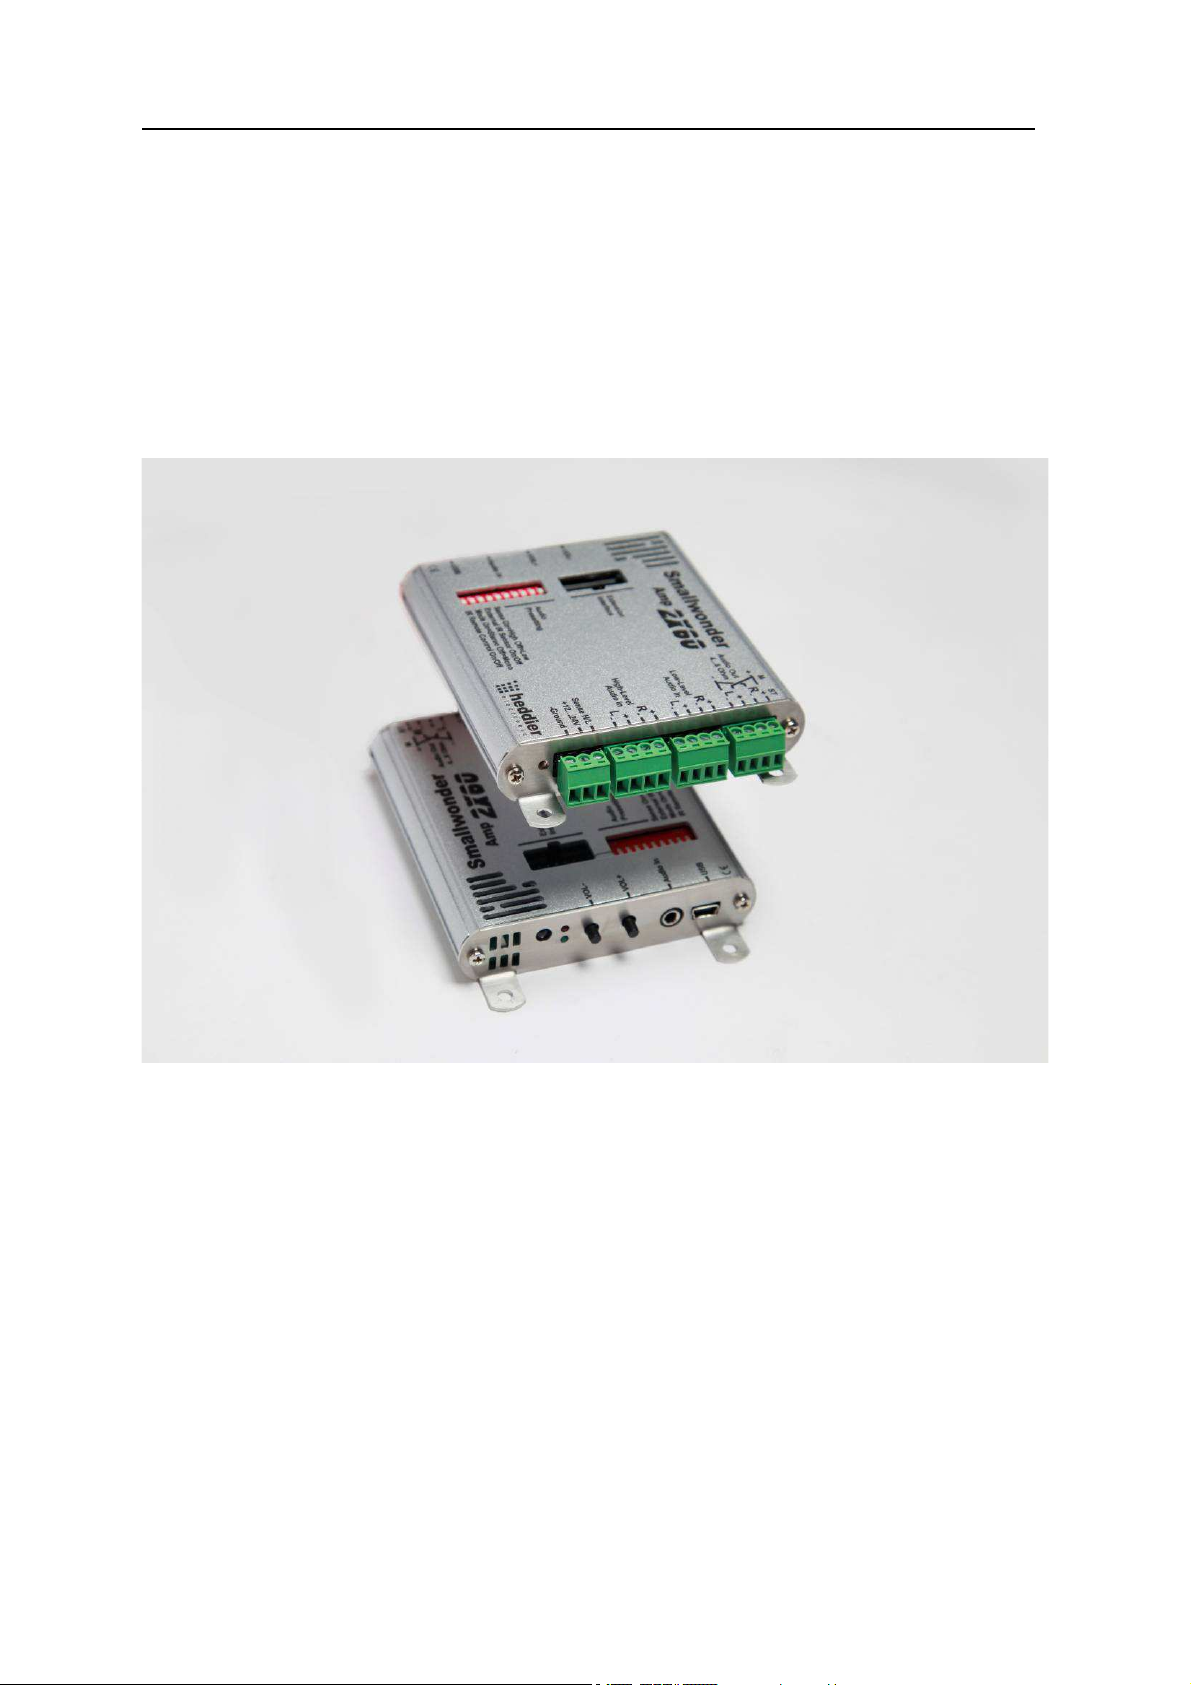
The ultra-compact mounting amplifier
Smallwonder SWA-2X60
Copyright notice: This document is copyright protected and is the property of heddier electronic
Gesellschaft für innovative Datensysteme mbH (in short: heddier electronic GmbH). Reproduction of
any kind is not permitted without written permission.
Smallwonder Amp is a registered trademark of heddier electronic GmbH. Bluetooth is a registered
trademark of the Bluetooth Special Interest Group. iOS is a trademark of Apple Inc.. Android is a
trademark of Google Inc..
heddier electronic GmbH has the right to modify technical characteristics without notice. Technical
errors are accepted.
Manual 7.1/13En

Operating Manual Smallwonder Amp 2X60(C)
Page: 2
Congratulations on your purchase of the Smallwonder Amplifier
Thank you for choosing the ultra-compact mounting audio amplifier Smallwonder Amp 2X60. All its
components have been carefully selected with the aim to meet the highest demands of sound
transmission. The fine price-performance ratio distinguishes this high-quality and potent mounting
amplifier from other comparable products.
The Smallwonder Amp 2X60 is especially designed for installation in furniture, vehicles and similar
objects. Thanks to its high-performance digital signal processor, it perfectly adapts to the respective
surrounding and setting into which it is to be incorporated. The modifiable transmission functions allow
operation of both surface acoustic speakers and regular speakers. The Smallwonder Amp turns any
smartphone and MP3 player into a powerful audio system.
Please take some time to read these instructions carefully. Only by following the instructions will you
be able to hook up this device in the technical proper way so as to put it into operation in order to get
to the best sound possible.
Upon request we offer special trainings on how to install the Smallwonder Amp amplifier to our
industrial and trade partners. If desired, our technicians will support you when fitting your products with
the mechanical vibration sound speakers and amplifiers.

Operating Manual Smallwonder Amp 2X60(C)
Page: 3
Table of contents
Page Description
4 Safety guidelines
5 Scope of delivery
6 – 7 Control elements and connections
8 Remote control
9 - 10 Instructions for installation
11 - 18 Functional descriptions
Power on/off
Standby mode
Bluetooth pairing
DIP switches
IR remote control
Protective mechanisms
LED status
18 Automatic self-test
19 - 30 Smallwonder Amp software
Installation software for Configurator software
Configurator software for programming
31 APP interface
32 - 33 Optional equipment
230 volt build-in power supply SWA-PS
External Bluetooth pairing key
External IR receiver
External Bluetooth antenna
19“ Carrier frame for rack mounting
34 Installation surface acoustic speaker
35 Technical data
36 Technical drawings and drilling template
37 - 38 Troubleshooting
39 Warranty conditions

Operating Manual Smallwonder Amp 2X60(C)
Page: 4
Safety guidelines
The Smallwonder Amp amplifier is designed and manufactured according to the latest quality and
safety standards. However, we kindly ask you to observe the following instructions on installation and
use:
1. Learn about safety
Read the entire operating manual prior to operating the device. Keep the manual in a safe place.
Observe all safety guidelines depicted in this manual.
2. Intrusion of objects and liquids
Prevent any kind of intrusion of objects or liquids into the housing of the Smallwonder Amp amplifier.
If, however, this should occur, immediately unplug the device from the power supply and return the
device to an authorized dealer or the manufacturer for inspection.
3. High temperature
Keep the device away from any kind of fire, candles, heating or other appliances producing heat.
Never install the device in highly flammable objects.
4. Ventilation
Take care to ensure sufficient space for ventilation around the device. The device is fitted with an
over-temperature protection and automatically switches off in case of overheating.
5. Temperature
This product was designed for use at temperatures ranging from -20 ° C to + 70 ° C. Operating
outside of these parameters should be avoided and can cause permanent damage.
6. Installation
Install the unit on flat, dry and solid ground. The Smallwonder Amp must not be exposed to
excessive heat such as sunshine, heaters, fires or the like.
7. Cleaning
Use a dry cloth for cleaning and dusting. Do not use any kind of liquid to clean the device.
8. Power Supply
Never connect the device directly to a 230 volt power line. Operation is only permitted using a suitable
power supply (primarily 230 volt AC and secondarily 12 volt to 24 volt DC). If in doubt, contact your
electrician or your suppliers.
WARNING: Never open the housing of the amplifier. The device does not contain any components
that require maintenance. Please leave possible repairs to qualified personnel only.
To avoid damage, please note the following:
1. Remove no screws from the device, lids or housing parts.
2. Do not expose the device to rain or moisture.
3. Leave maintenance and repair work to qualified personnel only.

Operating Manual Smallwonder Amp 2X60(C)
Page: 5
Scope of delivery
Inspect the content of the package for external damage to the carton packaging and for completeness
and intactness of the content.
Smallwonder Amp 2X60 amplifier
CD-ROM featuring documentation and Configurator software
Mini USB cable for programming the amplifier
12V DC power cable
Getting started guide

Operating Manual Smallwonder Amp 2X60(C)
Page: 6
Control elements and connections
Control elements/connections on the top of the device
APP interface for optional expansions
DIP switch for controlling operating functions such as audio pre-setting, sense input,
external IR receiver, stereo / mono switch and IR remote control
Control elements/connections on the front of the device
E Installation position for external (optional) Bluetooth antenna
IR receiver for remote control
Status LED red
Status LED green
VOL - decreasing the volume
VOL + , increasing the volume
AUX port, external AUDIO IN connector, 3.5mm stereo jack
USB port, external USB port for programming the amplifier

Operating Manual Smallwonder Amp 2X60(C)
Page: 7
Control elements/connections on the rear of the device
Operating voltage, ground, GND
Operating voltage + V, + 12 - 24 volts DC, max. 8 Ampere
Sense line H / L for automatic activation
High-level audio In left channel ground (L-)
High-level audio In left channel (L +)
High-level audio In right channel ground (R-)
High-level audio In right channel (R +)
Low-level audio In left channel ground (L-)
Low-level audio In left channel (L +)
Low-level audio In right channel ground (R-)
Low-level audio In right channel (R +)
Audio Out 4 - 8 ohms (L-)
Audio Out 4 - 8 ohms (L+)
Audio Out 4 - 8 ohms (R-)
Audio Out 4 - 8 ohms (R+)

Operating Manual Smallwonder Amp 2X60(C)
Page: 8
Remote control
Please keep the remote control in safe place. On request, all functions of the remote control can be
deactivated via DIP switches. Depending on the installation situation, this is an option in situations in
which the operator does not want to allow the user to change the settings of the Smallwonder
Amplifier.
Remove the battery protector before first use. The battery protector keeps the battery from discharging
should a key be pressed continuously while still being stored within the carton.
Caution! The remote control of the Smallwonder Amp uses lithium batteries. The battery must be
replaced once all power is used up. Please make sure to use CR2025 batteries only and mind the
polarity. Never throw the old battery into the fire. The battery may explode and release toxic
substances.
Key
Func
tion
Pairing
Confirmation key for coupling a Bluetooth
device with the Smallwonder Amp
Bluetooth
Selector key for Bluetooth Audio In
AUX Selector key for AUX Audio In
Power
Smallwonder Amp on/off
F Special function key
0 ... 9 Keys for selection of special functions
On Activate special function
Off Deactivate special function
DSP Digital signal processor on/off
PFT Not programmed; optional expansion
Mute
Mute, audio off
VOL Volume increase/decrease +/-
Bass Bass increase/decrease +/-
Treble Treble increase/decrease +/-
Balance Balance right / left audio channel

Operating Manual Smallwonder Amp 2X60(C)
Page: 9
Instructions for installation
After you have checked the contents of the package and once you are familiar with the control
elements and ports, you can proceed with installation of the Smallwonder Amp. First of all, however,
make sure to carefully read through this part of the installation guide.
This guide does not give instructions on how to install speakers; when guiding you along the process
of installing the Smallwonder Amp, we assume that the device is already equipped with properly
working speakers.
Caution! Only when all installation work has been completed, must the operating voltage be switched
on. Do not remove any cables or connectors during operation.
Step 1: Selection of the installation location
Select a suitable location for the installation of the Smallwonder Amp amplifier. The location should
be large enough and cool enough, not damp, well ventilated and easily accessible for maintenance
and repair.
The installation site must be chosen to ensure that overheating of the Smallwonder Amp is
prevented. Similarly, at low installation height (e.g. 19 mm), adequate ventilation or cooling is to be
ensured. In the event of overheating, the amplifier will turn off as a matter of precaution (see chapter
on protection mechanisms).
Likewise, the location should be chosen in a way that the maximum cable length does not, if possible,
exceed 3 m. Cables longer than 3 m may cause loss of power. For longer distances, cables with a
larger diameter must be used.
Step 2: Mounting the amplifier
Fix the amplifier with at least 4 screws at the mounting location. If desired, make sure that the amplifier
is within reach of the IR remote control.
Step 3: Installation and connection of power supply (alternatively battery operation)
Install the power supply required for operation and observe the safety regulations that ought to be
applied. Connection of permanently energized electrical cables and lines of 230 volts is to be carried
out by trained and authorized personnel only. An alternative for use in vehicles may be a 12 or 24 volt
battery.
Connect the amplifier to the terminals of the power supply/battery. Pay attention to the cables correct
polarity. Use the power cord included in the delivery. Do not turn on the power supply yet and do not
connect the amplifier to the battery.
Step 4: Connecting the speakers
The next step is to connect the preferred speakers or surface acoustic speakers.
You can choose between a stereo jack (standard with conventional speakers) and a mono jack
(usually the better alternative when using surface acoustic speakers).
Mono operation

Operating Manual Smallwonder Amp 2X60(C)
Page: 10
Mono operation is a proper mode if only one speaker or surface acoustic speaker is to be operated.
The two "+" channels and the two "-" channels are bridged according to the circuit diagram as
illustrated above. In addition, the DIP 9 switch must be set to "off". In mono operation, the speaker’s
maximum power is 120W. The speaker selected has to have an impedance of 4 - 8 Ω.
Stereo operation
The stereo mode is applied when two speakers are to be connected. The connection corresponds to
the above diagram. In addition, the DIP 9 switch must be set to "On". In stereo mode, the speakers
can be used with a maximum output of 2 x 60W. The selected speakers have an impedance of 4 - 8
Ω.
Step 5: Connecting the sense line (only if necessary)
Connect the sense line (for example, ignition in the car). Depending on the configuration, the
Configurator software or DIP switch, the Smallwonder Amp can automatically be switched on and off.
Step 6: Connecting an external IR receiver (only if necessary)
If the installation location is hidden and you want to work with the IR remote control, connect the
external IR receiver (article SWA items IRE). Afterwards, install it at the desired location.
Step 7: Connecting an external Bluetooth pairing key (only if necessary)
If you want to work with the external Bluetooth pairing key (article SWA-BPT), it is now possible to
connect and install it at the desired location.
Step 8: Finishing works
Check all connections once again. Cables should be secured with suitable material. In particular, when
using surface acoustic speakers, it is important that no cables or other parts come into to contact with
the vibrating surface without previously having been fixed.
Step 9: Switching on
Connect the power supply to the 230 volt mains or connect the battery. The amplifier automatically
turns on and is now in standby mode. Activate the Smallwonder Amp amplifier by using the remote
control. For a first test, connect to a signal source via cable or Bluetooth. Adjust the volume to your
liking by remote control or via the key situated on the front panel of the amplifier.
You can now make all the desired settings by using the remote control or via Configurator software.
The installation work has been completed. We hope you enjoy using the Smallwonder amplifier.

Operating Manual Smallwonder Amp 2X60(C)
Page: 11
Functional descriptions
The following section describes the different functions of the Smallwonder Amp. You will only
occasionally need very a few of these functions. Nevertheless, please read the functional descriptions
carefully. This way, you can make sure that you are familiar with all possible functions of your
amplifier.
Power on/off
The Smallwonder Amp switches on automatically when powered from the AC adapter or battery.
After only a few seconds it is detected by devices featuring Bluetooth and can play music via the
internal inputs. In order to switch it off, all you need to do is to cut the supply voltage by, for example,
using a switchable outlet socket.
Standby mode
In standby mode, the Smallwonder Amp has extremely low power consumption. This mode can be
set up in three different ways:
1. The Smallwonder Amp is set to standby via remote control.
2. The Smallwonder Amp automatically switches to standby mode as soon as the audio
signal is not detected any longer (via Bluetooth or AUX inputs). Once it detects a signal
again, the Smallwonder Amp automatically "awakes" from standby mode.
3. If the sense input is connected, the Smallwonder Amp "awakes" from stand mode as
soon as this input is supplied with voltage. If there is no voltage, the amplifier is set back
to standby mode. This mode, for example, can be used when the amplifier is to be
installed in a car (ignition on →amplifier on).
The standby mode is indicated by the red LED at the of the Smallwonder Amps front panel. The
display can also be turned off completely by using the key combination [F] + [7] + [2] + [Off]. The LED
is turned back to standby mode by entering the combination [F] + [7] + [2] + [On].
Bluetooth pairing
Bluetooth devices such as smartphones, tablets and MP3 player can be connected to the
Smallwonder Amp in four different ways. Please note that it is possible to hook up only one device at
a time to the Smallwonder Amp.
Simple pairing
This method is preferably used in the private sector. The connection with the Smallwonder
Amp directly is set directly via the Bluetooth device. The procedure may slightly vary
depending on the manufacturer and the model employed.
Please follow the following instructions (which generally apply to most of the devices):

Operating Manual Smallwonder Amp 2X60(C)
Page: 12
1. Switch on the Smallwonder Amp.
2. Switch on the device’s (e.g. Smartphone) Bluetooth function (usually to be found
under the device’s setting).
3. Scan for other available Bluetooth devices.
4. The Smallwonder Amp will be listed with the ID „Smallwonder“. Tick the ID in order
to connect. Some manufacturers require another second tick to establish a
connection. The ID "Smallwonder" can be changed according to the user’s wishes
via the Configurator software.
5. You have now successfully established a connection to the Smallwonder Amp. Now,
please open a music file that is saved on the device. Playback is carried out
automatically via the Smallwonder Amp.
Pairing via confirmation by using a push button
This type of Bluetooth pairing is perfect for locations that are highly frequented or which for
other reasons should authorize only certain individuals or a group to get access to the
Smallwonder Amp (e.g. hotel rooms or ship cabins).
To ensure this, a push button is installed at a location that cannot be publicly accessed. Only
authorized personnel are able to access the push button in order to establish pairing with the
Smallwonder Amp within a period of 180 seconds (3 minutes). Pairing is only possible within
the next 3 minutes after having pressed the key!
Pairing with confirmation via IR remote control
With this type of pairing, a connection to the Smallwonder Amp is only possible after having
pressed the remote control’s Bluetooth key for the duration of 180 seconds (3 minutes).
Pairing via PIN code
This method can only be carried via using older cell phone models. The Smallwonder Amp
receives a four-digit, numeric login PIN code via the Configurator software. If a user tries to
establish a connection with the amplifier, he will first be asked to enter the four-digit login PIN
code. If the code is incorrect, the connection will automatically be cut off. It is, however,
possible to start a new pairing afterwards.
Note: The option "Pairing with code entry" cannot be set via the Configurator software. This
pairing procedure is always selected automatically if an older mobile phone does not support
modern pairing procedures.
The following Bluetooth protocols are supported:
A2DP
The Smallwonder Amp supports audio streaming according to the A2DP standard (Advanced Audio
Distribution Profile).
AVRCP
The Smallwonder Amp receives control information according to the standard AVRCP (Audio Video
Remote Control Profile).

Operating Manual Smallwonder Amp 2X60(C)
Page: 13
DIP switches
In addition to audio pre-settings (transmission functions of the amplifier), it is also possible to set other
modes of operation. The DIP switches are located on the top of the amplifier housing and are labeled
accordingly.
The following settings can be made via the DIP switches:
Selection of desired control (DIP switch 1)
This DIP switch controls the default setting of the Smallwonder Amp. If DIP switch 1 is set to
"OFF", all of the other DIP switch settings are disabled. The basic setting of the amplifier is
then exclusively carried out via the Configurator software.
Audio pre-settings (DIP switch 2 to 4)
In addition to various standard audio pre-settings, an individual audio pre-setting can be
programmed via the Configurator software. Using the DIP switch 2 to 4 it is possible to select
different audio pre-settings.
DIP switch 2 DIP switch 3 DIP switch 4 Transmission function
OFF OFF OFF Equalizer off
OFF OFF ON For audio output with surface
acoustic speakers on wood
OFF ON OFF For audio output with surface
acoustic speakers on glass
OFF ON ON For audio output with surface
acoustic speakers on metal
ON OFF OFF For audio output with surface
acoustic speakers on lightweight
constructions and lightweight
walls
ON OFF ON Free for extensions
ON ON OFF Free for extensions
ON ON ON Individual audio output by using
Configurator software
DIP switch On Off
1 Control via DIP switch Control via software
2 Audio pre-setting 1 on Audio pre-setting 1 off
3 Audio pre-setting 2 on Audio pre-setting 2 off
4 Audio pre-setting 3 on Audio pre-setting 3 off
5 Free for extensions Free for extensions
6 Free for extensions Free for extensions
7 Sense mode high: active Sense mode low: active
8 External IR receiver: on External IR receiver: off
9 Stereo operation Mono operation
10 IR remote control allowed IR remote control locked

Operating Manual Smallwonder Amp 2X60(C)
Page: 14
Sense mode (DIP switch 7)
Via the sense mode it is possible to activate or switch off the Smallwonder Amp via an
external signal (5-24 volt). Thus, for example, when installed in a vehicle, the Smallwonder
Amp is switched on as soon as the ignition lock is activated. Installation should be performed
by trained personnel only.
Important: If the sense line is not connected, the DIP switch 7 must be set to "OFF", since the
unconnected input is set to low active.
External IR Receiver (DIP switch 8)
The Smallwonder Amp can be expanded with an external IR receiver if the installation is
located at places that are difficult to access. The IR receiver can be installed at any location,
thus ensuring that the remote control can still be used to operate the Smallwonder Amp. The
external IR receiver can be turned on and off via DIP switch 8.
Stereo / Mono (DIP switch 9)
Depending on the configuration of the speakers, this function allows for switching between
mono and stereo operation
IR remote control (Dip switch 10)
To avoid unwanted access by unauthorized persons, access to the Smallwonder Amp via IR
remote control can be completely turned off. In this case, the Smallwonder Amp can only be
controlled via the functions featured by the Bluetooth device.
The DIP switches 5 and 6 are free for possible future expansions.
IR remote control
The IR remote control can be used to modify the various settings of the Smallwonder Amp. For best
performance, make sure to guarantee continuous "visual contact" between the IR remote control and
Smallwonder Amp.
Important: If the DIP switch 10 is set to "OFF" and / or if the IR remote control is deactivated through
the Configurator software, operation via IR remote control is not possible.
An overview of the key assignment of the IR remote control has already been given in the previous
chapter "Control elements and connections". The functions and effects of the individual settings will be
explained in detail in the following section.
Pairing
If a Bluetooth pairing is set by remote control, this key can make the
Smallwonder Amp visible or it can be detected by other Bluetooth devices for
the duration of 180 seconds (3 minutes). Within this time frame, the amplifier
can be connected with the Bluetooth device
Bluetooth
The Bluetooth key allows for compulsory recognition of Bluetooth audio
streaming. This also applies if, for example, an audio signal is detected by the
AUX input. A smartphone, for example, will have a higher priority than a
connected AUX device.
Power
The power key sets the Smallwonder Amp in standby mode. When pressing it
a second time, it will wake / reactivate the Smallwonder Amp.

Operating Manual Smallwonder Amp 2X60(C)
Page: 15
AUXThe AUX key allows enforced detection of the AUX stream, even if an audio
signal is detected by the Bluetooth input. This way, for example, a connected
auxiliary device has a higher priority than a smartphone.
DSP The DSP key allows digital signal processor to be completely be switched off or
on. After shutdown all the preset filters (e.g. audio pre-setting, bass, treble,
balance, etc.) are inactive.
PFT Free for extensions
Mute
Turns the Smallwonder Amp to mute. To hear the unit again, press the mute
key once more or press VOL + / -
By VOL + Gradual increase of volume of the Smallwonder Amp.
-Gradual decrease of volume Smallwonder Amp.
Bass + Gradual increase of bass of the Smallwonder Amp.
- Gradual decrease of bass of the Smallwonder Amp.
Treble + Gradual increase of treble of the Smallwonder Amp.
- Gradual decrease of treble of the Smallwonder Amp.
Balance R Gradually changes the balance from the left to the right channel.
L Gradually changes the balance from the right to the left channel.
Key signals
On [F] + [7] + [0] + [On]
Turns on the key signal. If the Smallwonder Amp detects a valid function call
from the IR remote control, an acoustic signal is emitted. Exceptions are keys
to control the volume, bass and treble adjustment and balance.
Off [F] + [7] + [0] + [Off]
Turns off the key signals.
Automatic
activation
On [F] + [7] + [1] + [On]
If the amplifier is in standby mode and an audio stream is detected, the device
will automatically be activated and emit the audio stream. This setting is
activated by default.
Off [F] + [7] + [1] + [Off]
The Smallwonder Amp does not automatically start the playback of the audio
stream upon detection. The unit must first be switched on via IR remote
control.
Standby LED
On [F] + [7] + [2] + [On]
The red status LED emits a signal if Smallwonder Amp is set to standby
mode.
Off [F] + [7] + [2] + [Off]
When operating in standby mode, no LED is active. Thus, the standby mode
cannot be visually distinguished from the mode once the device is completely
switched off. This is vital in order to not further impair persons with increased
sensitivity to electromagnetic waves.

Operating Manual Smallwonder Amp 2X60(C)
Page: 16
Pseudo Stereo
On [F] + [8] + [1] + [On]
Enables the pseudo stereo mode. In this mode, an incoming mono signal
is processed to an artificial stereo signal and emitted as an artificial stereo
signal.
Off [F] + [8] + [1] + [Off]
Deactivates the pseudo stereo mode. An incoming mono signal is treated
as such and emitted through one channel only.
Pseudo Mono On [F] + [8] + [2] + [On]
Activates the pseudo mono mode. In this mode, an incoming stereo signal
is processed to an artificial mono signal and emitted as an artificial mono
signal.
Off [F] + [8] + [2] + [Off]
Deactivates the pseudo mono mode. An incoming stereo signal is treated
as such and emitted through both channels.
Restore Default
Settings
[F] + [1] + [0] + [0] + [On]
With this key combination the default system settings of the Smallwonder
Amp are restored. All individual settings made via remote control are lost.
Setting of the Configurator software will be retained.
Priority Bluetooth [F] + [1] + [2] + [0] + [On]
This setting permanently ensures that the Bluetooth input always has
priority over the input via cable (AUX input)
Priority AUX [F] + [1] + [2] + [1] + [On]
This setting permanently ensures that the input via cable (AUX input)
always has priority over the Bluetooth input. This feature is important, if
announcement and emergency call systems are connected by cable input.
In case of emergency calls, the Bluetooth output will automatically be
interrupted.
Save Volume
[F] + [2] + [0] + [0] + [On]
The current volume will be saved. The saved volume will be set on each
start of Smallwonder Amp.
Control - Protection
against overload
[F] + [5] + [0] + [1] + [On]
If activated, this function displays the number of occurred overload errors
by means of an audio signal (beep). Each acoustic signal corresponds to
maximum 10 errors.
.
Control - Protection
against under-voltage
[F] + [5] + [0] + [2] + [On]
If activated, this function displays the number of occurred under-voltage
errors by means of an audio signal (beep). Each acoustic signal
corresponds to maximum 10 errors.
Control - Protection
against over-voltage
[F] + [5] + [0] + [3] + [On]
If activated, this function displays the number of occurred over-voltage
errors by means of an audio signal (beep). Each acoustic signal
corresponds to maximum 10 errors.

Operating Manual Smallwonder Amp 2X60(C)
Page: 17
Control - Protection
against clipping
[F] + [5] + [0] + [4] + [On]
If activated, this function displays the number of occurred clipping
errors by means of an audio signal (beep). Each acoustic signal
corresponds to maximum 10 errors.
Control - Protection
against overheating
[F] + [5] + [0] + [5] + [On]
If activated, this function displays the number of occurred overheating
errors by means of an audio signal (beep). Each acoustic signal
corresponds to maximum 10 errors.
Protective mechanisms
The Smallwonder Amp has several built-in protective mechanisms. They protect both the
Smallwonder Amp and the connected speakers from damage.
The following protective mechanisms are integrated:
Reverse polarity protection
If the polarity of the supply voltage is accidentally reversed, the reverse polarity protection protects the
Smallwonder Amp from damage. Polarity protection is also triggered when connecting to an AC
instead of DC power source.
Caution! Voltages above 35 volts can cause permanent damage to the amplifier.
High-voltage Protection
The power consumption of the amplifier is continuously monitored. If it is too high, the device is
switched off as a precaution. Try to fix the error (e.g. excessive volume). The Smallwonder Amp is
automatically turned on again after a few seconds.
Caution! Voltages above 35 volts can cause permanent damage to the amplifier.
Low-voltage Protection
The power consumption of the amplifier is continuously monitored. If it is too low, the device is
switched off as a precaution. Try to fix the error (e.g. incorrectly set power supply, low battery). The
Smallwonder Amp is automatically turned on again after a few seconds.
Protection against distortion (clipping protection)
The audio output of the amplifier is continuously monitored. In case of excessive distortions, the
device is switched off as a precaution. Try to fix the error (e.g. overdriven input signal). The
Smallwonder Amp is automatically turned on again after a few seconds.
Protection against overheating
The operating temperature of the amplifier is continuously monitored. In case of excessive
temperatures, the device is switched off as a precaution. Try to cool down the device. The
Smallwonder Amp is automatically turned on again after a few seconds.

Operating Manual Smallwonder Amp 2X60(C)
Page: 18
LED status
The two LEDs on the Smallwonder Amp’s front panel pass on information on the device’s current
operating status and any possible errors by a combination of different signals.
The following table describes the various states of operation:
Device active
green LED:
red LED: illuminating
not illuminating
Standby
green LED:
red LED: not illuminating
illuminating
Protection
mechanism ON
green LED:
red LED: not illuminating
flashing (0,5s on, 1s off)
USB connection
detected
green LED:
red LED: flashing (0,5s on, 0,5s off; time interval: 4s)
not illuminating
Command from IR
remote control
green LED:
red LED: not illuminating for 0,3s
not illuminating
External pairing key
is pressed
green LED:
red LED: flashing rapidly (0,2s on, 0,2s off)
flashing rapidly (0,2s on, 0,2s off)
time interval: until pairing is successful or until
180s are over
Bootloader active
(firmware update)
green LED:
red LED: flashing alternately
flashing alternately
Automatic self-test
If required, the Smallwonder Amp can perform an automatic self-test. To start the self-test, follow
along these steps:
1) Disconnected the Smallwonder Amp from the mains so that it no longer carries any voltage (turn
off power supply or unplug from power supply).
2) Simultaneously press and hold VOL+ und VOL- key.
3) Switch on operating voltage (turn on power supply or plug in power supply).
The Smallwonder Amp now emits a 1000 Hz test tone in the following order:
1) 10 sec 1000 Hz test tone on left and right channels
2) 10 sec 1000 Hz test tone on left channel
3) 10 sec 1000 Hz test tone on right channel
Afterwards the amplifier will return to normal operation. With the automatic self-test you can easily
check the proper functioning of the amplifier and the speakers. Mind that minimal deviations with
regard to of the test tone’s interval and frequency are absolutely normal and do not indicate any
malfunction of the device.

Operating Manual Smallwonder Amp 2X60(C)
Page: 19
Smallwonder Amp software
The software (CD-ROM) for the Smallwonder Amp is included in the delivery and features the
following programs:
Installation software for Configurator software
Use this software to install the Configurator software. The software requires the .NET Framework
by Microsoft which can be downloaded for free at www.microsoft.de. The Configurator software
works with all current Windows personal computers.
Configurator software for programming
The Configurator software allows for easy and comfortable programming of all settings. Transmission
curves – also known as audio pre-settings – can be adjusted quickly. All settings can easily be
exported and transferred to a new system.
Note: The Configurator software offers its demanding listener to adapt the Smallwonder Amp to
achieve optimal sound quality.
Especially when surface acoustic speakers are to be used the transmission function can easily be
adapted to material that is to be applied.

Operating Manual Smallwonder Amp 2X60(C)
Page: 20
Installation software for Configurator software
The installation software installs the Smallwonder Configurator software on your personal computer.
The program serves as a simple tool to comfortably configure your Smallwonder Amp’s settings. The
Configurator software runs on the currently latest Microsoft Windows version. Please check the
download section under www.smallwonder.de for current program versions.
The software is usually needed only once to set up the Smallwonder Amp. In larger productions, it
can be used for quick programming of large quantities. The software enables you to optimize sound
quality according to one’s own individual sense of hearing.
Step 1:
Open the "ConfiguratorSetup.msi" installation
file on the CD-ROM. Confirm the installation in
the following window by clicking “Weiter”.
Screenshot translation:
The installer will guide you through the next steps of
installing the Configurator.
WARNING: This program is protected by US-
American copyright law and international copyright
agreements. Any unauthorized commercial
reproduction or distribution of this program or a part
there of is expressly prohibited by criminal and civil
law, and may result in severe civil and criminal
penalties and claims for damages.
Step 2:
Select an installation folder and specify for
which user the Configurator software should to
be installed.
Screenshot translation:
The installer will install the Configurator in the
following file:
To install to this folder, click “Weiter”. If you wish to
install the Configurator in another existing file, enter
it manually or click Browse.
Install the Configurator only for the current user or
for all users of this computer.
Table of contents
Popular Amplifier manuals by other brands

Mitsubishi Electric
Mitsubishi Electric Melservo-J3 Series MR-J3-B instruction manual

Iron sounds amplification
Iron sounds amplification JA-TMB PCB Installation/assembly guide

Primare
Primare A30.3 user guide

Brownlee Precision
Brownlee Precision 410 instruction manual

Soundstream
Soundstream TRX10000 owner's manual

Shinybow USA
Shinybow USA SB-3702 instruction manual