HEDECO Lime TWO User manual

USER MANUAL
MANUAL V2.0 - 05.01.2023
PRODUCT NAME: LIME TWO
MODEL NUMBER: H-LM020
HEDECO GMBH NÜRNBERG

Contents
1 Introduction 3
1.1 Basics . . . . . . . . . . . . . . . . . 3
1.2 First steps . . . . . . . . . . . . . . . 4
1.3 Battery . . . . . . . . . . . . . . . . . 5
1.4 Mounting/adapters . . . . . . . . . . . 7
1.5 Adaptive behaviour . . . . . . . . . . . 9
2 Menu 10
2.1 Structure . . . . . . . . . . . . . . . . 10
2.2 ISO selection . . . . . . . . . . . . . . 10
2.3 Stop resolution . . . . . . . . . . . . . 11
2.4 Button behaviour . . . . . . . . . . . . 12
3 Exposure modes 13
3.1 A: aperture priority (default) . . . . . . 13
3.2 S: shutter priority . . . . . . . . . . . 14
3.3 M: manual mode . . . . . . . . . . . . 14
3.4 EV: exposure value . . . . . . . . . . 15
3.5 Exposure Compensation . . . . . . . . 16
4
Measurement and calibration
17
4.1 Introduction . . . . . . . . . . . . . . 17
4.2 Calibration . . . . . . . . . . . . . . . 17

4.3 User calibration . . . . . . . . . . . . 18
5 General advice 20
5.1 Exposure advice . . . . . . . . . . . . 21
5.2 Exposure compensation . . . . . . . . 22
6 Technical data 25
7 Service/Cleaning 26
7.1 Cleaning . . . . . . . . . . . . . . . . 26
7.2 Dismantling . . . . . . . . . . . . . . 26
7.3 Problems . . . . . . . . . . . . . . . . 27
1

2

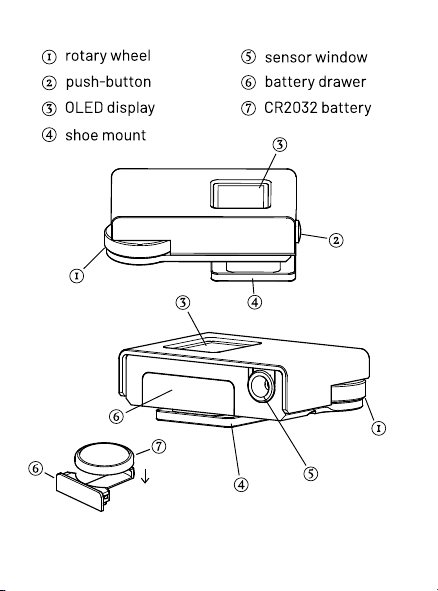
1 Introduction
1.1 Basics
This manual contains a detailed description of all the
functionality and operation of the Lime Two light me-
ter.
Formostexperiencedphotographerstheseparatequick
guide and the general advice section (section 5) are
probably enough to get the most relevant information.
Eine Schnellanleitung in deutscher Sprache gibt
es unter hedeco.de/downloads
3
1.2 First steps
The rst steps assume default settings which can be
achievedbyresettingthemeterbyreinsertingthebat-
tery.
Step by step rst use:
Attach the light meter to your camera via the acces-
sory shoe. Power the meter on by pressing the push
button . Double press the button and use the
wheel to go to the ISO screen. Press the button to
select the lm ISO using the control wheel. To go back
to the main info screen, double press again.
Being on the main info screen, rotate thecontrolwheel
to change the aperture to the desired value you also
have set on your lens. The light meter continuously
updates its reading depending on where you point the
meter at, while calculating and updating the corres-
ponding shutter speed.
When you are comfortable with a reading, transfer the
shutter speed to your camera shutter dial and take the
picture.
4

If desired, the exposurecompensation canbe changed
by simultaneously holding the button while rotat-
ing the control wheel (see section 5.2 for more on
exposure compensation).
To lock the measurement hold down the button .
Until the button is released the values are locked.
The meter shuts off automatically after 40 seconds of
not having an input.
When holding the second tap on entering the menu
for a second one can also shut off the meter manually.
This way accidental wheel movement can be avoided
for example when packing the meter away.
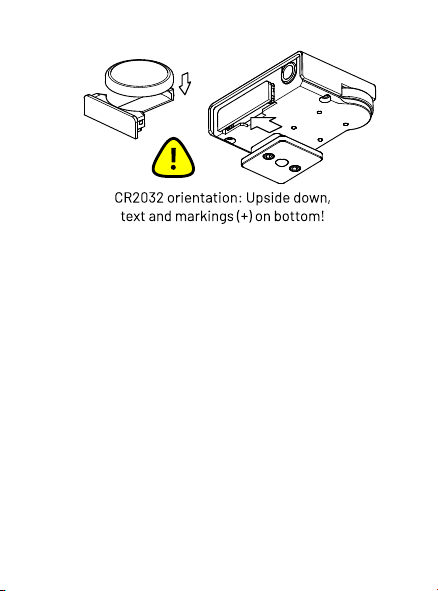
1.3 Battery
The Lime Two is designed to work with a CR 2032 coin
cell. Similarcoin cells liketheCR2025 could also work,
as long as they output 3V and have the 20mm diame-
ter, though because of their thinner size, they have a
shorter battery life.
5
The battery indication is displayed as a percentage on
the menu screen (BAT:). This is only an estimate: It
usesthe cell voltageas a way togauge the battery level,
which is affected by a lot of different factors, so the
following behaviour is expected:
• Depending on the individual coin cell, it can go
pretty fast from 100% to 90%
• Using it very heavily during a single day, it may
showalower estimateat theend of the dayand
recovers the next day
• After not using the meter for a couple weeks,
it may even show a higher estimate directly af-
6

ter powering on, going down to a more realistic
level after a moderate amount of use
Battery life should be at least 6 months with moderate
to high use.
1.4 Mounting/adapters
Thelight metercan be mountedon any accessory shoe
mount, be it a cold or a hot shoe. The sprung ball on
the bottom of the shoe mount isn't electrically con-
nected, so it should not interfere with any camera.
The meter offers left, center and right aligned mount-
ingpositions fortheshoemount (by defaulton theright).
Please follow the guide provided with the 1.5mm hex
key, since the sprung ball is clamped using the shoe
mount.
Thesprung ball can'twork in congurationswhere cam-
eras only grips the sides of the shoe mount (old Leica
cameras for example). If those mounts are worn or
lost their clamping force it can result in a loose grip.
Strips of adhesive tape (e.g. electrical tape) on the
7
This manual suits for next models
1
Table of contents


