Heimplanet Mavericks User manual

BASE CAMP/EXPEDITION TENT
GEODESIC STRUCTURE
MULTI CHAMBER SAFETY SYSTEM
ONEPUMP SYSTEM
WEIGHT . KG
HPT MAVERICKSPAT. NR.
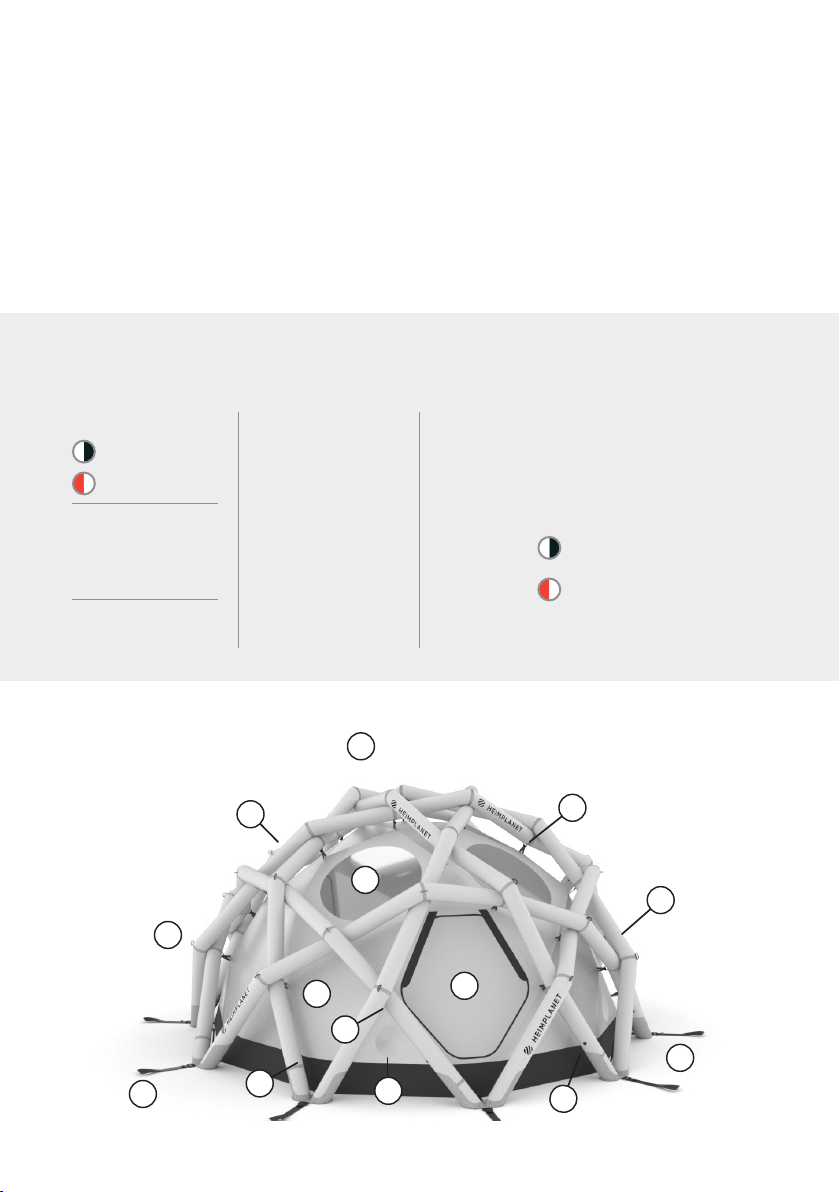
MAVERICKS
DESCRIPTION
MAVERICKS MANUAL P.NR.
Mavericks is designed to be an expedition base camp tent with the competence of a storm shelter.
It is engineered to handle wind forces up to 180km/h. With three separated entrances, a removable
floor and multiple ventilation options, it can be used in a wide range of climate conditions and can
function in various ways. Its iconic dome shape offers room for 10+ people which makes it a great
group shelter, a dining hall or communication center. With a weight of just 26.6kg, Mavericks is
packed in a duffle bag that can be checked in on commercial flights without the need for special
arrangements.
WHAT IS MAVERICKS
04
MATERIAL
AIRFRAME: RECYCLABLE MATERIAL
OUTER LAYER: EXTRA STIFF
AND RESISTANT POLYESTER
INNER LAYER: FLEXIBLE
THERMOPLASTIC POLYURETHANE
FLYSHEET: D HT x MINI RIP STOP
POLYESTER, TPU , mm
D RIP STOP POLYESTER
DWR PU mm
GROUNDSHEET: D NYLON, PU , mm
SIZE
DIAMETER INSIDE:
cm (13.5 ft)
GROUND AREA:
. m² ft²
OVERALL HEIGHT:
cm . ft
INNER HEIGHT:
cm . ft
PACKING SIZE:
X X cm³
X X in³
COLORS
WHITE, BLACK
RED, WHITE
WEIGHT
TENT GROUNDSHEET
. kg . kg
. lbs . lbs
INCLUDED
REPAIR KIT, CARRY BAG
SPECS
MAVERICKS DESCRIPTION P.NR.

MAVERICKS MANUAL P.NR.
Access and windows:
Mavericks comes with three
doors and three windows to
offer multiple access points
and a good overview of the
surrounding area (you find
more information at Access
and Windows).
The air beams feature
a tough, double-layer
construction. An air-tight
TPU (thermo-plastic
polyurethane) bladder
provides consistent air
pressure over long periods
of time. The outer sleeve
is made of an extra strong
polyester fabric, ensuring
outstanding rigidity and
durability.
Simplicity: Mavericks is
designed so that the tent
and the air frame can be set
up in one step (inflation).
This means that the air
frame and the tent must
be assembled only the
first time - after that they
remain connected and can
be pitched and packed
down together.
The Inflatable Diamond Grid
(IDG) is a self-supporting
air frame inspired by the
molecular structure of a
diamond. Its design follows
the principle of a geodesic
dome. What sets it apart
is its high stability and its
excellent surface-area-to-
volume ratio.
The patented Multi
Chamber Safety System
allows the entire air frame
(IDG) to be inflated in one
single step. The inflated
frame can then be divided
into ten separate chambers
with the one-pump
connectors, assuring
stability even if some parts
are damaged.
The IDG features ten
2-in-1-valves, each with
two closures: a one-way
valve for quick and simple
inflation of the air frame
and a large opening for easy
deflation.
So pitching and taking down
the tent is nearly effortless.
Ground fixation: There is
one extra large adjustable
webbing with a loop at each
of the 10 ground elements of
the tent frame.
Single Layer Tent:
Mavericks is designed to
be an extremely tough
base- and expedition tent
and doesn’t come with
an additional inner tent.
Through its very good
ventilation it can still be
used as a sleeping shelter if
necessary.
Lower ventilation:
Mavericks has five closable
lower ventilation areas
spread equally over the
structure to always offer a
downwind side to open (you
find more information at
Adjustable Ventilation).
Upper ventilation: Two
large and closable air vents
ensure perfect, upward air
circulation - even in the
worst conditions.
Tensioning options:
Mavericks frame comes
with multiple steel anchor
points for attaching guy
lines for additional stability
in extreme conditions (you
find more information at
Advanced Setup).
Groundsheet: The
integrated groundsheet
is completely removable
if necessary and shares
an overlapping area with
the actual tent body to
improve the floor water
resistance. (you find more
information at Ground
Area).

MAVERICKS MANUAL P.NR.
When assembling the Mavericks for the first
time, the frame and the tent are connected
to each other. Once the tent has been put
together, there is no need to repeat the first
assembly. From then on, the frame and the
tent can be unpacked and inflated to how they
were before - the tent “sets itself up”.
FIRST ASSEMBLY
You can now pump up the
IDG until the struts are fully
inflated with air. Everything
else happens by itself.
INFLATE
Spread out the inflatable
frame, and gently fill it with
air until it is erected.
SPREAD OUT IDG
Position the tent under the
erected IDG and connect the
flysheet to the struts.
CONNECT TENT
TO STRUTS
If the struts are twisted
too tightly, simply let out
a little air and correct it.
ARRANGE STRUTS
GROUNDSHEET READY TO USE TAKE DOWN
Install groundsheet if
wished.
Once you have completed
the first assembly, the
components can stay joint.
Set-up is easy from now
on: Spread out, pump up,
welcome home!
After first assembly, the
tent can be rolled up and
packed away in one piece. A
description can be found in
the next side.

MAVERICKS MANUAL P.NR.
THE COMPONENTS Mavericks consists of three components: The
frame, the tent body and the groundsheet.
Combining these three elements results in
a highly functional and stable tent that is
ready for all future adventures after the first
assembly!
A: The inflatable frame or IDG (Inflatable
Diamond Grid) maintains the construction of
the tent.
B: The tent protects against wind and weather.
C: Installing the groundsheet is recommenced
if you handle sensitive equipment, pitch on
loose or wet/dirty ground or if you consider
sleeping inside Mavericks.
In case you have heavy equipment and rocky
or hard ground or you have to wear heavy boots
all day long - we suggest using Mavericks
without the groundsheet. It is attached to the
tent body on the inside at ten points to offer
a winkle-free fit and is easily attached and
detached.
GroundsheetTent body rim Groundsheet + rim
overlapping area
B: Tent
C: Groundsheet
A: IDG
GROUNDSHEET
*
*
The flysheet includes a rim
of ground fabric for extra
water resistance. Adding
the groundsheet creates
an overlapping area which
ensures good protection
from the elements.

MAVERICKS MANUAL P.NR.
EASY SET UP
SPREAD OUT OPEN x
Inflation is quick, as the
tent pitches itself
INFLATECLOSE x
CLOSE x SECURE x GROUND FIXATION
Connect the adapter to the
valve and both to the pump
Close all valves.Lay out the tent flat
on the ground.
Disconnect the pump and
make sure all valves are
properly closed and sealed
Use the punch clips to
separate the air beams.
Apply your choice of peg
to the ground fixation
webbings and start with
adding moderate tension
to all anchor points before
applying final force for
maximum stability.
CAUTION: pegs are not
included!
Once the initial setup is complete, all you
need to do from now on is the very simple
and fast subsequent setup. Mavericks can
be assembled with two people in under ten
minutes. Thanks to its construction, this
expedition tent can even be set up alone.
The clips in the neoprene
sleeve and are easy to use.
They can be felt and operated
through the neoprene cover
by hand.
SECURE CLIPS
Open Closed
*
*

MAVERICKS MANUAL P.NR.
TAKE DOWN
RELEASE (x15)
Open all valves to release
the air.
Attention: do not be
alarmed by the sudden
noise!
Remember to remove
excess air from the struts
by pressing it out after
each fold.
FOLD
Place package in the tent
bag. Once in the bag you
can further compress the
package.
ROLL UP PACKOPEN x
Release the punch clips.
For dismantling, you can fold the assembled
components, frame, flysheet and eventually
groundsheet, together in one piece and pack
them away. It is thus quickly and easily made
available again for future use. Remember to
take all items out of the tent and make sure it
is dry, letting it air dry at home if necessary to
prevent mold.
A correctly folded tent fits
perfectly into the packsack.
To get the air frame as
deflated as possible, roll up
the tent and open it again
several times. By doing so,
more air is squeezed out
with each roll up. This is how
you compress the tent to a
minimum pack size.
TIP
*
*

MAVERICKS MANUAL P.NR.
Mavericks offers three identical entries for
maximum flexibility and to ensure good access
in various scenarios. All openings use #10 YKK
zippers which are partly covered to provide
an enhanced weather protection. All three
windows are made from transparent TPU and
ensure a good overview of the surrounding
even with all openings and doors closed.
To guarantee a good air flow Mavericks has
five closable openings to control the intake of
fresh/cold air. They are placed equally along
the ground (blue). At the top there are two large
zipper openings (red) where the warm air gets
pushed out as soon as colder air gets inside.
This chimney effect is the most effective
passive ventilation and with it’s multiple
openings you’ll always find a downwind facing
side to open.
ACCESS WINDOWS
ADJUSTABLE
VENTILATION

MAVERICKS MANUAL P.NR.
ADVANCED SETUP Mavericks is designed to withstand harsh and
most uncomfortable weather conditions. The
structure is engeneered to withstand strong
wind speeds up to 180 km/h. For moderate
conditions (<100 km/h) additional guy lines to
support the structure are not required. In case
you are expecting higher wind forces or very
strong gusts we suggest the use of guy lines to
strengthen the structure.
The frame features extra strong anchor
points (5 in each direction = total of 25). If you
are experiencing a prevailing wind direction
we suggest to start supporting the frame
windwards - depending on the wind force this
could already be sufficient. If you have strong
gusts from changing directions it is suggested
to support the frame in at least three
directions to maintain a balanced structure.
To spread the pulling force please always use
multiple anchor points in each direction.
Mavericks comes without
pegs and guy lines.
Depending on the environment
and weather conditions, the
appropriate material must
be supplemented. For more
information, please visit
WWW.HEIMPLANET.COM
CAUTION
*
*

MAVERICKS MANUAL P.NR.
The IDG is made of especially robust materials.
However if the outer sleeve or inner bladder is
damaged you can replace or patch it just as
you would a flat tire on a bike. If the bladder is
punctured it can easily be removed through the
repair opening at the end of each strut. Please
follow the QR code for detailed instructions.
REPAIR
If the outer sleeve of a strut
is damaged, it should be re-
placed immediately. Other-
wise, you might damage the
inner bladder. In this case,
unfasten the Velcro closure
on the corners and at the
bottom so you can remove
and replace the entire strut.
PLEASE NOTE
Pull the bladder out of the
outer sleeve carefully – the
string will be automatically
guided into the outer sleeve.
Use the string to reinsert
the bladder after repair.
PULL OUT BLADDER
You find the repair opening
(zipper) at the end of each
strut. Open the zipper to
access the inner bladder.
To prevent damage please
only open the zipper when
the structure is not inflated.
LOCATE THE
REPAIR OPENING
Remove the rubber tubes
and plastic rings from the
One-Pump Connectors.
Open the the valve and
press them out.
REMOVE ONE
PUMP CONNECTORS
AND VALVES Then attach a string to
the One-Pump Connector
farthest from the repair
opening.
ATTACH STRING
After the bladder has been
inserted, make sure it fills
out the space inside the
strut completely. Then
slowly fill the bladder with
air, taking care that it is
positioned correctly. If the
bladder is not positioned
correctly (e.g. bladder is
twisted or bladder does not
fill out the space inside the
strut completely), correct
its position or remove it and
reinsert it correctly.
INFLATE BLADDER
The TPU bladder is now
ready to repair with the self-
adhesive patches provided
in the repair kit. Cut a patch
with rounded corners out
of the repair material that
is approximately 2 cm
larger on all sides than the
damaged area.
If necessary, replace the
damaged bladder with a
new one.
READY TO
REPAIR / EXCHANGE Take great care not to
twist the bladder when
reinserting. Twisting
the bladder can lead to
damage when pumping it
up. After the bladder has
been reinserted, guide the
bladder ends to the strut
ends and make sure the
bladder fills out the entire
space inside the strut cover.
INSERT BLADDER
Be sure to securely close
the zipper completely.
CLOSE ZIPPER
*
*

MAVERICKS MANUAL P.NR.
Give your tent a quick wipe down after each use to
prevent from mold and mildew stains.
Stains and grime are best removed with a soft cloth
and lukewarm, soapy water. Do not clean the tent
in a washing machine. Do not have it professionally
dry-cleaned.
If a zipper is difficult to open and close simply treat it
with a bit of wax.
BE GOOD TO YOUR
TENT AND YOUR
TENT WILL BE GOOD
TO YOU.
The HEIMPLANET Mavericks tent is made from
high quality materials. With just a bit of care
it will serve you as a reliable home away from
home for many years to come.
CARE

HEIMPLANET ENTWICKLUNGS GMBH
LUTTEROTHSTRASSE A
HAMBURG / GERMANY
—
WWW.HEIMPLANET.COM
—
WWW.FACEBOOK.COM/HEIMPLANET
WWW.TWITTER.COM/HEIMPLANET
WWW.INSTAGRAM.COM/HEIMPLANET
THANK YOU
FOR YOUR SUPPORT.
WE HOPE YOU ENJOY OUR
PRODUCT AS WE ENJOYED
ENGINEERING IT.
JOIN THE MOMENT AND
MAKE YOURSELF A HOME
WHEREVER YOU GO.
Other manuals for Mavericks
1
Table of contents
Other Heimplanet Tent manuals


