PROTENT PRO-TENT 2000 User manual

MANUAL
PRO-TENT 2000

Important points to note
• Pro-Tent tent systems have been designed for temporary
outdoor use to provide protection from sun and rain.
• Do not use Pro-Tent tent systems in extreme weather
such as storms, snowfall or hail.
In windy conditions, the Pro-Tent tent systems must be
secured using the included tensioning kit and/or original
Pro-Tent weight plates. For further information see pages
10/11.
• Pro-Tent tent systems should not be exposed to extreme
weather conditions such as storms, snowfall or hail. In wind
and rain, the Pro-Tent tent systems must be secured with
our weight plates and/or tensioning ropes and tent pegs.
• Bear in mind that the colouring of the synthetic fabric may
fade over time as a result of UV radiation.
• Never fold up the fabric roof when it is damp. It is bestto lay
it loosely over the frame in a dry room.
• Pro-Tent tent systems have been released for delivery by our
quality assurance department and marked“awless in work-
manship and function”. If you still have reason to complain
about this product, please contact your local sales oce
immediately.
Product warranty
We grant a 5-year warranty, starting from the day of sale for
the folding construction of the Pro-Tent tent systems. During
this time, our warranty covers the following (upon presenta-
tion of the purchase receipt):
• The free replacement of defective parts due to quality de-
fects on the part of the manufacturer, including labour.
Further claims within warranty processing with the Pro-Tent
tent systems cannot be asserted. Defects that occur as a
result of not complying with these instructions are excluded
from the warranty in all cases.
AREAS OF APPLICATION
a) 1 aluminium frame
b) 1 carrier bag
c) 1 assembly instructions
d) 1 tensioning set
SCOPE OF DELIVERY
2
PRO-TENT 2000

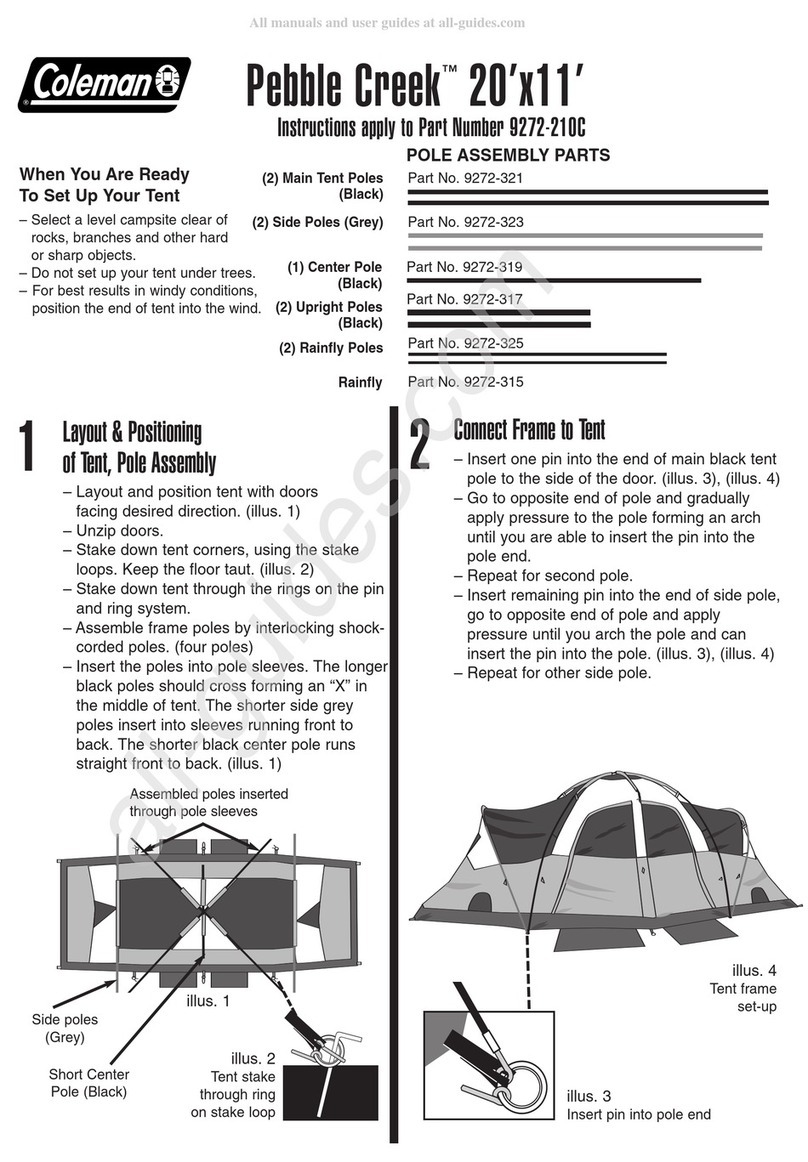
The Pro-Tent folding tent can be assembled comfortably by two people. Many steps
should be carried out at the same time.This generally applies to the entire assem-
bly and dismantling process.
Step 1:
Open the buckle at the bottom of
the bag. Open the zipof the transport bag, which
is now accessible, as far as it will go. Remove the bag from the side of the
frame and store it safely until you need
it again.
Grasp the frame on the outer proles.
Lift the frame slightly. Open the frame by stepping backwards and spreading
your arms at the same time.
ASSEMBLY
Assembly video
It is best to always
grasp the frame on the
shorter side of the tent -
i.e. on the 3m side of a
6 x 3m tent.
TIP
33
ASSEMBLY

Step 2:
Hold the frame below the middle pivot point by the cross
struts.This is the optimal handling position for opening the
frame. Lift the frame slightly and open it by stepping back
only so far that the gable pole extends about 10 cm.
Tensioning
loops
Step 3:
Throw over and x the four corners of the fabric roof to the
outer legs.
When positioning
the fabric roof, the
gable pole should only
be extended by
about 10 cm.
TIP
The corners of the fabric roof
are easily recognisable by the
sewn-on tensioning loops. After
the rst assembly, the roof can
remain in place. However, never
store the tent in the transport
bag when it is damp.
TIP
4
ASSEMBLY

Step 4:
Fasten the velcro straps on the inside of the fabric roof corners
tightly underneath the plastic connector around the leg.
Make sure that the reinforcement ap is placed symmetrically
and without creases around the leg beforehand.
Step 5:
Grasp the frame again below the middle pivot point at the
cross struts, lift slightly and open the frame by stepping back-
wards until the roof begins to stretch.
55
ASSEMBLY

Step 7:
Engaging the roof strut: Push the plastic gliders out beyond
the upper pushbutton springs (metal bolts)of the corner legs.
Important: Press down using your free hand from above.
For folding frames with centre legs (6x3): Engage
the roof strut also with the centre legs. Fix the velcro strip
attached to the roof to the centre leg.The outer fabric eyelet
and the inner reinforcing ap should be centred on the edge
of the upper plastic connector.
Step 6:
Attaching the inner fabric roof gable: Push the recess/slot on
the fabric sleeve through the tongue on the prole cover.
Tighten the sleeve rmly using the velcro strap.
6
ASSEMBLY

Extend the leg:
To do this, raise the leg
slightly and only then pull
it out with your foot.
It is easiest to
operate the lower
leg is using
your foot.
TIP
Step 9:
Now pull out all the legs to the end position (2). Functional explanation of how to engage the legs
Push button spring
in the upper leg
(locking of the gliders)
Height compensation
(30 mm)
for uneven terrain
End position
1.
1.
2.
2.
Step 8:
Easy tightening of the fabric roof by using the velcro straps.
To do this, pull the roof panel down a little rst.
77
ASSEMBLY

DISMANTLING
1. Loosen all velcro straps on the roof panel.
2. Press the red push button release below the plastic gliders
on each leg.This releases the pressure on the roof frame.
3. Release the push button spring and retract the legs.
4. Grasp the frame above the middle pivot point on the roof
proles, lift slightly and push together again by stepping
forward but do not close completely to prevent jamming.
5. Push the frame together completely at the upper corners.
6. The frame can now be stowed in the mobile transport bag
together with the roof, which should be smoothed out á
little beforehand. To do this, open the bag completely and
place it sideways over the frame with the fabric roof. Pull
the bag down well.Then close the zip and the buckle.
Push button release
8
DISMANTLING

ACCESSORIES/SIDE WALLS
2. Attach the side walls to the left and
right of the legs with the velcro strips.
Side wall
1. Attach the side wall horizontally
between the two legs to the inner
roof panel.
99
ACCESSORIES/SIDE WALL

10
45°
SECURING IN WINDY CONDITIONS
Ensure that the tent is well secured according to the prevailing weather conditions.
It is sucient to tension the tent using the loops on the roof in light to fresh winds (up to wind force 5). Use the tensioning set
included in the scope of delivery to tension the tent. If the ground conditions do not allow you to use pegs, you can also use
ProTent weight plates or ProTent water weights (see the next page).
As a general rule, we recommend weighing down even tensioned tents with weight plates.
IMPORTANT: For best results, the tent should be tensioned over the corners at an angle of approximately 45°, so that the ten-
sioning ropes are angled away from the tent.
CAUTION: Do not overtighten the tensioning ropes. Use a moderate amount of force to prevent them from sagging. In windy
conditions, you will need to check the tension from time to time and adjust the pegs if necessary.
The tent should be stretched and tensioned over the folding structure in strong winds (force 6-7).
CAUTION: In the event of a storm, or if gusts of wind (force 8 or higher) are expected, the tent must be taken down.
Pass the tensioning rope around the connector on the legs,
close the carabiner and tension it outwards as usual. The tensioning ropes are routed outwards between the val-
ance and the side wall when combined with side walls.
SECURING IN WINDY CONDITIONS

11
Hexagonal weight plate 12.5 kg
The weight plate is completely inside the folding tent and can be stacked up to 6 layers (up to 75kg per leg).The feet of the
legs are xed to the bottom weight plate with ball locking pins.
Water weight 50 litres
The water weights are a useful alternative if pegging is not possible or if you want to secure your folding tent with additional
weight (50 kg per leg).The tent is secured using the tensioning set included in the scope of delivery. An optional quick tensio-
ning kit is available to make handling even easier - see illustration.
SECURING IN WINDY CONDITIONS

PROTENT AG
Zelt- und Messebau-Systeme
Neuhofstrasse10
8630 Rüti
Schweiz
Tel.: +41 (0) 55 220 28 00
info@pro-tent.ch
www.pro-tent.ch
PROTENT GmbH
Zelt- und Messebau-Systeme
Im Brühl 1
65589 Hadamar-Ndz.
Deutschland
Tel.: +49 (0) 6433 946668-0
info@pro-tent.de
www.pro-tent.de
11/2023
Table of contents
Other PROTENT Tent manuals
