Ultraframe Pergola User manual

Installation Guide
Version 1 | March 2014
Pergola

2
Dear Customer
Thank you for choosing a Pergola. Please take a few minutes prior to installation to familiarise yourself with this guide.
INTRODUCTION
CONTENTS
Contents, Overview and Specification page 2
Tools and general points page 3
Pre-installation checks page 4
Overview page 4 - 5
Pergola installation steps page 6 - 8
Pergola Components page 9
Handling aluminium products page 10
Cleaning and maintaining powder coated aluminium products page 11
- Guidance for homeowners and fitters
Easy to install with virtually no on-site cutting or
wastage the PERGOLA is a complete solution.
Designed as both a car port or patio cover the
PERGOLA product is pre-fabricated in 9 size
options to provide a perfect solution for every
customer. The unique curved Pergola beam
is constructed from powder coated aluminium
and acts as an integral gutter and support
beam. Aluminium posts are part of the structural
support package – these also fulfil the function
of a rain water pipe.
Overview
• Pergola supplied unglazed for use with 6mm toughened glass for 0.6 snow
load areas - all other areas use 10mm.
• One combi post/rainwater pipe per Pergola - position is always from right hand
corner viewed from outside. Posts sit ‘inboard’ of each end by 200mm.
• 7.5° pitch
• Support posts are 2,900mm long - see p3 to calculate how to set out posts.
• Two colours / finishes - White (RAL 9003 80% Gloss) and Grey (RAL 7016,
textured)
Specification

3
Care should be taken when handling components that are seen by the
homeowner, as surfaces may be scratched if not handled with care
(see p10). Choose a suitable area for unpacking the components
and always check them before fitting. Any claims for missing or
damaged parts are only accepted in line with our standard terms
and conditions of sale.
Health & safety
Site safety is particularly important. The installation company shall
be responsible for the safety of all of the fitting team, the customer
and members of the public. The Surveyor should have carried out
a risk assessment to reduce risk on site and this should have been
discussed with you prior to starting.
Please use safe working platforms and ladders that comply with
BS EN 131. Always use equipment in line with manufacturers
recommendations .Personal Protective Equipment - such as
goggles, mask and ear defenders - should be used when, for
example, grinding out for the flashing.
Careful consideration should be given to the safe disposal of
all packaging – Pergola packaging is predominantly made from
recycled materials and can be readily recycled.
Components
The kit is supplied with a quality control check list. Should you need
to re-order a part the component identification chart on p9 will be
helpful.
Sealing
It is important to use the correct sealant when sealing the roof use
low modulus neutral cure brand of silicone.
The Superstructure
Before starting to install the Pergola, please check the condition of
the host wall and whether it’s plumb – depending upon what you find,
these conditions can seriously affect the final integrity of the roof.
Technical Support
PAINTED ALUMINIUM PRODUCTS - PLEASE NOTE
All paints will ‘chalk’ to some extent and there will be a
reduction in gloss level over time. (See Cleaning and
Maintenance guidelines p14)
Quality expectations on installation.
- Appearance. This is assessed based on the selection
of the ‘significant’ (primary) surface. From a distance of 3m,
stand at an oblique angle of 60degree and then defects such
as blisters, runs, pin holes etc should NOT be seen.
- Colour and gloss. Viewed from 5m, the coating must
be of even colour and gloss with good coverage.
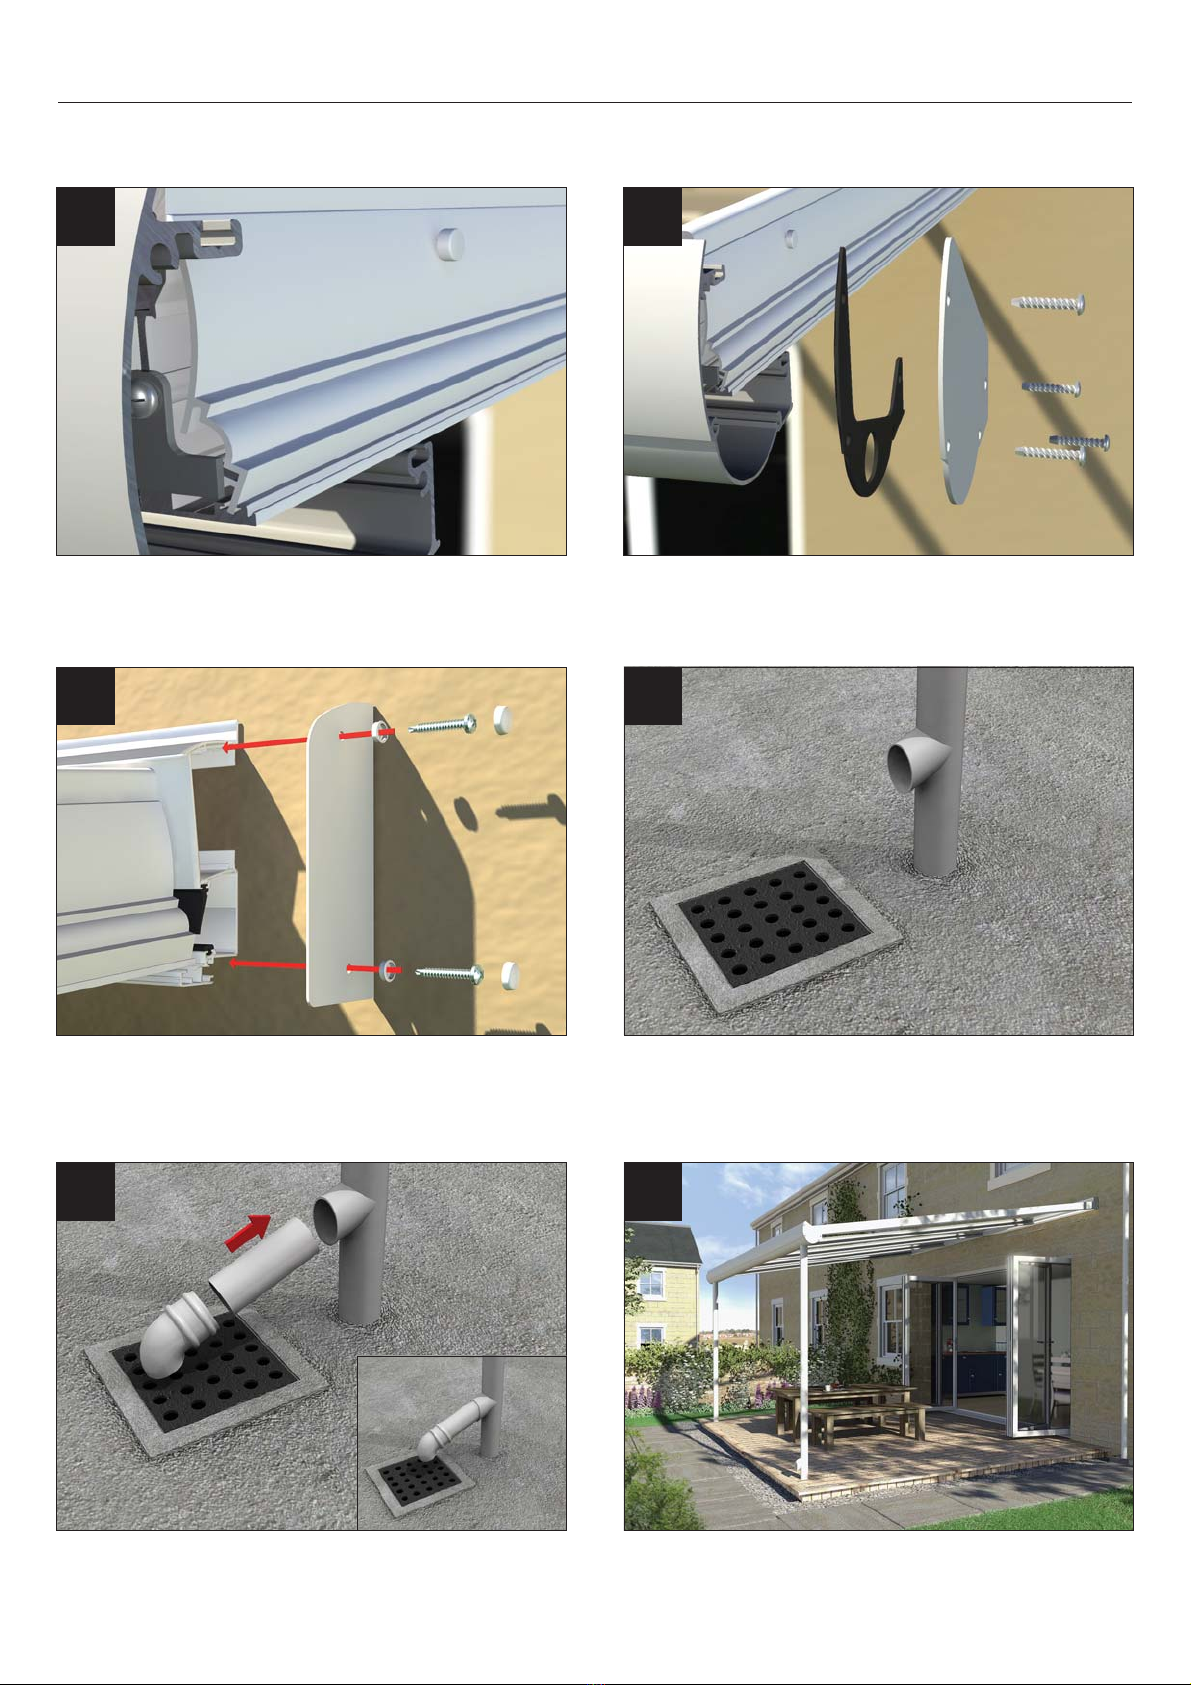
Pergola to host wall fixings not supplied.
8, 10, 13mm+
17mm Socket
Spanner
Deadblow
Hammer or White
Rubber Mallet
No. 2 Pozi-drive Bit Hack Saw Drill/Screwdriver Long nose pliars Gasket Shears/
Snips
4.5mm Drill Bit
10mm Drill Bit
Sealant Gun 17mm Open
Ended Spanner -
Tie Bars
Spirit Level Tape Measure Anglefinder Plumb bob
TOOLS OVERVIEW
Allen Keys
General Points
Screwdriver

4
PRE-INSTALLATION CHECKS
Wall plate
Glazing bar
Glazing support
Gasket
Wall plate assembly
OVERVIEW
IMPORTANT: FIT GLAZING PANEL END STOPS ON THE GROUND
BEFORE BARS ARE LIFTED INTO POSITION
NOTE: For end bar
cut down bracket
as shown.
On the two bars that
fit either end, cut
away the return leg
on the glass support
bracket on the outer
side of the bar to
allow the side trim to
be fitted. (AVBA005)
RIGHT HAND BAR
ILLUSTRATED
Low modulus
neutral cure
Check the condition of the
host wall as this may affect the
quality of the final installation.
Check the host wall is plumb.
If not, the wallplate may
require packing out with
aluminium shims.
Correct alignment in this
area is critical to a successful
installation. - Plumb posts,
wallplate and curved beam
level. Only use the specified
fixings - never be tempted to
substitute alternative sizes/
gauges.
Use the correct sealant
Cut supplied gasket to length and fit
to glazing bars. Depending on glazing
thickness use the appropriate gasket. The
6mm gasket will require sliding into the bar.
Q8211
(6mm)
Q8221
(10mm)
Fit the supplied gasket to the wallplate as shown. Use the
appropriate gasket for the glazing thickness as per the
bars. The 6mm gasket will require sliding into the wallplate.
WALLPLATE
ASSEMBLY
Q8211
(6mm)
Q8221
(10mm)
M5 bolts are
supplied as twin
bolts. Before fitting
to wallplate and
curved beam, cut
these bolts into 2
separate bolts as
shown.” (Q8077)
AVBA004
AVBA005
CHA008
AVBA006
Q8684
JRKA004/1
Q8685

5
C D
B
A
HOST WALL
PITCH 7½°
OVERVIEW
Support post ground level - & rainwater pipe positions
Projection
Height
Underside*
Height Top
plus flashing
2500 2799 2935
3000 2865 3000
3500 2931 3066
C DB
GROUND
LEVEL GROUND
LEVEL
GROUND
LEVEL
3000
2100
25
3000
2250
175
3000
2500
425
2900 2900
2900
Projection
Height
Underside*
Height Top
plus flashing
2500 2649 2785
3000 2715 2850
3500 2781 2916
C DB
Projection
Height
Underside*
Height Top
plus flashing
2500 2499 2635
3000 2565 2700
3500 2631 2766
C DB
2400
325
ENSURE
500MM IS
CONCRETED
INTO THE
GROUND

6
Assemble posts to Veranda beam as shown using M10 screw (AVBA017)
and washers provided (AVBA018, AVBA019). Drain post should sit in line
with circular hole pattern in the Veranda beam. Drain outlet always faces
outwards.
If not fitted earlier, ensure the glazing end stops
are in place before fitting glazing bars at eaves.
65
The posts are supplied 2900mm long. If
required cut post to length and fit endcaps
(ensure a minimum of 500mm is submerged
below ground). Fit end caps to lower open
end of all posts.
Insert posts into pre dug holes. Backfill around
posts with gravel to offer support. The outlet post
is always positioned on the right hand side looking
from outside back towards the house.
4
Accurately mark out base plan checking diagonals. Mark centres of
posts which will be 200mm in from the end of the Veranda beam. If
central post required, this will sit central to the other 2 posts. Dig holes
approximately 300mm x 300mm around the mark for the post centre to
a depth of at least 500mm.
Accurately mark wallplate height on wall. Ensure level and central. To
prevent damage to long glazing gasket either remove prior to drilling
or lift out of the way. If removed, refit as shown. Secure to wall using
suitable masonry anchors (not supplied) at 500mm centres.
1
3
PERGOLA INSTALLATION
Lift and support assembled Veranda beam into
position using a minimum of 2 props. Centralise
and measure distance from house wall. We
recommend using a timber packer to prevent
damage to the powder coated aluminium.
2
INTERMEDIATE BAR END BAR
RIGHT HAND
Cut down glazing end
stop. Fixing screws
should be to inside
face of glazing bar.

7
PERGOLA INSTALLATION
Fit outer bars first and then remaining bars. Locate over bolts (Q8077,
split) and secure using the M5 nuts (Q8400/2) provided.
From roll of glazing tape (AVA003) provided, cut lengths to fit between
glazing bars along curved beam.
7
9
Lift 6mm or 10mm toughened pieces of safety glass into place. Centralise
glazing between bars and place against supports at bottom of bars.
Fit glazing beads to each bar securing glazing. Push bead up against
wallplate. Engage lower leg into groove and work from one end to the
other using thumb pressure to compress the gasket and engage the top
clip of the bead. Constant pressure needs to be applied along the bead
as you work along so it will require 2 people. NOTE: If beading becomes
difficult, it is advisable to use warm soapy water on the bead gasket.
11
10
Repeat at bottom of bars, locating over bolts (Q8077, split) and securing
using the M5 nuts (Q8400/2) provided. Ensure that structure is square
and at correct pitch (adjust props to suit) and fix into Veranda beam
using screws (CHA008) provided.
8
On the outer bars, secure cloaking trim using the 3 screws (CHA007)
and caps (Q8084, Q8685) provided (outer legs of glazing end stop
bracket should have been cut back to allow trim to fit).
12

8
PERGOLA INSTALLATION
End bar cover shown in position. Fit the profiled rubber gasket and end plate to the curved beam
using 4 x M8 button head hex screws (AVBA014)provided. Repeat
on the opposite side.
Apply silicone to end faces of the wallplate and fix using screws (Q8686)
and snap caps (Q8684, Q8685) provided through holes.
13 14
15
Ensure pitch is correct and structure is square. Fill holes around
posts with appropriate concrete mix.
If required, cut supplied rainwater downpipe to length and attach
downpipe shoe.
16
17
Once concrete has set, remove props and finish floor as required.
18

9
PERGOLA COMPONENTS
AVBA500W/1
AVBA500TGR/1
Aluminium Veranda
Beam
*AVPA290W/1
AVPA290TGR/1
Post No Outlet
*AVPA290W/2
AVPA290TGR/2
Post With Outlet
QW8005/2.6
QYT8005/2.6 Widespan
Glazing Bar
QW8086/6
QYT8086/6
Lean - To Flashing
QBES60010W
QBES60010TGR
10mm Square Bead
QW8057/5.1
QYT8057/5.1
24mm Uni Wallplate
AVBA001 Veranda
Beam Gasket
AVSE005W
AVSE005TGR Veranda
Stop End Plate
QW8321
QYT8321
Uni Wallplate End Cap
AVBA003
Adhesive Tape 10mm
X 12mm x 5m
AVBA007
3mm X 10mm X 25m
PVC Foam Sealant
AVBA009
Pergolia Weathering
Gasket
AVBA010
Post Vinyl PVC End
Cap
Q8221
Pad Gasket (Push In)
(10mm glazing)
Q8201
Retain Bead Gasket
Q8211
Gasket (6mm glazing)
UZRW250W
UZRW250BL
Rainwater Down Pipe
UZRW002W
UZRW002BL Round
Downpipe Shoe White
CHA008 4.8 x 32 Self
Drill Phillips Pan Head
Use with:
1 pre AVBA005
1 per AVBA004
AVBA014
M8x25 SKT HD
BUTTON HEAD
Use 4 per: AVSE005(_)
Veranda Stop End Plate
JRKA004/1
M4 X 12 Pz Pan Tri-
Lobal Z&C
Use 2 per:
AVBA005
CHA007
4.2 x 19 Self Drill
Phillips Head Screw
Use:
3 per Q8086/6
AVBA017
M10 X 35mm Hex Hd
Use 1 per:-
AVPA290(_)/1
AVPA290(_)/2
AVBA018
M10 Fm A Plain Washer
Use 1 per:-
AVPA290(_)/1
AVPA290(_)/2
AVBA019
M10 Rect Single
Coiled Spring Washer
Use 1 per:-
AVPA290(_)/1
AVPA290(_)/2
Q8686
Dia4.2X25Mm P/P/S/
Drill Screw
Use 2 per:-
Q(_)8321
Q8077
12Mm Twin Fast
Screw Silver
Use 2 per:-
Q(_)8005/__
Q8400/2
M5 Nut
Use 2 per:-
Q8077
Q8684
Flat Bottom Snap Cap
Washer
Q8685
QY8685
Snap Cap
AVBA004
Veranda Beam - Bar
to Beam Bracket
Use 1 per:-
Q(_)8005/__
AVBA005
Veranda Beam Glass
Clip Bracket
Use 1 per:-
Q(_)8005/__
AVBA006
Glass bracket end
stop
Use 2 per:-
AVBA005
*CE marked under
EN1090-1: 2008
execution class 2

10
If site cutting is necessary (drainage slots need inserting or a down pipe
hole has to be cut) ensure all swarf is kept away from the painted surface
and then; seal with a primer/corrosion inhibitor and then top coat.
Alternatively, use a suitable gap sealant to prevent the onset of corrosion.
These steps are critical in marine environments.
Take care when fitting aluminium products to not use excessive force. Grease marks, dirt and mastic spillage may be removed using warm
soapy water.
3 4
5
When opening sealed packs, use a special box knife opener.
2
If storing in warehouse racking or on frails/roof racks, take care to
support the products and do not over tension straps and ropes.
1
HANDLING ALUMINIUM PRODUCTS

11
If surface damage is encountered, use 120-360 grit paper to prepare the
surface. Wipe clean with white spirit.
Ensure the surface is dry – apply a thin primer coat using a fine brush.
Finally, apply an air drying top coat with a fine brush. General cleaning can be undertaken by a wash with warm soapy water.
For added protection, on the white Pergola, a wax polish can be applied
up to twice per year – follow the polish manufacturer’s instructions
carefully.
1 2
3 4
5
CLEANING AND MAINTENANCE
FROM TIME TO TIME, CLEAN INSIDE THE CURVED VERANDA BEAM TO PREVENT BLOCKAGE FROM LEAF DEBRIS
It should be noted that polyester powder coatings are not
maintenance free – the extent of cleaning depends upon the
local environment and on the attitude of the building owner.
Think cars here...if the building owner wants a finish like that,
more regular cleaning is needed. All paints will ‘chalk’ to some
extent and there will be a reduction in gloss level over time –
this can be restored.
PLEASE PASS TO HOMEOWNER

AVBA008 Job No.: 2645 v1 2,000 2/14 It is Ultraframe’s policy to continually seek to improve its products, processes and services, and we reserve the right to change specifications without prior notice. Ultraframe is a trading name of Ultraframe (UK) Limited.
www.ultraframe.co.ukwww.quantal.co.uk
LoggiaPrestige
LoggiaPremium
LoggiaUltimate
Popular Tent manuals by other brands

Ozark Trail
Ozark Trail W203 Assembly instructions

Multiple Awnings
Multiple Awnings Winter Shelter installation manual

Coleman
Coleman CRESTLINE 9’10”x7’ Instructions apply

Dancover
Dancover TentZing CT168040 manual

skandika outdoor
skandika outdoor Esbjerg Travel 4 Setup Instruction

ZANE ARTS
ZANE ARTS DT-002 manual