HELIGUY HELIGUYATOM User manual

www.heliguy.com
Battery: 1 cell 3.7V 150mAh li-po rechargeable
Weight: 33g (Battery Included)
Rotor Diameter: 190mm
Length: 210mm
Height: 90mm
2www.heliguy.com
Contents:
Before you y... 2
Lithium Battery Safety... 3
Radio Transmitter Binding... 3
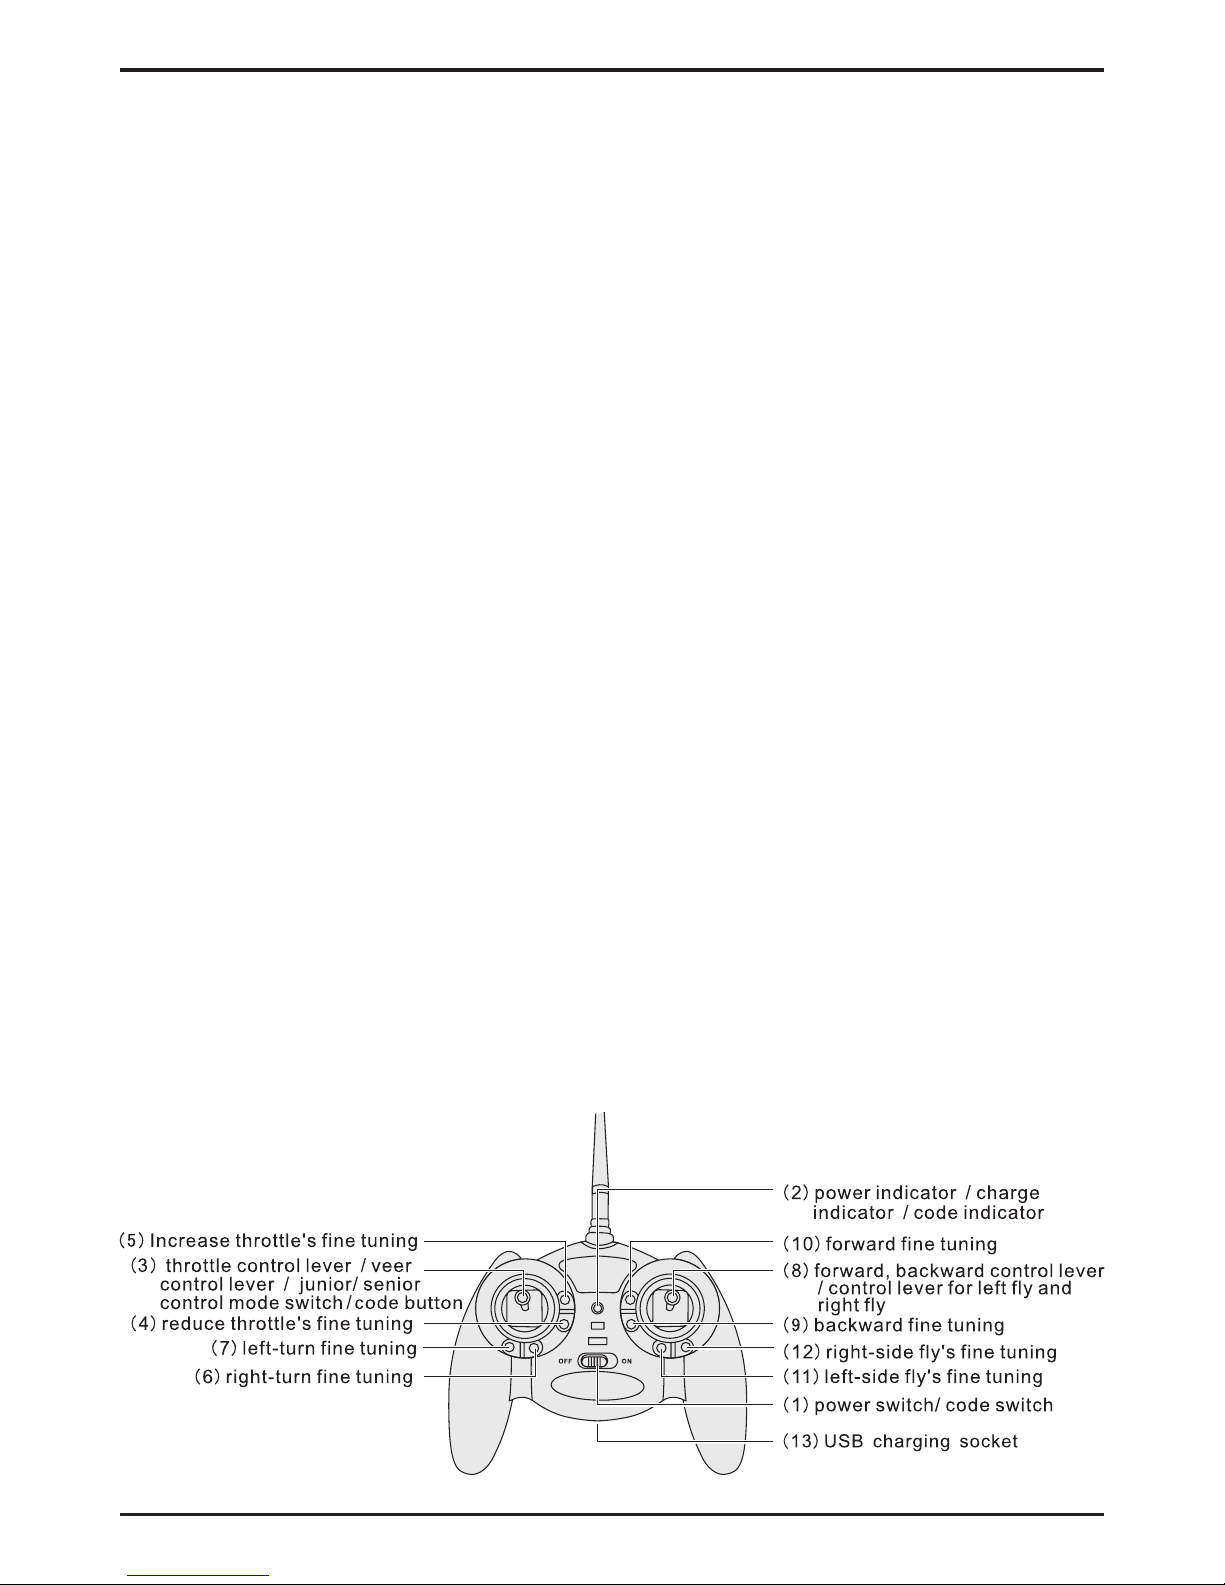
Radio Transmitter Diagram... 3
Steps for Safe Flying... 4
Batteries and Charging... 4
Junior and Senior Modes... 4
Notes, Training and Exercises... 5
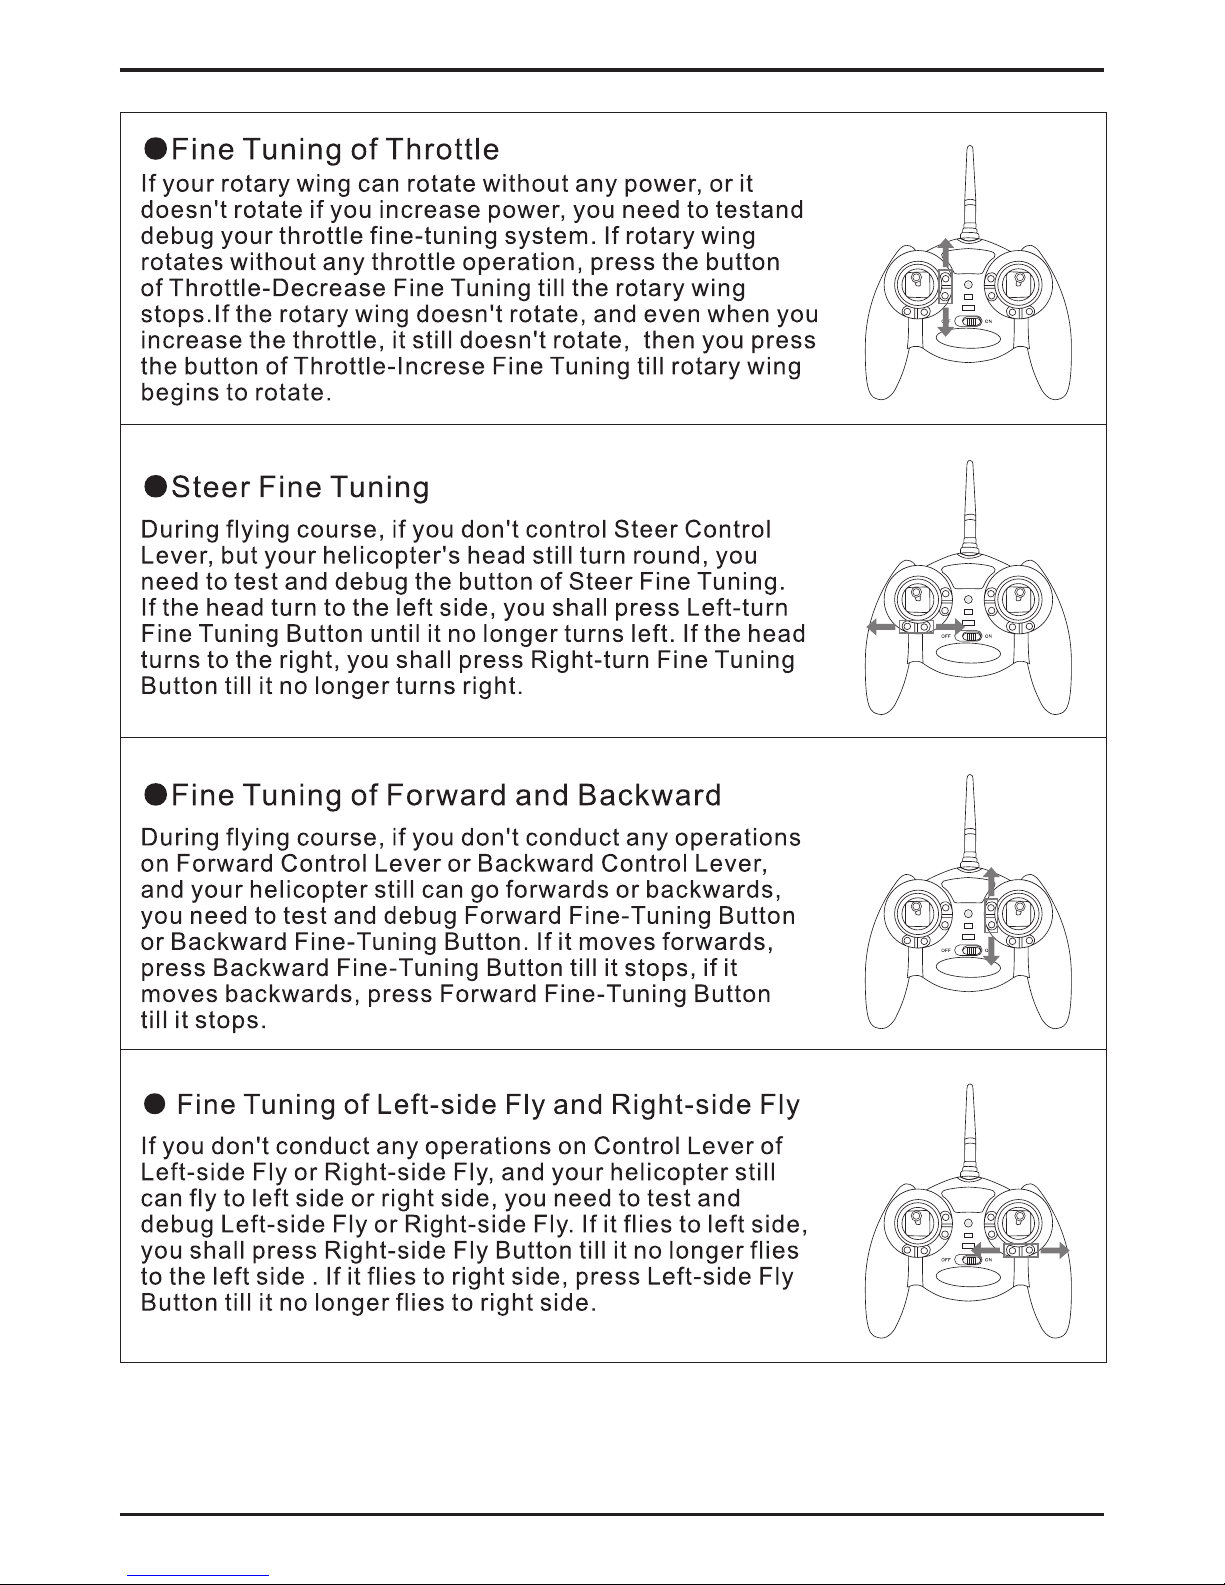
Fine Tuning... 6
Movement Diagrams... 7
Parts Diagram... 8
Parts List... 9
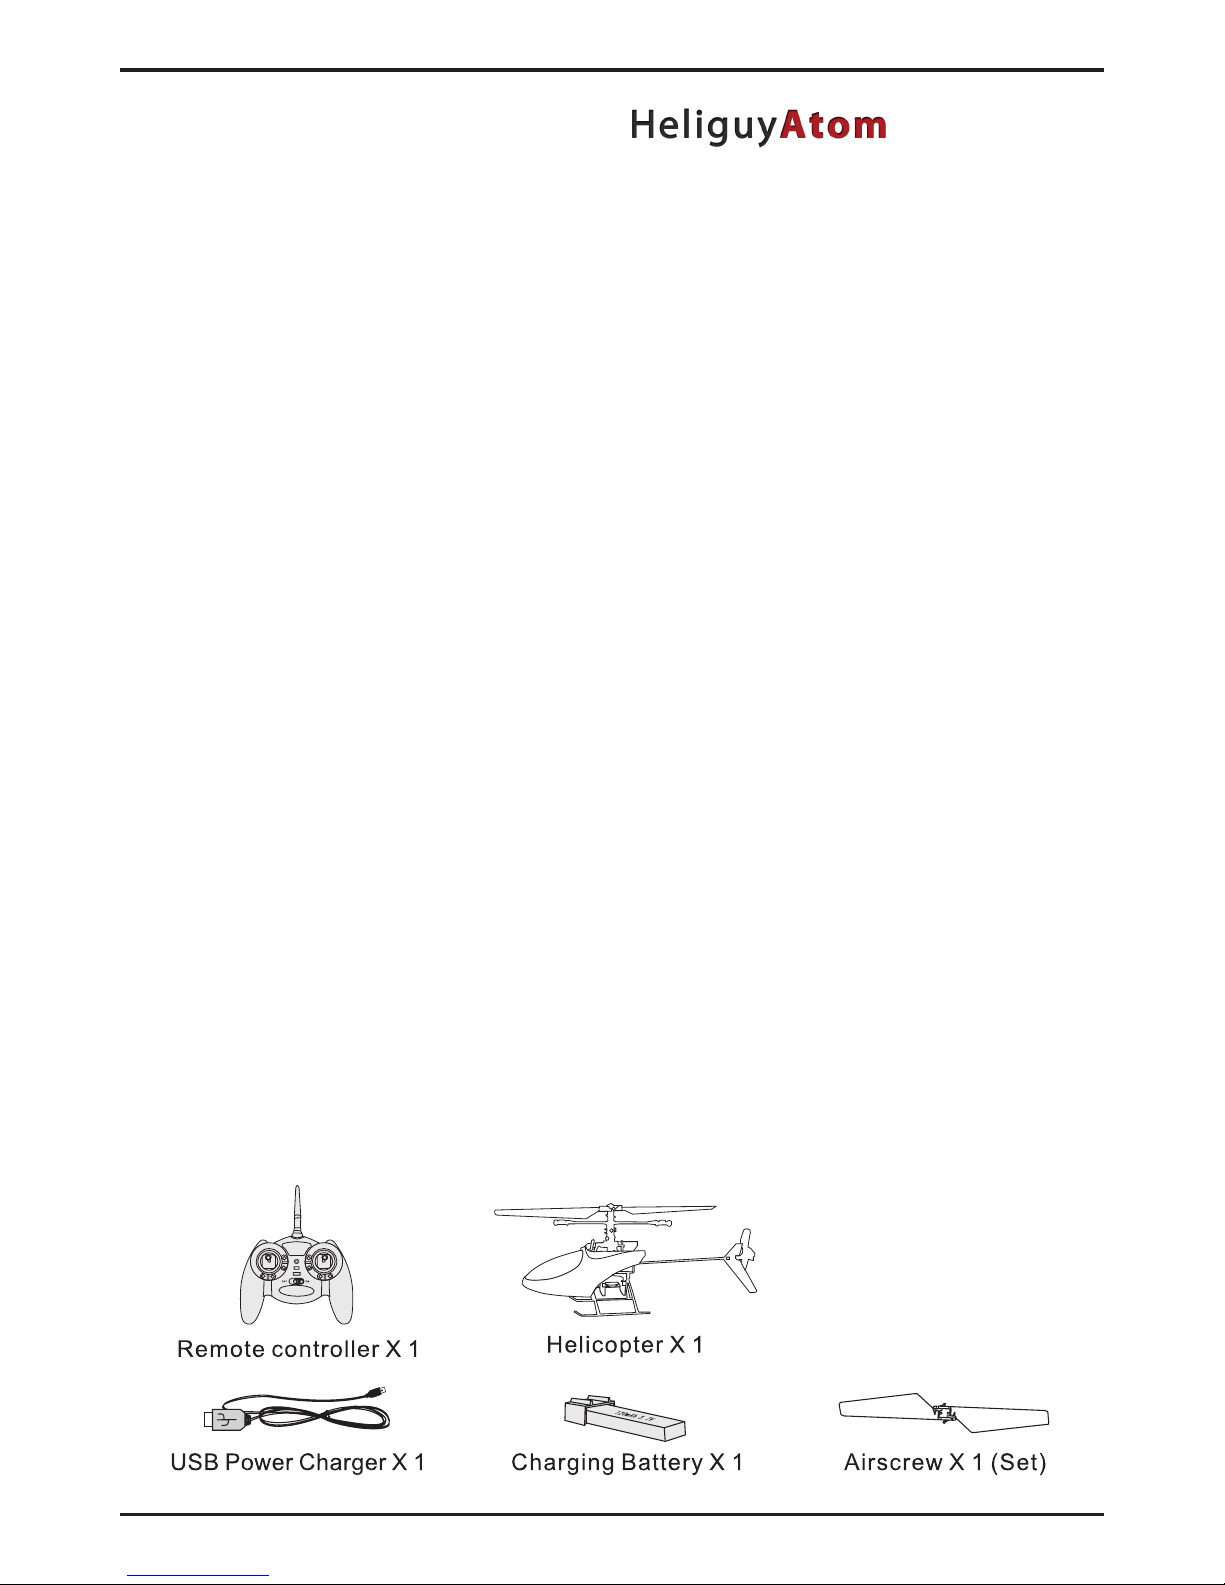
In the BOX:
The Heliguy Atom is the latest 2.4Ghz xed
pitch sub-micro rc helicopter. It features
excellent control characteristics giving an
advanced, well balanced opertion.
BEFORE YOU FLY
1. Ensure safe and accurate operation. This
machine is not suitable for children under 14
years of age.
2. If you dont have a good level of experience
with RC helicopters, we suggest using a
ight sim or getting lessons rst. We do not
accept any resposibility when it comes to
the use of the product.
3. Ensure that ying area is safe and clear of
other people and pets.
4. Ensure that you y either indoors or
outdoors only in still weather.
5. After ying, rst unplug the battery from the
helicopter, then turn of the transmitter.
6. Keep away from electrical equipment,
magnetic objects or wireless equipment in
order to avoid interferance.
7. Install the transmitter batteries correctly. A
sound will be emitted if the batteries are too
low and need to be replaced.
8. The helicopter lithium polymer battery needs
to be looked after properly. Please observe
all safety procedures when charging and in
use.
9. Only use the charger that comes with this
product, charge time is about 30mins.
10. Do not use if ANY part of the system is wet,
or if you have wet hands.
3
www.heliguy.com
Lithium Battery Safety
LITHIUM BATTERIES CAN CAUSE FIRE,
PERSONAL INJURY AND PROPERTY LOSS
IF THESE SAFETY MEASURES ARE NOT
OBSERVED PROPERLY.
PLEASE KEEP THE BATTERIES OUT
OF REACH OF CHILDREN AND PETS.
USERS UNDER THE AGE OF 16 SHOULD
BE UNDER ADULT SUPERVISION.
THIS PRODUCT IS NOT SUITABLE FOR
CHILDREN UNDER THE AGE OF 14.
THE WARRANTY COVERS RAW MATERIALS
ONLY. UNDER NO CIRCUMSTANCES WILL
COMPENSTION EXCEED THE VALUE OF
THE RETAIL PRICE OF THE PRODUCT.
1. Do not charge for an extended period of
time without supervision. No longer than
30mins should be needed for a full charge.
2. Do not dismantle the battery.
3. Do not place the battery near a source of
high temperature or ammable object.
4. Do not cover the battery or charger whilst in
use, allow ventialtion and charge on a non-
ammable surface.
5. If the battery shows any sign of: a weird
smell, overheating, colour changing,
distorting shape; at any time, immediately
move the battery outside. Dispose of it only
in a bucket of salty water.
6. Do not transport the battery with metal.
7. Do not put the battery in a re or burn it.
1. Do not connect the postive and negative
sides of the battery.
2. If the battery leaks beware of electrolyte. If
any gets in your eyes, do not rub them, rinse
with clean water and seek medical attention.
3. Store the battery in a cool, dry place.
Radio Transmitter Binding
The transmitter and reciever on board the rc
helicopter are bound at the factory. This means
that the helicopter will be ready to y out of the
box. A solid link has been created between the
helicopter and transmitter when:
The red light on the helicopter ashes
quickly for 5 seconds and goes solid.
A link has not been created if:
The red light on the helicopter ahses for 5
seconds and then blinks slowly.
To re-bind the transmitter to the helicopter:
1. Make sure the transmitter is off
2. Plug the battery into the helicopter, the light
will ash for 5 seconds, duringthis time
press down on the throttle (left) stick of the
transmitter and turn it on, release the stick.
3. The transmitter will ash green/red and
beep.
4. The light on the helicopter should then go
solid red, meaning the binding is complete.
5. Turn both off, then the transmitter on
followed by the helicopter, you should now
have control.

4www.heliguy.com
Steps for Safe Flying
1. Install 6 AA batteries in the transmitter and
turn it on.
2. Keep the helicopter level and plug in the
battery, be sure it i sthe correct way around.
light will ash for 5 seconds and go solid -
indicating ready to y.
3. You may need to trim the helicopter for
stable ight - please see trimming section of
the manual.
4. You can choose between Junior and
Senior modes depending on your level of
experience - see Junior/Senior selection
section of the manual.
5. At the end of the ight, unplug the battery
from the helicopter rst, only then turn of the
transmitter.
Remember:
• Whenturningonthetransmitter,keepthe
throttle(leftstick)atminimum/lowestpoint.
• Raisethethrottlestickupslowlytobegin
with.
• Ifyouhavethethrottleatmaximumandthe
helicopterisstrugglingtoliftoff,thebattery
islowandneedstoberecarged.Avoid
runninglithiumpolymerbatteriestoolow-
youwilldamagethem.
Charging the Lithium Polymer Battery
Using the transmitter to charge the battery:
1. Turn on the transmitter.
2. Plug the USB charging lead into the port on
the transmitter.
1. Connect the other end with the battery.
2. Within 5 secs the transmitter light will begin
to ash green. When charging is complete,
it will go solid green.
Charging by external USB
1. Power on your computer or other device.
2. Connect the USB charging lead to the
device, the light will turn on.
3. Connect the other end to you battery
4. When the USB light turns off, charging is
complete.
Junior/Senior Mode Switching
Junior Control Mode
Under this mode the ying speed and reaction
time is comparatively slow. This is ideal for
beginners.
Senior Control Mode
Under this mode the ying speed and reaction
time is much quicker. This is ideal for more
advanced pilots who feel comfortable with the
helicopter.
To Change Modes
Once everything is turned on and the helicopter
is operational, press down on the throttle (left
sick), the transmitter will beep to let you know
mode has been changed.

5
www.heliguy.com
Please Note
1. The Helicopter uses one 3.7V lithium
polymer battery, the transmitter uses 6 AA
alkaline batteries.
2. Please make sure you check the polarity
when installing or replacing batteries.
3. Don’t charge non re-chargeable batteries.
4. Always check that electrical wires, plugs,
shells and other parts are not damaged. If
they are, do not use them.
5. Never y if the battery power is getting low,
this will result in a damaged battery.
6. If/when you bump teh helicopter on objects
or have a hard landing, land and check for
damage.
7. Be ware of damage caused by collisions - to
both the helicopter and object.
8. Do not play with the helciopter on or near
roads or other busy areas.
9. Do not use the helicopter if it is raining, or is
going to rain.
10. Keep away from re, other people and any
material that may cause a short-circuit.
11. If you dont use teh lithium batteries for a
long time, they may not hold a charge,
please check and replace before ying.
Training
Choose a suitable area, a large space without
any obstacles, preferably indoors with no wind.
1. Place the helicopter in the middle of the
room and point it away from you. Power on
the transmitter then the helicopter.
2. Check servos are moving and you have
control.
3. Slowly raise the throttle until the helicopter
begins to lift off. At this time if the helicopter
moves in any direction without input, you
need to use the transmitter trims to counter-
act this movement (if it moves left, move left/
right trim to right).
4. Once the helicopter lifts off directly vertically
you have it trimmed. Try and keep the
helicopetr hovering at about 0.5m with small
stick adjustments.
5. Below 0.3m the helicopter will be harder to
control because of ‘ground effect’.
6. Experiment with moving the helicopter in
one direction at a time, and the back into a
hover.
7. Pratice landing in a xed spot, from higher
and higher points.
8. Once these manouvres are mastered,
move onto more advanced ying, yaw the
helicopter and try to hover sideways on and
then ‘nose in’.
Exercises
• Leapfrog - taking off and landing quickly
again, move onto larger and larger ‘leaps’.
• Hovering at a xed point.
• Turn left/right, y forwards and backwards,
move left/move right.
• Rotating 360 degrees.
• Hold hover with heli turned 90 degrees left/
right.
• Hold hover with heli faces towards you -
‘nose in’.
• Quadric hover training:
1. Dont yaw the heli, y in a box shape,
forwards, right, back, left.
2. Do the same with heli on its side.
3. Do the same with heli ‘nose in’.
• Try gure of 8 ying.
6www.heliguy.com

7
www.heliguy.com

8www.heliguy.com

9
www.heliguy.com
hguy # hguy #
AF19
AF14
AF15
AF22
AF01
AF11
AF17
AF16
AF05
AF09
AF09
AF09
AF07
AF21
AF20
AF20
AF10
AF03
AF07
AF21
AF06
AF08
AF04
AF04
AF02
AF02
AF12
AF23
AF03
AF03
AF03

10 www.heliguy.com
Table of contents


