Helios Senior User manual

HANDLEIDING
MOUNTING INSTRUCTIONS
INSTRUCTIONS DE MONTAGE
AUFBAUANLEITUNG
MONTAGE-VEJEDNING
MONTERINGSVEILEDNINGEN
ISTRUZIONI DI MONTAGGIO
HELIOS Senior - Master
Also applies to: Helios Hobby-Victorian-Mur, Eos Hobby-Victorian-Mur, Twin,…
Version 2022_4
https://janssens-alusystems.be/downloads
MANUAL
Manual
Manual
+

PRODUCTINFORMATIE
U heeft met de aanschaf van deze aluminium serre een juiste
keuze gemaakt waarmee wij u veel plezier wensen.
OPMERKINGEN
Deze handleiding is vooreerst opgesteld voor alle
standaardconstructies (Action Models) maar bevat
voldoende aanwijzingen om een vlotte montage van andere
uitvoeringen te garanderen. De zwarte rubber strips zijn aan
de binnenkant met olie behandeld, dit garandeert een
eenvoudige en snelle montage. Deze serre heeft het kweken
van planten en bloemen tot doel en wordt slechts betreden
voor het gebruik door een hiervoor bevoegde persoon.
Kleine ondichtheden en condensatiewater in deze
constructies zijn dan ook toelaatbaar! Mogelijke zwarte
plekken op de profielen zijn eenvoudig met een
aluminiumreinigingsmiddel af te nemen, het betreft geen
productiefouten. De serre dient geplaatst te worden op een
voldoende draagkrachtige betonfundering die voorzien is tot
op vaste vorstvrije grond. De verankering van de serre
alsook het regelmatig controleren van de toestand dient
steeds door de eigenaar of exploitant te worden voorzien.
Het dak van de serre dient in de winter van sneeuw bevrijd
te worden, of op een gepaste manier ondersteund worden.
De serre moet op een van de wind afgeschermde plaat
opgebouwd worden. Tijdens de montage dient men gepaste
beschermende kledij te dragen (b.v.
veiligheidshandschoenen) om kwetsuren te vermijden. Men
dient steeds de lokaal gebruikelijke bouwverordeningen in
acht te nemen.
OPSLAG
De verpakkingen en glasboxen dienen op een droge plek te
worden opgeslagen, gevrijwaard van zonlicht en elke vorm
van vochtigheid. Te hoge vochtigheid of condensatie in de
verpakking kan al snel aanleiding geven tot corrosie op
profielen en/of glas!
VOLGORDE VAN DE MONTAGE
Opbouw en montagevolgorde is voor alle modellen
hetzelfde.
- Uitsorteren van alle onderdelen.
- Montage en opbouw van gehele constructie.
- Horizontaal en waterpas stellen van de basisconstructie.
- Verankering van de constructie.
- Beglazing.
BENODIGD GEREEDSCHAP
Schroefsleutel Nr. 10, schroevendraaier, waterpas,
boorapparaat en boortje Ø4.2, metaalzaag,
werkhandschoenen, schaar (voor het snijden van rubber).
Constructiewijzigingen onder voorbehoud en zonder
voorafgaand bericht.
PRODUCT INFORMATION
Thank you for buying a high-quality aluminum greenhouse.
REMARKS
In all drawings you find the mounting-instructions for all
basic standard-models (Action Models). However this
manual should be a sufficient guidance for all special-case
greenhouses. This greenhouse is designed for cultivation of
plants/flowers. Therefore leakage, water drops and
condensation inside the building are allowed. The building
may only be entered by competent persons during
cultivation or maintenance. Aluminium profiles that are not
painted may show black stains, these stains are not a
production error: they can be easily removed with a
aluminium cleaner available at every good drugstore. The
rubber strips have been treated with oil/silicone on the
interior to facilitate the assembly. The building should be
mounted on a solid concrete foundation deep enough to get
a solid and frost-free ground. Anchoring of the foundation
should be made by the owner or operator and should be
checked periodically. During winter the roof has to be
cleared of snow or supported in a suitable way. The
greenhouse should be built in a location protected from
strong winds. Protective gear (such as protective gloves)
should be used during mounting in order to avoid injuries.
One should at all times pay attention to the local building
regulations.
STORAGE
The packages and glass boxes must be stored in a dry place,
protected from sunlight and any form of moisture. Excessive
humidity or condensation inside the packaging may lead to
corrosion on profiles and/or glass!
ASSEMBLY ORDER
The assembly procedure is the same for all our greenhouses.
- Sorting of all profiles and articles.
- Mounting of the complete aluminium construction.
- Leveling of the construction using a waterlevel.
- Securing the building to the ground
- Glazing.
REQUIRED TOOLS
Socket wrench nr. 10 or spanner nr. 10, water-level,
screwdriver, drilling machine + drill 4.2 mm, scissors (to cut
the rubber).
We reserve the right to change the construction without prior
notice!

INFORMATION SUR LE PRODUIT
Nous vous félicitons à l’achat de la serre en aluminium.
REMARQUES
Dans ce manuel vous trouvez les instructions de montage
pour tous les modèles standards (Action Models). Par
contre, ce manuel est aussi un bon guide pour tous les
modèles spéciaux. La serre est une verrière pour cultiver des
plantes et des légumes: des petites fuites et de l’eau de
condensation sont autorisées.
Les couvercles noirs en caoutchouc sont, à l’intérieur, traités
à l’huile. Ceci garantie un montage simple et rapide. Si les
profilés en alu montrent des taches noires, il ne s’agit pas
d’un défaut de production. Ces taches peuvent facilement
être enlevées au moyen de nettoyants pour aluminium, qui
sont disponible sur le marché. Une fondation à l’abris du gel
et portance suffisante est nécessaire. Pendant l’hiver il faut
enlever la neige de la toiture ou étançonner le toit. Il faut
construire la serre dans un endroit protégé du vent. Afin
d’éviter des blessures lors de la montage, il faut porter des
vêtements de travail, qui pourrons vous protéger (p.ex. des
gants de sécurité). En tout cas il faut respecter les règles
urbanistiques locales.
STOCKAGE
Les colis, emballages et palettes avec les verres doivent être
stockés dans un endroit sec, à l'abri du soleil et de toute
forme d'humidité. Une humidité ou une condensation
excessive dans l'emballage peut rapidement entraîner la
corrosion des profilés ou du verre !
DÉROULEMENT DU MONTAGE
L’ordre de montage est identique pour tous les modèles :
- Triage des profilés en alu en fonction des dimensions du
modèle.
- Assemblage des profilés et montage de la structure.
- Alignement vertical et horizontal de la construction.
- Pose du vitrage.
OUTILLAGE NÉCESSAIRE
Clef N° 10, tournevis, niveau à bulle, perceuse et foret
Ø4.2mm, scie à métaux, gants de travail, ciseaux (pour la
mise à longueur du joint en caoutchouc).
Sous réserve de tout changement.
PRODUKT INFORMATION
Wir möchten Ihnen zum Kauf dieses Gewächshauses gratulieren.
ANMERKUNGEN
Die Aufbauanleitung bezieht sich zunächst auf das
Standardmodell (Action Models). Für Sonderkonstruktionen
gibt es zusätzliche Hinweise zur Montage. Das Gewächshaus
sollte in einer windgeschützten Lage montiert werden.
Während des Winters sollte das Dach von Schnee befreit
werden oder durch geeignete Maßnahmen abgestützt
werden! Alle Konstruktionen sind bauseits in geeigneter
Weise am Aufstellungsort zu verankern! Im Jedem Fall muss
ein frostfreies Betonfundament vorhanden sein. Das
Gewächshaus ist vom Betreiber regelmäßig auf ihren
ordnungsgemäßen Zustand zu untersuchen. Unlackierte Alu-
Profile können schwarze Flecken aufweisen, hierbei handelt
es sich nicht um einen Produktionsfehler. Mit einem
handelsüblichen Alu-Reiniger lassen sich diese
weitestgehend entfernen. Die Gewächshäuser dienen der
Kultur von Pflanzen und werden durch gärtnerische tätige
oder entsprechend autorisierte Personen oder nur in deren
Begleitung betreten. Kleine Undichtigkeiten, Wassertropfen
und Kondensat sind zulässig. Das mitgelieferte
Dichtungsgummi ist an der Innenseite mit Talg behandelt,
was zu einer schnelleren und einfacheren Montage beiträgt.
Bei der Montage muss man Schutzausrüstung tragen z.B.
Sicherheitshandschuhe, um Verletzungen zu vermeiden. In
jedem Fall muss die landesübliche Bauordnung beachtet
werden!
LAGERUNG
Die Verpackungen und Glasboxen müssen an einem
trockenen Ort, geschützt von Sonnenlicht und jeglicher Form
von Feuchtigkeit gelagert werden. Zu hohe Feuchtigkeit oder
Kondenswasser in der Verpackung kann schnell zu Korrosion
an Profilen und Glas führen!
MONTAGEABLAUF
Der Montagevorgang ist bei allen Modellen gleich:
- Auslegen der Alu-Profile gemäß Modellgröße.
- Aufbau der Alu-Konstruktion.
- Horizontale und vertikale Ausrichtung der Konstruktion.
- Verankerung der Konstruktion.
- Verglasung.
BENÖTIGTES WERKZEUG
Schraubenschlüssel Nr. 10, Schraubenzieher, Wasserwaage,
Bohrmaschine und Bohrer (4.2 mm) Metallsäge, Schere (für
das Zuschneiden der Gummidichtung).
Konstruktionsänderungen behalten wir uns vor.

FUNDERINGSPLAN
PLAN DE FONDATION
FOUNDATION DRAWING
FUNDAMENT PLAN

" HELIOS + EOS "
X
2.360mm2.360mm
3.098mm 3.098mm
3.836mm3.836mm
4.574mm
6.050mm
5.312mm
A
B
AB
AB
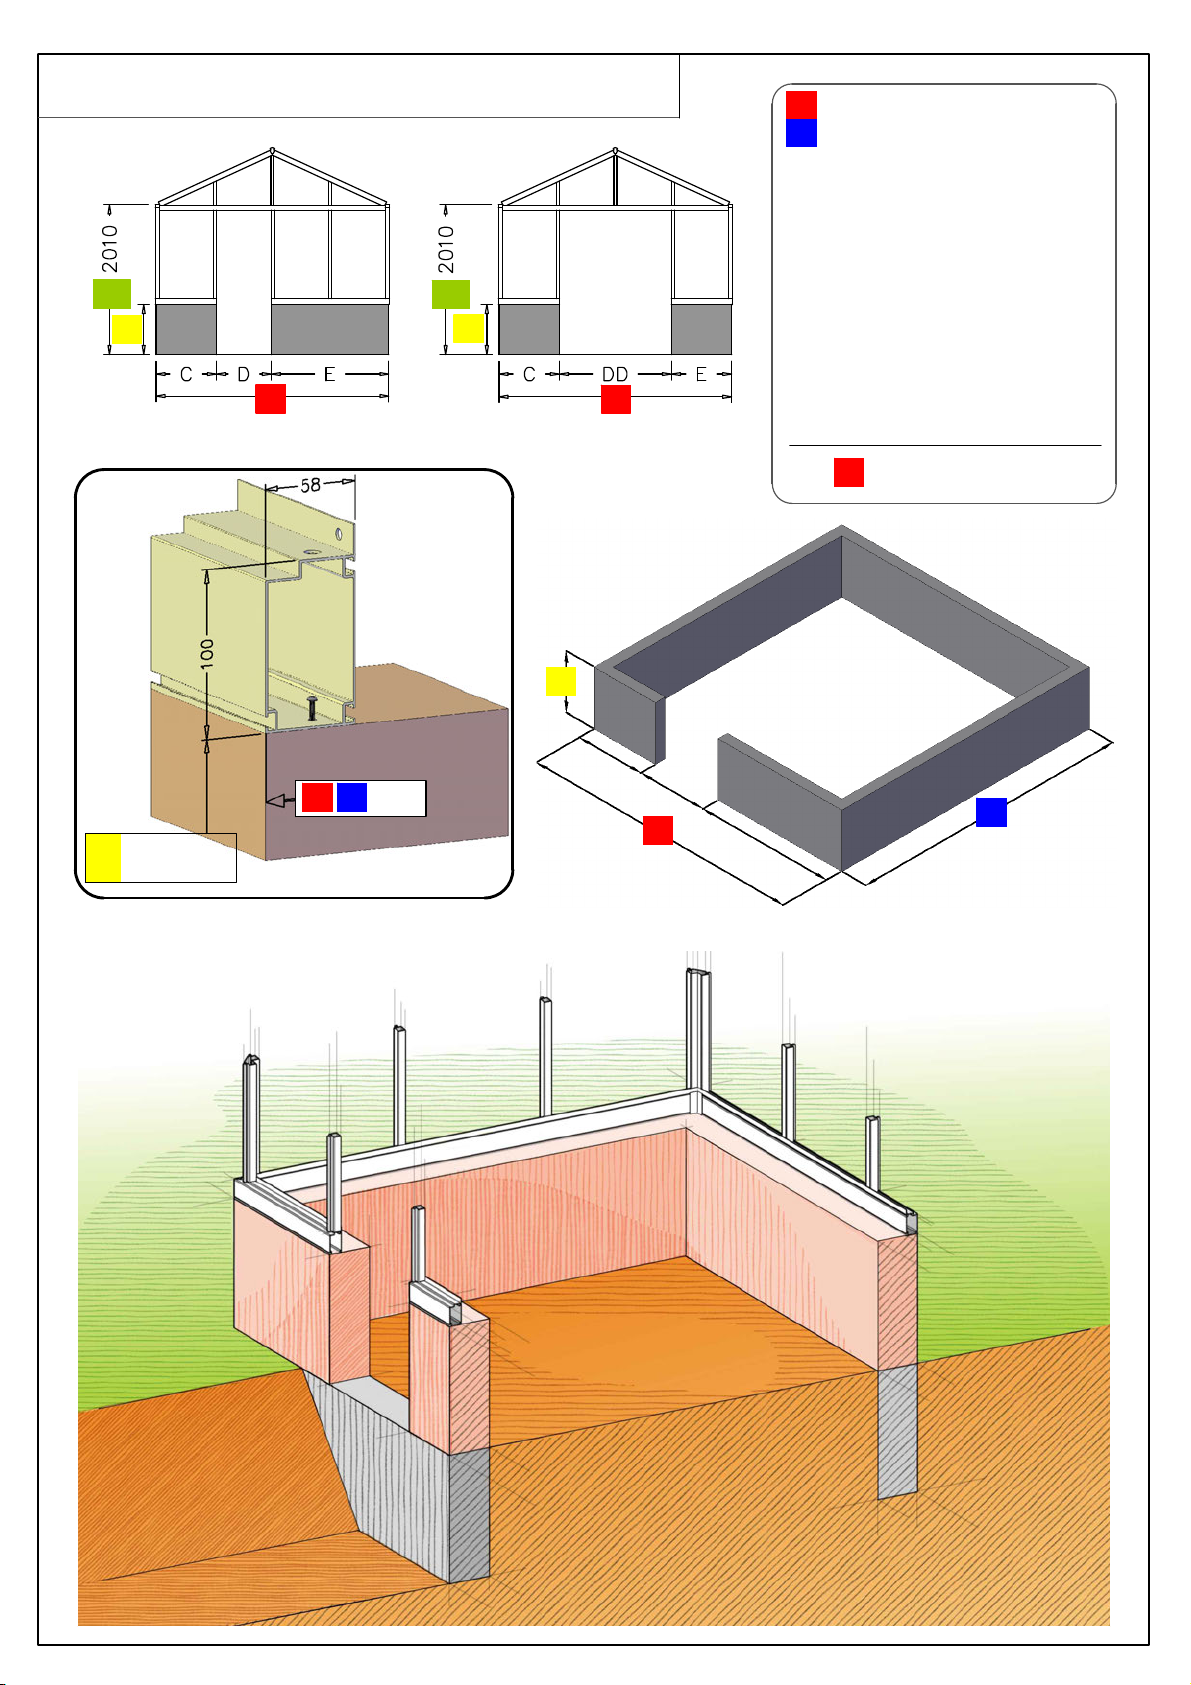
" HELIOS MUR + EOS MUR " A = 2.360 | 3.098 | 3.836
B = 2.360 | 3.098 | 3.836
4.574 | 5.312 | 6.050
C = 1.X = 829
2.X = 1.567
3.X = 2.305
4.X = 3.043
D = 703 (DD = 1.441)
E = 1.X = 829
2.X = 1.567
3.X = 2.305
4.X = 3.043
!!! A = C + D(D) + E !!!
A B C|E
M200 | 400
600 | 1.025
Alle maten zijn buitenmaten van de aluminium constructie.
All dimensions are external dimensions of the aluminum profiles!!
Toutes les dimensions sont des dimensions extérieures de la construction en alu!
Alle Maße sind Außenmaße des Aluminium-Konstruktion!
X X X X X
AA
AB
M
C
D
E
M
M
H1 H1

" HELIOS MUR 236 + EOS MUR 236 MODULE 37 "
A = 2.360
B = 2.360 | 3.098 | 3.836
4.574 | 5.312 | 6.050
C = 829
D = 703
E = 829
!!! A = C + D + E !!!
A B C|E
M200 | 400
600 | 1.025
Alle maten zijn buitenmaten van de aluminium constructie.
All dimensions are external dimensions of the aluminum profiles!!
Toutes les dimensions sont des dimensions extérieures de la construction en alu!
Alle Maße sind Außenmaße des Aluminium-Konstruktion!
A = 2.360
B = 2.360 | 3.098 | 3.836
4.574 | 5.312 | 6.050
C = 829
D = 703
E = 829
!!! A = C + D + E !!!
M
A
B
M
A
A
M
M

" HELIOS MUR 236 DD + EOS MUR 236 DD"
MODULE 37
A = 2.360
B = 2.360 | 3.098 | 3.836
4.574 | 5.312 | 6.050
C = 459
D = 1.442
E = 459
!!! A = C + D + E !!!
M200 | 400
600 | 1.025
Alle maten zijn buitenmaten van de aluminium constructie.
All dimensions are external dimensions of the aluminum profiles!!
Toutes les dimensions sont des dimensions extérieures de la construction en alu!
Alle Maße sind Außenmaße des Aluminium-Konstruktion!
A B C|E
A
B
A
A
MM
M

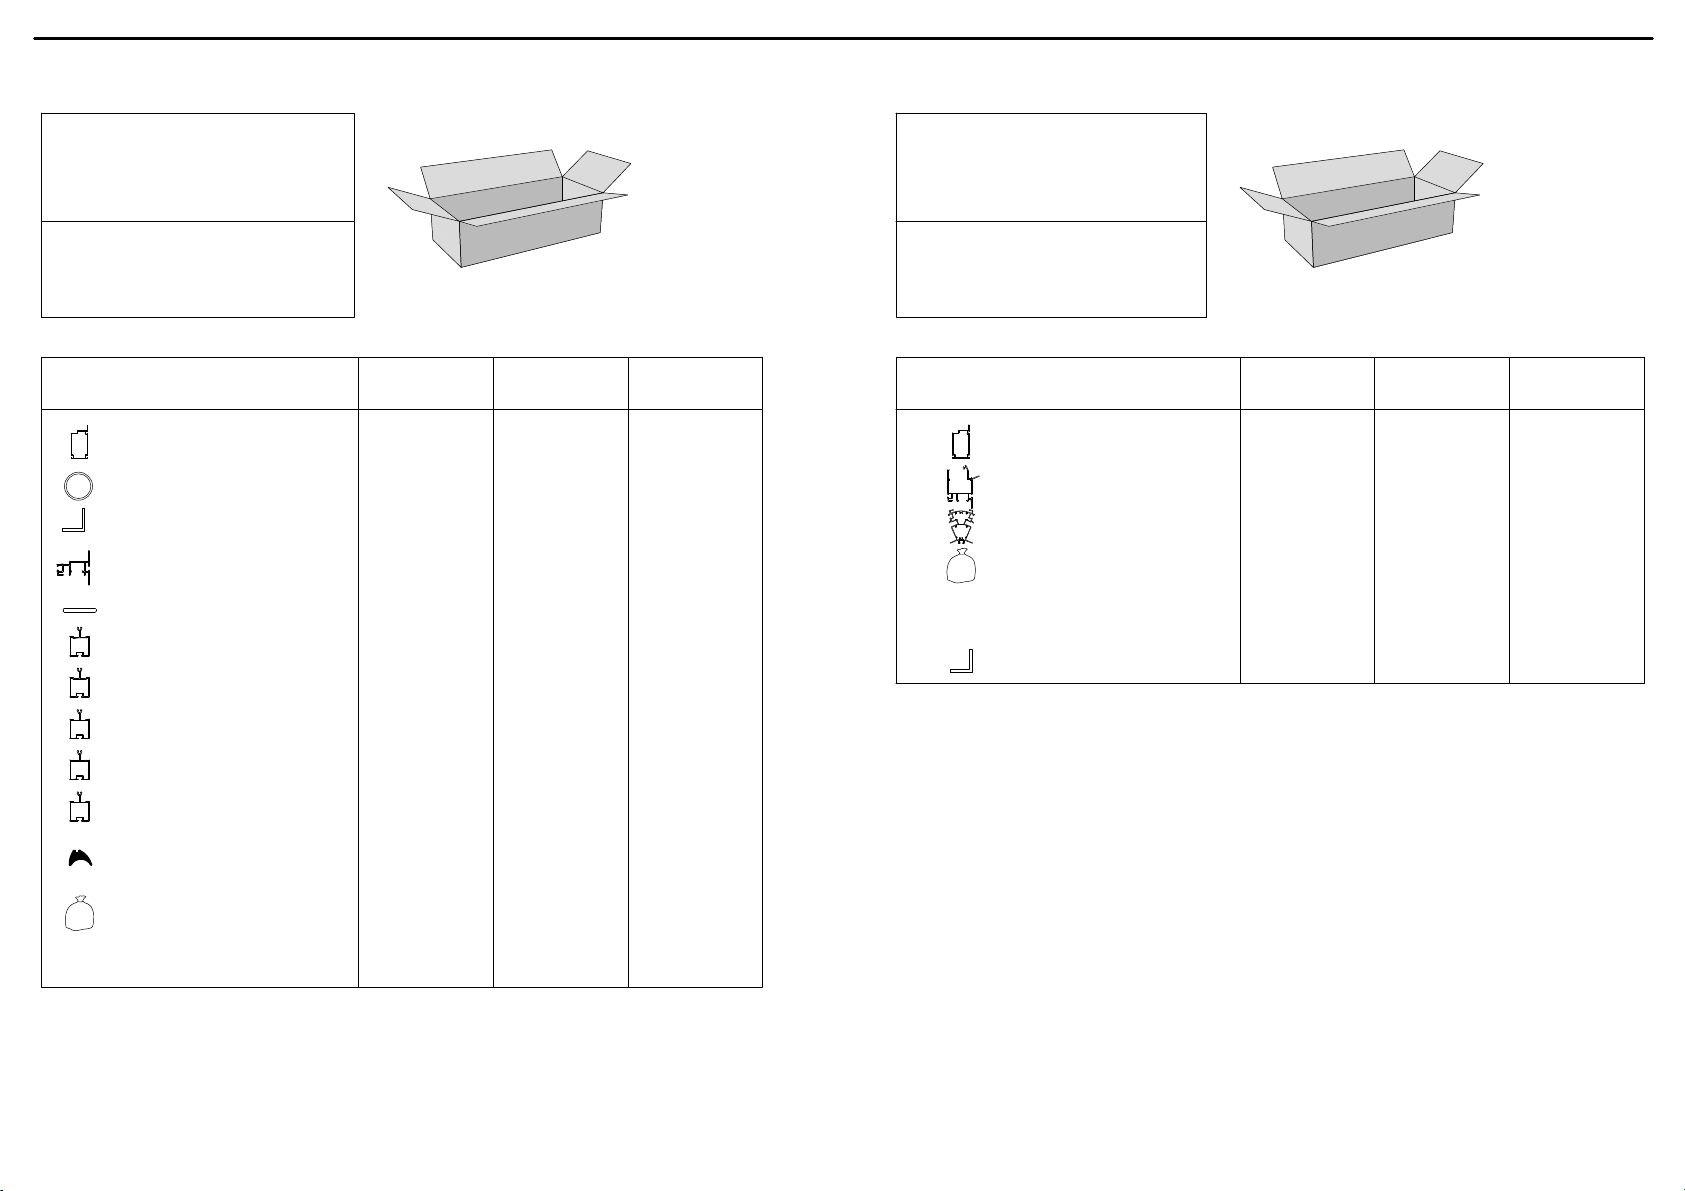
PAKLIJST
LIST DES PIECES
PARTS LIST
TEILELISTE

PALLET HELIOS SENIOR
WEIGHT: SENIOR
S23 355 kg
S24 447 kg
S34 530 kg
S36 635 kg
DIMENSIONS:
800 x 900 x 2300 mm
POSITION GLAS DIMENSIONS S23 S24 S34 S36
sliding door 730 x 1650 mm 1 pc 1 pc 1 pc 1 pc
gabels 730 x 1650 mm 13 pc 17 pc 19 pc 23 pc
triangle H1 1099 x 74 x 543 mm 4 pc 4 pc - -
triangle H2 730 x 74 x 411 mm - - 4 pc 4 pc
triangle H3 730 x 414 x 696 mm (113 plat) - - 4 pc 4 pc
roof 730 x 1250 mm 7 pc 10 pc - -
roof 730 x 1650 mm - - 10 pc 13 pc
roofwindow 730 x 825 mm 1 pc 2 pc 2 pc 3 pc
underneed roofwindow 730 x 425 mm 1 pc 2 pc - -
underneed roofwindow 730 x 825 mm - - 2 pc 3 pc
ITEM S23 S24 S34 S36
ESD_163_ZS 1 pc 1pc 1 pc 1 pc
DAKR_HEL 1 pc 2 pc 2 pc 3 pc
PRO6578 corner profile 1630 mm 4 pc 4 pc 1630 mm 4 pc 4 pc
PRO1456 glazing bar gable 1630 mm 10 pc 14 pc 1630 mm 16pc 20 pc
PRO6918 endbar roof 1230 mm 4 pc 4 pc 1630 mm 4 pc 4 pc
PRO1456 glazing bar roof 1230 mm 6 pc 10pc 1630 mm 10 pc 14 pc
PRO10980 round tube Ø40 1700 mm 2 pc 2 pc 1700 mm 2 pc 2 pc
PRO21214 wind bracings gabel 1795 mm 8 pc 8 pc 1795 mm 8 pc 8 pc
PRO1748 rubber 12m/rol 4 pc 5 pc 6 pc 7 pc
ZAK_H 1 pc 1 pc 1 pc 1 pc
screw 4.8x38 DIN7504 N A2 2 pc
bolt M6x25 DIN933 A2 4 pc
screw 4.8x19 DIN7504 M A2 10 pc
glasholder 32 pc
PVC Ø40 90° 2 pc
PVC gutter pieces 2 + 2 pc
BAG_GLASS SPACERS 1 pc 1 pc 1 pc 1 pc
spacers 80 pc
silicone 1 pc
RIDGE DECORATION box 1 pc 1+1 pc 1+1 pc 2+1 pc
SPANDREL 3 pc

PALLET HELIOS MASTER
WEIGHT: MASTER
M23 384 kg
M24 485 kg
M34 567 kg
M36 676 kg
M46 630 kg + 170 kg
DIMENSIONS:
800 x 900 x 2300 mm
POSITION GLAS DIMENSIONS M23 M24 M34 M36 M46
sliding door 730 x 1850 mm 1 pc 1 pc 1 pc 1 pc 2 pc
gabels 730 x 1850 mm 12 pc 16 pc 18 pc 22 pc 23 pc
underneed louvre-vent 730 x 825 mm 1 pc 1 pc 1 pc 1 pc 1 pc
triangle H1 1099 x 74 x 543 mm 4 pc 4 pc - - -
triangle H2 730 x 74 x 411 mm - - 4 pc 4 pc -
triangle H3 730 x 414 x 696 mm (113 plat) - - 4 pc 4 pc -
triangle H4 730 x 72 x 357 mm - - - - 4 pc
triangle H5 730 x 360 x 645 mm - - - - 4 pc
triangle H6 361 x 648 x 737 mm (133 plat) - - - - 4 pc
roof 730 x 1250 mm 6 pc 9 pc - - -
roof 730 x 1650 mm - - 9 pc 12 pc -
roof 730 x 2000 mm - - - - 10 pc
roofwindow 730 x 825 mm 2 pc 3 pc 3 pc 4 pc 6 pc
underneed roofwindow 730 x 425 mm 2 pc 3 pc - - -
underneed roofwindow 730 x 825 mm - - 3 pc 4 pc -
underneed roofwindow 730 x 1180 mm - - - - 6 pc
ITEM M23 M24 M34 M36 M46
LAMELLEN + ZAKJE_LAMEL 1 pc 1 pc 1 pc 1 pc 1 pc
ESD_183_ZS 1 pc 1pc 1 pc 1 pc 2 pc
DAKR_HEL 2 pc 3 pc 3 pc 4 pc 6 pc
PRO6578 corner profile 1830 mm 4 pc 4 pc 1830 mm 4 pc 4 pc 1830 mm 4 pc
PRO1456 glazing bar gable 1830 mm 10 pc 14 pc 1830 mm 16pc 120 pc 1830 mm 22 pc
PRO6918 endbar roof 1230 mm 4 pc 4 pc 1630 mm 4 pc 4 pc 1986 mm 4 pc
PRO1456 glazing bar roof 1230 mm 6 pc 10pc 1630 mm 10 pc 14 pc 1986 mm 14 pc
PRO10980 round tube Ø40 1900 mm 2 pc 2 pc 1900 mm 2 pc 2 pc 1900 mm 2 pc
PRO21214 wind bracings gabel 1975 mm 8 pc 8 pc 1975 mm 8 pc 8 pc 1975 mm 8 pc
PRO1748 rubber 12m/rol 5 pc 6 pc 7 pc 8 pc 9 pc
ZAK_H 1 pc 1 pc 1 pc 1 pc 1 pc
screw 4.8x38 DIN7504 N A2 2 pc
bolt M6x25 DIN933 A2 4 pc
screw 4.8x19 DIN7504 M A2 10 pc
glasholder 32 pc
PVC Ø40 90° 2 pc
PVC gutter pieces 2 + 2 pc
BAG_GLASS SPACERS 1 pc 1 pc 1 pc 1 pc 1 pc
spacers 80 pc
silicone 1 pc
RIDGE DECORATION box 1 pc 1+1 pc 1+1 pc 2+1 pc 2 + 1 pc
SPANDREL 3 pc 3 pc
ZAK_BOUT 1 pc
nut cap M6 50 pc
nut M6 50 pc
bolt M6x12 DIN933 A2 50 pc
ITEM S23 / S24 S34 / S36 M46
M23 / M24 M34 / M36
PRO6120 foundation profile 2360 mm 2 pc 3098 mm 2 pc 3836 mm 2 pc
B19_1030 round tube Ø19 1030 mm 2 pc 1030 mm 2 pc
L40X40GATFUND 400 mm 4 pc 400 mm 4 pc 400 mm 4 pc
PRO20229 horizontal gable prof. 2244 mm 2 pc 2982 mm 2 pc 3720 mm 2 pc
PRO21214 wind bracings roof 2543 mm 4 pc 2757 mm 4 pc 2980 mm 4 pc
PRO1456 glazing bar 547 mm 2 pc 703 mm 2 pc 736 mm 2 pc
PRO1456 glazing bar 90 / 65 396 mm 2 pc 345 mm 2 pc
PRO1456 glazing bar 90 / 65 634 mm 2 pc
PRO1456 glazing bar 65 / 90 396 mm 2 pc 345 mm 2 pc
PRO1456 glazing bar 65 / 90 634 mm 2 pc
E400330 halfmoon glazingrubber 1 pc 20 lm 1 pc 20 lm 1 pc
SAPAKHELIOS 1 pc 1 pc 1 pc
PVC gable pieces 4+4+2 pc
bolt M6x50 DIN933 A2 16 pc
Nut M6 16 pc
L2G 10 pc
COLLI A HELIOS SENIOR + MASTER
WEIGHT:
M23/M24 19 kg
M34/M36 25 kg
M46 29 kg
DIMENSIONS:
250 x 150 x 2800 mm M23 / M24 / S23 / S24
3300 mm M34 / M36 / S34 / S36
4050 mm M46
ITEM S23 / M23 S24 / S34 S36
M24 / M34 M36 / M46
PRO6120 foundation profile 3098 mm 2 pc 4574 mm 2 pc 6050 mm 2 pc
PRO20227 gutter profile 3098 mm 2 pc 4574 mm 2 pc 6050 mm 2 pc
PRO6760 ridge profile 3098 mm 1 pc 4574 mm 1 pc 6050 mm 1 pc
ZAK_BOUT 2 pc 3 pc 3 pc
nut cap M6 50 pc
nut M6 50 pc
bolt M6x12 DIN933 A2 50 pc
L40X40GATFUND 400 mm 2 pc
COLLI B HELIOS SENIOR + MASTER
WEIGHT:
M23 26 kg
M24 / M34 39 kg
M36 / M46 52 kg
DIMENSIONS:
250 x 150 x 3200 mm M23 / S23
4700 mm M24 / M34 / S24 / S34
6250 mm M36 / M46 / S36

HANDLEIDING
INSTRUCTIONS DE MONTAGE
MOUNTING INSTRUCTIONS
AUFBAUANLEITUNG

PRO6760
Ø 19
PRO20229
PRO1456
TRE
PRO210
PRO6918
PRO1456
PRO6120
HELIOS
PRO20227
PRO6578
PAGE: H_1

B
L = 600
B = LENGTH > 6m10
A
PRO6760
PRO6760
!
25 x 15 x 600
55 x 20 x 600
PRO20227
PRO20227
25 x 15 x 600
25 x 25 x 600
PRO6120
PRO6120
!
PAGE: H_2
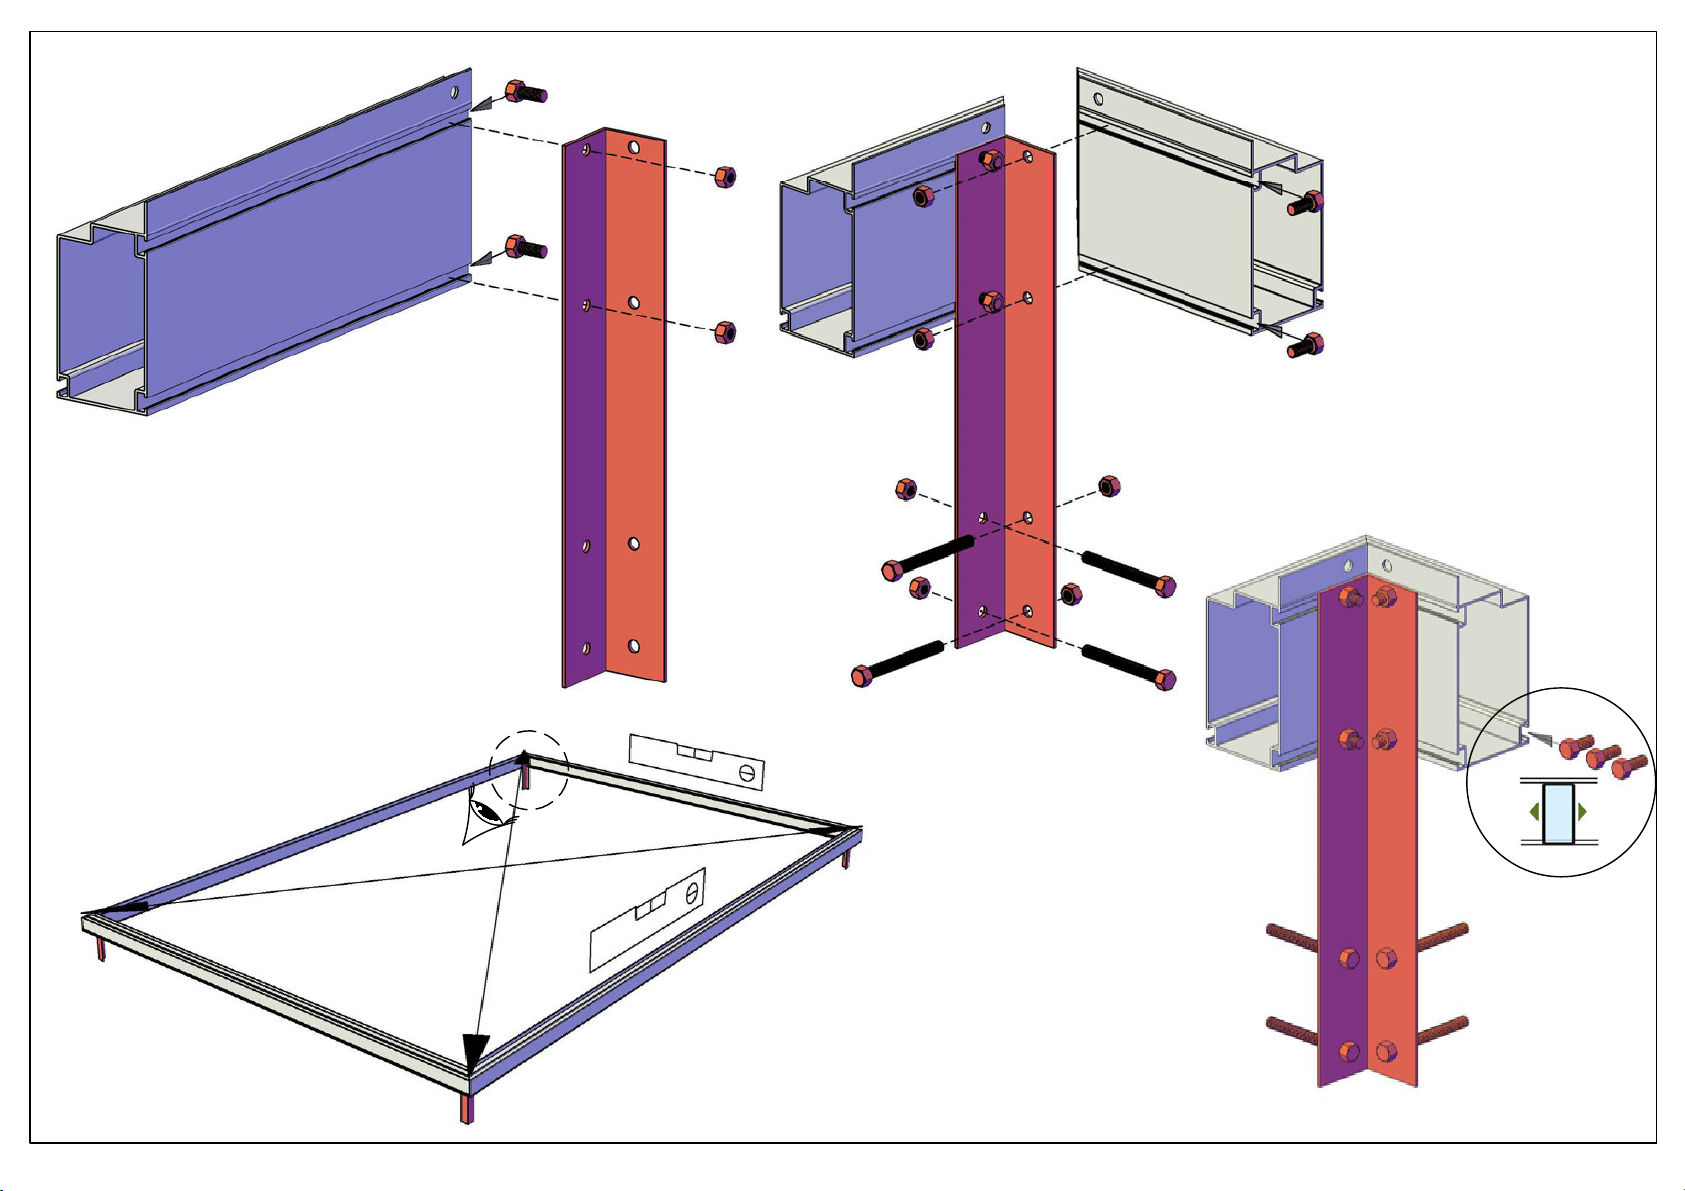
X
X
M6x15
M6x50
B
A
PRO6120
PRO210
PRO6120
PAGE: H_3
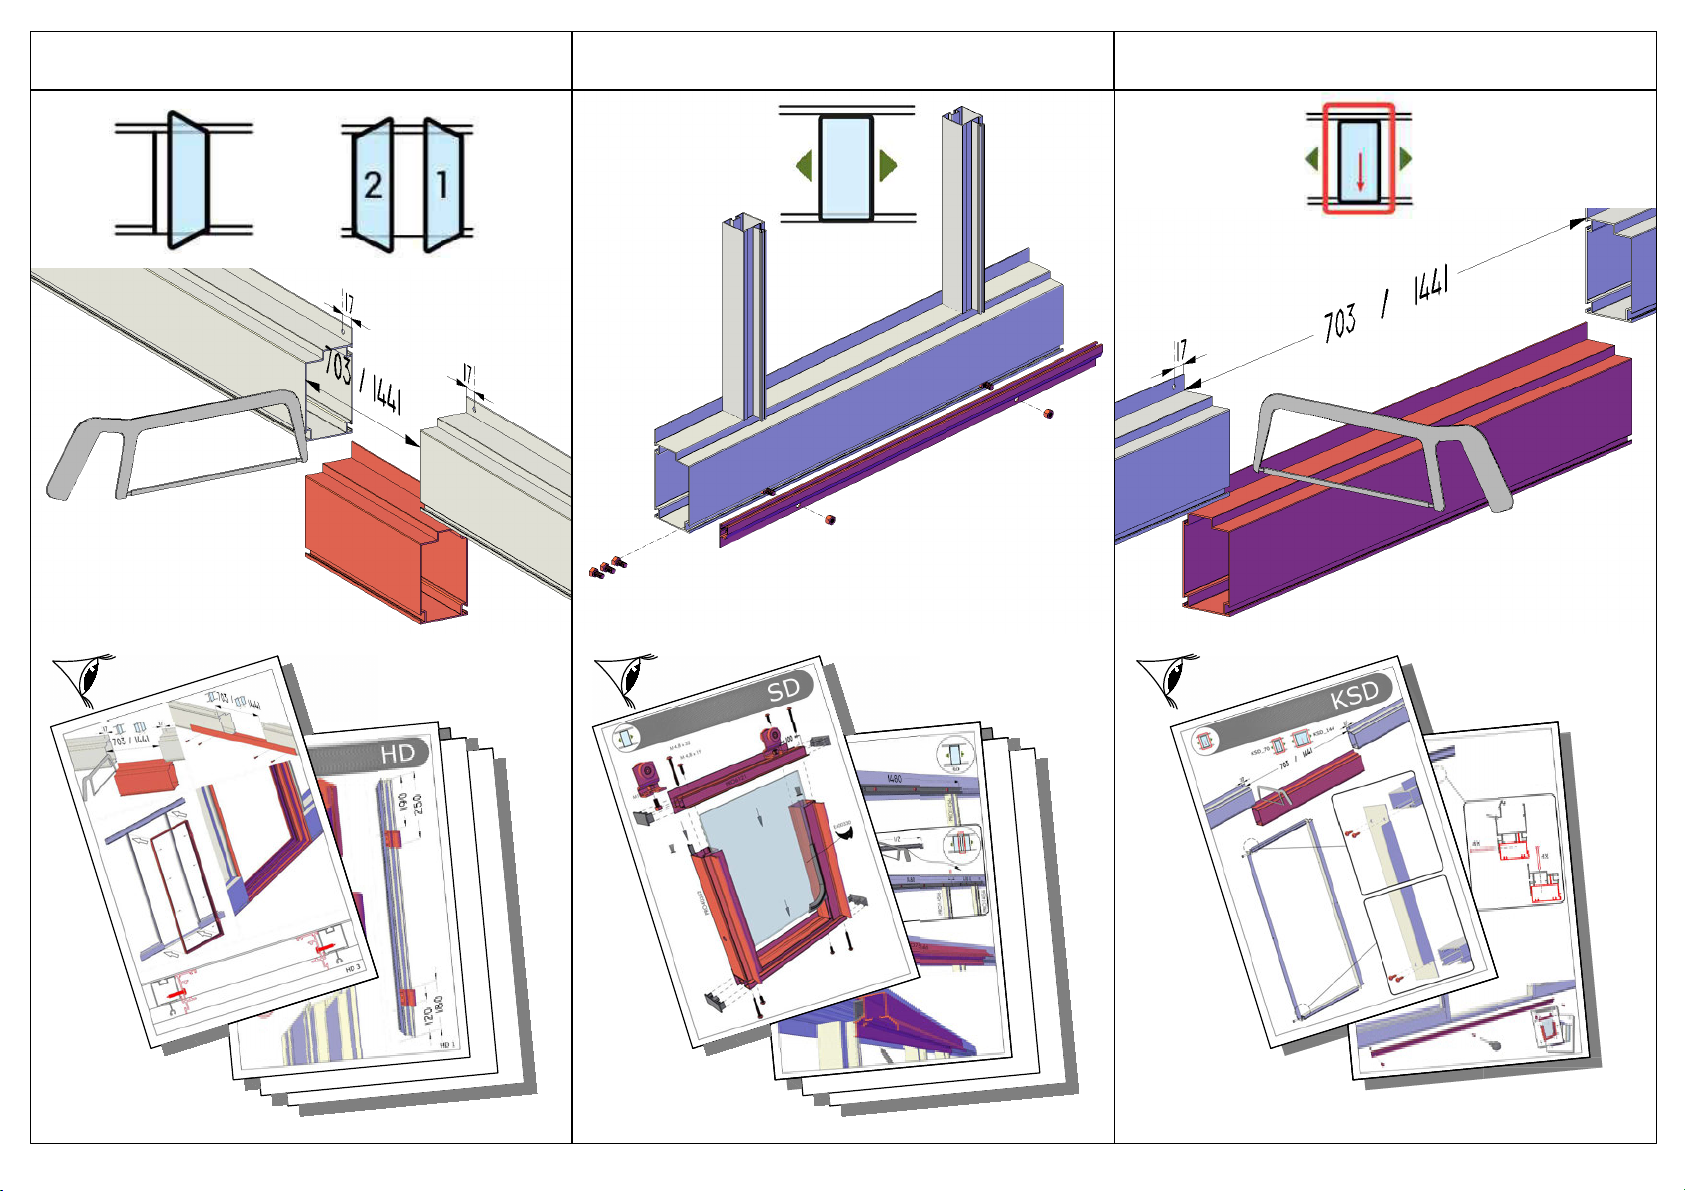
OPTION: HD (hinged door) OPTION: SD (sliding door) OPTION: KSD (low threshold)
PRO1456
PRO1456
PAGE: H_4

M6x15
PRO6578
PAGE: H_5

M6x15
PRO20229
PRO6578
PAGE: H_6

B
25 x 15 x 600
55 x 20 x 600
!!!! B = LENGTH > 6m10 !!!!
PRO20227 PRO20227
PAGE: H_7
This manual suits for next models
1
Popular Greenhouse Kit manuals by other brands


Palram
Palram Canopia SKYLIGHT 6x5 How to assemble

Palram
Palram Grow&Store - 6'x12' Assembly instructions

AeroGarden
AeroGarden 507140-0000 AD Planting & growing guide

Robinsons
Robinsons Renown Dwarf Assembly instructions

GREEN PROTECT
GREEN PROTECT Prima Assembly instructions

Outsunny
Outsunny 845-059V01 Assembly & instruction manual