manuals.online logo
Brands
  1. Home
  2. •
  3. Brands
  4. •
  5. Outsunny
  6. •
  7. Greenhouse Kit
  8. •
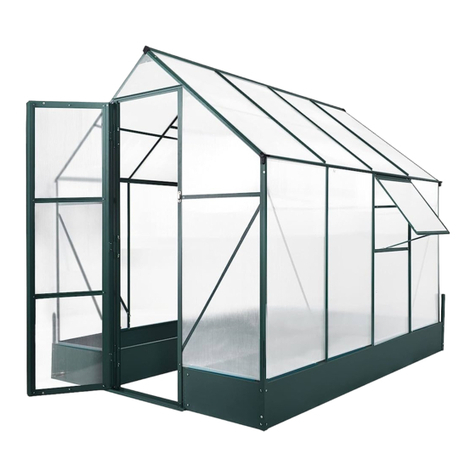
  9. Outsunny 845-059V01 Installation guide

Outsunny 845-059V01 Installation guide

ASSEMBLY & INSTRUCTION MANUAL
IMPORTANT, RETAIN FOR FUTURE REFERENCE: READ CAREFULLY
845-059V01
4HOURS
Tools Recommended
INbxb004V02_GL
1
TO PREVENT INJURY, READ AND UNDERSTAND THE
GREENHOUSE ASSEMBLY INSTRUCTIONS BEFORE USE.
Notes:
1. It takes about 1-2 hours to assemble the greenhouse by 2-3
persons.
2.The UV-protected side of the sheet is covered with opal white
film and must face towards the sun.
3.Remove approximately 2 inches of film from all sheet edges
before installing.Removing all film immediately after the
construction is completed
4.Make sure the greenhouse is located on a flat, level surface.
GENERAL SAFETY, WARNINGS AND PRECAUTIONS
KEEP WORK AREA CLEAN AND DRY.
Cluttered, damp or wet work areas invite injuries.
STAY ALERT. Watch what you are doing at all times. Use common
sense. Do not use the greenhouse when you are tired or
distracted from the job at hand. It is recommended to use gloves
for assembling the greenhouse.
MAINTAIN THIS PRODUCT WITH CARE.
Keep the greenhouse clean and dry for better performance:
maintenance should be performed regularly.
USE THE RIGHT PRODUCT FOR THE JOB.
Do not attempt to force a small product to do the work of a larger
industrial product. There are certain applications for which the
greenhouse was designed. It will do the job better and more
safely in the manner for which it was intended. Do not modify the
greenhouse and do not use the greenhouse for a purpose for
which it was not intended.
MAINTAIN A SAFE WORKING ENVIRONMENT.
Keep the work area tidy. Make sure there is adequate
surrounding
workspace. Avoid high traffic areas. Always keep the work area
free of obstructions, grease, oil, trash and other debris.
PROPER GREENHOUSE LOCATION.
Make sure the greenhouse is located on a flat, level surface.
EN
ASSEMBLY PREPARATION
2
POUR ÉVITER LES RISQUES DE BLESSURESVEILLEZ LIRE ET
COMPRENDRE LES INSTRUCTIONS DE MONTAGE DE LA SERRE
AVANT DE L'UTILISER.
Notes:
1.Il faut environ 1 à 2 heures pour assembler la serre par 2 à 3
personnes.
2.La face de la feuille protégée contre les UV est recouverte d'un film
blanc opale et doit être orientée vers le soleil.
3.Enlevez environ 2 pouces de film sur tous les bords de la feuille
avant l'installation. Enlever tous les films immédiatement après la fin
des travaux
4.Assurez-vous que la serre est située sur une surface plane et
horizontale.
SÉCURITÉ GÉNÉRALE, AVERTISSEMENTS ET PRÉCAUTIONS
GARDER LA ZONE DE TRAVAIL PROPRE ET SÈCHE.
Les zones de travail encombrées, humides ou mouillées sont
propices aux blessures.
RESTEZ VIGILANT. Surveillez ce que vous faites à tout moment.
Faites preuve de bon sens. N'utilisez pas la serre lorsque vous êtes
fatigué ou distrait du travail en cours. Il est recommandé d'utiliser des
gants pour le montage de la serre.
ENTRETENEZ CE PRODUIT AVEC SOIN.
Gardez la serre propre et sèche pour un meilleur rendement :
l'entretien doit être effectué régulièrement.
UTILISEZ LE PRODUIT APPROPRIÉ POUR LE TRAVAIL À
EFFECTUER.
N'essayez pas de forcer un petit produit à faire le travail d'un produit
industriel plus important. La serre a été conçue pour certaines
applications. Elle fera mieux le travail pour lequel elle a été conçue et
de manière plus sûre. Ne modifiez pas la serre et n'utilisez pas la
serre à des fins pour lesquelles elle n'a pas été conçue.
MAINTENIR UN ENVIRONNEMENT DE TRAVAIL SÛR.
Maintenez l'espace de travail en ordre. Assurez-vous que l'espace de
travail environnant est adéquat. Évitez les zones à forte circulation.
Maintenez la zone de travail toujours libre de tout obstacle, graisse,
huile, déchets et autres débris.
EMPLACEMENT ADÉQUAT DE LA SERRE.
Veillez à ce que la serre soit située sur une surface plane et de
niveau.
FR
PRÉPARATION DE L'ASSEMBLAGE
3
PA R A P R E V E N I R L E S I O N E S , L E A Y C O M P R E N D A L A S
INSTRUCCIONES DE MONTAJE DEL INVERNADERO ANTES DE
USARLO.
Notas:
1.Se requiere 1 y 2 horas para montar el invernadero por 2 y 3
personas.
2.El lado de la hoja protegido contra los rayos UV está cubierto con una
película de color blanco opal y debe mirar hacia el sol.
3.Retire aproximadamente 2 pulgadas de película de todos los bordes
de la hoja antes de instalar. Retire toda la película inmediatamente
después de que se complete la instalación.
4.Asegúrese de que el invernadero esté ubicado en una superficie
plana y nivelada.
SEGURIDAD GENERAL, ADVERTENCIAS Y PRECAUCIONES
MANTENGA EL ÁREA DE TRABAJO LIMPIA Y SECA.
Las áreas de trabajo desordenadas, húmedas o mojadas pueden
provocar lesiones.
MANTÉNGASE ALERTA. Vigile lo que está haciendo en todo momento
con el conocimiento común. No use el invernadero cuando esté
cansado o distraído del trabajo en cuestión. Se recomienda utilizar
guantes para montar el invernadero.
MANTENGA ESTE PRODUCTO CON CUIDADO.
Mantenga el invernadero limpio y seco para un mejor rendimiento: el
mantenimiento debe realizarse con regularidad.
USE EL PRODUCTO ADECUADO PARA EL TRABAJO.
No intente forzar a un producto pequeño a hacer el trabajo que debe
hacerse por un producto industrial más grande. Existen determinadas
aplicaciones para las que se ha diseñado el invernadero. Puede hacer
el trabajo mejor y con más seguridad si se usa en la manera para la que
fue diseñado. No modifique el invernadero y no lo utilice para fines para
los que no fue diseñado.
MANTENGA UN AMBIENTE DE TRABAJO SEGURO.
Mantenga el área de trabajo ordenada. Asegúrese de que haya un
espacio de trabajo circundante adecuado. No lo use en las áreas de
mucho tráfico. Mantenga siempre el área de trabajo libre de
obstrucciones, grasa, aceite, basura y otros desechos.
UBICACIÓN APROPIADA DEL INVERNADERO.
Asegúrese de que el invernadero esté ubicado en una superficie plana
y nivelada.
ES
PREPARACIÓN DEL MONTAJE
4
DE
VORBEREITUNG FÜR DIE MONTAGE
Um Verletzungen zu vermeiden, lesen und verstehen Sie bitte vor
dem Gebrauch die Anweisungen zur Montage des Gewächshauses.
Hinweise:
1. Es dauert ungefähr 1-2 Stunden, um das Gewächshaus von 2-3
Personen zusammenzubauen.
2. Die UV-geschützte Seite des Blattes ist mit opalweißem Film bedeckt
und muss der Sonne zugewandt sein.
3. Entfernen Sie vor der Installation ca. 2 Zoll Film von allen
Blattkanten. Entfernen Sie den gesamten Film sofort nach Abschluss
des Baus
4. Stellen Sie sicher, dass sich das Gewächshaus auf einer ebenen
Fläche befindet.
Allgemeine Sicherheit, Warnhinweise und Vorsichtsmaßnahmen
Halten Sie Arbeitsbereich sauber und trocken .
Überfüllte, feuchte oder nasse Arbeitsbereiche können zu Verletzungen
führen.
WACHSAM BLEIBEN. Beobachten Sie jederzeit, was Sie tun.
Verwenden Sie gesunden Menschenverstand. Verwenden Sie das
Gewächshaus nicht, wenn Sie müde oder von der anstehenden
Aufgabe abgelenkt sind. Es wird empfohlen, für die Montage des
Gewächshauses Handschuhe zu tragen.
Behalten Sie dieses Produkt mit Pflege
Halten Sie das Gewächshaus sauber und trocken, um eine bessere
Leistung zu erzielen: Regelmäßige Wartungsarbeiten sollten
durchgeführt werden.
Verwenden Sie das richtige Produkt für den Job
Versuchen Sie nicht, ein kleines Produkt zu zwingen, die Arbeit eines
größeren Industr ieprodukts zu erledigen. Es gi bt besti mmte
Anwendungen, für die das Gewächshaus konzipiert wurde. Es wird die
Arbeit besser und sicherer in der Weise erledigen, für die es bestimmt
war. Ändern Sie das Gewächshaus nicht und verwenden Sie es nicht für
Zwecke, für die es nicht vorgesehen war.
Sorgen Sie für ein sicheres Arbeitsumfeld.
Halten Sie den Arbeitsbereich sauber und ordentlich. Stellen Sie sicher,
dass Sie genügend Arbeitsfläche um sich haben. Vermeiden Sie stark
frequentierte Bereiche. Halten Sie den Arbeitsbereich immer frei von
Hindernissen, Fett, Öl, Müll und anderen Fremdkörpern.
Richtige Gewächshauslage.
Stellen Sie sicher, dass sich das Gewächshaus auf einer ebenen Fläche
befindet.
5
IT
MONTAGGIO
PER PREVENIRE LESIONI, LEGGETE E COMPRENDETE LE
IST R UZIONI DI AS S E MBLAG G I O D E LLA S E R RA PR I MA
DELL'USO.
NOTA:
1. Ci vogliono circa 1-2 ore per assemblare la serra con 2-3 persone.
2.Il lato protetto dai raggi UV del foglio ricoperto da una pellicola
bianca opalina deve essere rivolto verso il sole.
3.Togli circa 2 pollici di pellicola da tutti i bordi del foglio prima
dell'installazione.Togli tutta la pellicola immediatamente dopo il
completamento della costruzione.
4.Assicurati che la serra si trovi su una superficie piana e livellata.
SICUREZZA GENERALE, AVVERTENZE E PRECAUZIONI
MANTENETE L'AREA DI LAVORO PULITA E ASCIUTTA.
Le aree di lavoro disordinate, umide o bagnate potrebbero
provocare lesioni.
STAI ATTENTO. Stai attneto su cosa stai facendo in ogni momento.
Usa il senso comune e non usare la serra quando sei stanco o
distratto nel lavoro da svolgere. Si consiglia di utilizzare i guanti per
l'assemblaggio della serra.
MANTENETE QUESTO PRODOTTO CON CURA.
Mantieni la serra pulita e asciutta per prestazioni migliori: la
manutenzione deve essere eseguita regolarmente.
UTILIZZATE IL PRODOTTO GIUSTO PER IL LAVORO.
Non tentare di forzare un prodotto piccolo a svolgere un lavoro di un
prodotto industriale più grande. Ci sono alcune applicazioni per le
quali il prodotto è stato progettato. Il prodotto funzionera' meglio e
più sicuro nel modo per cui è stato progettato. Non modificare la
serra e non utilizzare la serra per scopi per i quali non è stata
concepita.
MANTENETE UN AMBIENTE DI LAVORO SICURO.
Tieni in ordine l'area di lavoro. Assicurati che ci sia uno spazio di
lavoro circostante adeguato. Evita le zone di molto traffico. Mantieni
sempre l'area di lavoro libera da ostruzioni, grasso, olio, rifiuti e altri
detriti.
POSIZIONE ADEGUATA DELLA SERRA.
Assicurati che la serra si trovi su una superficie piana e livellata.
6
Rear/Arrière/Trasero/Rückseite/Retro
Front/Devant/Delantero/Vorderseite/Fronte
Two sides of PC sheet are covered with thin film,one side's film
is transparent, another's film is opal white.The UV-protected
side of the sheet is covered with opal white film and must face
towards the sun.
EN
GL
Opal white film
PC sheet
transparent film
POLYCARBONATE PANEL
7
ES
FR
Les deux faces de la feuille de PC sont recouvertes d'un film fin,
le film d'une face est transparent, celui de l'autre est blanc opale.
La face de la feuille protégée contre les UV est celle recouverte
d'un film blanc opale; elle doit être orientée vers le soleil.
PANNEAU EN POLYCARBONATE
Film blanc opal
Feuille de PC
Film transparent
Dos lados de la hoja de PC están cubiertos con una película delgada,
la película de un lado es transparente y la película del otro es de color
blanco ópalo. El lado de la hoja protegido contra los rayos UV está
cubierto con una película de color blanco ópalo y debe mirar hacia el sol.
PANEL DE POLICARBONATO
Película blanca ópalo
Lámina PC
Película transparente
8
IT
DE
Zwei Seiten des PC-Blatts sind mit einem dünnen Film bedeckt,
der Film einer Seite ist transparent, der Film einer anderen ist
opalweiß. Die UV-geschützte Seite des Blattes ist mit opalweißem
Film bedeckt und muss der Sonne zugewandt sein.
POLYCARBONATPLATTE
Opalweißer Film
PC-Blatt
Transparenter Film
Due lati del foglio in PC sono ricoperti da pellicola sottile. La pellicola di
un lato è trasparente, la pellicola di un altro è bianca opaca. Il lato
protetto dai raggi UV del foglio ricoperto da una pellicola bianca opalina
deve essere rivolto verso il sole.
POLICARBONATO PANNELLO
Pellicola bianca opalina
Foglio in PC
Pellica transparente
9
PACKING DETALS:TOTAL 3 BOXES
10
PART
LIST
11
PART
LIST
12
01
13
02
14
03
15
04
16
05
17
06
18
07
19
08

Other Outsunny Greenhouse Kit manuals

Outsunny 84H-080V00 User manual

Outsunny

Outsunny 84H-080V00 User manual

Outsunny 845-421V03 Installation guide

Outsunny

Outsunny 845-421V03 Installation guide

Outsunny 845-243 Installation guide

Outsunny

Outsunny 845-243 Installation guide

Outsunny 845-421V02 User manual

Outsunny

Outsunny 845-421V02 User manual

Outsunny 845-243 User manual

Outsunny

Outsunny 845-243 User manual

Outsunny 845-421 Installation guide

Outsunny

Outsunny 845-421 Installation guide

Outsunny 845-391V01 User guide

Outsunny

Outsunny 845-391V01 User guide

Outsunny 845-011 Installation guide

Outsunny

Outsunny 845-011 Installation guide

Outsunny 845-421V03 User manual

Outsunny

Outsunny 845-421V03 User manual

Outsunny 845-421V02 User manual

Outsunny

Outsunny 845-421V02 User manual

Outsunny 845-301 Installation guide

Outsunny

Outsunny 845-301 Installation guide

Outsunny 845-435 User manual

Outsunny

Outsunny 845-435 User manual

Outsunny 845-391V02 Installation guide

Outsunny

Outsunny 845-391V02 Installation guide

Outsunny 845-334V01 Installation guide

Outsunny

Outsunny 845-334V01 Installation guide

Popular Greenhouse Kit manuals by other brands

Feelgood PY6 instructions

Feelgood

Feelgood PY6 instructions

Metalcraft GC1510 manual

Metalcraft

Metalcraft GC1510 manual

Backyard Discovery WILLOW 2404014 owner's manual

Backyard Discovery

Backyard Discovery WILLOW 2404014 owner's manual

Floria RC Series manual

Floria

Floria RC Series manual

OLT SSGS812-FJ-Ply Assembly manual

OLT

OLT SSGS812-FJ-Ply Assembly manual

Palram Lean To Assembly instructions

Palram

Palram Lean To Assembly instructions

Elite Greenhouses 2'3'' Wide Easy Grow Instructions & Illustrations

Elite Greenhouses

Elite Greenhouses 2'3'' Wide Easy Grow Instructions & Illustrations

Mercia Garden Products 04GREEN0406SD-V2 General instructions

Mercia Garden Products

Mercia Garden Products 04GREEN0406SD-V2 General instructions

Floria garden products Classic Plus Assembly instructions

Floria garden products

Floria garden products Classic Plus Assembly instructions

Vitavia Cassiopeia 9900 Assembly instructions

Vitavia

Vitavia Cassiopeia 9900 Assembly instructions

ACD Piccolo 03 manual

ACD

ACD Piccolo 03 manual

AeroGarden AeroGarden PRO Cleaning guide

AeroGarden

AeroGarden AeroGarden PRO Cleaning guide

Hunkin Garden Titan7x9 Assembly instructions

Hunkin Garden

Hunkin Garden Titan7x9 Assembly instructions

Palram Applications BeIIa 8x8 instructions

Palram Applications

Palram Applications BeIIa 8x8 instructions

OPCOM Farm GrowBox user manual

OPCOM Farm

OPCOM Farm GrowBox user manual

Dancover GH21100 manual

Dancover

Dancover GH21100 manual

Vitavia VM0041-F 5900 Assembly instructions

Vitavia

Vitavia VM0041-F 5900 Assembly instructions

Sun Hut 706925 installation instructions

Sun Hut

Sun Hut 706925 installation instructions

manuals.online logo
manuals.online logoBrands
  • About & Mission
  • Contact us
  • Privacy Policy
  • Terms and Conditions

Copyright 2025 Manuals.Online. All Rights Reserved.