Hello Kitty KT2012 User manual

SUBSCRIPTION TO CALLER ID SERVICE FROM YOUR LOCAL
TELEPHONE COMPANY IS REQUIRED FORALL CALLER ID FEATURES
TOOPERATECORRECTLY
OWNER’SMANUAL
CALLERIDTELEPHONE
KT2012
PLEASEREAD AND FOLLOWTHIS MANUAL BEFOREUSING YOUR TELE-
PHONEAND KEEP ITFORFUTURE REFERENCE
CARE AND MAINTENANCE
1. Cleanyour phone withadamp (never wet)cloth.Solvent or detergentshouldnever
beused.
2. Ifyour phone stopsworking, check tobe certain thatall modular plugsare properly
“snapped” into their jacks. If the phone still doesn’t work and you have other
telephones installed in your home, check to see if they are working. If they are, try
using your telephone on another outlet. If it still doesn’t work, it is more than likely
that there is a problem with your telephone. In this case, return the unit for service
in accordance with the instructions on your warranty card.
DONOT CALLTHE TELEPHONE COMPANYSINCE YOU MAY BE
RESPONSIBLEFOR CHARGES FROMTHEM.CHARGES FROM THE
TELEPHONECOMPANYARENOTCOVEREDBYTHETERMSANDCONDITIONS
OFTHEWARRANTY.
3. If other telephones in your house have also stopped working, the problem is most
likelywithyour telephone line service.Do notreturn yourtelephone forservice since
most likely there is nothing wrong with it. You should however, consult with your
telephone company to see if there has been any interruption to your line service.
4. If it is determined that your telephone is malfunctioning, FCC requires that it be
disconnected from the modular outlet until the problem has been corrected.
5. Alwayshave your unitrepairedby an experiencedtechnician or returnit for service
to:
ServiceDepartment
SpectraMerchandising International, Inc.,
ChicagoIndustry Tech Park
4230NorthNormandyAvenue,
Chicago,IL60634, U.S.A.
Tel: (773) 202-8408or toll-freehotline 1-800-777-5331
SERVICE
Pleaserefer to theinstructions ontheenclosed warranty cardforreturning your unitfor
service. When returning the unit, please remove batteries to prevent damage to the
unitintransit and/or from possiblebattery leakage. Weare notresponsible forbatteries
returned with the product or for the cost of replacement.
Printedin China
Conformsto therequirements ofASTM Standard
ConsumerSafety SpecificationonToy safety, F963
1
IMPORTANT SAFETY INSTRUCTIONS
This symbol is to alert you the important operating or servicing
instructionsthat may appearin your owner’smanual. Always
follow basic safety precautions when using this product to reduce
the risk of injury, fire or electric shock.
When using your telephone equipment, basic safety precautions should always be
followed to reduce the risk of fire, electric shock and injury to persons, including the
following:
1. Readand understand allinstructions.
2. Follow all warnings and instructions marked on the product.
3. Unplugthis product fromthewall outlet beforecleaning.Do not useliquid or aerosol
cleaners. Use a damp cloth for cleaning.
4. Donot use thisproductnear water,forexample, near abathtub, washbowl, kitchen
sink, or laundry tub, in a wet basement, or near a swimming pool.
5. Do not place this product on an unstable cart, stand, or table. The product may fall,
causing serious damage to the product.
6. Slots and openings in the enclosure and the back or bottom are provided for
ventilationto prevent overheating.Theseopenings must notbe blockedor covered.
Theopenings should neverbe blockedbyplacing the productona bed, sofa,rug,or
othersimilar surface. Thisproduct should neverbeplaced near orover a radiatoror
heatregister.Thisproduct should not beplaced in abuilt-in installationunless proper
ventilationisprovided.
7. Thisproduct should be operatedonlyfrom the typeofpower source indicated onthe
marking label. If you are not sure of the type of power supply to your home, consult
yourdealer orlocal power company.
8. Donot allow anything toreston the powercord. Donotlocate this productwhere the
cord will be abused by persons walking on it.
9. Do not overload wall outlets and extension cords as this can result in the risk of fire
or electric shock.
10. Never push objects of any kind into this product through enclosure slots as they
maytouch voltage pointsorshort out partsthatcould result ina risk of fireor electric
shock, Never spill liquid of any kind on the product.
11. Donot disassemble thisproduct; take itto a qualifiedservice technician orservice
centerwhenrepair work isrequired. Openingor removingcoversmayexpose you to
voltage or other risks. Incorrect reassembly can cause electric shock when the
appliance is subsequently used.
12. Unplug this productfrom the walloutlet and referto qualified servicepersonnel
underthe following conditions:
A. When the power supply cord or plug is damaged or frayed.
B. If liquid has been spilled into the product.
C. If the product has been exposed to rain or water.
2
D. Ifthe productdoes not operatenormally by followingthe operating instructions.
Adjust only those controls that are covered by the operating instructions.
Improperadjustment ofother controls mayresult in damageand may require
extensive work by a qualified technician to restore the product to normal
operation.
E. If theproduct has beendropped or theenclosure has beendamaged.
F. If the product exhibits a distinct change in performance.
13. Avoid using a telephone (other than a cordless type) during an electrical storm.
There may be a remote risk of electric shock from lightning.
14. Do not use the telephone to report a gas leak in the vicinity of a leak.
15. Never install telephonewiring during alightning storm.
16. Never install telephone jacks in wet locations unless the jack is specifically
designedfor wetlocations.
17. Never touch uninsulatedtelephone wires orterminals unless thetelephone line
hasbeen disconnectedat the networkinterface.
18. Use caution wheninstalling or modifyingtelephone lines.
19. Use only the power cord and batteries indicated in this manual. Do not dispose of
batteries in a fire. They may explode. Check with local codes for possible special
disposal instructions.
20. Plug the adaptor to the socket-outlet that near the equipment and shall be easily
accessible.
21. CAUTION
RISK OF EXPLOSION IF BATTERY IS REPLACED BYAN INCORRECT TYPE.
DISPOSE OF USED BATTERIESACCORDING TO THE INSTRUCTIONS.
SAVETHESEINSTRUCTIONS
AGES 8 and UP

CHANGESIN TELEPHONE COMPANYEQUIPMENT ORFACILITIES
The telephone company may take changes in its communications facilities,
equipment, operations or procedures, where such action is reasonably required and
proper in its business. Should any such changes render the customer’s terminal
equipment incompatible with the telephone company facilities, the customer shall be
givenadequate notice tomake modifications tomaintain uninterrupted service.
GENERAL
The FCC prohibits customer-provided terminal equipment to be connected to party
lines or to be used in conjunction with a coin telephone service.
INSTALLATION
The device is equipped with a USOC RJ11C standard miniature modular jack and is
designed to plug directly into a modular jack.
***THIS TELEPHONE HAS BEEN CERTIFIEDAS HEARINGAID COMPATIBLE ***
4
FCC INFORMATION
This equipment complies with Part 68 of the FCC Rules. The label affixed to this
equipmentcontains,amongotherinformation,theFCCRegistrationNumberandRinger
EquivalenceNumber (REN)for this equipment. Wesuggest that youreview the
followinginformation provided by theFCC.
NOTIFICATIONTO THE TELEPHONE COMPANY
Notificationto thetelephonecompanyisno longer requiredpriorconnectingtheregistered
equipment. However,upon request from thetelephonecompanythe usershalltell the
telephonecompanywhich line theequipment isconnected toaswellas the registration
number and the ringer equivalence of the registered protective circuitry. In most, but
not all areas, the sum of all REN’s should be 5.0 or less.
MALFUNCTIONOF THE EQUIPMENT
If the device is not operating properly, the user should immediately disconnect it from
thetelephone line asit may causeharm to thetelephone network. Intheevent service
is needed the user should contact:
ServiceDepartment
SpectraMerchandising International, Inc.,
ChicagoIndustry Tech Park
4230NorthNormandyAvenue,
Chicago,IL60634, U.S.A.
Tel:(773) 202-8408 or toll-freehotline1 -800-777-5331
TELEPHONECONNECTION REQUIREMENTS
Except for ringers provided by telephone company, all connections to the telephone
networkexceptfor made through standardplugs telephone companyprovided jacks,or
equivalent, in such a manner as to allow for easy and immediate disconnection of the
terminalequipment. Standard jacks shouldbe so arrangedthat, if theconnected plug
iswithdrawn, nointerferencetotheoperationof the equipmentatthecustomer’spremises
which remains connected to the telephone network shall occur by reason of such
withdrawal.
INCIDENCEOFHARM
Shouldterminalequipment or protectivecircuitry causeharm tothetelephone network,
thetelephone companyshall, where practical,notify the customerthat temporary dis-
continuanceof service may berequired.However, where priornotices are not practical,
the telephone company may temporarily discontinue service if such action is deemed
reasonable in the circumstances. In the case of such temporary discontinuance, the
telephone company shall promptly notify the customer who has the right to bring a
complaint to the FCC if he feels the disconnection is not warranted.
3

BATTERIES CAUTIONARY INSTRUCTIONS
CAUTION – To Reduce the Risk of Fire or injury to Persons, Read and Follow
theseinstructions.
1. Use only the following type and size of battery: 4 ‘C’ size (UM-2) alkaline batteries.
2. Do not dispose of the battery in a fire. The cell may explode. Check with local
codes for possible special disposal instructions.
3. Do not open or mutilate the battery. Released electrolyte is corrosive and may
cause damage to the eyes and skin. It may be toxic if swallowed.
4. Exercise care in handling batteries in order not to short the battery with conductor
materialsuch as rings,bracelets, and keys.The battery orconductor may overheat
andcause burns.
5. Do not attempt to recharge the battery provided with or identified for use with this
product by heating them. The batteries may leak corrosive electrolyte or explode.
6. Do not attempt to rejuvenate the battery provided with or identified for use with this
product by heating them. Sudden release of the battery electrolyte may occur
causing burns or irritation to eyes or skin.
7. All batteries should be replaced at the same time. Mixing fresh and discharged
batteriescould increase internalcell pressure andrupture the dischargedbatteries.
8. When inserting batteries into this product, the proper polarity or direction must be
observed. Reverseinsertion ofbatteries can causecharging, which mayresult in
leakageand explosion.
9. Remove the batteries from this product if it will not be used for a long period of time
(severalmonths ormore) since duringthis time thebattery could leak,damaging in
theproduct.
10. Discard “dead” batteriesas soon aspossiblesince “dead” batteriesaremore likely
to leak in a product.
11. Do not store thisproduct,or the batteries providedwith oridentifiedfor use with this
product in high-temperature areas. Batteries that are stored in a freezer or
refrigeratorfor the purposeof extending shelflifeshould be protectedfrom
condensation during the storage and defrosting. Batteries should be stabilized at
roomtemperature prior touse after storage.
12. Do notmix oldandnew batteries ordifferenttypes of batteries. Donotmix alkaline,
standard(Carbon-Zinc)or rechargeable (Nickel-Cadmium) batteries.
SAVE THESE INSTRUCTIONS
5
INTRODUCTION TO CALLER ID INSTRUCTIONS
Read this manual carefully before using this product.
Congratulations on your purchase of this product! The unit allows you to take
advantageof the CallerIdentification service thatmay be offeredby your local
telephone company. Not all local telephone companies provide Caller Identification
service,therefore youmustmake surethe service isavailable.
IMPORTANT: For your Caller ID to function, you must first contact your local
telephone company to arrange to have Caller ID service installed on your line.
There will be an extra charge added to your monthly telephone bill for this
service. Please consult with your local telephone company for the Caller ID
service charge.
1. TheCaller ID functioncan be usedto screen unwantedcalls, eliminate harassment
fromannoying calls, ortoreturn missed callsusing thedisplayed speed dial feature.
2. Whenused with CallerID service,theunit displays thenameand telephone number
ofthe person calling,along with thedateand time ofthe call beforeyoupick up your
telephone.
6
CONTROLS AND FEATURES
Features
1. Thisproduct features CallerID.
2. Displays the caller’s name, telephone number,timeanddate of thelast64 incoming
callsthat you havereceived.
3. Large three lines high resolution LCDdisplay.
4. Display Total andNew Calls received in standby screen.
5. Up / Down buttons allow easy scrolling forward or backward through stored call
records.
6. Erase button allows call records to be deleted individually or collectively.
7. Real Time Clock - Time and date will be automatically set by the local telephone
companywhen the phonerings.
8. Calling back a number from the Caller IDMemory.
9. NewCall LEDindicator.
10. Multi-Language Selectable -Allows you to select English, Spanish or French.
11. 10Two-Touch SpeedDial Buttons (MEMO 1 to 0).
12. Last Number Redial – Dials the last number called.
13. HandsetVolume Control –AdjustsVolume of handset receiverfromNormal to High
(N/H).
14. Requires 4 ‘C’ (UM-2) alkaline batteries (not included) and a 6VDC 300mA AC
adaptor with center positive plug (included).
7
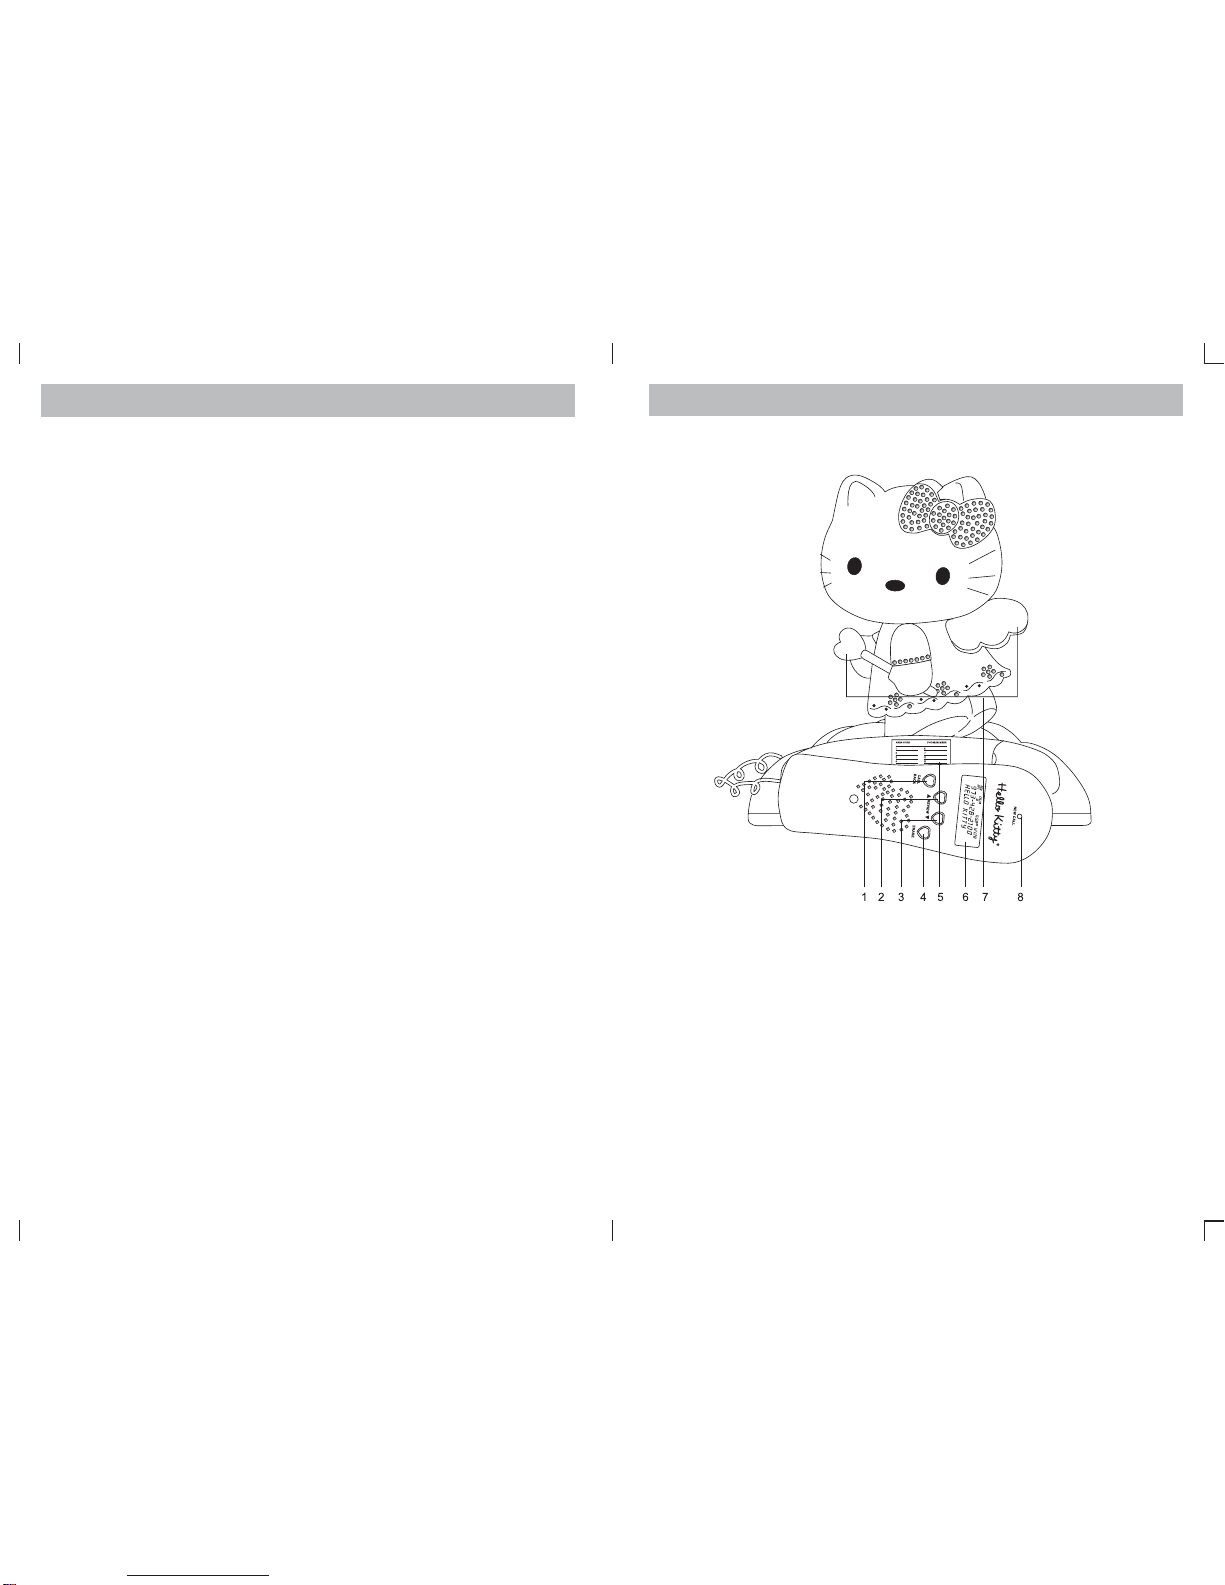
1.CALL BACK Button
2.REVIEW UP Button
3.REVIEWDOWN Button
4.ERASE Button
5.MemoryIndexCard
6.Display
7.FlashingRinger Indicators
8.NEWCALL Indicators
8
LOCATION OF CONTROLS
9
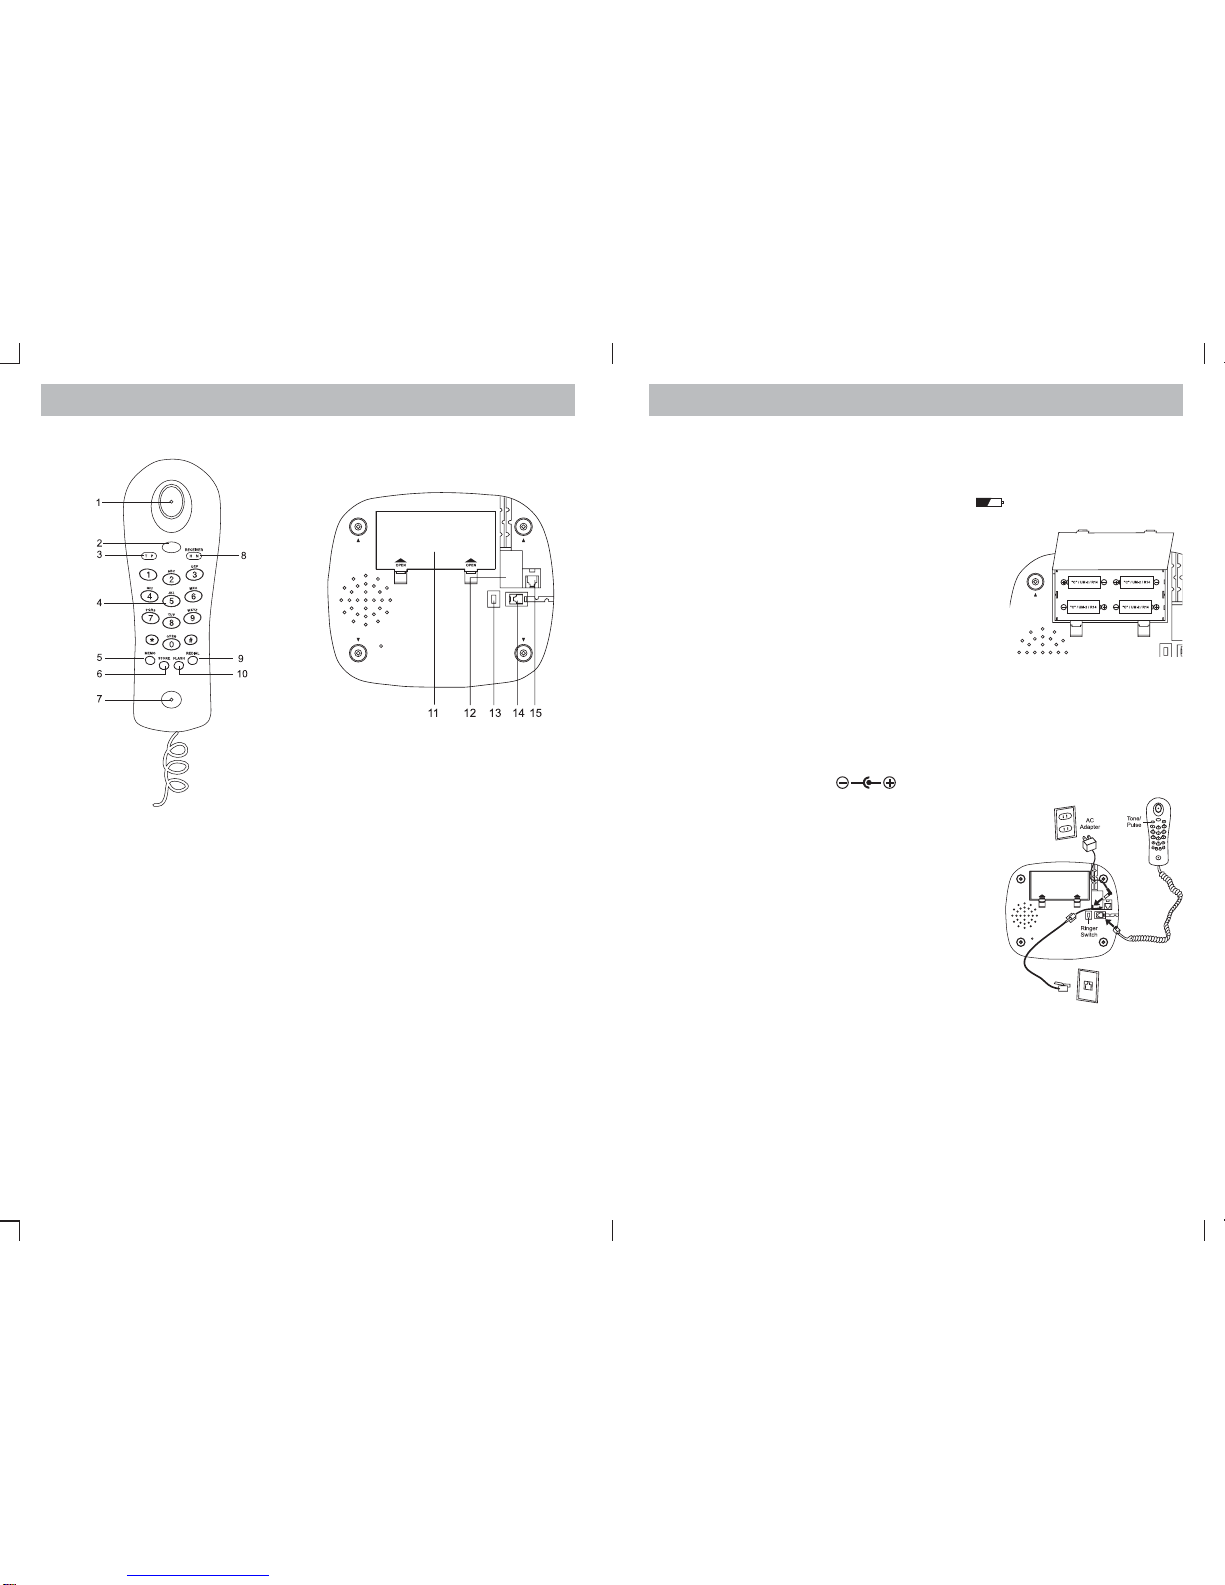
HANDSET BOTTOMOF BASE
1.Receiver
2.Hook Switch
3.TONE/PULSESwitch
4.KeyButtons (0-9,*,#)
5.MEMO Button
6.STOREButton
7.Transmitter
8.RECEIVER(NORMAL/HIGH)VolumeSwitch
9.REDIALButton
10.FLASHButton
11.BatteryCompartment
12.DCIN Jack
13.OFF/LO/HIRinger Switch
14.HandsetJack
15.LineIn Jack
LOCATION OF CONTROLS (CONTINUED)
10
LOCATION OF CONTROLS (CONTINUED)
CAUTION
Disconnectthe telephone linefrom the equipmentbefore replacing batteries.
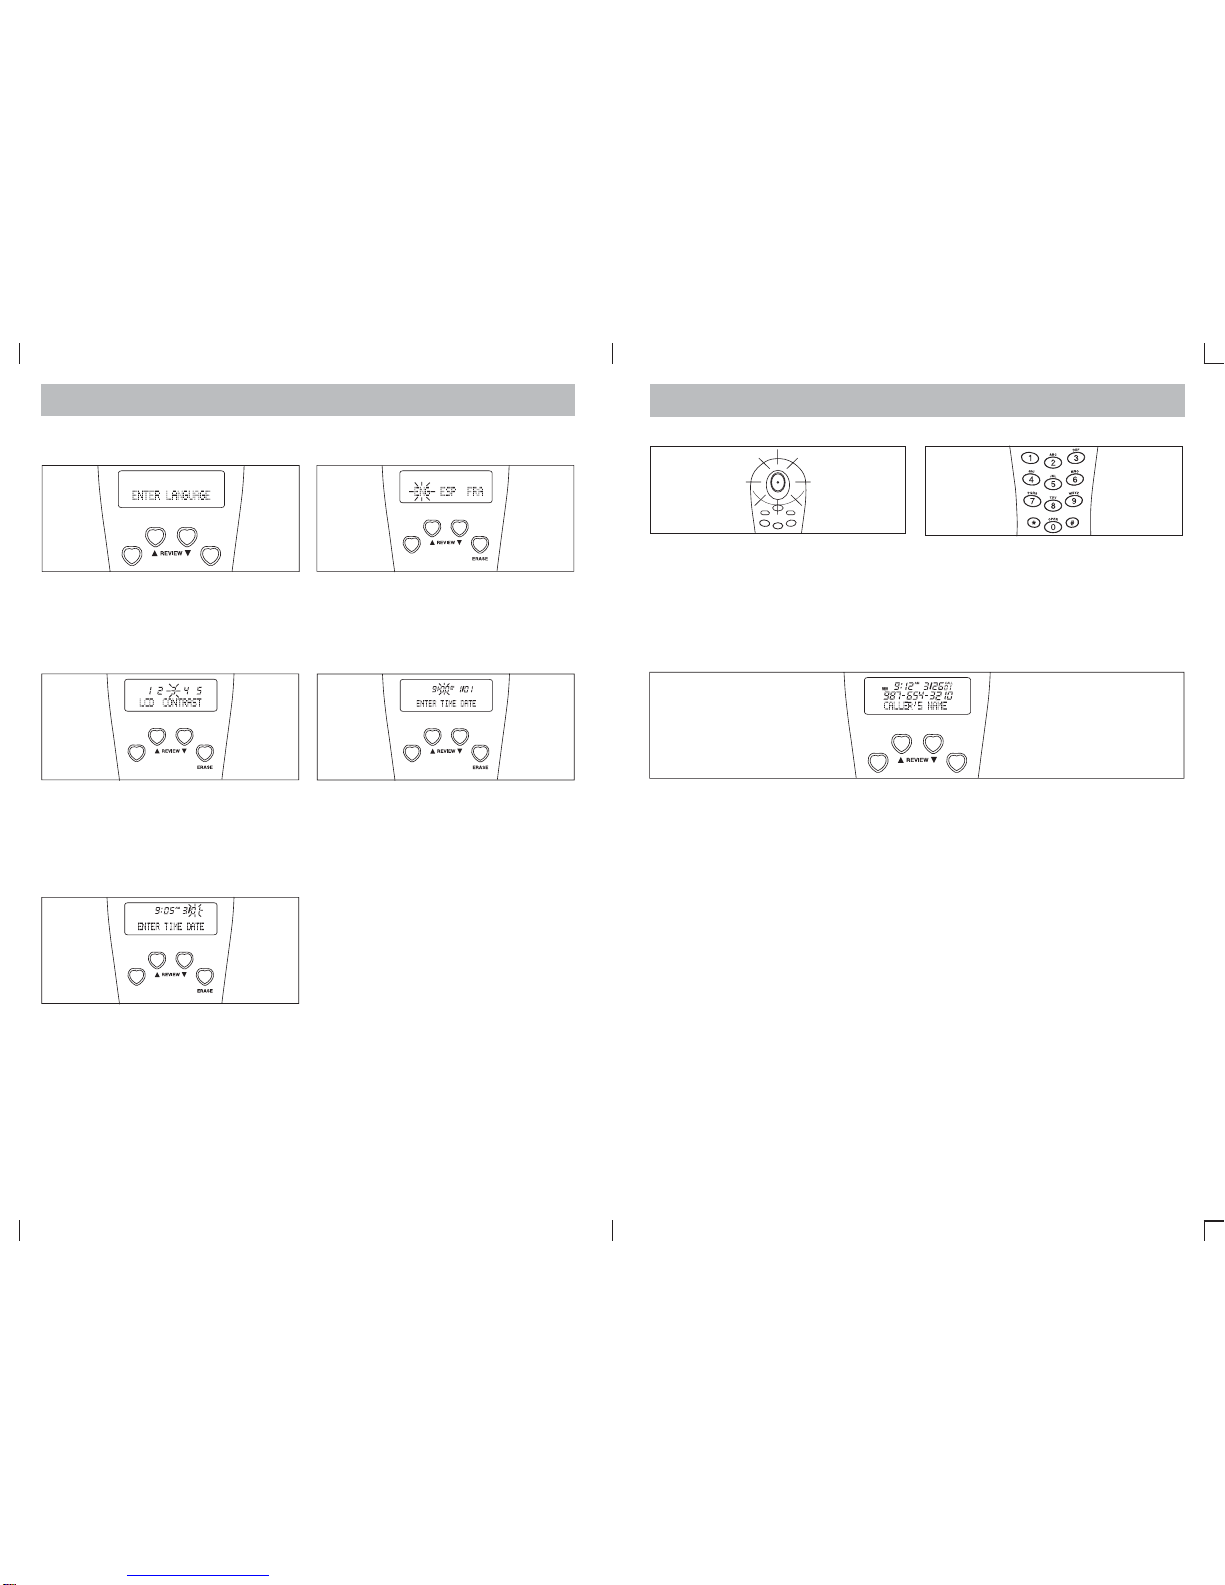
BATTERYINSTALLATION
When the batteries become weak, the battery icon ( ) will appear in the display.
Replace as described below. You must replace the
batteries within two minutes, or the caller ID and
memories will be lost.
Insertfour (4)“C” size (UM-2)batteries (not included)in
this unit to use the Caller ID and telephone functions
as follows:
1.Open the battery door by pulling back on the latch.
2.Insertfour (4) “C”size (UM-2) alkalinebatteries
(notincluded).
3.Snap the battery door back into place.
ACOPERATION
To operate the unit using AC power, connect the included AC adaptor to theDC jack
on the bottom of the base and to a wall outlet having 120V, 60HzAC only. The
batteries will work as battery back-up in the event of power failure and will keep all of
the functions without interruption. Make sure to only use the supplied adaptor, 6V
300mA with positive center ( ).
This unit can be used on a desk, or other level surface
away from excessive heat or direct sunlight.
1. Set the OFF/LO/HI Ringer switch to LO or HI
tohave the ringersound when receivingaphone call.
2. Set the TONE/PULSE switch to TONE or
PULSEto match theservice provided on
your telephone line. If you are not sure of
your service, please contact your
telephonecompany.
3. DONOTCONNECTTOTHE
TELEPHONELINEUNTILCALLERID
SETUPIS COMPLETED. Connectthe
coiled cord to the handset and base.
Connect the long telephone cord into the jack on the bottom of the base, thread it
throughthe groove towardthe backofthe base.
11
DO NOT CONNECT the line cord to the wall outlet until the caller ID setup has
been completed. Set the language, contrast, time and date as follows:
Press and hold the [] and [] buttons
simultaneouslyfor four secondsuntil
"ENTER LANGUAGE"appears,
followed by "ENG ESP FRA" for 20
seconds.
SELECTTHE LANGUAGE
Press the [] or [] button to select
ENG (English), ESP (Spanish) or
FRA(French). Press the ERASE button
to confirm.
SELECTTHECONTRAST:
Press the [] or [] button to select
oneof thefivecontrast levels(default is
three). Press the ERASE button to
confirm.
To reset, press and hold the [] / [] buttons simultaneously for four seconds until
“ENTERLANGUAGE”appears.
Note: When you receive the first call, the unit will automatically set the time and
date.
SETUP PROCEDURE
PLACING A CALL
12
Lift the handset and listen for a dial
tone. Press the Key buttons (0-9) for the
desired number you wish to call.
RECEIVINGA CALL
The last 64 incoming calls are saved in the caller ID log.
Make sure that the Caller IDservice is turned on by your phone company. When you
receive a call, the display will show the name of the caller, number, time and date of
the call. The NEW icon will appear in the display and the NEW CALL indicator will
blink. To answer the call, simply remove it from the base. To end a call, simply return
the handset to the base.
NOTES:
•Hello Kitty Wings and Wand will light when an incoming call is received. This visual
ring signal will operate even if the Ringer switch is set to the OFF position.
•If a call is received from an area which does not provide caller ID service, the display
willshow, “UNKNOWN”. If a call is received fromoutside the CallerIDarea,the
displaywillshow, “UNAVAILABLE”.
•If a call is received from a caller that has blocked his/her information, the display will
show, “PRIVATECALL” or “BLOCKEDCALL.
•When you receive the first call, the unit will automatically set the correct time and
date.
•Calls picked up on the first ring will not be logged in the caller ID log.
•If there are new calls, the NEW icon will appear in the display and the NEW CALL
indicator will blink.
•If an incorrect, invalid or incomplete caller ID signal is received, the display will show
“LINEERROR”.
BASIC OPERATIONS
SELECTTHETIMEANDDATE:
Press the [] or [] button to select
the present hour. Press the ERASE
button to confirm. Repeat this step to
set the minutes.
Press the [] or [] button to select
the present month. Press the ERASE
button to confirm. Repeat this step to
set the day. The settings are now
complete.

14
If you are in a Pulse dialing area you
maystill take advantageoftouch-tone
servicesafter dialing torespond to
touch-tone prompts. To do this, press
the*/TONE button totemporarily
changethe dialing modefrom Pulse to
Tone after dialing in the Pulse mode.
This will enable Pulse users to access
touch-toneservices. It willrevert back to
Pulseafter hanging up.
If you subscribe to Call Waiting through
your local phone company, and you
receiveanother phone call. Simply
press the FLASH button to answer the
new call. Press the FLASH button again
to return to the original call.
STORINGAND REDIALING NUMBERS IN THE SPEED-DIAL MEMORY
This telephone has ten speed-dial memories to store up to 10 of your most frequently
called numbers for easy two-touch redialing. Each of the 10 memories can store
numbers of up to 16 digits. HOWEVER, ONLYTHE LAST 14DIGITS WILLAPPEAR
INTHEDISPLAY
IMPORTANT:You must lift the handset from the cradle to store numbers in the
memory.After a few seconds off the cradle, you will hear the “offthe hook/hang up”
warningsignal from thephone company. Therefore,if you aregoing to store more
than one number at a time, please disconnect the straight cord from the wall jack to
avoidthe “off thehook/hang up”warningsignal. REMEMBER TORECONNECTTHE
STRAIGHTCORDAFTERYOU FINISH STORING YOUR NUMBERS.
TOSTORE
Liftthe handsetand press theSTORE
button.The“STORE” indicator will
appear in the display.
Use the number keys to enter the first
area code and number that you wish to
store.Remember to enterthe number
“1” if necessary.The numberswill
appear in the display as you dial them.
NOTE:Ifyou make amistake while
enteringthe number,depresstheHook
switch to clear the display and then
start with step 1 again.
BASIC OPERATIONS (CONTINUED)
13
OFF/LO/HI RINGER SWITCH
Slide the OFF/LO/HI Ringer switch to
the HI or LO position to turn the ringer
on.
Slide the OFF/LO/HI Ringer switch to
the OFF position to turn the ringer off.
Slide the TONE/PULSE switch to TONE
orPULSE to matchthe serviceprovided
onyour telephone line.If you arenot
sureof your service,please contact your
telephonecompany.
Toincrease/decrease thehandset’s
volume,slide the RECEIVER Volume
switchto the NORMAL(N) or HIGH(H)
position.
PresstheREDIALbutton to automatically
redialthe last numberdialed.
NOTE:Please note that only the last
number you called on this handset can
be stored in the Redial memory.
Press the FLASH button to hang up the
phonewithout having toreturn it tothe
base. If you subscribe to call waiting,
FLASH button is also used to switch
betweencalls.
BASIC OPERATIONS (CONTINUED)

15
Verify that the number on the display is
correct, then press the STORE button
again.TheMemory indicator (“MEM”)
will appear in the display.
Press the number “1” button to store the
displayednumber in memorylocation 1.
Repeat steps 1 through 4 to store up to
nineadditional numbers in memories“2”
through“0”
TOCHANGEASTORED NUMBER:
To change one of the stored numbers, simply follow the procedures in steps 1
through5 and enter anew phone numberin the desiredmemory.The newphone
numberwill be memorizedand the previousphone number willbe erased fromthe
memory.
NOTE:Foryour convenience, youmay write thenames of thepeople whose numbers
you stored on the small index card in the center of the cradle.
MESSAGEWAITINGFUNCTION
Lift the handset and listen for a dial
tone. Press the MEMO button and then press
oneof the numberkeys, “1” through“0”,
correspondingto the memorylocation
you want to dial. The stored number will
bedialedautomatically.
TO REDIAL A STORED NUMBER
BASIC OPERATIONS (CONTINUED)
When a caller has recorded a message
on a personal message service, “ ”
will appear in the display and will go out
whenyouretrieve your message.
This feature is only for subscribers of
a voice mail message waiting
service through the local phone
company.
VIEWING THE CALLER ID MEMORY
To view the new calls (NEW CALL
indicator will blink), press the [] or []
button. As they are checked, the CALL
# will decrease.
Whenall newcalls have beenchecked,
“ENDOF NEW CALL”will appear inthe
display. Press the [] to view the oldest
calls or the [] button to view the most
recent calls.
NOTES:
•After all calls are viewed, “ENDOF LIST” will appear in the display.
•The NEW CALL indicator will blink until all new caller ID information has been
reviewed.
•TheRPT iconwill appear inthe display ifyou have received multiple newcalls from
the same number.
•If you receivea call froma number previouslyviewed in thecaller IDmemory, the
data in memory will be replaced with the new call’s time and date, and the NEW icon
will light in the display.
•If no key is pressed within 20 seconds, the display will revert to normal display and
show the total call counter, new call counter, current time and date.
ERASINGTHE CALLER ID MEMORY
To erase a single call, press the [] or
[] button to select the call to delete,
then press the ERASE button twice
quickly. The information for that call will
be erased and the call # and caller ID
datawill be updated.
ALL NEW CALLS MUST BE
REVIEWEDBEFORE ERASING
CALLER ID MEMORY. To erase all calls
in caller IDmemory, press and hold the
ERASEbutton for threeseconds. The
message“ERASE ALL CALLS”will
appear in the display. Press the ERASE
button again to confirm. All caller ID
informationwillbe deleted and“NO
CALLS” will appearin thedisplay.
16
BASIC OPERATIONS (CONTINUED)

COPYING CALLER ID INFO TO A MEMORY PRESET
Press the [] or [] button to locate a
caller ID call to be copied into a
memorypreset.
Press the STORE button twice:
“MEM” will be displayed on the display.
Press the Key buttons (0-9) to enter the
desiredmemory location Repeatthese
stepsfor additional presets.
CALLINGBACK A NUMBER FROM THE CALLER IDMEMORY (ON-HOOK)
With the handset on the base, press the
[] or [] button to locate a caller ID
call to be dialed.
Press the CALL BACK button twice to
redial;the displaywill show “PICKUP
CALL”. Pick up the handset and the
numberwill be automaticallydialed.
Ifthe caller’sphone number is10 digits,
press the CALL BACK button once,
followed by the [] or [] button to add
thelong distancedialing digit “1”.Press
the CALL BACK button again and pick
up the handset to dial.
17
BASIC OPERATIONS (CONTINUED) BASIC OPERATIONS (CONTINUED)
CALLINGBACK A NUMBER FROM THE CALLER IDMEMORY (OFF-HOOK)
Pick up the handset and press the []
or [] button to locate a caller ID call to
bedialed.
Press the CALL BACK button twice and
thenumber will beautomatically dialed.
Ifthe caller’sphone number is10 digits,
press the CALL BACK button once,
followed by the [] or [] button to add
thelong distancedialing digit “1”.Press
the CALL BACK button again to dial.
18

19
TROUBLESHOOTING
20
PROBLEMS CHECK
No dial tone Is any plug disconnected from all modular
phone plugs? Is jack improperly wired?
Phone does not work Are all cords connected properly?
Phone does not ring Ringer Switch may be set to OFF?
Slide switch to ON position.
Cannot dial Check the Tone/Pulse Switch setting. You may
only have PULSE service.
Switch the Tone/Pulse switch to PULSE position
Other party cannot hear you Ensure Handset cord is connected properly.
Display showing erroneous
figures
OR
Display is corrupt or does
not work as intended
Setup the phone by pressing the and
Buttons together for a few seconds. After that,
reset the Language and LCD contrast. OR Your
phone must be reset by uninstalling all batteries
and unplugging the AC adaptor. Wait for 5
minutes before reinstalling the batteries or
plugging the AC Adaptor. This will also clear all
memories.
The display is faded
(Numbers are hard to see)
Adjust the contrast to a higher level by following
the setup procedure described above. Are
batteries correctly installed? Are the batteries
fresh? Change all 4 batteries.
Replace all 4 batteries at the same time.
Cannot store numbers into
memory No batteries are installed or batteries are weak
or installed incorrectly.
Caller ID does not work
Make sure the Caller ID service is active. The
phone is connected to a working wall jack. All
line cord connections are correct and secure.
Your answering machine should be set to
answer after at least 2 rings and you should
only pick up the phone after 2 rings.
The Caller ID display is
blank
Press either or Button to see if “NO
CALLS” appears. Check if batteries are properly
installed. Check if you have received the first
Caller ID record.
The Caller ID display does
not show the caller's
information
The Caller ID unit will not function until you have
Caller ID service from your local telephone
company. Call your local telephone company to
have Caller ID installed on your phone line.
Check your phone line connections. Make sure
all connections are secure and connected.
If it is a private call or a blocked call, the caller's
name and/or phone number will not appear on
the display.
Can not erase all records in
memory
The Erase Button must be quickly pressed twice
to erase a single call record. To erase ALL call
records, press and hold the Erase Button for at
least 3 seconds after you view all new calls.
Caller ID displays in the
wrong language
Reset the language by pressing the and
Buttons together until ENTER LANGUAGE
appears on the display. Press orButton to
choose the desired language. The default
language is English.
Memory Dialing does not
work
Check the phone if you have programmed the
numbers correctly by pressing that memory
number button. Also programming can only be
done if fresh batteries are installed correctly.
Can not see the name or
number of the caller
Did you wait for the second ring before picking
up the phone? The Caller ID will only detect
information between the first and second ring.
Caller's information is not
registered
The caller may have an unlisted or blocked
number to prevent Caller ID identification or it
may be an overseas call or you may have noise
on the line during that call.
Did you or your answering machine answer
calls before the second ring?
Message Waiting does not
work
Check with your telephone company if this
service is available or if you have subscribed to
it.
Pressing a Memory button
does not display number
Your Memory button has no stored number.
Please store the number again by pressing the
Store Button, dial the number, press the Store
Button again and a numerical button to store it
to the desired location.

This equipment complies with Part 68 of the FCC rules and the requirements
adopted by theACTAOn the bottom of this equipment is a label that contains,
amongother information, aproduct identifierof US: 2BFMT09BKT2010.
Ifrequested, this numbermust be providedto the telephonecompany.
The applicable jacks (i.e. RJ11C) for this equipment are provided in the packaging
witheach piece ofapproved equipment. Thejacks arecertified by UniversalService
OrderCodes(USOC).
A plug and jack used to connect this equipment to the premises wiring and
telephone network must comply with the applicable FCC Part 68 rules and
requirements adopted by theACTA.Acompliant telephone cord and modular plug
are provided with this product. They are designed to be connected to a compatible
modular jack that is also compliant. See installation instructions for details.
The REN is used to determine the number of devices that may be connected to a
telephone line. Excessive RENs on a telephone line may result in the devices not
ringing in response to an incoming call. In most but not all areas, the sum of RENs
should not exceed five (5.0).To be certain of the number of devices that may be
connected to a line, as determined by the total RENs, contact the local telephone
company. [For products approved after July 23, 2001, the RENfor this product is part
ofthe product identifierthat hastheformat US:AAAEQ##TXXXX. Thedigits
represented by ## are the REN without a decimal point (e.g., 03 is a REN of 0.3).
For earlier products, the REN is separately shown on the label.]
Ifthis equipment KT2012causesharm to thetelephonenetwork, the telephone
companywill notify youin advance thattemporarydiscontinuance of servicemay be
required.But if advancenotice isn’t practical,the telephone companywill notify the
customer as soon as possible. Also, you will be advised of your right to file a
complaint with the FCC if you believe it is necessary.
The telephone company may make changes in its facilities, equipment, operations or
proceduresthat could affecttheoperation of theequipment. If thishappensthe
telephonecompany will provideadvance noticeinorder for youtomake necessary
modificationstomaintain uninterrupted service.
If you experience trouble with this equipment, disconnect it from the network until the
problem has been corrected or until you are sure that the equipment is not
malfunctioning.
Pleasefollow instructions forrepairing if any(e.g.battery replacement section);
otherwisedo not alteror repair anypartsof device exceptspecified.
Connection to party line service is subject to state tariffs. Contact the state public
utility commission, public service commission or corporation commission for
information.
Thisequipment is hearingaidcompatible.
21
CONSUMER INFORMATION
22
NOTICE : If your homehas specially wiredalarmequipment connected tothe
telephoneline, ensure theinstallation of this equipmentKT2012 does notdisableyour
alarmequipment. If youhave questionsaboutwhat will disablealarmequipment,
consultyour telephone company or aqualified installer.
WARNING : Changes or modifications to this unit not expressly approved by the party
responsiblefor compliance couldvoidthe user’s authoritytooperate the equipment.
NOTE: This equipment has been tested and found to comply with the limits for a
Class B digital device, pursuant to Part 15 of the FCC Rules. These limits are
designedtoprovide reasonable protection againstharmfulinterferencein a residential
installation.This equipment generates,uses, andcanradiated radio frequencyenergy
and, if not installed and used in accordance with the instructions, may cause harmful
interferenceto radiocommunications.However, there is noguarantee that interference
will not occur in a particular installation. If this equipment does cause harmful
interferenceto radio ortelevision reception,which can be determinedby turning the
equipment off and on, the user is encouraged to try to correct the interference by one
ormore of the followingmeasures:
• Reorientorrelocate the receiving antenna.
• Increasethe separationbetween theequipmentandreceiver.
• Connect the equipment into an outlet on a circuit different from that to which the
receiverisconnected.
• Consultthe dealer oranexperienced radio TVtechnicianfor help.
Other manuals for KT2012
1
Table of contents
Other Hello Kitty Cordless Telephone manuals


