HELPINSTILL 280 User manual
HELPINSTILL
PIANO SENSOR
Model 280
For Grand Pianos
Please Read Instructions Carefully
Before Using Your Helpinstill
5154 Spruce St., Bellaire TX 77401
Website: www.helpinstill.com
Telephone: 713-432-1089
Copyright© 2020 Charles Helpinstill
All Rights Reserved
Model 280 For Grand Pianos
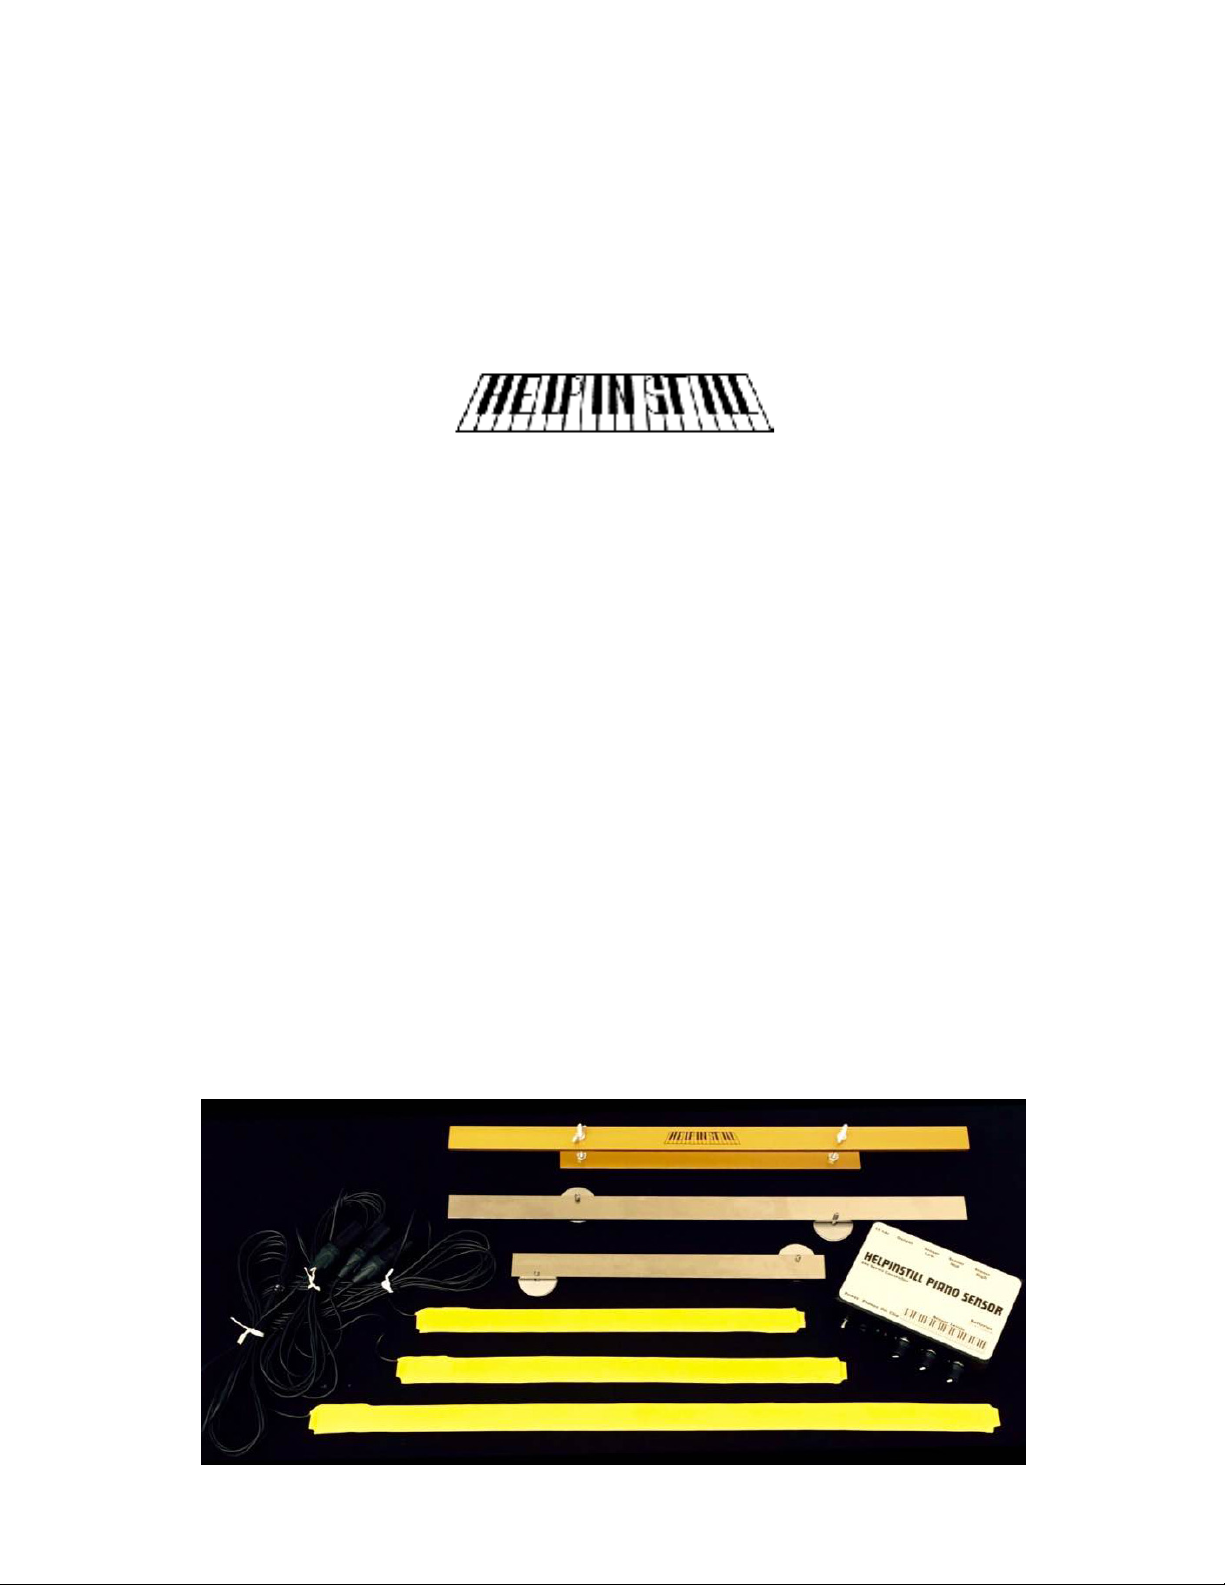
Your complete unit consists of the following pieces:
3 Humbucking Sensors in lengths of 24", 16" and 14"
1 Gold Double Support Bar
2 Silver Underbars with adjustable pedestals
Standard Mixer or Phantom Power Mixer (Optional)
Screwdriver for adjustment of pedestals
Owners Manual - Please read this first!
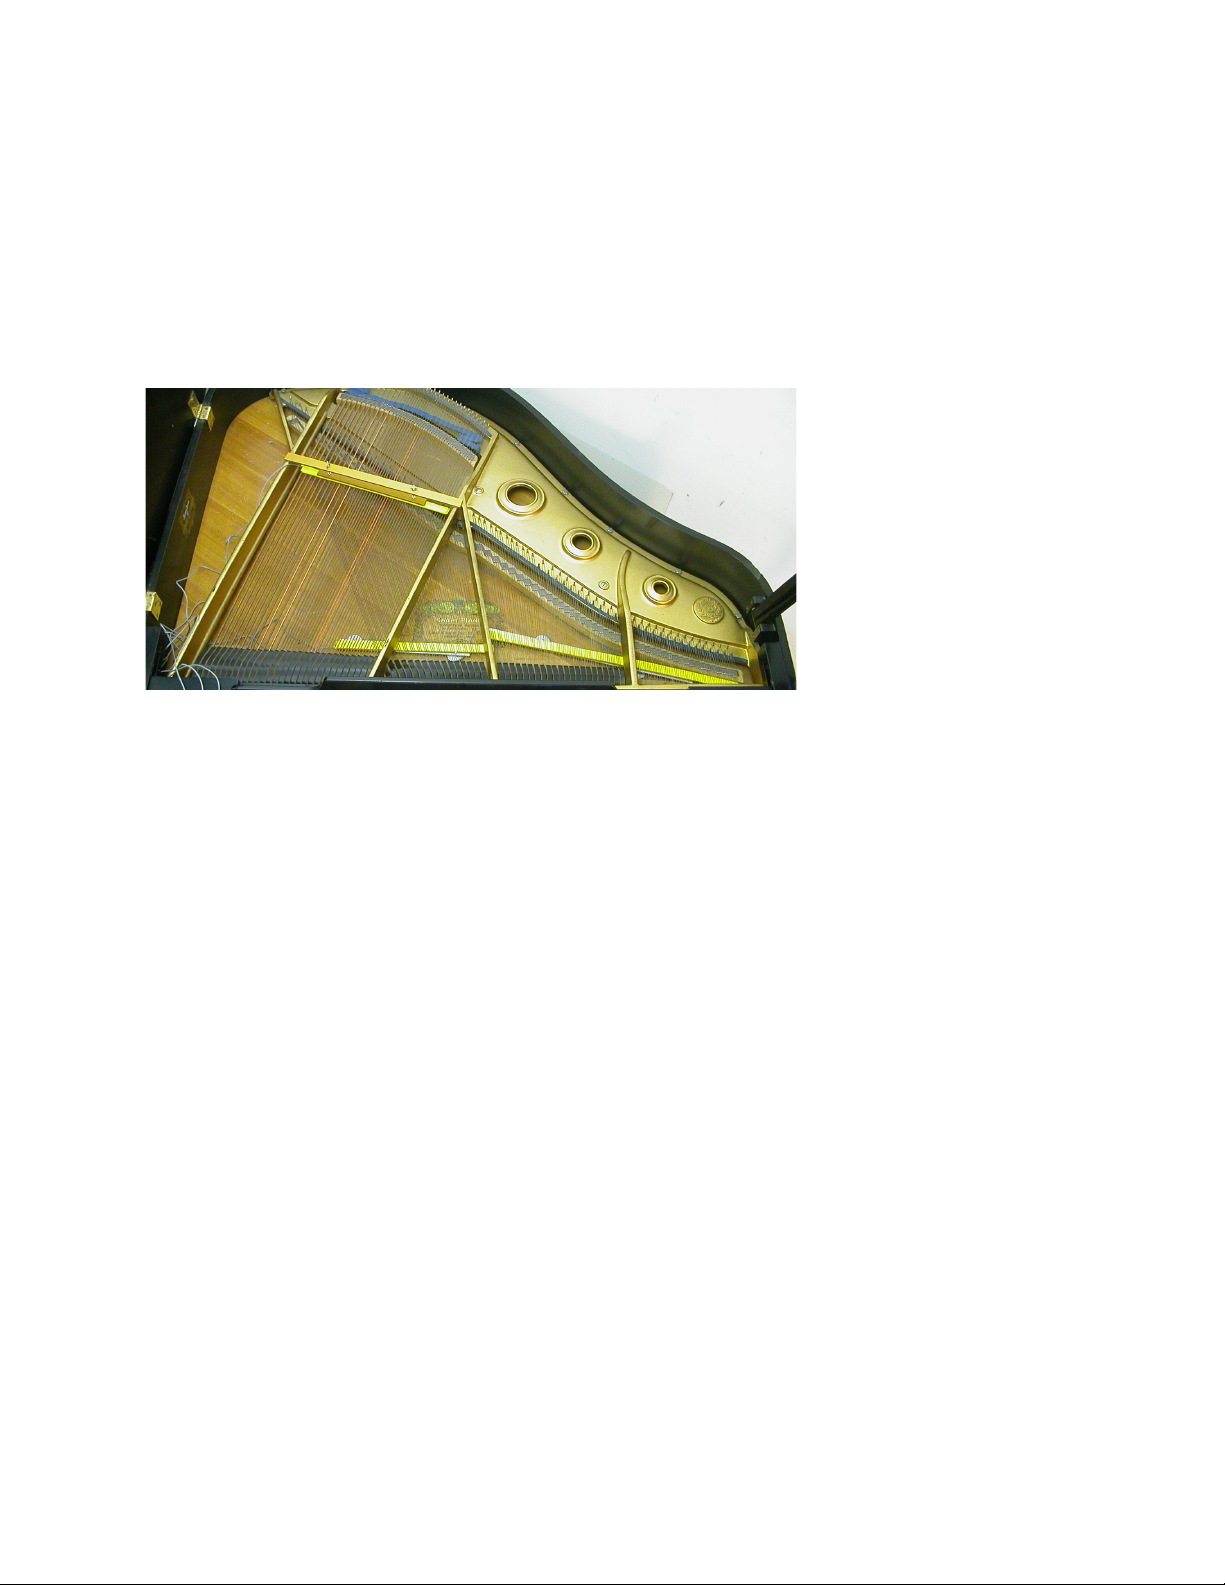
Installation
The silver support bars are used to support two sensors under the middle and treble strings. The
gold double support bar suspends the third sensor over the bass strings.
Before installing any of the pickup strips, remove the tie wraps from the cables and smooth out,
stretch and straighten the cables. If they kink and curl under the strings, they may touch
them and cause a buzzing noise.
The longest pickup strip is always used under the highest notes. Select which of the
remaining two best fits the width of the bass section ( usually the medium length) and attach it to
the magnetic strip on the gold support bar. This bar then rests on the frame pieces on either side of
the bass notes,and the double wingnut adjustment is used to hang the sensor strip about 1/4" over
these strings. The gold bar has gray non-slip pads where it rests on the piano frame to eliminate
rattles and minimize movement from vibration.This bar may be placed anywhere along strings, but
the best sound will be achieved about 1/5of the way from the end of the string at either end. The
illustration shows the sensor at the far end from the keyboard, but it may also be placed at the other
end near the area where the hammers strike the strings.
The copper-wound bass strings generate less signal in the pickups because copper is not magnetic,
and only the steel core of these string produces output. Therefore, the limitation of the volume of
the whole unit depends on adjusting the pickup hanging over the bass end until it is as close to the
strings as possible without the strings buzzing on the pickup when played hard. This is usually
about 1/8 inch of clearance. The other two pickups can be further away.
A Video showing the entire Installation is available on our website at www.helpinstill.com
or on YouTube at https://www.youtube.com/watch?v=bt9XpECy9pQ&t=45s

Next place the other two sensors on the silver underbars, the longest sensor on the longest
bar. ( They will stick on quite firmly because of their magnetic nature.) These support bars rest on
pedestals that are padded to prevent scratching the soundboard, and to minimize vibration to the
sensors. Make sure the screws of these pedestals are on either side of the sensors so that they will
be adjustable from above. These two units are simply slid in under the strings from the left side of
the piano, the longest first so it will end up under the highest notes. If the clearance between the
strings and the soundboard seems too close, and the tops of the pedestal screws hit the strings
when sliding in, move them nearer the bridge (that's the end of the strings farthest from the
keyboard.) The screws will be the right height when the sensor is finally in place.
After the sensors are in place under the strings, stick the small screwdriver through the
strings and turn the pedestal screw to adjust the clearance between the sensor and the strings to
about 1/8" at the highest notes to about 1/4" in the middle of the piano.
Sliding the High Sensor In
The position of the highest sensor is critical under the highest few notes. Try to align this
sensor at a straightened angle that will keep its upper end as far away from the keys as possible to
keep the top hammers from striking the sensor. The length of these highest strings allows just
enough space for this clearance.
After the sensors are in place under the strings, stick the small screwdriver through the
strings and turn the pedestal screw to adjust the clearance between the sensor and the strings to
about 1/8" at the highest notes to about 1/4" in the middle of the piano.The sensors do not pick up
any string movement over the last 1/4" on each end. Be careful to place the middle and highest
pickups so that they overlap slightly to insure that the notes at their boundaries are properly picked
up.

After placing the middle pickup in place under the strings, it helps to use the screwdriver to
tuck the wire from the highest pickup under the middle bracket to insure that it won’t curl up and
touch the strings and cause buzzing noises.
When removing these units from the piano it is perfectly okay to use the wires to pull them out of
the piano. These wires are very strongly attached inside the sensors and nearly impossible to pull
loose.
Adjustment & Hookup
After the sensors are in place in the piano, run the wires out the left side of the piano and
plug each one into the corresponding input jack on the mixer, or into a mic channel if not using
a mixer. Either or both of the outputs can then be connected to a sound system or amplifier.
For proper adjustment and balancing of the pickup levels, the signal needs to be routed to a
monitor speaker or amp near the piano that is louder than the natural sound of the piano. The
pickup can be used with the lid of the piano open or closed (it makes no difference to the pickup),
but it is easier to tell the real volumes of the sensors with the lid shut.
Moving the middle pickup as close to the keyboard as possible will result in the best tone in
that region; moving it further back will tend to emphasize the lower harmonics, resulting in more of
an electric piano sound. There is a "sweet spot" about 2 inches beyond the dampers that is the best
tone.
Using Without Mixer
The Model 280 can be used without amixer. Since the Sensor cables terminate in XLR-type
connectors, they can be plugged into the inputs of any mixer or soundboard with mic level channel
inputs. Care should be taken to insure that the three channels involved are at suitable volume levels to
result in uniform reproduction across the width of the keyboard. Sections can then be equalized di
erently to bring out harmonics in dierent areas. Some physical adjustment of the clearances between
the Sensors and the strings may be necessary to regulate the volumes uniformly.

Standard Mixer
The Standard Mixer is a powered unit. It can be used with the supplied power supply, or by
inserting two nine-volt batteries in the compartment on the right side. The three knobs on the
control box control the volume of the three sensors. To start with, they should all be turned to about
the 9 o'clock position. If any section of the piano sounds louder than the rest, it can be turned down
in volume to balance. Invariably the lowest (bass) section is quieter than the rest, and its knob
usually is set at a higher volume.
Power Switch
Inputs
Sensor Volume Controls
Output
Power Supply
Phantom Power Mixer
Inputs
Output
Sensor Volume
Controls
When using the phantom-powered control box, the channel on the board where the Helpinstill output
is connected needs to have the phantom power switch turned on at all times. The three knobs on the
control box regulate the volume of the three sensors. To start with, they should all be turned near the
12 o'clock (full volume) position. If any section of the piano sounds louder than the rest, it should be
turned down in volume to balance.
The phantom powered control box
eliminates the need for supplying
an outlet in the vicinity of the
piano, since it draws its power
from the board. FET circuitry
insures that background hiss is
minimized with this unit.
IMPORTANT:
There are six DIP switches recessed on the back panel of the standard mixer. These should all be left in
the DOWN position for optimum operation. (The even-numbered switches activate phantom power,
not required for Helpinstill Piano Sensors. The odd-numbered switches insert a low rolloff filter, also
not desireable for the best sound output.)

piano tuner not move the pickups around, since that will obviously change the installation. The
position of the pickups is rarely in the tuner's way, yet they often have a tendency to move the
pickup brackets out of the way and not move them back when they're finished.
Troubleshooting
As durable as the Helpinstill systems have proven to be over the years, any instrument can
malfunction.
Sensors It is important that care is taken not to puncture the outer plastic casing of the sensors.
The sensors are made to be flexible and durable, but contain hair-fine wires on the interior which
could possibly be broken under extreme treatment.
If you suspect that a sensor is not working, measure it with an ohmmeter at the output plug
between pins 2 & 3. Each sensor should read between 50-200 ohms. There should be no
fluctuation of this measurement with bending or tapping on the sensor. If this measurement is
consistent, the sensor will definitely work properly in the system.
Buzzing Noises Aside from mechanical buzzing of the strings against the pickup or wires,
buzzing noise or hum of an electrical nature has two primary causes: ground problems between the
unit and the mic line it's plugged into, and electromagnetic interference in the vicinity of the
piano.The Model 280 was developed with humbucking-style coils that virtually eliminate any
chance of hum pickup. Any hum is probably a result of interconnection with the sound system and
can be isolated as follows:
If the piano signal seems to accentuate the notes at top end of the highest pickup too much,
use the screwdriver pedestal adjustment to move that pickup further away from the strings on the
high end rather than rolling off the high frequency equalization on the piano channel, since that
would dull the tone of the whole piano. In general, the two pickups under the strings need to be
about the same distance from the strings at either end of the pickup. If they are slanted in height, it
will be impossible to adjust the volumes across the whole keyboard to be smooth and balanced.
Play test notes on the piano in the following order: first, play notes at near either end of each
sensor; this will insure that the brackets are level. If they are not, use the screwdriver pedestal
adjustments to balance. Then, play notes on either side of the junctions between sensors while using
the control box volume knobs to smooth the transition between pickups. After this procedure is
followed, the entire keyboard is now being reproduced at uniform volume.
In a permanent installation, such as a church or club, it is always a good idea to request that the

As always, making sure the signal from the pickup is maximized through closer pickup-to-string
proximity will minimize any hum.
Warranty
When you own a Helpinstill, you're a member of the family. We want your unit to work forever,
and we'll do whatever it takes to keep you satisfied. Call us anytime at (713) 432-1089 with
questions or suggestions, or e-mail us at [email protected], or visit our website at
www.helpinstill.com
"There's No Substitute for Real Piano"
A Note On Tone: Moving the middle pickup as close to the keyboard as possible will result in
better tone in that region; moving it further back will tend to emphasize the lower harmonics,
resulting in more of an electric piano or "Rhodes" sound. This area of the piano seems to be
more critical in pickup placement to achieving a "realistic" tone than the bass and high sensors.
Sometimes a movement of as little as 1/2" along the strings will dramatically alter the balance of
harmonics and, as a result, regain the familiar sound of the piano in that region.
1. System problems If ground-loop buzzing is encountered, try unplugging the mic cable from
the control box and plugging it into an ordinary dynamic microphone, such as an SM-58. The
continued presence of the hum in the system would, of course, rule out the piano pickup as its
source. This sounds obvious, but it's surprising how often in our experience this turns out to be
the case.
2. Ground Loops If the previous mic-switching test seems to indicate hum only when the piano pickup is
connected, try patching the output of the piano pickup into a direct box with a ground lift, and
plugging the mic cable into the direct box. Lifting the ground at the direct box may then eliminate the hum.
Table of contents
Popular Accessories manuals by other brands

Major Science
Major Science MD-01N-110 instruction manual

TSPROF
TSPROF K-02 user manual

Brandson Equipment
Brandson Equipment 301826 user manual

LANKIM
LANKIM MIGHTY CARVER EK1126 quick start guide

Briggs & Stratton
Briggs & Stratton Wireless Monitor Kit Installation and operation manual

Superroof
Superroof SOFIA 1000 Assembling Instruction


