HEUTE NEPTUN I User manual

NEPTUN I
Sole cleaning unit
Art.-No.: 84-620
Please read the instruction carefully before
assembling and putting into operation.
Keep instruction for future reference.
Contents
1. General
2. Function
3. Installation
4. Water connection
5. Water drainage
6. Power connection
7. Replacement of disinfectant tank
8. Metering pump adjustments
9. Initial start-up
10. Normal operation
11. Safety instructions
12. Fuse replacement in metering pump
13. Cleaning
14. Maintenance
15. Warranty
16. Troubleshooting
17. Spare parts / service
18. Circuit diagram
1. General
The HEUTE machine Neptun I cleans and disinfects
soles of boots, working and safety shoes.
2. Function
(cf. fig. 2)
Pressing the safety push button (1) starts the wheel
brush (2) while water (3) and disinfectants (4) will
be sprayed onto the rotating brush.
This way cleansing and disinfection of the soles will
take place at the same time.
3. Installation
Having placed the machine on site it needs to be
aligned horizontally.
By screwing / unscrewing the threaded base feet
up to 15 mm of ground unevenness can be compen-
sated.
4. Water connection
(cf. fig. 3)
The customer is responsible for providing water
supply as well as connecting the hose.
For wet cleaning cold or hot water (approx. 45°C)
can be used - max. pressure is 3 bar.
- Lift up protective cover.
- Connect 1/2" hose of sufficient length without
bending it and make sure to use pressure- and
temperature-resistant hose.
- Attach hose (2) to nozzle (1) of solenoid valve up
to end stop and fix with hose clamp.
Assembly and
operating instructions
Fig. 2
Fig. 3

NEPTUN I
Sole cleaning unit
Art.-No.: 84-620
5. Water drainage
(cf. fig. 4)
Dirty water is drained off through the pipe socket (1)
to the floor.
Pipe socket diameter outside 70 mm, inside 66
mm, length 58 mm.
6. Power connection
The machine comes with a cord of approx. 4m
length, fitted with a 5-pole CEE connector (16 A).
The customer must provide an appropriate CEE
socket installed (400 VAC/16 A).
Motor / wheel brush rotates clockwise.
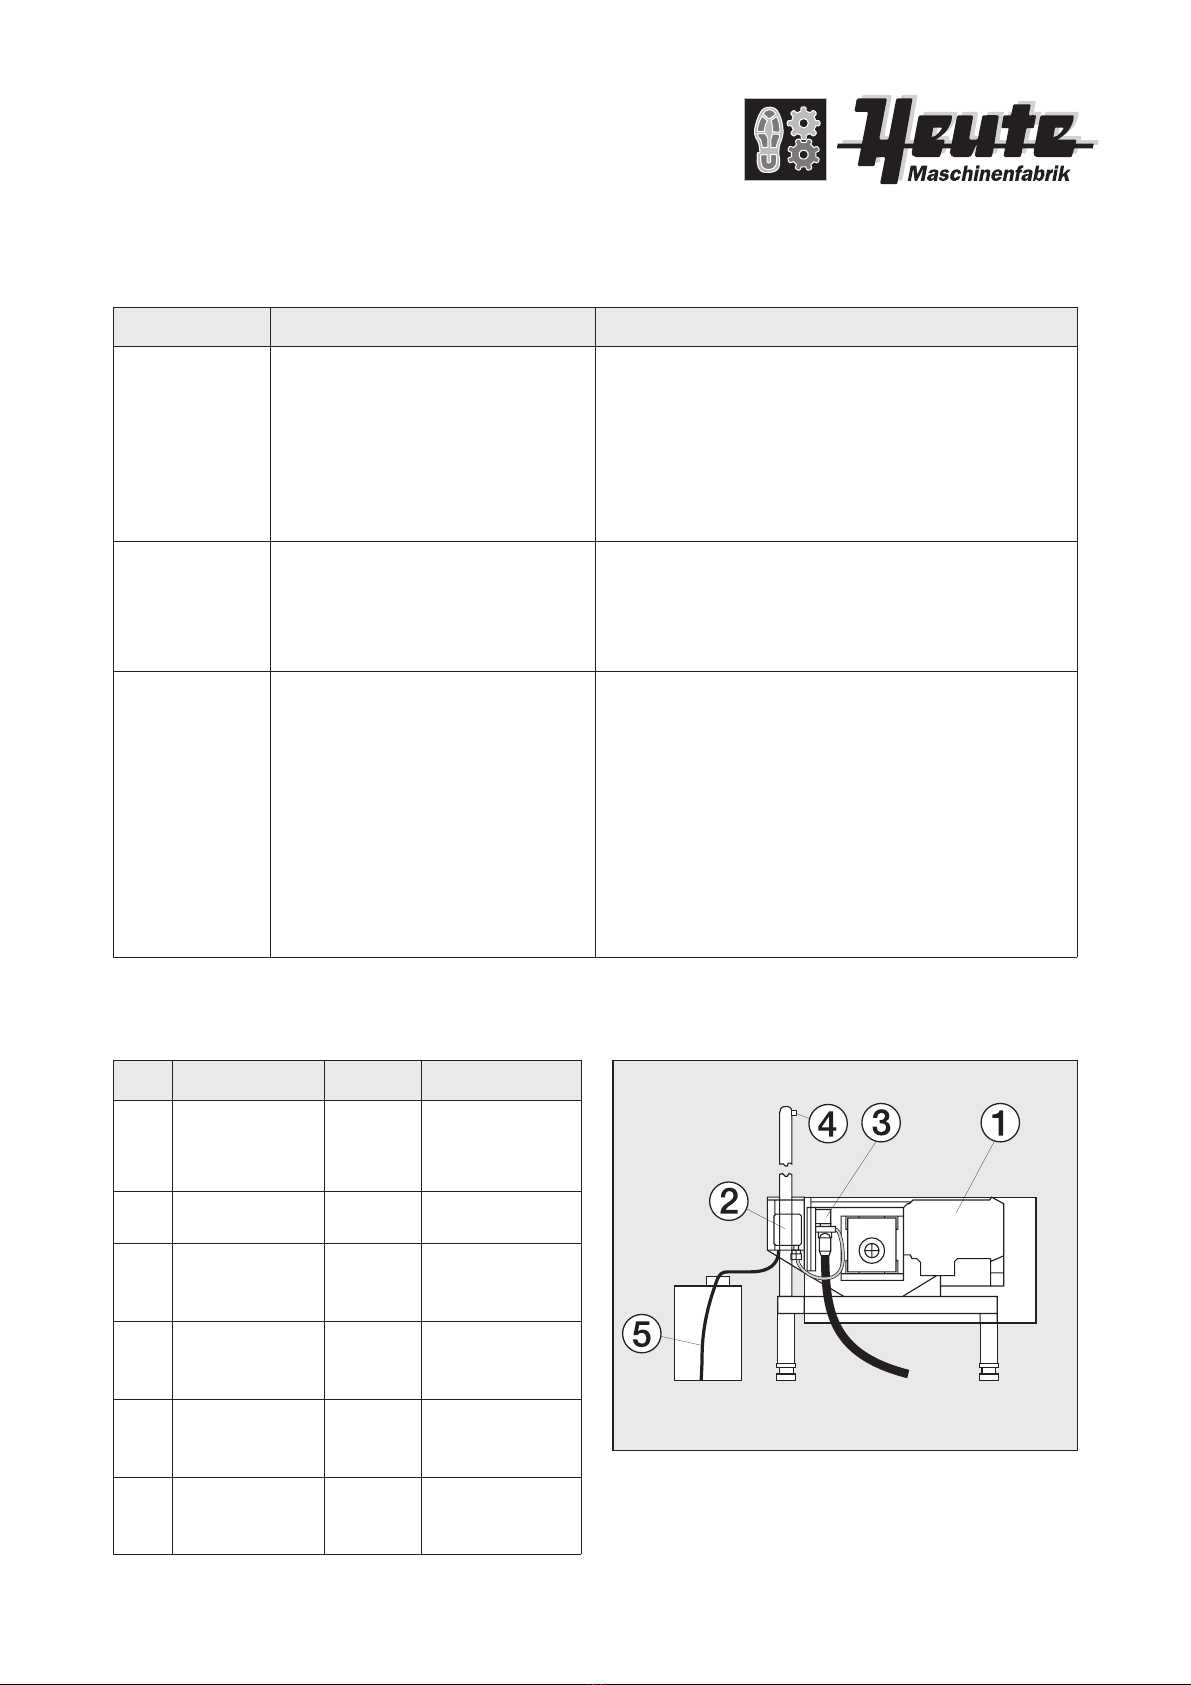
7. Replacement of disinfectant tank
(cf. fig. 5)
- Place tank (1) with disinfectant next to the machine.
- Insert hose (2) into the tank down to base level;
avoid kinks and bends.
- Press and continue to hold down the safety push
button (3) and high-speed push button (4) on
metering pump (5) until disinfectant flows out
of the spray tube (6) without forming bubbles;
afterwards release (3) and (4).
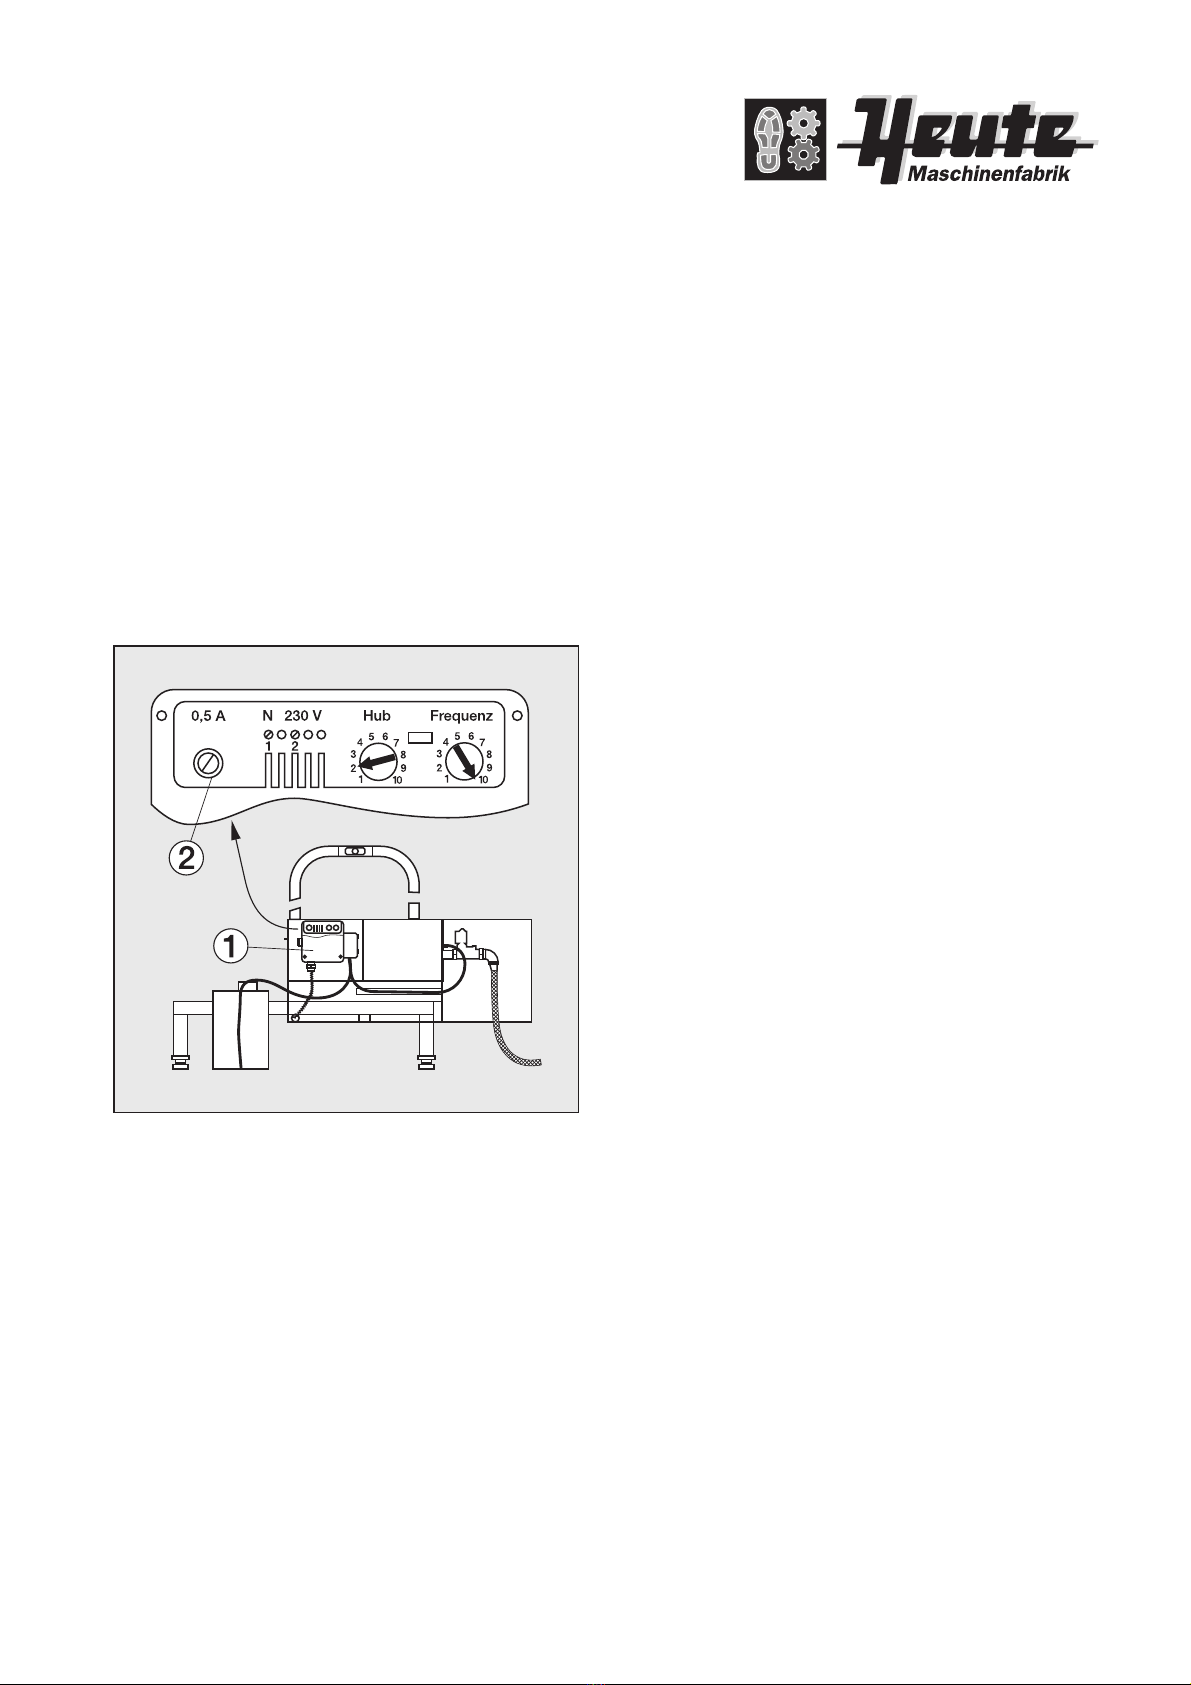
8. Metering pump adjustments
- Opening of the metering pump may only be carried
out by qualified electrician.
- Caution! Components carry live voltage
- Volumetric displacement 0,01 - 0,5 l/min
- Follow disinfectant manufacturer's instructions
for dosage and take samples
8.1 Increase dosage
(cf. fig. 6)
- Loosen cover screws and take off cover (1) of
metering pump
-
Turn “Hub” adjuster (2) clockwise with a screwdriver
- Remove pressure hose (3)
- Press safety push button (4) and place measuring
cup (5) underneath the pressure nozzle (6)
- Adjust “Hub” (2) according to measurement results
- Re-assemble in reverse order
8.2 Decrease dosage
(cf. fig. 7)
- Loosen cover screws and take off cover (1) of
metering pump
- Turn the “Hub” adjuster (2) counter-clockwise with
a screwdriver
- Remove pressure hose (3)
- Press safety push button (4) and place measuring
cup (5) underneath the pressure nozzle (6)
- Adjust “Hub” (2) according to measurement results
- In case the dosage is still too high when using
setting "Hub=1" adjust "Frequenz" (7) counter-
clockwise
- Re-assemble in reverse order
Fig. 4
Fig. 5

NEPTUN I
Sole cleaning unit
Art.-No.: 84-620
9. Initial start-up
After power and liquid connections have been made
follow these steps:
- Hook the protective cover into carriers
- Insert gratings into carriers
- Turn on water tap
- Plug in main power supply
- Carry out test run
- Place machine on platform
- Firmly grasp retaining bracket
- Step on grating in the cleaning area with one foot
at a time
- Press safety push button and release button after
a short runtime
10. Normal Operation
- Enter platform
- Firmly grasp retaining bracket
- Step on grating in the cleaning area with one foot
at a time
- Press safety push button and release the button
after cleaning process
11. Safety Instructions
- Operation not permitted without protective cover
in proper position
- Do not start a cleaning process without grating in
its proper place
- Do NOT touch rotating brushes either with bare
hands or wearing gloves
- The machine must only be used for cleaning the
soles of boots, working and safety shoes
- Disconnect mains plug prior to carrying out any
maintenance or repair work
Fig. 6 Fig. 7
NEPTUN I
Sole cleaning unit
Art.-No.: 84-620
12. Fuse replacement in metering pump
(cf. fig. 8)
- Opening the metering pump may only be carried
out by a qualified electrician
- Caution! Components carry live voltage
- Loosen cover screws and take off cover (1) of
metering pump
- Loosen protective cap (2) with slide catch by
pressing down and turning slightly counter-clock-
wise
- Remove defective fuse and insert new fuse of
identical rating (M 0,5A /250 V/C)
- Re-assemble in reverse order
13. Cleaning
- The machine must only be cleaned when turned
off and not running
- Cleaning intervals depend on individual usage and
requirements
- In case the machine is heavily soiled it should be
cleaned inside and outside
14. Maintenance
- The machine must only be maintained when turned
off and not running
- Check hoses and make sure they fit tightly and
are leak-proof otherwiser replace them
- Check metering pump on casing for possible
leakage
- Make sure the safety push button runs smoothly
- Replace brush if worn with use
15. Warranty
We guarantee our products are free of manufactur-
ing and material faults. Warranty extends to
6 months on electrical components and to one year
on metal components commencing on the day
of dispatch from the supplier’s premises or depot.
Changes or modifications made by customers to our
products without our prior consent thereto given in
writing will void the guarantee.
Not following the operating instructions will also
void the warranty.
Fig. 8
NEPTUN I
Sole cleaning unit
Art.-No.: 84-620
Quantity
1
1
1
1
3 m
1
Pos.
1
2
3
4
5
6
Art. Nr.
MG.03.201
SB.10.022
EM.01.005
ES.09.424
KG.01.021
80.05.001.053
Description
Three-phase
a.c. motor
Metering pump
Solenoid valve,
G1/2“-24VAC
Safety push
button
Hose,
Di 6 x 1,5 mm
Disk brush,
D 180 mm
Error
- Brush does
not rotate
- No Water
- No
disinfectant
Cause
- Mains plug not plugged in
- Safety push button defective
- Transformer fuse has triggered
- Motor too hot, thermostat has
triggered
- Gate valve closed
- Hose removed from nozzle
- Hose defective
- Solenoid valve fails to open
- Storage tank empty
- Suction hose not inserted down
to base
- Metering pump fails to run
- Metering pump runs but no
delivery
Solution
- Plug in main power supply
- Have button checked by qualified electrician;
replace if necessary
- Have it checked by qualified electrician
- Have it checked by qualified electrician
- Open gate valve (max. pressure 3 bar)
- Make sure hose is fixed tightly to nozzle
- Replace hose
- Replace solenoid valve /notify HEUTE-Service
- Fill up storage tank or replace (refer to
7. Replacement of tank with disinfectant)
- Insert suction hose down to base (refer to
7. Replacement of tank with disinfectant)
- Refer to 12. Fuse replacement in metering pump
- Pump hose defective, replace / notify HEUTE-
Service
16. Troubleshooting
17. Spare parts
(cf. fig. 9)
Fig. 9
Product specifications and design
subject to change without notice.
NEPTUN I
Sole cleaning unit
Art.-No.: 84-620
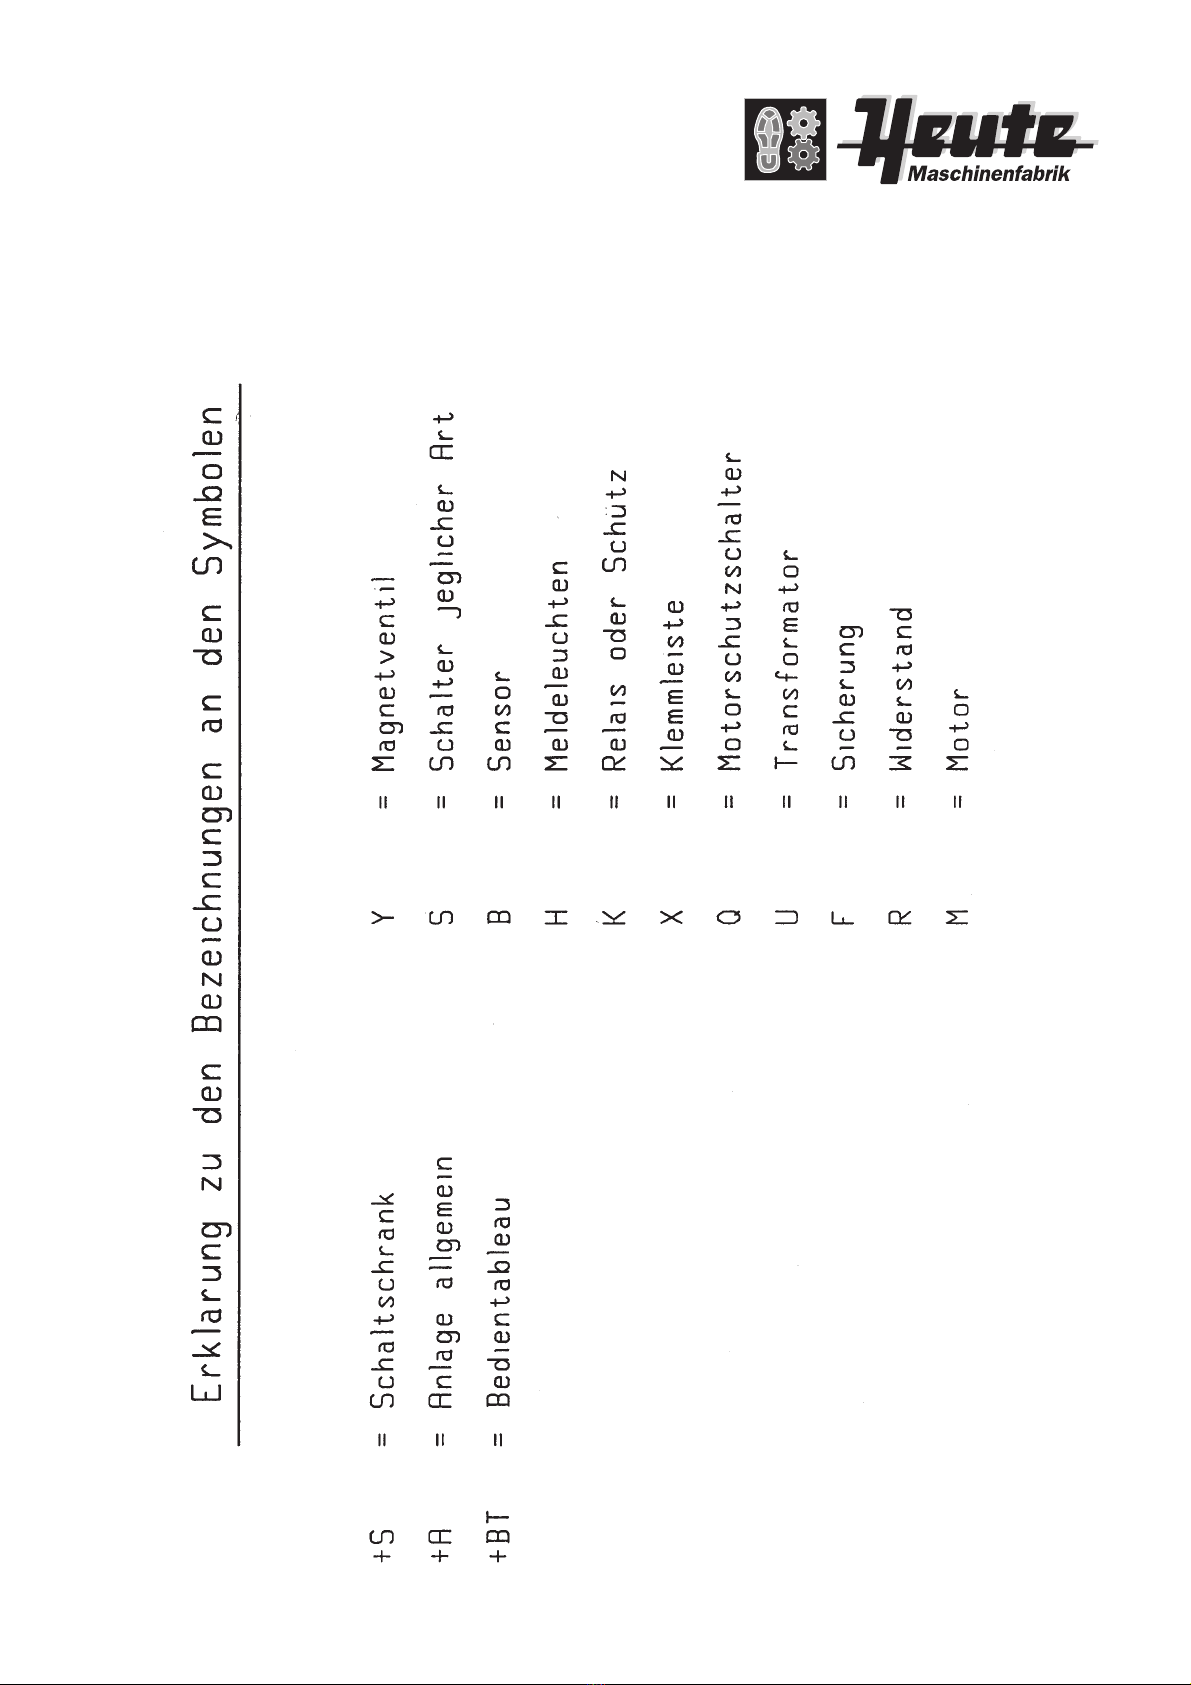
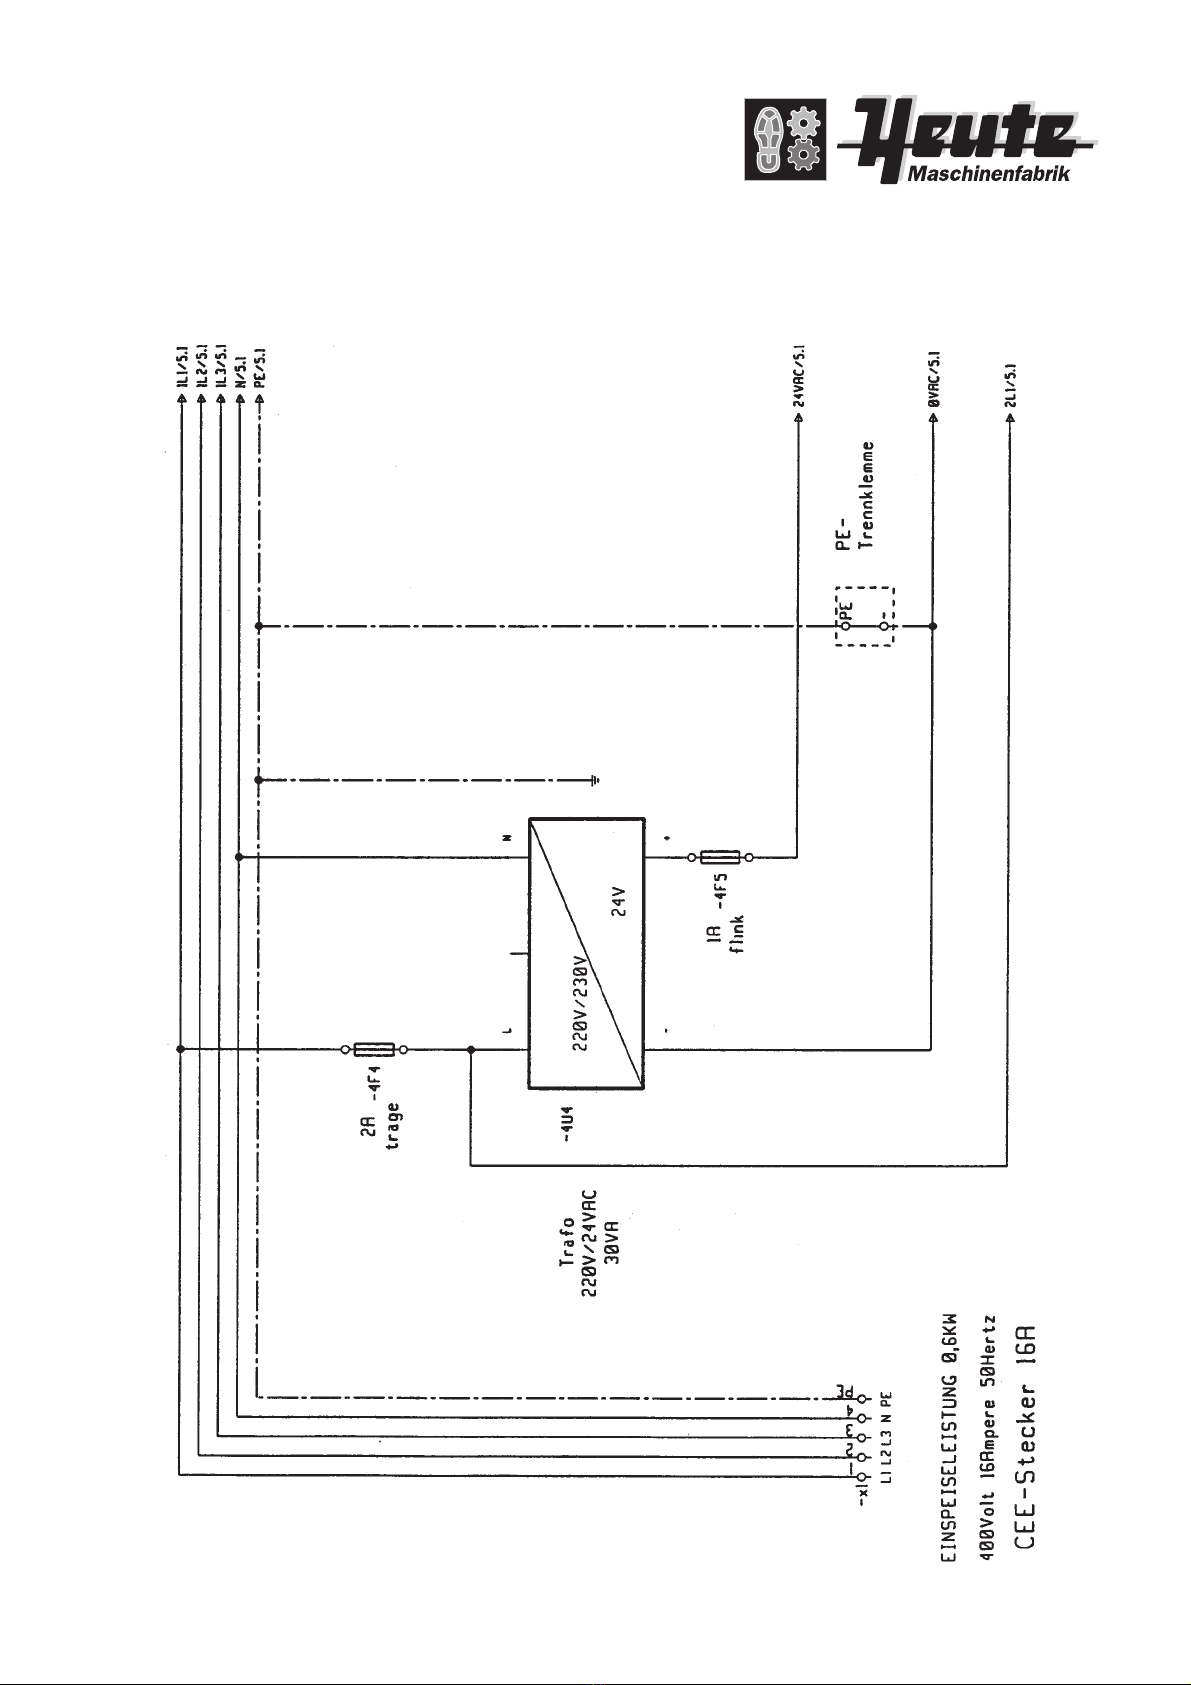
18. Circuit diagram
NEPTUN I
Sole cleaning unit
Art.-No.: 84-620
18. Circuit diagram

NEPTUN I
Sole cleaning unit
Art.-No.: 84-620
18. Elektro-Schaltplan

Maschinenfabrik
Heute GmbH & Co. KG
Germany
Postal address:
P.O.Box 10 05 07
42605 Solingen · Germany
Address:
Weinsbergtalstrasse 2-6
42657 Solingen · Germany
Phone:
+49 (0)212-3 80 31-13/14
Fax:
+49 (0)212-81 80 85
E-mail:
expor[email protected]
Internet:
www.heute-gmbh.de
Contact us for service, spare parts
and additional information:
Other manuals for NEPTUN I
1
Table of contents
Other HEUTE Washer manuals


Popular Washer manuals by other brands


Bosch
Bosch WAU28PBHSN User manual and installation instructions

Amana
Amana NTW4516FW quick start guide

Tricity Bendix
Tricity Bendix BA 450 Operating and installation instructions

Siemens
Siemens Washing machine installation instructions

Bosch
Bosch Vision 300 Operating Operating, care and installation instructions

Asko
Asko W4086.P.T.AU Instructions for use


