HIGH ONE 973743 User manual

ELECTRO DEPOT
1 route de Vendeville
59155 FACHES-THUMESNIL - FRANCE
EN
WARRANTY CONDITIONS
This product has a 2-year warranty as of the date of purchase*, covering any fault
resulting from a manufacturing or material defect. This warranty does not cover defects
or damage resulting from incorrect installation, improper use or abnormal wear of
the product.
*as shown on the sales receipt.
FR
CONDITION DE GARANTIE
Ce produit est garanti pour une période de 2 ans à partir de la date d’achat*, contre
toute défaillance résultant d’un vice de fabrication ou de matériau. Cette garantie ne
couvre pas les vices ou les dommages résultant d’une mauvaise installation, d’une
utilisation incorrecte ou de l’usure anormale du produit.
*sur présentation du ticket de caisse.
NL
GARANTIEVOORWAARDEN
Dit product wordt gaegarandeerd voor een periode van 2 jaar vanaf de aankoopdatum*,
voor elke storing die het gevolg is van een fabricagefout of het materiaal. Gebreken of
schade door slechte installatie, onjuist gebruik of abnormale slijtage van het product
worden niet gedekt door deze garantie.
*op vertoon van kassabon.
ES
CONDICIONES DE GARANTÍA
El certificado de garantía de este producto tiene una duración de 2 años a partir de la
fecha de compra* que se limita a los defectos de fabricación y averías del material.
Se excluyen de la garantía deficiencias o daños originados por una mala instalación,
errores en la manipulación o por un auso inadecuado.
*previa presentación del comprobante de compra.

973743 - WF 580 D W701T V2
INSTRUCTIONS FOR USE ..........................02
CONSIGNES D'UTILISATION ....................42
GEBRUIKSAANWIJZINGEN ....................86
INSTRUCCIONES DE USO ..................128
2/2 01/2022-01
Washing machine
Lave-linge
Wasmachine
Lavadora

12
3
4
5
6
8
9
10
7


2 FR
A
2 EN
Thank you!
Thank you for choosing this HIGHONE product.
Selected, tested and recommended by ELECTRO
DEPOT, HIGHONE brand products guarantee you easy
use, reliable performance and impeccable quality.
With this appliance, you know that you’ll be pleased
every time you use it.
Welcome to ELECTRO DEPOT.
Visit our website: www.electrodepot.fr

3FR
Aperçu de l’appareil
A
3 EN
Contents
AOverview of the
appliance
CUseful information
BUsing the appliance Installation
Use
Presentation of the control panel
Using the machine
Programme table
Cleaning and maintenance
Error codes
Description of the appliance

4EN
Overview of the appliance
A
Description of the appliance
1Electronic display 6Drain pump filter access hatch
2Programme selector 7Water inlet valve
3Work top 8Power cord
4Dispenser drawer 9Drain hose
5Drum 10 Transit bolt

5EN
Using the appliance
B
Installation
Removing the transit bolts
X X4 4
X4
12
3 4
1Before using the washing machine, remove the 4 transit bolts and rubber washers
located at the rear of the machine. Failure to comply with this instruction may cause strong
vibrations, a high level of noise and damage to the machine, rendering the warranty null and
void.
2Loosen the transit bolts by turning them anti-clockwise with a suitable spanner.
3Remove the transit bolts by pulling them straight out.
4Fit the plastic blanking plugs supplied with the accessory kit in the holes left once the
transit bolts have been removed. Keep the transit bolts for later use.
PLEASE NOTE : Remove the transit bolts before using
the machine for the first time. The warranty does not
cover faults resulting from the machine being used with
the transit bolts still in place.

6EN
Using the appliance
B
Adjusting the feet/adjusting the adjustable housings
1
1Do not install the machine on a surface that could prevent air from flowing underneath
(e.g. a carpet).
• For quiet and vibration-free operation, install the machine on a firm surface.
• The machine can be levelled using the adjustable feet.
• Loosen the plastic lock nut.
X4
23
2To increase the height of the machine, turn the feet clockwise. To reduce the height of
the machine, turn the feet anti-clockwise.
• Once the machine is level, re-tighten the lock nuts by turning them clockwise.
3Never place wedges made of cardboard, wood or any other similar material under the
machine to level it.
• When cleaning the floor around the machine, be careful not to change the levelling.
7EN
Using the appliance
B
Electrical connection
• Your washing machine requires a 220-240 V, 50 Hz mains power supply.
• The power cord of your washing machine is fitted with an earthed plug. This plug must
always be connected to an earthed 10-amp socket.
• This plug must always be connected to an earthed 10-amp socket. The fuse rating for the
socket must also be 10 amps.
• If the plug or fuse does not meet these requirements, call a qualified electrician.
• We disclaim all liability for any damage resulting from the use of unearthed equipment.
PLEASE NOTE : Using the machine at low voltage will
shorten its lifespan and limit its performances.
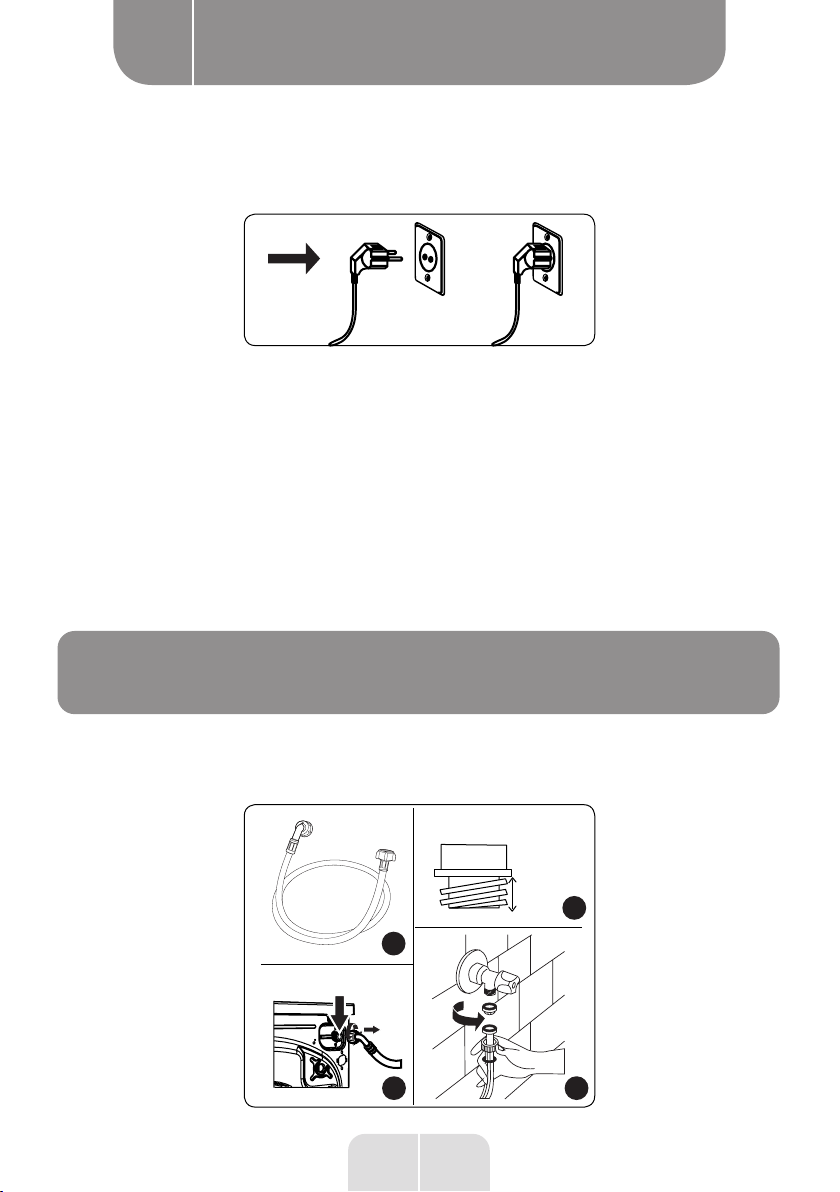
Connecting the water inlet hose
1
3
2
4
3/4"
10 mm

8EN
Using the appliance
B
1Depending on its technical specifications, your machine may be fitted with either a single
water inlet hose connection (cold water) or a double connection (hot and cold water). The
hose with a white cap should be connected to the cold-water inlet and the hose with a red
cap to the hot-water inlet (if applicable).
• To prevent water leaking from the joints, 1 or 2 nuts (depending on the technical
specifications of your machine) are delivered in the hose packaging. Fit these nuts to the end
of the water inlet pipe(s) to be connected to the water supply.
2Connect the new water inlet hoses to a 1.9 cm threaded tap.
• Connect the white end of the water inlet hose to the white water inlet valve located at the
rear of the machine and the red end of the hose to the red water inlet valve (if available).
• Tighten the connections by hand. If in doubt, consult a qualified plumber.
• A water pressure between 0.1 and 1 MPa is required for optimum operating efficiency (a
pressure of 0.1 MPa corresponds to a flow rate of more than 8 L of water per minute with a
fully open tap).
3Once all the connections have been made, carefully turn on the water supply and check
for any leaks.
4Make sure that the new water inlet hose is not pinched, twisted, bent, kinked or crushed.
• If the machine is fitted with a hot water inlet connection, the temperature of the water
supplied must not exceed 70°C.
PLEASE NOTE : The appliance must be connected to
the water supply network using the new connection sets
supplied with the appliance; used connection sets should
not be reused.

9EN
Using the appliance
B
~ 95 cm
~ 95 cm~ 145 cm
~ 140 cm
~ 95 cm ~ 150 cm
0 – max. 100 cm
Connecting the drain hose
• Connect the drain hose to a drainpipe or to a sink waste pipe bend using additional
hardware.
• Never attempt to lengthen the drain hose.
• Do not place the end of the machine's drain hose in a container, bucket or bathtub.
• Make sure that the drain hose is not kinked, twisted, crushed or overstretched.
• Fit the drain hose no higher than 100 cm from the ground.

10 EN
Using the appliance
B
Presentation of the control panel
1 2 3
1Dispenser drawer
2Programme selector
3Operating lights
Dispenser drawer

11 EN
Using the appliance
B
1
2
3
4
5
6
1Accessories for washing liquids 4Detergent compartment, pre-wash
cycle
2Detergent compartment, main
wash cycle 5Washing powder levels
3Fabric softener compartment 6Washing powder scoop (*)
(*) The technical specifications may vary depending on the model of machine.
Compartments
Detergent compartment, main wash cycle:

12 EN
Using the appliance
B
This compartment is intended for washing powder or liquid, or anti-limescale products. The
graduated rule (optional) for liquid detergent is delivered inside the machine. (*)
Softener, starch or detergent compartment:
This compartment is for fabric softeners, conditioners or starch. Follow the instructions on
the packaging. If the fabric softener leaves a residue after use, try diluting it or use a liquid
fabric softener.
Detergent compartment, pre-wash cycle:
Only use this compartment when the Pre-wash function has been selected. It is
recommended that this function is only selected for use with heavily soiled laundry.
13 EN
Using the appliance
B
(*) The technical specifications may vary depending on the model of machine.
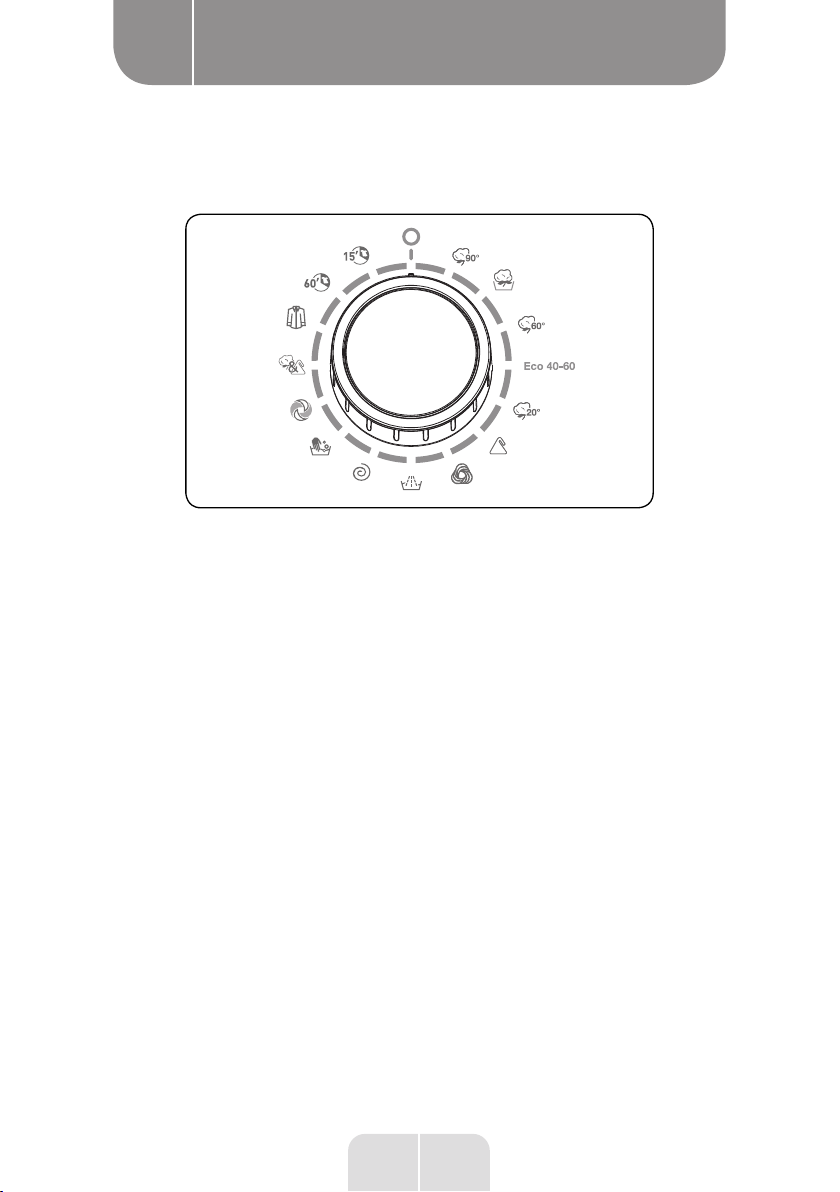
Programme selector
• To select a programme, turn the programme selector clockwise or anti-clockwise until the
indicator points towards the desired programme.
• Make sure that the programme selector is pointing precisely at the desired program.

14 EN
Using the appliance
B
Electronic display
1
2
34
5
9
678
1Display screen 6Additional function 1 button
2Wash 7Additional function 2 button
3Rinse 8Start/Pause button
4Spin 9Additional function indicator lights
5End
• The indicator lights show the remaining time, the additional functions selected and the
various stages of the selected programme (pre-wash/wash, rinse, spin).
• The display screen shows “Finished” when the programme reaches the end.
• The display screen also shows any errors on the machine.

15 EN
Using the appliance
B
Using the machine
Preparing the laundry
12
3 4
56
7
1Follow the instructions on the garment care labels.
• Sort the laundry according to the type of fabric (cotton, synthetic, delicate, wool, etc.), the
washing temperature (cold, 30°C, 40°C, 60°C or 90°C) and how dirty it is (slightly dirty, dirty,
very dirty).
2Never wash white laundry with coloured laundry.
• Dark clothing may contain an excessive amount of dye and should be washed separately
several times.
3Be sure to remove any metallic materials that may be present in the laundry or in the
pockets.

16 EN
Using the appliance
B
WARNING: The warranty doesnot coverany malfunction
resulting from damage caused by the presence of foreign
objects in the machine.
4Do up zips, hooks and buttons
5Remove metal or plastic curtain hooks or place them in a mesh or laundry bag.
6Turn clothing such as trousers, blouses, T-shirts and sweatshirts inside out.
7Wash socks, handkerchiefs and other small items in a mesh laundry bag
F P A
Can be bleached Do not bleach Machine wash,
normal/moderate
cycle
Maximum ironing
temperature
150°C
Maximum ironing
temperature
200°C
Do not iron
Can be dry
cleaned
Do not dry clean Dry flat
Line dry without
spinning
Dry flat without
spinning
Do not tumble dry
Dry clean with
petroleum
solvents
Dry clean with
usual solvents Dry clean with
solvents

17 EN
Using the appliance
B
Putting laundry into the machine
• Open the machine door.
• Distribute the laundry evenly inside the machine.
PLEASE NOTE : Exceeding the maximum load of the drum
causes poor washing results and creased clothing. Refer
to the programme table to find out the load capacities for
the various programmes.
The following table shows the approximate weight of the most common laundry items:
Type of laundry Weight (g)
Towel 200
Sheet 500
Bathrobe 1,200
Duvet cover 700
Pillowcase 200
Underwear 100
Tablecloth 250
• Add each item separately.
• Check that no items are trapped between the rubber seal and the door.
• Gently push the door until you hear a click.
This manual suits for next models
1
Table of contents
Languages:
Other HIGH ONE Washer manuals

Popular Washer manuals by other brands

KRAFT
KRAFT KF-AKL65103ZW user guide

Samsung
Samsung WD106U4SA Series user manual

Beko
Beko WMB 51421 manual

Electrolux
Electrolux EIFLW55HIW - 27" Front-Load Washer Use & care guide

Bosch
Bosch WAU28US8SN User manual and installation instructions

Beko
Beko WM6167 Installation & operating instructions and washing guidance


