Highland HIO60MP User manual

Instruction manual 3
Built-in multifunction electronic oven with 9 programmes
HIO60MP
en

1
Fig. 1
Fig. 2a/2b/2c
Fig. 3a/3b/3c
Fig. 1
A C
B
Fig. 2a Fig. 2b
Fig. 2c
A
B
Fig. 3bFig. 3a Fig. 3c

2
Fig. 4a/4b
Fig. 5/Fig. 6
Fig. 7a/7b
B
595 mm
MIN 7 mm
MAX 590 mm
MIN 580 mm
MIN 560 mm
MIN 550 mm
595 mm
544 mm
23 mm
595 mm
MIN 580 mm
MIN 560 mm
MIN 550 mm
544 mm
595 mm
23 mm
Fig. 4a
Fig. 4b
B
Fig. 5 Fig. 6
A
Fig. 7a Fig. 7b

3
en
Contents
Introduction........................................................................................................................................ 3
Safety instructions............................................................................................................................... 3
A close view........................................................................................................................................ 4
Switching on the first time.................................................................................................................. 4
Useful advice....................................................................................................................................... 5
Operation ........................................................................................................................................... 5
Cooking table ..................................................................................................................................... 9
Oven cleaning and maintenance ....................................................................................................... 11
Assistance ......................................................................................................................................... 12
Installation (Fig. 4)............................................................................................................................. 12
Installation instructions ..................................................................................................................... 12
Electrical connection ........................................................................................................................ 12
Technical data ................................................................................................................................... 13
Introduction
Thank you for choosing a Highland product.
Before using the appliance, please carefully read the instructions and advice contained in this manual. In this way you will
be able to make best use of the appliance and also ensure its lasting efficiency. Keep this booklet for further reference.
Safety instructions
• The Manufacturer declines any liability for damage due to: incorrect installation, improper, wrong or unreasonable use.
• This appliance is not intended for use by persons (including children) with limited mental or motory abilities or without
experience and knowledge of it, unless supervised or instructed in its use by someone responsible for their safety.
• Children must be supervised to ensure that they do not play with the appliance.
Always contact qualified personnel in the following cases:
To ensure safe and efficient operation of this electrical appliance:
– only contact authorised service centres;
– always demand the use of original spare parts;
– the appliance is designed for non-professional household use; do not modify its characteristics;
– the dataplate gives the symbols indicating the countries for which the instructions apply;
– appliance electrical safety is guaranteed only when it is connected to an earthing system in compliance with the
current regulations.
–Do not touch the heating elements or any parts of the oven door during use, as they become very hot.
Keep children away.
Do not allow children to touch:
– the controls and the appliance in general;
– the packing elements (bags, polystyrene, staples, etc.);
– the appliance during and immediately after oven use, since it becomes very hot;
– the appliance when not used (make any potentially hazardous parts safe).
Do not:
– touch the appliance with wet parts of the body;
– use the appliance when barefoot;
– pull the appliance or power cable to unplug it from the socket;
– carry out improper or hazardous operations;
– block the ventilation and cooling openings;
– leave the power cables of other electric appliances on hot parts of the appliance;
– expose the oven to atmospheric agents (rain, sun);
– use the oven to store various objects;
– use flammable liquids near the appliance;
4
– use adapters, multi-sockets and/or extension leads;
– allow anyone except qualified personnel to install or repair the appliance.
Always contact qualified personnel in the following cases:
– installation (according to the manufacturer’s instructions);
– doubts regarding appliance operation;
– replacing the socket if incompatible with the appliance plug.
Contact service centres authorised by the manufacturer in the following cases:
– immediately after unpacking, in case of doubts about appliance integrity;
– replacing or damage to the power cable;
– malfunction or poor operation; always demand original spare parts.
Important:
– only use the appliance to cook food;
– disconnect the appliance from the power supply before any cleaning or maintenance or in case of malfunction;
– use oven gloves when placing containers in the oven or removing them;
– since the end of the door handle may be hotter due to exiting hot air, always grip it in the middle;
– always make sure the control knobs are in the off position when the oven is not in use;
– if the oven is no longer to be used, disconnect it from the power supply.
A close view
Control panel
Cooking Mode selection knob
LCD graphic display for showing:
before cooking: cooking selection and various settings menu
during cooking: temperature
cooking times (incremental, duration, cooking end)
timer
selected cooking mode
various operation information for the user
Increase (+) / decrease (-), forward / back and conform (OK) knob
Rack and drip-tray runners
Used for correctly positioning the racks and drip-trays in 5 or 6 pre-arranged
positions (depending on model; from 1 to 6 starting from the bottom); the cooking
table (page 9) gives the best position for each type of cooking.
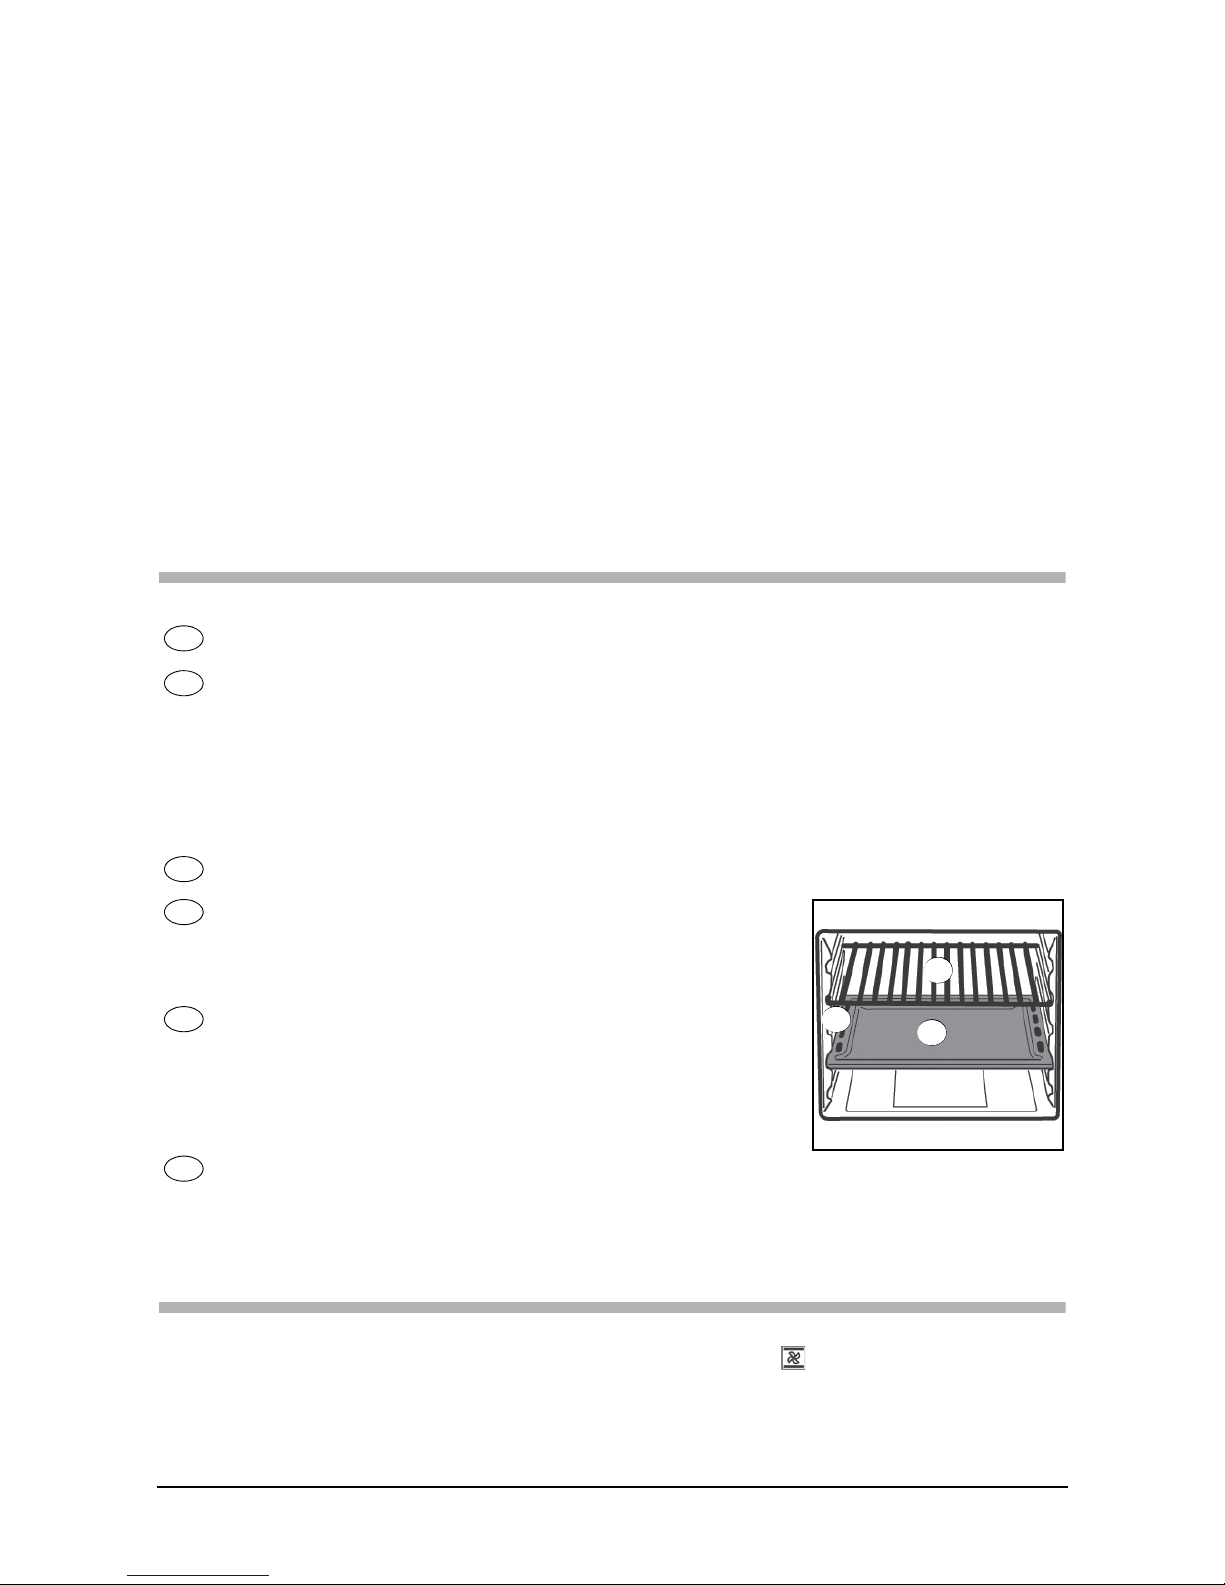
Drip-trays
Normally used for collecting juices from grilled food or for cooking food directly;
the drip-trays must be removed from the oven if not used. The drip-trays are made
from “AA” food-grade enamelled steel. N.B.: To achieve optimal cooking results it is
advisable to insert the drip-tray with the inclined part towards the rear wall of the
oven compartment.
Grill
Used for supporting pans, pastry moulds and any containers different from the drip-trays provided, or for cooking meat
and fish mainly with the grill and turbo grill functions, toasting bread, etc. Direct contact of the grill with food is
inadvisable.
Switching on the first time
When using the oven for the first time, operate it while empty at its maximum temperature for at least 40 minutes with
the door open, airing the room well and selecting the fan-assisted cooking function .
The odour noticed during this operation is due to the evaporation of substances used to protect the oven during the
period between manufacture and installation. At the end of this time, the oven will be ready to use.
A
B
C
E
D
F
D
E
F

5
en
Useful advice
For successful cooking, never place food in the oven when it is cold; wait until it has reached the set temperature.
During cooking, never place pots or containers directly on the oven floor; place them above the grills or drip-trays
provided, on one of the five shelves available; failure to do so could damage the oven enamel.
Never cover the walls of the oven with aluminium foil, especially in the lower part of the cooking compartment.
Any repairs must be carried out by specialised, licensed personnel.
Contact our nearest service centre and demand only original spare parts.
Your Highland oven uses a special enamel which is easy to keep clean, however it is advisable to clean it frequently to
avoid baking on grime and previous cooking residuals.
NB: - Read the relevant instructions carefully before switching the oven on.
Operation
This oven combines the advantages of “static” natural convection ovens with those of modern “fan” ovens. It is a very
versatile appliance enabling safe and easy selection of different cooking methods. For best use of your Highland oven,
consult the cooking table on page 9.
Settings
Firstly, access the “SETTINGS” menu and update the data shown as required.
Switch the oven on. With the knob C go to “SETTINGS” and confirm by pressing it.
By turning the knob it is now possible to select the date and time, language, control panel brightness, display contrast
and acoustic alarm tone settings.
It is also possible to change the various values and confirm them by pressing the knob C.
Once confirmed, these settings are saved even after the oven is switched off; the settings are saved even in case of a
temporary power failure lasting up to hours 10 hours.
Options
Eco display: when activated, this option reduces the brightness of the display during oven standby, also offering energy
saving.
Display off: when activated, this option ensures that the display is not backlit (for aesthetic reasons and/or energy saving)
when the oven is not working.
SW versions: indicates the oven software version. This is useful in case of any work on the oven by a technician.
Demo: a password must be entered in order to be activated. It allows the oven to be used without activating the heating
elements. Not usable by the end-user.
Manual oven operation
Turn the knob A to instantly access the Self Cooking Modes. Each mode is associated with a recommended temperature,
modifiable as required by turning the right knob.
Once a Cooking Mode is selected, the oven starts to heat up: the display shows the time from the start of cooking.
To reset this time and restart it (e.g. from when food is placed in the oven), press the knob C, then select
and confirm “Reset incremental timer”.
The display shows the description of the activated function, which will alternate with the message “PREHEATING” until
the set temperature is reached.
When the set temperature is reached, the oven emits a triple sound twice and the display only shows the description of
the activated function. The thermometer symbol ( ) will indicate that the “mercury column” has reached the
maximum level: this is always an indicator of the instantaneous inside temperature (even with the set temperature
reached, a temporary fluctuation with the second-last level of the “mercury column” is considered a normal oven self-
regulating process).
The preset temperature can be changed at any time with the knob C, going from a minimum of 50 °C (except for the
defrost, conventional grill and turbo grill functions - see section “Cooking mode”) to a maximum of 270 °C (except for
the defrost, soft cooking (230 °C), conventional grill and turbo grill functions) in steps of 5 °C.
Instantaneous temperature reading: press and hold knob C (for approx. 5 seconds) to display the instantaneous
oven temperature reading.
Child safety lock: press and hold knob C for even longer (approx. 10 seconds) to activate the child safety lock function
(a small key appears on the display to indicate its activation). This will effectively disable knob operation. To deactivate
this function, press and hold knob C again, for approx. 10 seconds.
6
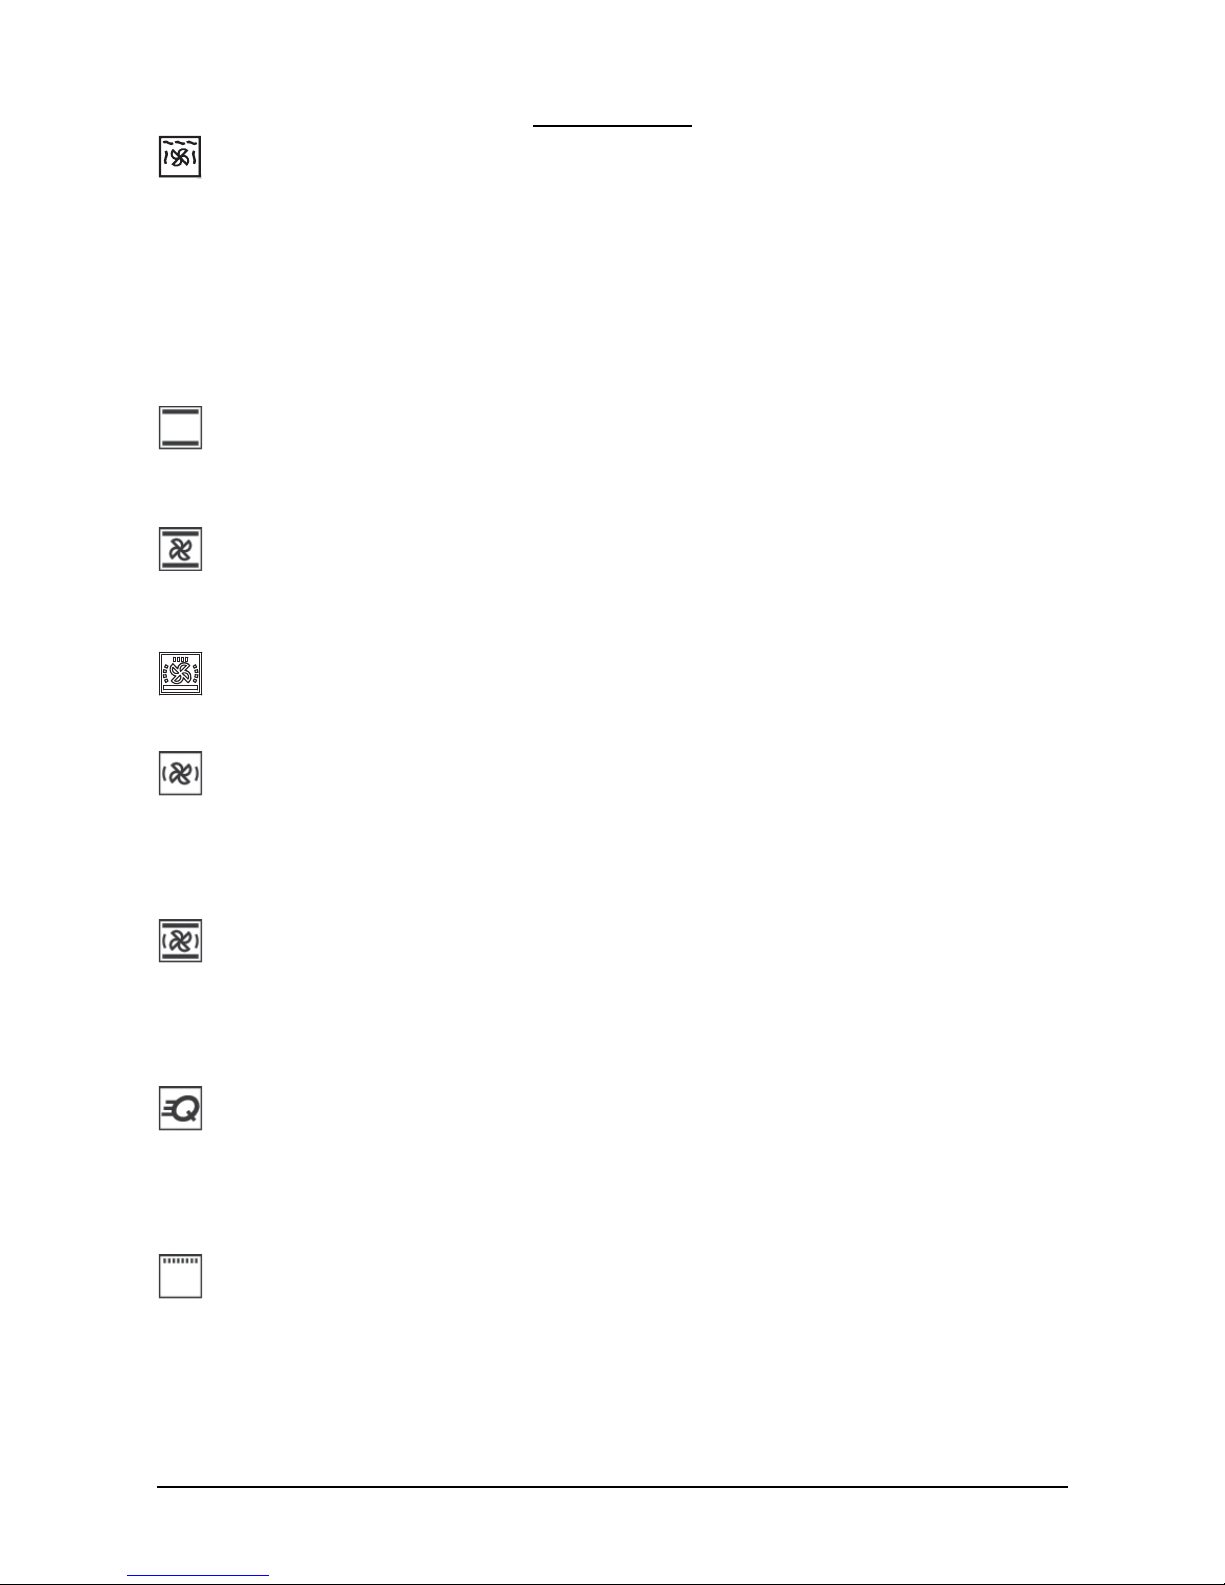
Cooking mode
Soft Cooking (Defrost - Quick defrost - Plate warmer)
The circular and top (roof) heating elements are partially activated. The low power and the fan allow very gentle and
even cooking. Ideal for dry pastry and all types of prolonged low-temperature cooking.
The temperature is preset to 100 °C for “wellness” cooking and provides for preheating of the oven before placing food
in it.
With this oven, Highland further develops this cooking programme, allowing the air to be heated gradually in a controlled
way and at low power, by means of the knob C. This offers new possibilities for treating the food:
Defrost The temperature is only 25-30 °C with the inside fan on.
Quick Defrost The conditions for quick thawing of food are obtained between 35 and 55 °C with the fan on.
Plate warmer Increasing the temperature to between 60 and 80 °C allows the warming of cooked but cold food
or food which must be kept hot without affecting the cooking.
Natural conventional cooking
The heat source is from above (roof heating element) and below (floor heating element). This is the conventional
cooking function which ensures even cooking using a single shelf.
The temperature is preset to 180 °C and provides for preheating of the oven before placing food in it.
Fan cooking
The top (roof) heating element, bottom (floor) heating element and fan inside the oven are activated.
The constant and uniform heat cooks and browns the food evenly. Various dishes can be cooked at the same time,
using a maximum of 2 shelves.
“Master Cooking”
The circular, bottom (floor) and top (roof) heating elements are partially activated. The even temperature distribution,
in combination with forced air circulation, makes this function ideal for baking all types of pizzas.
Hot air
The circular heating element is switched on and the fan starts. The constant and even heat cooks and browns the food
evenly. Different foods can also be cooked the same time, provided their cooking temperatures are similar. This is the
gentlest type of fan cooking available with this Highland oven, and is ideal for preparing cakes and pastries, enabling three
shelves to be used at the same time.
The temperature is preset to 150 °C and provides for preheating of the oven before placing food in it.
“Multi power” hot air cooking
This turns on the circular heating element together with partial activation of the top (roof) and bottom (floor) heating
elements and the fan. Compared with the previous function, it is a more powerful and faster way to reach the required
temperature; this, in combination with an even distribution of heat, makes it ideal for roast meat and fish and for baked
pasta, using up to three shelves.
The temperature is preset to 200 °C and provides for preheating of the oven before placing food in it.
“Quick cooking”
The circular heating element is turned on together with the top (roof) and bottom (floor) heating elements and fan.
This is the most powerful function available on your Highland oven, and the heat distribution is designed to be more
intense towards the bottom; this makes it ideal for preparing pizzas or fast cooking of frozen foods in general. It can be
used for quickly bringing the oven to the required temperature, and then setting any of the other available programmes.
The temperature is preset to 220 °C and provides for preheating of the oven before placing food in it.
Grilling
Activating the Grill heating element at the top of the oven, these cooking programmes work using infrared radiance;
therefore it is not the temperature that is important but the amount of radiance, which depends on the set power level.
It is possible to select from 4 power levels: 20%, 40%, 60% (default) and 80% max. grill power.
It is best to put the food in the oven when the oven is cold, immediately exploiting the incandescence of the grill heating element.
This quick surface cooking keeps the meat tender on the inside; it is also possible to quickly toast up to 9 slices of bread.
If the grill is used for a prolonged period the oven automatically limits the maximum temperature, in which case the grill
reduces its effectiveness.
The Highland oven is designed to grill food with the oven door completely closed.

7
en
Important: Highland has designed the oven opening to protect hands as much as possible. However, the grill heating
element is still very hot when in use; be careful not to touch it accidentally when handling food to be grilled.
The preset power level is 60% max. power and does not provide for oven preheating.
Turbo grill cooking
The grill heating element at the top of the oven and the fan are activated. It combines one-way heat radiation with
forced air circulation inside the oven. This prevents burning the surface of the food and increases penetration of the
heat. Excellent results are obtained using the turbo grill for mixed meat and vegetable kebabs, sausages, spare-ribs and
lamb chops, broiled chicken, quail with sage, pork fillets, etc.
The preset power level is 60% max. power and does not provide for oven preheating.
Pyrolytic automatic cleaning
The PYROLYTIC self-cleaning function turns oven cleaning into a quick, easy and instant procedure. The temperature
reached in the cooking compartment, 480 °C, carbonises all food and fat residue. During this process, some particles of
residue may glow; this is a normal phenomenon due to instantaneous combustion.
The activation of this function by means of knob A ensures that, from that point at which a temperature of 330 °C is
reached and (after reaching the maximum temperature) until the oven temperature drops under 180°, the oven door
is locked and cannot therefore be opened. This situation is indicated by the padlock icon lighting up.
Furthermore, during heating, the “P” icon also lights up.
Before cleaning:
1. Do not leave anything inside the oven; remove all accessories such as drip-trays, racks, runners, telescopic guides,
etc. In fact, as well as hindering the correct circulation of heat on all the walls, these could also be damaged by the
high temperature.
2. Remove food residues using a moist sponge; never use detergents or any other specific cleaning product.
3. Do not obstruct the circulation of air in the area in front of the oven.
Above all, do not leave anything on the door handle.
During “Pyrolytic” automatic cleaning the surfaces can become very hot. Keep children away.
Any obscuring of the LCD display during the Oven Cleaning - Pyrolysis process is normal and not a cause for concern.
It is a precautionary display protection feature, caused by the high temperatures in use. This obscuring may last for
several tens of minutes; during this period the latter two indicator lights will provide all necessary information relating to
the process as it is running (P) and the door lock status (padlock).
N.B.: Any obscuring of the LCD display during Cooking processes may be caused by a fault in the oven cooling system,
which activates a protection feature (indicated by the flashing P symbol). If this situation arises, switch off the oven and
leave it to cool. If the problem persists, contact our After-Sales Service.
Cooling fan
In order to reduce the temperature at the door, control panel and sides, the Highland oven is equipped with a cooling
fan which is automatically activated when the oven is hot. When the fan is on, air blows from the front of the oven
between the front panel and oven door; special attention has paid to ensure that the exiting air does not disturb the
kitchen environment and that noise is kept to a minimum.
To protect kitchen units, the fan stays on after cooking until the oven has cooled down sufficiently.
Programming cooking time
This enables a cooking mode to be programmed with the required times and temperature.
The possibilities are:
- timer: countdown of a fixed time, without effects on start and end of cooking;
- duration: instant start of cooking with set duration;
- cooking end: delayed start of cooking with set duration.
Setting the Timer
The Timer is separate from any other oven function and is used to set a required time after which an acoustic signal
sounds, without affecting the cooking processes.
Switch the oven on, press the knob C once, the icon starts flashing, and the display will show the message “SET TIMER”.
Select “TIMER” and confirm by pressing the same knob. Then set the required time in 30-second steps (and one-minute
steps for a time of more than 1 hour) up to a max. of 9 hours and 59 minutes. Confirm by pressing the knob C.
(After 15 seconds the oven confirms in any case, even if the user does not confirm).
The display will now show the message “TIMER” and starts the countdown.
If the time remaining is more than 1 hour it will be shown in hours and minutes (e.g. 1h:03, indicates 1 hour and
3 minutes remaining).

8
If the time remaining is less than 1 hour it will be shown in minutes and seconds (e.g. 9’14, indicates 9 minutes and
14 seconds remaining).
A acoustic alarm sounds for 1 minute at the end of the set time. It can be muted by pressing any button. At the same
time, the display shows the message “END OF TIMER”.
To reset the timer press the knob C and turn it to change the timer duration.
If other programming parameters are set as well as the timer, the display highlights both. In any case the oven will carry
out its countdown with an acoustic signal at the end.
The timer can be activated even after selecting a cooking function from the self cooking menu: the setting modes are the
same as those described above.
Instant start of cooking with set duration
To cook for 30 minutes at 200 °C. With the oven on, select a cooking mode from the “self cooking” menu then select
“duration”. Confirm by pressing the knob C.
Then set the required cooking duration (30 minutes in the example) and in any case from a minimum of 1 minute to a
maximum of 9 hours and 59 minutes. After confirming, the display shows the cooking end time. Cooking starts after
confirming again (cooking will start automatically after 15 seconds even without confirming). By turning the knob C
the temperature can now be increased or decreased from a min. of 50 °C to a max. of 270 °C (200 °C in the example)
in steps of 5°.
NOTE: For all the functions, except defrost, grill and turbo grill, after having confirmed the cooking duration, and when
it is at least 15 minutes, the programme asks if the last 5 minutes of cooking are to be used with the grilling function.
This additional function is suitable for browning food.
A - preheating stage
(The set parameters can always be corrected with the same operations)
The display now shows the message “PREHEATING” together with the Cooking Mode Name, e.g. “MULTI POWER”,
as well as the set duration and current time.
The thermometer with mercury column rising ( ) indicates that the oven is becoming hotter.
The display starts the countdown only after the required temperature is reached (except in grill functions, where the
countdown begins immediately), when two series of three sounds will be heard.
B - cooking stage
Place food in the oven.
The display now shows the message “DURATION” together with the Cooking Mode Name, e.g. “MULTI POWER”,
as well as the current time and the countdown which indicates the residual cooking time.
C - end of cooking
An acoustic alarm sounds for 1 minute at the end of the set time. It can be muted by pressing any button. At the same
time the display shows the message “COOKING END”.
The oven automatically switches off the heating, and the inside lamps remain on for about 15 minutes for checking
cooking. However the temperature will remain high for several minutes.
To continue cooking manually, just press the knob C and follow the procedures as described above in the Self Cooking
section.
To end everything, turn knob A to the off position.
It is possible to return to the previous menu screen at any time by selecting “Back” using knob C.
Delayed start of cooking with set duration
Set the cooking duration and the end of cooking time. Assuming the time is 8:00h and cooking is for 30 minutes ending
at 13:00h. After setting the duration and cooking mode as described in the previous section, select “COOKING END”
and confirm by pressing the knob C. Select the cooking end time (13:00h in the example) and confirm.
(After about 13 seconds the oven confirms in any case, even if the user does not confirm.)
The oven is now programmed and in standby mode.
The display shows:
0h30 / 13:00
alternatively the display indicates that their meaning is respectively
DURATION / COOKING END TIME
The set parameters, mode, temperature and times can always be corrected by selecting “Back” using knob C.
Cooking stage:
On reaching the cooking stage the oven behaves as in point B of the previous section.
The cooking duration countdown starts immediately, and not after the required temperature has been reached. This is
because it assumes that the food has already been placed in the oven at the moment of programming. The preheating
time is included in the cooking duration.

9
en
Cooking table
NB: The indications given in the table are the result of cooking tests carried out by a team of professional chefs. They are given only
as a guide and can be changed according to personal tastes.
Guided cooking setting
This Highland electronic oven offers the possibility of cooking 35 different types of food using preset programmes, times
and temperatures: therefore after selecting the recipe, the oven automatically cooks with the best combination of
Selection knob
setting
Type of food or recipe Weight
(kg)
Shelf position Preheating
time (min.)
Thermostat
setting (d2)
Duration
(min.)
Natural
conventional
cooking
Roast pork
Omelettes
Cod-gilthead-turbot
Bread rolls
Pies
Freshwater fish
Polenta with sauce
Cheesecakes
1
1.5
1
1
1
1.5
0.5
1.5
3
2
3
2-4 cont.
2
3
2
2
9.5
10.5
9.5
9.5
10.5
10.5
9.5
9.5
180 °C
200 °C
180 °C
175 °C
200 °C
200 °C
180 °C
180 °C
65-75
25-30
15
25-30
40-45
35-40
25-30
25-30
Fan cooking Roast pork
Baked crayfish
Cod-gilthead-turbot
Bread rolls
Fruit tarts
Meat & veg pies
1
0.5
2
2
1.5
2
3
3
2-4 cont.
2-4 cont.
2
3-5 cont.
9
10
7.5
9
9
9
180 °C
200 °C
150 °C
180 °C
175 °C
180 °C
60-70
30-40
25-30
25-30
30-35
40-45
“Master
Cooking”
Bread rolls
Pitta bread
Vegetable pie
Pizza
Chicken (pieces)
Turkey
Duck
Roast beef
Gilthead-bass-cod
Stuffed vegetables
Biscuits
Fruit tarts
Meringues
1
1
0.8
0.4
0.8
1.5
1.5
1
0.8
1.5
0.5
0.8
0.5
3
1
3
1-3 cont.
2 or 3
3
2 or 3
3
3
3
3
3
3
To
speed
up preheating
time, use the
“Quick Cooking”
function
170 °C
Max
180 °C
Max
170 °C
170 °C
170 °C
185 °C
150 °C
180 °C
160 °C
170 °C
90 °C
30-35
14-18
45-50
12-14
55-60
85-90
80-85
105-115
17-23
40-45
13-17
32-38
70-75
Hot air Pumpkin bread
Wholemeal bread
Puff pastry
Salt biscuits
Vegetable pies
Cakes
Cheese pies
Trout en papillote
2.5
1
1
0.75
1
0.5
1.5
0.3
2, 3 or 4
1-4 cont.
1-4 cont.
1-3-5 cont.
3
2 or 3
3
3
7
8
8
8
7
7
7
8.5
180 °C
190 °C
190 °C
190 °C
180 °C
180 °C
180 °C
200 °C
25-30
30-35
30-35
25-30
55-60
25-30
25-30
15-20
“Multi power”
hot air cooking
Meat pies +
Meat & veg pies
1.5
1.5
1-3-5 cont.
1-3-5 cont. 7.5 200 °C
50-55
35-40
Chicken
Roast suckling-pig
Salt biscuits
Fruit tarts
Roast potatoes
1.5
6.5
0.3
1.5
1
2
3
3
3
3
6
7.5
6
7.5
6
180 °C
200 °C
180 °C
200 °C
180 °C
60-65
370-390
20
30-35
30-35
“Quick
cooking”
Focaccia
Bread rolls
Black bread
Pizza
Roast beef
Pork/veal leg
Turkey
1
1
1
0.9
1.5
1
1
3
1-4 cont.
3
1-3-5 cont.
3
3
3
11.5
5.5
5.5
11.5
5.5
5.5
5.5
Max
180 °C
180 °C
Max
180 °C
180 °C
180 °C
55-60
20-25
25-30
10-11
35-40
110-120
45-50
Grilling Chicken wings
Chops
Scallops
Roast potatoes
Freshwater fish
Tomatoes au gratin
Eel kebabs
Turkey kebabs
1
0.8
0.5
1
1
0.5
0.5
0.5
4-5 cont.
3
3 or 4
3
3 or 4
2 or 3
3
4
7
7
7
7
7
7
7
7
Max
Max
Max
Max
Max
Max
Max
Max
25-30
20-25
14-16
20-25
25-30
20
20-25
20-25
Turbo grill
cooking
Chicken legs
Spare-ribs
Guinea fowl
Gilthead en papillote
Chicken
Quails
Sausages
Vegetables
1
0.5
1.2
0.3
1.5
0.8
1
1
4 or 5
4
4
3
3
4
4
4 or 5
9.5
14
14
8
14
14
14
14
220 °C
Max
Max
200 °C
Max
Max
Max
Max
25-30
40-45
30-35
20-25
35-40
30-35
20-25
10-15

10
programmes, cooking temperature and time to obtain the best possible results. All the preset recipes have been tried
and tested by professional chefs.
To set one of the 35 recipes, proceed as follows.
Pressing and turning the knob C, select “GUIDED COOKING” and choose from one of the 5 categories of food described
(vegetables or pasta, meat, fish, cakes, bread or pizza) confirming with the same knob. Then select one of the proposed
recipes, confirm and place food inside the oven on the shelf recommended in the cooking table (see previous page).
The display shows the selected recipe and a preset weight of the food: this weight can be modified by turning the
knob C (the weight of the food will affect the cooking time). It is now possible to choose to start cooking immediately
(“INSTANT START”) or to start cooking later in an independent way, setting the cooking end time. The latter will be
initially proposed on the display, taking into account the duration of the chosen recipe: with the knob C it is possible to
change the cooking end time and therefore the start. Select the function suggested on the display by turning the knob A;
press the knob C to confirm and the oven will automatically start heating up according to a preset temperature and
time. If the wrong function is selected the oven will not start and an audible alarm signals the error. No preselected
recipe starts the preheating function.
During cooking, the display shows the name of the preselected recipe and the function active at that moment.
Cooking can be stopped and cancelled at any stage by returning the knob A to the 0 (off) position. An acoustic signal
sounds at the end of cooking and the oven switches off automatically; the food is kept hot for about another 30 minutes,
since the temperature is lowered to 80 °C.
Wellness function
The Wellness programme enables the cooking of meat, fish and vegetable dishes in a completely natural and dietetic
way. In fact, this programme requires prolonged cooking at a low temperature (around 100 °C) without using oil or
other condiments: this preserves all the food’s nutrient elements (minerals, vitamins, etc.), enhancing its natural taste.
After selecting “GUIDED COOKING”, select the Wellness programme and one of the 6 preset recipes, each time
confirming with the knob C.
Then follow the same sequence of operations as described above for the preset recipes.
“Complete Menus” function
This function allows you to cook up to 3 different dishes (hors-d’oeuvre, first course, main course, dessert) at the same
time for a complete meat or fish menu, or bake up to 3 pizzas or bread in 3 trays at the same time.
To set this function, proceed as follows.
Pressing and turning the knob C, select “GUIDED COOKING”, then select “COMPLETE MENUS” confirming by pressing
the same knob. Then choose from the various combinations (A= Hors-d’oeuvre, 1= First course, 2= Main course,
D= Dessert) of the meat and fish menus and confirm the 3 dishes, positioning them as shown on the display. Then turn
the knob A until selecting the function suggested by the display and confirm with the knob C. The display will show the
total cooking duration of the selected menu.
The meat menu can consist of:
– Hors-d’oeuvre: 500 g – single-portion soufflés / savoury pies / omelettes for 6/8 people
– First course: 2000 g – cannelloni / lasagna
– Main course: 1500 g – chicken (pieces)
– Dessert: 800 g – sponge cake / angel cake
The fish menu can consist of:
– Hors-d’oeuvre: 400 g – scallops / mussels / clams au gratin
– First course: 1800 g – tuna crepes / cannelloni with perch / gilthead
– Main course: 1500 g – gilthead / bass / cod (whole)
– Dessert: 800 g – angel cake / fruit tart
The oven will now start to heat up according to an automatically preset temperature and time. The complete menus,
except for the 3 pizzas or bread on 3 trays, do not provide for preheating.
During cooking, the display shows the time remaining until the next dish is ready to be taken out. An acoustic signal
sounds (for 1 minute) when each of the 3 dishes is cooked: at the same time, the display shows “REMOVE TRAY” and the
corresponding letter starts blinking.
Once also the third and last tray has been removed, the display shows “COOKING END”.
Cooking can be stopped and cancelled at any stage by returning the knob A to the off position.
An acoustic signal sounds at the end of cooking and the oven switches off automatically; the food is kept hot for about
another 30 minutes, since the temperature is lowered to 80 °C.
IMPORTANT: If cooking only two dishes at the same time, make sure to place the trays on the specific levels. In this
case, when a message on the display says remove an unused tray, simply ignore it and wait for the next message.
Also, never put food that is still frozen in the oven.

11
en
Oven cleaning and maintenance
Important
Before servicing the oven, always unplug it or disconnect the power at the main electrical system switch.
– The stainless steel and enamelled parts will always remain like new if cleaned with water or specific products,
drying them thoroughly.
– Never use scouring pads, steel wool, muriatic acid or other products that can scratch or mark the surface.
Do not use steam cleaners or direct jets of water.
– Any stains (sauces, sugar, egg white and fat) on the bottom of the oven are always due to spills and splatters.
Spattering occurs during cooking at too high temperatures, whereas spills are due to the use of pots that are too
small or wrongly judged increases in volume during cooking. These two problems can be avoided by using pots with
high rims or using the drip-tray supplied with the oven. For cleaning the lower part of the oven, it is advisable to
clean any stains when the oven is still warm; stains are easily removed when fresh.
Cleaning the oven door (Fig. 5)
– The oven door must be cleaned (internally and externally) when the oven is completely cold, using hot water.
Do not use coarse cloths. Clean the glass with suitable detergents.
– Do not use coarse abrasive materials or sharp metal scrapers to clean the glass parts of the oven door, as they
could scratch the surface and cause the glass to shatter.
– Clean the enamelled surfaces and inside the oven with hot water and non-abrasive detergents.
– The oven door’s plastic panel can be removed for more thorough cleaning. With the door open, press at the sides
and remove the panel, as shown in the figure. To refit the panel in the oven door, just slide it in place and press lightly
to engage the side hookings.
Removing the oven door internal glass (Fig. 2)
The oven door can be removed to enable thorough cleaning of the internal glass, by proceeding as follows:
• with the door completely open, turn the two black blocks (with the word “CLEAN”) at the bottom of the door 180°
so that they fit into the seats in the oven structure.
N.B.: Make sure you turn them fully (the blocks will click into this position).
• Carefully lift the internal glass: the two blocks will prevent the door from closing (if the blocks are not turned fully,
removing the glass will cause immediate closing of the door).
After carrying out the cleaning operations, refit the internal glass (the correct position is indicated by the wording
“TEMPERED GLASS”, which must be perfectly legible) and turn the two glass retaining blocks back to their original
position.
CAUTION: Never try closing the door when only one or both blocks have partially or completely freed the
internal glass. After cleaning, always remember to turn both blocks before closing the door.
Removing the side frames
Bend down the crosspiece engaged in the fixing bush and remove it from the groove.
Tilt the frame upwards approx. 60° and push it lightly in the direction of inclination. Keeping the frame tilted, remove the
two top hooks from the respective holes.
Fitting the side frames
Keeping the frame tilted, insert the top hooks in the respective holes, pushing lightly in the direction of inclination.
With the frame tilted, pull in the direction of inclination until the top hooks stop against the outside of the compartment wall.
Turn the frame towards the compartment wall. Bend down the crosspiece engaged in the fixing bush and remove it from
the groove.
Removing the oven door
To facilitate oven cleaning, the oven door can be removed (see Fig. 3a, Fig. 3b and Fig. 3c), operating on the hinges
as follows:
– The hinges (A) have two movable saddles (B). Lift the saddle (B) to release the hinge.
– Then lift the door up and pull it outwards; to do this, hold the door at the sides near the hinges.
– To refit the door, firstly insert the hinges in the special grooves.
– Before closing the door, remember to turn the two movable saddles (B) previously used to release the two hinges.
Replacing the oven lamp (Fig. 6)
Highland ovens are equipped with two rectangular lamps. To replace the oven lamp, proceed as follows:
– turn off the power to the appliance by means of the omnipolar switch used for connecting it to the electrical system,
or disconnect the plug if accessible;
– remove the glass cover (A), prising it off with a flat screwdriver;
12
– remove the lamp and replace it with one resistant to high temperature (300 °C), having the following characteristics:
Voltage: 220/240 V ~ 50-60 Hz
Power: 25 W
Connection: G9 for halogen bulb.
Note: It is advisable not to touch the lamp with hands; use a cloth or a piece of absorbent paper.
Assistance
In case of any operation problems, contact a Highland After-Sales Service Centre
(refer to the enclosed list).
Never resort to unauthorised technicians.
Specify:
– type of fault;
– appliance model (Art.);
– serial number (S.N.).
This information is given on the appliance dataplate, on the warranty certificate.
Installation (Fig. 4)
Important: Installation must comply with the current standards and regulations. It must be only be carried out by
specialised and licensed personnel.
Cabinet requirements
For fitted units, the components (plastic materials and veneered wood) must be assembled with heat-resistant adhesives
(max. 100 °C): unsuitable materials and adhesives can result in warping and ungluing. The cabinet must allow sufficient
room for the electrical connections. The cabinet in which the oven in fitted must be strong enough to take the weight of
the equipment.
The oven must be securely fitted in the recess. The oven can be installed in a column unit or under the top of a modular
unit, provided sufficient ventilation is guaranteed (see Fig. 5 depending on the model).
Installation instructions
Fit the appliance in the compartment; fix the oven to the cabinet with the 4 screws and the 4 bushings provided, using
the holes prepared in the side panels (Fig. 7a).
Note: (applies to all models) If the oven is to be fitted under a cooktop, firstly turn the top connection (R)
to the right or left so that the oven fits properly (Fig. 7b).
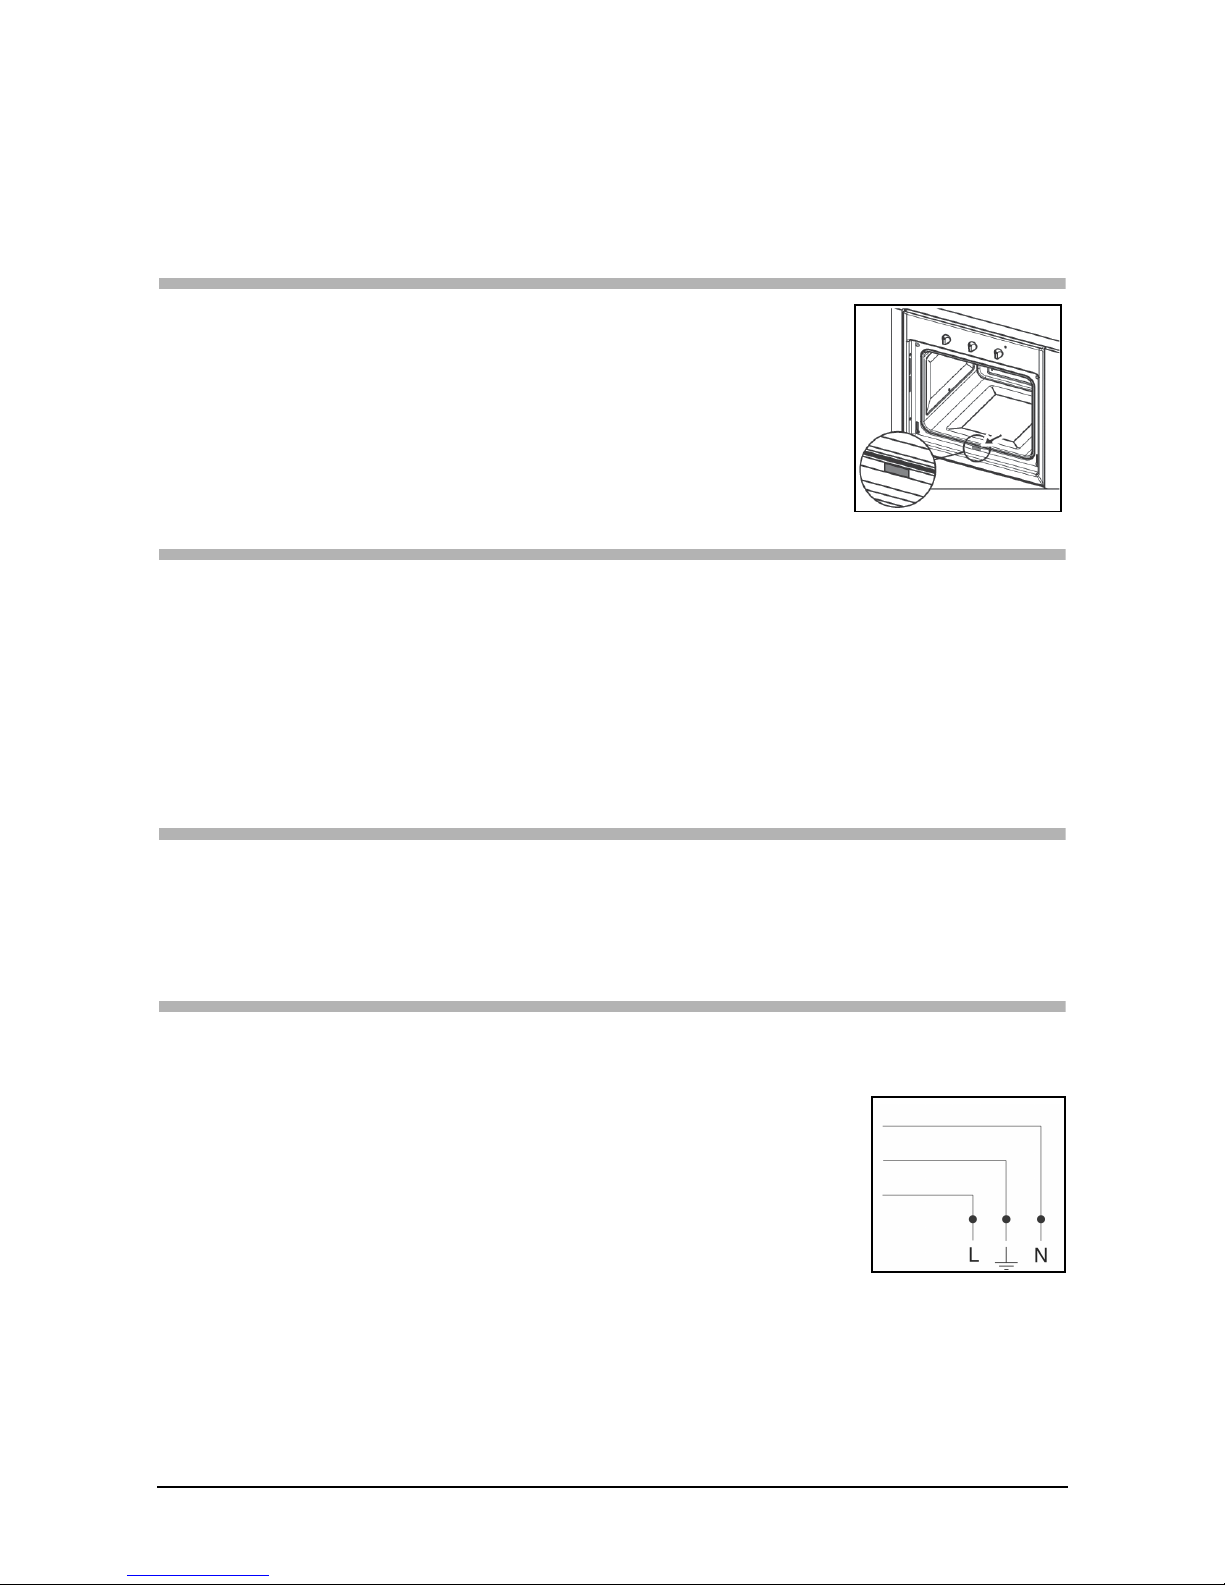
Electrical connection
The Highland oven is supplied with a three-core power cable with free terminals.
If the oven is permanently connected to the power supply install a device that ensures disconnection from the power
supply, with a contact opening distance enabling complete disconnection in category III overvoltage conditions. Make sure:
a) the plug and socket are suitable for a 16 A current;
b) both can be easily reached and are positioned so that no live part is accessible when
inserting or removing the plug;
c) the plug can be easily inserted;
d) the oven does not rest against the plug when installed in the cabinet;
e) the terminals of two appliances are not connected to the same plug;
f) a 3 x 1.5 mm2cable type H05VV-F is used when replacing the power cable;
g) the connection polarities of the free terminals are respected
(Brown=Line Blue=Neutral Yellow/Green=Earth).
NB: Make sure the characteristics of the household electrical system (voltage, maximum power and current)
are compatible with those of your Highland oven.
NB: If the power cable is damaged, it must be replaced by the manufacturer or its after-sales service or else by a person
with similar qualifications, in order to avoid any risks.
BLUE
YELLOW-GREEN
BROWN

13
en
Technical data
INFORMATION FOR USERS
in accordance with the article of Legislative Decree no. 15 of July 25 “Implementation of Directives 2002/95/EC,
2002/96/EC and 2003/108/EC, regarding reduction of the use of hazardous substances in electrical and
electronic appliances, and waste disposal”.
The barred dustbin symbol given on the appliance indicates that at the end of its useful life the product must be collected
separately from other waste.
Therefore, when the appliance has reached the end of its useful life the user must take it to an appropriate differentiated
collection centre for electronic and electrotechnical waste, or return it to the dealer when purchasing a new appliance
of equivalent type.
Adequate differentiated collection of the scrapped appliance for subsequent recycling, treatment and environmentally-
friendly disposal will help prevent possible negative effects for the environment and the health of people and favours
recycling the materials the appliance is made from.
Improper disposal by the user involves application of the administrative penalties under Leg. Decree no. 22/1997
(art. 50 et seq. of Leg. Decree no. 22/1997).
Useful oven dimensions:
width 430 mm
depth 410 mm
height 370 mm
Useful oven volume:
65 litres
Consumption (conventional function):
to reach 175 °C: 0.32 kW/h
to maintain 175 °C: 0.62 kW/h
total consumption: 0.94 kW/h
Consumption (fan function):
to reach 200 °C: 0.31 kW/h
to maintain 200 °C: 0.81 kW/h
total consumption: 1.12 kW/h
Power supply voltage and frequency:
220/240 V ~ 50-60 Hz
Total power and fuse rating:
2900 W - 16 A
Heating element power:
roof 1000 W
floor 1250 W
grill 2250 W
circular 2000 W
fan 30 W
oven light 1 x 25 W
tangential fan 35 W
This appliance complies with
the following EC Directives:
– 2006/95/EC (Low Voltage);
– 2004/108 EEC
(Electromagnetic
Compatibility).

__________________________________________________
__________________________________________________
__________________________________________________
__________________________________________________
__________________________________________________
__________________________________________________
__________________________________________________
__________________________________________________
__________________________________________________
__________________________________________________
__________________________________________________
__________________________________________________
__________________________________________________
__________________________________________________
__________________________________________________
__________________________________________________
__________________________________________________
__________________________________________________
__________________________________________________
__________________________________________________
__________________________________________________
__________________________________________________
__________________________________________________
__________________________________________________
__________________________________________________
__________________________________________________
__________________________________________________
__________________________________________________
__________________________________________________
__________________________________________________
__________________________________________________
__________________________________________________

__________________________________________________
__________________________________________________
__________________________________________________
__________________________________________________
__________________________________________________
__________________________________________________
__________________________________________________
__________________________________________________
__________________________________________________
__________________________________________________
__________________________________________________
__________________________________________________
__________________________________________________
__________________________________________________
__________________________________________________
__________________________________________________
__________________________________________________
__________________________________________________
__________________________________________________
__________________________________________________
__________________________________________________
__________________________________________________
__________________________________________________
__________________________________________________
__________________________________________________
__________________________________________________
__________________________________________________
__________________________________________________
__________________________________________________
__________________________________________________
__________________________________________________
__________________________________________________

__________________________________________________
__________________________________________________
__________________________________________________
__________________________________________________
__________________________________________________
__________________________________________________
__________________________________________________
__________________________________________________
__________________________________________________
__________________________________________________
__________________________________________________
__________________________________________________
__________________________________________________
__________________________________________________
__________________________________________________
__________________________________________________
__________________________________________________
__________________________________________________
__________________________________________________
__________________________________________________
__________________________________________________
__________________________________________________
__________________________________________________
__________________________________________________
__________________________________________________
__________________________________________________
__________________________________________________
__________________________________________________
__________________________________________________
__________________________________________________
__________________________________________________
__________________________________________________

??Franke S.p.A.
via Pignolini, 2
37019 Peschiera
del Garda (VR)
www.franke.it
991.0302.025
Table of contents
Other Highland Oven manuals

Popular Oven manuals by other brands


NEFF
NEFF N70 B24CR71G0B User manual and installation instructions

First Choice
First Choice Moorwood Vulcan MLE60R-F-S manual

MBR Electronics
MBR Electronics X-REFLOW305 user manual

Johnson
Johnson L12 Instructions for use

Samsung
Samsung NV51R5511DS user manual

montpellier
montpellier MON-SFOP59MFGG Installation and operating instructions