HIKE CREW Inverter Generator 2250 User manual

Inverter Generator
2250
USER GUIDE
HCIG2250

Thank you for purchasing the Hike Crew™ Inverter Generator 2250. This User Guide is intended to
provide you with guidelines to ensure that operation of this product is safe and does not pose risk to the
user. Any use that does not conform to the guidelines described in this User Guide may void the limited
warranty.
Please read all directions before using the product and retain this guide for reference. This product is
intended for household use only. It is not intended for commercial use.
This product is covered by a limited one-year warranty. Coverage is subject to limits and exclusions.
See warranty for details.
SAFETY PRECAUTIONS
DO NOT, EVER, UNDER ANY CIRCUMSTANCES, RUN THE GENERATOR IN AN INDOOR
OR ENCLOSED ENVIRONMENT. CARBON MONOXIDE GAS CAN KILL YOU IN MINUTES.
NEVER use this generator inside a home or garage, even if doors and windows are open.
Only use this generator outside, far away from any windows, doors, or vents leading inside.
Running engines give off carbon monoxide, an odorless, poisonous gas that can cause nausea,
fainting, and/or death. Do not start or run this engine indoors or in an enclosed area, even if
windows and doors are open.
Before use, make sure to add gasoline so that the level reaches the red ring in the tank.
Before use, make sure to check the oil level.
The gas from the engine in this generator contains carbon monoxide. Do not under any circumstances
run this generator indoors or in an improperly ventilated location, as this could cause death.
Always make sure you have provided adequate ventilation while the generator is in operation.
Failure to do so may result in death.
During and immediately after operation, the muffler will be extremely hot. Do not touch the muffler.
Gasoline is extremely flammable and explosive. Please take care when storing, filling, and using
gasoline with this generator.
IT IS OF CRITICAL IMPORTANCE THAT YOU THOROUGHLY READ AND MAKE SURE YOU
UNDERSTAND ALL SAFETY PRECAUTIONS AND SAFE USE REQUIREMENTS BEFORE
ATTEMPTING TO USE THIS APPLIANCE. FAILURE TO PROPERLY FOLLOW THE GUIDELINES
ESTABLISHED HEREIN COULD RESULT IN SEVERE INJURY, FIRE, OR EVEN DEATH.
1

Always add gasoline in a well-ventilated location. Make sure you turn off the generator engine and
allow it to cool before filling it.
Do not refuel the generator near an open flame. In general, keep the generator away from open flames.
If there is any gasoline spilled while refueling the generator, make sure to wipe it up immediately.
Obviously, do not use this product in locations with a high risk of fire or explosion, as this could result
in (even larger) fires or explosions, as well as death.
Do not connect the generator directly to your power system, or else it may cause people to die from
electric shock when they come into contact with the wires. This could also damage the generator or
damage your home appliances.
Always perform a pre-operation check before starting the engine, to avoid accidents, equipment
damage, fires, or death.
Always operate any generator at least 3.28” (1 m) away from any buildings.
Always make sure the generator is positioned on level, horizontal ground. If the generator is placed
at an angle, it may cause the gasoline to spill or overflow, which could lead to equipment damage,
fires, or death.
Make sure you have mastered the art of quickly shutting off generators, and that you understand the
operation of all the controls.
Always keep children and pets away from the operating area of the generator. While the engine is
running, everyone should avoid its rotating parts.
Always make sure to use the generator properly; improper operation could result in potential danger
to the generator.
NEVER operate the generator with wet hands.
Do not use the generator in the rain, snow, or similarly damp environments. Always make sure to keep
it dry.
All maintenance on the generator should always be conducted by professionals. Do not attempt to
repair the generator yourself.
Protect children by keeping them at a safe distance from the generator.
Fuel is combustible and very easily ignited. Do not refuel while in use; do not refuel while smoking,
or near any naked flames; do not spill the fuel. If fuel is spilled, clean it up immediately.
Certain parts of the internal combustion engine are extremely hot and may cause burns.
2

Engine exhaust gases are toxic and may cause death. Do not operate the generator in unventilated rooms.
When using a generator in a ventilated room, take additional precautions against fire and explosions.
Before use, check the generator and its electrical equipment, including the power lines and plug
connections, to ensure they are not defective.
Do not connect the generator to other power sources, e.g., the power company supply mains. In special
cases, where stand-by connection to existing electrical systems is intended, this should ONLY be done by
a qualified electrician who has to consider the differences between operating equipment using the public
electrical network and operating the generating set.
Protection against electrical shocks depends on circuit breakers specially matched to this generating set.
If you need to replace the circuit breakers, they should only be replaced with circuit breakers that have
identical ratings and performance characteristics.
Due to the high mechanical stresses produced by this engine, only tough rubber-sheathed flexible cable
(in accordance with IEC 60245-4) or the equivalent should be used.
Always make sure the generator is properly grounded. If the generator is not grounded, you risk
electrocution. Always refer to all applicable local, state, and federal regulations regarding to grounding.
Always make sure to conform to electrical safety regulations applicable to the location where you are
using the generator.
Generators should only be loaded up to their rated power under the rated ambient conditions. If you
are using the generator under conditions which do not conform to the conditions as stipulated in ISO
8528-8:2016, 7.1, and if the cooling of the engine or alternator is impaired (for example, as a result of
being used in a restricted area), a reduction in power will be necessary. If the generator is being used in
higher temperatures, at a significant altitude, or in humid climates (not ideal), the power will need to be
reduced.
3WARNING
Toxic Fumes Hazard. Running engines give off carbonmonoxide, an odourless poisonous gas that can cause nausea,fainting, or death. Do not start or run engine indoors or in anencllsed area, even if windows and doors are open.
Running engines give off carbon
monoxide, an odorless poisonous
gas that can cause nausea, fainting,
or death. Do not start or run engine
indoors or in an enclosed area, even
if windows and doors are open.

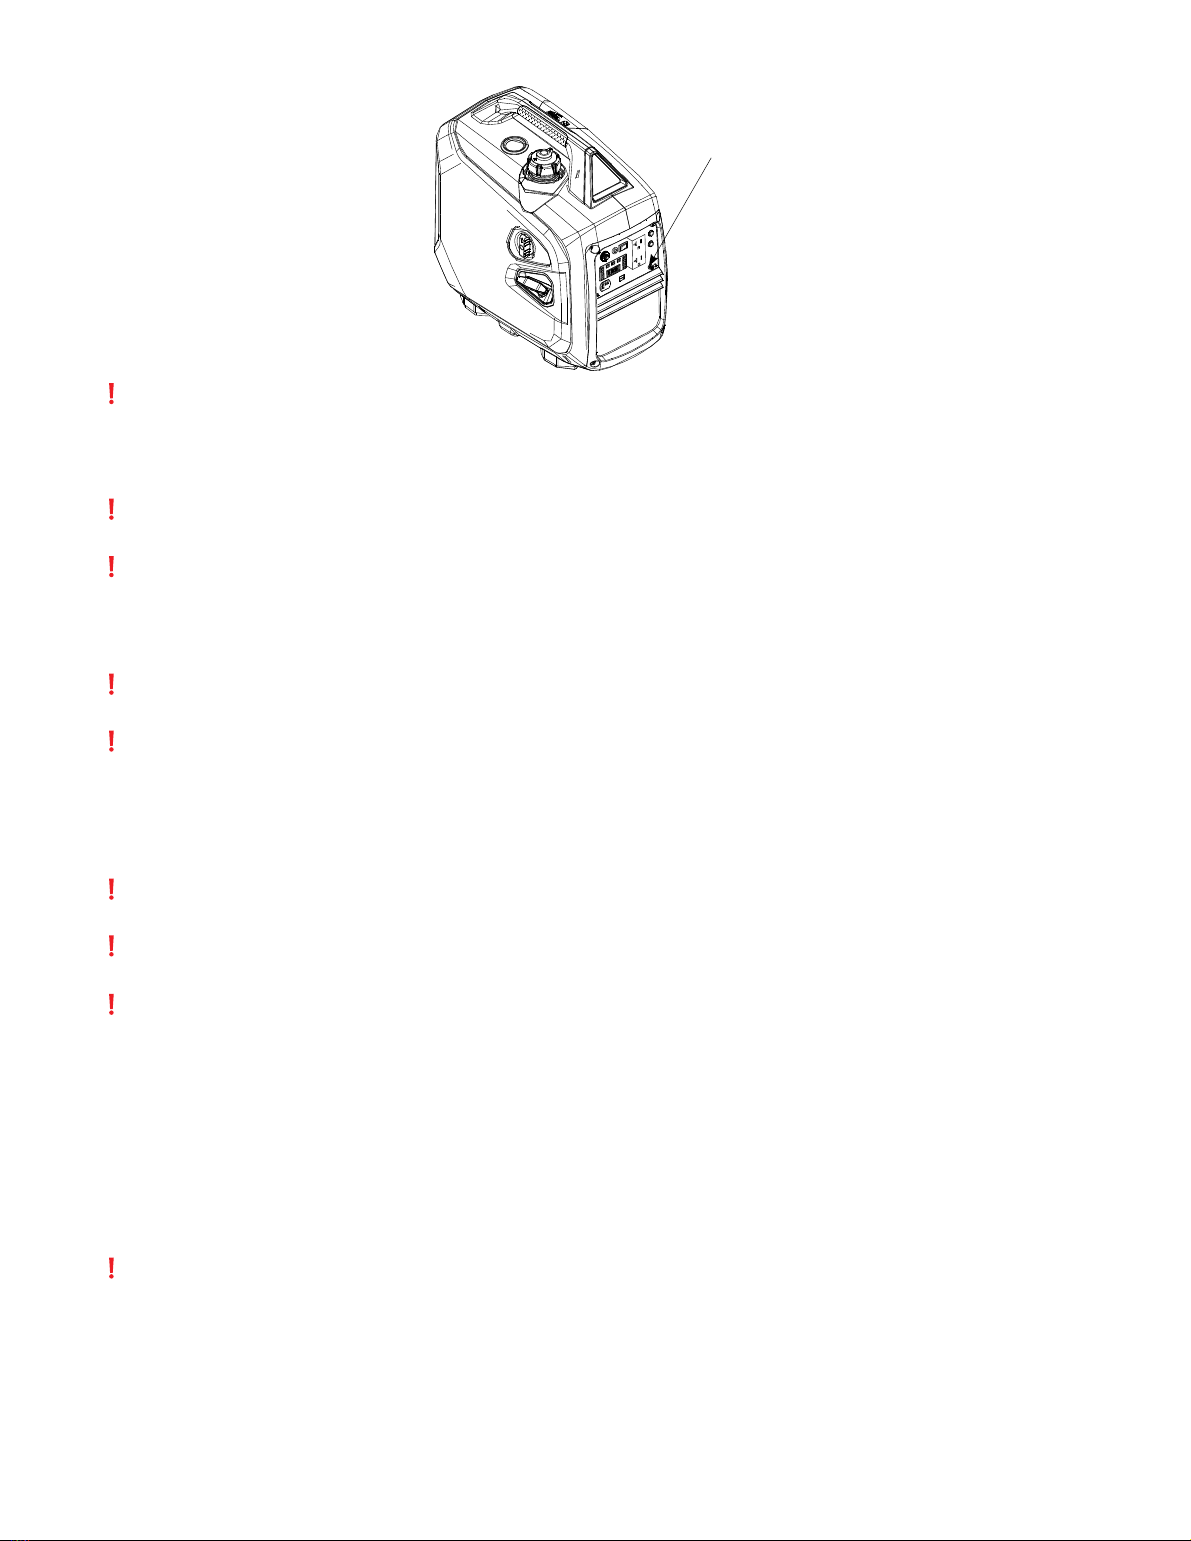
PRODUCT OVERVIEW
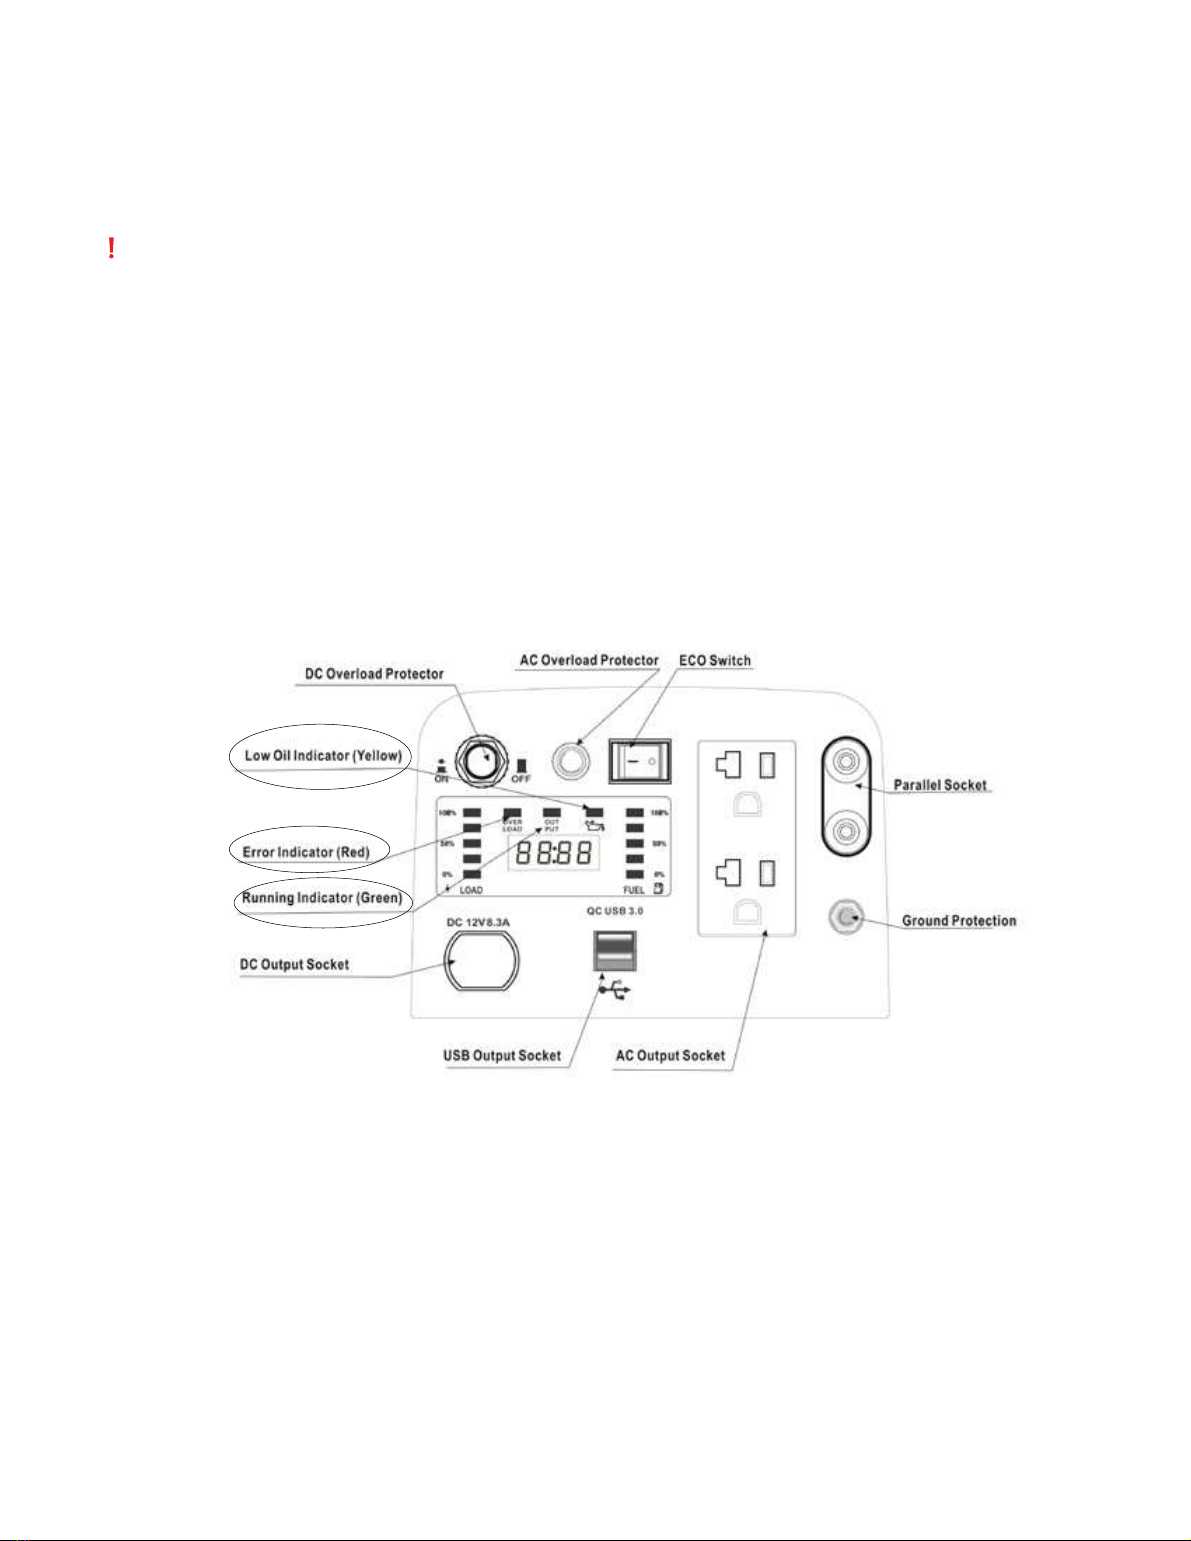
CONTROL PANEL OVERVIEW
1. Low oil indicator (Yellow)
2. Error indicator (Red)
3. Running indicator (Green)
4. DC output socket
5. USB output socket
6. AC output socket
7. Ground protection
8. Parallel socket
9. ECO switch
10. AC overload protector
11. DC overload protector
4
Tank Cap Switch
Fuel Tank Cap Body
Control Panel
Starter Handle
Engine Switch
Fuel Indicator
Spark Plug Maintenance Cover
Muffler Exhaust Port
Air Filter & Oil Maintenance Cover

5
ECO Switch
When you flip the ECO switch to the energy-saving position, the generator enters an energy-saving
state. This means that when the generator is disconnected or using lower amounts of power, the engine
will automatically return to a lower-speed state, thus reducing the amount of fuel consumed by the engine.
Full-Speed Function
When the ECO switch is not in the energy-saving position, the engine will continue to run at full speed
all the time.
DC and USB Output Function
The DC output voltage at no load is 12-18 V, and should only be used with 12 V DC terminals, such
as batteries. The USB output voltage is 5 V and can be used to charge digital products.
Parallel Function
If you want to make use of the power output from two generators for use with high-power equipment,
you will need a parallel connect box to run the two generators in parallel. The combined output
power will be 3.4 kW when the two generators are connected in this manner.
Charging Cable

WARNINGS:
In order to reduce changes in voltage, make sure to keep the energy-saving switch in the “full
speed” position (meaning OFF) in situations when your electrical equipment needs a large amount
of power instantaneously, or when the generator is connected to an apparatus that requires a high
amount of power at the same time.
If you are using the 12 V DC output socket, put the energy-saving switch in the OFF position.
Running the engine at full speed with the ECO switch off is suitable for situations where the
negative load of electrical appliances varies greatly.
When the engine is in a non-overload state, you cannot restore the output by pressing the reset key.
Each time you start the engine, the number of effective times you can use the protection cut-off
switch resets to five (5). Once you have used the protection cut-off switch five (5) times, you will
need to restart the engine in order to use the protection cut-off switch again.
PRE-OPERATION CHECKLIST
Make sure first that the generator is placed on a level, horizontal surface and the engine is shut off.
Do not start the engine until you have completed these checks.
Check the Oil Level
1. Remove the dipstick and wipe it with a clean cotton cloth.
2. Re-rotate the dipstick into the crankcase and remove it again.
3. Check the oil level, and if the level is below the oil gauge indicator line, add more oil.
WARNINGS:
Do not use 2-stroke oil, or detergent-free oil, as these can shorten the life of the engine.
Only use high-quality 4-stroke oil that meets or exceeds the SG, SF classification of the American
Petroleum Association required by American automakers.
Select oil that is a suitable viscosity for the average temperature in your area– refer to the following
table if you are unsure about the SAE viscosity grade.
6

Store and use oil carefully, so that dirt or dust do not fall into it. When adding oil to the engine,
make sure to always wipe the area around the refueling opening.
Do not mix different specifications of oil. Mixing different oil types can have negative effects on the
oil’s performance.
Do not allow the oil level to drop below the red oil level indicator.
Do not run the engine when the oil is low. This can seriously damage the engine.
The engine oil alarm system is designed to automatically shut off the engine before the oil level
falls below safety limits. However, in order to avoid the inconvenience of the generator suddenly
shutting off while you really need it, we recommend you check the oil level before use.
Check the Fuel Level
1. Make sure that the fuel tank is full up to the red ring.
2. If not, add more fuel.
WARNINGS:
Always use unleaded gasoline of E10 or a higher level to fill the tank.
Do not use a mixture of oil and gasoline or dirty gasoline.
Make sure to prevent dirt and water from entering the tank.
Do not use gasoline containing more than 10% ethanol or gasoline containing methanol, as this
will seriously damage the engine.
Always refuel the tank in a well-ventilated place while the engine is shut off. Do not allow any
pyrotechnics in the area where you refuel the engine, or in the area where you store the gasoline.
Do not overfill the tank with gasoline or allow it to spill over into the oil reservoir.
After refueling, always tighten the tank cover.
After filling the gas tank, wipe away the gasoline with a clean, soft cloth.
Avoid prolonged, repeated contact with gasoline. Do not inhale gasoline vapor.
Do not allow children to touch gasoline.
Tank capacity: 1.06 gal. (4.0 L)
7
Average Environmental Temperature
-13°F – 86°F (-25°C – 30°C) 10W-30
15W-40
5°F – 104°F (-15°C – 40°C)
Recommended Oil Type

Check The Air Filter
1. Loosen the air filter maintenance cover screw and remove the air filter maintenance cover.
2. Snap open the air filter cover and remove it.
3. Take out the air filter element and check to make sure it is clean and functional. If necessary,
clean or replace the filter.
WARNING:
Do not run the engine without an air filter, or else dirt will enter the engine via the carburetor,
which causes rapid wear and tear.
STARTING THE ENGINE
WARNINGS:
Disconnect all electrical equipment from the alternator’s AC socket before you start the engine.
8
Tank Cap Switch
Screw
Screw
Air Filter & Oil Maintenance Cover
Screw
Air Filter
Filter Element
Screw
Maintenance Cover
ON

If the generator has been unused for a while, and you’re starting it for the first time, turn the engine
switch knob to the ON position for 10-20 seconds before starting, so the gasoline can enter the
engine carburetor.
Do not ever, under any circumstances, use this generator in an indoor, closed environment. The
fumes will cause asphyxiation and death. Always use this generator in a well-ventilated environment.
Follow these steps to start the engine on your generator:
1. Rotate the tank cap switch to the ON position.
NOTE: When you transport the generator, always make sure the fuel tank cap switch is cranked
into the OFF position.
2. Turn the generator engine switch knob to the CHOKE position. In this position, the choke will be
fully closed
NOTE: If the engine is hotter after starting, or the ambient temperature in the area is higher
than normal, you should turn the engine switch knob to the ON position, rather than CHOKE.
9
Tank Cap Switch
Fuel Tank Cap Body
ON

3. Gently pull the starter handle until you feel resistance, and then pull it in the direction indicated
by the arrow in the following figure.
WARNINGS:
When you pull the starter handle, make sure not to pull it at too severe of an angle, or else you
will wear down the handle housing.
Do not allow the starter handle to rebound and retract automatically to avoid damage to the shell.
Always put the starter handle back slowly.
4. Turn the engine switch to the running position while the engine is running.
WARNINGS:
If the engine fails to start after being shut down, check the position of the tank cover switch, the
engine switch (three-in-one switch), and ensure you followed all the steps to starting the engine
properly. If you did follow steps correctly and all switches are in the ON position, check the oil level.
USING YOUR INVERTER GENERATOR
WARNINGS:
Make sure to properly ground the generator in order to prevent electric shock.
10
ON
As a backup power source, this generator cannot be connected to the power company’s grid
system. This could cause electrocution and possibly death. Do not connect the generator to your
home power system.
Do not overload the generator.
Do not connect the generator to the power grid company’s household power system, or else it may
cause people to die from electric shock when they come into contact with the wires. This could also
damage the generator or your household appliances.
Do not attempt to lengthen the engine exhaust pipe.
For extension cords, use flexible cables such as rubber sleeves (compliant with IEC245 or
corresponding requirements). Cord length limit: the total length of a cord with a cross-sectional
area of 2.5 mm2should not exceed 196.85’ (60 m); for a cross-sectional area of 4.0 mm2, this
should not exceed 328.08’ (100 m).
Keep this generator away from other wires and cables, such as distribution networks.
You can use AC and DC power at the same time.
When using both the AC and DC sockets, make sure that the total power required does not exceed
the sum of the AC and DC power.
Using DC Power
The output voltage of the DC socket is 15-20 V. For 12 V batteries or other 12 V terminal products only.
WARNING:
When using the DC power supply, always keep the energy saving switch in the full speed (not
ECO) position.
Follow these steps to use the DC power supply on the generator.
1. Use a charging cable and connect one end to the DC socket of the generator while connecting the
other end to the polar terminals of the battery.
11
Ground Protection

2. Start the engine.
WARNINGS:
DC power can be used when also using AC power, as long as the total power required is not
more than the sum of the AC and DC power outputs.
DC current passing through the load may cause the DC overcurrent protector to kick in. First
disconnect the load, then wait a few minutes to reset the DC protector key.
Using AC Power
1. Start the engine, making sure the AC output light (green) is on.
2. Turn off the power supply switch, and plug your device into the generator’s output socket.
3. In order to provide the best performance and the maximum service life of the generator,
12
WARNING:
To prevent sparks from sparking next to the battery, make sure to connect the charging cable to the
battery first, and then to the generator. Similarly, make sure to disconnect the cable from the generator
first, and then from the battery.
When charging a car battery with the generator, make sure to disconnect the battery ground wire first. Once
the battery is charged, wait until you have removed the charging cable before reconnecting the battery ground
wire. This will prevent a short circuit or sparks, even if you accidentally touch the battery with the car frame.
Don’t start the vehicle engine while the generator is still connected to the battery.
Connect the positive electrode of the charging cable to the positive electrode of the battery. Do not mix
up the polarities of the electrodes, as this could result in serious damage to the generator and the battery.
Batteries emit an explosive gas while charging, and should be kept away from flames, pyrotechnics, and
static charges in the ventilation.
Charging Cable
make sure to run the generator for at least 20 hours at 50% load, which optimizes the engine
performance.
WARNING:
Before connecting your device to the AC output socket, make sure that your electrical equipment
is functioning properly. If, during use, the electrical equipment suddenly stops working or isn’t
working properly, immediately disconnect the equipment and stop the engine.
Understanding the Indicator Lights
Under normal operating conditions, the green operating indicator light will be lit.
If the generator is overloaded, or if the connected electrical equipment short-circuits, the green
operating indicator light will turn off and the red error indicator will be lit. The output power will be cut
off at this time, but the engine will still be running.
If the red error indicator lights are lit, you should first disconnect any electrical equipment. If the red error
light turns off and the green operating light comes back on, you can reconnect the electrical equipment.
If the green light does not come back on, shut down the engine and check it for any malfunctions.
Low Oil Alarm
The low oil level alarm system is designed to prevent engine damage, which can occur due to
insufficient oil in the crankcase. The low oil alarm automatically shuts down the engine before the
engine oil in the crankshaft box dips below a safe level. The generator engine switch will remain in the
ON position, but the engine itself will shut off.
Once the low oil alarm shuts down the engine, if you try to start the engine again, the yellow low oil
alarm indicator light will turn on, and the engine will not run. You will need to fill the oil before the
engine can run again.
STOPPING THE ENGINE
In an emergency, if you need to stop the engine, just turn the engine switch to the OFF position.
13

1. Turn off the connected electrical appliances, and disconnect the generator output plug.
2. Turn the engine switch to the OFF position.
3. After the engine has cooled down completely, turn the fuel tank cap switch counterclockwise to
the OFF position.
WARNING:
Always make sure the fuel tank cap switch and the engine switch are both fully in the OFF position
when stopping, transporting, and storing the generator.
CARE AND MAINTENANCE
We have provided a recommended schedule of maintenance in order to keep your generator in the best
operating condition and improve engine life and performance.
WARNINGS:
Always stop the engine before performing any maintenance. If the engine has to be running for
some reason, make sure you are in a well-ventilated area due to the poisonous carbon monoxide
contained in the exhaust.
To ensure continued quality, make sure to use the original spare parts or parts of the same quality
when replacing damaged parts.
14
Fuel Tank Cap Body
Tank Cap Switch
OFF

Maintenance Schedule
*Maintenance should be conducted more frequently when the generator is being used in dusty areas.
**These items should be serviced by a professional mechanic, unless you have the proper tools and
are mechanically proficient. Hike Crew is not liable for damage to parts sustained due to mechanical
ineptitude. Don’t try to replace it if you’re not sure you can. Don’t try to replace it because you
watched one YouTube video.
***These are just recommended guidelines for scheduled maintenance. If you use your generator more
often, or run it for extended periods of time, the engine may require servicing more frequently.
Changing the Oil
While the engine is shut down, you should make sure to remove the oil quickly and completely.
1. Loosen the air filter maintenance cover screws and remove the air filter maintenance cover.
15
Regular Service Period*** Every use Every month or
every 10 hrs
Every 3 months
or every 50 hrs
Every 6 months
or every 100 hrs
Every 2 yrs. or
every 300 hrs
Item
Engine oil
Air filter
Spark plug
Spark arrestor
Valve clearance
Fuel tank & filter
Cylinder
Fuel line
Check/adjust
Clean
Clean Every 300 hrs. **
Every 2 years (Replace if necessary)**
Check
Check level
Check
Check/adjust
Clean
Replace
Clean *
**
Replace
Air Filter & Oil Maintenance Cover
Screw
Screw

2. Take out the dipstick.
3. Use a pan to collect the dirty oil as you drain it from the oil reservoir. The tank capacity is 0.42 qt.
(0.4 L).
4. Refill the oil reservoir once the oil is drained and check to make sure the oil level is sufficient.
5. Replace the air filter maintenance cover and the dipstick, then tighten the screws back into place.
WARNING:
In order to conform to environmental protection requirements, pour the used oil into a container,
seal the container, and take it to a service station for recycling. Do not throw the used oil into the
trash, dump it down a drain, or pour it on the ground.
Replacing the Air Filter
A dirty air filter will restrict air flow into the carburetor. Please clean and maintain your air filter
regularly to prevent the carburetor from breaking down. If your generator is being used in a high-dust
area, you will need to maintain the air filter more frequently than normally recommended.
16

WARNINGS:
Do not use gasoline or low-ignition-point solvents for cleaning. They are flammable and explosive
and this is just not a good idea when dealing with a combustion engine.
Never run the generator without the air filter. This will quickly abrade the engine.
Follow these steps to safely and properly replace the air filter in your generator:
1. Loosen the air filter maintenance cover screws and remove the air filter maintenance cover.
2. Snap open the air filter cover and remove it.
3. Take out the air filter element and clean it with non-flammable or high-flash-point solvent (e.g.,
kerosene or motorcycle engine oil), and then dry it fully.
4. Clean the air filter element with clean oil, and then squeeze out the excess oil.
17
Air Filter & Oil Maintenance Cover
Maintenance Cover
Screw
Screw
Filter Element
Air Filter Cover
Screw
Screw

18
5. Replace the air filter element, screws, and air filter cover.
6. Replace the air filter maintenance cover and tighten the screws.
Changing the Spark Plugs
Recommended spark plugs: E5RTC
In order to ensure that the engine operates normally, your spark plug needs a correct distance between
the center and side electrodes, and no carbon buildup. Follow these steps to ensure your spark plugs
are in good shape.
1. Remove the spark plug maintenance cover.
2. Take off the spark plug cap.
3. Remove the spark plug using a spark plug spanner.
4. Visually inspect the spark plug. If the insulator is cracked or chipped, replace it with a new one. If
there is buildup on the plug, clean it with a wire brush (if you are reusing it).
5. Measure the spark plug gap between the center and side electrodes using a feeler gauge. The
normal value should be 0.028-0.031” (0.7-0.8 mm).
Clean the dirty element
Spark Plug Maintenance Cover
0.028—0.031 in
(0.70—0.80 mm)
Filter cover

WARNING:
Always securely tighten the spark plug. Improper tightening can lead to the spark plug overheating
or damaging the engine. Never use a spark plug with an improper heat range.
6. Install the new spark plug carefully and by hand, to ensure against cross-threading.
7. A new spark plug should be tightened ½ turn by hand with a spanner while pressing down the
washer. A used spark plug should only be tightened between 1/8 and ¼ turn with the spanner.
8. Replace the spark plug cap.
9. Replace the spark plug maintenance cover and tighten the screws.
Cleaning the Spark Arrestor
WARNING:
The spark arrestor needs to be maintained after every 100 hours of engine operation.
Follow these steps to clean and maintain your spark arrestor:
1. Make sure the muffler is cooled completely, then loosen the screws on the muffler outlet and
remove the spark arrestor.
2. Use a brush to clean the carbon deposits on the spark arrestor and inspect it for damage. If it is
damaged, replace it.
3. Replace the spark arrestor and re-tighten the muffler outlet screws.
4. Replace the maintenance cover and tighten the muffler cover screws.
TRANSPORTING AND STORING THE GENERATOR
WARNINGS
Do not overfill the fuel tank. Make sure there is no residual fuel on the neck of the gas tank.
Do not use the generator while it’s on the transport vehicle. Make sure to first remove it from the
vehicle and use it in well-ventilated environments only.
Do not expose the generator to direct sunlight during transit, or store it in a place where it will be
exposed to direct sunlight.
19
Clean Spark Collector
This manual suits for next models
1
Table of contents


