Hitachi GPM1NB10 User manual

Multi OS DVD Writer
GPM1NB10
GPM1NW10

2
01
Table of Contents
Product Description
Before First Use
Intended Use
Operation
Cleaning and Maintenance
Frequently Asked Questions
Copyright Statement
Specifications
3
4
4
4.1. System requirements
4.1.1 DVD and CD
4.1.2 Drivers
4.2 Connecting to a power source
4.3 Disconnecting from the power source
4.4 Insertinga disc
4.5 Ejectinga disc
4.6 Performingan emergencyeject
4.7 Installing software (Windows® only)
4.8 Burning a disc
4.8.1 Windows®
4.8.2 Mac®
4.9 Listening to music
4.9.1 Windows®
4.9.2 Mac®
4.10 Disc region code
5.1 Cleaning
5.2 Handling the disc compartment
5.3 Handling discs
5.4 Storage
8.1 Reading and writing speeds
02
03
04
05
06
07
08
4
4
4
4
5
6
7
7
7
8
8
8
9
10
10
10
11
11
11
11
12
12
13
14
14
14

1. Product Description
A
B
E D CF
G
H
A
Micro
USB port (USB 2.0)
B
Main
unit
C
Emergency
eject hole
D
Open
compartment button
E
Indicator
F
Disc
compartment (for 3"/8cm and 4.7"/12 cm discs)
G
Software
disc/user manual disc
H
USB
-A power/data cable
3

WARNING
Only drives bearing the logo “Compact Disc Rewriteable Ultra Speed” can write or erase “Ultra
Speed CD-RW” media “Ultra Speed CD-RW” media may be recognized by the same “Compact
Disc Rewritable Ultra Speed” logo on the disc label or packaging material Attempting to write to
“Ultra Speed CD-RW” media using CD-RW drives not bearing the logo “Compact Disc Rewriteable
Ultra Speed” may result in data loss “DVD+R Double Layer” media may have compatibility problem
with other drives
4.1 System requirements
In order for the product to operate as intended, the following hardware requirements (or higher) are
needed:
2. Before First Use
DANGER Risk of suffocation!
Keep any packaging materials away from children and pets –these materials are a potential
source of danger, e.g. suffocation.
- Remove all the packing materials
- Remove and review all components before use
- Check the product for transport damages
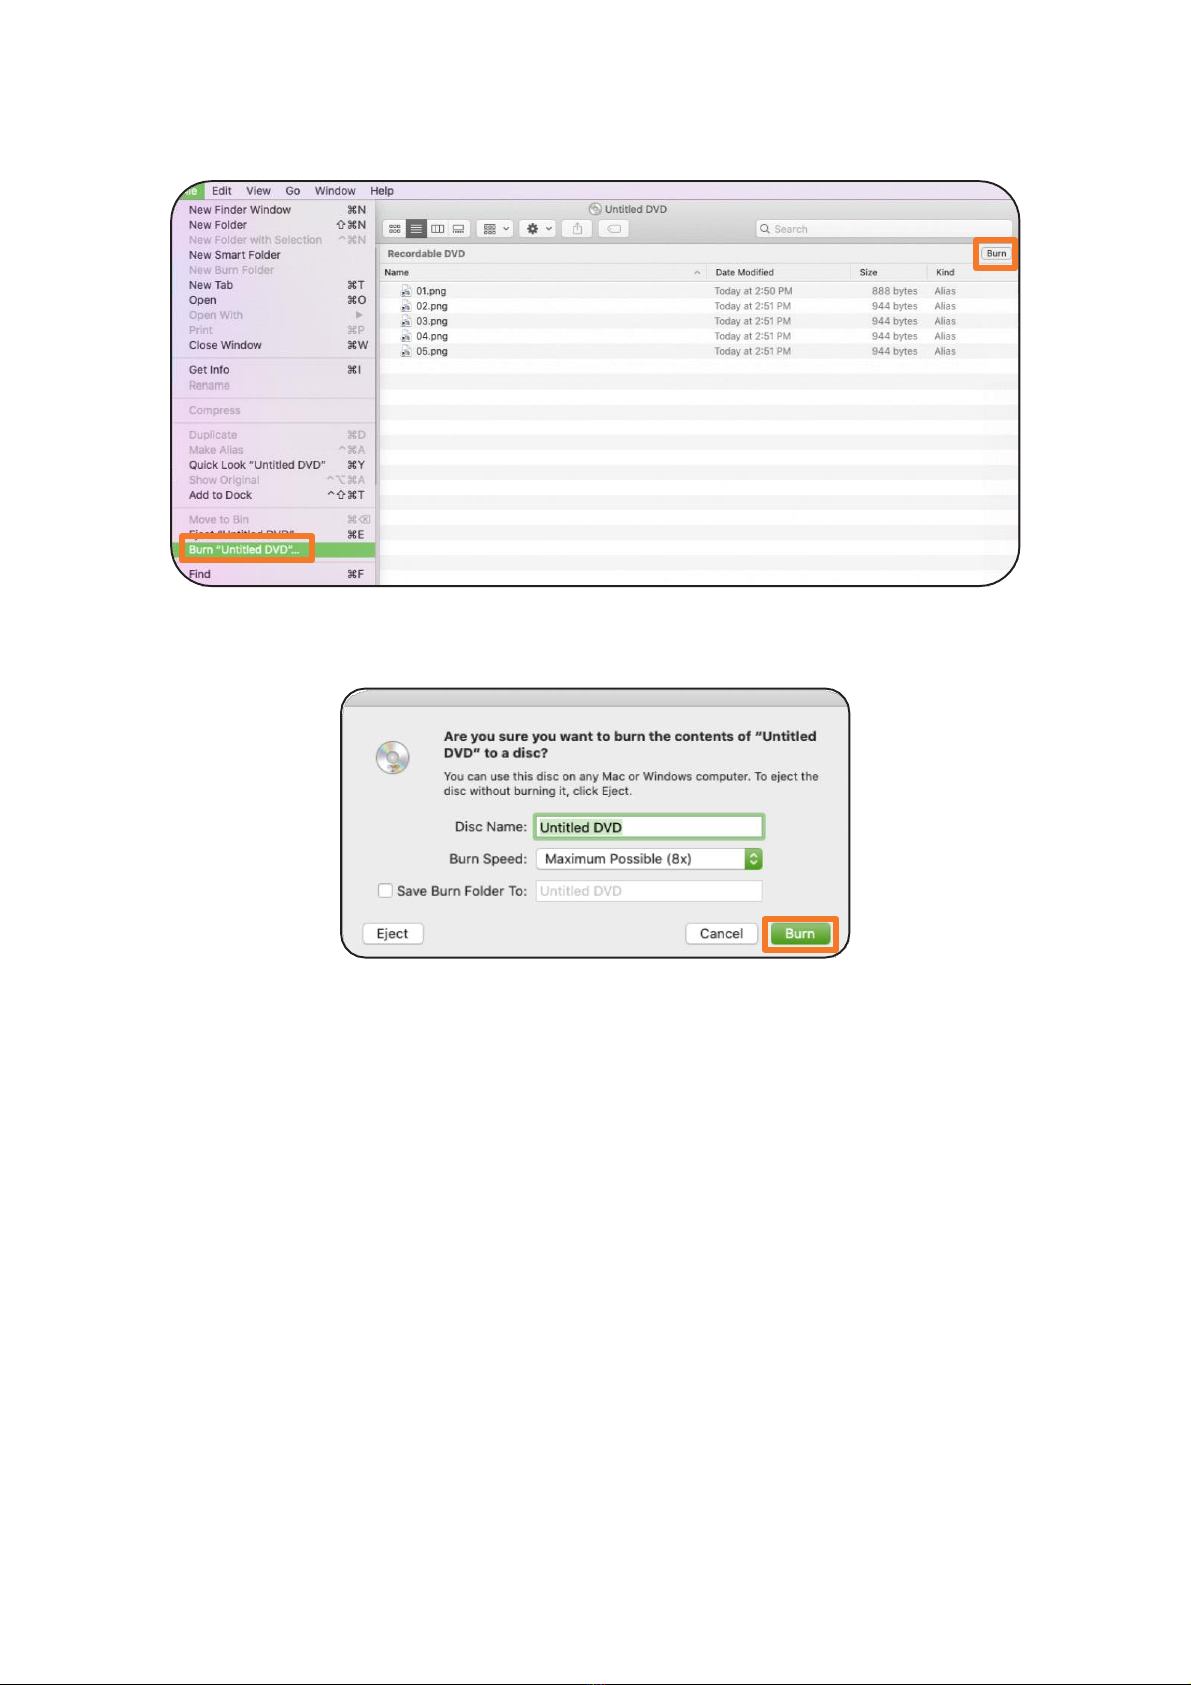
3. Intended Use
- This product is intended for discs and reading and writing, DVD and CD discs
- This product can be also connected to a TV using ODD mode (optical disc drive) and can be used
to view/playback content directly on TV without using any additional software
- This product is intended for private use only
- This product is intended to be used in dry indoor areas only
4. Operation
DISCLAIMER - It is the sole responsibility of the user for direct or indirect damages (including data
loss) caused by the use of this product or its malfunction Backup all important data as protection
against data loss
4.1.1 DVD and CD
O/S
Windows 10 or higher, mac
OS 10,
12 or higher
CPU
1 GHz or faster processor or
SoC
RAM
4 GB or higher
Interface
USB 2
.0 (3.0 Compatible)
4.1.2 Drivers
Under Windows 10, 8, 7, Vista and Mac OS X a separate driver is not required. The drivers will be
installed automatically by the operating system after plugging in.
4
NOTICE
-
Performance of the product cannot be guaranteed for configurations that do not meet the
above requirements.
-
The USB 2.0 port is backward compatible with USB 1.1. However due to USB 1.1 slower transfer
rates, the picture and sound might be disrupted while watching a DVD or Blu-ray movie.
-
Operation through a USB hub cannot be guaranteed.

Do not install the product in an inclined position. It is designed to be operated in a
horizontal position only.
4.2 Connecting to a power source
Connection to computer or A/V Device
Connect the drive to the computer as shown in figure.
A. Connect the USB cable (micro plug) to the drive.
B. Connect the other end of the USB cable to your computer.
※The drive may get its power from the PC USB power. All
systems may not meet USB power requirements and full
performance may not be achieved.
In this case, connect to the USB Y type cable
(not supplied.).
A
B
5
NOTICE

EN
In case of computers/laptops, a single USB port might not supply enough power to
operate the product. If this happens, connect both USB-A plugs (1 and 2) of the USB-A
power/data cable (H).
- Connect the micro USB plug of the USB-A power/data cable (H) to the micro USB port (USB 2.0)
(A) (Fig. 1). The indicator (E) flashes green once.
The product does not show up as a drive on the computer until a disc is inserted,
then the disc acts as a drive.
4.3 Disconnecting from the power source
1. Close the software being used.
2. On the computer, eject the product drive:
Windows® Eject Path
Press Windows + E on the keyboard to open File
Explorer
. Right-click on the optical drive and select
“Eject” from the pop
-up menu.
Mac® Eject Path
Method 1: Right
-click on the disc icon on the desktop
and select “Eject” from the pop
-up menu.
Method 2: Press Command + Shift + C on the
keyboard to open “Computer” folder
. Right-click on
the disc icon and select “Eject” from the pop
-up
menu
.
Method 3: Drag the disc icon on the desktop to “Bin”
.
3. After the product drive is successfully ejected, disconnect the USB-A power/data cable (H) from
the computer and the main unit (B). 6
NOTICE
NOTICE

NOTICE
4.4 Inserting a disc
The disc compartment (F) only fits 3" (8 cm) and 4.7" (12 cm) discs.
1. Press the open compartment button (D). The disc compartment (F) opens.
2. Place the disc in the center of the compartment with the label side facing up.
3. Push the disc compartment (F) until it clicks into place. The indicator (E) flashes green as drive
reads the inserted disc.
4.5 Ejecting a disc
1. Stop the playback of the content of the disk.
2. Press the open compartment button (D). The disc compartment (F) opens.
3. Take out the disc.
4. Push the disc compartment (F) until it clicks into place. The indicator (E) flashes green once.
4.6 Performing an emergency eject
Use this method only in emergency situations. Using this method excessively may
cause the product to malfunction.
The emergency eject procedure should only be used to retrieve your disc if the drive fails to eject.
Caution : Shut down the power supply when this eject will be used.
Emergency Eject Hole
7
CAUTION
The disc rotates at high speed in the drive unit
. Use of worn, damaged, or non-standard discs can
adversely affect the drive and cause the disc to shatter or crush while in use. Disc crush can only
occur when damaged disk is used
. It is an extremely rare occurrence, but there are steps which
can be taken to prevent it
.
-
Always check discs before placing them onto the disc compartment.
-
Take care not to use worn, cracked, damaged, warped or poor quality discs.
-
Check the center of the disc, cracks here are the main cause of disc crush.
-
Do not play discs which are a non-standard (non-circular) shape, such as heart shaped discs, or
discs in the shape of a business card.
To prevent the discs from being damaged
:
-
When not in use, remove discs from the drive.
-
Keep discs in the packaging supplied with them and out of direct sunlight and away from heat
sources.
-
Excessive vibration or a sudden jolt to the drive during operation may cause a malfunction.
Avoid exposing the drive to sudden changes in temperature as it may cause condensation to
collect inside the drive.
NOTICE

4.8 Burning a disc
- DVD movie titles cannot be recorded because of the copyright protection.
-To achieve maximum record and burn speed, copy the contents to the computer’s hard drive first
instead of directly writing from another source disc or external drive.
4.8.1 Windows®
EN
4.7 Installing software (Windows® only)
The provided software is for Windows® only. Mac® software has to be installed or
purchased separately.
The product comes with a disc (G) containing audio/video playback, video/image editing and disc
writing software. After connecting the product to power, insert the disc (G) then follow the on-
screen instructions to install the desired software. The disc (G) also contains a copy of this user
manual and a Quick Start Guide.
The screenshots in this chapter were taken on Windows 10 and might vary for
different versions of the OS.
1. Place a blank compatible disc onto the disc compartment (F) and close it.
2. Click the notification that appears on the bottom right on the screen to select what to do with a blank
disc.
3. Select “Burn files to disc”.
4. Once a pop-up window opens, input the disc title and select the “With a CD/DVD player”
burning option then click “Next”.
5. The disc drive folder opens with File Explorer.
6. Copy and paste or drag files or folders that are to be burned into the disc drive.
8
NOTICE
NOTICE
NOTICE

EN
7. To burn the added files, click the “Manage” tab then “Drive Tools” on the tool bar ribbon of the
File Explorer then click “Finish burning”.
8. Once a pop-up window opens, set the disc title, recording speed then click “Next” to start the
writing process. The writing process may take some time depending on the size of the files.
9. After writing, click “Finish” to close the pop-up window.
4.8.2 Mac®
The screenshots in this chapter were taken on OS Catalina and might vary for
different versions of the OS.
1. Place a blank compatible disc onto the disc compartment (F) and close it.
9
NOTICE

2. Once a pop-up window opens, set action to “Open Finder” then click “OK”.
3. Finder opens the blank disc drive folder.
4. Copy and paste or drag files or folders that are to be burned into the disc drive.
5. To write the added files, click the “File” tab on the tool bar ribbon then click “Burn “Disc name”” or
click “Burn” on the top right side of Finder.
6. Once a pop-up window opens, set the disc name, burn speed then click “Burn” to start the
writing process. The writing process may take some time depending on the size of the files.
7. After writing, the pop-up window closes automatically.
4.9 Listening to music
4.9.1 Windows®
1. Place the desired disc onto the disc compartment (F) and close it.
2. Open the disc drive using a File explorer.
3. Double click the song that you want to play.
4. The Windows Media Player app / your default music player opens and plays the song.
4.9.2 Mac®
1. Place the desired disc onto the disc compartment (F) and close it.
2. Open the disc drive using a Finder.
3. Double click the song that you want to play.
4. The Music app / your default music player opens and plays the song.
10

4.10 Disc region code
Each region around the world has a different region number on the disc being sold in a region. The
region code of the product can be changed to other regions up to 5 times by using the software
decoder. After changing the region code 5 times, the product locks onto the last (5th change) region
code and would be unable to change to another region code anymore.
5. Cleaning and Maintenance
Unplug the product before cleaning.
5.1 Cleaning
- To clean the product, wipe with a soft, slightly damp cloth.
- Wipe the product dry after cleaning.
- Never use corrosive detergents, wire brushes, abrasive scourers, metal or sharp utensils to clean
the product.
5.2 Handling the disc compartment
- Do not insert foreign objects into the disc compartment as this could damage the mechanics.
- The information from the compact disc is read by a laser from an optical lens. If the product is
brought into a warm room after being in the cold, a build up of condensation on the optical lens
may affect the playback quality. In this case, let the product adjust to the room temperature for
approximately 1 hour before using. If the problem persists, consult a professional.
11
NOTICE

EN
5.3 Handling discs
- Protect discs from dust or scratches.
- Keep discs out of direct sunlight and away from heat sources. Always store the compact disc in
the disc case when not in use (Fig. A).
- To maintain the original content quality, occasionally wipe off the disc with a soft cloth, from the
center to the outer edge (not in a circular motion) (Fig. B). Do not use petrol or other solvents
for cleaning.
- Only hold the disc on the edges (Fig. C).
- Burning a disc is a sensitive data transmission procedure. The process can be easily affected by
the slightest mechanical disturbance.
- Never clean the product with a commercially available CD/DVD cleaning set. This can damage
the product.
- Recordable and rewritable discs are more sensitive than commercially available discs. Use only a
solvent-free, non abrasive marker when writing on a disc.
- Do not stick labels on the discs.
- Do not use worn, damaged, cracked, warped or poor quality discs. They might affect the product
and cause the disc to shatter.
- Do not play discs which are non-standard (no-circular) shape, such as heart-shaped discs or
business card-shaped discs.
5.4 Storage
Store the product in its original packaging in a dry area. Keep away from children and pets.
12
ABC

The inserted disc is
not recognized
.
Incorrect disc format
.
Use a disc with a suitable disc format
.
Disc is scratched or broken
.
Use another disc
.
Disc is not inserted properly
.
Take out the disc from the disc
compartment and insert the disc again
.
The lens may be dirty
.
Open the disc compartment and clean the
lens with a professional lens brush or wipe
.
Jumping of tracks
during playback
.
Inserted disc is dirty or
scratched
.
Clean the disc with a soft cloth or insert
another disc
.
6. Frequently Asked Questions
Problem
Possible
Cause
Solution
The
product does
not
switch on.
The
power/data cable is not
connected
properly.
Check
if the power/data cable is properly
connected
to 2 USB-A ports and the main
unit
.
No
sound.
Volume
is set too low.
Increase
the volume level.
No
video.
The
USB-A power/data
cable
is
not installed correctly.
Re
-install the USB-A power/data cable.
Bad
audio quality.
Inserted
disc is dirty or
scratched
.
Clean
the disc with a soft cloth or insert
another
disc.
The
USB-A power/data
cable
is
not connected properly.
Check
the USB-A power/data cable
connections
.
13

EN
7. Copyright Statement
This product and its software provided are only for reproducing material that you have the copyrights
to or have permission to copy from the copyright owner. Without the copyrights or the permission to
copy, you may be violating the copyright law and could be subjected to payment of damages and
other remedies from the original copyrights owner. Contact your legal advisor if you are uncertain of
your rights. You (the user) assume full responsibility for the responsible and legal use of this product
and its software. This product was designed for private use only.
8. Specifications
Model number
GPM1NB10, GPM1NW10
Power input
5 V
1.6 A
Protection class
III
Supported disc sizes
3
" (8 cm) and 4.7" (12 cm)
Reads
DVD ROM, DVD R (Ver
. 2.0 for Authoring) CD ROM, CD ROM XA,
CD I, Video CD, CD Extra, CD Text, Photo CD (Single and Multi
session), standard CD DA, M
-Disc DVD
Reads and writes
DVD R (Ver
. 2.1 for General), DVD R DL (Dual Layer), DVD RW,
DVD RAM (Ver
.2.2), DVD+R, DVD+R DL (Double Layer),
DVD+RW
CD R discs conforming to “Orange Book Part 2”, CD RW discs
conforming to “Orange Book Part 3", DVD R/RW/RAM with CPRM
Supports
“CD layer” of Super Audio CD Hybrid type, AVCHD” format DVD disc,
“AVCREC” format DVD disc
Operating temperature
and relative humidity
+
41 to +104 °F (+5 to +40 °C)
15% to 80% (
non-condensing)
Storage/transportation
temperature and relative
humidity
-
40 to +140 °F (-40 to +60 °C)
5% to 90% (
non-condensing)
Altitude
Operating 0 to 6561' (2000 m
)
Net weight
A
pprox. 0.44lbs(200g)
Dimensions (W x H x D
)
A
pprox. 5.7 x 0.6 x 5.4”(14.4 x 1.4 x 13.7 cm)
DVD-R 3.95GB (Ver. 1.0) and DVD-RAM 2.6GB discs are not supported.
8.1 Reading and writing speeds
DVD
8x
DVD±R Write 6x DVD±RDL Write 5x DVD-RAM Write
CD
24x
CD-RW Write
14
NOTICE
This manual suits for next models
1
Table of contents