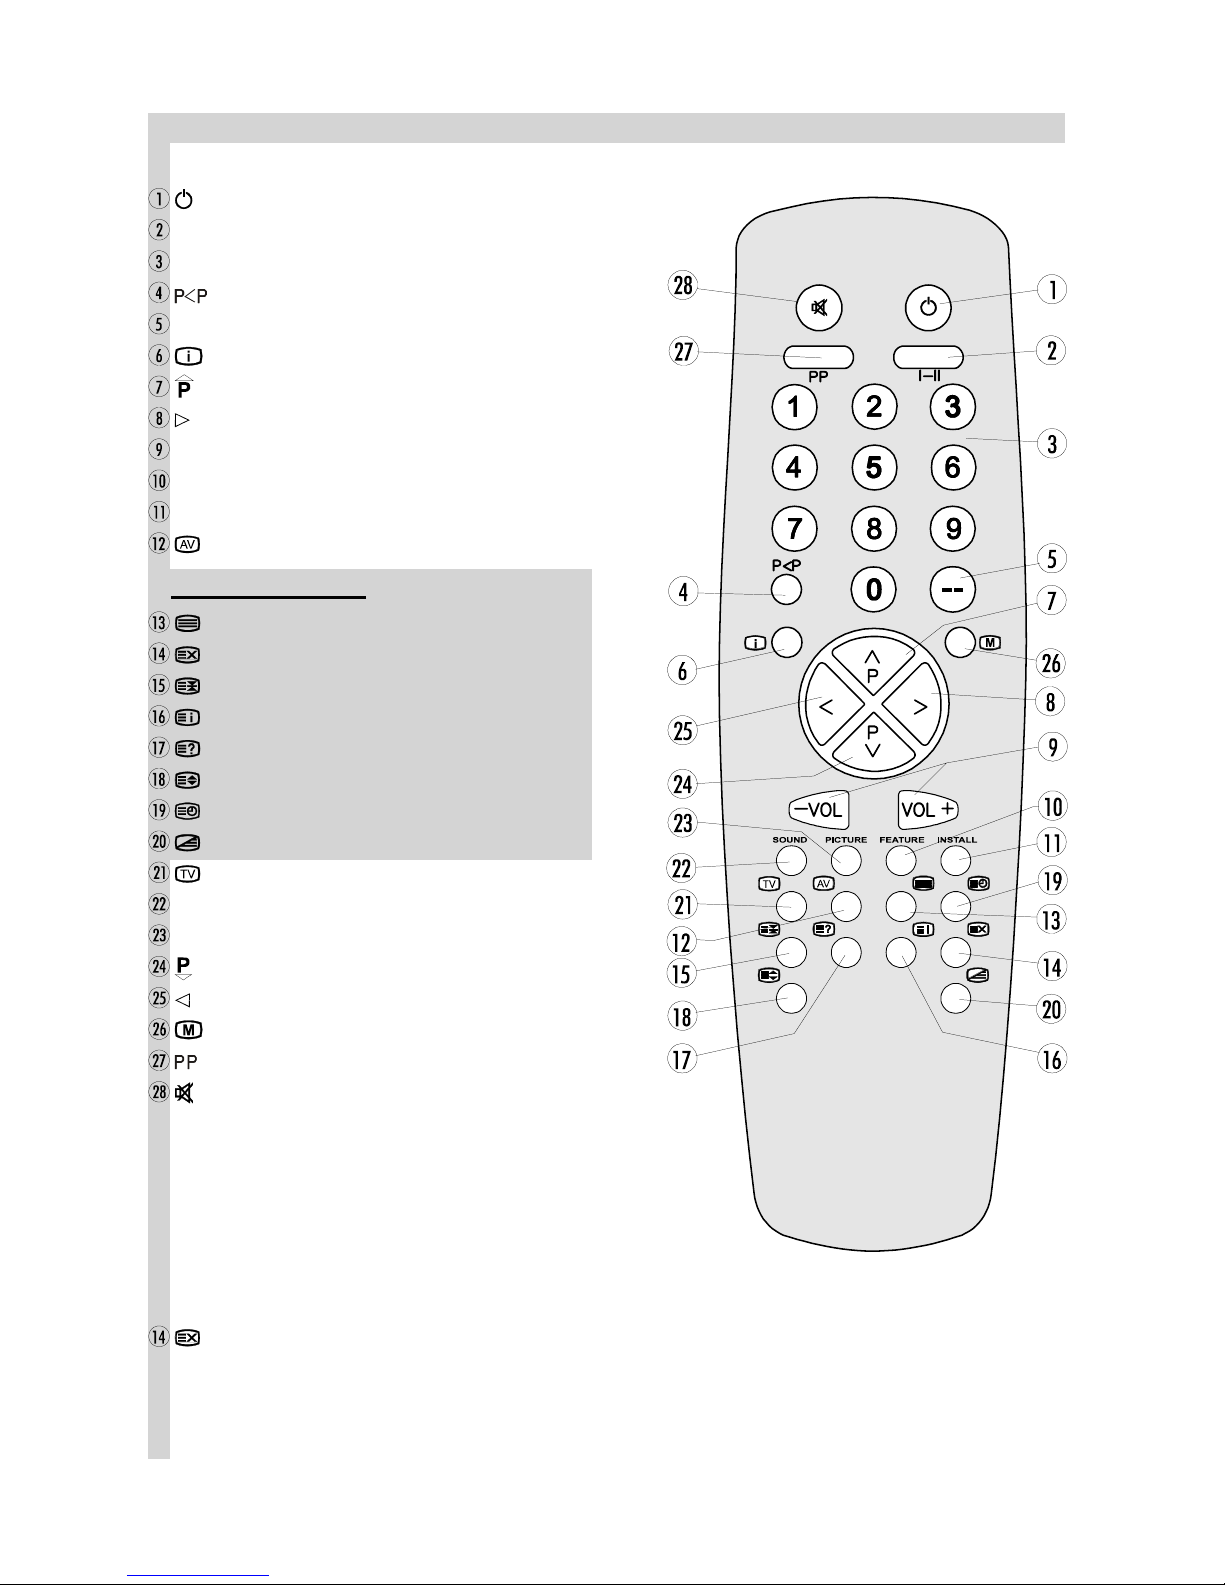
Hitachi C32W460N User manual

GB
F
NL
I
E
N
S
Instructions for use
Notice d'utilisation
Gebruiksaanwijzing
Istruzioni per l'uso
Manual de Instrucciones
Bruksanvisning
Bruksanvisning
C32W460N

ENGLISH - 1 -
Contents
Remote Control Buttons ................................................. 2
Control Panel Buttons ..................................................... 3
Connect Peripheral Equipment ...................................... 3
Connect Peripheral Equipment ...................................... 4
Via the Euroconnector .................................................... 4
RGB mode ...................................................................... 4
Via Ant Input ................................................................... 4
Decoder .......................................................................... 4
TV and Video Recoder (VCR) ........................................ 4
P ayback NTSC .............................................................. 4
Copy Faci ity ................................................................... 4
Search for and store the test signa of the
video recorder ................................................................. 4
Camera and Camcorder ................................................. 4
SVHS (via EXT.2) ........................................................... 4
Connect the decoder to the video recorder .................... 4
Connecting Headphones ................................................ 4
Preparation .......................................................................
Safety Precautions ...........................................................
Before Switching on your TV .......................................... 7
Power connection ........................................................... 7
Connections to the RF input socket ............................... 7
How to connect other devices ........................................ 7
Inserting batteries in the remote contro handset ........... 7
Switching the TV ON/OFF ............................................... 7
To switch the TV on ........................................................ 7
To switch the TV off ........................................................ 7
Operating the TV .............................................................. 7
A.P.S. (Automatic Programming System) ....................... 7
Operating with the buttons on the TV set ....................... 7
Operating with Remote Contro ...................................... 8
Menu System .................................................................... 8
Sound Menu ................................................................... 8
Picture Menu ................................................................ 10
Feature Menu ............................................................... 11
Insta Menu .................................................................. 12
Programme Menu ......................................................... 12
Autostore ...................................................................... 13
Other Features ............................................................... 13
TV Status ...................................................................... 13
Programme Swap (P<P) .............................................. 13
Doub e-digit (- -) ............................................................ 13
Persona Preferences (PP) ........................................... 14
Sound Indicator ............................................................ 14
S eep Timer Last Minute Indicator ................................ 14
Mute Indicator ............................................................... 14
No-Signa ...................................................................... 14
B ue Background During No-Signa ............................. 14
Vo ume Bar ................................................................... 14
Teletext ............................................................................ 1
To operate Te etext ....................................................... 15
To se ect a page of Te etext .......................................... 15
To Se ect Index Page .................................................... 15
To Se ect Te etext with a TV Programme ...................... 15
Searching for a page whi e watching TV ...................... 15
To Se ect Doub e Height Text ....................................... 15
To Revea concea ed Information ............................... 15
To Stop Automatic Page Change .................................. 15
To Se ect a Subcode Page ........................................... 15
Fastext .......................................................................... 15
To exit Te etext .............................................................. 16
To Disp ay the Time ...................................................... 16
Tips .................................................................................. 16
Care of the Screen ....................................................... 16
Poor Picture .................................................................. 16
No Picture ..................................................................... 16
Sound ........................................................................... 16
Remote Contro ............................................................ 16
No so ution .................................................................... 16
Specifications ................................................................. 16

ENGLISH - 2 -
Remote Control Buttons
= Stand By
I-II = Mono/Stereo - Dua I-II
0 - 9 = Direct Program
=Previous Programme
- - = Doub e Digit
= Info (Program Menu)
= Programme Up (Cursor Up)
= Cursor Right
-VOL / VOL + = Vo ume - / Vo ume +
Yellow (FEATURE) = Feature Menu
Blue (INSTALL) = Insta ation Menu
= Externa Source (AV-1, AV-2, F-AV, RGB, SVHS)
Teletext Buttons
= Te etext
= Update
= Ho d
= Index Page
= Revea
= Expand
= Time
= Mix
= TV / Quit Menu
Red (SOUND) = Sound Menu
Green (PICTURE) = Picture Menu
= Programme Down (Cursor Down)
= Cursor Left
= Menu
= Change Picture Preset
= Mute
= Picture Mode Change (Auto / 4:3 / 16:9 / 14:9 / CINEMA / SUBTITLE)

ENGLISH - 3 -
Control Panel Buttons
Connect Peripheral Equipment
There is a wide range of audio and video equipment that can be connected to your TV.
The connection diagrams show the back of the TV where the different equipment shou d be connected.
REAR PANEL
POWER / = Power On / Off
- VOLUME + = Vo ume - / Vo ume +
- PROG. + = Program - / Program +
MENU = MENU
Front AV input
AUDIO L / R = Audio eft (white) / right (red)
VIDEO = VCR (ye ow)
H-PHONE = Headphone 3,6 mm Ø

ENGLISH - 4 -
Connect Peripheral Equipment
There is a wide range of audio and video equipment that can
be connected to your TV.
The fo owing connection diagrams show you where the differ-
ent equipment shou d be connected at the back or the front
side of the TV.
Via the Euroconnector
Your TV set has one or two Euroconnector socket. If you want
to connect periphera s (e.g. video, decoder, etc.) which have
Eurocon-nectors, to your TV, use EXT.1 and EXT.2 inputs.
If an externa device is connected via Euroconnector sockets
TV is switched to AV mode automatica y. If the signa is RGB
then the RGB OSD indicator is disp ayed on the screen.
In AV mode if you press the button the TV status OSD is
disp ayed on the screen.
RGB mode
If an equipment can output the RGB signa s, connect it to the
AV-1 (EXT.1) termina .
Se ect the RGB mode to watch images from that equipment.
When not in the RGB mode, turn the RGB signa s output
equipment off.
Via Ant Input
If you want to connect to your TV, periphera s ike video re-
corders or decoders, but the device you want to connect does
not have Euroconnector, you shou d connect it to the ANT in-
put of your TV set.
If the VCR is connected via antenna input it is suggested
to use the Programme 0.
Decoder
Cab e TV offers you a wide choice of programs. Most of them
are free, others are to be paid for by the viewer. This means
that you wi need to subscribe to the broadcasting organisation
whose programmes you wish to receive. This organisation wi
supp y you a corresponding decoder unit to a ow the
programmes to be unscramb ed.
For further information ask your dea er. See a so the book-
et supp ied with your decoder.
Connect a decoder with an aerial socket to the TV
Connect the aeria cab e.
Connect a decoder without an aerial socket to the TV
Connect the decoder to your TV with a eurocab e / RCA Jack
Cab e to EXT.1 and EXT.2 / RCA Jack. When your decoder
has a Euroconnector / RCA Jack you can obtain better picture
qua ity if you connect a eurocab e / RCA Jack Cab e to EX-
TERNAL /RCA Jack.
TV and Video Recoder (VCR)
Connect the Video Recorder to the ANT (antenna input) socket
of the TV with the aeria cab e.
Connect the Video Recorder to the AV-1 or AV-2 termina with
the SCART cab e, or connect it to the F-AV termina with the
audio and video cab es.
Playback TSC
Connect NTSC VCR p ayer to Euroconnector at the back of
the TV.
or,
Connect NTSC VCR p ayer to RCA Jack at the front of the TV.
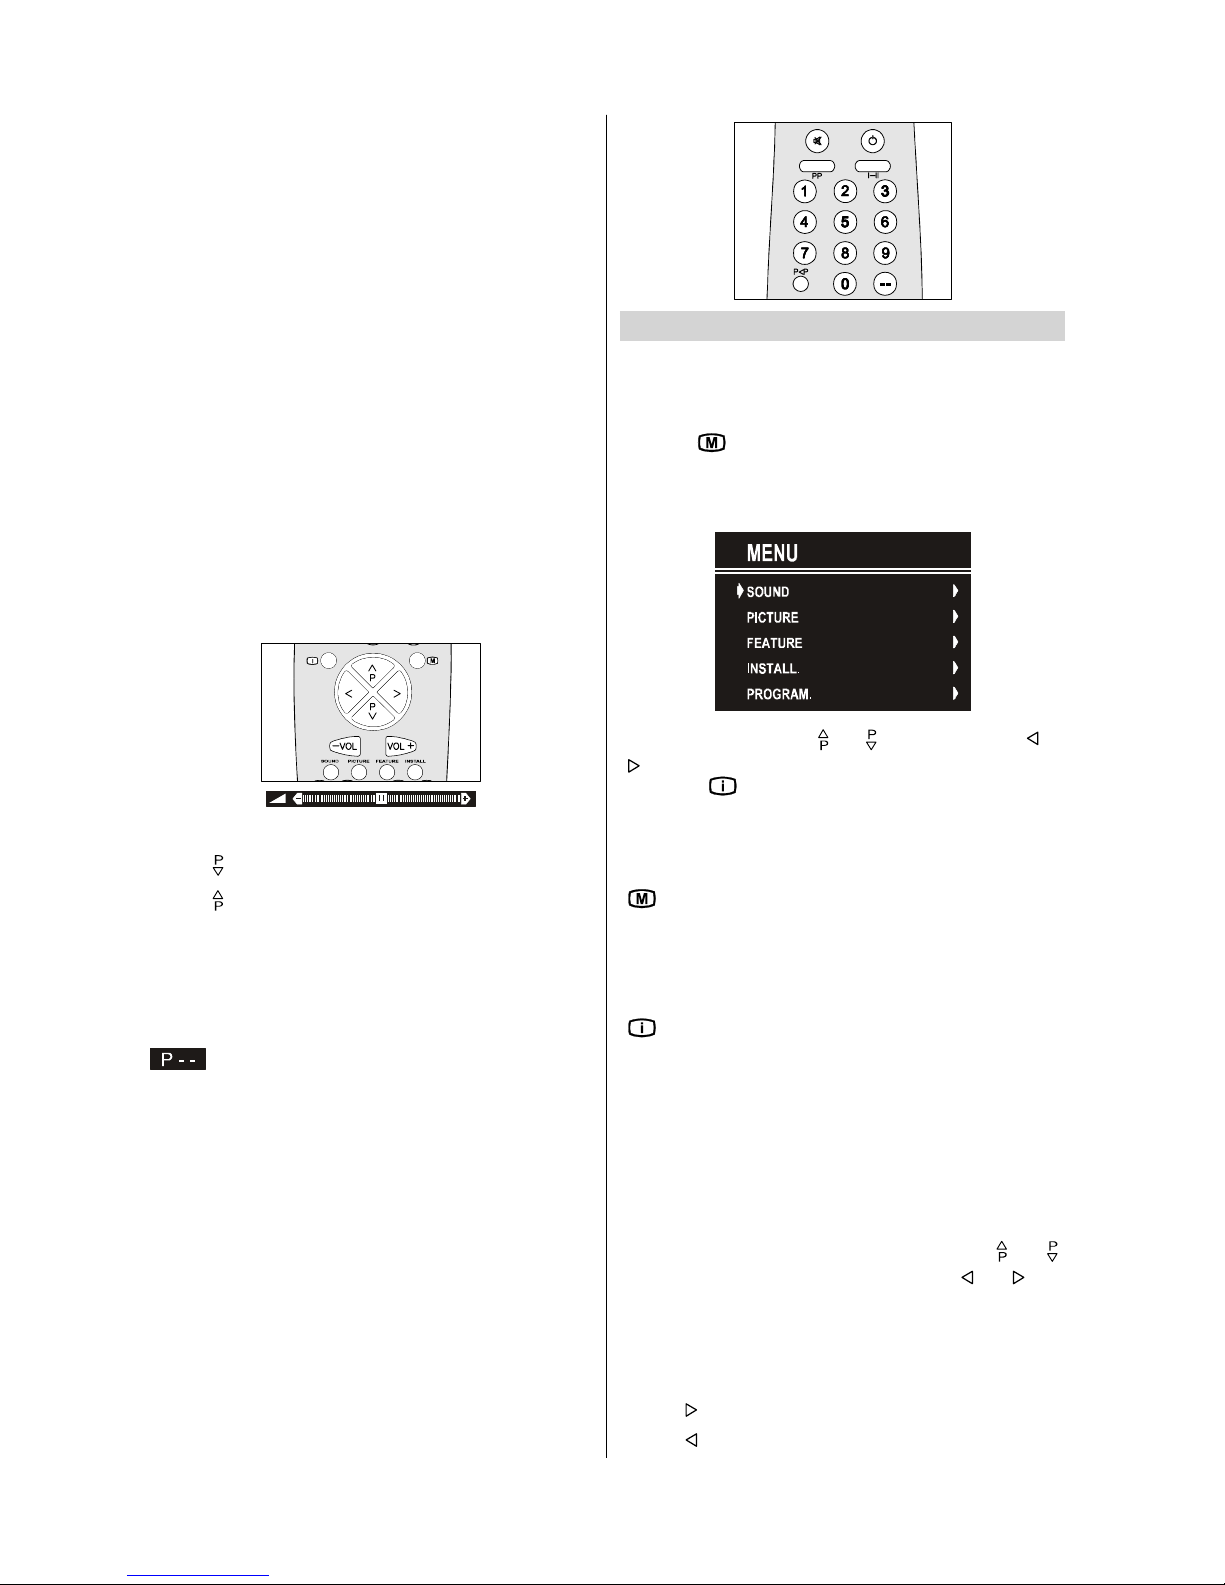
Then, press
$9
button to se ect AV-1, AV-2, F-AV, RGB or
SVHS.
Copy Facility
Source se ection for VCR recording.
Se ect Features Menu in the Main Menu.
Se ect AV-2 OUTPUT source pressing or button.
Search for and store the test signal of the video
recorder
Unp ug the aeria cab e from the aeria socket ANT of your
video recorder.
Switch on your TV and put the video recorder on the test sig-
na . (See the handbook for your video recorder.)
Enter the Tuning menu via the Insta menu.
Search for the test signa of your video recorder in the same
way as you searched for and stored the TV signa s. See Tun-
ing, Search and Store TV channe s. Store the test signa un-
der programme number 0.
Rep ace the aeria cab e in the aeria socket ANT. of your
video recorder once you have stored the test signa .
Camera and Camcorder
To connect to Front-AV input (F-AV)
Connect your camera or camcorder at the front side of your
TV.
Connect your equipment to the TV via VIDEO (ye ow), AUDIO
R (red) and AUDIO L (white) inputs. You shou d connect the
jacks to the input in the same co our.
SVHS (via EXT.2)
If the equipment connected to your TV set supports S-Video (Y/
C) output from Euroconnector, you can have a better picture
qua ity by se ecting AV-2 mode and connecting your equipment
to the EXT.2 termina of TV. See your equipment's book et to
check if your equipment has such feature.
Connect the decoder to the video recorder
Some video recorders have a specia euroconnector for de-
coder.
Connect a eurocab e to the euroconnector of your decoder and
to the specia eurocon-nector of your video recorder. See a so
the handbook of your video recorder.
To connect your video recorder to the TV, see TV and Video
Recorder section.
If you want to connect more equipment to your TV, consu t
your dea er.
Connecting Headphones
Use the stereo headphone socket on the ower front side of
your TV, to connect headphones.

ENGLISH - 5 -
Preparation
P ace the TV on a so id surface.
If p acing the TV into a cabinet or a cove, ensure there is at east
a 100mm (10cm) gap to the sides and rear and top of the TV.
This is to a ow for adequate venti ation during operation. P ease
read be ow for more safety information before insta ation.
Use this apparatus in tropical and/or moderate climates
Features
It is a remote contro ed co our te evision.
100 programmes from VHF, UHF bands or cab e channe s can
be preset.
It can tune cab e channe s.
Contro ing the TV is very easy by its menu driven system.
It has Euroconnector socket for externa devices (such as
computer, video, video games, audio set, etc.)
Second Euroconnector socket is avai ab e.
German + Nicam Stereo sound systems.
Fu function Te etext. (Fastext)
It is possib e to connect headphone.
Direct channe access.
A.P.S. (Automatic Programming System).
A programmes can be named.
Programme swapping between ast watched two program-
mes.
Forward or backward automatic tuning.
S eep timer.
Chi d Lock.
Automatic sound mute when no transmission.
When no va id signa is detected, after 5 minutes the TV
switches itse f automatica y to stand-by mode.
WSS (Wide Screen Signa ing).
NTSC P ayback.
SVHS (EXT.2) is avai ab e.
Front AV in is avai ab e.
Safety Precautions
IMPORTANT SAFETY INFORMATION ON
OPERATING YOUR TV
Dos and Donts
DOs
This Te evision has been designed and manufactured to meet
internationa safety standards, but ike any e ectrica equipment,
care must be taken if you are to obtain the best resu ts and
safety is to be assured.
DO read the operating instructions before you attempt to use the
equipment.
DO consu t your dea er if you are in any doubt about insta ation,
operation or safety of your equipment.
DO be carefu with g ass pane s or doors on equipment.
This TV is supp ied with a fitted mains p ug. This p ug must not
be cut off as it may contain a specia radio interference fi ter, the
remova of which cou d ead to impaired performance. If you
wish to extend the ead, obtain an appropriate safety approved
extension ead or consu t your dea er.
Observe the manufacturers instructions when connecting ex-
tension eads to the TV. Check the fuse rating on the new p ug,
this shou d be fitted with a 5 Amp fuse which conforms to either
ASTA or BSI (BS1 362) approva s, these are easi y identifiab e
by either the or symbo s. If you are in any doubt about
the insta ation of an extension ead, p ease consu t a compe-
tent e ectrician.
DONTs
DONT continue to operate the equipment if you are in any
doubt about it working norma y, or if it is damaged in any way
switch off, withdraw the mains p ug and consu t your dea er.
DONT p ace water fi ed vesse s on top of T.V. cabinets.
DONT remove any fixed cover as this may expose dangerous
vo tages.
DONT eave equipment switched on when it is unattended
un ess it is specifica y stated that it is designed for unattended
operation or has a stand-by mode. Switch off using the switch
on the equipment and make sure your fami y know how to do
this. Specia arrangements may need to be made for infirm or
handicapped peop e.
DONT use equipment such as persona stereos or radios so
that you are distracted from the requirements of traffic safety. It
is i ega to watch te evision whi st driving.
DONT obstruct the venti ation of the equipment, for examp e
with curtains or soft furnishings. Overheating wi cause dam-
age and shorten the ife of the equipment.
DONT use makeshift stands and NEVER fix egs or stands to
the TV with any screws other than those provided - to ensure
comp ete safety a ways use the manufacturers approved stand
with the fixings provided.
DONT a ow e ectrica equipment to be exposed to rain or
moisture.

ENGLISH - 6 -
ABOVE ALL
EVER let anyone, especially children push anything into
holes, slots or any other opening in the case - this could
result in a fatal electric shock.
EVER guess or take chances with electrical equipment
of any kind - it is better to be safe than sorry!
1. Power Cor
The power supp y cab e shou d be p aced so that it is not ike y
to be wa ked on or pinched by items p aced on or against it. Pay
particu ar attention to the cab e
Where it enters the p ug, power out et, and the point where it
emerges from the receiver.
2. Moisture an Water
Do not use this equipment in a humid and damp p ace (avoid
the bathroom, the sink in the kitchen, and near the washing
machine). Do not expose this equipment to rain or water, as this
may be dangerous and do not p ace objects fi ed with iquids
on top. Avoid from dripping or sp ashing.
3. Cleaning
Before c eaning, unp ug the receiver from the main supp y
out et. Do not use iquid or aeroso c eaners. C ean with a soft
dry c oth.
4. Lightning
To prevent damage during a storm, ightning or when going on
ho iday, disconnect the power ead and aeria from the wa
out et and disconnect the aeria p ug from the back of the te e-
vision.
5. Ventilation
The s ots and openings on the receiver are intended for venti-
ation and to ensure re iab e operation. To prevent overheating,
these openings must not be b ocked or covered in anyway.
6. Replacement Part
When rep acement parts are required, be sure the service tech-
nician has used rep acement parts which are specified by the
manufacturer or have the same specifications as the origina
one. Unauthorized substitutions may resu t in fire, e ectrica
shock, or other hazards.
7. Servicing
P ease refer a servicing to qua ified personne . Do not remove
the back cover as this may resu t in an e ectric shock.
8. X-rays
This te evision has shei ding for protection against the emission
of X-rays.
9. Flame sources
Do not p ace naked f ame sources on the apparatus.
Warning!
Any intervention contrary to regulations, in particular, any modi-
fication of high voltage or a replacement of the picture tube may
lead to an increased concentration of x-rays. Any television
modified in this way no longer complies with license and must
not be operated.
Instructions for waste disposal:
Packaging and packaging aids are recyclable and should
principally be recycled. Packaging materials, such as foil bag,
must be kept away from children.
Batteries, including those which are heavy metal-free, should
not be disposed of with household waste. Please dispose of
used batteries in an environmentally sound manner. ind out
about the legal regulations which apply in your area
DO NOT LEAVE YOUR TV IN STAND-BY OR OPERAT-
ING WHEN LEFT UNATTENDED FOR A LONG TIME
CAUTION
RISK O ELECTRIC SHOCK
The ightning f ash with the arrowhead symbo , within an equi atera triang e, is intended to a ert the user to
the presence of uninsu ated ''dangerous vo tage''
within the product' enc osure that may be of sufficient magnitude to constitute a risk of an e ectric shock.
The exc amation point within an equi atera triang e is intended to a ert the user to the presence of impor-
tant operating and maintenance (servicing) instructions in the iterature accompanying the app iance.

ENGLISH - 7 -
Before Switching on your TV
Power connection
IMPORTANT: The TV set is designed to operate on 220-240V
AC, 0 Hz.
After unpacking, a ow the TV set to reach the ambient room
temperature before you connect the set to the mains.
Connections to the RF input socket
Connect the aeria or cab e TV p ug into the RF input socket
on the back of the TV.If you are a so connecting a video re-
corder /sate ite receiver, p ug the aeria into this equipment
first and then connect the RF output socket from this device
to the RF input on the back of the TV.
VHF/UHF
W
79
5($5
3$1(/
&$%/(79
How to connect other devices
IMPORTANT: Switch off the TV before connecting any externa
device.
Sockets for externa connections are at the back of the TV. For
connection of other devices via Euroconnector refer to the
manua s of the re ated devices.
Inserting batteries in the remote control
handset
P ace the batteries in the right directions as seen be ow.
Remove the battery cover ocated on the back of the handset
by gent y pu ing upwards from the indicated part.
Insert two AAA (R03) or equiva ent type batteries inside.
Rep ace the battery cover.
OTE: Remove batteries from remote control handset when it
is not to be used for a long period.Otherwise it can be damaged
due to any leakage of batteries.
Switching the TV ON/O
To switch the TV on
Your TV wi switch on in two steps:
1- Press the power button ocated on the front of the TV. Then
the TV switches itse f to standby mode and the RED LED
ocated be ow the TV turns on.
2- To switch on the TV from stand-by mode either:
Press a digit button on the remote contro so that a programme
number is se ected,
or,
Press Programme Up or Down buttons on the front of the TV or
on the remote contro , so that ast switched off programme is
se ected.
In either case the TV wi switch on and the RED LED wi turn
to GREEN.
To switch the TV off
Press the stand-by button on the remote contro , so the TV wi
switch to stand-by mode and the GREEN LED wi become
RED,
or,
Press the power button ocated on the front of the TV, so the TV
wi switch off and the GREEN LED wi turn off.
Operating the TV
You can operate your TV both using the remote control
handset and onset buttons.
A.P.S. (Automatic Programming System)
"PLEASE, CHECK ANTENNA CABLE. AUTO PROGRAM-
MING SYSTEM" message wi be disp ayed when you turn
on your TV for the first time. A.P.S., searches and sorts a
channe s and stores them automatica y on your TV, accord-
ing to the transmission of programme systems in your area.
To cance A.P.S. before starting, press
79
button. First of
a choose the COUNTRY. This, wi effect the sort process
in A.P.S.. To se ect START use or button and
press or button. To cance A.P.S. during running
press or button.
$36,65811,1*
39+)
&$1&(/
After A.P.S. is fina ized, a programme ist wi apper on the
screen. In the programme ist you wi see the programme
numbers and names assigned to the programmes.
If you do not accept the ocations and / or the programme
names of programmes, you can change them in Programme
menu.
Operating with the buttons on the TV set
Vo ume setting and programme se ection can be made us-
ing the buttons on the front pane .
Volume Setting
Press - VOLUME button to decrease vo ume or VOLUME+
button to increase vo ume, so a vo ume eve sca e (s ider) wi
be disp ayed at the midd e of the bottom on the screen.

ENGLISH - 8 -
By pressing both the VOLUME + and - VOLUME buttons
at the same time you can enter Main menu.
Programme Selecting
Press PROG. + button to se ect the next programme or
PROG. - button to se ect the previous programme.
Entering Main Menu
Press "MENU" button to enter Main menu. In the Main menu
se ect sub-menu using PROG. - or PROG. + button and
enter the sub-menu using - VOLUME or VOLUME + but-
ton. To earn the usage of the menus, refer to the Menu Sys-
tem section.
Operating with Remote Control
The remote contro handset of your TV is designed to contro a
the functions of the mode you se ected. The functions wi be
described in accordance with the menu system of your TV.
Functions of the menu system are described in Menu System
section.
Volume Setting
Press VOL+ button to increase vo ume. Press VOL- button
to decrease vo ume. A vo ume eve sca e (s ider) wi be dis-
p ayed at the midd e of the bottom on the screen.
Programme Selecting (Previous or next programme)
Press button to se ect the previous programme.
Press button to se ect the next programme.
Programme Selecting (direct access)
Press digit buttons on the remote contro handset to se ect
programmes between 0 and 9. TV wi switch to the se ected
programme. To se ect programmes between 10 - 99, you must
use the doub e digit button "- -".
this OSD is disp ayed at the eft hand upper on the
screen.
After this, press the digit buttons consecutive y for the
programme you want to se ect (eg. for programme 27, first press
2 and then 7). If the second digit is not entered within 3 seconds,
this function wi disappear.
Press direct y the programme number to rese ect sing e digit
programmes.
Programme Swapping
Press "P<P" (programme swap) button to se ect the ast se-
ected programme. This button provides swapping between
ast two se ected programmes. For examp e, se ect
programme 8, then se ect programme 2. Now, if you press
"P<P" button, programme 8 wi be se ected. If you press the
same button again, programme 2 wi be se ected and so on.
Menu System
Your TV has been designed with a menu system, to provide an
easy manipu ation of a mu ti-function system. The TV is con-
tro ed by choosing the commands, which are disp ayed on the
screen.
Press the " " button. The Main menu wi be disp ayed at the
midd e on the screen.
A the se ected items in this menu system is indicated with
CYAN characters and with an arrow on the eftside of items.
To se ect a sub-menu use or button, and press or
button. Each option can a so be se ected with the co oured
button and " " button on the remote contro .
MAI ME U
The menu system is described be ow.
The short way in order to enter the menus, press :
"" Button, Main Menu.
Red Button, Sound Menu.
Green Button, Picture Menu.
Yellow Button, Feature Menu.
Blue Button, Install Menu.
"" Button, Programme Menu.
Menu button has two functions; first is opening or c osing the
"MAIN MENU", and the second is c osing the sub-menu and
then opening its parent menu.
Sound Menu
To change sound settings
Enter the Sound Menu direct y, pressing the Red button or,
As you enter the main menu, sound wi be the first se ected
option. In the main menu, se ect SOUND using or
button, then enter the sound menu pressing or but-
ton.
Setting Volume
As you enter the sound menu, Vo ume wi be the first se ected
option.
Press button to increase vo ume.
Press button to decrease vo ume.

ENGLISH - 9 -
Or you can direct y change the vo ume settings using VOL+
(to increase) or -VOL (to decrease) button.
Setting Balance
It a ows adjusting the distribution between the eft and right
speakers.
Using or button se ect Ba ance.
Press button to change ba ance rightward.
Press button to change ba ance eftward.
When ba ance contro is in mid position, the cursor is disp ayed
with the two reciproca arrows.
Selecting Mode
Using or button se ect Mode.
Press or button to change Mode.
You can choose MONO, STEREO or DUAL (I-II) mode, on y if
the se ected channe supports that mode.
You can a so change sound mode direct y pressing I-II button
on your remote contro .
In case of bi ingua broadcast (Dua Sound), you can se ect
origina or dubbed anguage using mode option.
Setting AVL
Automatic Vo ume Limiting (AVL) function norma ises sound to
obtain fixed output eve between programs, having different
sound eve s. Pressing or button wi turn on and off this
feature.
Setting Effect
You can use this feature to switch the sound effect on and off.
Pressing or button wi turn on and off this feature. If the
current sound system is MONO and the sound effect is set ON,
then the sound wi be heard as if it is STEREO. If the current
sound system is STEREO, switching this effect on wi make the
sound deeper. Switching it off wi make no change in MONO
and STEREO.
Equalizer
To enter Equa izer sub-menu, se ect Equa izer using or
button, then enter Equa izer menu pressing or button.
In MODE item there are five predefined and one user defined
options. These are USER, CLASSIC, JAZZ, ROCK, POP and
FLAT. The predefined options can not be changed by the user.
If you change one of the frequency va ues of the predefined
options, the MODE is switched automatica y to USER option.
The USER option may be adjusted by the user.
The 5 items be ow the MODE are avai ab e to adjust the sound
settings in 5 frequency va ues: 120 Hz, 500 Hz, 1.5 kHz, 5 kHz
and 10 kHz. To change the va ues of 5 frequency options, se-
ect one of the options by or button, and then press
to increase the va ue, or to decrease the va ue. In mid
position, cursor is disp ayed with the two reciproca arrows.
To store the Equa izer settings, press or button on
STORE option.
During the store process a the items are stored, moreover, the
USER mode information wou d not be ost. In other words, when
the user mode is se ected again, after storing the MODE with
one of the predefined options, the user definde frequency va -
ues wou d be set.
To Change Headphone Sound Settings
Pressing or button on HEADPHONE, enter the Head-
phone menu. This is a sub-menu of Sound menu, and a op-
tions in this menu are working as the same in the Sound menu.

ENGLISH - 10 -
Setting Headphone Volume
As you enter the Headphone sound menu, Vo ume wi be the
first se ected option.
Press button to increase vo ume.
Press button to decrease vo ume.
Setting Headphone Balance
When ba ance contro is in mid position, the cursor is disp ayed
with the two reciproca arrows.
Using or button se ect Ba ance.
Press button to change ba ance right-wards.
Press button to change ba ance eft-wards.
Setting Headphone Mode
Using or button se ect Mode.
Pressing or button wi change the current sound mode.
(e.g.: If the current sound mode is stereo, it wi be stereo or visa
versa).
In case of bi ingua broadcast, you can se ect origina or dubbed
anguage again using mode menu. So when somebody istens
to the origina anguage from the oudspeakers, somebody e se
can isten to the dubbed anguage from headphone.
To Store the Settings
Using or button se ect Store. Press or button
to store current headphone vo ume and ba ance. The stored
va ues wi be va id for a the programmes.
To Store the Settings
Press or button on STORE option to store Sound
menu settings.
Picture Menu
To enter the Picture menu direct y, press the GREEN button,
or
Press " " button, now you are in Main menu. In the Main
menu, se ect PICTURE using or button, then enter
the Picture menu pressing or button.
Setting Brightness
As you enter the picture menu, Brightness wi be the first
se ected option.
Press button to increase brightness.
Press button to decrease brightness.
%5,*+71(66
&2175$67
&2/285
6+$531(66
02'(
6725(
Setting Contrast
Using or button se ect Contrast.
Press button to increase contrast eve .
Press button to decrease contrast eve .
Setting Colour
Using or button se ect Co our.
Press button to increase co our eve .
Press button to decrease co our eve .
Setting Sharpness
Using or button se ect Sharpness.
Press button to increase peaking eve .
Press button to decrease peaking eve .

ENGLISH - 11 -
Setting Hue
(During P ayback NTSC system, this wi appear in AV mode
on y when NTSC video source is app ied. Otherwise, HUE
option is invisib e in Picture menu.):
Using or button se ect Hue.
Press button to increase hue eve .
Press button to decrease hue eve .
Center va ue is indicated with the two reciproca arrows.
Mode
This item is used to change the picture size. By pressing
or button you may choose one of these options: 4:3,
16:9, 14:9, CINEMA, SUBTITLE and AUTO. It is a so
possib e to change picture modes direct y by pressing button
on your remote contro .
4:3 This option forces the picture ratio to 4:3 mode.
16:9 This option forces the picture ratio to 16:9 mode.
14:9 This option forces the picture ratio to 14:9 mode.
Cinema This option forces the picture ratio to Cinema mode.
Subtitle This option forces the picture ratio to Subtit e mode.
AUTO This a ows to change the picture mode automatica y,
according to the transmission of the se ected channe . For
examp e, your TV is 4:3 mode, but the transmission of that
channe is in 16:9 mode. If you se ect the AUTO mode, the TV
is switched to 16:9 mode automatica y. If the TV is in 4:3 mode
and the picture ratio of the channe is a so 4:3, there wi be no
affect se ecting the picture mode to AUTO mode.
WSS feature is on y used in TV and F-AV modes. For the Pic-
ture Mode se ection in AV-1 and AV-2 the pin 8 (of Scart) va ue
is used. In RGB and SVHS modes the Picture Mode can be 4:3,
16:9, 14:9, CINEMA or SUBTITLE (Auto mode is not avai -
ab e.).
When the menu appears on screen, picture mode wi automati-
ca y change to its defau t tube mode (4:3 or 16:9) but it wi
turned to its stored mode when the menu disappears.
To Store the Settings
Press or button on STORE option to store Picture
menu settings except Picture Mode.
Feature Menu
To enter the Feature menu direct y, press the YELLOW
button, or
Press " " button, now you are in Main menu. In the Main
menu, se ect FEATURE using or button. Then enter
the Feature menu pressing or button.
Sleep Timer
As you enter the Feature menu, SLEEP TIMER wi be the first
se ected option. Use or button to change the S eep
Timer va ues between OFF, 0:1 :00, 0:30:00, 0:4 :00, 1:00:00,
1:1 :00, 1:30:00, 1:4 :00 and 2:00:00.
It is disp ayed on the upper right of the screen. If s eep timer is
activated it is disp ayed with the TV status and erased with it after
3 seconds.
If there is eft on y one minute of the down counting of the timer,
it is disp ayed automatica y on the upper right of the screen, and
stayed there unti finishing. Then TV goes automatica y to
stand-by.
Child Lock
You can use this feature to prevent chi dren turning on TV or
changing programs or adjustments etc. without remote contro .
The CHILD LOCK feature can be set by or button to
either ON or OFF. When OFF is se ected, there wi be no dif-
ference in the operation of your TV. When ON is se ected, the
TV can on y be contro ed by the remote contro handset. In this
case, the front pane buttons (except the Switch On/Off button)
wi not work.

ENGLISH - 12 -
Selecting Menu Language
Menu anguage can be chosen by pressing or button
on LANGUAGE item.
AV-2 OUTPUT
From AV-2 OUTPUT, either TV or AV-1 can be given. TV or
AV-1 can be chosen by pressing or button on "AV-2
OUTPUT".
To Store Settings
In Feature menu a settings are stored automatica y.
Install Menu
To enter the Insta menu direct y, press the BLUE button, or
Press " " button, now you are in Main menu. In the Main
menu, se ect INSTALL. using or button. Then enter
the Insta menu pressing or button.
Selecting Programme
To se ect programme number, you can use or button,
Digit Buttons or The Doub e Digit button with digit buttons.
Selecting Band
BAND, can be chosen either,
VHF1, VHF3 or UHF by or button.
Selecting Frequency
The frequency va ue is,
044 - 890 MHz for band VHF1 - VHF3 - UHF.
FREQUENCY can be changed by or button, by the
Digit buttons or by the Doub e Digit button with digit buttons.
The decima va ue in frequency can not be changed by the digit
buttons, it can be changed on y by the or button. The
va ue can be 00, 25, 50 and 75. A so changing Fine Tun-
ing changes the decima part.
Selecting Standard
Using or button on STANDARD, you can change
the standard to B/G, D/K, L/L'.
Selecting Search
To start the search process, press button for forward search
or button for backward search. SEARCH item b inks dur-
ing search process, since the process is stopped or signa is
found. During search process the semi-transparent menu back-
ground becomes "BLUE". To stop the search process or
button must be pressed again.
Selecting Fine Tuning
You can use the Fine Tuning process for fine adjustment (after
coarse adjustment), if you are not happy about the image on the
screen.
Use or button on FINE TUNING item, unti getting the
best image on the screen.
To Store Settings
Press or button on STORE option to store Insta menu
settings.
Programme Menu
To enter Programme menu direct y, press the " " button, or
Press " " button, now you are in Main menu. In the Main
menu, se ect PROGRAM. using or button. Then
enter the Programme menu pressing or button.
By moving the cursor in four directions you can reach 30
programmes in the same page. By scro ing the pages up or
down by pressing the navigation buttons you can se ect a the
programmes in TV mode (except the AV mode).
In menus, and buttons are working ike "Direction Up"
and "Direction Down".
By cursor action, programme se ection is done automatica y.
Se ected programme is disp ayed with CYAN characters. In
order to se ect programme is a so possib e by using digit or
doub e-digit button. In this way programme se ection is auto-
matic and after se ection the se ected programme is disp ayed
with cyan characters. The TV Status is changed by the
programme se ection too. When using doub e-digit button in
order to se ect a programme, the Programme Number in TV
Status OSD is disp ayed in "P --" form, and by pressing digit
buttons they are disp ayed in it.
Programme Number is between 00 and 99. Programme Name
has a name string with 5 characters. After autostore process the
Programme Names are set to "PR01" (programme number),

ENGLISH - 13 -
At the bottom of the menu there is a programme sort functions
section. Each function is activated by co or button (seen be ow).
NAME a ows changing the programme name. By DELETE you
can de ete programmes that you decided. INSERT section is for
inserting programmes into another programme spaces. By
se ecting AUTOSTORE section, Autostore menu wi be avai -
ab e.
To change the name of a decided programme, Se ect the
programme and push the RED (NAME) button. The first etter
begins to b ank on the se ected name. To change that etter
or button can be used, and to se ect the other etters,
or button can be used. If the cursor is at the ast etter of the
Programme Name, pressing button moves the cursor at the
beginning. On the contrary, if the cursor is at the beginning of
the Programme Name, pressing button moves the cursor
at the end.
35
35
35
35
35
35
$8726725(,16(57 '(/(7(1$0(
After changing the name by pressing the RED button (STORE)
it is stored. After activating the name process the INSERT,
DELETE and AUTOSTORE processes wi be inactive and
"CANCEL" option wi be va id. This option cance s the name
process, if the new name do not want to be stored.
When the GREEN button is pressed, "NAME", "AUTOSTORE"
and "DELETE" functions are erased, the se ected programme
(A) is disp ayed with green characters. From now on, the auto-
matic se ection is cance ed. Cursors moves are indicated with
CYAN characters. With navigation buttons, the decided pro-
gram space (B) can be se ected and by pressing the green
button again the programme wi be inserted into that space.
A programmes be ow the inserted programme wi move down
by one number.
"CANCEL" function cance s the activated "INSERT" process.
For "DELETE" process press the ye ow button, (NAME, IN-
SERT and AUTOSTORE functions are inactive). Pressing
ye ow button again erases the se ected programme from the
programme ist, and the programmes be ow shift one up. Press-
ing b ue button cance s the activated DELETE process.
To enter Autostore menu, press to the b ue button. To earn the
features of this function see "AUTOSTORE" be ow.
Autostore
(A.P.S. : Automatic Programming System)
A.P.S, searches and stores a channe s automatica y on your
TV, according to the transmission of programme systems in
your area.
$36,65811,1*
39+)
&$1&(/
To cance A.P.S. before starting, press
79
button. First of a
choose the COUNTRY.
Using or button on STANDARD, you can change
the standard to B/G, D/K, L/L'.
This, wi effect the sort process in A.P.S.. To se ect START use
or button and press or button. To cance A.P.S.
during running press or button.
After A.P.S. is fina ized, a programme ist wi apper on the
screen. In the programme ist you wi see the programme num-
bers and names assigned to the programmes.
If you do not accept the ocations and/or the programme names
of programmes, you can change them in Programme menu.
Other eatures
TV Status
Programme Number, Programme Name (or AV), (they are
disp ayed on the upper eft of the screen) and Sleep Timer
(shows the time eft on the upper right screen if enab ed). In
stereo options the sound indicator is disp ayed with them too.
They are disp ayed after programme change for 3 seconds.
Programme Number
Programme Name (5 characters)
These OSDs are disp ayed when a new programme is entered
by digit button, by pressing P<P button, or by or but-
ton, or by
79
button.
Programme Swap (P<P)
This button is used to reenter to the preceding entered
programme again. Pressing "P<P" consecutive y a ows to swap
into two ast entered programmes.
Double-digit (- -)
This OSD is disp ayed when the Doub e-Digit button pressed
in p ace of the programme number indicator.
After that, in order to enter a programme press two digits con-
secutive y. Both digits must be entered within 3 seconds or the
function wi disappear.

ENGLISH - 14 -
Personal Preferences (PP)
A the preset va ues wi be restored, when pressing "PP".
Sound Indicator
This is a stereo option. The a ternatives of the indicator are
Mono, Stereo, Dua I and Dua II. This indicator is disp ayed
under the programme number indicator on the screen. "I-II"
button is used to se ect Mono or Stereo, or Dua I or Dua II.
In Mono broadcast or in forced-mono (for stereo broadcast).
In Stereo broadcast.
If dua broadcast detected. Dua I is se ected in defau t and a so
can be se ected after Dua II by Remote Contro .
If Dua II se ected by Remote Contro .
Picture Mode
The picture mode OSD is disp ayed be ow the sound indicator,
by TV Status OSDs. According to the WSS data, inside of the
OSD box 4:3, 16:9, 14:9, CINE, SUBT or AUTO is writ-
ten.
By pressing button (if Te etext is not active) the picture
mode can be switched into 4:3, 16:9, 14:9, Cinema, Subtit e or
Auto Mode.
Sleep Timer Last Minute Indicator
It is disp ayed on the upper right of the screen. If s eep timer is
activated it is disp ayed with the TV status and erased with it after
3 seconds.
If there is on y one minute of the countdown eft of the timer, it
is disp ayed automatica y on the upper eft of the screen, and
stayed there unti finishing. Then TV goes automatica y to
stand-by.
Mute Indicator
It is p aced in the upper midd e of the screen when enab ed, and
it stays there unti it is disab ed.
To cance mute, there are two a ternative; the first one is press-
ing to " " button, thus vo ume is set to the preceding va ue, and
the second one is increasing the vo ume eve , thus it starts at
the minimum eve to increase. By decreasing the vo ume eve
in mute state, mute wi not be ignored, on y the vo ume eve wi
decrease. If mute is cance ed after decreasing the vo ume eve ,
the vo ume wi return at the decreased eve .
o-Signal
No-Signal Timer Indicator
It is disp ayed in the midd e of the screen when no va id signa
detected. It shows the time remaining before the switching to the
Stand-By mode (it takes 5 minutes when no signa detected or
no any Remote Contro command is accessed). The indicator
is disp ayed for 3 seconds when there is no va id signa .
After an Remote Contro command (if No-Signa Timer is active)
the timer stops and if no signa detected again the timer is ini-
tia ized to 5 minutes and starts 3 seconds ater again to count
down.
It is not va id in AV mode.
Blue Background During o-Signal
In case, no va id signa is detected (in TV or AV mode) B ue
Background is activated.During search process B ue Back-
ground is not active. But instead there is another feature given;
the semi-transparent menu background is made b ue.
Volume Bar
It is disp ayed in the ower midd e of the screen. When a vo ume
command is received (pressing Vol+ or Vol- by Remote
Contro or Front pane ) and no menu is active, it stays on the
screen for 3 seconds, after the ast vo ume command or unti
another command is received in between.
AV Modes
By pressing the button you can switch your TV to AV
modes (except being in Te etext). Pressing this button wi
consecutive y switch the TV in one of the optiona AV modes:
AV-1, AV-2, F-AV (Front AV), RGB (EXT.1) or SVHS (EXT.2).
AV-1 supports the RGB mode and AV-2 supports SVHS mode
un ess there is an SVHS socket.
In order to quit the AV mode press the
79
button.

ENGLISH - 15 -
Teletext
Te etext is an information system that disp ays text on your TV
screen. Using the Te etext information system you can view a
page of information on a subject that is avai ab e in the ist of
contents (index).
On screen disp ay is not avai ab e in text mode.
Contrast, brightness or co our contro is not avai ab e, but vo -
ume contro is avai ab e in text mode.
To operate Teletext
Se ect a TV station on which Te etext is being transmitted.
Press (TELETEXT) button. Usua y the ist of contents
(index) is disp ayed on the screen.
To select a page of Teletext
Press the appropriate digit buttons for the required Te etext
page number.
The se ected page number is disp ayed at the top eft corner of
the screen. The Te etext page counter searches unti the se-
ected page number is ocated, so that the desired page is dis-
p ayed on the screen.
Press button to move the Te etext screen forward one
page at a time.
Press button to move the Te etext screen backward one
page at a time.
To Select Index Page
To se ect the page number of the index (genera y page 100),
press button.
To Select Teletext with a TV Programme
Press button. The text is now superimposed over the
programme on the screen.
Press button again to return to the Te etext page.
Searching for a page while watching TV
Whi e Te etext Mode is on, pressing wi change the
mode to TV, one more press to wi change the mode
from TV to the atest Te etext page we eft. In the TV mode enter
a page number using digit keys. As you enter digits first ine of
te etext page wi appear on top screen and wi remain there
unti the requested page is found. Then te etext ine wi be
rep aced by page number to indicate that page has been
found. Now you can disp ay this te etext page pressing
button.
To Select Double Height Text
Press button for the top ha f of the information page to
be disp ayed in doub e height text.
Press button again for the bottom ha f of the informa-
tion page to be disp ayed in doub e height text.
Press button once more for the fu page of norma height
text.
To Reveal concealed Information
Pressing button once wi revea answers on a quiz or
games page.
Pressing button again wi concea the revea ed an-
swers.
To Stop Automatic Page Change
The te etext page you have se ected may contain more informa-
tion than what is on the screen; the rest of the information wi
be disp ayed after a period of time.
Press button to stop the automatic page change.
Press button again to a ow the next page to be dis-
p ayed.
To Select a Subcode Page
Subcode pages are subsections of ong Te etext pages that can
on y be disp ayed on the screen one section at a time.
Se ect the required Te etext page.
Press button.
Se ect the required subcode page number by pressing four
digit buttons (e.g. 0001).
If the se ected subcode page is not disp ayed in a short time,
press button. TV programme wi be disp ayed on the
screen.
Te etext page number wi be disp ayed on the upper eft cor-
ner of the screen when the se ected page is found.
Press button to disp ay the se ected Te etext page.
Fastext
Your CTV supports the 7 page Te etext system. When the page
number of any of the 7 pages in memory is entered, the system wi
not search for the requested page; instead it wi disp ay the page
automatica y.
Press button to move the Te etext screen forward one page
at a time.
Press button to move the Te etext screen backward one
page at a time.

ENGLISH - 16 -
For Fastext
The subject-heading for the information may have a particu-
ar co our.
Press an appropriate RED, GREEN, YELLOW or BLUE
button in order to reach the re evant page quick y.
To exit Teletext
Press
79
button. The screen wi switch to TV mode.
To Display the Time
Whi e watching a TV programme with Te etext transmission
press button. The current time information, captured
from Te etext wi be disp ayed at the upper midd e of the
screen for 5 seconds.
If the programme being watched does not have Te etext trans-
mission, no iformation wi be disp ayed.
Tips
Care of the Screen
C ean the screen with a s ight y damp, soft c oth. Do not use
abrasive so vents as they may damage the TV screen coating
ayer
Poor Picture
Have you se ected the correct TV system? Is your TV set or
house aeria ocated too c ose to the oudspeakers, non-earthed
audio equipment or neon ights, etc. ?
Mountains or high bui dings can cause doub e pictures or ghost
images. Sometimes you can improve the picture qua ity by
changing the direction of the aeria .
Is the picture or Te etext unrecognisab e? Check if you have
entered the correct frequency.
The picture qua ity may degrade when two periphera s are
connected to the TV at the same time. In such a case, discon-
nect one of the periphera s.
o Picture
Is the aeria connected proper y? Are the p ugs connected tight y
to the aeria socket? Is the aeria cab e damaged? Are suitab e
p ugs used to connect the aeria ? If you are in doubt, consu t
your dea er.
No Picture means that your TV is not receiving any transmis-
sion. Have you pressed the correct keys on the remote contro ?
Try once more.
Sound
You can not hear any sound. Did you perhaps interrupt the
sound, pressing key?
Sound is coming from on y one of the speakers. Is the ba ance
set to one direction extreme? See SOUND menu.
Remote Control
Your TV no onger responds to the remote contro . Press the
79
button on the remote contro once more. Perhaps the
batteries are exhausted. If so you can sti use the oca keys at
the front of your TV.
Have you se ected the wrong menu? Press
79
key to return
to TV mode or press to return to the previous menu.
o solution
Switch your TV set off and on. If this does not work, ca the
service personne ; never attempt to repair it yourse f.
Specifications
TV BROADCASTING
PAL SECAM B/G D/K L/L
RECEIVING CHANNELS
VHF (BAND I/III)
UHF (BAND U)
HYPERBAND
CABLE TV (S1-S20 / S21-S41)
NUMBER OF PRESET CHANNELS 100
CHANNEL INDICATOR
On Screen Disp ay
RF AERIAL INPUT
75 Ohm (unba anced)
OPERATING VOLTAGE
220-240V AC,50 Hz.
AUDIO OUTPUT
German + Nicam Stereo
AUDIO OUTPUT POWER (WRMS.) (%10 THD)
2 x 10
POWER CONSUMPTION (W) (max.)
135
PICTURE TUBE
32 16:9 (82 cm.)
DIMENSIONS (mm)
'/+
:(,*+7NJ

Hitachi, Ltd. Tokyo, Japan
International Sales Division
THE HITACHI ATAGO BUILDING,
No. 15 –12 Nishi Shinbashi, 2 –Chome,
Minato –Ku, Tokyo 105-8430, Japan.
Tel: 03 35022111
HITACHI EUROPE LTD,
Whitebrook Park
Lower Cookham Road
Maidenhead
Berkshire
SL6 8YA
UNITED KINGDOM
Tel: 01628 643000
Fax: 01628 643400
Email: consumer-service@hitachi-eu.com
HITACHI EUROPE S.A.
364 Kifissias Ave. & 1, Delfon Str.
152 33 Chalandri
Athens
GREECE
Tel: 1-6837200
Fax: 1-6835964
Email: service.hellas@hitachi-eu.com
HITACHI EUROPE GmbH
Munich Office
Dornacher Strasse 3
D-85622 Feldkirchen bei München
GERMANY
Tel: +49-89-991 80-0
Fax: +49-89-991 80-224
Hotline: +49-180-551 25 51 (12ct/min)
Email: HSE-DUS.service@hitachi-eu.com
HITACHI EUROPE S.A.
Gran Via Carlos III, 86, planta 5
Edificios Trade - Torre Este
08028 Barcelona
SPAIN
Tel: 93 409 2550
Fax: 93 491 3513
Email: atencion.cliente@hitachi-eu.com
HITACHI EUROPE srl
Via Tommaso Gulli N.39, 20147
Milano, Italia
ITALY
Tel: +39 02 487861
Tel: +39 02 38073415 Servizio Clienti
Fax: +39 02 48786381/2
Email: customerservice.italy@hitachi-eu.com
HITACHI Europe AB
Box 77 S-164 94 Kista
SWEDEN
Tel: +46 (0) 8 562 711 00
Fax: +46 (0) 8 562 711 13
Email: csgswe@hitachi-eu.com
HITACHI EUROPE S.A.S
Lyon Office
B.P. 45, 69671 BRON CEDEX
FRANCE
Tel: 04 72 14 29 70
Fax: 04 72 14 29 99
Email: france.consommateur@hitachi-eu.com
HITACHI EUROPE LTD (Norway) AB
STRANDVEIEN 18
1366 Lysaker
NORWAY
Tel: 67 5190 30
Fax: 67 5190 32
Email: csgnor@hitachi-eu.com
HITACH EUROPE AB
Egebækgård
Egebækvej 98
DK-2850 Nærum
DENMARK
Tel: +45 43 43 6050
Fax: +45 43 60 51
Email: csgnor@hitachi-eu.com
HITACHI EUROPE AB
Neopoli / Niemenkatu 73
FIN-15140 Lahti
FINLAND
Tel : +358 3 8858 271
Fax: +358 3 8858 272
Email: csgnor@hitachi-eu.com
Hitachi Europe Ltd
Bergensesteenweg 421
1600 Sint-Pieters-Leeuw
BELGIUM
Tel: +32 2 363 99 01
Fax: +32 2 363 99 00
Email: sofie.van.bom@hitachi-eu.com
HITACHI EUROPE LTD
Na Sychrove 975/8
101 27 Pr aha 10 –Bohdalec
CZECH REPUBLIC
Tel: +420 267 212 383
Fax: +420 267 212 385
Email: csgnor@hitachi-eu.com
www.hitachidigitalmedia.com
Other Hitachi CRT TV manuals

Hitachi
Hitachi 13GA1B User manual

Hitachi
Hitachi C32WF540N User manual

Hitachi
Hitachi CP2155TA User manual

Hitachi
Hitachi 20CX20B501 User manual

Hitachi
Hitachi C2566TN User manual

Hitachi
Hitachi 27GX01B User manual

Hitachi
Hitachi CG2026S User manual

Hitachi
Hitachi C36WF830N User manual

Hitachi
Hitachi 27CX01B User manual

Hitachi
Hitachi 36SDX88B User manual

Hitachi
Hitachi GX Series 32GX01B User manual

Hitachi
Hitachi C2874TN User manual

Hitachi
Hitachi 27CX29B User manual

Hitachi
Hitachi CL32W460AN User manual

Hitachi
Hitachi CL1426T User manual

Hitachi
Hitachi C32W35TN User manual

Hitachi
Hitachi CL28W460N User manual

Hitachi
Hitachi CL2554AN User manual

Hitachi
Hitachi 31DX22B User manual

Hitachi
Hitachi 27UX01B User manual