Hizero F801 User manual
Bring the
World into
Bionic
Cleaning Era
User Manual
4-in-1 Bionic Mop (F801)
F8P-USG03
4-in-1 Bionic Mop
www.hizero.com
2
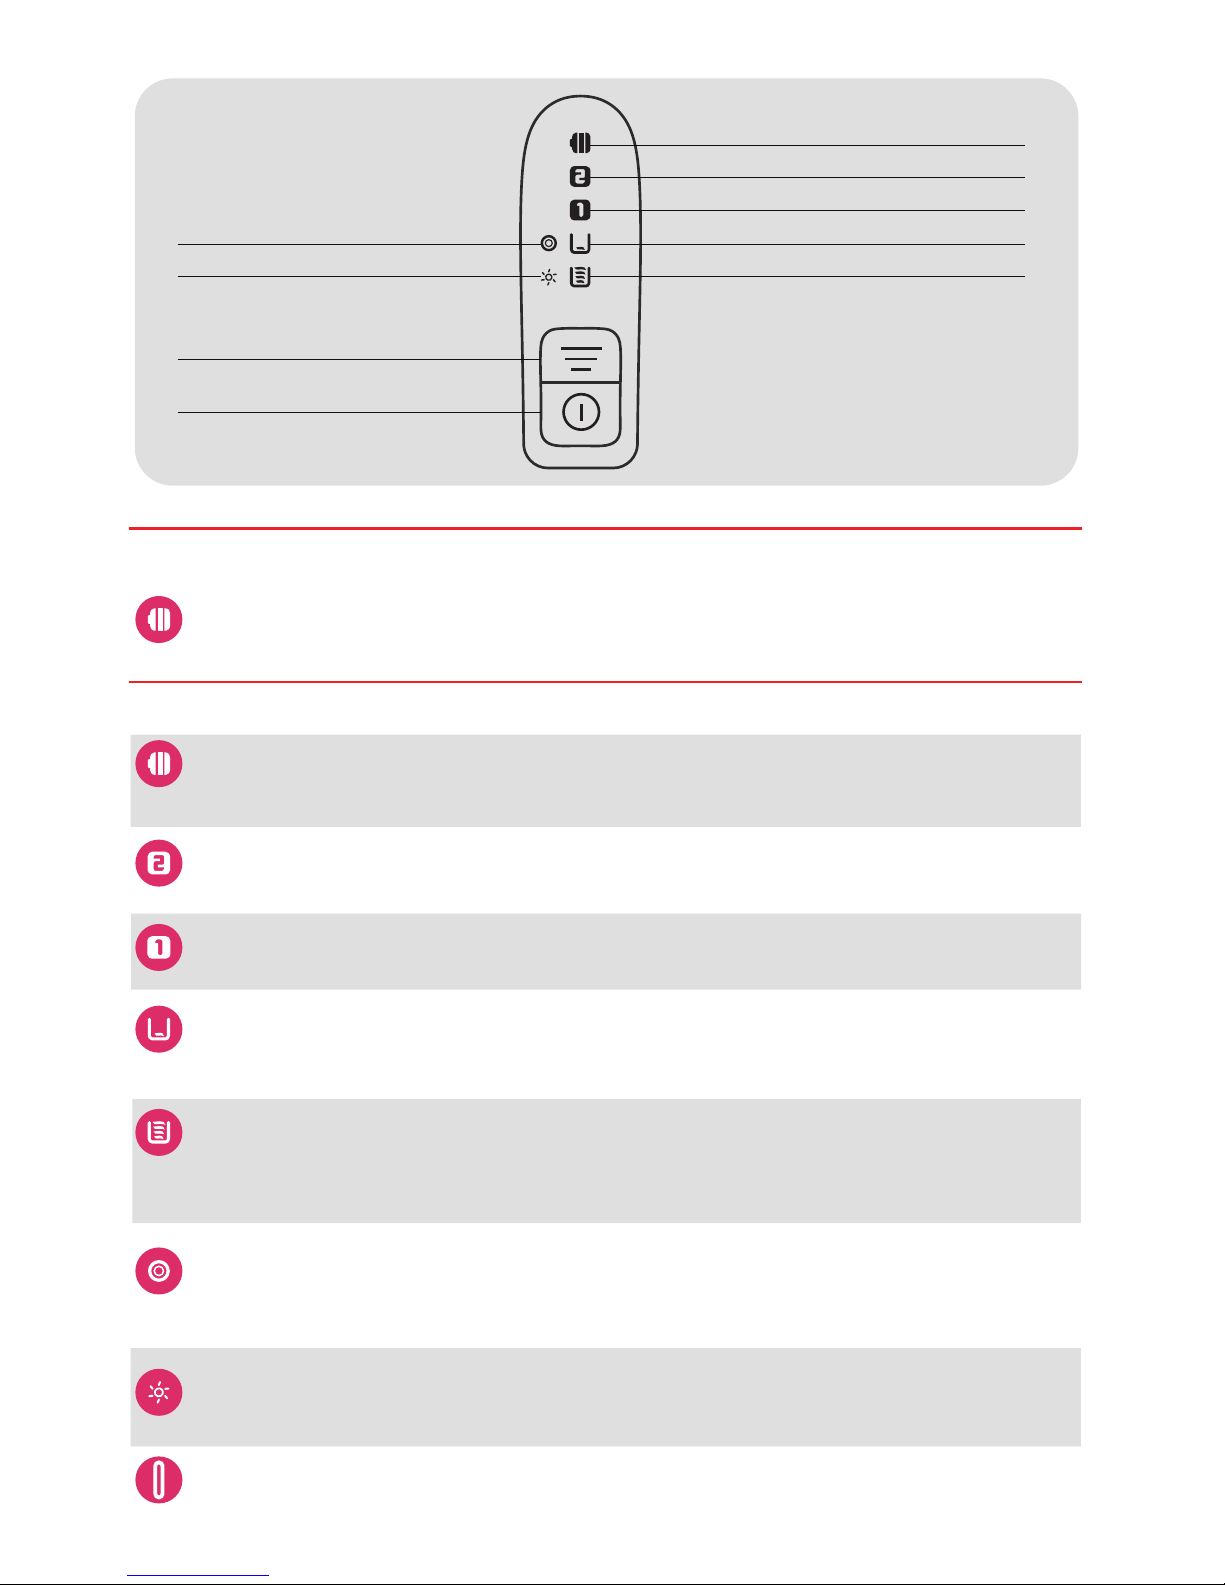
Flashing in red: Appliance is charging
Lighting up in red: Low battery. The appliance can only operate for 10-15 minutes and will
automatically switch-off once the battery runs out.
Lighting up in blue: Battery capacity is still good.
Mode 2: Strong mode, meaning more water consumption for self-cleaning. A full tank of clean water
can be used for approximately 5 minutes.
Mode 1: Normal mode, meaning less water consumption for self-cleaning. A full tank of clean
water can be used for approximately 10 minutes.
Flashing: Clean water tank is short of water. The appliance will stop working and automatically
switch-off after 30 seconds.
Lighting up continuously: The appliance is not functioning properly. Please contact after-sales
service.
Flashing: A. Dirty water tank may not be placed properly. B. Dirty water tank is full.
C. Dirty water sensor is covered by dirt.
The appliance will stop working and automatically switch-off after 10 seconds.
Lighting up continuously: The appliance is not functioning properly. Please contact after-sales
service.
Flashing: Cleaning roller is jammed by foreign objects. The appliance will stop working.
Lighting up continuously: The cleaning roller has reached the end of its useful life. Please
replace it with a new cleaning roller, then long press mode button until
the indicator goes out.
Atmosphere lamp shows in blue: The appliance is in normal operation.
Atmosphere lamp shows in red: The appliance is not functioning properly. Please check the display
panel for indication.
Flashing: A. Cleaning head cover is not well closed.
B. Brush roller is jammed by foreign objects, the appliance will stop working.
Lighting up continuously: The appliance is not functioning properly. Please contact after-sales
service.
Lighting up in blue: Appliance is fully charged
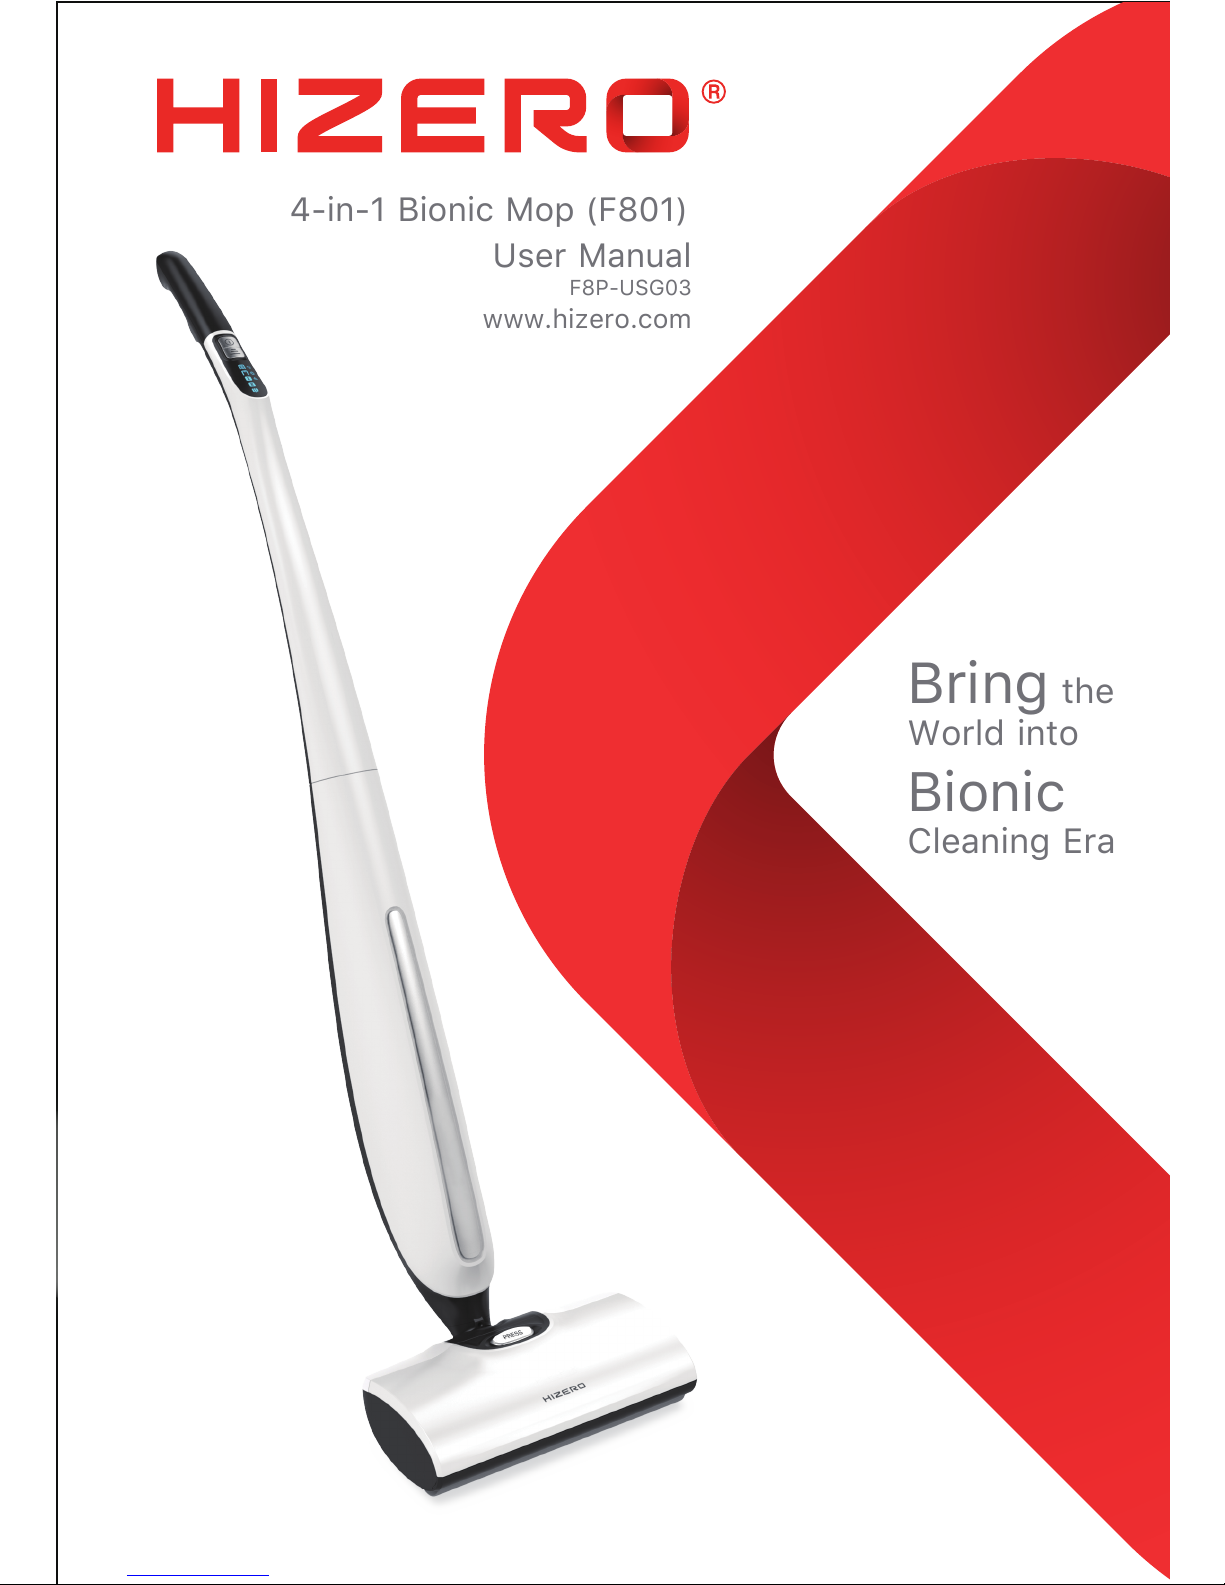
Battery Indicator
Mode 2 (Strong)
Mode 1 (Normal)
Tank Empty Indicator(clean water tank)
Tank Full Indicator(dirty water tank) Brush Roller Status Indicator
Cleaning Roller Status Indicator
Mode Button
Power Button
Charging
In Service
3
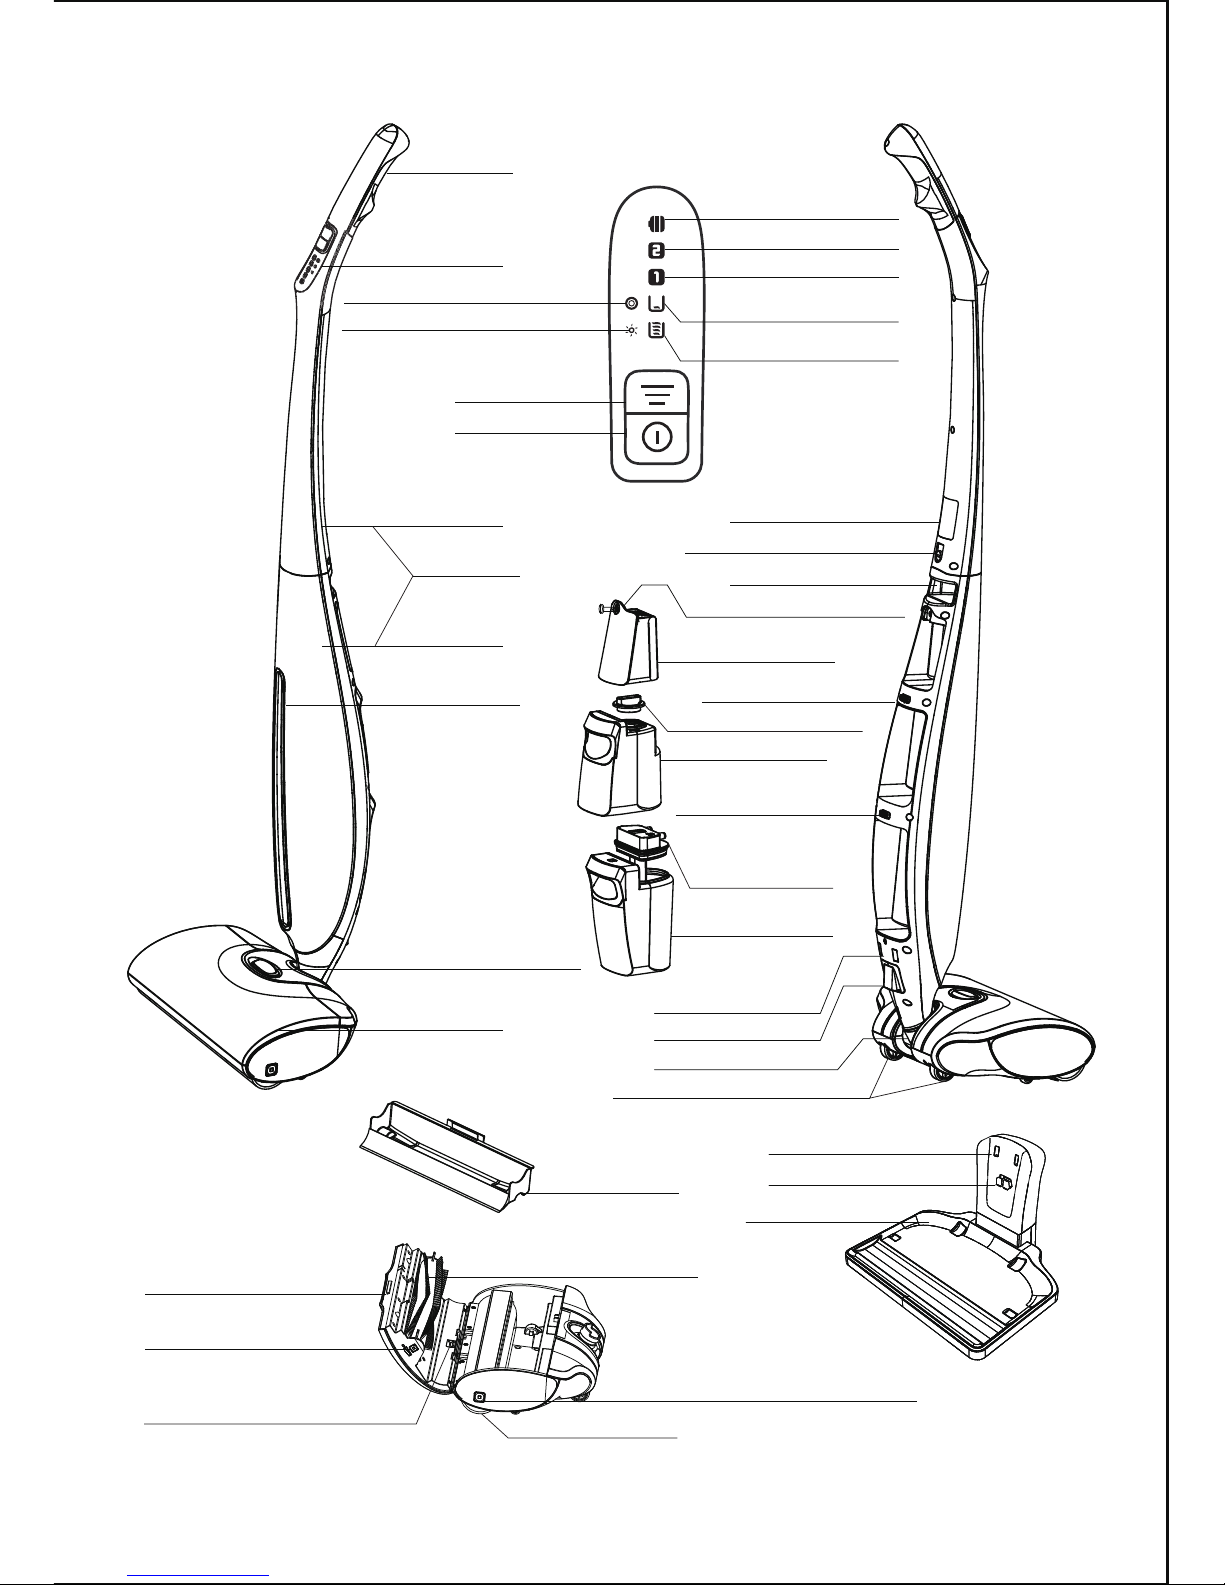
Appliance View
Handle
Display Panel
Battery Indicator
Mode 2 (Strong)
Mode 1 (Normal)
Tank Empty Indicator
(clean water tank)
Tank Full Indicator
(dirty water tank)
Cleaning Roller Status Indicator
Brush Roller Status Indicator
Mode Button
Power Button
Product Label
Body Quick-Mount Screw
Battery Quick-Mount Screw
Li-ion Battery
Release Button of Clean
Water Tank
Release Button of Dirty
Water Tank
Dirty Water Tank
Cap (With Sensor)
Dirty Water Tank
Charging Contactor
Latch Locator
Spindle
Auxiliary Wheel
Power Contactor
Disconnect Button of
Cleaning Head Cover
Locating Stud
Charging Base
Clean Water Tank Cap
Clean Water Tank
Hand Lifting Position
Upper Body
Lower Body
Atmosphere Lamp
Release Button of Cleaning
Head Cover
Cleaning Head
Trash Container
Lock of Cleaning Head Cover
Disconnect Button of
Brush Roller
Brush Roller
Cleaning Roller
Disconnect Button of Cleaning Roller
Body

Table of Contents
1 Introduction
1 Introduction
1.1 Safety Instructions
1.2 Technical and Security Specifications
1.3 Self-Protection System
1.4 Intended Use
1.5 Floor Maintenance
2 Assembling
3 Preparation
3.1 Charging
3.2 Removing Loose Objects
3.3 Filling the Clean Water Tank
3.4 Locking the Body
4 Operation
4.1 Releasing the Body
4.2 Start Cleaning
4.3 Tank Full/Tank Empty Indicator
4.4 Emptying the Dirty Water Tank
4.5 Emptying the Trash Container
4.6 Self-Protection System
5 Maintenance & Cleaning
5.1 Maintenance
5.2 Cleaning the Water Tanks
5.3 Cleaning the Brush Roller
5.4 Cleaning the Cleaning Roller
5.5 Cleaning the Trash Container
5.6 Cleaning the Cleaning Head Cover
6 Storing & Moving
6.1 Storing
6.2 Moving
7 Replacing
7.1 Replacing the Brush Roller
7.2 Replacing the Cleaning Roller
8 Ordering Accessories
9 Caring for the Environment
10 Warranty & Service
11 Troubleshooting
Thank you for choosing HIZERO 4-in-1
Bionic Mop!
HIZERO 4-in-1 Bionic Mop is an intelligent
floor cleaning machine based on innovative
bionic technology, which perfectly
integrates the functions of sweeping,
mopping, drying and self-cleaning. Its
advent is honored as “The Second Revolu-
tion in Floor Cleaning Field”. The appliance
equipped with built-in rechargeable battery,
is able to separate solid trash from dirty
water, and automatically self-clean during
operation. After use, all that needed is to
discard the disposable trash tray and
empty the dirty water tank. It is featured by
extremely high cleaning efficiency, simple
operation and easy maintenance.
In this user manual, we will give you some
tips to make the cleaning job as easy and
efficient as possible. We hope that you
enjoy using this appliance as much as we
enjoyed creating it.
Please read this user manual carefully
before you use the appliance and save it
for further reference.
To prevent electric shock, nerver move the
appliance over any kind of power socket.
To prevent electric shocks, never move
the appliance over floor or wall sockets,
when it is in charging.
Keep clothing, hair, fingers, and all parts
of human body; pet and other obstacle
away from the cleaning roller and
openings in front of cleaning head.
The appliance must be removed from the
charging base before cleaning or
maintenance.
4
1.1 Safety Instructions
1.1.1 Danger
1.1.2 Caution
4
4
5
5
7
7
7
7
6
5
5
13
14
14
14
15
13
12
12
13
12
12
11
8
8
8
9
9
9
10
10
11
11
11
11
12

Note: Do not use this appliance for carpet.
Always switch off the appliance before you
remove water tanks or open the cleaning
head cover. The cleaning roller, brush roll and water
tanks are not dishwasher-proof or
washing machine-proof.
Clean the dirty water tank after every use
to prevent the bacteria breeding or odour.
This appliance is intended for indoor
household use only.
This appliance complies with the current
recognized electrical product technical
specifications and safety regulations. If
handled properly according to the instruc-
tions in this user manual, the appliance is
safe to use.
To avoid a hazard, do not let the appliance
pick up sharp objects.
To avoid any damage, never immerse the
body of the appliance in water or any other
liquid, nor rinse it under the tap.
Never use this appliance to pick up flamma-
ble or combustible liquids and do not put
flammable or combustible liquids in the
clean water tank.
Regularly check the appliance and involved
parts, do not use them if the appliance or
the charging base is damaged. You must
have it maintained or replaced by an
authorized service center.
This appliance is not intended for use by
persons (including children) with reduced
physical, sensory or mental capabilities, or
lack of experience and knowledge, unless
they have been given supervision or
instruction concerning use of the appliance
by a person responsible for their safety.
Children should be supervised to ensure
that they do not play with the appliance.
Never store the appliance at a temperature
lower than 0°C/32°F.
Never put acetic acid (vinegar) or a descaler
in the clean water tank or use the appliance
to pick them up.
Never put wax, oil or floor maintenance
products that cannot be diluted in the clean
water tank, nor use the appliance to pick
them up.
Never use the battery for other purposes
other than this appliance, and never expose
it to heat (50°C/122°F), outdoor or wet
conditions.
When removing the battery, keep the
terminals away from other metal objects like
paper clips, keys, bails, screws etc., to avoid
any thermal effect, smoke, burn or even
explosion.
Use only HIZERO cleaning authorized solution
intended for use with this appliance to
prevent internal component damage.
Never clean the cleaning roller with a sharp
object, as this may damage the roller and
reduce the cleaning performance.
To prevent leakage, never put the appliance
on its side or upside down when the water
tank contains water .
5
1.2 Technical and Security
Specifications
This appliance is equipped with active
protection system. If large object, like towel
or curtain is adsorbed, the appliance will
stop working and show an indication to
prevent damage.
1.3 Self-Protection System
This appliance is used exclusively for cleaning
hard floors only (e.g. tile/marble/wooden floor
and all water-resistant floors). Do not use this
appliance to clean carpet or other floor that is
water-sensitive.
1.4 Intended Use
2 Assembling
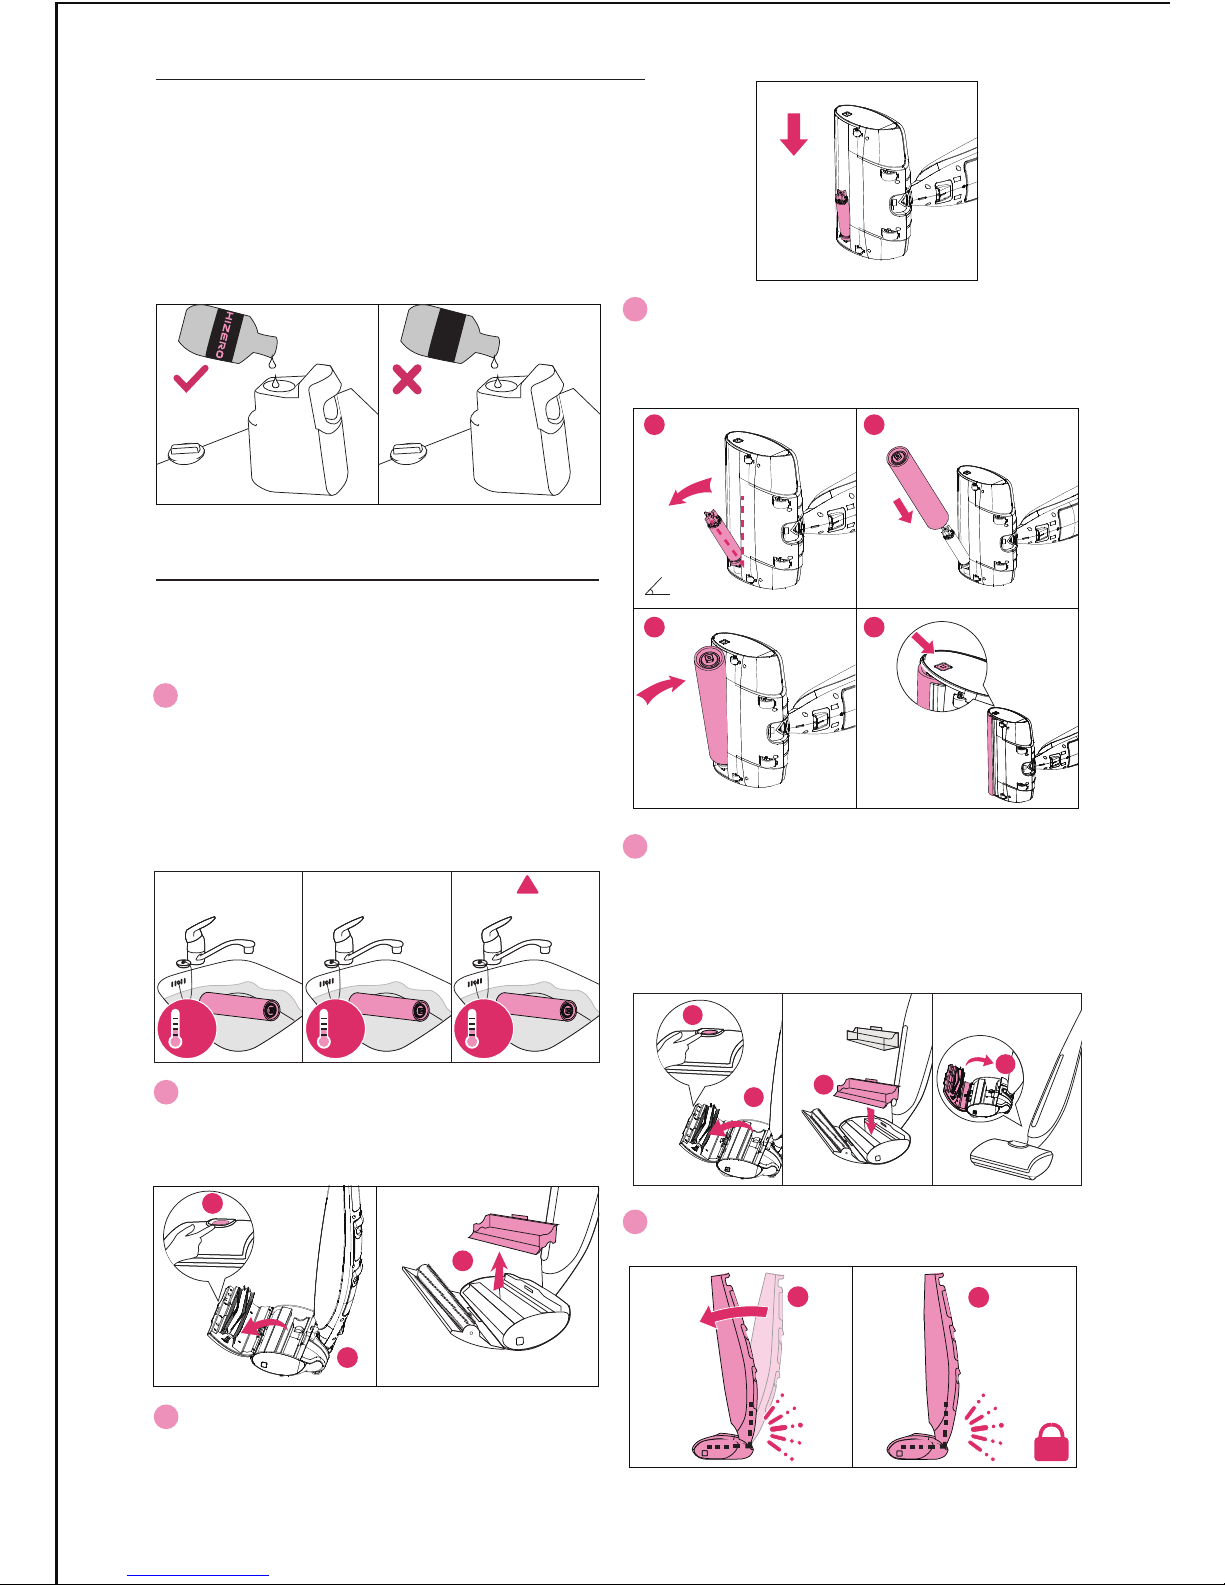
1 Open the packing box and take out the
cleaning roller. Please immerse it in 40
℃/104℉ warm water for two minutes to
make it soft before first use (the water
temperature should not be higher than 50
℃/122℉; if in cold water, please immerse it
for above ten minutes).
4 Insert the cleaning roller onto the motor
(note: the maximum open angle of the drive
motor is 45°), push and fix it into the
cleaning head till the lateral button in place.
5 Place the lower body in upright position,
open the cleaning head cover, insert the
trash container and press it into place, then
place a disposable trash tray. Close the
cover until you hear a click, the cover is
locked.
6 Push the lower body forward lightly until
you hear a click to lock it in parking position.
2 Take out the lower body of the appliance,
press the release button of the cleaning
head cover to open the cover, then take out
the trash container.
3 Close the cleaning head cover, put the
body on its side on flat ground to upturn
the disconnect button of the cleaning roller.
Always follow the maintenance instructions
of your hard floor when you use this
appliance.
HIZERO cleaning solution can be used to
strengthen cleaning effects. Do not add any
unauthorized floor-care product into the
water tank.
6
1.5 Floor Maintenance
!
?
12
Lock
10min 2min
0-20℃40℃MAX
50℃
1
2
3
12
3 4
45º
1
23
4

3 Preparation
1 Make sure the charging base and
power adapter are well connected, plug the
appliance into a properly grounded outlet.
Note: For your safety, please keep the
charging base in a dry place and do not
touch the charge port.
Note: Please flip to the other side of
cable and try to connect again if the
snap joint doesnʼt fit.
2 Place the appliance on the charging base
and clasp the latch locator onto the locating
stud. The charging indicator will flash in red
to indicate the appliance is charging.
3 Before first use, please charge the
appliance. When the battery runs out, it
requires approximately 4 hours charging to
regain full battery capacity.
Before you clean your floor, clear the floor
of loose objects such as toys, power cords
and shoes.
7 Take out the upper body of the appliance
and remove the body quick-mount screw
first. Connect the flat cables in upper and
lower bodies.
8 Insert and tighten the quick-mount screw
with a coin or screwdriver to make the upper
and lower body fit together exactly.
9 Insert the battery into battery
compartment on the lower body and tighten
the screw
10 Assemble the charging base, insert the
foot pads into the hole on the bottom of the
charging base. Connect the power adapter,
the excess power line can be stored in the
cable slot.
7
3.1 Charging
3.2 Removing Loose Objects
Fill the clean water tank before every
use. Under Mode 1, a full tank of clean
water can be used for about 10 minutes
(normally enough to clean a surface area
of about 50m /450sqf).
3.3 Filling the Clean Water Tank
12
12
34
12
1
3 4
2
2
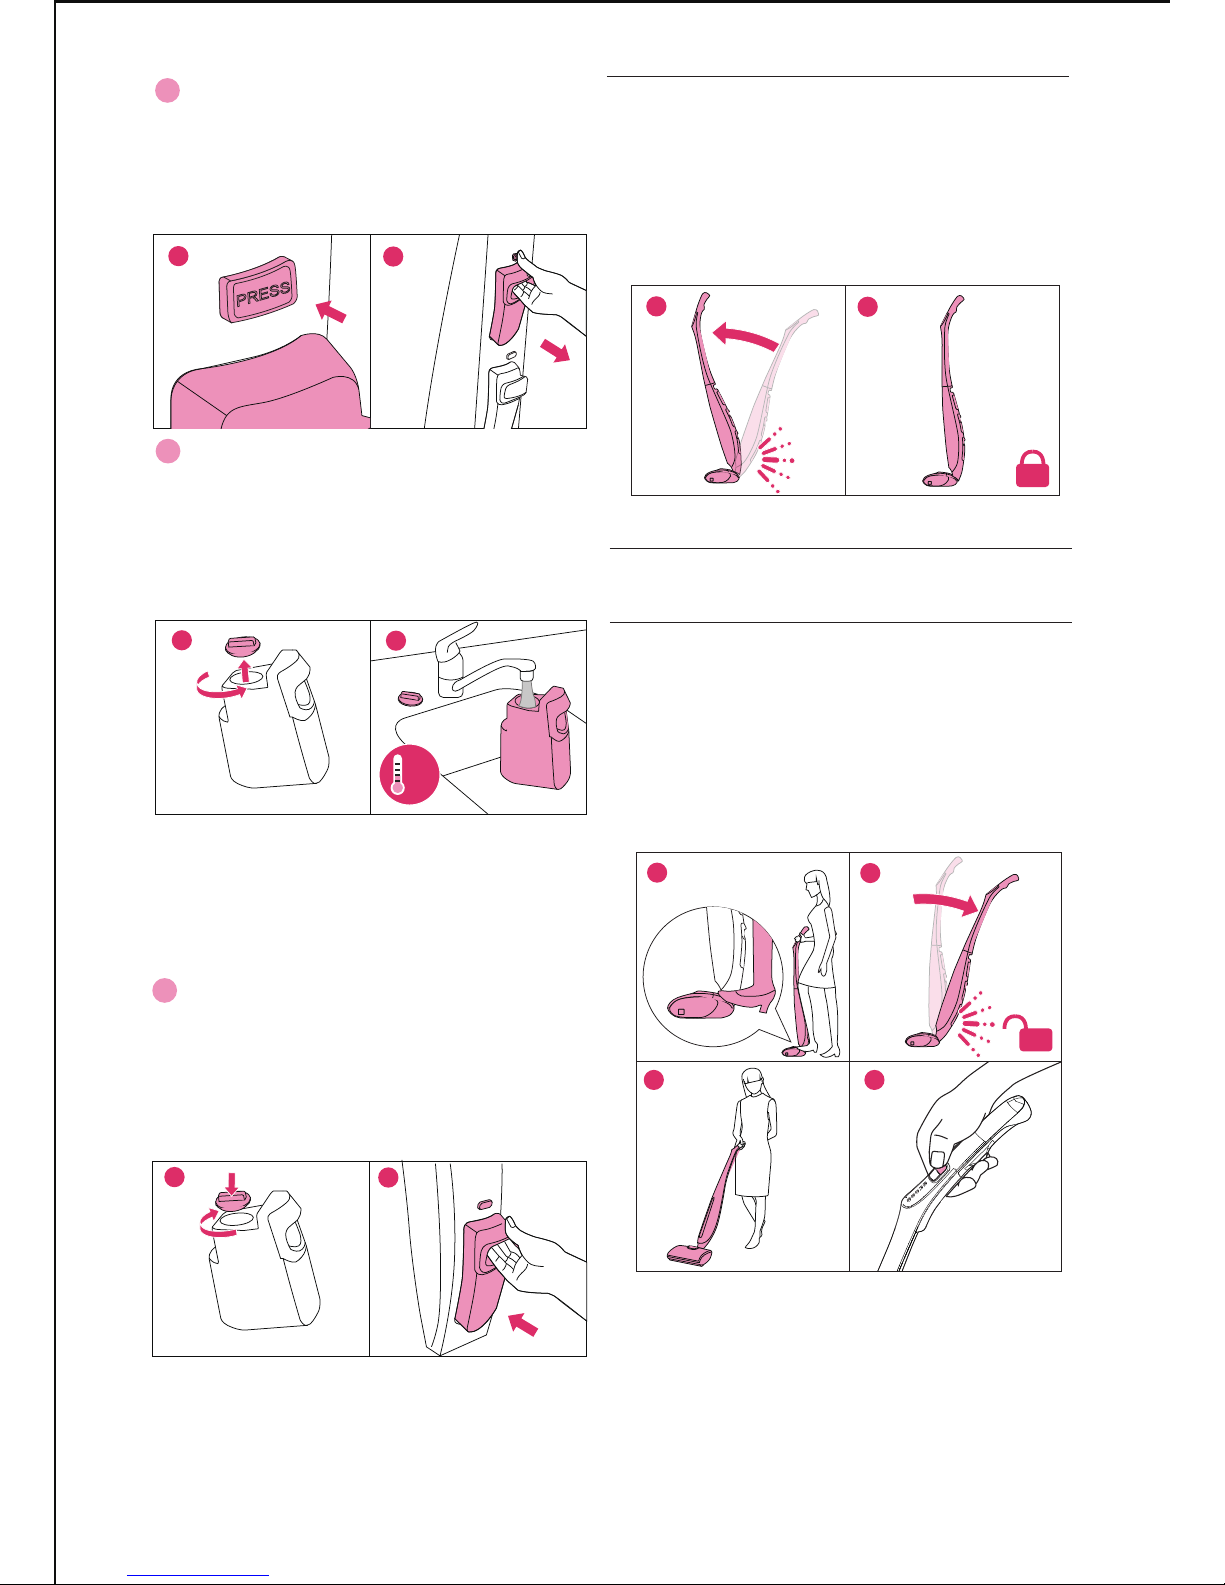
1 Press the release button while
pulling the clean water tank to take it
out. To prevent the appliance from
toppling over, hold it upright with one
hand and take out the clean water tank
with your other hand.
2 Turn the cap anticlockwise and
remove it from the clean water tank. Fill
the clean water tank with cold or warm
water(should not be higher than
40℃/104℉). If needed, appropriate
detergent may be added (please refer to
1.5 Floor Maintenance).
3 Put back and turn the cap clockwise to
fix it. Insert the clean water tank back into
the appliance completely until you hear a
click, the tank is locked into place. To
prevent the appliance from toppling over,
hold it upright with one hand and place
the clean water tank with your other hand.
Note: If detergent is needed, only environ-
mental friendly detergent authorized by
HIZERO is allowed. First add the quantity
of detergent indicated on the bottle
packing and then fill the clean water tank
with water.
Note: During locking and releasing the body,
a “clicking” sound is normal.
Note: To avoid the water tank from creeping
down during cleaning, please make sure it is
well placed and locked.
4 Operation
4.1 Releasing the Body
Lift up the appliance from the charging base,
hold the handle and fix the cleaning head
with your foot, pull back the body until you
hear a clicking sound, then the body is
released. Press the power button to start the
appliance.
Hold the handle of the appliance, push it
forward lightly until you hear a clicking sound,
then the appliance is locked in parking
position.Don't push it any further, or it will
cause the machine to be damaged.
3.4 Locking the Body
8
12
12
3 4
Lock
Unlock
12
MAX
40℃
12
12
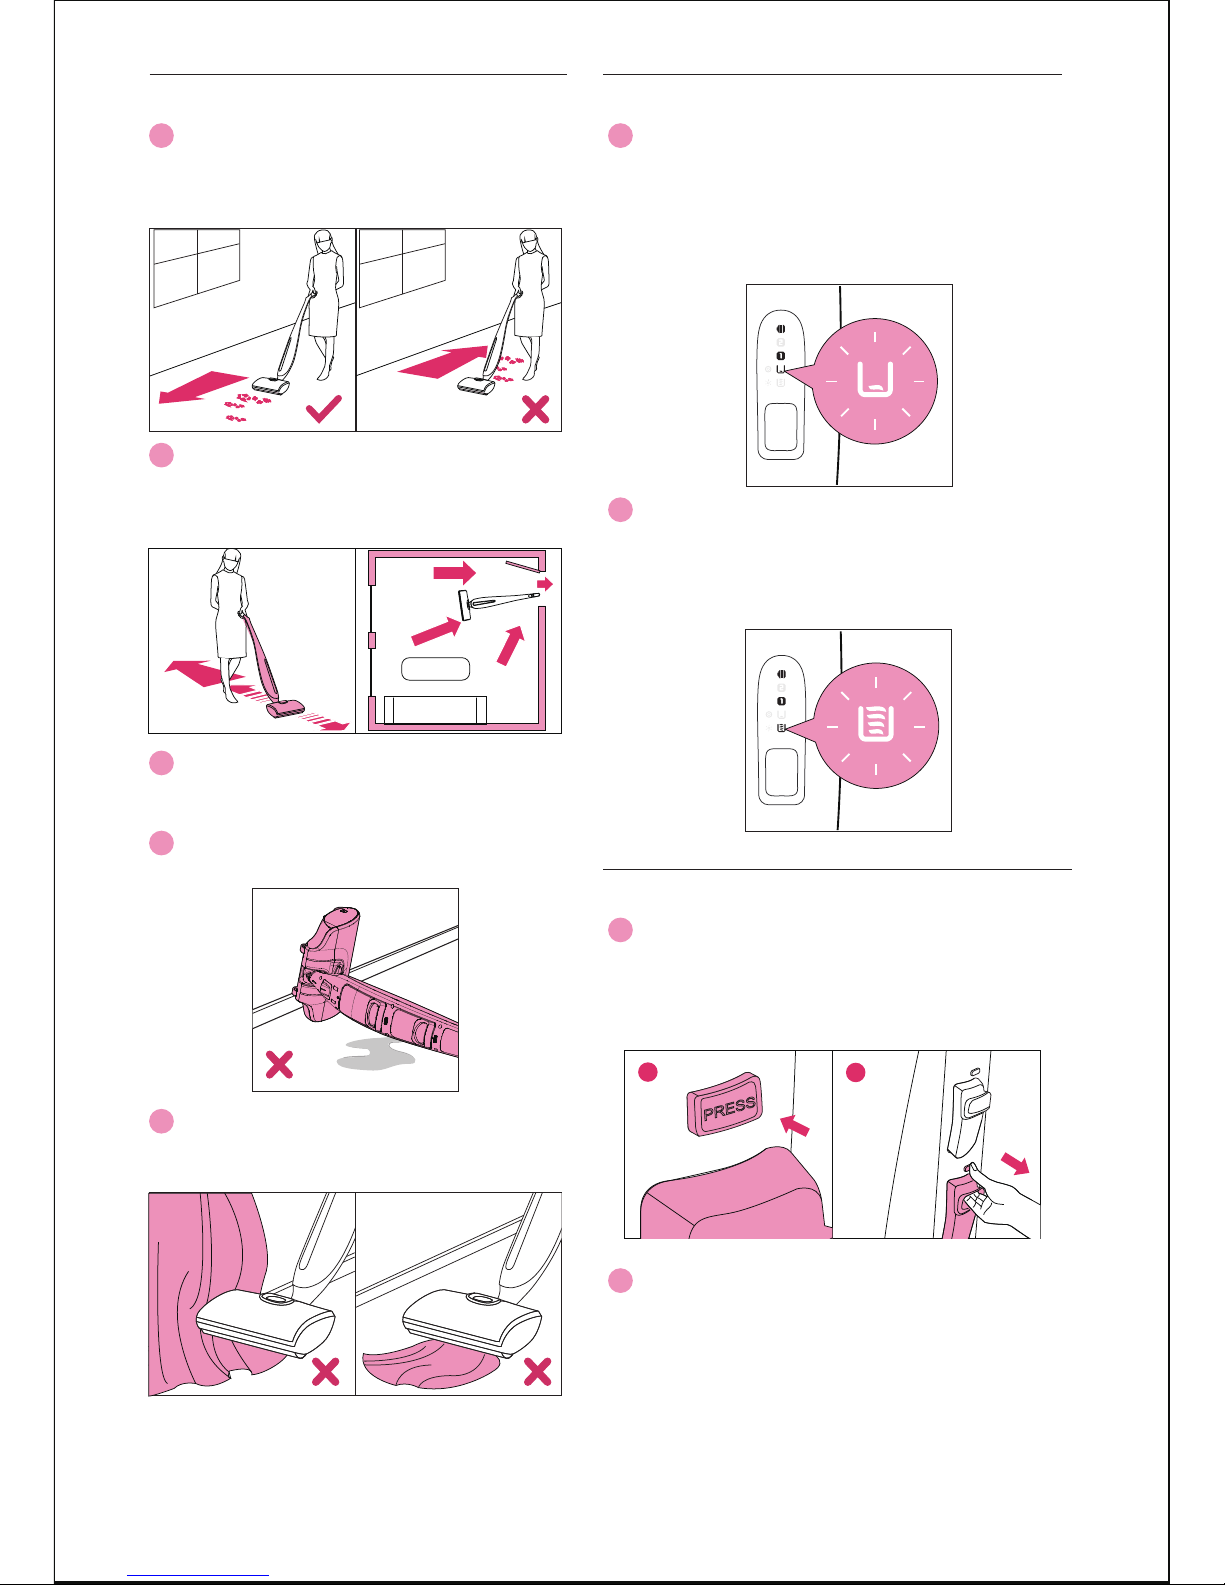
1 Make sure the cleaning head can
move forward to adsorb trash. If trash
is behind the cleaning head, it may not
be cleared up.
2 Work backwards and in the direction
of a door to avoid walking on the
mopped floor. The path as shown on the
following figures is recommended.
3 To remove stains, move the
appliance back and forth repeatedly.
4 Please do not make the machine fall
to the ground.
5 If there is object adsorbed, please
press the power button to switch off
the appliance.
4.2 Start Cleaning
1 The tank empty indicator starts flashing
when the clean water tank is empty. Please
switch off the appliance and fill the clean
water tank (please refer to 3.3 Filling the
Clean Water Tank). Then re-start the
appliance.
2 The tank full indicator starts flashing and
the appliance stops operating when the
dirty water tank is full. Empty the dirty
water tank (please refer to 4.4 Emptying the
Dirty Water Tank) and re-start the
4.3 Tank Full/Tank Empty Indicator
1 Press the release button of dirty water
tank to take it out. To prevent the appliance
from toppling over, hold it upright with one
hand and take out the dirty water tank with
your other hand.
2 Remove the cap of dirty water tank, pour
the dirty water out, and be careful of water
overflow and spilling.
4.4 Emptying the Dirty Water Tank
9
12

Note: To avoid the water tank from
creeping down during cleaning, please
make sure it is well placed and locked.
To avoid any bad connection, please
make sure to wipe dry the metal sensor
plate.
3 Rinse the empty dirty water tank and its
cap under the tap, wipe dry the metal
sensor plate. Then place the tank back
into the appliance until you hear a click.
To prevent the appliance from toppling
over, hold it upright with one hand and
place the dirty water tank with your other
hand.
1 Open the cleaning head cover, take out
the disposable trash tray, throw it away
into
2 If a disposable trash tray was not used,
please take out the trash container, and
use the cleaning brush to sweep the trash
into a dustbin.
1 Open the cleaning head cover and remove
the jammed object.
2 If the jammed object is not easy to find,
please disassemble the brush roller to
have a better look.
3 After clearing obstruction, reinstall the
brush roller and re-start the appliance.
To disassemble and assemble the brush
roller, please refer to 7.1 Replacing the
Brush Roller.
1 Open the cleaning head cover, take out the
trash container and remove the jammed
object.
2 If the jammed object is not easy to find,
please disassemble the cleaning roller to
have a better look.
3 After clearing obstruction, reinstall the
cleaning roller and re-start the appliance.
To disassemble and assemble the cleaning
roller, please refer to 7.2 Replacing the
Cleaning Roller.
4.5 Emptying the Trash Container
The self-protection system has been
designed to recognize abnormal conditions.
When the system is activated, the appliance
will stop operating immediately to prevent
damage to the object and appliance.
To continue cleaning, follow the instructions
below!
4.6.1 Brush Roller Self Protection
Brush roller indicator starts blinking when
brush roller doesnʼt work properly.
4.6.2 Cleaning Roller Self Protection
Cleaning roller indicator starts blinking
when cleaning roller doesnʼt work properly.
4.6 Self-Protection System
10
12
a disposable trash tray is used a disposable trash tray is not used

5 Maintenance & Cleaning
Note: The appliance must be
removed from the charging base
and switched off before cleaning
or maintaining.
Note: Make sure the appliance won’ t topple
over when hanged above the floor.
Note: Clean the dirty water tank after
every use to prevent the growth of
!
1 Regularly clean the outer body of the
appliance with a soft damp cloth. Do not
use scouring pad or an abrasive cleaning
agent to clean the outer body, as this
may cause scratches on the surface.
2 To avoid any damage, never immerse
the body in water or any other liquid, nor
rinse it under the tap.
3 Regularly check the cleaning roller
and brush roller.
4 Regularly check the power adapter to
ensure the power cable is intact and safe
to use.
5.1 Maintenance
We strongly advise you to empty the
tanks before storing the appliance.
To disassemble and assemble the clean
water tank, please refer to 3.3 Filling the
Clean Water Tank . The removed clean
water tank and cap can be rinsed under
the tap. To disassemble and assemble
the dirty water tank, please refer to 4.4
Emptying the Dirty Water Tank. The
removed dirty water tank and cap can be
rinsed under the tap.
5.2 Cleaning the Water Tanks
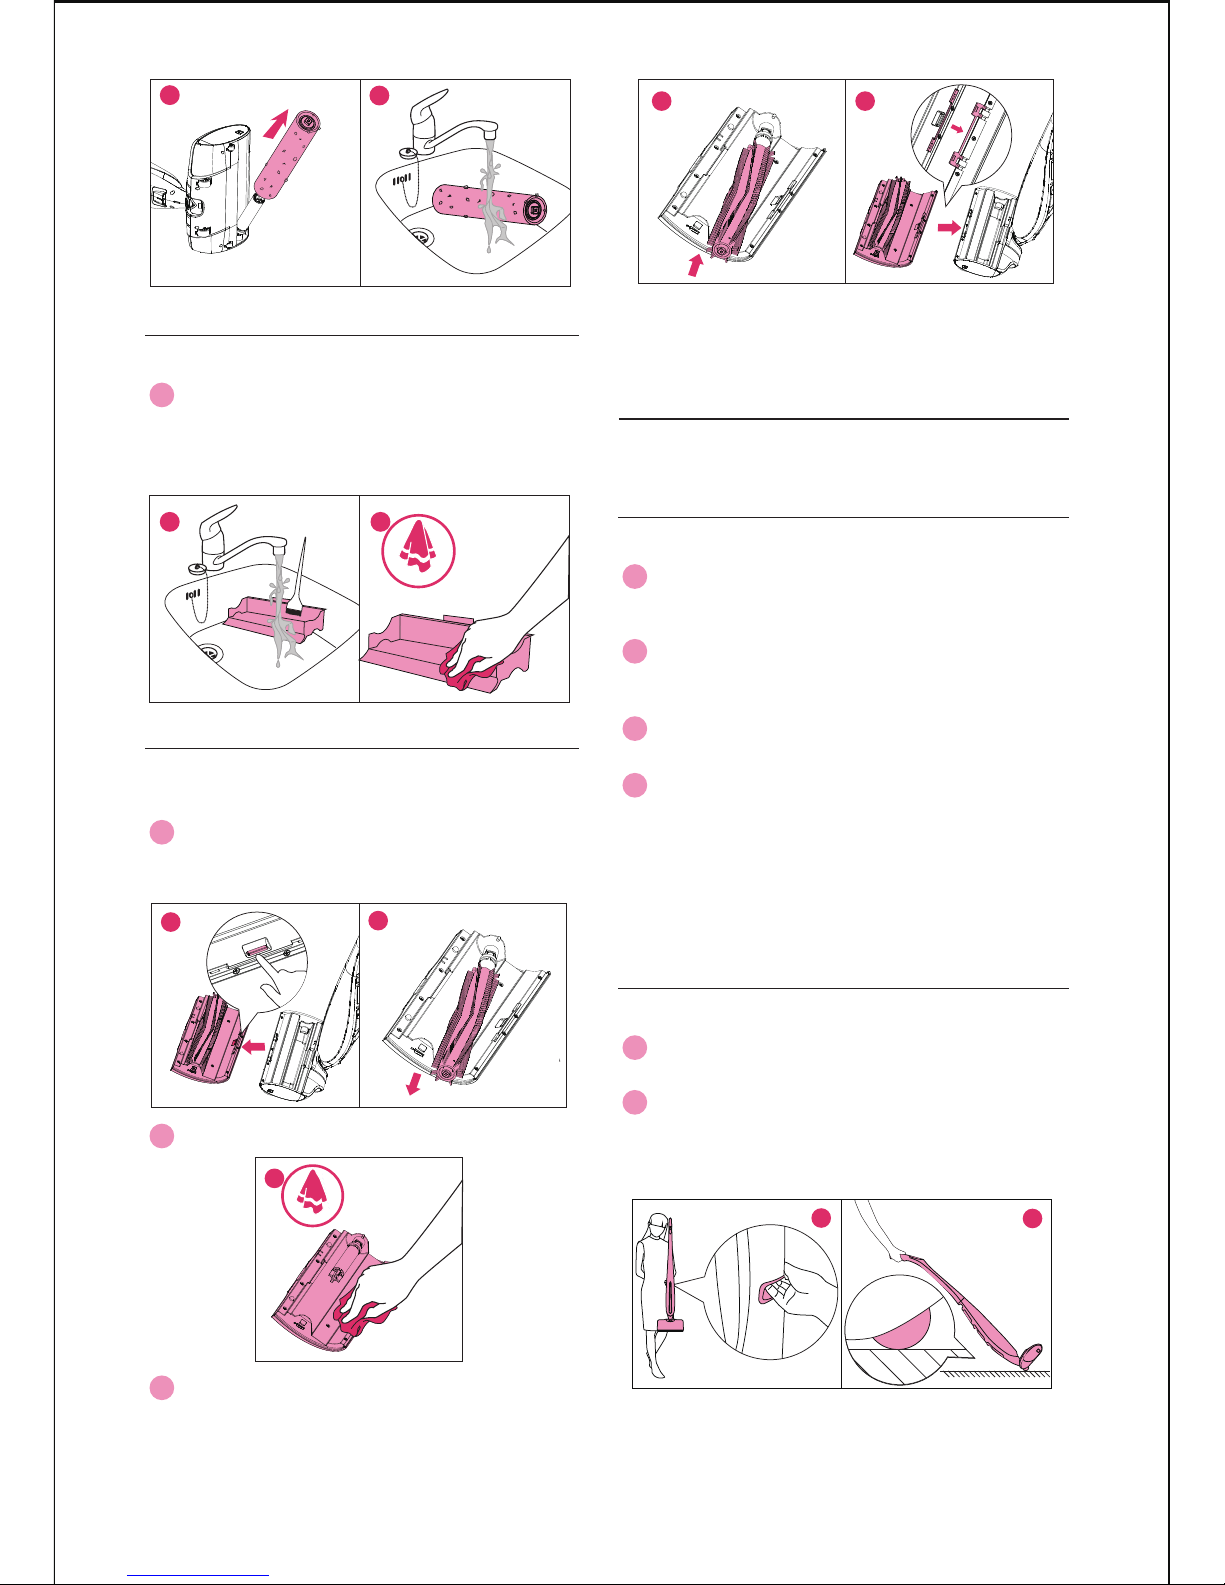
1 To disassemble and assemble the brush
roll, please refer to 7.1 Replacing the Brush
Roller.
2 Cut off hair and other entanglement on
the brush roller and then remove them.
3 Clean the brush roller with cleaning
solution. Let the brush roller dry before
reassembling.
5.3 Cleaning the Brush Roller
1 Before cleaning, fill up the clean water
tank, add HIZERO cleaning solution if
needed, and empty the dirty water tank.
Method 1
Method 2
2 Make sure the body of the appliance
and cleaning head are locked. Start the
appliance and switch to Mode 2.
3 As per the following figures, hang the
cleaning roller above the floor, make the
appliance continuously operate in Mode 2
until clean water runs out.
4 Steps 1 to 3 could be repeated for two
to three times to achieve better cleaning
effects.
5.4 Cleaning the Cleaning Roller
11
1 Refer to 7.2 Replacing the Cleaning Roller
to dismantle the cleaning roller for cleaning.
Note: empty the dirty water tank before
aforementioned steps.
12
Note: If there is sand or sharp object on
the floor, do not operate the appliance to
avoid any possible scratch.
Note: Do not store the appliance directly on
wooden floor without charging base for a
long time to avoid any possible damage of
your floor.
6 Storing & Moving
1 Take out the trash container, then
empty and wash it under the tap. The
cleaning brush can be used to sweep off
the trash. Let it dry before reassembling.
5.5 Cleaning the Trash Container
1 Before storage, switch off the appliance,
lock the body and place it onto the
charging base.
2 Please clean the inside of the cleaning
head before storing to avoid bacteria
breeding.
3 Before storage, please make sure the
water tanks are empty.
4 If the appliance will be out of service
for above one week, please unplug the
power cord, remove the cleaning roller and
store it after drying.
6.1 Storing
1 Make sure the appliance is switched off
and locked in upright position.
2 You can move and uplift the appliance
by the hand lifting position at the
appliance’ s back; or lean it backward, the
auxiliary wheels will help for easy moving.
6.2 Moving
1 Open the cleaning head cover, press
the release button to take it out, then
remove the brush roller.
2 Clean the cover with a soft damp cloth.
3 Reinstall the brush roll into the cover,
then fix the cover back to the cleaning
head.
5.Cleaning the Cleaning Head
Cover
12
1 2
125 6
4
12
2
1
Note: The replaced brush roller and the
cleaning roller are plastic waste. Please
properly dispose and recycle them accord-
ing to local environmental protection
regulation.
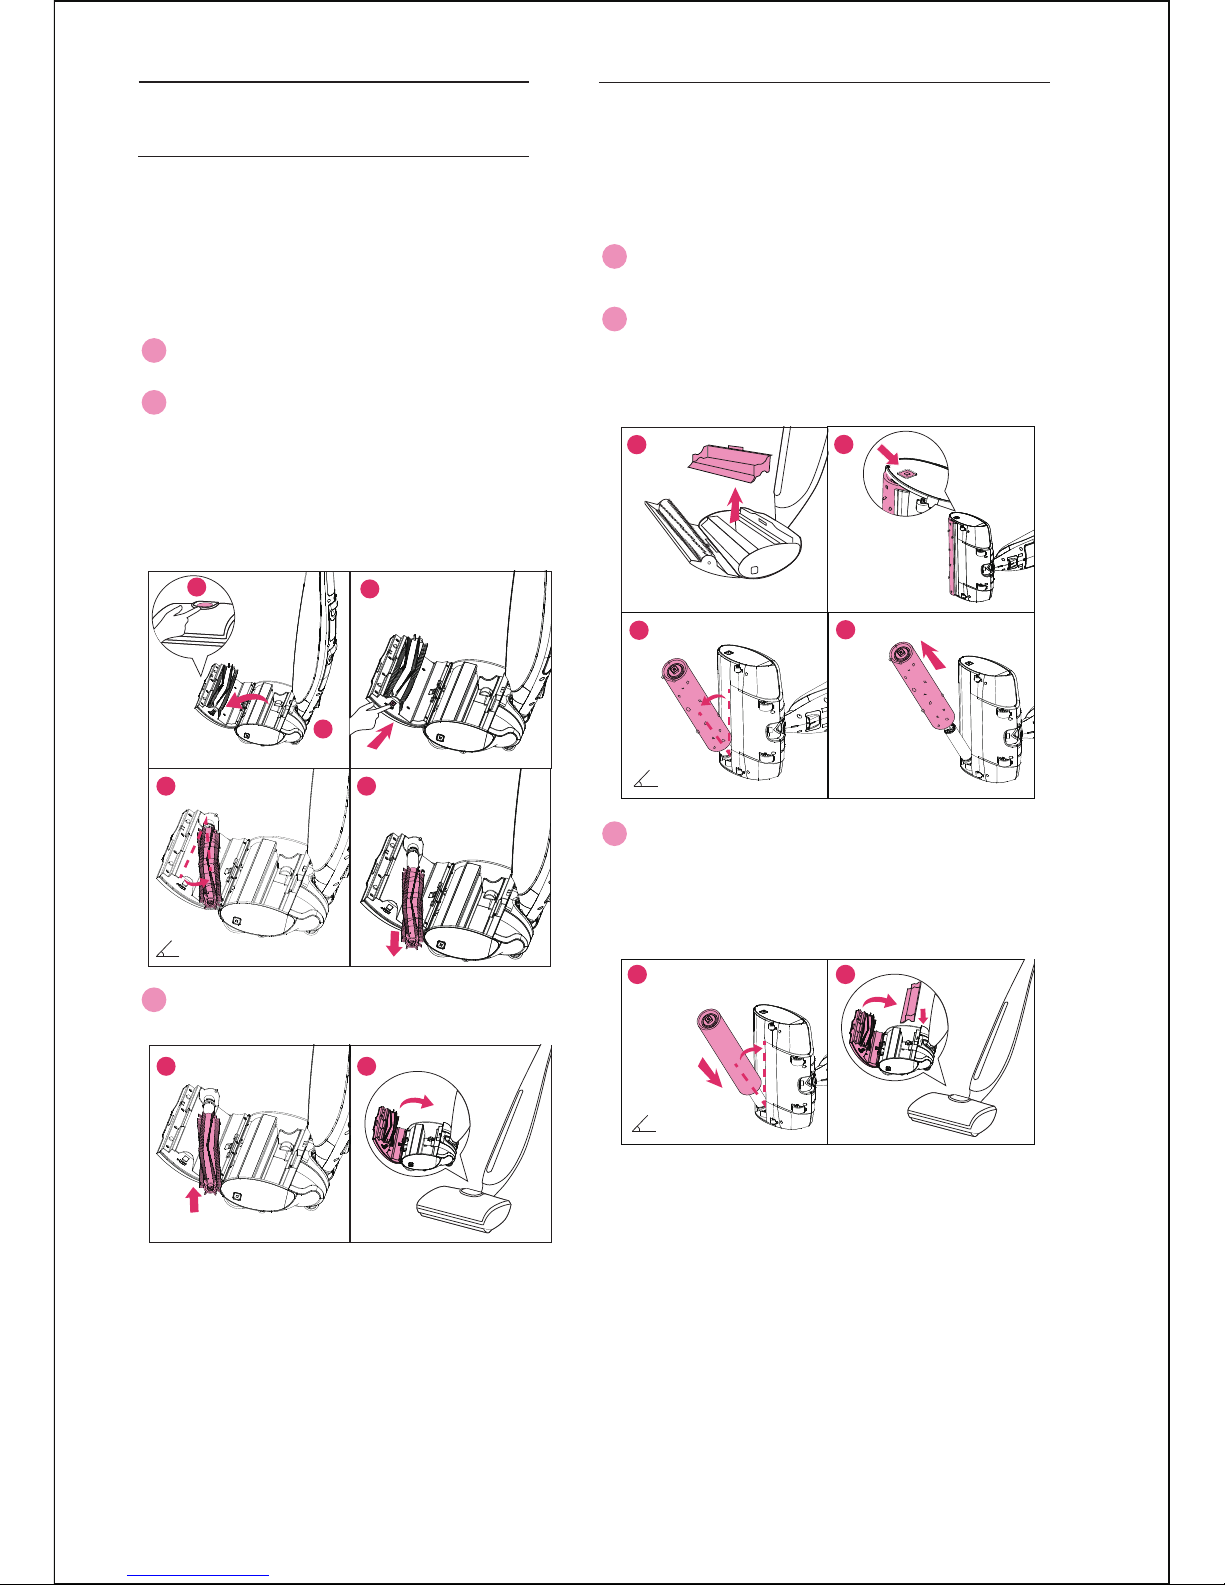
The maximum open angle of the drive
motor is 45°, please operate carefully.
Note: The maximum open angle of the
drive motor is 30°. Please operate it
carefully.
7 Replacing
If you want to continue to benefit
from the best cleaning results, make
sure you always use original HIZERO
brush roller, and we recommend you
to replace it every six months.
1 Switch off the appliance, lock it in
upright position.
2 Open the cleaning head cover,
press the square buckle at the lateral
side to take out the brush roller
(Maximum open angle of the drive
motor is 30°. Please use appropriate
strength and method to avoid any
damage).
3 Insert a new brush roller, close the
cover after it is well assembled.
7.1 Replacing the Brush Roller
If you want to continue to benefit from the
best cleaning results, make sure you always
use original IZERO cleaning roller, and
replace it every four months.
1 Take out the trash container, Switch off the
appliance, empty or remove the water tanks.
2 Put the body on its side on flat ground to
upturn the disconnect button of the cleaning
roller. Press the lateral disconnect button of
the cleaning roller and take it out.
3 Insert a new cleaning roller onto the
motor, push and fix it into the cleaning
head till the lateral button in place.
To insert a new cleaning roller, please refer
to 2 Assembling.
7.2 Replacing the Cleaning Roller
13
1
2
3
2
34
1
6 7
30º
45º
4 5
5 6
45º
A
B
C
D
8 Ordering Accessories
To purchase accessories for this appliance,
please visit our website:www.hizero.com, or
contact HIZERO Consumer Care Centre in your
country.
9 Caring for the Environment
Do not throw away the appliance with the
normal household waste at the end of its life,
but hand it in at an official collection point for
recycling. By doing this, you help to preserve
the environment.
10 Warranty & Service
If you need service or if you have any
question, please visit our website: www.hize-
ro.com or contact HIZERO Consumer Care
Centre in your country.
Your 4-in-1 Bionic Mop has been designed and
developed with the greatest possible care. In
the unfortunate case that the appliance needs
repair, the Consumer Care Centre in your
country will help you by arranging any
necessary repairs in the shortest possible time
and with maximum convenience.
HIZERO is not liable for all damages
caused by improper use or disassembly
by customer themselves.
14
!

11 Troubleshooting
This chapter summarizes the most common problems you could encounter with the
appliance. If you are unable to solve the problem with the information below, please contact
the Consumer Care Centre in your country or visit our FAQ page on www.hizero.com.
15
Problem
Tank empty indicator
lights up continuously.
Tank full indicator lights
up continuously.
Appliance may
malfunction.
Appliance may
malfunction.
Please contact Consumer Care Centre.
There is a gap between
upper and lower body.
The connection
cable is stuck.
Disassemble the upper and lower body,
put the connection cable into the line
slot. Insert and tighten the quick-mount
screw to ensure the upper and lower body
fit together exactly.
The appliance leaves
water on the floor.
The cleaning roller
may be broken.
Please check if the cleaning roller is
deformation or damaged, if yes, please
replace it with a new cleaning roller.
The appliance fail to
boot.
A.The battery runs out. Charge the appliance and restart it.
B.The connection
cable has not be
assembled properly.
C.The battery has not
be well inserted.
Reassemble the cable.
Reinsert the battery.
Please contact Consumer Care Centre.
The wheels cannot move
or move with big noise
The trash cannot be
cleared up when
cleaning.
The tank full indicator
doesnʼt show any
indication when the
dirty water tank if full.
Cleaning roller status
indicator lights up
continuously.
The cleaning roller has
reached its useful life.
Please replace it with a new cleaning roller,
then long press mode button until the
indicator goes out
If a new cleaning roller is not available
temporarily, please directly long press
mode button until the indicator goes out.
The dirty water sensor
may be broken.
Please contact Consumer Care Centre.
Possible cause Solution
A. The weels get
jammed.
Remove foreign objects.
B. The wheels have not
been assembled properly.
Adjust the wheels or reassemble them.
A. The trash
container is full.
C. The trash container
may be broken.
Empty the trash container.
Replace it with a new trash container.
B. There are foreign
objects at the bottom of
the trash container, which
causes the trash container
not assembled properly.
Remove the foreign objects , replace the
trash container and press it into place.

www.hizero.com
Other manuals for F801
2
Table of contents


