HKS Super SQV IV 71008-AK001 User manual

コード No.
備 考
スーパーSQVⅣ本体キット
自動車部品
取説品番 E04531-K00140-00 2011/3/25 作成 Ver.3-1.01 ( 禁無断複写、転載 ) ( 株 ) エッチ・ケー・エス
71008-AK001
汎用
本書は取付けを行う前に必ずお読みください。
●本書は本製品を安全に取付けていただき、あなたや他の人々への危険や損害を未然に防止するために守っていただきたい注意事
項を記載しています。
●お客様又は第三者が本製品及び付属品を誤使用したことにより受けた損害については、当社では一切その責任を負いかねます
のであらかじめご了承ください。
●本製品を使用して生じた損害や、脱着工賃およびそれに付随する費用、また、自動車を使用することができないことによる損
失等につきましては、一切の補償はいたしかねます。
●本製品はノーマル車輌を基準に製作されております。ノーマル車輌以外に取付けた場合は、本製品の機能・性能及び安全性に
ついて保証いたしかねます。
●本製品は日本国内での使用を目的に設計されたものです。海外では使用しないでください。
This�product�is�designed�for�use�in�Japan�only.It�must�not�be�used�in�any�other�country.
●本製品の仕様は付属品を含め、改良のため予告なく変更をすることがあります。
●本書は予告なく改版することがありますので本製品と本書の整合をご確認ください。
●消耗部品や紛失部品及び本書のご注文はお買上の販売店までお問い合わせください。部品を発注する際は、商品名・コード No.・
車輌型式・エンジン型式を注文先にお伝えください。
取付けは必ず専門業者に依頼してください。本書はご使用前に必ずお読みください。
商品名
用 途
1
●この度は HKS スーパーSQVⅣキットをお買い上げいただき誠にありがとうございます。取付けは必ず専門業者に依頼し、
取付け終了後は本書に記載されている内容を守り安全にご使用ください。
● HKS スーパーSQVⅣは、ターボチャージャー車のスロットルバルブ急閉時にチャンバパイプ内に発生する余剰空気を制御
する部品です。
バルブ作動時にチャンバパイプの空気が抜ける音がしますが異常ではありません。また車種・仕様によって音質・音量が異な
りますのであらかじめ御了承ください。本製品は、車種別キットと異なりスーパーSQV3本体のキットです。車輌に取付け
る際、スーパーSQV専用のフランジキット及びホース類が必要となります。

●電気ショートによる電装部品の破損及び焼損・火災を防止するために、次のことを守ってください。
・バッテリのマイナス端子のターミナルを取外してから作業を行ってください。
・コネクタを外すときは、断線しないようにコネクタを持って外してください。
本書では下記のような記号を使用し、お客様及び作業者への危険レベルを示しています。
作業者又は使用者が障害を負う危険が想定される場合(人損)
拡大物損の発生が想定される場合
(拡大物損とは、当該製造物が原因で誘発された物的損害[例えば、車輌破損及び焼損])
作業者又は使用者が死亡、又は重傷を負う可能性がある場合
●キットの構成部品をパーツリストに記載してあります。取付け前に異品、欠品の無いことを確認してください。
●ノーマルパーツの取付け取外しはメーカー発行の整備書をよく読んでから行ってください。整備書がお手元にない場合は、
メーカーにてご購入ください。
●本製品の取扱いは慎重に行ってください。落としたり、強いショックを与えないでください。取付け不良や故障の原因になり
ます。
●ボルト、ナット類は適切な工具で確実に締付けてください。必要以上に締付けを行うと、ボルトのねじ部が破損します。
●取付け作業のため、一時的に取外すノーマルパーツは破損又は紛失しないように保管してください。又、ノーマルパーツを
取付ける際は、間違えて取付けないように取外す部品にはマーキングしてください。
●本製品の誤使用及び分解は絶対に行なわないでください。
・誤使用及び分解したことにより、最悪の場合エンジンが壊れる恐れがあります。
・本来の性能を損なう恐れがあります。
●作業を始める前にエンジンルーム内の温度が約40℃位( 手で触れて熱くない程度)に下がっていることを確認してください。
・火傷する恐れがあります。
●パイプ等に異物が入らないようにウエス等をかけておいてください。
・異物がエンジンに入りエンジンが破損する恐れがあります。
2

�ブローオフ本体の取付け
(1) ブローオフパイプのフランジ部にOリングを組付けてくだ
��� さい。(図1)
��� このときにOリングが浮かないようにしてください。
��� ブローオフ本体の合わせ面及びOリング溝(シール部分)
��� にはゴミ・ホコリ等の汚れがないことを確認してくださ
��� い。
(2) Cリングプライヤ等を使用してブローオフ本体をブローオ
��� フパイプへ組付けてください。(図1)
1
2
3
4
1. ブローオフ本体
2. Cリング
3. Oリング
4. フランジ部
Cリングプライヤ等
Cリングを組付ける時、必ずテーパ面を上に組付けてくださ
い。(図2)
Cリングを逆に組付けるとブローオフ本体が確実に固定され
なくなります。
Cリング組付け後、ブローオフ本体が確実に固定されている
か必ず確認してください。
ブローオフ本体が動くようですと確実に固定されていません
のでもう一度やり直してください。但し、ブローオフ本体を
無理に回転させたりこじったりしますと破損する恐れがあり
ますので絶対にしないでください。
ブローオフ本体が確実に固定されていないと走行中にブロー
オフ本体がチャンバ圧で飛ばされて破損する恐れがあります。
ブローオフ本体の向きを変えるときは必ずCリングを緩めて
から行なってください。
Cリングを緩めないでブローオフ本体を回転させたりこじっ
たりしますと破損しますので絶対にしないでください。
図2
テーパ面
ブローオフ本体
Cリング溝
Cリング
Oリング
Oリング溝
フランジ部
図1
図3
3SQV4_AK001_3-1.01

ブローオフアッセンブリを取外す時など、ホースφ 4 をブロー
オフアッセンブリから抜く際は、タイラップを外した後、一度
ホースφ 4 を切断し切り込みを入れてから取外してください。
(図5)
ホースφ 4 を引っ張ったり、プライヤー等でこじって抜かない
でください。
ブローオフアッセンブリが破損する恐れがあります。
図5
ブローオフ
アッセンブリ
ホースφ4
タイラップ
(2) ブローオフアッセンブリのニップル部に取付けた
��� ホースφ 4 をタイラップで縛り、固定してください。
���(図4、図5)
配管方法
(1) キットパーツと別売りのホース等を使用して、ブローオフバルブ作動用の配管を行ってください。(図4)
ブローオフバルブはインテークマニホルド圧で作動させてください。
ホースφ4、ホースφ6は本キットには含まれていません。 図4
ホースφ4 ホースφ4又は、
ホースφ6
エアフィルタ
インテークマニホルド圧
の取出しが可能な場所に
接続してください。
各部からエア漏れがないか.
軽く 2,3 度空吹かしを行ないブローオフアッセンブリ
が作動しているか.
部品による干渉音はないか.
アイドリング状態に異常はないか.
エンジンを停止し、ボルトが緩んでいないか.
( 再度取付部の締付け確認 )
エンジン始動前の確認 エンジン始動後の確認
確認項目 確認 確認項目 確認
パイプ・ホース等の配管が間違っていないか.
バッテリのマイナス端子にケーブルターミナル
が確実に取付けられているか.
ホースバンドが確実に締まっているか.
ボルト・ナット類の締め忘れはないか.
取付けた部品が他の部品と干渉していないか.
4

5SQV4_AK001_3-1.01
快適に運転していただくために、お車を運転する前には必ず日常点検を行ってください。
●安全な整備はドライバーの責任です。必ず実施してください。
●ユーザーマニュアルに記載されている事項以外は専門業者に依頼してください。
●スーパーSQVⅣの性能を維持するため、エアフィルタの交換は定期的に行ってください。
( 交換の目安 )3,000 ~ 5,000km または 3 ヶ月~ 6 ヶ月
但し、使用方法及び環境により条件が異なりますので汚れ具合によっては早めの交換をおすすめします。
交換エアフィルタは別売りです。 � �品名 スーパーSQV交換フィルター
●故障等の修理はお客様ご自身では絶対に対処せず、必ず専門業者に依頼してください。
●走行中、異音・異臭・振動等の異変があった場合には、ユーザーマニュアルに従って対処してください。
●本製品を譲られる時は、必ず次のオーナーのために取扱説明書をお渡しください。
●本製品をお車から取外す際には、必ず専門業者に依頼してください。
1
ブローオフ
本体 7
数 形状 備考 No. 品名 数 形状 備考
4
5
6
No. 品名 数 形状 備考
取扱説明書
1
Cリング
Oリング
1
1
2
3
No. 品名
8
9
エアフィルタ 1
1
1 1
φ 6-4-6
スリーウェイ
φ 4-4-4
スリーウェイ
タイラップ 3
本製品に関するお問い合わせは、専門業者またはお買上の販売店までお問い合わせください。
本書の記載内容は、予告無しに変更することがありますのであらかじめご了承ください。
スーパーSQVⅣから吐出される空気をサクションリターンする際は別売のリターンニップルをご利用ください。
ニップルより先のリターン用パーツ(パイプ・ホース・ホースバンド類)は本キット・リターンニップルともに付属しており
ませんので、別途お買い求めください。
リターン用ニップル取付け方法
1.�右図の矢印で示す 4 本のボルトを外し、ファンネルを取外し
�� てください。
他の 4 本は本体固定用ですので、絶対に外さ
ないでください。
2.�ファンネルを取外すとフィンを取外すことができます。
3.�逆の手順でリターン用ニップルを取付け、ファンネルをボル
�� ト ( 再使用 ) で再度固定してください。
スーパー SQV リターンニップル ( 別売 ) �� ニップル外径φ 19������ コード No.�:�71002-AK003
���������������������������������������� ニップル外径φ 29������ コード No.�:�71002-AK004

6
PART�NUMBER
Super�SQV�Ⅳ�Universal�Application
71008-AK001
NAME�OF�PRODUCT
This manual assumes that you have and know how to use the tools and equipment necessary to safely perform
service operations on your vehicle. This manual assumes that you are familiar with typical automotive systems
and basic service and repair procedures. Do not attempt to carry out the operations shown in this manual unless
these assumptions are correct. Always have access to a factory repair manual. To avoid injury, follow the safety
precautions contained in the factory repair manual.
SAFETY PRECAUTIONS
WARNING
● To prevent electrical damage/burns/res, always:
- Disconnect the negative terminal of the battery before beginning installation.
- When disconnecting wires/connectors, take extra care to avoid breaking/snapping the wires.
CAUTION
● Do not misuse this product.
- Misuse of this product may lead to engine damage.
- Misuse of this product may lead to loss of original function.
● Prior to installation, make sure the engine bay temperature has cooled to approximately 40℃/104 ゚F
- Failure to let the engine cool down properly can lead to severe burns.
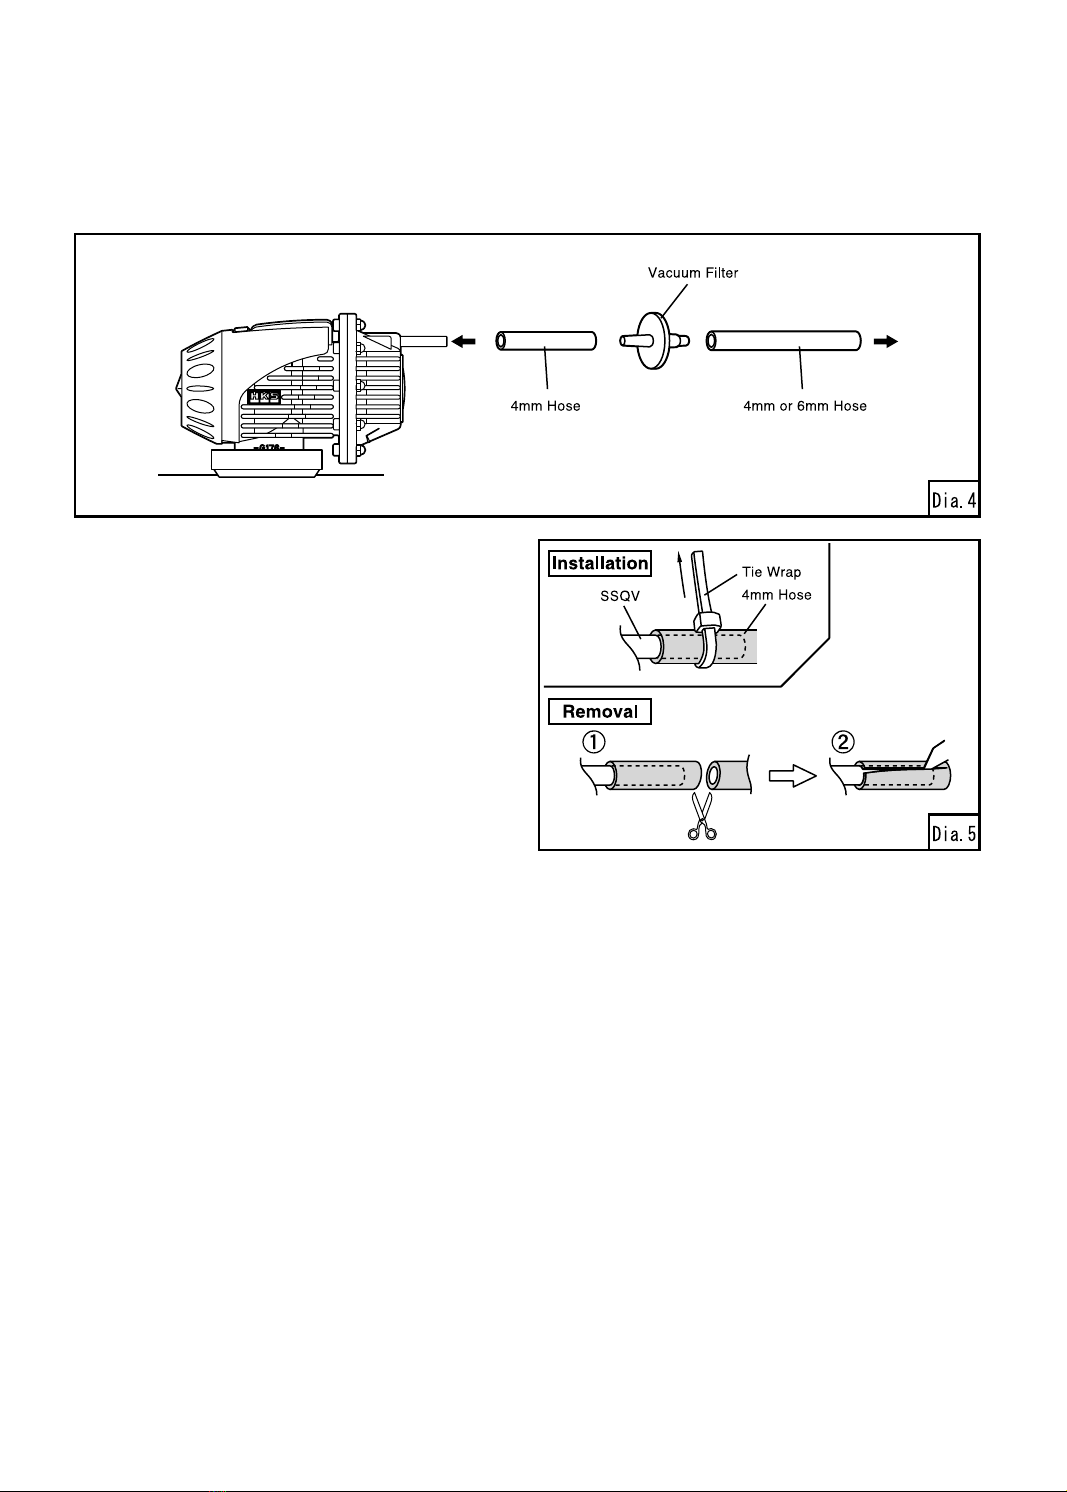
● Insert clean rags into open piping to prevent contaminants from entering the pipes.
- If neglected, contaminants in the piping can lead to engine damage.
- Make sure that all of the parts listed in the Parts List are included in the kit.
- Reference the factory service manual for the vehicle when removing factory parts.
- Be careful when handling this product; avoid dropping or subjecting it to excessive impact. Failure to do so may
result in product damage or improper installation.
- Use the proper tools when tightening nuts and bolts. If over tightened, the bolts may become damaged.
- Keep the removed factory parts in a safe place for ease of re-installation at a later date (if necessary).
When reinstalling the removed factory parts, make sure to reinstall them correctly.

INSTALLATION PROCEDURE
(1) Remove the cable from the negative terminal of the
battery.
(2) Remove the section of the intercooler piping where
the SSQV is to be installed.
(3) Cut a hole in the intercooler piping and weld the SSQV
ange (sold separately) onto the intercooler piping.
(4) Install the O-ring in the groove on the ange.
(Dia.1, 3)
(5) Connect the SSQV to the ange using the provided
C-clip.
The tapered side should face up on the C-clip.
(Dia.1, 2)
ADVICE:
During removal and installation, make sure no foreign objects
get inside the pipes and hoses.
7

(6) Reinstall the removed section of the intercooler piping.
(7) Connect the SSQV to the intake manifold source such as:
A. Factory fuel pressure regulator
B. A pressure tting after the throttle body
If necessary, use one of the provided T-ttings to splice into an existing hose. (Dia.4)
(8) Install the vacuum lter between the SSQV and the source
of the intake manifold pressure (with the short end going to
the SSQV). (Dia.4)
(9) Install the vacuum hose using the provided vacuum lter.
Attach the other end to the SSQV. Cut the 4mm hose to the
appropriate length. (Dia.4, 5)
(10) Secure the 4mm Hose connected to the SSQV Fitting
using a Tie Wrap. (Dia.4, 5)
ADVICE:
When uninstalling the SSQV Assy or when removing the 4mm hose from the SSQV Assy, remove the Tie Wrap, cut the hose
past the port on the SSQV Assy, and slice the 4mm Hose lengthwise and then remove the 4mm hose. (Dia.5)
Do not pull or wriggle the 4mm Hose using pliers or other tools to prevent damage to the SSQV Assy.
The SSQV must be activated by intake man-
ifold pressure.
(11) Inspect all parts for proper installation. Verify the SSQV Assy is securely mounted to the ange and the C-clip is installed
correctly. Make sure the manifold pressure hose is not pinched and there are no holes or cuts on it.
(12) If the SSQV is mounted near the hood or any other part, make sure the SSQV Assy has adequate clearance so it does not
come in contact with other parts.
(13) Reconnect the battery cable to the negative terminal of the battery.
8

If it is necessary to recirculate the SSQV back into the suction pipe, please refer to the instructions below.
Miscellaneous hose clamps, suction pipe tting and return hose are not included in this kit.
For 1” ID Hose P/N : 71002-XA001
SSQV Recirculation Fitting (sold separately) For 19mm ID Hose P/N : 71002-AK003
For 29mm ID Hose P/N : 71002-AK004
1. Remove 4 bolts (per diagram) and remove the cover.
NOTE
Do not remove the remaining 4 bolts as they are to stay
afxed to the SSQV main body.
2. After removal of the cover, the recirculation tting can
be removed.
3. Install the Recirculation Fitting. Reinstall the cover and
retighten the 4 bolts.
9
1
SSQV 7
QT Image Remarks No.
4
5
6
No.
Instruction
Manual
1
C-clip
O-ring
1
1
2
3
No. Description
8
9
Vacuum Filter 1
1
1 1
6-4-6mm
T-Fitting
4-4-4mm
T-Fitting
Tie Wrap 3
QT Image RemarksDescription QT Image RemarksDescription
Check the following after the installation process is complete.
(1) Check the following before starting the engine:
● Make sure all pipes and hoses are routed and connected correctly.
● Make sure all hose clamps are tightened.
● Make sure the negative cable terminal is securely attached to the battery.
● Make sure all bolts and nuts are tightened.
● Make sure all installed components do not come in contact with other parts.
(2) Start the engine and check the following:
● Make sure air is not leaking.
● Make sure the RPM rises smoothly after revving the engine 2-3 times while in neutral.
● Make sure the installed parts are not hitting each other.
● Make sure there are no unusual conditions found while idling.
● Make sure there are no loose bolts after turning off the engine. Re-tighten if necessary.

10
Proper maintenance of this product is necessary in order to maintain the safety, reliability, and function of this product.
- Maintenance is the responsibility of the driver/owner.
- If work needs to be performed outside the scope of this manual, consult a professional.
- If the vehicle gets damaged, have the repairs performed by a professional.
- If you experience any abnormal noise, smell, or vibration from the vehicle while driving, reference the vehicle’s Owner’s Manual.
- If this product is ever re-sold, please give this Instruction Manual to the new owner.
- When removing this product from the vehicle, please consult a professional.
(禁無断複写、転載)
Table of contents
Languages:
Popular Control Unit manuals by other brands

Comfort365
Comfort365 WDDCK installation manual

Kentec Electronics
Kentec Electronics 723 Information guide

SICK
SICK MSM Series Mounting instructions

Digiplan
Digiplan PKC Series user guide

Siemens
Siemens simovert masterdrives operating instructions

DMP Electronics
DMP Electronics 780 Installation and programming guide