Holars GSM-206 User manual

1 | P a g e w w w . h o l a r s . s e | w w w . h o l a r s . n o
User Manual V1.1 Updated Aug 2013
GSM-206
User Manual For GSM-206 3G Wireless Phone
Product Mo6

2 | P a g e w w w . h o l a r s . s e | w w w . h o l a r s . n o
User Manual V1.1 Updated Aug 2013
Safety and Maintenance
While using the phone, please observe the following points
Before use please read the instruction manual carefully.
Do not power on the phone when use of the phone is prohibited or it may cause interruption or
danger.
Please keep your phone off when you are on a plane. If functions that will automatically power on
your phone, such as alarm clock or calendar, are setup, please check and cancel the configuration
before boarding the plane.
While using the phone, please keep away from heat sources and high voltage environments, such as
electric appliances or electric cooking devices. Please use the phone under normal temperature.
Using it in temperatures above 55°C or below -10°C may damage the phone.
Pay attention to fire prevention. Make sure to power off the phone while you are near flammable
materials, such as gas-filling stations and fuel storage.
Do not hold the phone in your hand while driving. Do not put the phone above the air bag or within
reach of the airbag so as to prevent damage when the airbag is inflated.
Original battery, charger and accessories should be used.
Phone may interfere with nearby electronic devices; therefore keep it away from electronic devices
such as radio, PC, pacemaker and hearing aid, etc. Do not place the phone near credit cards or
magnetic fields. Please power off your phone in hospital and other special places according to
specific regulations there.
Keep the phone away from mechanic vibration or shaking. Do not hit the screen of your phone with
sharp tools.
If plastic cover or case is used for the phone, surface coating may be damaged.
Do not disassemble the phone without professional help.
Do not use benzene, thinner or alcohol to clean the cover of your phone. Keep your phone away
from corrosive chemicals such as detergent. Use a clean and soft cloth instead and wipe gently.
Prevent your phone from insulation or places with excessive smoke or dust.
Your phone is not water-proof, so please keep it dry. Do not use it in a damp environment, such as a
bathroom. Keep it away from rain and moisture.

3 | P a g e w w w . h o l a r s . s e | w w w . h o l a r s . n o
User Manual V1.1 Updated Aug 2013
When you are to pull the charger away from your phone or cut off the power supply of the charger,
please hold the connector tightly and then pull out. Do not drag the power cable.
Do not rely on your phone as the only communication device for emergency, such as medical rescue.
Keep the phone out of reach of children so as to avoid danger.
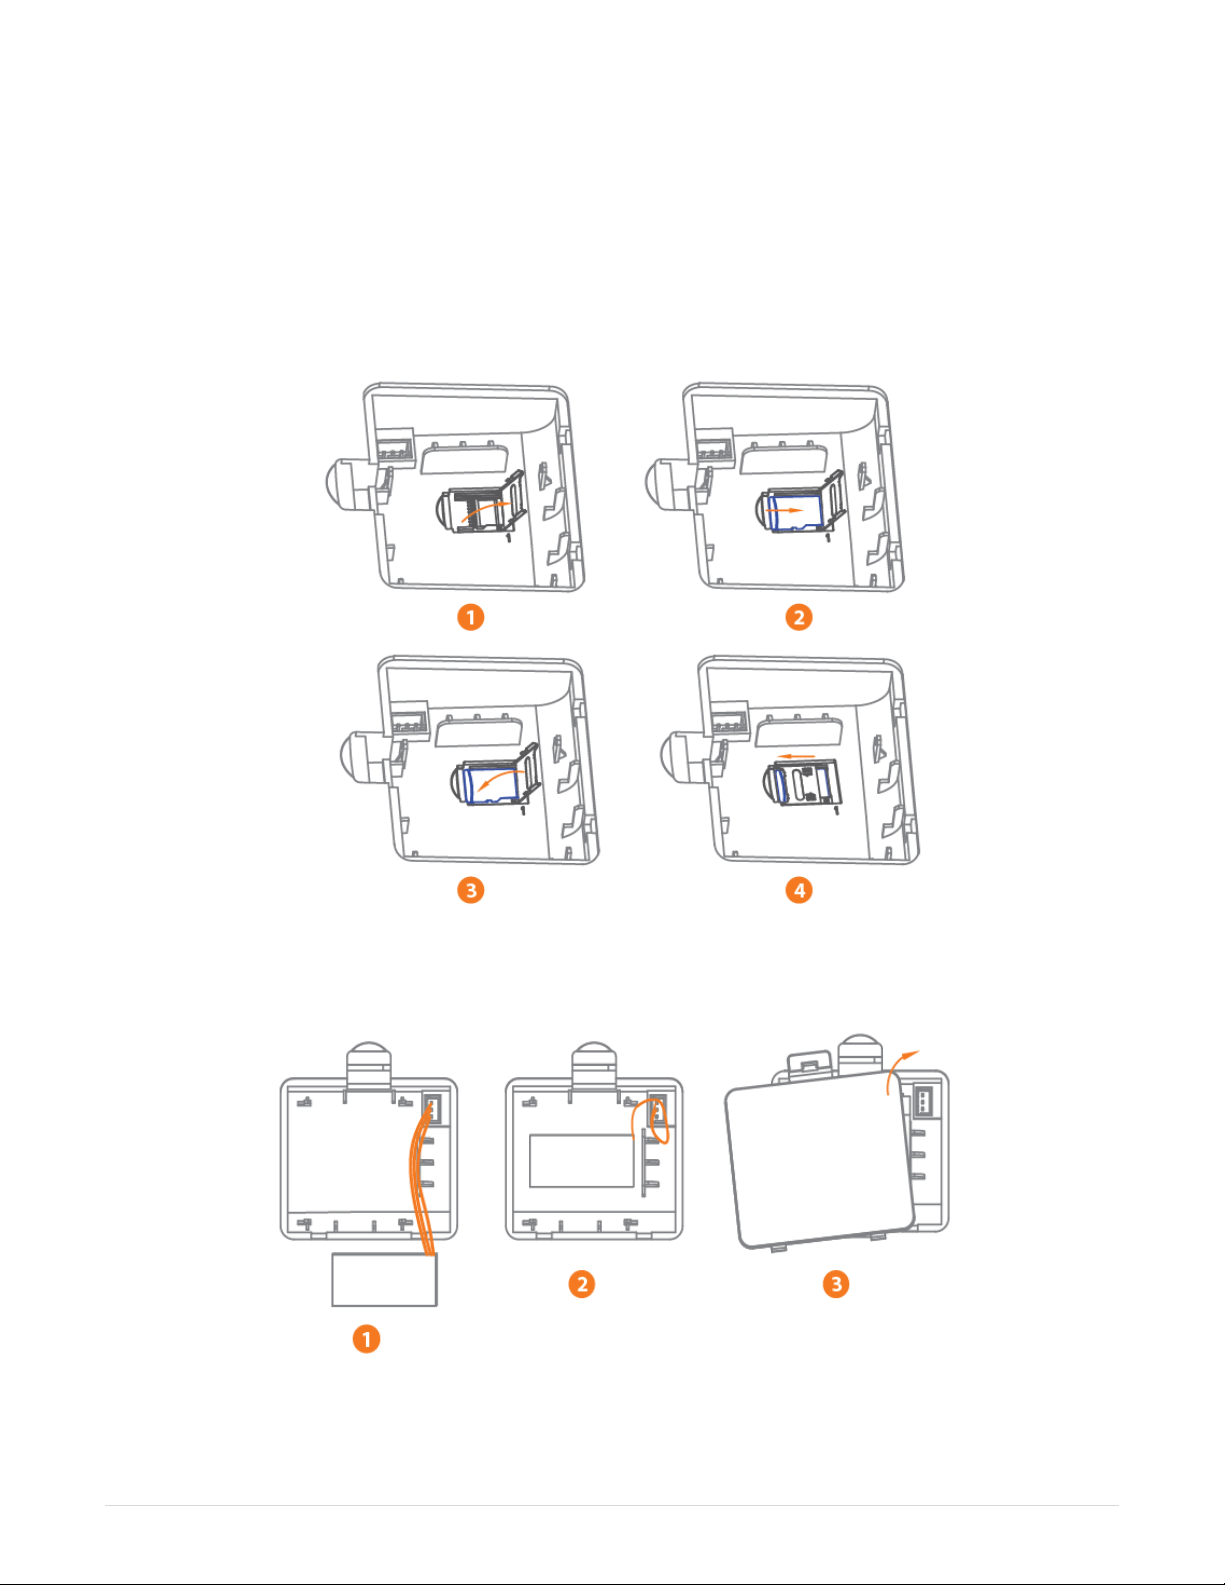
While using battery, please observe following points
Before use, please read instructions for use, as well as the label on the surface of battery.
Please charge the battery in a cool and well-ventilated room. Otherwise, high environment
temperature may lead to overheating, smoking, burning, distortion or even explosion of the battery.
There are special protection circuits and devices inside the battery, so do not open the battery;
otherwise it may lead to short circuit or electrolyte leak. If electrolytes enter the eyes, there is
danger of blindness. In such case, immediately wash eyes with clean water (Do not to rub the eyes
with hands) and then immediately go to hospital for treatment.
Do not squeeze the battery. Keep it away from mechanical vibration and shaking. Do not short
connect the battery, for this may damage the battery and components connected to it. A short
circuit may be caused by coin or clip directly connecting the anode and cathode of the battery, so do
not put the battery together with metal objects.
Please keep the metal contact points and battery clean.
Do not use a damaged or depleted battery.
The battery should be replaced when it cannot meet the requirements for performance. Battery can
be charged hundreds of times before it should be replaced. Battery belongs to consumables. Though
it can be charged hundreds of times, its quantity of electric charge may decrease gradually. When
service time (talk time and standby time) is found to have decreased, the battery shall be replaced.
Prevent battery’s exposure to the sun or places with excessive smoke or dust. Do not use it in damp
environments, such as a bathroom. The battery is not waterproof; so keep it away from rain and
moisture.
Do not put the battery in places that are too hot or too cold. Temperatures above 55°C or below -
10°C may affect performance of the battery.
Do not put the battery in fire so as to avoid explosion.
Do not put the battery in water so as to avoid short circuit inside, resulting in battery overheat,
smoking, distortion, damage or even explosion.
Treat battery according to local regulations (for example, recycling). Do not treat battery as
domestic garbage so as to avoid explosion and pollution.
Special charger should be used to charge this battery, and charging time should not exceed 12 hours.
Keep battery out of reach of children to avoid danger.
Do not place the battery in fire; follow local laws and ordinances in disposing used battery.
Using other types of battery, charger and accessories may violate the certification or warranty terms
of equipment and may result in danger.

4 | P a g e w w w . h o l a r s . s e | w w w . h o l a r s . n o
User Manual V1.1 Updated Aug 2013
While using battery charger, please observe following points:
Before use, please read instructions first, as well as labels on the surface of the charger.
Do not disassemble or modify the charger or use it when power cable is damaged; otherwise there
will be electric shock or fire, or the charger may be damaged.
Do not touch the charger with wet hands. If the charger contacts water or other liquids, immediately
cut off the power supply.
Do not short connect the charger and keep it away from mechanical vibration or shaking and direct
sunshine. Do not use it in damp environments, such as a bathroom. The battery charger is not
waterproof; so keep it away from rain and moisture.
Do not use the charger near electric appliances such as a TV set or radio.
When pulling out the plug, hold the charger instead of dragging the power cable so as to avoid
damage to the power cable.
Keep the charger out of reach from children so as to avoid danger.
1. Phone
1.1 Appearance

5 | P a g e w w w . h o l a r s . s e | w w w . h o l a r s . n o
User Manual V1.1 Updated Aug 2013
1.2 Key Description
1
LEFT SOFT KEY
Press to go into the main menu in idle screen
2
RIGHT SOFT KEY
In any menu you can go back to the last menu
3
UP KEY
You can scroll the cursor with the UP key;
Shortcut to access the settings menu in idle screen
4
DOWN KEY
You can scroll the cursor with the DOWN key;
Shortcut to access the alarm menu in idle screen
5
LEFT KEY
Shortcut to access the main menu in idle screen
6
RIGHT KEY
Shortcut to access the contacts menu in idle screen
7
OK
Press it to access the submenu
Press to go into main menu in idle screen
8
CLR
Press to delete the characters you’ve entered

6 | P a g e w w w . h o l a r s . s e | w w w . h o l a r s . n o
User Manual V1.1 Updated Aug 2013
9
MUTE
When the call is connected, select it to switch to MUTE mode
10
MP3
Shortcut to access the Media Player menu in idle screen
11
FM (optional)
Shortcut to access the FM menu in idle screen
12
CALL LOG
Shortcut to access the Call Logs menu in idle screen
13
SMS
Shortcut to access the SMS menu in idle screen
14
Dial key
To make a phone call, input the phone number and press Dial key
15
Power on or off/
END Key
Hold for a couple of seconds to power the phone on/off;
Press the end key to end the phone call or go back to the idle screen
16
0~9 Numeric Keys
To input numbers and characters
17
*
In idle screen, press to enter *, +, P, W.
In message editing screen, press to enter the special symbol mode.
18
#
In idle screen, press to enter #
In message editing screen, press to switch the input method.
19
Speaker Key
Activate hands-free operation(speaker icon)
1.3 State Icons
Signal strength indicator.
You can use the 3G network services.
New Email received
New MMS received.
New SMS received.
Missed call.
Ring only
Activated silent mode.
Alarm clock is on.
Battery life.
Insert earphone.
Locked keyboard
The signal of WLAN

7 | P a g e w w w . h o l a r s . s e | w w w . h o l a r s . n o
User Manual V1.1 Updated Aug 2013
1.4 Screen Background Light
Background light can illuminate the screen. When you power on your phone, the background
light will turn on for a certain period. If no key is pressed within the period, the background
light will turn off automatically so as to save battery.
To setup background light brightness:
1) [Menu] [Settings] [Phone Settings] [Misc. Settings] [LCD backlight].
1.5 Adjust The Volume
1.5.1. During a call
1. Press [Up Key] to increase the volume.
2. Press [Down Key] to decrease the volume.
1.5.2. During MP3 playing
1. Press [2] key to increase the volume.
2. Press [8] key to decrease the volume.
1.5.3. During FM playing
1. Press [#] key to increase the volume.
2. Press [*] key to decrease the volume.
2. Instruction Before Use
2.1 Connectors on the Phone
1. Antenna connector
2. Earphone jack
3. USB port
4. AC-Adaptor jack

8 | P a g e w w w . h o l a r s . s e | w w w . h o l a r s . n o
User Manual V1.1 Updated Aug 2013
2.2 Assemble Micro SD Card (Optional)
2.3 Assemble Battery

9 | P a g e w w w . h o l a r s . s e | w w w . h o l a r s . n o
User Manual V1.1 Updated Aug 2013
2.4 Assemble The Cord Line
2.5 Assemble The Antenna
2.6 Assemble The phone On The Wall
Hang On The Wall

10 | P a g e w w w . h o l a r s . s e | w w w . h o l a r s . n o
User Manual V1.1 Updated Aug 2013
2.7 Power On/Off
2.7.1. Power On
The device can work on both single battery mode and single charger mode.
1. Press and hold [Power key] button until boot screen appears.
2. If there is a prompt for PIN code, please input your PIN code and then press [OK] key. Please contact
with the operator for the default PIN.
After power on, if SIM card inserted is valid, your phone will automatically search for an available
network; if not, it will prompt: Insert SIM or Invalid SIM.
2.7.2. Power Off
To power off, please hold [Power key] until power off screen appears
2.8 Security Password
You can use access password to avoid unauthorized use of your SIM card.
2.8.1. PIN Code
PIN code is used to prevent illegal use of user’s SIM card. If your phone has enabled PIN code protection,
there will be prompt for entering the PIN code. If wrong the PIN code is entered for three times, the SIM
card will be automatically locked. You have to enter PUK code in order to unlock it. PIN code is related to
SIM card instead of the phone and is provided by your network service operator.
2.8.2. PUK Code
PUK code, referring to personal unlock code, is used to unlock a SIM card that is locked because of the
wrong input of PIN code. If the wrong input of PUK code exceeds ten attempts, the SIM card will lose
efficacy. PUK code is provided by network service operator.
3. Basic Functions
3.1 Dial Phone
3.1.1. Direct Dial

11 | P a g e w w w . h o l a r s . s e | w w w . h o l a r s . n o
User Manual V1.1 Updated Aug 2013
1. In standby state, press the number keys to enter the phone number and then press [Send
key] to call.
2. Press [CLR] to clear the last digit or hold it to clear all.
If the phone number being dialed can be recognized by the phonebook, the name and icon
of the contact person will be displayed on the dialing screen and a calling animation is
displayed at the same time.
3. Press [Power key] to end a call.
3.1.2. Quick Dial From Contacts List
1. In standby state, press [Right soft key] to enter the phonebook.
2. Slide the scroll bar to choose a contact, or select Search to search for the contact you want
to call, either by name or by number.
3. Press [Send key] [Left soft key] to dial out.
3.1.3. Quick Dial From All Calls List
1. In standby state, press [Send key] to enter [All calls] list.
2. Slide the scroll bar to select the person you want to call or the number you want to dial.
3. Press [Send key] to dial out the number.
3.2 Answer Incoming Call
When there is an incoming call, incoming call animation will be displayed together with a
special ringtone.
1. Press [Send key] to answer calls.
2. Press [Power key] directly to reject the incoming call.
If the phone number of a caller can be recognized, the number will be displayed on the
incoming call screen.
If information about the number is stored in contacts, the caller’s name and icon will
also be displayed. At the same time, a specified ringtone will be played according to the
current settings.
If a caller hides his/her number or the network bans call indication, the incoming call is
displayed as ******.
3.3 Terminal Call
When there is an incoming call, press [Power key] to reject the call.
During the call, press [Power key] to terminate current call.
A call that has just been dialed can be cancelled by pressing End key.
3.4 Making Emergency Calls

12 | P a g e w w w . h o l a r s . s e | w w w . h o l a r s . n o
User Manual V1.1 Updated Aug 2013
As long as you are within coverage of network, you can make emergency calls even you have
not registered to the local network or do not have SIM/UIM card. Enter local emergency
number and then press [Send key] to make an emergency call.
3.5 Make International Long-Distance Call
1. Before an international phone number can be dialed, press [0] key until “+” sign appears.
“+” sign tells the network you are making an international call.
2. Input country code, area code (without 0) and phone number
3. Press [Send key] to call.
** Note: Some networks do not allow “+” for dialing international numbers
3.6 Talk Options
The phone provides some talk control functions in the process of call.
During the call, press [Left soft key] to enter [Options] menu to access the talk control functions.
3.6.1. Hold/Release Talk State
If network supports, you can hold current call.
1. During the call, press [Left soft key] and select [Hold Single Call] in the [Options] menu.
2. To activate held talk, Press [Left soft key] and select [Retrieve Single Call] in the [Options]
menu.
3.6.2. Dial Second Number
During a call you can dial another number.
1. Directly enter the second number and press [Send key] to call
2. Or press [Left soft key] [Main Menu] [Phonebook] to select the number and press
[Send key] to call. When the second number is put through, the first call will be held
automatically.
3.6.3. Answering a Second Incoming Call
Please make sure the network supports the call waiting function and the status has been set to
Enabled.
1. If there is a second incoming call in the process of the first call, you’ll hear the “Beep” tone
and the screen will prompt.
2. Press [Left soft key] and select [Answer] in [Options] menu. When the second call is put
through, the first call will be switched to held state.

13 | P a g e w w w . h o l a r s . s e | w w w . h o l a r s . n o
User Manual V1.1 Updated Aug 2013
3. Press [Power key] to terminate the second call.
3.6.4. Select Current Phone Number
When the second call is answered, press [Left soft key] to [Options] menu:
Swap: to hold current call and activate the held call
Conference: Add held call to conference call.
End single call: Terminate current call.
End all calls: Terminate two calls.
Transfer: Transfer current call to another call. You can enter the number.
New call: To make another call.
Main menu: Enter main menu screen
Sound recorder: Enter record mode.
DTMF: Status to On/Off.
***Note: Not all networks provide the multi-party service.
4. Menu Function
You can press [Left soft key] in standby state to enter the main menu. Press [Right soft key] or
[Power key] to return to standby mode
4.1 Messages
In standby state, enter [Menu] [Messaging] menu.
4.1.1. Write Message
In the edit mode, you can select edit SMS or MMS.
When editing SMS, press the [Left soft key] to enter [options] menu, as listed below:
Send to: Send the message.
Insert symbol: Insert the symbol in the message.
Input method: Select input method you want.
Input method options: Select input mode.
Add picture: Add picture in the MMS from phone.
Add sound: Add sound from phone and also record sound for MMS.
Add video: Add video from phone.
Add subject: Add subject for the MMS.

14 | P a g e w w w . h o l a r s . s e | w w w . h o l a r s . n o
User Manual V1.1 Updated Aug 2013
Slide options: Add a new slide behind or before the MMS.
Switch to MMS: Switch SMS mode to MMS mode.
Advanced: You can insert text template, attachment, contact number, contact name or bookmark in
MMS or SMS through this function.
Save: Save SMS or MMS to drafts.
Details: View details of the SMS or MMS.
4.1.2. Conversations
If [Conversations] is set to On, it will display the conversations folder in the menu list. To set the status:
1. [Menu] [Messaging] [Message settings] [Conversations]
2. The status can be set to On or Off.
3. Once the status has been set to On, [Inbox]/ [Outbox]/[Sent messages] folder will be replaced by
[Conversation] folder in [Messaging] menu list..
4.1.3. Inbox
The SMS and MMS you receive are all stored in [Inbox].
Open a SMS or MMS and press [Left soft key] to enter [Options] menu, with the options: View, Reply,
Call sender, Forward, Delete, Delete all, Save to phonebook, sort by, move and mark the SMS or MMS
and so on.
4.1.4. Drafts
SMS and MMS which are not sent out can be saved to [Drafts].
4.1.5. Outbox
SMS and MMS which fail to send out will be saved to [Outbox].
4.1.6. Sent Messages
SMS and MMS which have been sent out can be saved to [Sent messages]. Please choose Save sent
message in [Common settings] first.
4.1.7. Archive
You can move SMS and MMS to [Archive] from [Inbox], [Outbox], [Sent messages] or [Conversations].
4.1.8. Delete Messages
Delete the messages from [Inbox], [Drafts], [Outbox], [Sent messages] or [Archive]. You can also delete
all messages through this function.

15 | P a g e w w w . h o l a r s . s e | w w w . h o l a r s . n o
User Manual V1.1 Updated Aug 2013
4.1.9. Email
After setting up Email accounts, you can send or receive e-mail.
The details as follows:
1. Start to create account: Input your email account address.
2. Select the email’s protocol: select pop3 or IMAP4.
3. Select Data account: select data account from GPRS account.
4. Input receiver email’s server.
5. Input send email’s server.
6. Input your username.
7. Input your user password.
8. Activate the account you set.
9. [Email accounts][Options][Edit] [Advanced settings] [Outgoing server] [Authentication]
On.
10. In [Advanced settings] menu, you can set outgoing/incoming server, signature and account settings.
11. You can edit email and send or receive.
4.1.10. Broadcast Message
The options: Receive mode, Channel settings, Languages, Read messages.
4.1.11. Templates
There are templates for SMS or MMS
4.1.12. Message Settings
1. Text message settings contain Profile settings, Voicemail server, Common settings, Memory status,
and Preferred Conn.
2. MMS settings contain Profiles, Compose, Sending, Retrieval, Memory status.
4.2 File Manager
In standby state, enter [Menu] [File manager] menu.
1. You can open, create or format the file in phone memory.
2. When you format the file, the phone password should be inputted, the default password is 1122.

16 | P a g e w w w . h o l a r s . s e | w w w . h o l a r s . n o
User Manual V1.1 Updated Aug 2013
4.3 Phonebook
In standby state, enter [Menu] [Phonebook] menu.
1. Move the cursor to Add New Contacts. You can choose to save the contact to SIM or Phone.
2. Press [Left soft key] to enter [Options] menu, with the following options: Select, Mark Several, Caller
Groups, Phonebook Settings.
Select: Save to SIM or Phone.
Mark several: You can mark or unmark multiple/all contacts, to delete or send SMS.
Caller groups: Add the name, picture, ringtone and/or video of the groups. Then you can add on the
members. Only contacts saved in the phone can be added to groups.
Phonebook settings: Following are the settings
a) Preferred storage: Select priority storage location for a new contact, to SIM, Phone or Both.
b) Speed dial: Set speed dial from phonebook, then you can dial the contact by pressing the
corresponding numeric key in standby mode.
c) My number: Set personal business cards which can be sent.
d) Extra numbers: You can edit owner numbers and fixed dial.
e) Memory status: View memory status.
f) Copy contacts: Use the menu to copy contacts between the SIM/UIM card and the phone.
g) Move contacts: Use the menu to move contacts between the SIM/UIM card and the phone.
h) Delete all contacts: Use the menu to delete all contacts from the SIM/UIM card or phone, and the
phone password should be input, the default password is 1122.
i) Name display: set the name display format.
3. Move the cursor to contacts list, press [Left soft key] to enter [Options] menu. The following are the
options: View, Send message, Call IP dial, Edit, Delete, Copy, Move, Send business card, Add to
Blacklist, Mark several, Caller groups, Phone settings.
4.4 Fun & Games
In standby state, enter [Menu] [Fun & Games] menu.
Currently provides OperaMini, Yahoo Messenger, and Facebook.
4.5 Call Center
In standby state, enter [Menu] [Call center] menu.

17 | P a g e w w w . h o l a r s . s e | w w w . h o l a r s . n o
User Manual V1.1 Updated Aug 2013
4.5.1. Call History
In standby state, enter [Menu] [Call center] [Call history] menu. Below are the options:
Missed Calls: press [OK] to view missed calls list
Dialed Calls: press [OK] to view dialed calls list
Received Calls: press [OK] to view received calls list
In the missed, dialed, and received calls interface, press [Left soft key] to [Options] menu. The following
are the options:
a) View: View the Type, Number, Call time, Times of call.
b) Call: To call back.
c) Send message: Send message to the call.
d) Save to phonebook: Save the number to phonebook.
e) Add to blacklist: Adding a number to blacklist prevents it from reaching your phone.
f) Edit before call: Enter the dial number screen so you can then edit the phone number.
g) Delete: Delete the call.
Delete Call Logs: You can delete all dialed calls, missed calls, received calls or all calls.
Call Timers: You can view the duration of last call, dialed calls, received calls or reset all time
Call Cost: This function requests network’s support. Please contact your operator for details.
Text msg. counter: Count the number of sent and received messages
GPRS Counter: Press [OK] to view GPRS Counter (Unit B). The following are the options: Last Sent, Last
Received, All Sent, All Received, Reset Counter.
4.5.2. Call Settings
In standby state, enter [Menu] [Call center] [Call settings] menu. Below are the options:
Caller ID: If you choose [Hide ID], your phone number will not be sent when you call out. This function
requests network’s support. Please contact your operator for details.
Call waiting: This function requests network’s support. Please contact your operator for details.
a) Activate: Activate the Call Waiting function.
b) Deactivate: Deactivate the Call Waiting function.
c) Query Status: Query the status of this function.
Call divert: Divert the incoming calls to other phone number. This function requests network’s support.
Please contact your operator for details.

18 | P a g e w w w . h o l a r s . s e | w w w . h o l a r s . n o
User Manual V1.1 Updated Aug 2013
Call barring: Use the menu to set the call barring. It contains outgoing calls, incoming calls, Cancel all,
Change barring password. This function requests network’s support. Please contact your operator for
details.
Line switching: You can change the line 1 or line 2. This function requests network’s support. Please
contact your operator for details.
Advance settings: Below are the options.
a) Blacklist: Edit the blacklist numbers and activate blacklist mode. Afterwards you can’t receive the
calls on the list.
b) Whitelist: Edit the whitelist numbers and activate whitelist mode. Afterwards the calls on the list
can be auto-answered.
c) Auto redial: Enable or disable this function.
d) IP dial: To set the prefix code for IP dial, you can edit 3 numbers. After activate IP dial, you can dial
the saved number by IP dial. Choose the desired number in phonebook, press [Left soft key] to
[Options] menu and select IP dial, then the pre-set prefix code will be added automatically.
e) Call time reminder: Enable or disable this function. Allows you to set a reminder with a warning
tone during the call.
f) Auto quick end: Automatically end the calling as time is on.
g) Reject by SMS: Set on/off.
h) Connect notice: After setting the status to On, you will hear a “Beep” tone when the outgoing call is
connected.
i) Answer mode: You can choose to answer the call with any key or Auto-answer when in headset
mode.
4.6 Multimedia
In standby state, enter [Menu] [Multimedia].
4.6.1. Image Viewer
1. [Menu] [Multimedia] [Image viewer] to display photo list.
2. Press [Left soft key] to enter [Options] menu. There following are the options: View, Image
Information, Edit, Browse Style, Send, Use As, Rename, Delete, Sort By, Delete All Files.
4.6.2. Media Player
1. [Menu][Multimedia][Media Player]. The following are the options: Now playing, All songs, All
videos, Music playlist, Streaming URL.
2. Enter the Media Player interface; you can see player interface and press [Left soft key]. The
following are the options:
Current playlist: Display all songs list. In the [Options] menu you can find the following options: Play,
Refresh, Add to playlist, Delete, Send, Use, Details.
Go to library: Go to Media player menu.

19 | P a g e w w w . h o l a r s . s e | w w w . h o l a r s . n o
User Manual V1.1 Updated Aug 2013
Settings: Below are the settings.
a) Player settings: Set the Skin, Shuffle, Repeat, Background play, Sound effects, and Bass
enhancement.
b) Audio settings: Set Audio plays speed, Display style.
Details: You can view the detailed information of current file.
4.6.3. Photo Editor
You can edit photos stored in phone
4.6.4. Sound Recorder
You can record and set the sound recorder. Press [Left soft key] to enter [Options] menu. The following
are the options:
New Record: Start a new recorder
List: View the list of files. Press [Left soft key] to enter into the [Options] menu. The options are: Play,
Append,Rename,Delete,Delete all files, Use as, and Send.
Settings: Set file format and Audio quality.
4.6.5. FM Radio
In the FM playing interface, press [Left soft key] to enter [Options] menu. The following are the options:
Channel List: Channel the new FM from the list.
Manual Input: You can manually tune the FM
Auto Search: Preset the FM by auto search.
Settings: The following are the options.
a) Background Play: This phone supports background play mode. When you selected “On”, you can
continue other operations when the music is playing.
b) Skin: Set the display style of FM playing screen.
c) Loud Speaker: You can select On/Off.
d) Recorder format: You can select AMR, WAV.
e) RDS settings: Set RDS parameters.
Record: Record sound of current playing channel.
Append: Choose one record file first and continue to make that record.
File list: Record list.
4.7 Organizer
In standby state, enter [Menu][Organizer] menu. The following are the functions.

20 | P a g e w w w . h o l a r s . s e | w w w . h o l a r s . n o
User Manual V1.1 Updated Aug 2013
4.7.1. Calendar
1. You can set calendar for Reminder, Meeting, Course, Date, Call, and Anniversary.
2. In the Calendar Screen, press [Left soft key] to enter [Options] menu. The following are the options:
View: View the events for current day.
View all: View all events.
Add event: You can set the Type, Start time, End time, Subject, Alarm, Repeat, Location, and Details.
Delete event: You can delete All, Overdue or Specific period.
Jump to date: Jump to the day you desire.
Go to today: Jump to today.
Go to weekly (monthly) view: The calendar is displayed by week or month.
4.7.2. Tasks
1. If there is no pre-set task, press [Left soft key] to add a new task. You can set date, time, subject,
alarm, repeat, priority, details, and/or status.
2. In the task list, press [Left soft key] to enter [Options] menu. The following are the options:
View: View current task.
Add: Add a new task.
Edit: Edit current task.
Search: You can search task by time or subject.
Delete: Delete current task.
Delete overdue: Delete the tasks which are overdue.
Delete all: Delete all tasks.
Jump to date: Jump to the day you desired.
View uncompleted: Display the tasks which haven’t been done.
Send vCalendar: You can send out the task by SMS, MMS or Email.
Save as file: Save the task as a file.
a) Choose a folder in phone memory, press [Left soft key] to [Options] menu.
b) Choose Select Option- this will enter the filename edit screen.
c) Enter the file name and press [OK] key.
4.7.3. Alarm
Table of contents