manuals.online logo
Brands
  1. Home
  2. •
  3. Brands
  4. •
  5. Holbach
  6. •
  7. Camera Accessories
  8. •
  9. Holbach 3S User manual

Holbach 3S User manual

Aluminum
Tripod 3S
Operating Manual
Please read this manual before using the tripod.
Note the safety instructions on page 5.
- 1 - - 2 -
Aluminum Tripod 3S Aluminum Tripod 3S
Note: This operating manual refers to the use with
compact devices for samplings and measure-
ments. For other uses, please read the included
manual of the tripod manufacturer.
Open the tripod legs up to the mechanical stop.
There are stops for three angles on each tripod leg
to adapt to different heights of the underground
(e.g. steps). To change the angle of a tripod leg,
press the button while opening it. Release the but-
ton shortly before the desired mechanical stop is
reached and open the tripod leg further up to the
mechanical stop.
Take the tripod 3S out of the carrying bag.
Release the locking by opening the levers to extend
the legs.
The recommended order is
to start from the thickest
tripod leg and end with
the thinnest one.
Pull the tripod legs out up
to the desired length and
lock them by closing the
locking levers.
The center column can
be extended to fine ad-
just the height. Unlock
the column locking by
turning, pull the col-
umn out to the desired
height and lock it again by turning the column lock-
ing in the opposite direction.
The delivery includes:
the aluminum tripod 3S
the carrying bag
hex wrenches for adjusting the latches
a ball head with profiled quick-release plate
an extension for the center column
a disk
the operating manual of the tripod manufacturer
The parts , and are not used for operation
of the tripod 3S according to this manual and can
be stored outside of the bag.
The wrenches can be stored in the outside
pocket of the carrying bag.
4 5 6
3
Scope of Delivery
5
5
6
6
4
4
3
3
2
2
1
1
Assembly
Assembly (continued)
open
closed
closed
opening
closing
Button
Stops
Stops
Button
Please check whether the spikes on the feet are fully
retracted before putting the tripod 3S onto damag-
eable undergrounds.
By turning the foot clock-
wise, the spikes can be
extended.
By turning the foot counter-
clockwise, the spikes can
be retracted.
Column locking
On the first use, the quick-change plate has to be
mounted to the base of the device. A 1/4 inch UNC
thread (tripod thread) on the device is required for
that.
Take the quick-change plate out as described on the
following page and screw it onto the device base.
Umweltanalytik Holbach GmbH
Sperberweg 3 D-66687 Wadern
Internet: www.holbach.biz
eMail: info@holbach.biz
Phone: 06874 / 18 22 77
Fax: 06874 / 18 22 78
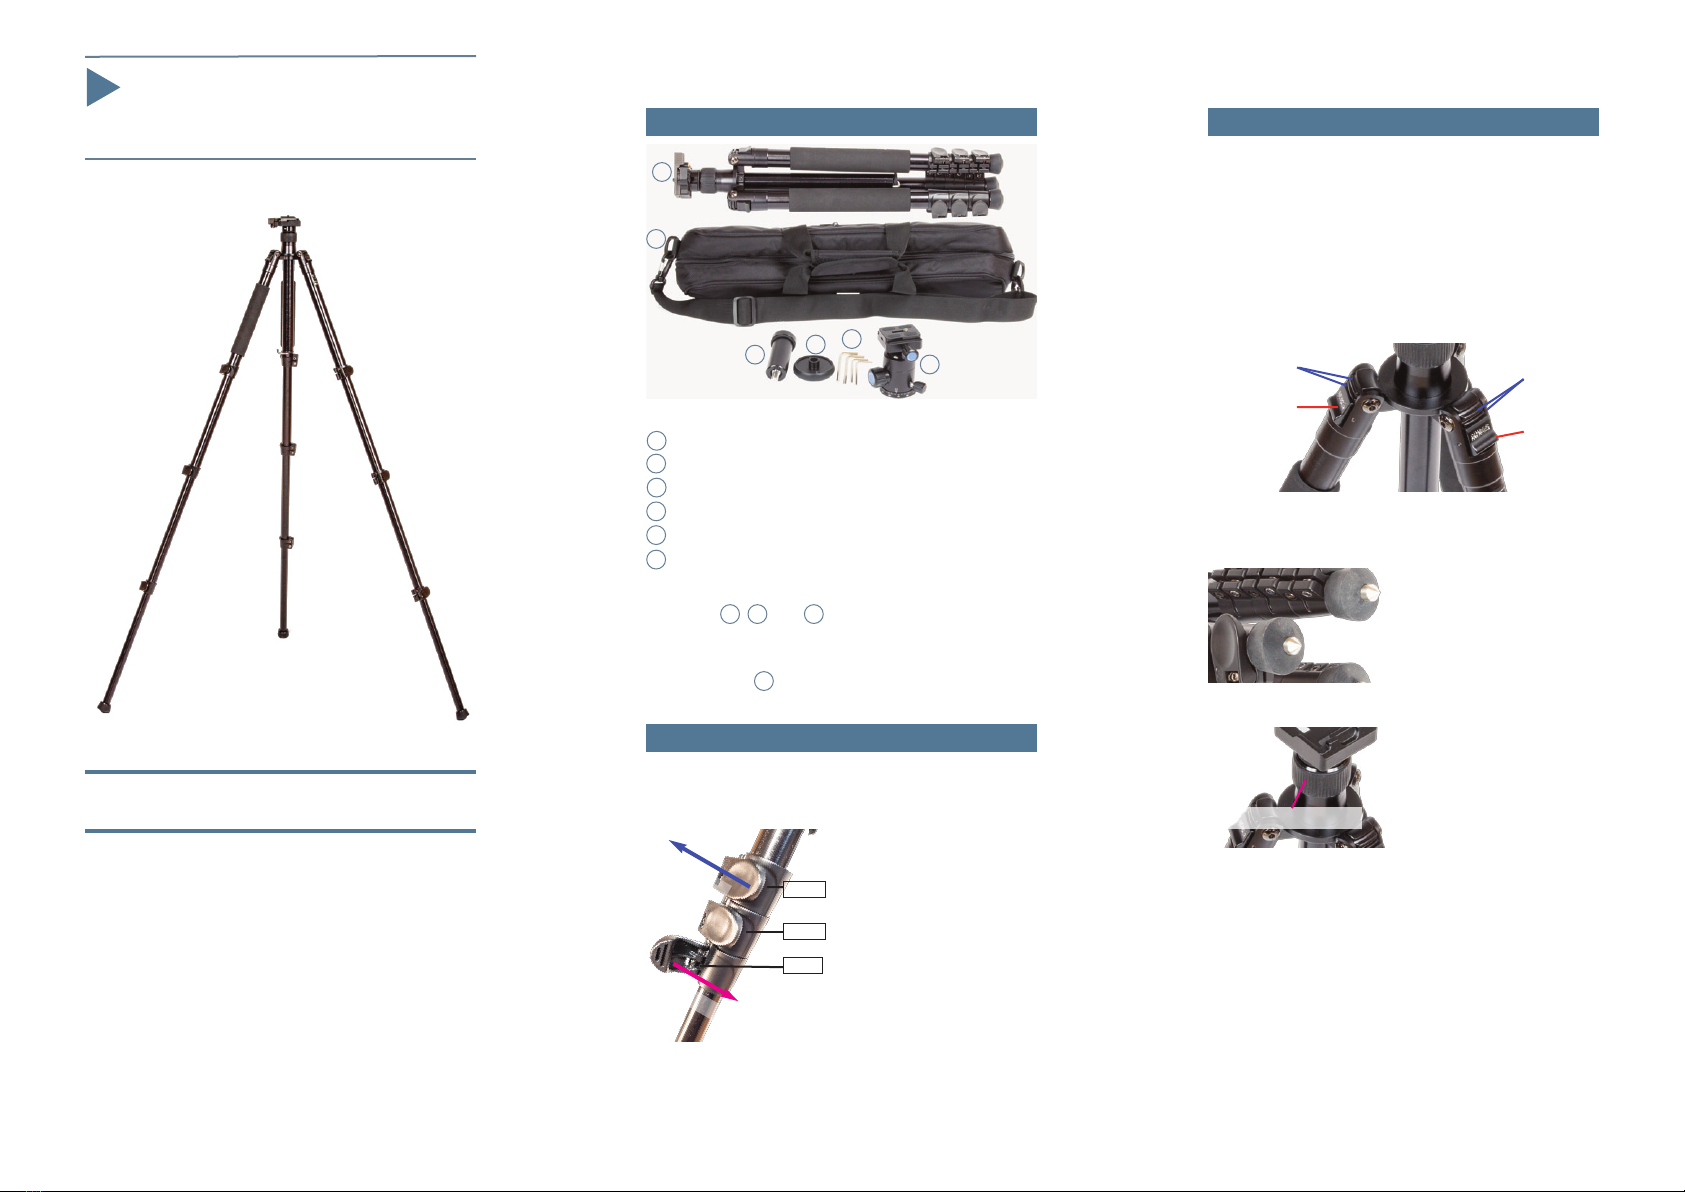
Aluminum Tripod 3S
Technical Data
Safety Instructions
Issued: 11/2020
Only use the tripod for its intended purpose.
Ensure that the tripod stands securely.
Ensure that the tripod legs are locked correctly.
Ensure that the locking lever of the quick-change
adapter is locked correctly.
Take the device off the tripod while carrying.
Keep children away from the assembly.
Do not leave the tripod with the device unat-
tended.
Do not use the tripod if it is damaged.
Never overload the tripod.
Check the locking of the tripod legs in regular in-
tervals.
Minimum height 47 cm
Maximum height 145 cm
Transport length 53 cm
Load capacity up to 12 kg
Leg locking with levers
Leg extensions 3
Leg angle locking 3 steps
Quick-change adapter included in delivery
Mounting thread 1/4 Inch UNC
Weight without bag 1.7 kg
Article no. 02-120
!
!
!
!
!
!
!
!
!
!
- 3 - - 4 - - 5 -
Aluminum Tripod 3S
Aluminum Tripod 3S
To remove the plate, first turn the safety lever out-
wards (as illustrated)
and then turn the lock-
ing lever into its outer
position. The plate can
then be lifted upwards
out of the bottom part.
Lift the turning ring on
the bottom side of the
plate and screw the
plate onto the device.
Fold the ring back in
afterwards.
Safety Lever
Locking Lever
Plate
Assembly (continued)
Device Mounting
Disassembly
Maintenance
Cleaning
Turning Ring
Turn the safety lever outwards.
Turn the locking lever outwards until it snaps into
place.
Put the thin side of the plate into the bottom part
such that the edge of the plate locks into the side
wall of the bottom part.
Push the device with the plate downwards until
the locking lever unlatches and turns inwards.
After mounting, the locking lever has to be pushed
to the front with low force until the connection be-
tween the tripod and the device is firm.
Turn the safety lever to the front.
Check if the connection is solid!
Only clean the tripod with a soft cloth and mild de-
tergents.
Keep the locking and sliding parts free of dust and
dirt.
Do not use lubricants.
Note: For a safe operation with sampling
devices, we do not recommend the use of the
included ball head .
4
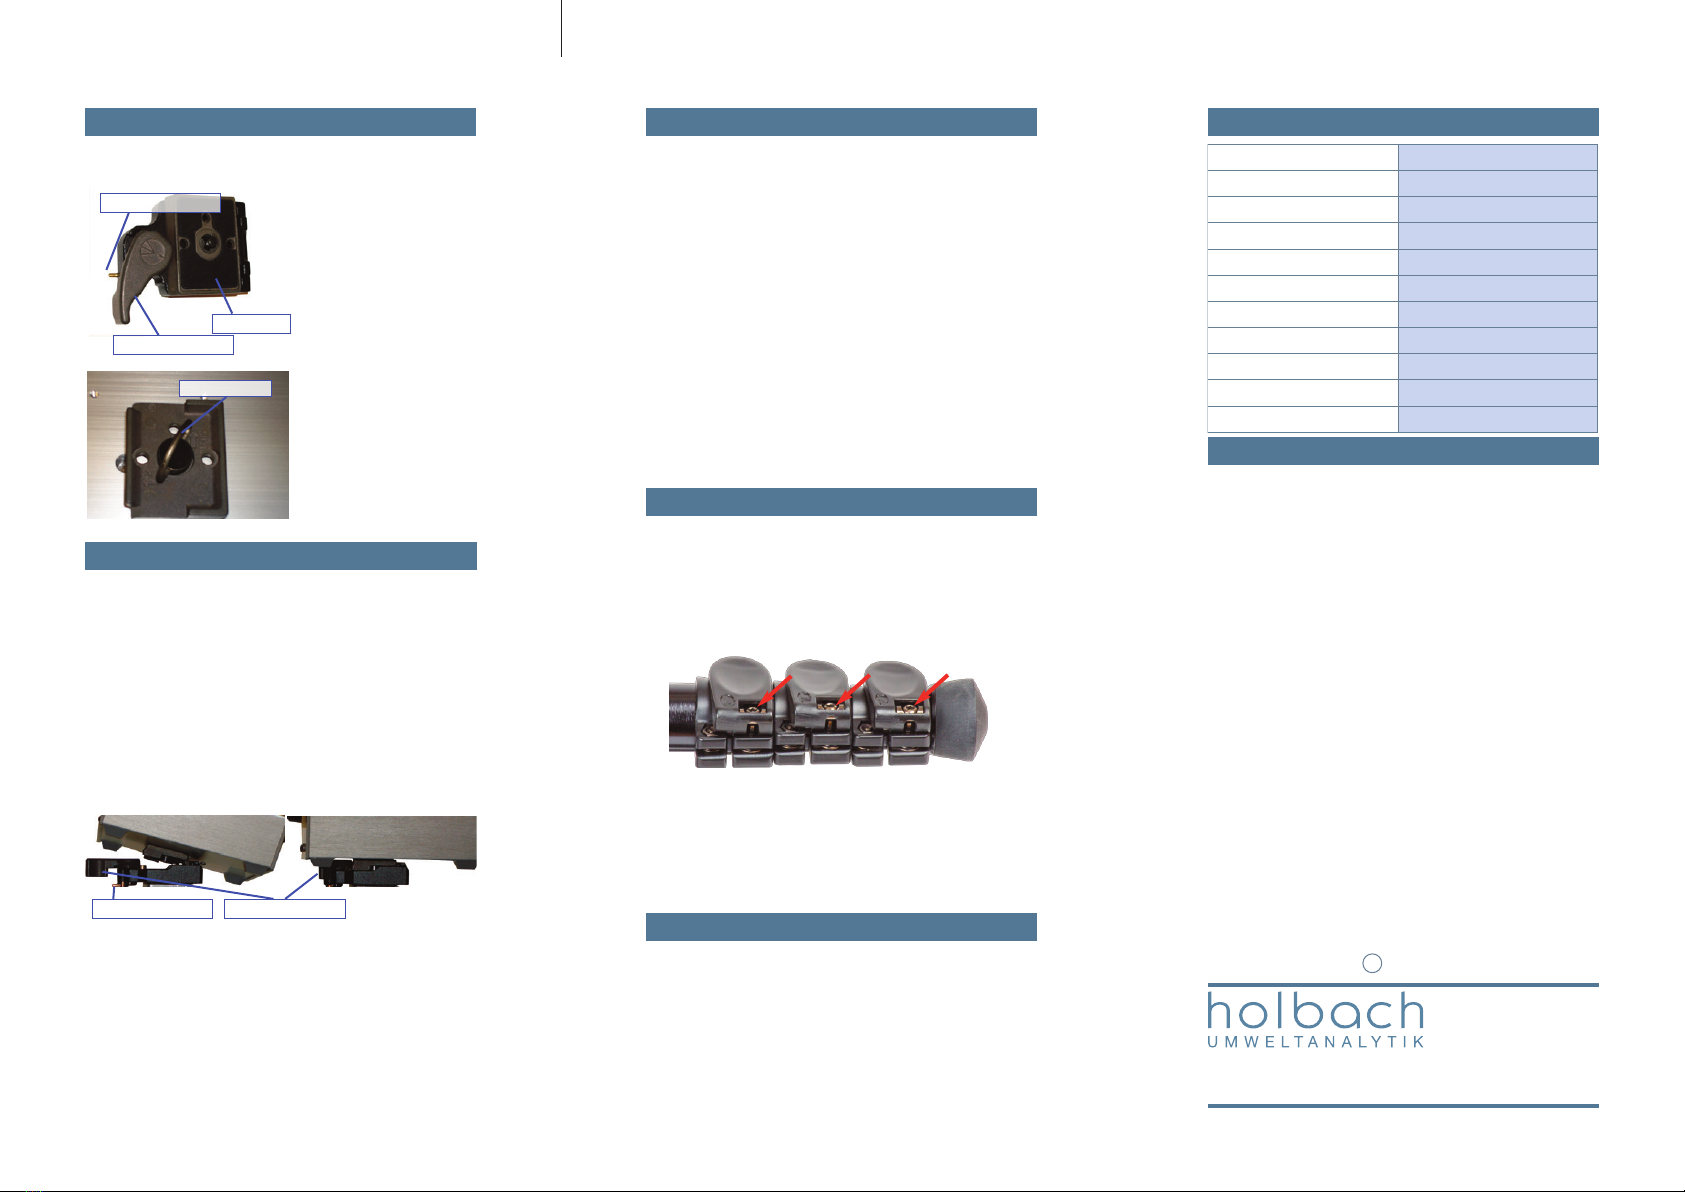
Regularly check the locking of the tripod legs.
If the lever no longer locks the tripod leg tight
enough, the locking can be adjusted by tightening
the marked hex screws. The corresponding 3 mm
hex wrench is included in the delivery.
If the lever is very hard to operate, the screws are
too tight.
Check whether the locking is tight enough after
the adjustment.
Hold onto the device while releasing it.
Turn the safely lever of the quick-change adapter
outwards.
Turn the locking lever of the quick-change adapter
outwards until it snaps into place.
Lift the device diagonally upwards.
If required, push the center column back in.
Push the tripod legs back in.
If required, screw the spikes in.
Fold in the tripod legs.
Put the tripod into the carrying bag.
Insert device diagonally and push downwards
Locking LeverSafety Lever

Popular Camera Accessories manuals by other brands

Panasonic H-FS1442AE operating instructions

Panasonic

Panasonic H-FS1442AE operating instructions

10 Bar Underwater Housings 5 D Mark II user manual

10 Bar Underwater Housings

10 Bar Underwater Housings 5 D Mark II user manual

Philips Power Life LR6PC20X Specifications

Philips

Philips Power Life LR6PC20X Specifications

walser Walimex Pro Operator instruction manual

walser

walser Walimex Pro Operator instruction manual

Tiffen Monopod Duo Specification sheet

Tiffen

Tiffen Monopod Duo Specification sheet

Zhiyun CRANE-M3 user guide

Zhiyun

Zhiyun CRANE-M3 user guide

Profoto Air Remote TTL-N user guide

Profoto

Profoto Air Remote TTL-N user guide

SES SE-3020 user manual

SES

SES SE-3020 user manual

Moza Mini MX 2 user manual

Moza

Moza Mini MX 2 user manual

Hasselblad CF LENS ADAPTER datasheet

Hasselblad

Hasselblad CF LENS ADAPTER datasheet

Hohem iSteady X2 user manual

Hohem

Hohem iSteady X2 user manual

Hohem HG5 PRO user manual

Hohem

Hohem HG5 PRO user manual

Bioenno Power BLF-1250AS Instructions for use

Bioenno Power

Bioenno Power BLF-1250AS Instructions for use

Fantasea FE 330 manual

Fantasea

Fantasea FE 330 manual

0-360.com 0-360 Panoramic Optic Setup instructions

0-360.com

0-360.com 0-360 Panoramic Optic Setup instructions

Pentax Data LX user guide

Pentax

Pentax Data LX user guide

DreamGEAR Power Bricks user guide

DreamGEAR

DreamGEAR Power Bricks user guide

vapanion TAROT NANO user manual

vapanion

vapanion TAROT NANO user manual

manuals.online logo
manuals.online logoBrands
  • About & Mission
  • Contact us
  • Privacy Policy
  • Terms and Conditions

Copyright 2025 Manuals.Online. All Rights Reserved.