Hologram KJ600TA User manual

GASOLINE TILLER
MODEL KJ600TA
MANUAL INSTRUCTION
Gasoline Engine: 139cc, OHV, Single Cylinder, 4 Strokes


WARNING!
There is a risk that stones and other
objects could be thrown out by the tiller.
Always keep other people, children pets
at a safe place.
WARNING!
This tiller uses petrol and oil. AI ways
take extreme precautions when
operating or moving this machine.
WARNING!
Turn off the eng ine and disconnect
the
spark plug cap before cleaning,
trans porting, m aking any adjustments
or leaving the tiller unattended.
WARNING!
Never put your hands or feet under the
tiller deck while the blade is being
rotated.
/
This symbol means the engine speed is fast.
WARNING SYMBOLS
Thefollowing symbols aredisplayed onthe machine inordertoremindyou
of the safety precautions you should take when operating the tiller
Read this instruction booklet carefulIy before using the
tiller and keep it in a safe place for future reference.
WARNING! This is a Warning symbol. The symbol is used
through the Instruction Booklet whenever there
is a risk of personal inquiry. Ensure that these
warning were read and understood at all times.
CAUTION! This is a Caution symbol. The symbol is used
through the Instruction Booklet whenever there
is a risk of personal inquiry. Ensure that these
warning were read and understood at all times.
This symbol means the engine speed is slow

Readthismanualcarefullybeforeputting
the unit in operation
Everyeffortismadetoimproveourproductscontinuously.Therefore,technical
date and figures are subject tochange.
1 Unit
The lightweight tiller isequippedwithahigh-efficient4-strokeengine.Arugged
design for light to medium heavy soils is ideal for titling close-planted crops.
Please extra-silent and steady run. A tiller of special steel, only little wearable
provides for good cost-effectiveness. A special shape of blades provides for
thrifty and efficient titling. It is easy operation by use a turning guide wheel.
Start-up system responding to a button pressing (the tiller will run upon
pressing an operation button in rest state) improves the labor safety.
Scope of Delivery
1.
Carriage
2.
Left-hand handle (driving lever)
3.
Driving lever
4.
Depth limiter
5.
Bracket and handle
6.
Wheel
7.
Right-hand handle (ON/OFF,SPEED)

2 General Safety Instructions
Prior to the initial use of the unit, the operating instructions should be read
completely.Ifindoubtwithregardtoconnectionandoperationoftheunit,consult
the manufacturer (Servicing Department)
FOLLOW THE INSTRUCTIONS BELOW CAREFULLY IN ORDER TO
SECURE A HIGH DEGREE OF SAFETY:
CAUTION!
1.
Payattentiontotheconditions ofthearea, whichyou’re workingin.Afterthe
engine is started, power machine will produce poisonous flue gas. The gas
maybeinvisibleandodorless.Henceneverworkwiththemachineclosedor
poorly ventilated areas. Provide for good lighting when cutting. Provide for
stability when cutting in wet, snow or icy weather conditions on slopes or
rough ground.
2.
Donotletanyunauthorizedpersonsapproachthemachine.Thevisitorsand
viewers,primarilythechildren,theillandinfirmpersonsshouldnothaveany
accesstotheworkingarea.Prevent otherpersonsfromanycontactwiththe
machine.
3.
Makeprovisionforthetoolsstorage.Themachinesnotincurrentuseshould
bekeptinadryplace,elevatedorlockedwherepracticablesothatanyaccess
to them is prevented.
4.
Always use acorrect tool forthe job tobedone. E.g. avoidusing small tools
andaccessoriesforworkthatshouldbeactuallydonewithaheavytool.Use
the tools only for the purposes they were designed for.
5.
Pay attention to adequate clothing. The clothing should fit the purpose and
should not put any limits to you when working.
6.
Use personal protection equipment. Wear safety shoes with steel toes and
antiskid or rough sole.
7.
Wear goggles. Object may be thrown against you.
8.
Wear ear protectors. Wear personal protective equipment to protect your
ears, such as ear protectors.
9.
Hand protection. Wear hard gloves-gloves of chrome tanned side leather
give a good protection.
10.
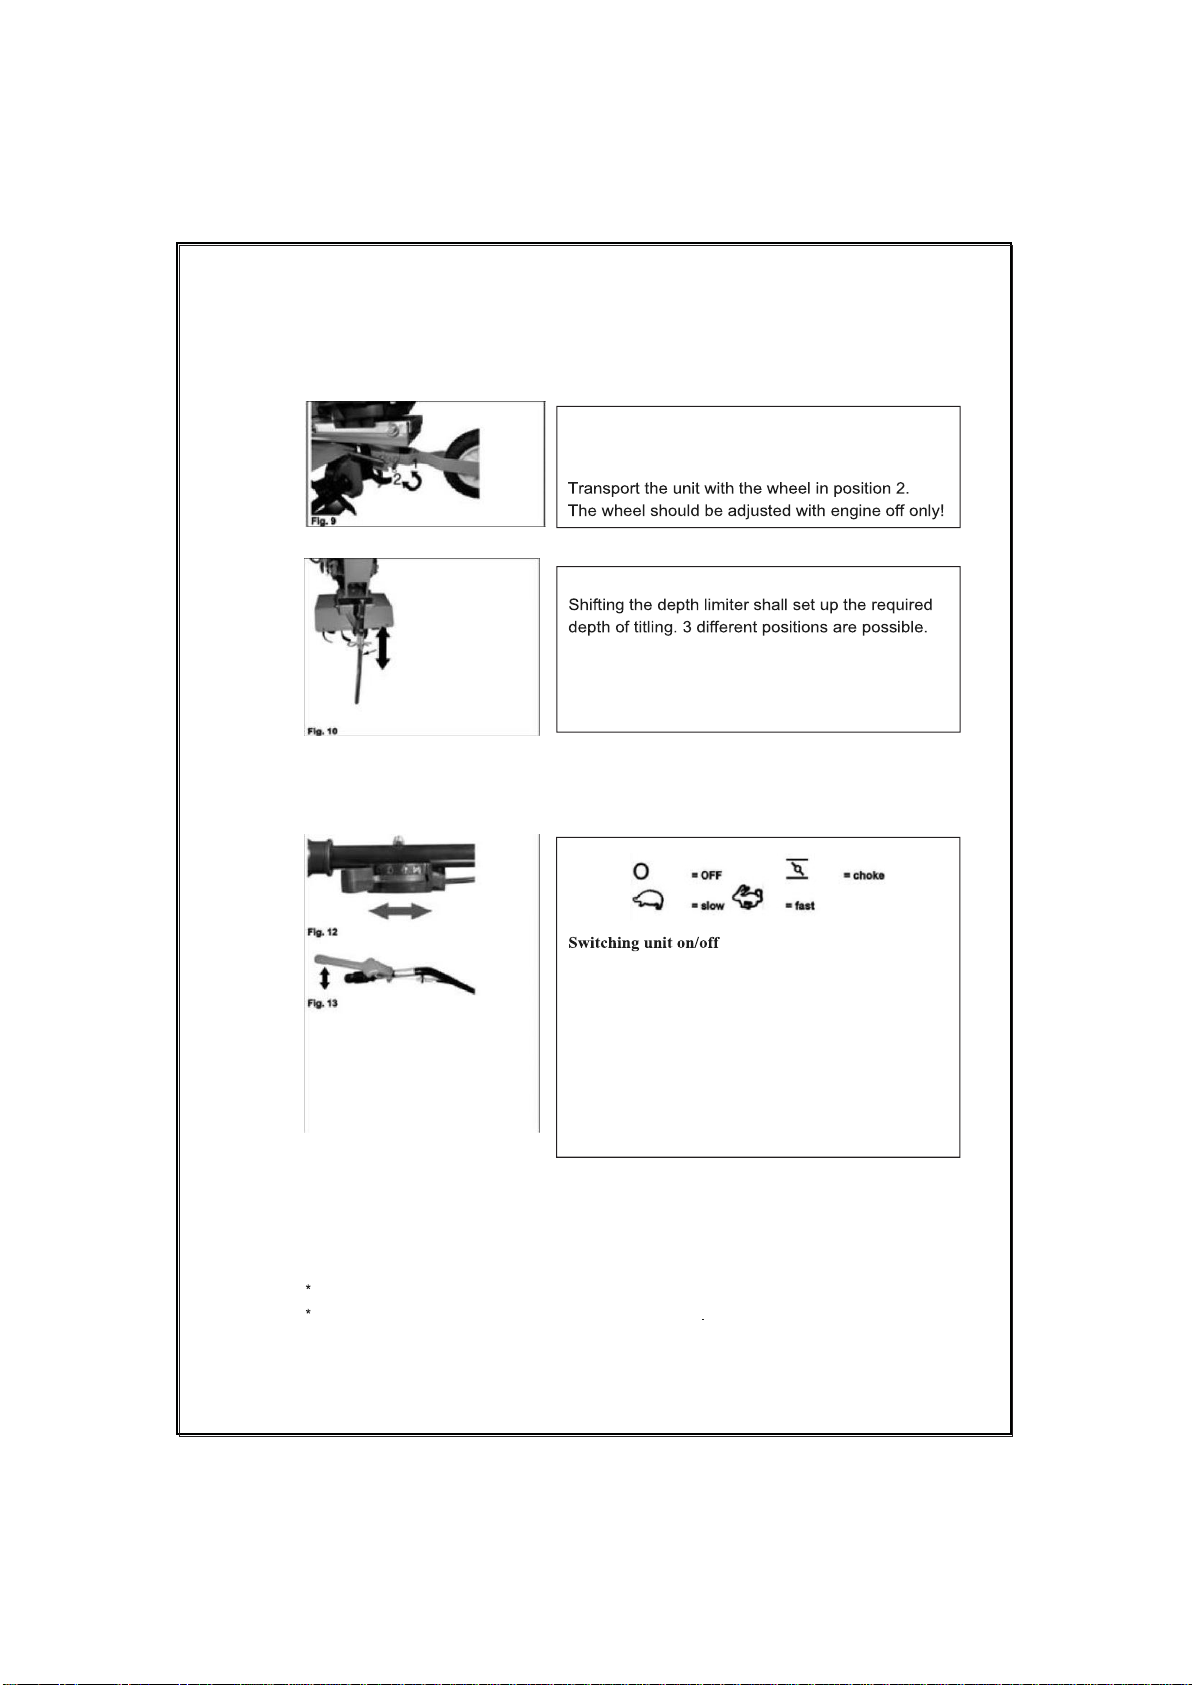
Transport. The tiller should be always transported with the driving wheel in
transportposition.Makesurethatnobodyisexposedtoriskwhenthetilleris
putoutofservice.Securetheunitagainsttilting,damageandfuelleakage.
11.
Remove the wrench etc. Any wrenches/spanners etc. must be removed
before the tiller is put on.
12.
Be attentive any time. Mind what you are doing. Use common sense.

Do not use the tiller when tired. Never work with the crusher when
influence by alcohol, drugs or medicaments affecting the concentration
capability.
13.
Refueling. Always switch the engine off before refueling. Open the tank
closure carefully for overpressure run out slowly and the fuel ejaculation is
prevented.Whenworkingwiththetiller,theunitbodytemperatureincreased.
Lettheunit cool down before refueling. Otherwise, the fuel could ignite and
persons getburnt. Beware ofoverfilling the tank. Ifthereisaspill, remove it
andcleantheunit.Afterfinishingtherefueling,makesurethescrewedclosure
is tight to avoid loosening inresult of vibrations.
14.
Watchoutforanydamaged parts. Inspect themachine before use.Are any
parts damaged? Ask yourself seriously when detecting slight damage whether
themachinewillworkperfectlyandsafelydespitethat.Watchoutforproper
aligning andadjustment ofanymoving parts. Do the partsfit one inanother
properly?Arethepartdamaged?Iseverythinginstalledasappropriate?Are
any other prerequisites of proper working in place? Damaged protective
devices etc. must be repaired or replaced by authorized entitles unless the
operationmanualexpresslysaysotherwise.Anydefectiveswitchesmustbe
replacedatanauthorizedservicingcentre.Donotusethemachineifitcannot
beput onandoffwith theswitch. Whenrepairs arenecessary, kindly turnto
your local servicing centre.
15.
Switchtheengineoffbeforeanyadjustmentandmaintenance.Thatappliesto
the blades replacement in the firstplace.
16.
Useapprovedpartsonly.Useonlyidenticalsparepartsformaintenanceand
repairs.Requestadviceofanauthorizedservicingcentreforthispurpose.
2.1
Emergency Action
Applythefirstaidadequatetotheinjuryandgetqualifiedmedicalassistanceas
quickly as possible. Protect the injured person from more accidents and calm
him/her down.
2.2
Assigned Use
Theunitisdesignedonlyforregularuseinagriculture,forestry,andhorticulture
andareatreatment.Themanufacturershouldnotbeheldliableforanypersonal
andmaterial losses due to afailure to observe these rules.

3 Transportation and Storage
•The unit is allowed to be transported with the engine off only
•Clean the unit thoroughly before putting in onstorage
•Store the unit at a dry cleanplace
Fuel or oil may leak at transport. Secure the unit as appropriate
and take preventive action to protect the environment against
contamination.
4 Assembly and First Putting in Operation

Refueling
Use only regular leadless petrol
Explosion hazard!
•Refuel outdoors only!
•Never refuel with engine running or while it still hot!
•Do not smoke and do not handle open fire!
Engine oil filling
Use only oil type 15W40
Use oil dip rod to check the filling status.
Avoidfueloroilsplashingsothatsoilcontaminationis
avoided. Useappropriatetoolsforfilling(funnel)
4.1
Safety Instruction for the First Putting InOperation
Always make surethatthe screwed parts aretight asappropriate anduseonly
the parts included in thedelivery.
4.2
Procedure
Assemble separate parts in the correct order as shown. Make sure that structural
parts are arranged as shown in figures.
The unit is delivered without oil and fuel. Fill in the liquids according to specifications.

5 Operation
Guiding wheel in work position
Put the wheel in pos.1 for titling.
CAUTION!
Cutting height setting
Put the lever onthe chute (Fig 12).Pull thestartercable
evenly.Theengineshouldstartupafter3-5pulls.Putthe
leverattherequiredspeedandpullthedrivinglever(Fig.
12) against the handle (Fig. 13)
Notice:Iftheengineisheatedup,itispossibletostartup
in the slow/fast position.
Withthedrivinglevertripped,thedrivewillbe off but the
engineworkson.Theenginemaybeswitchedoffwiththe
switch in OFF position (Fig.12)
5.1 Operator Safety Instruction
Do not use the machine until you have read the instruction manual carefully.
Observe any safety instruction included in the manual

*
Be responsible to the others
*
The unit is provided a foot-operated brake than stops the blades within 3
secondsafterthedrivelevertripping.Neverattemptstoppingtheunitortilting
the unit with blades still rotating. Wait for the blades to come stand by
themselves.
*
If the blades get in touch with foreign objects, stop the engine immediately
and check the unit with blades stopped for damage. Continue working
with unit undamaged only.
*
Walk while working and do notrun.
*
Always walk forward only. Never pull theunit walking backwards.
*
When working on a slope, always work across, never down and up. Be
particularly careful when changing direction.
*
Whentravellingacrossno-grassareasandtransferringtheunitfromthework
area to another one, the blades must not be operating.
5.2 Step-by-Step Instructions
1.
Fill in the fuel (see chapter Assembly andFirst Putting In Operation)
2.
Clear any foreign objects from the land.
3.
Spud the land until the soil is sufficientlyloose.
4.
Clean the unit thoroughly after every use.
6 Troubles-Causes-Troubleshooting
Trouble
Cause
Troubleshooting
Engine will not
start
1.
Empty tank
2.
Fouled air filter
3.
No ignition spark
4.
Flooded engine
1. Fill in the tank, check the fuel in carburetor,
and clean the hole in the lid with a needle.
2. Clean the air filter.
3. Clean the ignition plug or use a new one.
4. Remove the plug, clean and wipe dry; pull the
starting cable several times with the plug
removed.
Faltering
engine
1. Ignition cable detached
2. Fuel piping clogged or wrong
fuel
3.
Blocked hole in the fuel tank
cover.
4.
Water or dirt in fuelsystem
5.
Fouled air filter
1.
Push the plug socket firmly on the plug.
2.
Clean fuel piping, use fresh/differentfuel.
3.
Replace the fuel tank cover
4.
Drain the fuel and refuel.
5.
Clean the air filter
Engine often
switches off
1. Too long ignition interval,
defective ignition plug
1.
Adjust/replace the ignition plug
2.
Set up the carburetor

7 Inspections and Maintenance
7.1 Inspections and Maintenance Safety Instructions
The machine will serve as a sufficient aid only if maintained and care for
appropriately. Insufficient maintenance and care may result in accidents and
injuries.
•Priortoanyworksontheunit,alwaysswitchtheengineoffandpullthesparkle
plug socket out!
•Never useaggressive detergents forcleaning. That couldresult indamage
or destruction of the unit.
7.2 Inspection and Maintenance Schedule
8 Technical Data
when idling
2.
Carburetor not set correctly
3.
Fouled air filter
Drive will not
work properly
1* Check the drive lever cable
tension
2. Drive does not work
1.
Adjust the cable tension ifnecessary.
2.
Have the unit checked in a servicing shop
Excessive
vibrations
1. Loose lock screws
1. Tighten the lock screws
Time Interval
Description
Before start of work
•
Check the engine oil level
•
Check for any loosen parts
Every 25 operating
hours
•
Exchange the engine oil
•
Check the engine oil level
•
Clean the air filter
•
Remove remnantsofgrassfromrotatingpartingwitha
brush or a blunt tool
•
Wipe the body with a softcloth
•
Whenthedirtishardened,theunitmaybecleanedwith
soft cloth wetted in soapywaters
Every 100 operating
hours
•
check, clean orreplace the ignition sparkle plug
Drive Type:
Hand push
Engine Model:
XAS1P65FA

Due to continual improvement, specifications are subject to change
without prior notification.
9 Explosion Picture
Engine:
4-stroke,Forcedaircooling,Singlecylinder,OHV
Rated Power:
2.6 kw
Rated Speed:
3000rpm
Displacement:
139cc
Starting:
Recoil
Tank Volume:
1.2L
Cutting Path:
600mm
Wheel Diameter:
5 ”
Wheel Width:
42mm
Noise Lever:
93dB(A)
Max Permissible Slope:
20
N.W./G.W.:
36kg/39kg

KJ600TASparePartsList
POS.
Part No.
Spare Parts Name
Material or
Specification
Qty
1
GB5783
screw
M8X30
5
2
GB96—86
basher
ᴓ8.1Xᴓ28X2.5
3
Xl5l1000000
handle fixer
PP
4
X l512000000
handle fizer
Q235A
5
GB96/T889.l
net
M8
13
6
GBl1544—96
belt
PI(6I3
7
X1211000000
pu11y
ADCI2
8
GB5789—86
screw
M6X35
9
X1421000000
limited plate
Q235A
10
GB96/T889.1
nut
11
Xl111000000
dust cover
0235A
12
X1312000000
right blade
13
X1310030000
pin
4
14
X1314000000
right blade
l5
X1310020000
dust cover
2
16
GB5783
screw
14
17
GB93—86
spring
6
18
GB96—86
flasher
ᴓ8.lX ᴓ24X2
18
19
X1211000000
gear box
20
X1131000000
protect cover
Q235A
21
GB5789—86
screw
M8X25
22
X1313000000
right blade
23
X1311000000
left balde
24
Xl133000000
right protect cover
Q235A
25
X1132000000
right protect cover
Q235A
26
X1410020000
spring
65Mn
27
X1410030000
pin
65Mn
28
GB96/T889.l
nut
Ml0
29
GB5783
screw
Ml0X65
30
X1141000000
handle
Q23SA
31
X1410010000
axle
Q235A
32
X1411000000
wheel fixer
Q235A
33
X1410040000
flasher
PA6+30%GF
34
X1412000000
whe11 assem
35
X1230010000
spring
65Mn
36
Xl231000000
tension pu11y
37
GB5789—86
screw
M8X40
3
38
GB96—86
flasher
ᴓ8.4Xᴓl6Xl.6
2
39
X1121000000
engine f ixer
PA66+30%GF
40
GA510020000
blade screw
20Cr ( L=30)

41
GB96—86
basher
ᴓ1OXᴓ28X2
42
BD003B00000
they
4.7*4.7*4O
43
X1222000000
pully
ADC12
44
SG450
gasoline engine
45
X1532000000
clutch cable
46
GB5789—86
screw
M5X35
47
X1521020000
holder
PP
48
X1521040000
spring
65Mn
49
X1521010000
clutch handle
Q235A
50
GB96/T889.1
nut
MS
51
GB/T12165—1990
rivets
4X10
52
X1521030000
liamited plate
PP
53
X1521000000
1eft handle
Q235A
54
X1520010000
handle cover
PVC
55
GB5789—86
screw
M6X45
56
X1531000000
throttle cable
57
X1522000000
righ handle
Q235A
58
GB802—88
nut
M6


BENSIINIKÄYTTÖINEN
KULTIVAATTORI
MALLI KJ600TA
KÄYTTÖOHJE
Bensiinimoottori: 139 cm3, yläventtiilillä, yksisylinterinen, nelitahtimoottori


VAROITUS!
On mahdollista, että kultivaattorin
toimiessa sen alta saattaa lentää kiviä tai
muita esineitä. Varmista, että muut
ihmiset, lapset ja eläimet ovat turvallisella
etäisyydellä koneesta.
VAROITUS!
Tämä kultivaattori tarvitsee toimiakseen
bensiiniä ja öljyä. Ole aina varovainen,
jos käytät tai siirrät tätä konetta.
VAROITUS!
Ennen koneen puhdistamista, kuljet-
tamista, säätöjen muuttamista tai jos
kultivaattoria ei käytetä, sammuta moottori
ja irrota sytytystulppa.
VAROITUS!
Älä laita käsiä tai jalkoja kultivaattorin
suojakannen alle, kun terät pyörivät.
/
Tämä symboli viittaa nopeasti toimivaan moottoriin
VAROITUSSYMBOLIT
Seuraavat symbolit on kiinnitetty koneen ja niiden tarkoitus on muistuttaa
turvallisuudesta kultivaattorin osien avaamisessa
Lue tämä ohje huolellisesti ennen, kuin käytät kultivaattoria
ja säilytä se vastaisuuden varalle.
VAROITUS! Tämä on varoitussymboli. Tätä symbolia on
käytetty tässä käyttöohjeessa viittamaan
henkilöiden loukkaantumisvaaraan. Varmista,
että varoitukset on luettu ja ne on ymmärretty.
VAARA! Tämä on vaaran symboli. Tätä symbolia on
käytetty tässä käyttöohjeessa viittamaan
henkilöiden loukkaantumisvaaraan. Varmista,
että varoitukset on luettu ja ne on ymmärretty.
Tämä symboli viittaa hitaasti toimivaan moottoriin

Lue tämä käyttöohje ennen koneen
käyttämistä huolellisesti
Tuotetta parannetaan jatkuvasti. Tämän johdosta saattaa koneessa tai
teknisissä tiedoissa olla muutoksia.
1 Unit
Kevyt kultivaattori on varustettu tehokkaalla nelitahtimoottorilla.
Lujatekoinen laite sopii kevyeen tai keskiraskaan maan muokkaamiseen
lähekkäin istutettujen kasvien välissä. Toimii hiljaisesti ja tasaisesti.
Kultivaattori on valmistettu erikoisteräksestä, on kulumisenkestävä ja näin
ollen hyvin edullinen käyttää. Tarkoin muotoillut terät muokkaavat maata
tarkasti ja tehokkaasti. Laitteen ohjaaminen on helppoa ohjauspyörän
avulla. Käynnistys nappia painamalla (sammutettu kultivaattori käynnistyy
nappia painamalla) varmistaa turvallisen toiminnan.
Toimituspaketti
1. Runko
2. Vasemmanpuoleinen kahva (ohjausvipu)
3. Ohjausvipu
4. Syvyydenrajoitus
5. Kannatin ja kahva
6. Pyörä
7. Oikeanpuoleinen kahva (ON/OFF,
NOPEUS)

2 Tärkeimmät turvallisuusohjeet
Ennen laitteen varsinaista käyttöä on luettava käyttöohje huolellisesti. Jos
on kysyttävää laitteen liitäntöjen tai käytön osalta, ota yhteyttä valmistajaan
(huoltoyksikkö)
NOUDATA TARKOIN ALLA OLEVIA OHJEITA, NÄIN VARMISTAT
LAITTEET TURVALLISEN KÄYTÖN:
VAARA!
1.
Huomioi laitteen käyttöalueen olosuhteet. Kun kone on käynnistetty,
moottorin käynnistyksessä syntyy jonkin verran myrkyllisiä kaasuja.
Kaasu saattaa olla näkymätön ja hajuton. Tämän johdosta ei laitetta
koskaan käyttää suljetussa tai huonosti ilmastoidussa tilassa. Varmista
hyvä valaistus koneen käytön aikana. Varmista, että kone pysyy vakaan,
kun muokkaat maata sateessa, lumisateessa tai jäisissä oloissa tai
epätasaisella tai kovalla maalla.
2.
Älä anna epäpätevien henkilöiden olla laitteen lähellä. Sivullisilla
henkilöillä, erityisesti lapsilla, sairailla tai iäkkäillä ihmisillä ei saa olla
pääsyä koneen käyttöalueelle. Estä muilta henkilöiltä mahdollisuus
koneen käyttämiseen.
3.
Varmista koneelle asianmukaiset säilytystilat. Konetta säilytetään, kun
sitä ei käytetä, kuivassa paikassa, maasta korkeammalla olevassa ja
lukitussa paikassa, estäen sen luvattoman käytön.
4.
Käytä aina suunniteltavaan työhön sopivaa työkalua. Vältä käyttämästä
mm. liian pieniä työkaluja ja varusteita sellaisten työn tekemiseen, joka
edellyttää raskaiden työkalujen käyttämistä. Käytä työkaluja vain niiden
käyttötarkoitukseen.
5.
Varmista, että koneen käyttäjällä on asianmukainen vaatetus.
Vaatetuksen tulee olla käyttötarkoituksen mukainen ja se ei saa estää
koneen käyttöä tai työskentelyä.
6.
Käytä henkilösuojaimia. Käytä turvajalkineita, joissa on teräksinen kärki
ja ei-liukas tai luja pohja.
7.
Käytä suojalaseja. Kultivaattorin alta saattaa lentää kiviä tai esineitä.
8.
Käytä kuulonsuojaimia. Käytä suojalaitteita kuulon suojaamiseen, mm.
korvasuojaimia.
9.
Käsien suoja. Käytä riittävän suojan tarjoamiseen lujatekoisia käsineitä,
mm. kromiparkitusta nahkasta valmistettuja käsineitä.
10.
Kuljetus. Kultivaattorin kuljetuksessa pitää ohjauspyörä siirtää
kuljetusasentoon. Varmista, että kultivaattori ei aiheuta sivullisille vaaraa,
kun sitä ei käytetä. Varmista laite satunnaiselta putoamiselta,
vaurioitumiselta ja polttoaineen vuodolta.
11.
Poista jakoavain tms. Ennen kultivaattorin käynnistämistä on kaikki
jakoavaimet tms. kiristimet poistettava.
Table of contents
Languages: