HOMCOM 370-103V70 User manual

ASSEMBLY INSTRUCTION
INfaa029V01_UK
370-103V70
IMPORTANT, RETAIN FOR FUTURE REFERENCE: READ CAREFULLY
●Suitable age 37-95 months.
●This product should be assembled by adult.
●This instruction contains important safety information
content,please keep it as a reference.
● Music,light
● Forward and backward
CHILDREN ELECTRIC MOTORCYCLE MANUAL

-1-
1
1
1
1
About the products
Thank you for choosing our children electric motorcycle.We always keep
pursuing being outstanding and designing comfortable and safe ride on car
for children.
Please read this instruction carefully before use,it will tell you the right way
of assembling and operating.To avoid incorrect operations damaging the
product or injuring your children.
Please keep this instruction.
Specifications
Part
Name
Part
Name
Part
Name
Picture Picture
Q'ty
(pcs)
Q'ty
(pcs)
Part
Number
Part
Number
Main
body
Handle
bar
Front
fender
Head
stock
Parts List
6V4AH
PP
37-95months
25kg
RS-380-6V RPM14000 x1
88x 42x53cm
74x 30x35cm
2-3km/h
1-2hours after charging about 8-12hours
Input AC100-240V; Output DC6V500mA/6V700mA
Resettable Fuse
Battery:
Main material:
Suitable age:
Maximum weight:
Motor:
Car Size:
Package Size:
Speed:
Operation time:
Charger:
Fuse:

1
2
1
7
1
4
1
2
2
8
2
1
1
1
1 1
1
-2-
Part
Name
Part
Name
Part
Name
Picture Picture
Q'ty
(pcs)
Q'ty
(pcs)
Part
Number
Part
Number
Charger
Screw
Wind
shield
Steering
lamp
Wrench
Front
wheel Foot
board
Right
rear
wheel
Left
rear
wheel
(Plum)
Rear
axle
Front Front
axle
Gasket
Nut
fork
License
plate
Front
cap
Rear
cap
17 18
19 20
21

-3-
1
2
3
4
8
9
10
11
12
15
16
18
19
20
21
6
7
5
Main body
Rear axle
Rear cap
Front fork
Front axle
Foot board
Front fender
Head stock
Handlebar
Right rear wheel
Front cap
License plate
Gasket
Nut
Steering lamp
Front wheel
Windshield
Left rear wheel
Explosion map
1
20
3
3
3
4
5
7
8
9
10
10
11
12
16
16
18
18
18
18
18 221
18 18
19
19
19
19
6
15

-4-
Assembling
The vehicle should be assembled by adult before use.It will take
30minutes to complete.
The small parts might cause choke,please keep away from the children.
Please check the number of the parts before assembling,and keep the
packaging bags away from the children in in case of choke.
1.Front wheel installation
Figure take off the front axle, the fender set in the front fork pipe.Turn the
front axle from left to right through the gasket, front fork tube, gasket, front
wheel, gasket, front fork tube, gasket, and then put nuts at both ends of
the front axle, and then tighten with a wrench.
Finally buckle the front cap.
11
11
3
18
19
12
3
5
12
18
19
16
16

-5-
2.Handlebar installation
Place the front wheel assembly in the corresponding position of the car
body , fit the handlebar and screw it.
3.Installation of head
First, install the windshield on the front of the head stock, and install the
steering lamp to the front hole.Connect the wire terminal with the body, then
clip the two feet of the head into the corresponding position of the body,
finally fix with two screws.
4
1
11
4
1
4
21
20
20
21
2
2
17 17 17
17

-6-
4.Installation of rear wheel
Insert the rear axle through the gearbox axle hole from the side of the body
into the axle hole of the body, place the wheels on the left and right side
respectively, install the motor, gasket and wheels as shown in the picture,
then lock them with nuts and put the rear wheel cap on the outside.
5.Pedal installation
Attach the pedals to the grooves in the body of the car, making sure they are
in place and not easy to come off.
1
6
91
8918 9
7
19 14 16
16 19
18 818
9
1
7
18
19
16
18 19
9

-7-
6.Installation of license plate
As shown in the picture, the license plate is inserted into the
corresponding hole of the body , and the license plate is fixed in the
body with two screws.
7.Connection power supply
Open the seat cushion,connect the red power cord with the red end
(positiveextreme) on the battery ,install and fix the seat cushion.
15
17 17

-8-
Warnings
For children' s safety, please read these carefully.
Assembly and adjustment must be done by adults, keep children away.
Keep children under 36 months away from small parts.
Do not be closeto fire.
Adult must teach how to play it and never leave children alone for playing.
Do not stand up or play when children are stepping on foot pedal.
Battery must be charged by adults only.
Please charge it first before use.Keep children away from plastic bag, or s
uffocation may occur.
Only use spare parts which provided by manufacturer.
Charger is not a toy for playing.
Maximum loading capacity is 25KG. Do not overload.
Suitable age: 37-95 months.
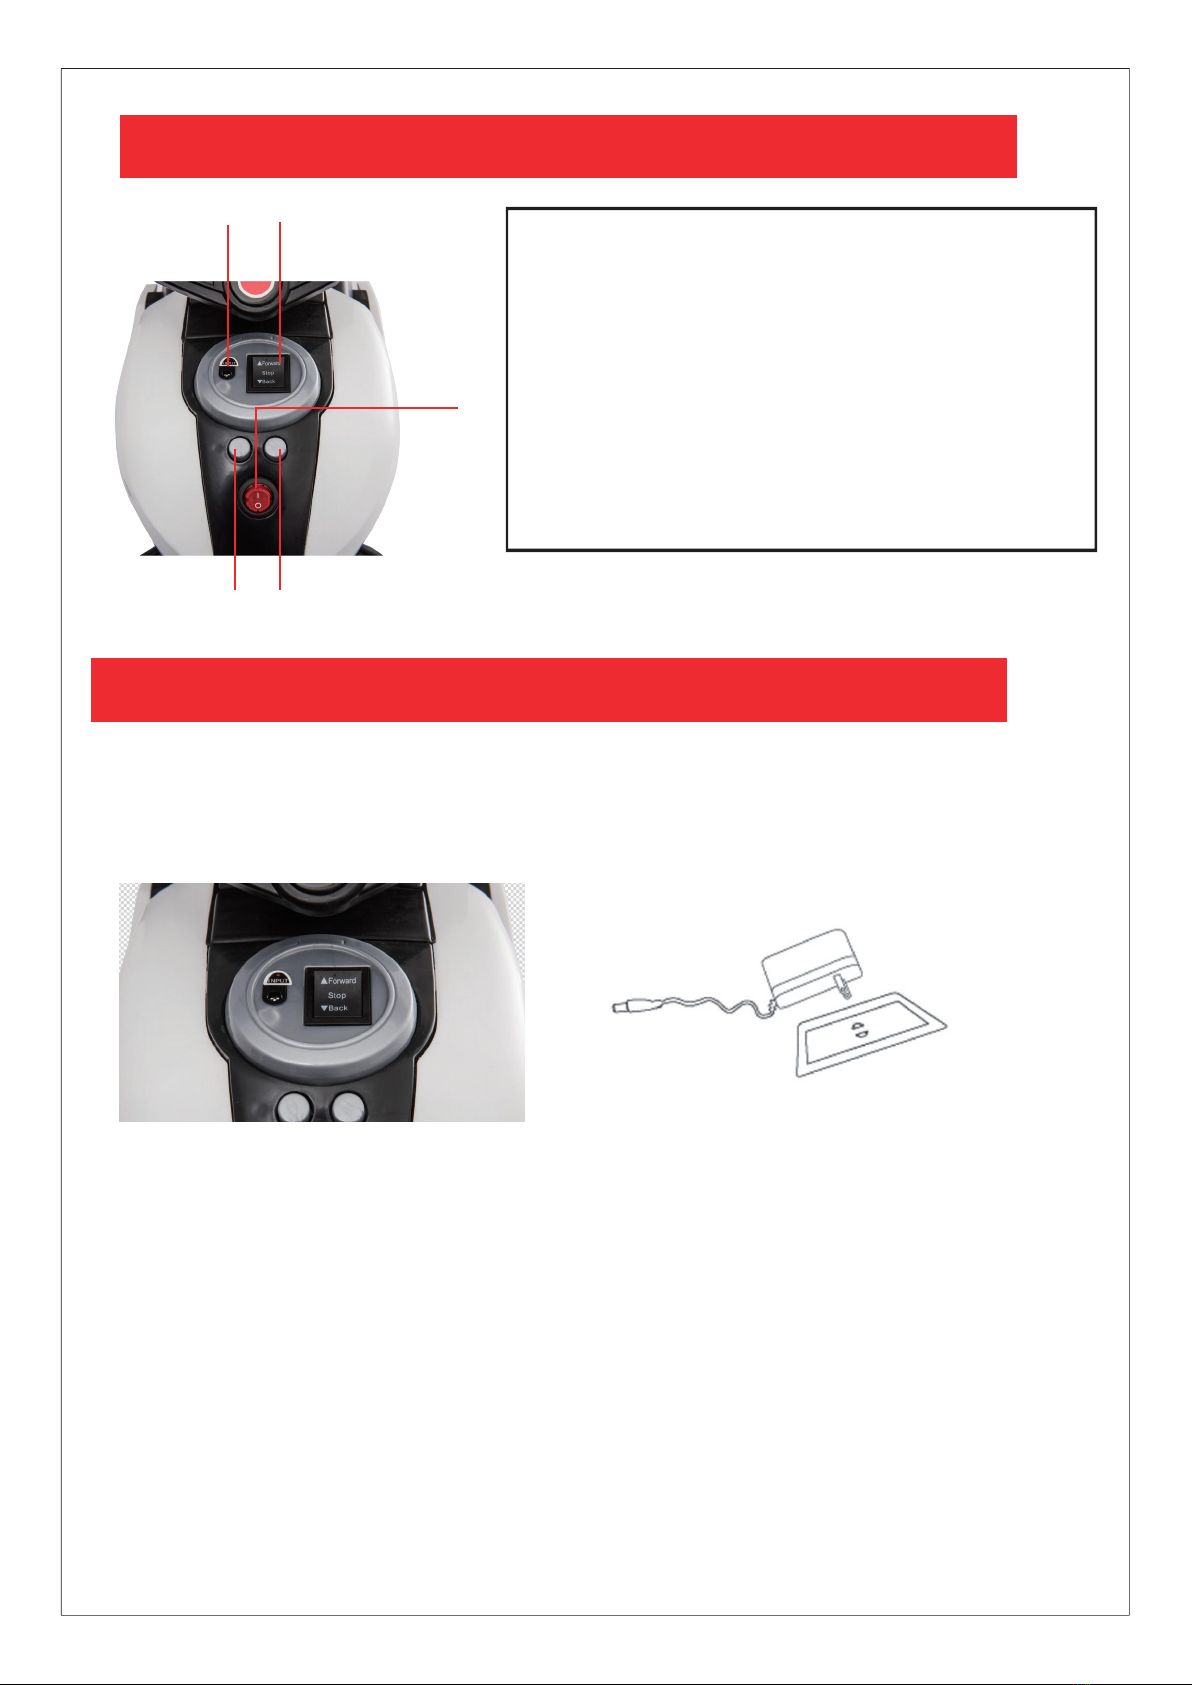
Charging notification
For the first use, please charge 10 hours, or will damage the battery.
Plug charger DC line into charge hole first, then plug charger into socket.
The product can not be played when it charging.
The product can not be charged for more than 18 hours each time.
It is normal that charger and battery warm (under 60°) during charging.
Do not charge if plug is wet, or will occur short-circuited.
Only use charger provided by manufacturer, or will damage charger and
battery or occur short-circuited.
If don't used it for a long time, make sure to charge it once a month.

-9-
③④
⑤
②
①
Button function
①Charging hole
②Forward stop backward button
③Horn button
④Music button
⑤Power button
Warning: This product must be charged by adults only.
Thisproduct is useless during charging.
Step 1 : The charging hole is under the handlebar.
Step 2 : Put the charger plug into the plug hole.
Step 3 : Connect the charger to the power socket.
Function
Charging steps are as follows:

• Check battery, charger and other spare parts regularly. If any problem,
please fix it before playing.
• Use lubricating oil to care iron parts. Keep car away from fire and
sunshine.
• Park it on the even place, not reversal orgradient.
• Park it indoor and cover it with waterproof cloth.
• Keep car away from fire, like stove or heater, or plastic may melt.
• Keep away from flammable things, or may occur fire accident.
• Charge it after use and must be done by adults only.
• Clean the vehicle with dry cloth only. Do not use chermical solvent to wipe
plastic parts. Do not wash it with water or play it when raining or snowing.
• When stop using the motorcycle, cut off the power,turn all the buttons to
“stop” or “off”.
• Do not use inconsistent fuse.
• Do not change the line system,structure and additional electric system of
the vehicle by yourself,repair work must be done by career man or under
professional supervision.
• Toy is not to be used for other purposes.
-10-
Maintenance and Service

0$/)81&7,21(/,0,1$7(6
9HKLFOH
FRXOGQW
PRYH
&KHFNZKHWKHUWKHSRZHUVZLWFKLVRII
&KHFNZKHWKHUWKHIRUZDUGEDFNZDUGVZLWFKLV
LQWKHQHXWUDOJHDULQWKHPLGGOH
&KHFNWKHIXVHLVGDPDJHGLIVRFKDQJHLW
&KHFNZKHWKHUWKHEDWWHU\ZLUHVDUH
FRQQHFWHGZHOO"
&KDUJHUVGFLQWKHFKDUJLQJVRFNHWZLOOPDNHLW
QRWZRUNLIVRWDNHLWRXW
&KHFNZKHWKHUVWHSSHGRQWKHSHGDO
&KHFNZKHWKHUDQ\WKLQJWUDSSHGLQWKHZKHHOV
9HKLFOH
PRYH
VORZO\
&KHFNZKHWKHUWKHEDWWHU\EHIXOO\FKDUJHG
&KHFNZKHWKHUDQ\WKLQJWUDSSHGLQWKHZKHHOV
&KHFNZKHWKHUWKHYHKLFOHLVRYHUORDGHG
9HKLFOH
FDQQRWEH
FKDUJHG
&KHFNZKHWKHUWKHFKDUJHURUEDWWHU\LVGDPDJHG
&KHFNZKHWKHUWKHFKDUJHUDQGWKHEDWWHU\LV
ZHOOFRQQHFWHG
7KHFKDUJHURUEDWWHU\LIWKHUHLVDORRVH
FRQQHFWLRQ
:$51,1*
7KLVQRWHLVWRXVHLOOXVWUDWLRQVWRLOOXVWUDWHWKHRSHUDWLRQ of WKHSURGXFW
DQGSURGXFWVWUXFWXUHWKHUHDUHDIHZGLႇHUHQFHVLQNLQGSUHYDLO
,QRUGHUWRLPSURYHWKHTXDOLW\RIWKHSURGXFWVXQGHUWKHFRQGLWLRQRI
ZLWKRXWWHOOLQJZHPD\PDNHFKDQJHVWRWKHSURGXFWSDUWRIWKH
VWUXFWXUHZLWKWKHDSSHDUDQFHSOHDVHXQGHUVWDQGLQJ.

Table of contents
Other HOMCOM Motorcycle manuals