Placement
Place the HomeTech CA308 on a level surface, in an upright position, out
of direct sunlight and away from windows through which rain may enter.
NOTE: The amplifier must always rest on its four feet to allow the built-
in cooling fan to operate properly or it may sustain damage.
Situate the amplifier away from heat sources such as hot air ducts
or radiators.
CAUTION: The HomeTech CA308 requires four inches of clearance
above and on all sides.
• Never place any object on or against the amplifier.
• Never operate the amplifier on a carpeted surface as this will compro-
mise ventilation.
• When the amplifier is installed in any cabinet, the front or back must
be open during operation. Alternately, install fans in the cabinet to
assure continuous ventilation.
Thermal Shutdown Protection
If the amplifier’s built-in cooling fan fails, or if the amplifier’s cooling
vents are blocked, the amplifier may exceed its safe operating tempera-
ture. If the amplifier overheats it will self-protect, and the following will
occur:
• The audio output to all connected zones will shut off.
• All the Zone Volume LEDs on the amplifier’s front panel will extinguish.
• The Zone Status LEDs will turn red and will repeatedly flash ON in
sequence, from Zone 1 through Zone 4.
Once a safe temperature is reached, the Zone Status LEDs will all
continually illuminate red, indicating that all zones are OFF.
IMPORTANT: Before turning any of the zones back ON, correct the
problem that caused the over-temperature condition. (Volume set
too high, etc.) If the fan has failed, contact our Tech Support
Department for assistance.
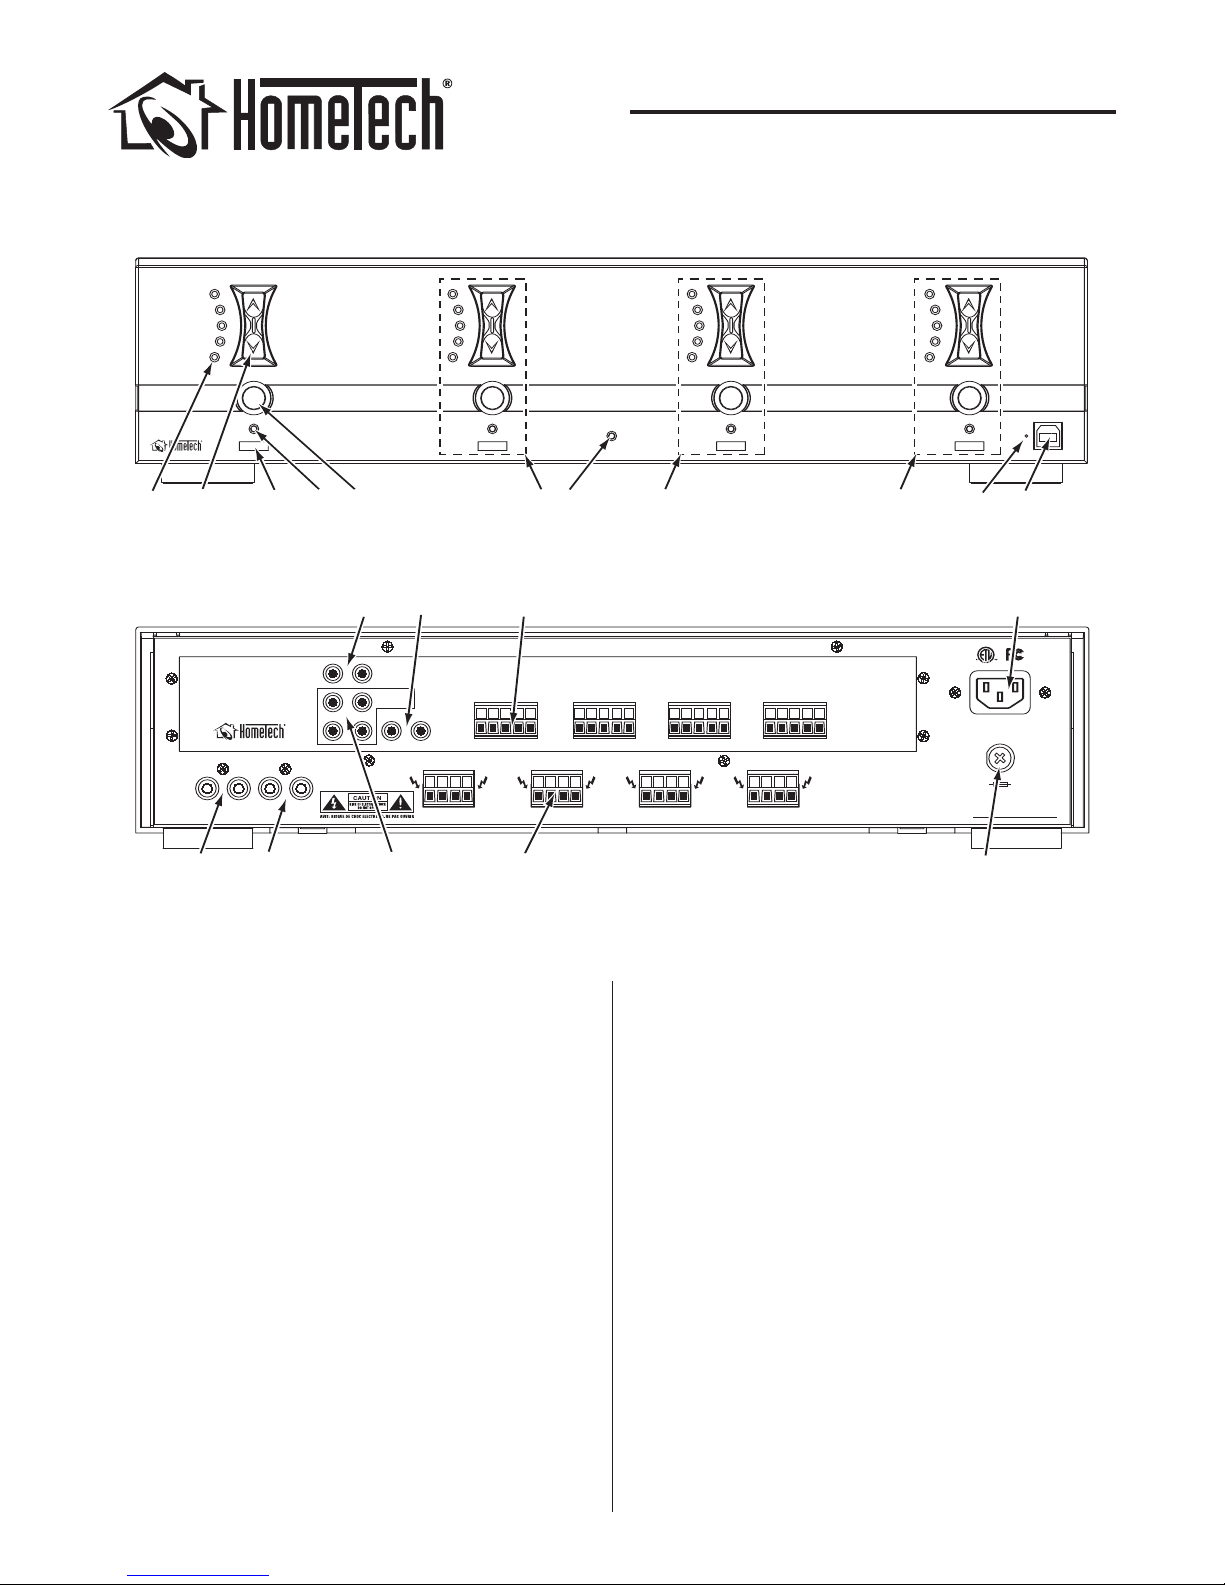
Power Connection (page 2 — #19)
The HomeTech CA308 uses an 18-gauge IEC-standard 120-volt grounded
power cable (provided). Due to the power requirement of this amplifier,
it is not advised that this cable be replaced with another of unknown
quality. Connect the power cable to a 15 or 20 amp grounded wall outlet.
Note: NEVER attempt to operate the amplifier from the accessory
outlet of another component.
Source Connections (page 2 — #12, #13)
To avoid noise interference, if the source component is located more than
20 feet from the amplifier HomeTech recommends that you convert the
source signal to a balanced line using optional 3rd-party components.
Always use quality high-fidelity interconnect cables.
Note: Always check local building codes before installing wire in walls
or ceilings.
• Connect the source component (receiver tape outputs, CD player, satel-
lite radio tuner, etc.) to the Left & Right Line-Level Audio Inputs (#12).
• Connect additional CA308 amplifiers to the Left & Right Buffered
Audio Outputs (#13).
Note: To avoid noise interference, do not run source connections
parallel to high-voltage (AC) wiring. If the source connections must
cross high-voltage wiring, to minimize noise ensure that they cross at
right-angles.
Speaker Connections (page 2 — #18)
Always turn off power and unplug the amplifier before making
source signal or speaker connections.
To assure optimum sound reproduction, use high-quality speaker wire
such as HomeTech HTC100 16-gauge 4-conductor wire. Small gauge or
inferior quality wire will degrade imaging, diminish bass reproduction,
and add a generally congested quality to music.
Note: Always check local building codes before installing wire in walls
or ceilings.
1. Run speaker wire from each speaker to the amplifier location. We
recommend that you mark each wire’s positive (‘+’) and negative (‘–’)
leads, its channel (Left or Right) and which speaker pair it is from so
that you can connect them to the proper terminals.
2. Strip ¼” – ½” of insulation from each speaker lead. Twist the strands or
tin the exposed wire with solder to ensure that there are no stray strands.
(Touching wires can cause a short-circuit that can damage the amplifier.)
3. The HomeTech CA308 has a removable 4-pin
screw connector for each zone. Insert the
exposed portions of the speaker wires into
the holes in the terminals. Make sure to
insert the ‘+’ and ‘–’ leads into the correct
holes. (See illustration, right.)
4. Use the included screwdriver to tighten the
screws and secure the wires in the connector.
5. Press the 4-pin screw connectors into the
corresponding speaker connector on the
amplifier until they lock into place.
• The 4-pin connectors will only fit one way on
the amplifier.
Always provide sufficient slack
in wires to avoid tension.
Always contain any excess
wire to prevent tripping
hazards.
IR Connections (page 2 — #14, #15)
The Common IR outputs (#15) allow the connection of IR emitters that
can relay control commands to the system source component(s) from IR
receivers built-into CA308 zone control keypads. The IR Link connections
(#14) distribute these IR commands between any number of CA308
amplifiers when multiple amplifers are daisy-chained together in larger
installations. This allows control of the system source component from
any zone. Connectors are mono 3.5mm mini jacks.
Zone Keypad Connections (page 2 — #17)
Removable 5-pin screw connectors receive control signals from the
CA308 keypads. Each zone has its own keypad input, and each keypad
controls only the zone it’s connected to (except for “All ON” and “All OFF”
commands). See the CA308 Keypad Instruction Manual for wiring details.
Control Links (page 2 — #16)
When using two or more CA308 amplifiers in a system, use a 3.5mm
mono mini cable to connect these jacks together. This will link the micro-
processor control signals between the amplifiers, allowing an “All ON” or
“All OFF” command from any keypad or remote to control all of the
CA308s in the system.
Zone ON/OFF Button (page 2 — #5)
Pressing a zone’s ON/OFF button toggles that zone ON and OFF. If the
zone is so enabled (see page 4), holding-down the button for at least 5
seconds while the zone is OFF turns all zones ON (“All ON”); holding-down
the button for at least 5 seconds while the zone is ON turns all zones OFF
(“All OFF”).
Note: Every time you turn a zone ON its volume will automatically
ramp-up to the Turn-On Volume you set for it (see Setting Zone Turn-On
Volume, below).
3
INSTRUCTION MANUAL
CA308 SINGLE SOURCE/4-ZONE
POWER AMPLIFIER