Hoval Genius (06-35) User manual

EN
Air/ Water Heat Pump
Genius®(06-35)
Genius®Compact (07)
Operating instructions
Subject to modifications4 204 745 / 01 - 07/07
Hoval Export
Hovalwerk AG
Austrasse 70
9490 Vaduz
Principality of Liechtenstein
Phone: +423 399 24 00
Fax: +423 399 26 18
Hoval United Kingdom
Hoval LTD
Northgate
Newark
Nottinghamshire NG24 1JN
Phone: +44 1636 67 27 11
Fax: +44 1636 67 35 32

Important Addresses.................................................................................................................. 3
Safety
Instructions
...................................................................................................................... 4
Heater Control........................................................................................................................5-35
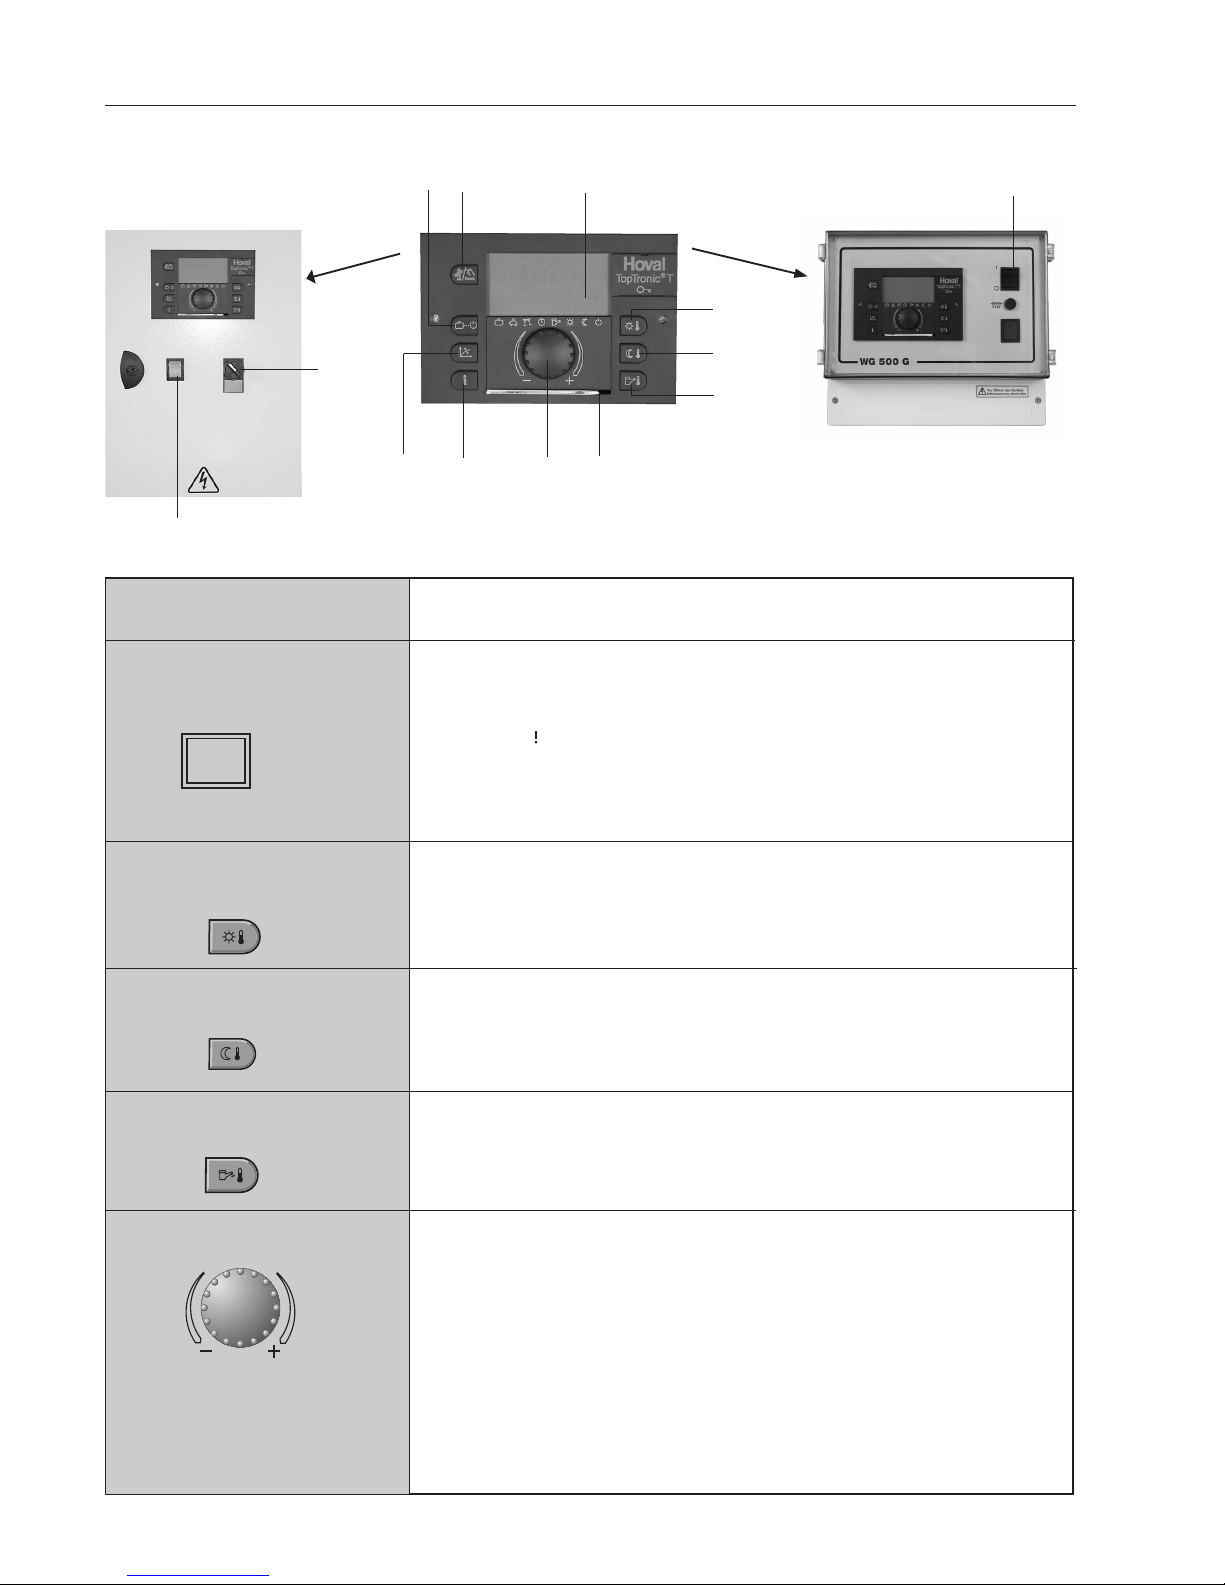
Operator and Display Elements
What is the control TopTronic®T used for? ........................................................................................................5
Function of the Operator Elements ...................................................................................................................6
Basic Procedures for Altering Settings..............................................................................................................6
What to do if ......................................................................................................................................................7
Heat Pump Control Operator Elements........................................................................................................8,10
The Most Important Settings
Changing Room Temperature .................................................................................................... 11,12
Holiday, Absence, Long-term Decrease
....................................................................................................13
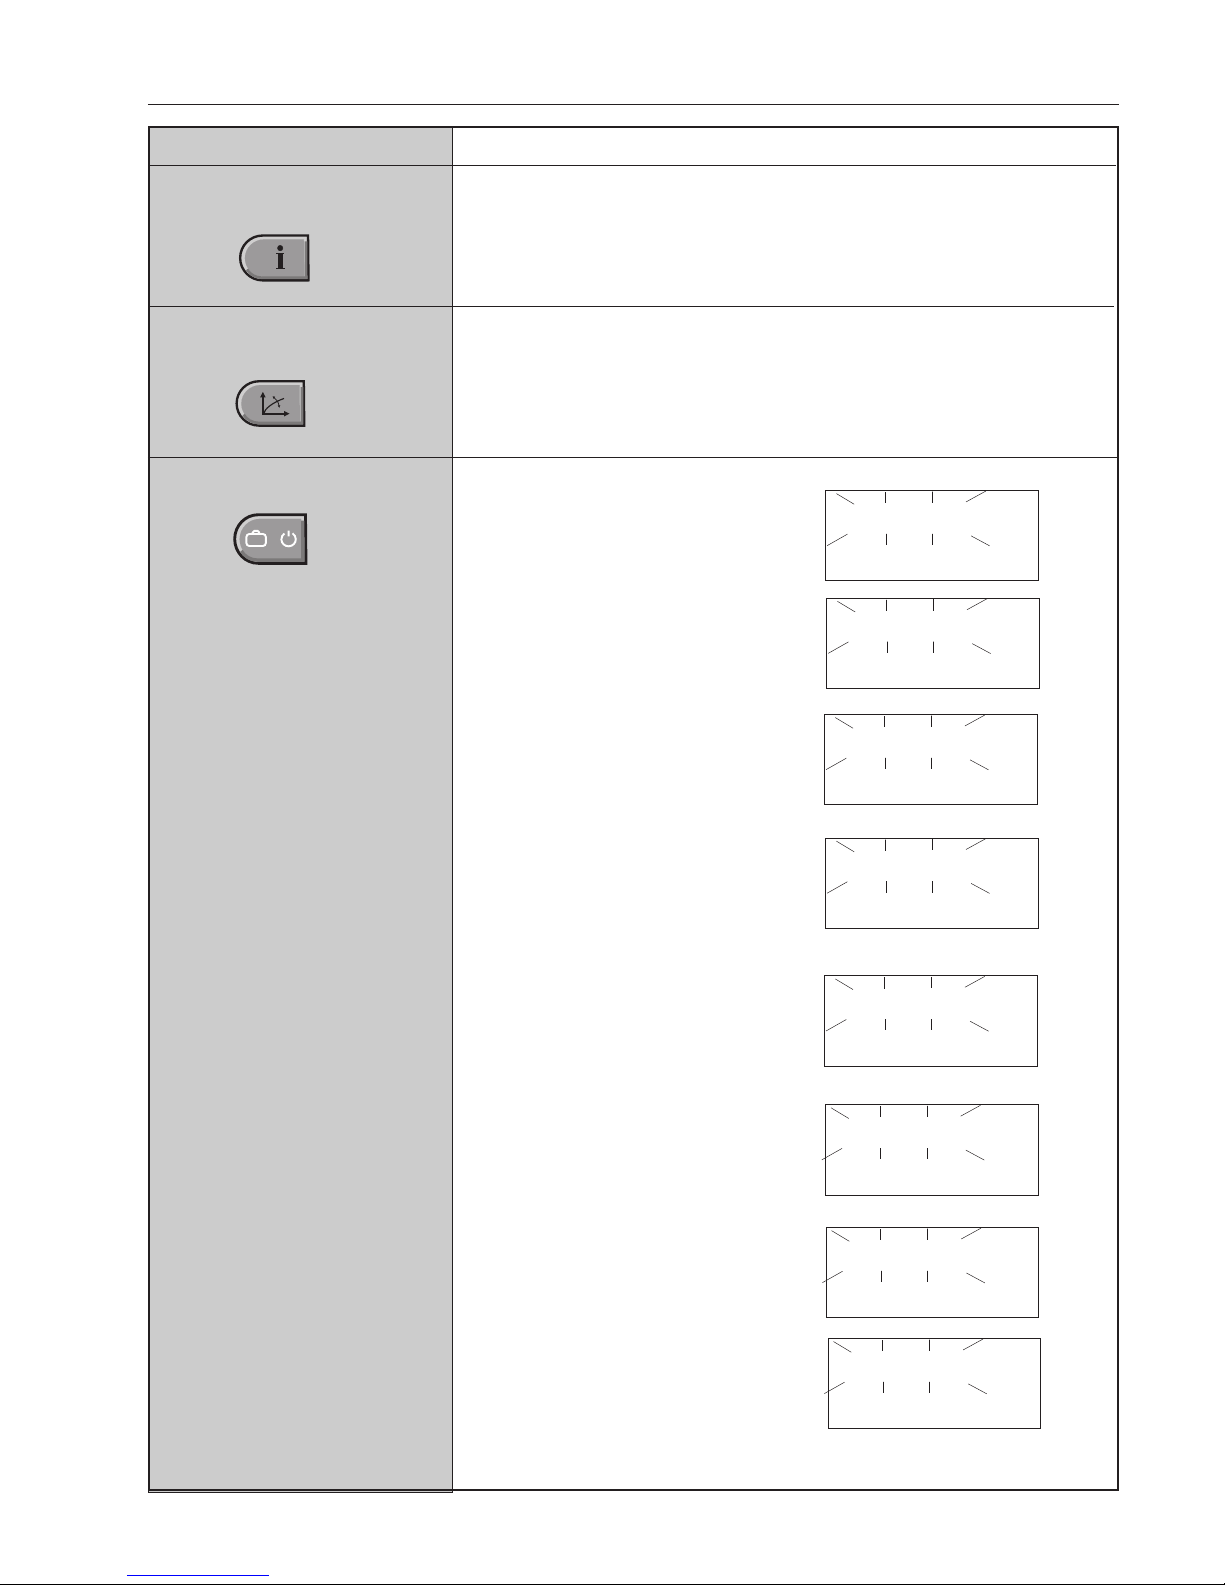
Setting Operating Mode ............................................................................................................................ 14-16
Changing Switching times......................................................................................................................... 17-19
Copying Switching Times ...........................................................................................................................20,21
Heating Curve (Heating characteristic
) ................................................................................................22,23
Hot Water Settings
Adjusting the hot water temperature
................................................................................................ 23,24
Manual hot water loading
.................................................................................................................... 24
Domestic hot water economy temperature (reduced temperature) ............................................................25,26
Other Settings
Setting the Clock .............................................................................................................................................27
Setting the Date...............................................................................................................................................28
Changing between summer and winter time ...................................................................................................28
Setting the Language ......................................................................................................................................29
Reloading the standard switching times program - Deleting the own time program...................................30,31
Fault Reports...................................................................................................................................................32
System Information
Information Key for System Temperature and Heating Circuit Information......................................................33
Special Symbols..............................................................................................................................................34
Optional Accessories.......................................................................................................................................35
Plant Control - Internal Electric Panel
System Master Switch.....................................................................................................................................36
Operating Displays ..........................................................................................................................................36
Fault Displays ..................................................................................................................................................36
Control Modul type RAM 100A........................................................................................................................37
Troubleshooting........................................................................................................................ 38
Maintenance / Service.............................................................................................................. 39
2
4 204 745 / 01

Important Addresses
Dear Customer
The Hoval Heat Pump Thermalia®
Genius®is an excellent choice. They
offer all the advantages of a modern
and efficient heating system. Please
take the time to read through this
operating manual; it will help you un-
derstand how the equipment works,
and it explains operation, mainte-
nance and general troubleshooting
procedures.
For any additional questions, please
contact one of our customer service
offices.
Heating Installer _____________________________________
_____________________________________
_____________________________________
Tel. No._______________________________
Plumbing Installer _____________________________________
_____________________________________
_____________________________________
Tel. No._______________________________
Electrical Installer _____________________________________
_____________________________________
_____________________________________
Tel. No._______________________________
Thank you.
To make it easier for our customer service department
to assist you, please have your operating manual at
hand when you call us,in order to provide us with your
observations according to the check list, the heater
type and the serial number.
Important Addresses and
Telephone Numbers
3
4 204 745 / 01

Safety Instructions
Fig. 2
Genius
® Master Switch
Safety Instructions
Installation and service work on heat
pumps may be dangerous due to high
pressures, electrically conductive com-
ponents and the mounting location.
As such, heat pumps may only be in-
stalled, commissioned or maintained by
trained and qualified service personnel.
When working on this device, please
observe all safety instructions found in
the associated documents, stickers and
signs on the device as well as all other
applicable safety measures.
The heat pump is not electro-
less until the master switch
on the electric panel has been
turned off.
Because the heating output
of the air/water heat pump
is highly dependent on the
outside temperature, it should
not be placed into operation
at temperatures near freezing,
in building shells for structur-
al drying or for moving floor
heating pipes.
Genius
®Master Switch
4
4 204 745 / 01

What is the control used for
TopTronic
®
T Together with the connected temperature sensor, the control
is, in a manner of speaking, the brain of the device. The most
important functions are:
- Providing the desired room temperature at any outside tem-
perature
- Only heating the flat when you want (when you’re at home)
- Only producing hot water (e.g. for bathing) when you want
- Displaying information
Other Functions:
- Enables input of desired temperatures
- Turns heat pump ON/OFF
- Temperature monitoring
All settings were already been configured by the manufacturer
or the professional at the time of commissioning. Changes
should be made especially if you go on a trip or if it is too cold
or too hot in your apartment. You’ll find a summary of the most
frequently asked/questions and answers on pages 12 and 18 of
these instructions.
How to save energy Turning of the heater in warm weather in fall is worth it.
In doing so you avoid producing unnecessary heat due to the
low outside temperature in the morning, and your home will not
be overheated. Consciously switching on/off the heater based on
the current weather conditions is one of the most effective en-
ergy saving measures. Hoval also offers remote controls which
allow you to control and adjust your heater from the comfort of
your living room, without having to go to the basement or boiler
room.
Basic Display On the basic display screen, the day, date and time as well as
the current return temperature (or backup memory; depending
on use) or room temperature (room station) are displayed.
Heating Control
Heating Control
5
4 204 745 / 01

Heating Control
Function of the operating elements The central rotary push-button and the labelled keys are
designed for easy and straightforward operation.
Rotary push-button:
Change and store
values
Basic procedure for
changing settings
An example
Select the desired function
Turn the rotary push-button to
select or change the desired
parameter (flashing word or
number)
Press the Info key at any time to
go back to the basic display
without storing the values set
Press the rotary push-button to
store the value set.
It is also possible to store the
value using the selected function
key.
Function keysFunction keys
6
4 204 745 / 01

Heating Control
What to do if...
The following information can be used as a first level support in frequently
occurring situations.
7
4 204 745 / 01
Observation
It is too cold
It is too warm
From now on, equal day and
night temperatures should be
maintained continuously
This evening, the heating
should remain on for longer
A larger amount of hot water
is required
From now on, hot water but no
heating is required
Suddenly, there is no heating
or hot water; it is cold
The room temperature set point
requires frequent adjustments
because it is too cold or too
hot
Today, I will be absent for several
hours during the day
I am travelling for a short period
of time (e.g. 3 days)
I will be travelling for an indefinite
period of time
In summer, it is too cold or too
warm
Remedy
Set a higher value for the room temperature with and
the rotary push-button (page 11).
Set a lower value for the room temperature with and
the rotary push-button (pages 11,15).
Set the operating mode to “HEATING”
with
� � �
(page 15)
Set the operating mode to “PARTY” with
� � �
and set the
desired time (page 14)
Press for 3 seconds and set the additional loading time
(page 24)
Set operating mode to “SUMMER” with
� � �
(Heating off, only hot water) (page 15).
Check the control unit for malfunction notifications and if neces-
sary consult a heating professional.
Change the set heating curve (page 22)
Changing the heating curve is not sensible if your system is fitted
with a room sensor (or room station) and an outdoor sensor.
The correct settings for the heating curve are then provided
automatically
Set the operating mode to “ABSENT TIL” with
� � �
and set
the return time (page 14)
Set the operating mode to “HOLIDAY TIL” with
� � �
and set
the return date (page 14)
Set the operating mode to “RED. HEATING” with
� � �
When returning with
� � �
, set the operating mode to
“AUTOMATIC” (page 15)
Indicates that the summer disconnection is active. If it is too cold,
set the operating mode to “HEATING”
with
� � �
(page 15).

Heat Pump Control Operator Elements
1
2
3
4
5
9
6
7
1. ON/OFF
Mains Switch
2. Desired
Daytime Room Temperature
3. Desired decreased
Room Temperature
4. Desired
Hot Water Temperature
5. Turn/Push Button
Key to Symbols Function
Ι = ON - Heat Pump working
0 = OFF - Heat Pump not working
Attention: No Frost Protection
Function Key for altering the desired room temperature during the day
For more information, see pages 11
Function Key for altering the desired room temperature during the re-
duced heating period
For more information, see pages 12
Function Key for setting the desired hot water temperature during the
days
For more information, see pages 23, 24
The turn/push button is used to select/change the desired parameters
(word or number blinking
- Turn clockwise to the right (+) upward adjustment
- Turn counter clockwise to the left (-) downward adjustment
- Tap briefly: Enters the desired and displayed values, saves
- Press and hold for about three seconds: Switch to programmer mode
(mode selection)
8
Heating Control
10
0
I
11
12
1
8
4 204 745 / 01

Key to Symbols Function
Heating Control
6. Key for
System Information
7. Key for
Heating Curve Settings
8. Op. Mode Selection Key
HOLIDAY TIL
27.08
ABSENT TIL
19:45
ppPARTY TIL
02:30
AUTOMATIC
SUMMER
DHW
HEATING
RED. HEATING
STANDBY
- Consulting temperature and operating hours
- Returning to the basic display without saving the selected value is
also possible at any time using this function key.
For more information, see pages 33, 34
The heating curve shows the heat flow temperature depending on the
outside temperature. The heating curve can be changed using this
button.
For more information, see pages 22, 23
Switching off the heating system
during a holiday (frost protection)
Interrupt heating
Prolonged heating
Automatic heating
according to the set heating periods
Hot water only
Heater off
Constant heating operation
Constant decreased heating
System off
Frost protection active
For more information, see pages 13-16
� � �
9
4 204 745 / 01

Heating Control
Key to Symbols Function
2
1
3
4
6
7
5
9. Key for Manual Operation
Emission Measurement
10. Display
11. Engage Switch for Supple-
mentary Heating
12. Short Operating Instruc-
tions
This key does not apply to heat pumps
On the basic display screen, the day, date and time as well as the cur-
rent return temperature (or backup memory; depending on use) or room
temperature (room console) are displayed.
Possible Display Screens:
1 Active Heating time 24 hr
2 Day of the week
3 Display of the current operating status or the active timer programs
4 Time
5 Selected operating mode
6 Date / Day / Month/ Year
7 Room Temperature (when activated)
Pos. „0“ Supplementary heating is off
Pos. „1“ Supplementary heater is on (manual operation)
Pos. „auto“ The supplementary heater turns on automatically (e.g.
to cover peaks, if the heat pump cannot supply the
system’s heat output requirements
The heat pump includes special short operating instructions.
10
4 204 745 / 01

Main settings
Changing the room temperature
Setting the daytime room temperature
Basic display
Briefly press the “desired daytime room temperature” key
The daytime room temperature
setpoint flashes.
Set the desired room temperature
by turning the “rotary push-button”.
- Setting range 5.....30°C (Factory setting 20°C)
The new “Daytime room temperature”
setpoint appears on the display.
Briefly press the “Desired daytime room temperature” key to
confirm the set temperature.
MO. 16. AUG.'04
14:00 62.5C
ROOM DAY
-20.0C
ROOM-DAY
-22.0C
If you have a room console, you
can configure the settings on it.
If “MC1” is shown on the
display, you need to select
the heating circuit.
(Information on which
heating circuit to select for
your home can be found
on page 5 of these instruc-
tions).
Heating Control
11
4 204 745 / 01

Heating Control
Setting the reduced (night time) temperature
MO. 16. AUG.'04
14:00 62.5C
ROOM-NIGHT
-20.0C
ROOM-NIGHT
-18.0C
Basic display
Tap the “Reduced room temperature” key.
The night time room temperature
setpoint flashes.
Set the desired room temperature
by turning the “rotary push-button”.
- Setting range 5.....30°C (Factory setting 16°C)
The new “Reduced room temperature”
setpoint appears on the display.
Tap the “Reduced room temperature”
key to confirm the temperature
setpoint.
If you have a room console, you can con-
figure the settings on it.
If “MC1” is shown on the
display, you need to select
the heating circuit. (Infor-
mation on which heating
circuit to select for your
home can be found on
page 5 of these
instructions).
12
4 204 745 / 01

Holiday, absence, long-term decrease
Depending on the duration of your absence and what your requirements are in regard to comfort, there
are different operating modes available for interrupting or reducing the heating. In any case you will be
able to save a lot of energy and money if the rooms are not heated or less heated during your absence.
The following table is intended as a guide for finding the best operating mode for each particular case:
Application
You go on holiday for e.g. 1
week and you know the return
date.
You leave home in the morn-
ing and come back late in
the evening.
You are travelling for an indefi-
nite period of time and want
the living area to be at the set
reduced temperature on re-
turn.
You are away for an indefinite
period of time during spring or
autumn and you don’t mind if
your home is cool on return.
Operating mode
System off while on Holiday
"HOLIDAY TIL"
Heating interrupted temporarily
"ABSENT TIL"
Continuous reduced heating
mode
"RED. HEATING"
System switched off - Frost
protection activated
"STANDBY"
Function
- Heating system OFF / Calorifier
frost protected (5°C)
- Room temperature set to mini-
mum (10°C)
Setting range:
current date .-. 250 days
End of holiday = Return date
Time 0:00
Early return:
“Press” for 3 sec. to return
to “AUTOMATIC” mode (see
page
Heating temporarily interrupted
until set time
Setting range: 0.5.....24h
Continuous reduced heating and
DHW mode around the clock.
The entire heating system is
switched off and frost protected.
Calorifier frost protected!
Heating Control
� � �
See following pages for a detailed description on how to set the operating modes..
By pressing and holding the
� � �
key for three seconds, you can return to “AUTOMATIC” mode
(normal heating mode) at any time
13
4 204 745 / 01

Heating Control
Briefly press the “operating mode selection” key
The note “OP. MODE” is displayed for a short time.
Then the currently active operating mode flashes on the display and
a bar on the bottom of the display indicates the corresponding sym-
bol.
Set the desired operating mode by turning the “rotary push-button”:
"HOLIDAY TIL" or "ABSENT TIL" or "PARTY TIL"
The selected operating mode will be shown flashing on the display
Set the desired operating mode by turning the “rotary push-button”:
Today’s date (“HOLIDAY TIL”) or the current time (“ABSENT TIL”,
“PARTY TIL”) is shown flashing on the display.)
By turning the “rotary push-button”
- for “HOLIDAY TIL”, the date of return from holiday.
- for “ABSENT TIL”, the expected return time (within max. 24h).
- for “PARTY TIL”, the time the party is expected to end.
Briefly press the “rotary push-button” to confirm the setting
Setting Operating Mode
Procedure for activating the operating modes “HOLIDAY TIL”, “ABSENT TIL” or
“PARTY TIL”.
OP. MODE
AUTOMATIC
HOLIDAY TIL
HOLIDAY TIL
27.08
� � �
14
4 204 745 / 01

Heating Control
Procedure for activating the operating modes “AUTOMATIC”, “SUMMER” , “HEATING”,
“RED. HEATING” and “STANDBY”
Briefly press the “operating mode selection” key.
The note “OP. MODE” is displayed for a short time
Then the currently active operating mode flashes on the display
Set the desired operating mode by turning the “rotary push-button”
For example “RED. HEATING”
OP. MODE
AUTOMATIC
RED. HEATING
Press the “rotary push-button” to confirm the selected
operating mode.
� � �
15
4 204 745 / 01

Operating Mode Function
AUTOMATIC
SUMMER
HEATING
RED. HEATING
STANDBY
Automatic regular operation according to the heating periods entered in the
first switching time program
Factory Settings:
Heating from 06.00 am - 22.00 pm
Decreased heating from 22.00 pm - 06.00 am
Hot Water: 05.00 am - 22.00 pm
Hot water only
Hot water is generated at the times entered in the changeover program
(for bathing etc.)
Hot Water Factory Settings:
05.00 am - 22.00 pm
Hot Water Factory Settings
Constant Heating
Room temperature is not decreased at night
Hot water is generated according to the time programme
Constant Decreased Heating
The flat is constantly heated to the “ROOM-NIGHT” temperature
Constant Heating
Switching off the heating system
The flat is neither heated nor is hot water produced. Frost protection is en-
sured
Heating Control
Info:
“Summer” mode cannot be se-
lected if each heating circuit is set
separately
16
4 204 745 / 01

... pro Tag
1 Heizzyklus!
... pro Tag
2 Heizzyklen!
... pro Tag
3 Heizzyklen!
... pro Tag
1 Heizzyklus!
... pro Tag
2 Heizzyklen!
... pro Tag
3 Heizzyklen!
per day
1 heating cycle
per day
2 heating cycles
per day
3 heating cycles
Heating Control
Changing switching times (heating times)
Using this function, individual switching time programs for heating and hot water production can be config-
ured. After selecting the applicable circuit, the factory set standard programme (P1) can be called up and
be individually overwritten.
The factory pre-set heating periods are, for example:
Circuit Day Heating from
All heating circuits
(HC,MC-1,MC-2)
Mo-Su 06.00 - 22.00
Hot water circuit
(DHW) Mo-Su 05.00 - 22.00
Other standard programmes can be activated by the installer - or have been activated (P1-P3)
see page 24
A maximum of 3 heating times per
day are possible, e.g.:
Table for recording individual switching times
Switching times program for living
area..............(MC1)
Cycle 1 Cycle 2 Cycle 3
from to from to from to
Mo
Tu
We
Th
Fr
Sa
Su
Switching times program for living
area...............(MC2)
Cycle 1 Cycle 2 Cycle 3
from to from to from to
Mo
Tu
We
Th
Fr
Sa
Su
Switching times program for living
area................(HC)
Cycle 1 Cycle 2 Cycle 3
from to from to from to
Mo
Tu
We
Th
Fr
Sa
Su
Switching Time Programme for Hot Water Hea-
ter (DHW)
Cycle 1 Cycle 2 Cycle 3
from to from to from to
Mo
Tu
We
Th
Fr
Sa
Su
17
4 204 745 / 01

Basic display
Press the “rotary push-button” for min. three seconds
“TIMEPROGRAMS” appears on the display
Briefly press the “rotary push-button” to confirm the settingn
The letters “HC” then appear on the display
Select the heating circuit by turning the “rotary push-button”.
(You’ll find tips on which heating circuit you need to select for your
flat on page 5 of these instructions)
select switching times program P1, P2 or P3, if required - see
page 19.
Briefly press the “rotary push-button” to confirm the heating circuit
selection
Using the “rotary push-button”, select the day on which a change to the heating
period is desired.
Note: The third heating cycle is skipped if the second heating cycle
does not contain any switching times
Change/Exit:
Each flashing setting value can be corrected and confirmed with the knob if nec-
essary. Return to the previous step by pressing the , key; return to the basic
display by pressing the
� � �
key or automatically after approx. 60 seconds.
Heating Control
0 2 4 6 8 10 12 14 16 18 20 22 24
06.00-22.00
MO-1-
MO. 16. AUG.'04
14:00 62.5C
TIMEPROGRAMS
TIMEPROGRAMS
HC
TIMEPROGRAMS
MC-1
z.B.
18
4 204 745 / 01

Heating Control
If P1 is displayed, it means that further standard heating times programs are already enabled. If not, P2
and P3 can be enabled by the heating technician.
Circuits Day Heating from
All heating circuits
(HC,MC-1,MC-
2)
Mo-Th
Fr
Sa-Su
06.00-08.00 16.00-22.00
06.00-08.00 13.00-22.00
07.00-23.00
Hot water circuit
(DHW)
Mo-Th
Fr
Sa-Su
05.00-08.00 15.30-22.00
05.00-08.00 12.30-22.00
06.00-23.00
Circuits Day Heating from
All heating circuits
(HC,MC-1,MC-
2)
Mo-Fr
Sa-Su
07.00-18.00
reduziert
Hot water circuit
(DHW)
Mo-Fr
Sa-Su
06.00-18.00
reduziert
Factory setting:
Switching times program P2
Factory setting:
Switching times program P3
0 2 4 6 8 10 12 14 16 18 20 22 24
06.00-22.00
MO-1-
0 2 4 6 8 10 12 14 16 18 20 22 24
06.00-22.00
MO-1-
0 2 4 6 8 10 12 14 16 18 20 22 24
06.00-22.00
SO-1-
� � �
0 2 4 6 8 10 12 14 16 18 20 22 24
-.---.--
MO-2-
.......
Briefly press the "rotary push-button"” to confirm the desired day
The current start time for heating flashes in the display field
Set the desired heating start time by turning the "rotary push-button"
Briefly press the "rotary push-button" to confirm the start time
Set the desired heating end time for the displayed day of the week by
turning the "rotary push-button"
The day of the week is displayed flashing. Now a second heating
period (Mo - 2) can be input by turning the "rotary push-button"
or
it can be turned directly to Tuesday in order to input the desired heat-
ing period.
Instead of entering each day individually, the “copy” function can be
used - see page 20
Using this function, the switching times for a given day of the week
can be applied to other days (Monday - Sunday) or the entire week
(1-7) or groups of days like Monday-Friday (1-5) or weekends (6-7).
Once you have made all changes, briefly tap the mode selection key
in order to confirm the settings and return to the basic display.
19
4 204 745 / 01

Basic display
Press the “rotary push-button” for min. three seconds
“TIMEPROGRAMS” appears on the display
Briefly press the “rotary push-button” to confirm the setting
The letters “HC” then appear on the display
Select the desired heating circuit by turning the “rotary push-but-
ton”
(You’ll find tips on which heating circuit you need to select for your
flat on page 5 of these instructions)
Select switching time programme P1, P2 or P3 as appropriate -
see page 19
Briefly press the “rotary push-button” to confirm the heating circuit
selection
The set heating period flashes on the display
Turn the “rotary push-button” further
until “COPY”, “DAY” flashes on the display
Heating Control
Copying switching times
COPY
DAY
MO. 16. AUG.'04
14:00 62.5C
TIMEPROGRAMS
TIMEPROGRAMS
HC
TIMEPROGRAMS
MC-1
0 2 4 6 8 10 12 14 16 18 20 22 24
06.00-22.00
MO-1-
20
4 204 745 / 01
This manual suits for next models
2
Table of contents
Other Hoval Water Pump manuals
Popular Water Pump manuals by other brands

Maro
Maro MA Series operating manual

Sicce
Sicce SyncraSDC 6.0 instruction manual

Bosch
Bosch rexroth 11 Series instruction manual

Debem
Debem DM Series Instructions for use and maintanence

BLACKMER
BLACKMER TLGLF3HD Installation, operation and maintenance instructions

LEAD FLUID
LEAD FLUID YZ Series operating manual

Fristam Pumps
Fristam Pumps FDS Series Instruction and maintenance manual

KRAL
KRAL CLC Series operating instructions

OmarLift
OmarLift C40 operating instructions

Banjo
Banjo M222 Series instruction manual

Kärcher
Kärcher HDI 38/12 manual

FMT Swiss AG
FMT Swiss AG AdBlue 13 040 OPERATING INSTRUCTIONS AND SAFETY NOTES