manuals.online logo
Brands
  1. Home
  2. •
  3. Brands
  4. •
  5. HSS Hire
  6. •
  7. Chainsaw
  8. •
  9. HSS Hire 457 User manual

HSS Hire 457 User manual

Other HSS Hire Chainsaw manuals

HSS Hire 728 Troubleshooting guide

HSS Hire

HSS Hire 728 Troubleshooting guide

HSS Hire 822/04 Troubleshooting guide

HSS Hire

HSS Hire 822/04 Troubleshooting guide

HSS Hire 822/04 Troubleshooting guide

HSS Hire

HSS Hire 822/04 Troubleshooting guide

Popular Chainsaw manuals by other brands

Husqvarna 435 Workshop manual

Husqvarna

Husqvarna 435 Workshop manual

Husqvarna 42, 242XP, 246 Operator's manual

Husqvarna

Husqvarna 42, 242XP, 246 Operator's manual

Makita EA3601FG instruction manual

Makita

Makita EA3601FG instruction manual

Premier MS-4815 instruction manual

Premier

Premier MS-4815 instruction manual

Echo CS-6703 parts catalog

Echo

Echo CS-6703 parts catalog

Husqvarna 1151338-95 Operator's manual

Husqvarna

Husqvarna 1151338-95 Operator's manual

Poulan Pro 380 Operator's manual

Poulan Pro

Poulan Pro 380 Operator's manual

Elem Garden Technic TRE2042SO-OR Original instructions

Elem Garden Technic

Elem Garden Technic TRE2042SO-OR Original instructions

Royal RPC 3835 Original operating instructions

Royal

Royal RPC 3835 Original operating instructions

Famastil F-Power instruction manual

Famastil

Famastil F-Power instruction manual

McCulloch M3816 instruction manual

McCulloch

McCulloch M3816 instruction manual

Echo CS-8000 TYPE1-E instruction manual

Echo

Echo CS-8000 TYPE1-E instruction manual

Echo CS-346 instruction manual

Echo

Echo CS-346 instruction manual

SNOWJOE sunjoe SWJ807E Operator's manual

SNOWJOE

SNOWJOE sunjoe SWJ807E Operator's manual

Husqvarna 555 Workshop manual

Husqvarna

Husqvarna 555 Workshop manual

Stiga A 305 Operator's manual

Stiga

Stiga A 305 Operator's manual

Bosch Ake 40 s Original instructions

Bosch

Bosch Ake 40 s Original instructions

Dolmar AS-3626 instruction manual

Dolmar

Dolmar AS-3626 instruction manual

manuals.online logo
manuals.online logoBrands
  • About & Mission
  • Contact us
  • Privacy Policy
  • Terms and Conditions

Copyright 2025 Manuals.Online. All Rights Reserved.

Concrete
Chainsaw
Cutting Guide
A wall mountable jig used in
conjunction with the HSS petrol
driven concrete cutting chainsaw
designed to increase the accuracy of
the cut.
Operating & Safety Guide 457
The concrete chainsaw is supplied with a pivot
support assembly, which locates in the hooked
slots of the guide. The assembly will need to be set
to suit either a left or right hand cut depending
upon which side of the guide the cut is required.
To change the assembly, unscrew the lock knob
and withdraw the pivot shaft from the mounting
tube. Insert the pivot shaft into the opposite end
of the mounting tube and secure in place with the
lock knob. Make sure the lock knob is fully tightened.
Prepare the chainsaw as described in guide No
995 then, with the chainsaw engine running,
hook the pivot shaft onto the highest pair of
hooked slots.
You must never work with the saw above shoulder
height and never use the chainsaw ‘up side down’.
Adopt a stable, comfortable stance - one that gives a
good view of the cut - keeping the whole of your
body clear of the chain.
Do not cut through masonry, which is supporting a
load, always use suitable supports.
Bring the chainsaws engine up to maximum
speed.
Rotate the saw into the wall making sure the cut
starts exactly on the cut line. This will ensure
straight cuts.
Using the hooked slot as a pivot point, cut
vertically downwards in a straight line. Use
sufficient pressure to push the saw through the
material.
Keep your right hand on the throttle grip and your
left hand on the bar grip at all times.
If the guide bar becomes trapped in a cut, switch
OFF the saw before freeing it. Do not lever the bar
free or you will damage the saw.
As the saw approaches the end of its rotation keep
the chain running and index to the next set of
hooks. It’s easier to index if the saw has not
reached a full 90 degrees.
Continue cutting and moving to a lower position
until the cut is finished.
Once the cut is complete, remove the chainsaw
and place somewhere safe.
Loosen the fixings that hold the guide to the wall
then remove the guide. Make sure that you keep
the oversized washers with the guide.
Take your time and don’t over do it. You are more
likely to have an accident if you are tired or rushing.
BASIC TECHNIQUES
Never push the equipment beyond its design
limits. If it will not do what you want with reasonable
ease and speed, assume you have the wrong tool for the
job. Contact your local HSS Hire Shop for advice.
Keep the equipment clean - you will find this less of a
chore if you clean it regularly, rather than wait until the
end of the hire period.
When not in use, store the equipment somewhere
clean, dry and safe from thieves and unauthorised
users.
Collect all parts together and give them a final
clean, ready for return to your local HSS Hire Shop.
FINISHING OFF
EQUIPMENT CARE
Code 07148
©HSS Hire Service Group Plc 2001 No. 457/01
Group Office: 25 Willow Lane, Mitcham, Surrey CR4 4TS
Web Site: http://www.hss.co.uk
Contact your local
0845 728 2828
…any comments?
If you have any suggestions to enable us to improve
the information within this guide please fax your
comments or write to the Product Manager at the
address below
Fax: 020 8687 5001
457/01
For advice on the safety and suitability of this equipment
contact your local HSS Hire Shop.
There is a serious risk of personal injury if you do
not follow all instructions laid down in this guide.
The hirer has a responsibility to ensure that all
necessary risk assessments have been completed
prior to the use of this equipment.
This equipment should only be used by an operator
who has been deemed competent to do so by
his/her employer.
This equipment should be used by an able bodied,
competent adult who has read and understood these
instructions. Anyone with either a temporary or permanent
disability, should seek expert advice before using it.
Keep children, animals and bystanders away from
the work area. Cordon off a NO GO area using
cones and either barriers or tape, available for hire
from your local HSS Hire Shop.
Never use this equipment if you are ill,
feeling tired, or under the influence of
alcohol or drugs.
A face shield MUST be worn by everyone in
the work area.
Wear practical, protective clothing,
gloves and footwear. Avoid loose garments
and jewellery that could catch in moving parts, tie back
long hair.
Ensure the work area is well lit and ventilated, if in
doubt, ask about lighting and ventilation equipment at
your local HSS Hire Shop.
Do not work near flammable gases or liquids, petrol
or paint thinner fumes for example. Keep combustible
materials at a safe distance - at least 5m.
Watch your footing. Think twice before working
anywhere other than on firm, level ground. Never work
in slippery or wet conditions.
Make sure that anyone in the immediate work area
is warned of what you are doing.
Take special care when cutting into walls or floors,
they may contain hidden pipe work or electrical
cables. If in doubt, hire a Cable Avoiding Tool or metal
locator, to determine the exact position of such hazards.
Concrete and masonry are heavy and care must be
taken to safeguard yourself against being struck by
falling debris and off cuts.
Check the condition of the equipment before use.
If it shows signs of damage or excessive wear, return it to
your local HSS Hire Shop.
GENERAL SAFETY
This equipment is designed for use with the HSS
Concrete Chainsaw and this guide should be read
in conjunction with the HSS Guide No 995,
available from your local HSS Hire Shop.
Cutting sequence: Always start with the right-
hand side cut first, then bottom, and then top.
Save the left-hand side cut for last. Using this
sequence you will only need to reverse the axle for
the last cut.
Be sure cut concrete cannot fall and injure
operator or bystanders.
Check for live electrical wiring near the cutting
area or in the concrete to avoid electrocution
which can result in death or serious personal
injury.
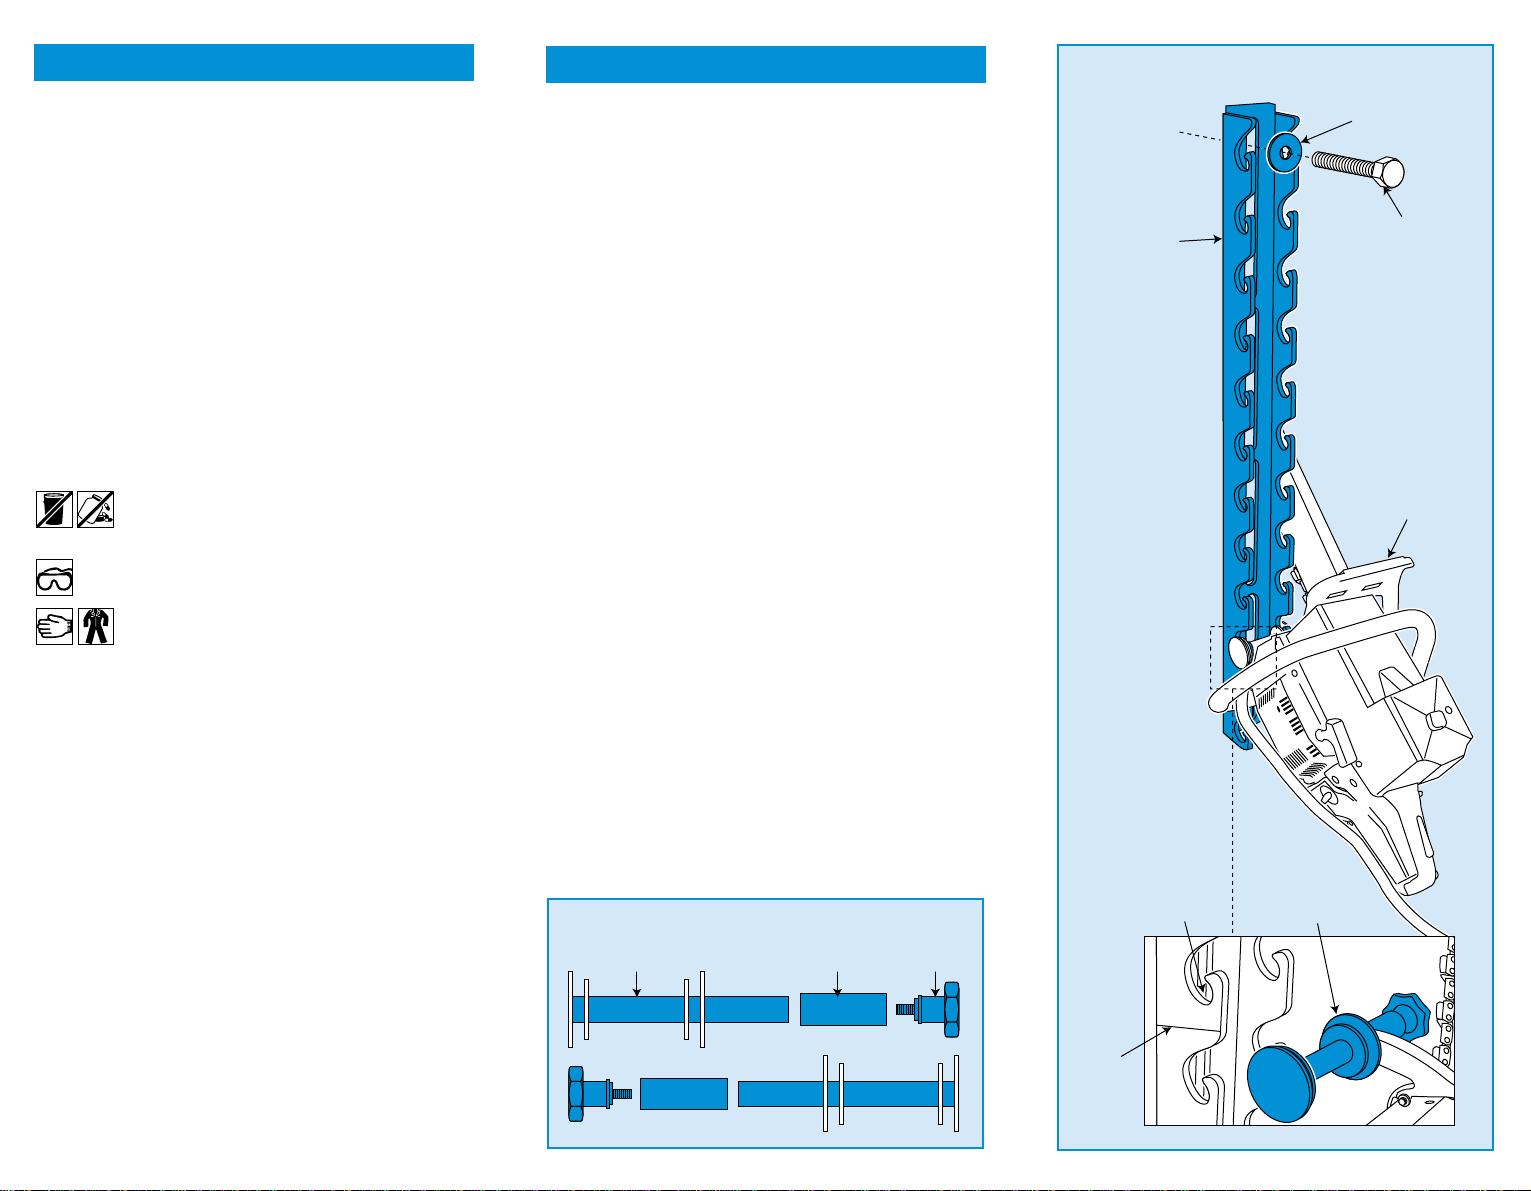
Mark the wall to be cut with a chalk line then
decide upon which side of the cut the guide needs
to be fixed.
Mark a second chalk line 83mm to the side of the
first, this will mark the position of the anchors.
Mark the line to the left if the guide is to be fixed
to the left of the cut line and to the right if the
guide is to be on the right.
Drill suitable holes for the fixings. Make sure that
the anchor bolts don’t extend out from the wall
greater than 35mm as they may interfere with the
saw when attached.
Hold the guide in position and attach to the wall
with suitable fixings, ensuring you use the
oversized washers provided.
Once in position, make any necessary adjustments
to align the guide correctly.
Use the scribe line at the bottom of the rail to line
up where you want the cut to end.
Position the outside of the rail 35mm from the
centre of the cut line and securely tighten the
anchors.
GETTING STARTED
Oversized
Washer
Fixings
(not supplied)Guide
Concrete
Chainsaw
Scribe
Line
Hooked
Slots
Pivot
Support
Assembly
Concrete Chainsaw Cutting Guide
Pivot
Shaft Mounting
Shaft Lock
Knob
Pivot Support Assembly