Hugyfot HFN-D7200 User manual

Hugyfot User Manual HFN-D7200
1
The only limitation is your imagination ...
Hugyfot User Manual
HFN-D7200
MADE IN
MADE IN
BELGIUM

History
In 1953, René Hugenschmidt is introduced to the
diving sport in the Italian city of Nervi and realises
that from that moment on his life will be dedicated
to underwater photography.
The young construction engineer transforms his
workshop at the Zürichzee into a Hugyfot assembly
plant. At first the production is limited to housings
for Agfa, Edixa, Exakta, Kodak, Leitz, Voigtländer
and Zeiss cameras.
At the same time, the Cousteau-Gagnan regulator
makes it’s entry and in Paris the world’s first diving
related magazine is released. Hans Hass gets well-
known with his movies ‘Abenteuer im Roten Meer’
and ‘Unternehmen Xarifa’ and arouses a general
interest in the world below sea level. The diving in-
dustry is starting to get organised ...
Philosophy
From the early start in 1953, the Hugyfot philoso-
phy consisted of developing housings that were not
only functional and of high quality, but that also
distinguished themselves from other brands by
their well-considered and stubborn design.
1953 ...
picture: Luc Eeckhaut
The HugyCheck system is awarded ‘Innovation of the
year 2009’ at Duikvaker in Utrecht.
The HugyCheck system allows the diver to check
prior to the dive whether the housing has been
closed properly and whether the O-rings are intact.
Hugyfot was the first company to introduce a vau-
um check system for underwater housings.

Hugyfot User Manual
1. Introduction ....................................................................................................... 4
2. Safety precautions ....................................................................................... 5
3. Tips ........................................................................................................................... 5
4. Housing overview .......................................................................................... 6
5. Installing the camera ........................................................................... 7-8
6. Fitting the lens ................................................................................................ 9
7. Fitting the port ............................................................................................. 10
8. Connecting the strobes ........................................................................ 11
Fixing a sync cord .......................................................................... 11
Fixing an optical adapter .......................................................... 11
Fixing the strobe arms ................................................................ 11
9. Fitting a viewfinder .................................................................................. 12
10. Using the HugyCheck system .................................................. 12-13
On/off & battery status switch .............................................. 12
Vacuum system ................................................................................ 13
Leakage alarm ................................................................................... 13
Hugyfot User Manual 3

1. Introduction
Thank you for purchasing Hugyfot products.
When taking off to remote areas in order to shoot exceptional images, one
should leave nothing to chance since there might never be a second chance.
When shooting pictures under water, reliable equipment is even more impor-
tant. An underwater camera housing should not only protect your expensive
camera equipment from the surrounding water, it should also allow you to con-
trol your camera as easily as if it weren’t there. Underwater photography in ex-
treme situations requires a compact, yet ergonomically designed housing that
allows you to shoot pictures without having to trouble your mind with how to set
the camera controls. Hugyfot is renowned for its compact and ergonomically
designed housings, machined from solid aluminum. Since, by definition, travel
often involves keeping luggage to a minimum, these housings have proven to
be the best choice particularly when reliability, handiness and weight become
of significance.
Your Hugyfot housing has been designed and developed by using the latest
CAD/CAM techniques. It has been milled out of a solid block of seawater re-
sistant aluminum and has been treated with a Teflon coating after it has been
anodised. All controls have been fitted by hand and your housing has been
tested to ensure swift and flawless operation.
This user manual will guide you through the steps necessary to install your
camera into your Hugyfot housing and to ensure it functions correctly throughout
the dive. Please read this manual carefully and always take your time to carry
out (and to practice) these steps.
Hugyfot User Manual 4
Your Hugyfot housing has been
milled out of a solid block of
seawater resistant aluminum.
picture: Danny Van Belle

Hugyfot User Manual HFN-D7200
5
2. Safety precautions
To prevent personal injury and/or damage to the equipment, carefully read this
manual as well as the manual of your camera and all other devices being used
in combination with this housing.
To prevent personal injury:
- Use only the type of battery specified in this manual and carefully read and
follow up the manufacturers guidelines.
- Immediately remove the battery from the housing in case it should leak.
While doing this, be careful not to suffer injuries due to acid or other che-
micals produced by the battery.
- Keep the batteries away from children.
- While using the housing under water, keep track of your depth and de-
compression information.
- The depth rating of this housing (100 metres) may exceed your personal
level of training and skills. Do not use this housing at depths beyond your
training level and skills.
To prevent damage to your equipment:
- Do not put the housing in direct sunlight as it may heat up and cause da-
mage to the components inside.
- Avoid direct sunlight falling into the viewfinder (any type) as this may con-
verge and cause damage inside the housing.
- Do not use thinner, benzene or other organic solvents to clean your hou-
sing. These can cause fire and are harmful to your health.
3. Tips
- Your housing has been developed and machined with great precision.
Treat it with great care and avoid dropping it or exposing it to physical
shocks.
- The inside of the housing is not waterproof and should be kept dry
at all times. Avoid drops of water on the inside of the housing (es-
pecially on the HugyCheck circuit board). If ever salt water gets into the
housing or on the HugyCheck circuit board, immediately remove with a
slightly moist (fresh water!) cloth and dry immediately.
- When moving the housing from a cold to a warm environment, con-
densation may form on the inside of the housing and on the circuit
board. To avoid condensation being formed, move the housing from
a cold to a warm environment in a sealed bag or case. Once the housing
has reached the surrounding temperature, you can remove it from the bag
or case.
- If condensation does form on the inside of the housing, do not use it.
Remove the camera and battery and wait until the condensation has eva-
porated.
- When the housing has not been used for an extended period, check the
housing and all of its functions before taking it under water.
- After a dive (especially a salt water dive) thoroughly rinse your housing in a
fresh water tank. Push all buttons several times to create a flow of water
behind the buttons, through the spring mechanism.
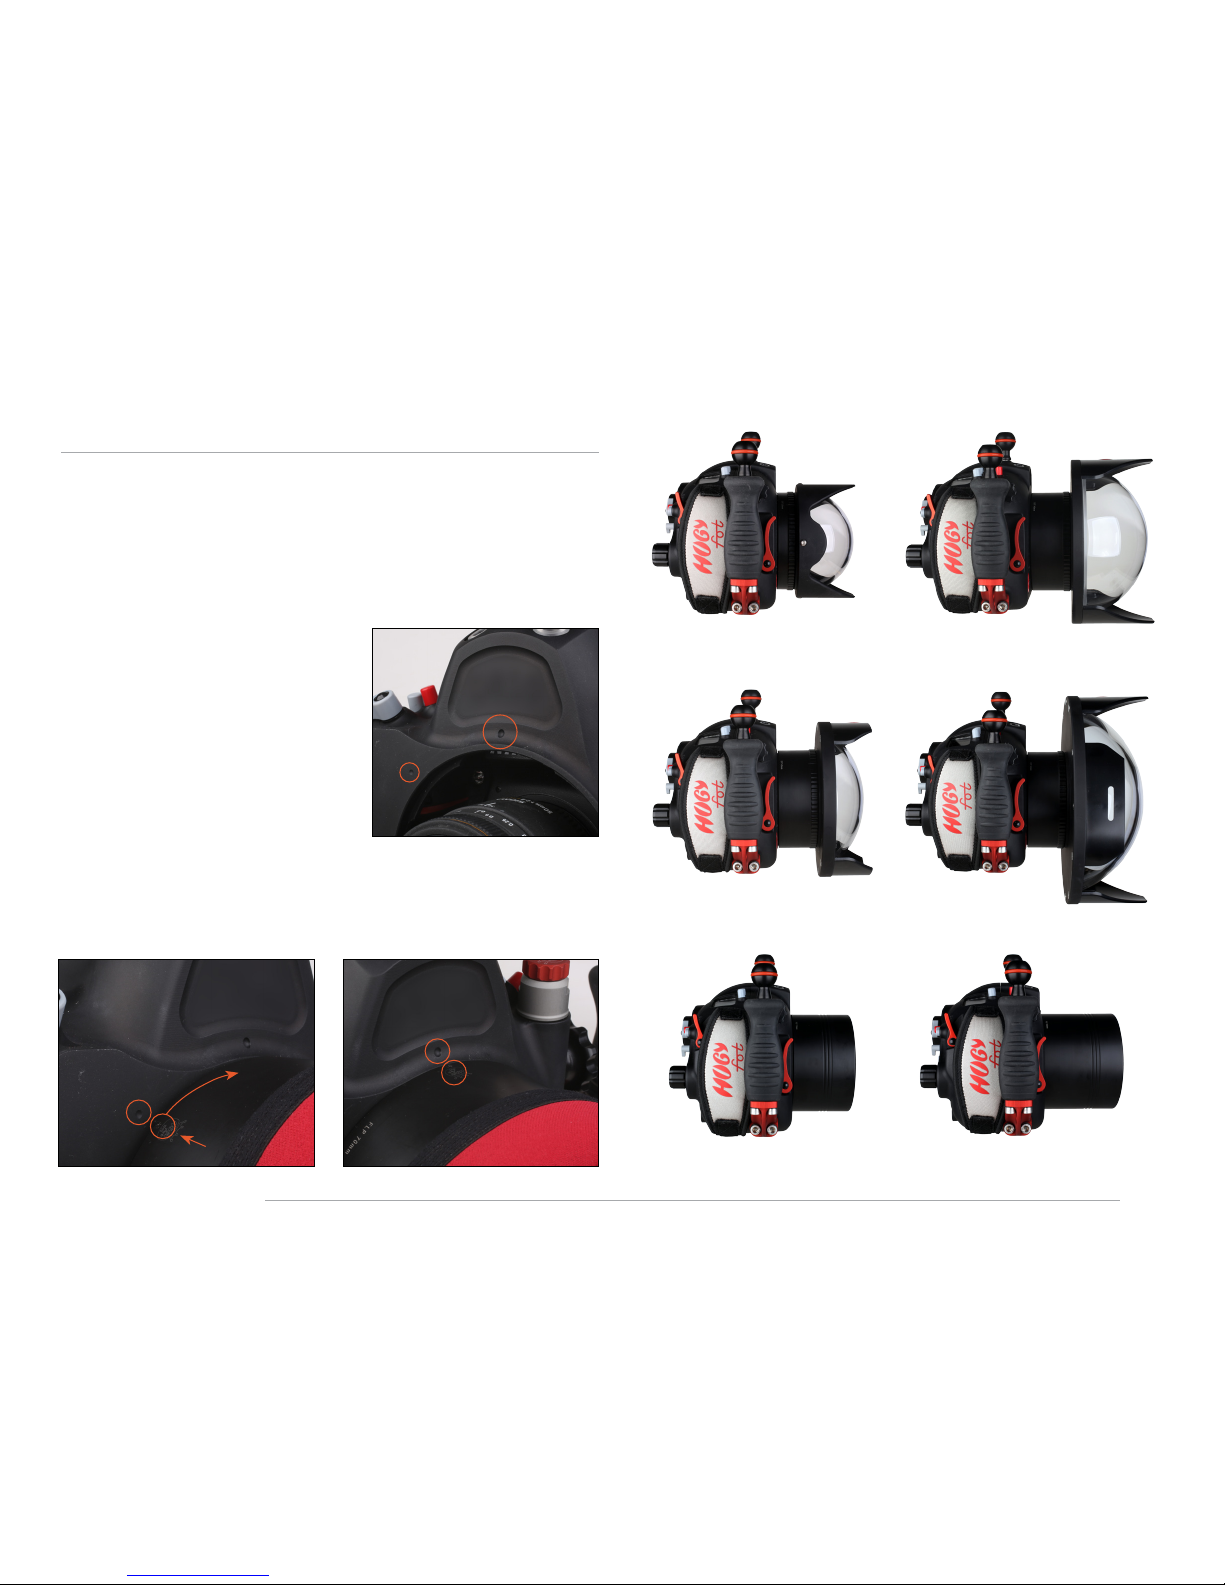
- Check and grease the O-rings before every dive or at least whenever the
housing is opened/closed or whenever a port has been removed/fit.
- Grease the O-ring and threaded part of the connectors on the
sync cords whenever they are connected to the housing bulk heads.
Greasing the threaded part will allow swift fitting and removal of the
connectors and will avoid corrosion on the bulkheads.

Hugyfot User Manual HFN-D7200
6
34
32 33
11 20 21 22 23 24
12
25
13 27
26
14 15
15 28
16 29
17 30
18
19 31
1 2 3 9 10
4 6 6 7 85
1
1. Aluminium handle (2)
2. Fn control
3. Shuerreleaselever
4. Aperture control
5. On/oswitch
6. Opcalbulkhead(2)
7. Nikonos5-pinbulkhead
8. Zoom control
9. Lensrelease
10. AF/MFswich
11. HugyCheckonewayvalve
12. Playbackbuon
13. Deletebuon
14. Menubuon
15. Lockingbolt(2)
16. Helpbuon
17. Playbackzoominbuon
18. Playbackzoomoutbuon
19. ibuon
20. Flashclosinglever
21. Meteringmodebuon
22. Videostart/stop
23. Exposurecompensaon
24. Shuerspeedcontrol
25. AF-Locklever
26. Neoprenehandstrap
27. Mulselector
28. OKbuon
29. Photo/Videoselector
30. Liveviewbuon
31. Infobuon
32. Flashpop-upbuon
33. Modeselector
34. AF-modebuon
4. Housing overview

Hugyfot User Manual HFN-D7200
7
5. Installing the camera
When installing the camera into the housing, make sure you have a clean, flat
and large enough surface at your disposal. Avoid carrying out the installation in
a windy, sandy or moist environment.
Make sure the camera battery is fully charged and the memory card has been
emptied (if required). Remove the camera strap and any lens mounted to the
camera (if applicable). Make sure the bayonet catch of the camera body is
equipped with a dust cap. Open the housing with the supplied allen key.
Prior to mounting the camera in the housing, check the function and battery
status of the HugyCheck system and leakage alarm. The HugyCheck system is
located at the bottom of the camera support. Make sure a CR123 Lithium bat-
tery is installed correctly. Pushing and holding the switch on the HugyCheck
system to the right will activate the battery test mode. If the LED turns green,
the battery is OK. If the LED turns red, the battery does not have enough power
left and needs to be replaced. By pushing the switch to the left, the HugyCheck
system is activated.
Installing the camera
Put the front shell of the housing on a clean, flat and large enough surface.
No port or lens should be fitted at this time. Set the on/off switch on the hou-
sing (1) and camera (2) to the ‘on’ position. Set the AF/MF control lever on the
housing (3) and camera (4) to the ‘M’ position. The gap in the fork of the AF/
MF control lever should be facing to the front of the housing and facing down
with a 45° angle.
1 2 3 4
5 6 7 8
Make sure the hot shoe connector is remo-
ved from the housing dust cap (velcro) and is
placed outside of the housing.
Pushing and holding the switch to the right
will activate the battery test mode. Green
LED: battery is OK. Red LED: replace battery.
Pushing the switch to the left: activate Hu-
gyCheck system (LED blinks red/green/red).
activate system test mode
on
off
45°
close
close
close
open
light
The camera support is equipped with a quick release system. Turning the lever
to the left will disengage the lock. Turning the lever to the right will engage the
lock. Turn the lever to the left and remove the camera support (5). Fix the
camera support tightly to the bottom of the camera by turning the tripod screw
clockwise (6). Take the camera body and slide it into the camera support re-
ceiver (7). Make sure to keep the camera body perpendicular. As soon as the
camera touches the controls on the front, it is in position.
Lock the camera support in place by turning the locking lever to the right (8).
The camera body should now be centered and locked. Test the on/off switch
as well as the AF/MF control lever. If one of these (or both) should not react pro-
perly, remove the camera from the front shell and reinstall it. All other controls
should only be tested when the housing is fully closed as some controls need
to be pushed onto the camera by the back shell of the housing.
Activate the HugyCheck system prior to closing the housing.

Hugyfot User Manual HFN-D7200
8
Slide the hot shoe onto the camera accessory shoe (1) keeping the ribbon
cable on the left hand side. If the housing is used with fiber optic strobes, the
hot shoe is not to be used and can then be disconnected from the connector
board located on the left side inside the housing (2).
Check the main housing O-ring (red 195*3 O-ring). This O-ring should be lay-
ing inside its groove and should be clean. No dirt, hairs or other substances
should be covering this O-ring. If necessary, clean this O-ring with micro fiber
cloth. Do not use cloth that produces fluff. As this is a static O-ring (which does
not move or rotate in relation to any other part) it doesn’t need to be greased.
Set the photo/video mode selector on the housing (3) and camera (4) to the
photo mode. The eyelet for the camera strap on the left hand side should be
flipped down, while the eyelet for the camera strap on the right hand side
should be flipped up.
Take the housing back shell with both hands and hold it over the front shell
containing the camera (5). The top side of the back shell should be about 3
cm over the top side of the front shell. Gently lower the top part of the back
shell while bringing it backwards (6). While bringing the back shell backwards,
make sure not to lift the top part of the back shell as this will also pull the hot
shoe backwards, disturbing the hot shoe connection (this will result in strobe
malfunction). Stop when the top parts of both shells are in line with each other
and are touching. Then gently lower the bottom part of the back shell until
both shells slide into one another (7). Make sure nothing gets between the two
shells when closing the housing (lanyards, …).
Fasten the closing bolts with the Allen key supplied (8). Fasten both sides gradu-
ally and stop turning when the resistance on the Allen key increases signifi-
cantly. When the housing is fully closed, both shells will be in contact with each
other and no gap should be visible between them.
The housing is now closed.
Please check all camera functions before proceeding.
1 2 3 4
5 6 7
8
disconnect

Hugyfot User Manual HFN-D7200
9
6. Fitting the lens
When using zoom lenses, fit the zoom gear before fitting the lens to the ca-
mera. When using fixed focal lenses, fit the focus gear (if applicable) before
fitting the lens to the camera body. Hugyfot provides several zoom and focus
gears depending on the brand, model or type of lens. Please check the lens
charts on our website to look up the appropriate zoom or focus gear for your
lens.
To fit the zoom or focus gear, keep in mind the following guidelines:
- the black teethed outer ring should be positioned onto the lens as far to the
back (bayonet) as possible without touching the camera’s internal strobe
(keep approx 3 mm of play);
- the white inner ring should be fit into the black teethed outer ring so it
exactly matches the lenses’ zoom or focus ring;
- when inserting the white inner ring, make sure that its grooves coincide
with the ones inside the black outer ring.
Depending on the brand, model or type of lens, it may be necessary to slide
the complete gear set over the lens starting from the front end or starting from
the back end. A larger lens diameter at the front will make you start from the
back while control switches at the back of the lens will make you start from
the front end.
While fixing the zoom or focus gear, make sure that your lens is equipped with
a dust cap on both ends to prevent the optics from becoming dirty (finger-
prints, …).
Before fixing the lens, make sure that the lens release lever is upwards (1).
Once the lens is fitted, try the lens release lever to check on its function. Af-
ter testing, turn the lens release lever upwards again to ensure that the lens
release button on the camera is not pushed. The housing is now ready to be
fitted with the port.
width of
zoom ring on lens
position of
silicon ring in
zoom gear
gap of 3 mm
1

Hugyfot User Manual HFN-D7200
10
7. Fitting the port
Depending on the lens being used, different Hugyfot ports and extension rings
are available. Please check our port charts in order to determine which port and
extension ring you need for a specific lens. Before fitting any port or extension
ring, make sure that it is fitted with the proper O-ring (black 105x3) and see to
it that this O-ring is clean, slightly greased and that it doesn’t show any damage
or cracks.
The front of the Hugyfot housing shows two
marks (see picture) which are used to align
and fit any Hugyfot port or extension ring.
The smallest mark (approx at 10 o’clock)
indicates the starting point while the larg-
est mark (at 12 o’clock) indicates the end
point. Each port and extension ring has a
mark (Hugyfot logo) on the top side (at 12
o’clock) next to the bayonet. When fitt ing
a port or extension ring, turn the port or ex-
tension ring so its top mark faces the start-
ing point on the housing (at 10 o’clock).
Apply a steady and perpendicular pressure to insert the port or extension ring
into the housing. Once fully inserted, turn the port or extension ring clockwise
until the top mark on the port faces the top mark on the housing. The housing
is now fully closed.
start
stop
lock
locked
5” glass fisheye dome
6.5” glass/acrylic wide angle port
L70 glass/acrylic flat port
7” acrylic fisheye dome
9” glass/acrylic wide angle port
L90 glass/acrylic flat port

Hugyfot User Manual HFN-D7200
11
8. Connecting the strobes
Your Nikon D7200 housing is equipped with 1 Nikonos 5-pin bulkhead and 2 fiber
optic connector ports.
Connecting a sync cord
Each sync cord (whether it is a 5-pin or a 6-pin) will have a plug on the hou-
sing side of the cable that will correspond with the bulkhead on the housing.
Before fixing the sync cord, make sure that the plug is fitted with the appropriate
o-ring and that this o-ring is clean, slightly greased and free of dirt or cracks.
We strongly recommend greasing the threaded part of the plug as well as this
will allow swift fitting and removal of the plug and will prevent corrosion to the
threaded part due to exposure to salt water. When inserting the plug into the
bulkhead, make sure that the pinhole layout of the plug is symmetrical to the
pin layout inside the bulkhead. If you should feel any resistance when insert-
ing the plug into the bulkhead, do not force the
plug any further. Remove the plug and check the
pinholes positions compared to the pins inside
the bulkhead. Once fitted, tighten the locking nut
to prevent the plug from getting loose during the
dive. If the housing is to be used without external
strobes, the bulkheads should be fitted with seal-
ing caps. Make sure that these sealing caps are
fitted with the proper O-rings and see to it that
these O-rings are clean, slightly greased and that
they don’t show any damage or cracks.
Connecting an fiber optic cable
Your Nikon D7200 housing is equipped with 2
fiber optic connector ports on top of the housing.
These ports are compatible with Sea & Sea and
Inon fiber optic cable systems. The plug at the
end of a Sea & Sea or Inon fiber optic cable fits
in the fiber optic connector ports on top of the
housing. When using this system, the internal
strobe has to be popped up so it can trigger the
external strobe by sending its light through the
fiber optic cable. The hot shoe inside the camera
cannot be used when fiber optic cables are be-
ing used. You can unplug the camera hot shoe cable and store the hot shoe.
Installing the strobe arms
Your Hugyfot housing comes with three 25mm (1”) arm balls (one on top of
each handle and one on top of the housing). The Hugyfot strobe arms are also
equipped with 25mm (1”) arm balls on both ends and are fixed to the housing
(and to each other) by means of clamps.
Nikonos 5-pin
bulkhead
Fiber optic
connector port
HugyFloat Adjustable Buoyancy system

Hugyfot User Manual HFN-D7200
12
10. Using the HugyCheck system
Your Hugyfot underwater housing is equipped with the ‘genuine’ HugyCheck pre-
dive check system. Introduced in 2008, this system has constantly proven its
value and has been improved continuously. The latest version now comes with
even more functionality. The HugyCheck system is a pre-dive check system that
allows you to check prior to the dive whether the housing has been closed prop-
erly and whether the o-rings are in good condition. A vacuum pump will create
a slight under pressure inside the housing which can be monitored by means of
an LED pressure indicator.
1. On/off & battery status switch
The mini-HugyCheck circuit board is equipped with a power on/off switch and
a battery status indicator (located at the right side of the bottom of the camera
tray). When set to the middle position (1) the HugyCheck system is turned off
and no power will be used from the battery. When set to the left (2), the Hu-
gyCheck system is activated. Two ‘beeps’ will sound when the leakage alarm
is activated and three beeps will sound when the leakage alarm is deactivated
(see next section: leakage alarm). When held to the right (3) the battery status
indicator is activated. If the green LED lights up after the beeps, the battery is
OK. If the red LED lights up, the battery needs to be replaced.
9. Installing a viewfinder (standard, straight or 45°)
Your Hugyfot housing comes with a stan-
dard viewfinder which is depth rated to
100m (150m with an optional spring up-
grade for your housing). Your housing can
also be equipped with a straight or a 45°
viewfinder. Both viewfinders of-
fer a larger magnification of the
camera viewfinder image and are
depth rated to 70m. To remove a
viewfinder, unlock the retaining nut
of the viewfinder on the inside of the housing. Once the retaining nut has
been removed, the viewfinder can be pulled out of the acrylic window. Before
installing another viewfinder, make sure that the viewfinder is fitted with the
appropriate O-ring and that this O-ring is clean, slightly greased and free of dirt
or cracks. Check the hole in the acrylic window and make sure that it is clean
and free of cracks. Gently push the viewfinder through the hole in the acrylic
window. When installing a 45° viewfinder, see to it that the two little metal
pins on the back of the viewfinder base slide into the 2 holes in the acrylic
window. These pins will keep the base of the 45° viewfinder in place when the
viewfinder is rotated.
2 31

Hugyfot User Manual HFN-D7200
13
2. Vacuum system
As soon as the system is activated, the HugyCheck system will beep twice and
will turn to ‘stand-by’ mode. The red LED below the camera support will blink
once every 5 seconds. To start the vacuum procedure, please make sure that
the system is in ‘stand-by’ mode. Start the vacuum procedure at least 30 min
prior to the dive.
- Make sure that the one-way valve is fitted with the appropriate O-ring and that
this O-ring is clean, slightly greased and free of dirt or cracks.
- Fit the one-way valve to the bulkhead on the back of the housing (1).
- Remove the sealing cap (2) from the one-way valve.
- Put the vacuum pump (3) onto the one-way valve and start pumping.
- As soon as the HugyCheck system detects a pressure between
950hPa and 850hPa, the red LED will blink once each second.
- When the HugyCheck system detects a pressure between 850hPa and
750hPa, the red LED will blink 3 times each second.
- When a pressure of 750hPa (or less) is registered the red LED will stop
blinking and the green LED will take over (4).
Stop pumping as soon as the green LED is activated!
If the housing hasn’t been closed properly or if an O-ring is faulty, the pressure
of 750hPa will not be reached or will not be kept. In this case a loss of vacuum
will be registered by the system and the red LED will be reactivated while the
green LED will stop blinking.
When opening the housing after a dive, the vacuum has to be released by
unscrewing the one way valve from the bulkhead.
3. Leakage alarm
The mini-HugyCheck circuit board is equipped with a leakage alarm which is
triggered by a humidity sensor (located at the bottom of the housing). In some
cases of extremely high air humidity, it may be necessary to decrease the sen-
sitivity of the humidity sensor or to completely deactivate the leakage alarm.
To decrease the sensitivity or deactivate the humidity sensor, the protective
cover of the circuit board is to be removed by loosening a black plastic bolt (5).
A potentiometer in the center of the circuit board controls the humidity sensor.
When turned fully to the left, the leakage alarm is deactivated and 2 beeps will
sound. When turned to the right, the leakage alarm is activated and 1 beep will
sound. The more the potentiometer is turned to the right, the more sensitive
the humidity sensor will be.
Turn fully left
to switch off
leakage alarm.
Turn right to activate
leakage alarm and to
increase sensitivity
of humidity sensor.
12 3 4 5

Hugyfot NV
Industrielaan 30 - Zuid III - 9320 Erembodegem - Belgium
Fits your camera like a glove
Table of contents
Popular Digital Camera manuals by other brands

Sony
Sony Cyber-shot DSC-W80 instruction manual

Panasonic
Panasonic DMC-FT25GN Basic operating instructions

Pentax
Pentax 30 - Optio 30 3.2MP Digital Camera operating manual

RND
RND 355-00006 user manual

Point Grey
Point Grey Grasshopper2 Getting started

Panasonic
Panasonic LUMIX DMC-LS75 operating instructions