Huyosen CG430MF-3 User manual

Gas Pole Saw
OPERATOR’S MANUAL

Contents
Introduction..................................................................... 2
Safety..............................................................................4
Assembly........................................................................ 9
Operation...................................................................... 11
Maintenance................................................................. 14
Troubleshooting............................................................ 22
Transportation, storage and disposal........................... 22
Technical data.............................................................. 23
Accessories.................................................................. 24
EC Declaration of Conformity....................................... 25
Introduction
Intended use
The product is used for cutting branches and twigs.
Note: National regulations can set limit to the operation
of the product.
Product overview
2
Fuel Tank
Starter Handle
Harness
Manual
Spike Plug
Front Handle
Knob
Chain oil tank
Saw Chain
Guide Bar
Switch Button
Throttle Trigger
Trigger lockout
Harness Eyelet
Shaft Coupling
Air Filter Cover
Choke Control
Bar Cover
Shaft B
Shaft A
Shaft C
Tools Bag Hex Wrench Screwdriver
Allen Key
Mixture Container
Wrench

Symbols on the product
WARNING! This product is dangerous.
Injury or death can occur to the operator or
bystanders if the product is not used
carefully and correctly. To prevent injury to
the operator or bystanders, read and obey
all safety instructions in the operator's
manual.
Please read the operator's manual carefully
and make sure that you understand the
instructions before use.
Use a protective helmet in locations where
objects can fall on you. Use approved
hearing protection. Use approved eye
protection.
Use approved protective gloves.
Use heavy-duty slip-resistant boots.
Fuel.
Chain oil.
Adjustment of the oil flow.
Direction of rotation, saw
chain.
Primer bulb.
Noise emission to the environment refer to
the European Community's Directive. The
emission of the product is specified in the
Technical data chapter and on the label.
This product is not electrically insulated. If the product touches or comes close to high-volt-
age power lines it could lead to death or serious injury. Electricity can jump from one point to
another by arcing. The higher the voltage, the greater the distance electricity can jump. Elec-
tricity can also travel through branches and other objects, especially if they are wet. Always
keep a distance of at least 10 m between the machine and high-voltage power lines and/or
any objects that are touching them. If you have to work within this safe distance you should
always contact the relevant power company to make sure the power is switched off before
you start work.
The operator of the product must ensure, while working, that no persons or animals come
closer than 15 meters.
Choke off
Choke on
3

Safety
Safety definitions
Warnings, cautions and notes are used to point out
specially important parts of the manual.
WARNING: Used if there is a risk of injury or
death for the operator or bystanders if the
instructions in the manual are not obeyed.
CAUTION: Used if there is a risk of damage
to the product, other materials or the
adjacent area if the instructions in the
manual are not obeyed.
Note: Used to give more information that is necessary in
a given situation.
General safety instructions
WARNING: Read the warning instructions
that follow before you use the product.
• This product produces an electromagnetic field
during operation. This field may under some
circumstances interfere with active or passive
medical implants. To reduce the risk of serious or
fatal injury we recommend persons with medical
implants to consult their physician and the medical
implant manufacturer before operating this product.
• This product is a dangerous tool if you are not
careful or if you use the product incorrectly. This
product can cause serious injury or death to the
operator or others.
• It is very important that you read and understand the
contents of this operator’s manual. If you feel
uncertainty about a work situation or the operating
procedures after you read the operator's manual,
speak to a service agent before you continue.
• Under no circumstances may the design of the
product be modified without the permission of the
manufacturer. Do not use a product that appears to
have been modified by others and only use
accessories recommended for this product. Non-
authorized modifications and/or accessories can
result in serious personal injury or the death of the
operator or others.
• Do a check of the product before use. Do not use a
defective product. Do the safety checks,
maintenance and service instructions described in
this manual.
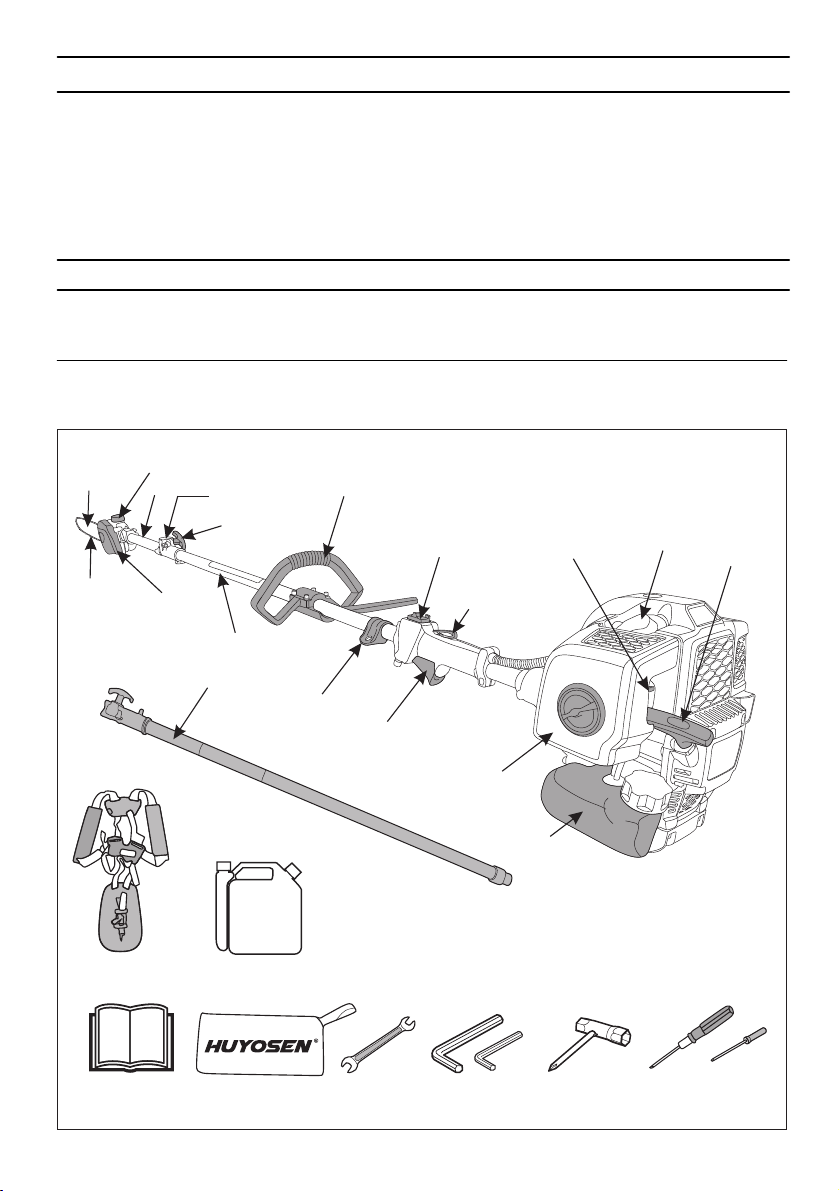
Safety instructions for assembly
WARNING: Read, understand and obey
these instructions carefully before you use
the product.
• The complete clutch cover and shaft must be fitted
before the machine is started, otherwise the clutch
can come loose and cause personal injury.
• The only accessories you can operate with this
product are the cutting attachments we recommend.
• Use approved protective gloves.
• Make sure that you assemble the protective cover
and shaft correctly before you start the engine.
• To operate the product safely and prevent injury to
the operator or other persons, the product must
always be attached correctly to the harness.
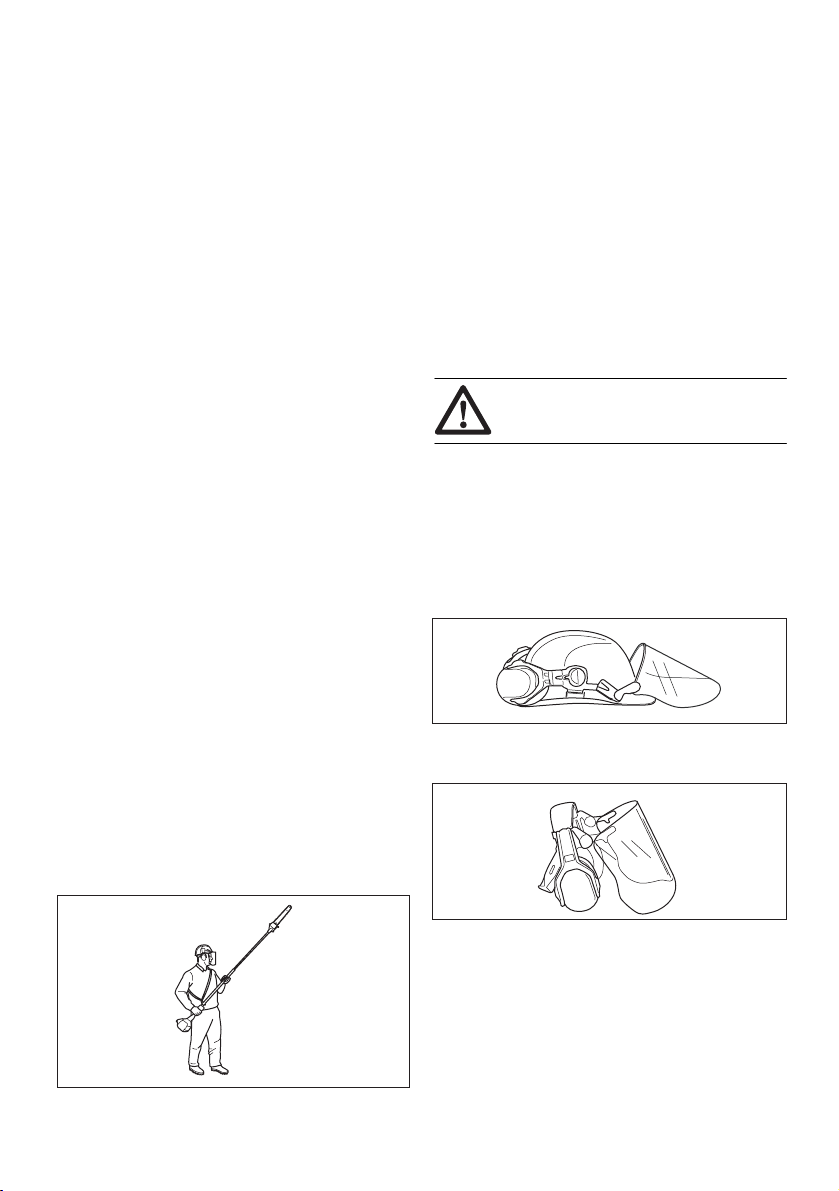
Safety instructions for operation
WARNING: Read the warning instructions
that follow before you do maintenance on
the product.
• Use personal protective equipment.
• This product is not electrically insulated. If the
product touches or comes close to high-voltage
power lines it could lead to death or serious bodily
injury. Electricity can jump from one point to another
by arcing. The higher the voltage, the greater the
distance electricity can jump. Electricity can also
travel through branches and other objects, especially
if they are wet. Always keep a distance of at least 10
m between the product and high-voltage power lines
and/or any objects that are touching them. If have to
work within this safe distance you should always
contact the relevant power company to make sure
the power is switched off before you start work.
• Overexposure to vibration can lead to circulatory
damage or nerve damage in persons who have poor
circulation. Speak to your physician if you
experience symptoms of overexposure to vibration.
Such symptoms include numbness, loss of feeling,
tingling, pricking, pain, loss of strength, changes in
skin colour or condition. These symptoms usually
show in the fingers, hands or wrists. The risk
increases at low temperatures.
• The inside of the muffler contain chemicals that may
be carcinogenic. Avoid contact with these elements
in the event of a damaged muffler. Long term
inhalation of the engine’s exhaust fumes, chain oil
mist and sawdust can represent a health risk.
4
• Never use the machine indoors or in spaces lacking
proper ventilation. Exhaust fumes contain carbon
monoxide, an odourless, poisonous and highly
dangerous gas.

• Do not operate a product without a muffler or with a
defective muffler. A defective muffler can increase
the noise level and the risk of fire. Keep fire
extinguishing tools near. If you must have a spark
arrestor mesh in your area, do not use the product
without or with a broken spark arrestor mesh.
• If the saw chain does not stop when idling, adjust the
idle speed.
Do not use the product until it is correctly
adjusted or repaired.
• This product has a long reach. Make sure that no
people or animals come closer than 15 m when the
product is running.Always look behind you before
you turn around with the product. Stop the product
immediately if a person or animal enters the 15 m
safety zone. If more than one operator does work in
the same area, keep a safety distance of a minimum
of 15 m.
• Observe the applicable safety regulations for work in
the vicinity of overhead power lines. Also falling
branches can result in short-circuiting.
• Never stand directly underneath a branch that is
being cut. This could lead to serious or even fatal
personal injury.
• Watch out for stumps of branches that can be thrown
out when you cut. Do not cut too close to the ground
where stones and other objects can be thrown out.
• Do not operate the product in bad weather, such as
dense fog, heavy rain, strong wind and intense cold.
To operate in bad weather can make you tired and
add risks, such as icy ground and unpredictable
felling direction.
• Do not use the product if you are tired, ill, or under
the influence of alcohol, drugs or medicine, as this
has a negative effect on your vision, alertness,
coordination and judgment.
• Make sure that you can move safely and have a safe
stance. Examine the area around you for obstacles
such as roots, rocks, branch and ditches. Be careful
during work on slopes.
• Do not remove the cut material, or let other persons
remove cut material, while the engine is on or the
cutting equipment rotates, as this can result in
serious injury.
• Do not overreach. Keep a stable position of the feet
and a good balance at all times.
• Always hold the product with both hands. Hold the
product on the right side of your body.
• Keep your hands and feet away from the saw chain
until it has stopped completely when the product is
deactivated.
• Never work from a ladder, stool or any other raised
position that is not fully secured.
• Do not put the product down with the engine on
unless you have it in clear view.
• Listen for warning signals and loud voices when you
use hearing protection. Always remove your hearing
protection when the engine stops.
• Stop the engine before you move to a new work
area. Always attach the transport guard before you
move the equipment.
• Never allow children to use or be in the vicinity of the
product. Remove the spark plug cap when the
product is not under close supervision.
Personal protective equipment
WARNING: Read the warning instructions
that follow before you use the product.
• Always use approved personal protective equipment
when you use the product. Personal protective
equipment cannot fully prevent injury but it
decreases the degree of injury if an accident does
occur. Let your dealer help you select the right
equipment.
5
• Use a protective helmet where there is a risk of
falling objects.
• Use approved hearing protection that provides
adequate noise reduction. Long-term exposure to
noise can result in permanent hearing impairment.

• Use approved eye protection. If you use a visor, you
must also use approved protective goggles.
Approved protective goggles must comply with the
ANSI Z87.1 standard in the USAs or EN 166 in EU
countries.
• Use gloves when necessary, for example when you
attach, examine or clean the cutting equipment.
• Use sturdy non-slip boots.
• Use clothing made of a strong fabric. Always use
heavy, long pants and long sleeves. Do not use
loose clothing that can catch on twigs and branches.
Do not wear jewelry, short pants, sandals or go with
bare feet. Put your hair up safely above shoulder
level.
• Keep first aid equipment close at hand.
Safety devices on the product
WARNING: Read the warning instructions
that follow before you use the product.
• Do not use a product with defective safety devices.
• Do a check of the safety devices regularly.
• If the safety devices are defective, speak to Huyosen
service .
To do a check of the throttle trigger lockout
The throttle lockout is designed to prevent accidental
operation of the throttle control.
1. Press the throttle trigger lockout (A) and make sure
that the throttle control is released (B). When you
release the handle the throttle control and the throttle
trigger lockout both move back to their initial
positions. This movement is controlled by two
independent return springs. This arrangement
means that the throttle control is automatically
locked at the idle setting.
A
B
2. Make sure that the throttle control is locked at the
idle setting when the throttle trigger lockout is
released.
B
3. Press the throttle trigger lockout and make sure that
it returns to its intial position when you release it.
4. Do a check of the throttle control and throttle trigger
lockout move freely and that the return springs work
properly.
A
A
B
5. Start the product and apply full throttle .
6. Release the throttle and make sure that the saw
chain stops and remains at a standstill. If the saw
chain rotates with the throttle in the idle position the
carburettor idle setting must be checked.
6

To do a check of the stop switch
1. Start the engine.
2. Move the stop switch to the stop position and make
sure that the engine stops.
Fuel safety
WARNING: Read the warning instructions
that follow before you use the product.
• Do not mix the fuel indoor or near a heat source.
• Do not start the product if there is fuel or engine oil
on the product. Remove the unwanted fuel/oil and let
the product dry. Remove unwanted fuel from the
product.
• If you spill fuel on your clothing, change clothing
immediately.
• Do not get fuel on your body, it can cause injury. If
you get fuel on your body, use a soap and water to
remove the fuel.
• Do not start the engine if you spill oil or fuel on the
product or on your body.
• Do not start the product if the engine has a leak.
Examine the engine for leaks regularly.
• Be careful with fuel. Fuel is flammable and the fumes
are explosive and can cause injuries or death.
• Do not breathe in the fuel fumes, it can cause injury.
Make sure that there is a sufficient airflow.
• Do not smoke near the fuel or the engine.
• Do not put warm objects near the fuel or the engine.
• Do not add the fuel when the engine is on.
• Make sure that the engine is cool before you refuel.
• Before you refuel, open the fuel tank cap slowly and
release the pressure carefully.
• Do not add fuel to the engine in an indoor area. Not
sufficient airflow can cause injury or death because
of asphyxiation or carbon monoxide.
• Tighten the fuel tank cap carefully or a fire can
occur.
• Move the product at a minimum of 3 m (10 ft) from
the position where you filled the tank before a start.
• Do not put too much fuel in the fuel tank.
• Make sure that a leak cannot occur when you move
the product or fuel container.
• Do not put the product or a fuel container where
there is an open flame, spark or pilot light. Make
sure that the storage area does not contain an open
flame.
7
• Only use approved containers when you move the
fuel or put the fuel into storage.
• Empty the fuel tank before long-term storage. Obey
the local law on where to dispose fuel.
• Clean the product before long-term storage.
• Remove the spark plug cap before you put the
product into storage to make sure that the engine
does not start accidentally.
• Keep the correct depth gauge setting. Obey the
instructions and use the recommended depth gauge
setting.
• Make sure that the saw chain has the correct
tension. If the saw chain is not tight against the guide
bar, the saw chain can derail. An incorrect saw chain
tension increases wear on the guide bar, saw chain
and chain drive sprocket.
Safety instructions for the cutting
equipment
WARNING: Read the warning instructions
that follow before you use the product.
• Only use the guide bar/saw chain combinations and
filing equipment that we recommend.
• Use protective gloves when you use or do
maintenance on the saw chain. A saw chain that
does not move can also cause injuries.
• Keep the cutting teeth correctly sharpened. Obey the
instructions and use the recommended file gauge. A
saw chain that is damaged or incorrectly sharpened
increases the risk of accidents.

Assembly
To assemble the bar and chain
1. Unscrew the bar nut and remove the bar cover .
Make sure that the drive links of the chain fit correctly
on the drive sprocket and that the chain is in the
groove in the bar .
5. The chain is correctly tensioned when it does not
sag from the underside of the bar, but can still be
turned easily by hand.
8. When fitting a new chain, the chain tension has to be
checked frequently until the chain is run-in. Check
the chain tension regularly. A correctly tensioned
chain ensures good cutting performance and long
life.
2. Lift the saw chain above the guide bar .
Make sure that the edges of the cutting links are
facing forward on the top edge of the guide bar.
3. Place the chain over the drive sprocket .
Fit the guide bar over the bar bolt .
Locate the chain adjuster pin in the hole in the bar .
Chain Adjuster Pin
Drive sprocket
Chain Tensioning
Screw
Chain Adjuster Pin
4. Tension the chain by turning the chain tensioning
screw clockwise using the screw driver. The chain
should be tensioned until it does not sag from the
underside of the bar.
7. Hold up the bar tip and tighten the bar nuts with the
wrench .
8
4. Tighten the bar nut finger-tight.

To assemble the three-piece shaft
1. Remove the shaft A cap
A
3. Align the tab of the cutting attachment (A) with the
arrow of the coupling (C).
2. Turn the knob to loosen the coupling.
Knob
C
A
4. Carefully push the shaft(A) into the coupling until you
hear a click.
AC
5.Push the coupling down and tighten the knob fully .
A
To assemble the Front handle
B
B
1. Put the rubber washer on the shaft B..
2. Put the handle on the rubber washer .
B
3. Tighten the handle screws .
B
A
C
6. Assemble the third shaft .
B
c
C
9

To wear the harness
1. Take out harness from the package .
2. Pull the snap and open the lock .
3. The rope on the back plate faces out.
5. Make sure soft side is down . the shoulder strap
4 Make sure you back looks like this ..
6. Make sure the board is on the right side of your body.
7. Wearing the harness . (Front / Right )
8. Closed the buckle.
9. Adjust the rope to the best condition
10

1. Put the buckle through the hook.
To attaching the harness
Buckle
Hook
B
G
2. Loosen the hook screw and move it to the best position
B
Hook screw
4. Emergency Release
Pull the red tag (G) the buckle will breaks away .
3. Maintain balance and reduce burden on hands.
11

Operation
Fuel
This product has a two-stroke engine.
CAUTION: Incorrect type of fuel can result in
engine damage. Use a mixture of gasoline
and two-stroke oil.
Gasoline
CAUTION: Always use a quality gasoline/oil
mixture of at least 90 octane (RON). There
is a risk that use of lower octane grade
causes knocking. This gives rise to high
engine temperature, which can result in
serious engine damage.
CAUTION: If your product is equipped with a
catalytic converter use a good quality
unleaded gasoline/oil mixture. Leaded
gasoline will destroy the catalytic converter.
• Ethanol blended fuel, E10 may be used (max 10%
ethanol blend). Using ethanol blends higher than
E10 will cause lean running condition which can
damage the engine.
•We recommend a higher octane rating when you do
work at continuous high speed.
Two-stroke oil
CAUTION: Unsatisfactory oil quality and/or
incorrect oil/fuel ratio can damage the
product and decrease the life time of
catalytic converters.
CAUTION: Do not use oil for four-stroke
engines.
To mix gasoline and two-stroke oil
Gasoline, liter Two-stroke oil,
liter
4% (25:1)
5 0.20
10 0.40
15 0.60
20 0.80
US gallon US fl. oz.
15
2 1/2 13
525⅞
CAUTION: Small errors can influence the
ratio of the mixture drastically when you mix
small quantities of fuel. Measure the quantity
of oil carefully and make sure that you get
the correct mixture.
25:1
10
10
4. Fill the gasoline with 10 scale .
6. Shake the fuel mixture.
CAUTION: Do not mix fuel for more than 1
month at a time.
25:1
10
10
2. Add the Two -stroke oil to the container with10 scale.
1. Open the oil cap .
3. Open the gasoline cap .
5. Tighten both cap .
12
Fuel Tank

To fill the fuel tank
1. Clean the area around the fuel tank cap.
2. Shake the container and make sure that the fuel is
fully mixed.
3. Fill the fuel tank.
4. Tighten the fuel tank cap carefully.
5. Move the product 3 m (10 ft) or more away from the
refueling area and fuel source before starting.
CAUTION: Contamination in the tanks
causes malfunction. Clean the fuel tank
regularly and replace the fuel filter one
time a year or more.
To use the correct chain oil
WARNING: Do not use waste oil, which can
cause injury to you and the environment.
Waste oil also causes damage to the oil
pump, the guide bar and the saw chain.
WARNING: The saw chain can break if the
lubrication of the cutting equipment is not
sufficient. Risk of serious injury or death to
the operator.
WARNING: This product has a function that
lets the fuel run out before the chain oil. Use
the correct chain oil for this safety function to
operate correctly. Speak to your servicing
dealer when you select your chain oil.
13
Note: This product has an automatic chain lubrication
system. You can also adjust the oil flow.
• Use a chain oil with good adherence to the saw
chain.
• Use a chain oil with correct viscosity range that
agrees with the air temperature.
CAUTION: If the oil is too thin, it runs out
before the fuel. In temperatures below
0°C/32°F some chain oils become too
thick, which can cause damage to the oil
pump components.
To use the product
• Hold the product as close to your body as possible to
get the best balance. Use the harness to support the
weight of the machine and make it easier to handle.
• Make sure that the tip does not touch the ground.
• Do not rush the work, but work steadily until all the
branches have been cut back cleanly.
• Always slow the engine to idle speed after each
working operation. Long periods at full throttle
without any load on the engine can lead to serious
engine damage.
• Always work at full throttle.
• Whenever possible position yourself so that you can
make the cut at right angles to the branch.
90°
• Do not work with the shaft held straight out in front of
you (like a fishing rod) as this increases the apparent
weight of the cutting attachment.
• Cut large branches in sections so that you have
better control over where they fall.
• Never cut through the swelling at the root of the
branch as this will slow down healing and increase
the risk of fungal attack!

• Use the stop at the base of the cutting head to
provide support during cutting. This will help prevent
the cutting attachment from ”jumping” on the branch.
• Make an initial cut on the underside of the branch
before cutting through the branch. This will prevent
tearing of the bark, which could lead to slow healing
and cause permanent damage to the tree. The cut
should not be deeper than 1/3 of the branch
thickness to prevent jamming. Keep the chain
running while you withdraw the cutting attachment
from the branch to prevent it jamming.
• Use the harness to support the weight of the
machine and make it easier to handle.
• Make sure you have a firm footing and that you can
work without being hampered by branches, stones
and trees.
WARNING: Never activate the throttle
without having the cutting attachment in
full view.
To start a cold engine
2.Hold the trigger and trigger lockout then press the
4. Move the choke control up into choke on position.
1.Move the switch button open the engine .
5. Pull the starter rope until the engine warm up .
6. Push the choke control down into the choke off .
Warm up ( Engine start / Try to start ) .
Pull Max 6 times .
Trigger
Trigger lockout
Lock
Stop
3.Push the air primer bulb 6-10 times .
Primer Bulb
7.Pull the starter rope again until the engine start .
CAUTION: Do not pull the starter rope all
the way out and do not let go off the
starter rope handle when the starter rope
is fully extended. This can cause
damage to the product.
14
Lock button .

8. Make sure the engine runs smoothly.
7. Operate the throttle gradually when the engine starts.
To stop the engine
Push the switch button to stop the engine .
Stop
To start a warm engine
1.Open the engine .
Stop
2.Push the air primer bulb 6-10 times .
Primer Bulb
3.Pull the starter rope again until the engine start .
About the surface
WARNING: Do not touch the area that is
identified with gray in the illustration. There
is a risk of burn injuries when the product is
hot. There is a risk of electrical shock if the
spark plug cap is damaged. Do not use a
product that has a damaged spark plug cap.
15
To check the chain lubrication
1. Check the chain lubrication each time you refuel.
Aim the tip of the bar at a light coloured surface
about 20 cm (8 inches) away. After 1 minute running
at 75 % throttle you should see a distinct line of oil
on the light surface.
2. If the saw chain lubrication does not operate
correctly, do a check of the guide bar.
To fill with chain oil
1. Open the oil cap on top of the bar head.
2. Fill the saw chain oil.
3. Attach the cap again.
Chain oil tank

Maintenance Daily Weekly Monthly
Clean the external surface. X
Make sure that the throttle trigger lock and the throttle works correctly. X
Do a check of the stop switch to make sure that it works correctly. X
Make sure that the saw chain does not rotate at idle speed. X
Maintenance
Maintenance schedule
Clean the air filter. Replace if necessary. X
Check the saw chain with regard to visible cracks in the rivets and links, whether
the saw chain is stiff or whether the rivets and links are abnormally worn. X
Clean the area under the protective cover. X
Make sure that the screws and nuts are tight. X
Examine the engine, the fuel tank and the fuel lines for leaks. X
Clean the cooling system. X
Examine the starter and the starter rope for damages. X
Examine the vibration damping elements for damages and cracks. X
Clean the outside of the spark plug. Remove it and do a check of the electrode
gap. Adjust the gap to the correct distance or replace the spark plug.
Make sure that the spark plug is fitted with a suppressor.X
Clean the outside of the carburettor and the space around it. X
File off any burrs from the edges of the bar. X
Clean or replace the spark arrestor mesh on the muffler. X
Clean the fuel tank. X
Do a check of the fuel filter for contamination and the fuel hose for cracks or
other defects. Replace if neccessary. X
Do a check of all cables and connections. X
Do a check of the clutch, clutch springs and the clutch drum for wear. Replace if
neccessary by an autorized service workshop. X
Replace the spark plug. Make sure that the spark plug is fitted with a suppressor X

To adjust the idle speed
1. Make sure that the air filter is clean and the air filter
cover is installed.
2. Adjust the idle speed with the idle adjustment screw.
The idle adjustment screw T is identified with a "T"
mark.
3. Turn the idle adjustment screw clockwise until the
cutting attachment starts to turn.
4. Turn the idle adjustment screw counterclockwise
until the cutting attachment stops.
The idle speed is correct when the engine operates
smoothly in all positions. The idle speed must be below
the speed when the cutting attachment starts to turn.
WARNING: If the cutting attachment does
not stop when you adjust the idle speed,
Speak to Huyosen service . Do not use the
product until it is correctly adjusted or repaired.
T
To examine the spark plug
CAUTION: Always use the recommended
spark plug type. Incorrect spark plug type
can cause damage to the product.
• Examine the spark plug if the engine is low on
power, is not easy to start or does not operate
correctly at idle speed.
•To decrease the risk of unwanted material on the
spark plug electrodes, obey these instructions:
a) Make sure that the idle speed is correctly
adjusted.
b) Make sure that the fuel mixture is correct.
c) Make sure that the air filter is clean.
• If the spark plug is dirty, clean it and make sure that
the electrode gap is correct.
• Replace the spark plug if it is necessary.
To do maintenance on the trimmer
head
1. Only use the recommended cutting attachment and
cutting attachment guard.
2. Make sure that the cutter on the cutting attachment
guard is not damaged, it cuts the cord to the correct
length.
3. Install the cord as the illustrations on the last pages
of the manual shows.
Air filter
Remove dust and dirt from the air filter to keep it clean in
order to prevent:
•Carburettor malfunctions.
• Starting problems.
• Loss of engine power.
• Unnecessary wear to engine parts.
• Too much fuel consumption.
Clean the air filter at an interval of 25 hours, or more
regularly if conditions are unusually dusty.
To clean the air filter
CAUTION: A air filter that is damaged, very
dirty or soaked with fuel must always be
replaced.
If you use an air filter for a long time it cannot be fully
cleaned. Replace the air filter with a new one at regular
intervals.

To examine the cutting equipment
1. Make sure that there are no cracks in rivets and links
and that no rivets are loose. Replace if it is
necessary.
2. Make sure that the saw chain is easy to bend.
Replace the saw chain if it is rigid.
3. Compare the saw chain with a new saw chain to
examine if the rivets and links are worn.
4. Replace the saw chain when the longest part of the
cutting tooth is less than 4 mm/0.16 in. Also replace
the saw chain if there are cracks on the cutters.
To do a check of the guide bar
1. Make sure that the oil channel is not blocked. Clean
if it is necessary.
2. Examine if there are burrs on the edges of the guide
bar. Remove the burrs using a file.
3. Clean the groove in the guide bar.
4. Examine the groove in the guide bar for wear.
Replace the guide bar if it is necessary.
5. Examine if the guide bar tip is rough or very worn.
6. Make sure that the bar tip sprocket turns freely and
that the lubricating hole in the bar tip sprocket is not
blocked. Clean and lubricate if it is necessary.
7. Turn the guide bar daily to extend its life cycle.
To sharpen the saw chain
Information about the guide bar and saw chain
WARNING: Use protective gloves when you
use or do maintenance on the saw chain. A
saw chain that does not move can also
cause injuries.
• Guide bar length, in/cm. Information about the guide
bar length can usually be found on the rear end of
the guide bar.

• Number of teeth on bar tip sprocket (T).
• Chain pitch, in. The distance between the drive links
of the saw chain must align with the distance of the
teeth on the bar tip sprocket and drive sprocket.
PITCH =
D
D
2
• Number of drive links. The number of drive links is
decided by the type of guide bar.
• Bar groove width, in/mm. The groove width in guide
bar must be the same as the chain drive links width.
• Chain oil hole and hole for chain tensioner. The
guide bar must align with product.
• Drive link width, mm/in.
General information about how to sharpen the
cutters
Do not use a blunt saw chain. If the saw chain is blunt,
you must apply more pressure to push the guide bar
through the wood. If the saw chain is very blunt, there
will be no wood chips but sawdust.
A sharp saw chain eats through the wood and the wood
chips becomes long and thick.
The cutting tooth (A) and the depth gauge (B) together
makes the cutting part of the saw chain, the cutter. The
difference in height between the two gives the cutting
depth (depth gauge setting).
A
B
When you sharpen the cutter, think about the following:
• Filing angle.
• Cutting angle.
• File position.
• Round file diameter.

To tension the chain
WARNING: A saw chain with an incorrect
tension can derail from the guide bar and
cause serious injury or death.
A saw chain becomes longer when you use it. Adjust the
saw chain regularly.
1. Loosen the bar nut that hold the clutch cover/chain
brake.
2. Tighten the bar nuts by hand as tightly as you can.
3. Lift the front of the guide bar and turn the chain
tensioning screw.
4. Tighten the saw chain until it is tight against the
guide bar but still can move easily.
5. Tighten the bar nuts using the wrench and lift the
front of the guide bar at the same time.
6. Make sure you can pull the saw chain around freely
by hand and that it does not hang from the guide
bar.
To adjust chain lubrication
WARNING: Stop the engine before you
make adjustments to the oil pump.
Turn the adjustment screw for the oil pump. Use a
screwdriver or combination wrench.
• Turn the adjuster screw clockwise to increase the oil
flow.
• Turn the adjuster screw anticlockwise to decrease
the oil flow.
Table of contents