Gardenline FLX-TBS-1 User manual

User Manual
TELESCOPIC TREE PRUNER
ID: #05007
m
y
h
a
n
s
e
c
o
n
t
r
o
l
.
c
o
m
M
A
N
U
A
L
D
E
V
E
L
O
P
E
D
I
N
G
E
R
M
A
N
Y
User-friendly
Manual

Dok./Rev.-Nr. 196632_20180731
Overview .............................................................................3
Use........................................................................................4
Pack contents/device parts ................................................6
General information............................................................ 7
Reading and storing the user manual ..................................7
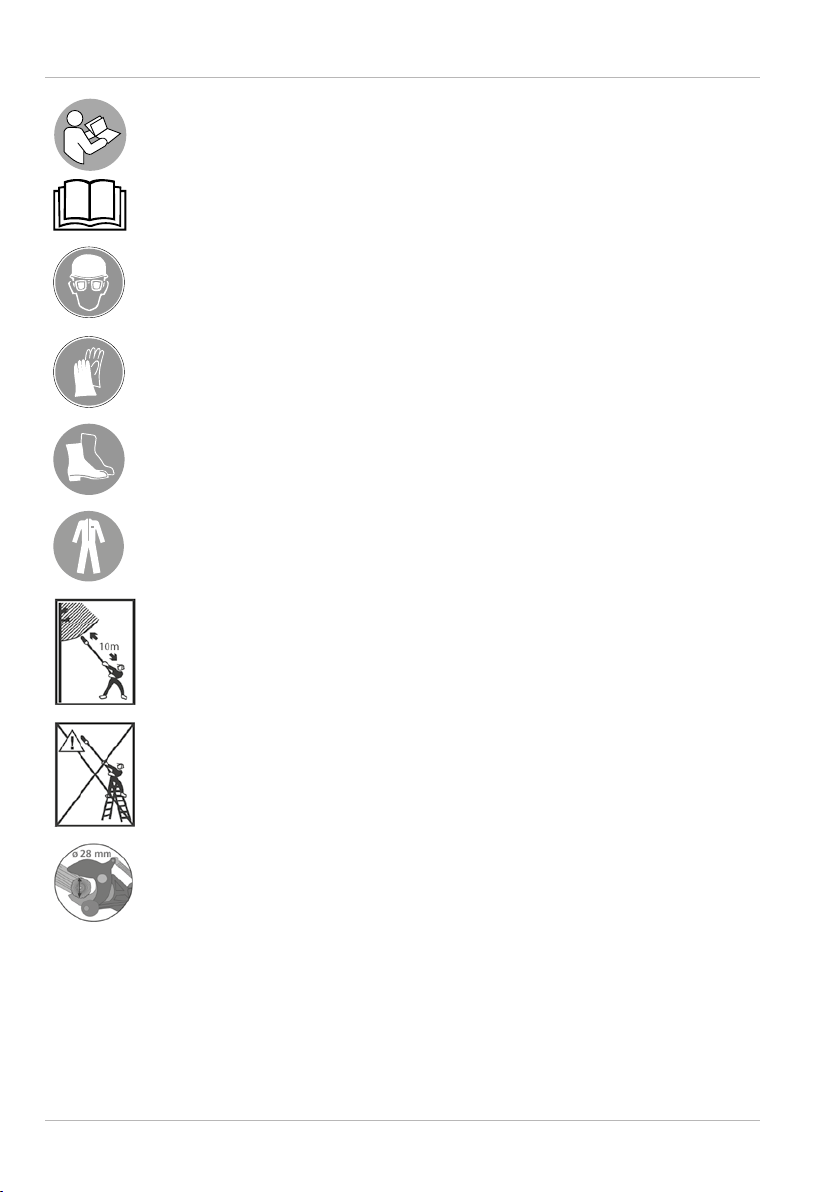
Explanation of symbols ...........................................................7
Safety ...................................................................................9
Proper use................................................................................. 9
Safety instructions................................................................... 9
Checking the tree pruner and pack contents...................11
Preparing the tree pruner .................................................12
Setting the clippers ................................................................ 12
Fixing the saw blade .............................................................. 12
Setting the telescopic rod...................................................... 13
Using the tree pruner........................................................ 14
Cutting...................................................................................... 14
Sawing...................................................................................... 15
Correct cutting and sawing .................................................. 15
Cleaning and maintenance............................................... 16
Cleaning the tree pruner.......................................................16
Maintaining the tree pruner .................................................16
Transport ........................................................................... 16
Storage .............................................................................. 16
Technical data ....................................................................17
Disposal...............................................................................17
Disposing of the packaging .................................................. 17
Disposing of the tree pruner................................................. 17
Warranty Details................................................................ 18
Repair and Refurbished Goods or Parts Notice .............. 19
Contents

3
A
2
3
4
5
7
8
1
6
9

4
D
B C
E F
4
2
10
9
11

5
G
45°

6
Pack contents⁄device parts
1Saw blade (with bracket)
2Wing nut (saw blade)
3Telescopic rod
4Safety lock (telescopic rod)
5Grip plate
6T-handle
7Protective cover (saw blade)
8Protective cover (clippers)
9Clippers
10 Wing nut (clippers)
11 Tension cable

General information
7
General information
Reading and storing the user manual
This user manual accompanies this telescopic tree pruner (hereafter re-
ferred to as the “tree pruner”). It contains important information about
safety and use.
Before using the tree pruner, please read through the user manual care-
fully. This particularly applies to the safety instructions. Failure to observe this user
manual may result in severe injury or damage to the tree pruner.
Store the user manual for future use. If you pass the tree pruner on to third parties,
please be absolutely sure to include this user manual.
Explanation of symbols
The following symbols and signal words are used in this user manual, on the tree
pruner or on the packaging.
DANGER!
This signal symbol/word indicates a hazard with
high risk that, if not avoided, results in death or a
severe injury.
WARNING!
This signal symbol/word designates a hazard
with moderate degree of risk which may lead to
death or severe injury if not avoided.
CAUTION!
This signal symbol/word designates a hazard
with low risk that, if not avoided, may result in
minor or moderate injury.
NOTE! This signal word warns against potential damag-
es to property.
This symbol provides you with useful supplementary information on
assembly or operation.

General information
8
Read the user manual and safety instructions.
Wear head and eye protection.
Wear protective gloves.
Wear non-slip shoes and tight-fitting clothing.
Wear suitable, tight-fitting clothing.
Danger of electric shock! Do not store the tree pruner near high-volt-
age lines, electric cables or electric fences. Maintain a distance of at
least 10m from high-voltage lines.
Do not use on ladders. Danger of falling due to two-handed operation.
The tree pruner is suitable for fresh wood with a diameter of up to 28
mm.

Safety
9
Safety
Proper use
The tree pruner is only designed to cut fresh wood with a diameter of up to 28 mm.
For branches with a diameter greater than 28 mm or for dry, hard wood, use the saw
blade supplied.
The tree pruner is intended for private use only and is not suitable for commercial
purposes, e.g. for a horticultural business.
Use the tree pruner only as described in this user manual. Any other use is deemed
improper and may result in damage to property or even personal injury. The tree
pruner is not a child’s toy.
The manufacturer or vendor accepts no liability for damage caused by improper or
incorrect use.
Safety instructions
DANGER!
Risk of electric shock!
The tree pruner is not protected against electric shocks from touch-
ing power lines. There is a risk of electric shock if you allow the tree
pruner to touch high-voltage lines, electric cables, electric fences,
etc.
− Do not store the tree pruner near high-voltage lines, electric
cables, electric fences or the like. Maintain a distance of at least
10m.
WARNING!
Risk of injury!
Improper use of the tree pruner may result in injury.
− Before each use, check that all screws are tight. Tighten loose
screws, nuts and bolts.
− Before each use, check the cutting function of the tree pruner.

Safety
10
− Make sure before each use that the safety lock of the telescopic
rod is closed to avoid unintentional retraction or extension of
the telescopic rod.
− When the tree pruner is being transported or is not being
used, engage the safety lock, fold the clippers all the way
down and follow the instructions in the chapters "Transport"
and “Storage”.
− When the tree pruner is being transported or is not being
used, always cover the clippers and the blade with the accom-
panying protective covers to avoid injury from cuts.
− Do not use the tree pruner while standing on ladders.
− Make sure you are in a safe and stable position when using the
tree pruner.
− Keep children away from the tree pruner and do not use the
tree pruner if children are nearby.
− Children must not be allowed to use the tree pruner or play
with it.
− Wear protective gloves, head and eye protection, sturdy shoes
and tight-fitting clothing.
CAUTION!
Crushing hazard!
There is a risk of crushing if the tree pruner is not used properly.
− Make sure that the safety lock of the telescopic rod is closed
when in use.
− Make sure that the safety lock of the grip plate is closed if you
are not using the grip plate.
− If you release the grip plate during use, this can shoot up-
wards and pinch you. Be careful when using the grip plate.
Hold it firmly in your hand and always run it back to the origi-
nal position.

Checking the tree pruner and pack contents
11
NOTE!
Risk of damage!
Improper handling of the tree pruner may damage it.
− Use the clippers to cut fresh wood only, with a maximum
diameter of 28 mm.
− Use the saw blade to cut branches with a diameter greater
than 28 mm or for dry, hard wood.
− Observe the correct cutting angle in the chapter “Correct
cutting and sawing”.
Checking the tree pruner and pack contents
NOTE!
Risk of damage!
The tree pruner can be damaged if you incautiously open the
packaging with a sharp knife or another pointed object.
− Proceed carefully when opening.
1. Take the tree pruner out of the packaging.
2. Check to make sure that all parts are included (see Fig.A–F).
3. Check whether the tree pruner or individual parts exhibit damage. If this is the
case, do not use the tree pruner. Contact the manufacturer at the service address
specified on the warranty card.

Preparing the tree pruner
12
Preparing the tree pruner
Setting the clippers
WARNING!
Risk of injury!
The blades of the tree pruner are sharp. You could sustain cuts or
injuries when setting the clippers.
− Always wear protective gloves when setting the clippers and
working with the tree pruner.
− Always place the protective cover over the clippers when they
are not being used.
The clippers can be adjusted to a maximum of 180°.
To set the clippers, proceed as follows:
1. Loosen the wing nut 10 of the clippers 9by turning it clockwise (see Fig. B).
2. Turn the clippers to the desired position.
3. Tighten the wing nut again by turning it anticlockwise (see Fig. C).
Fixing the saw blade
WARNING!
Risk of injury!
The saw blade of the tree pruner is sharp. You could sustain cuts or
injuries when fixing the saw blade to the tree pruner.
− Always wear protective gloves when fixing the saw blade and
working with the tree pruner.
− Always place the protective cover over the saw blade when it
is not being used.
The saw blade can be used to saw branches with a diameter greater
than 28 mm or for dry, hard wood.

Preparing the tree pruner
13
If you would like to use the saw blade 1, first attach it to the telescopic rod 3as
follows:
1. Loosen the wing nut 2of the saw blade by turning it anticlockwise.
2. Attach the saw blade bracket to the telescopic rod (see Fig.D).
3. Slightly tighten the wing nut of the saw blade by turning clockwise.
4. Slide the saw blade all the way up to the clippers 9.
5. Loosen the wing nut 10 of the clippers by turning it clockwise.
6. Fold the clippers all the way down.
7. Tighten the wing nut of the saw blade by turning it clockwise.
Setting the telescopic rod
Setting the length
To set the length, proceed as follows:
1. Open the safety lock 4of the telescopic rod 3(see Fig. E).
2. Set the telescopic rod to the desired length.
The telescopic rod can be extended from 2.29m to 3.63m.
3. Close the safety lock of the telescopic rod.
4. Please ensure that the screw is firmly tightened to the safety lock 4. Otherwise
the telescopic rod 3can slide downwards.
Setting the opening width of the clippers
The maximum opening width of the clippers is 28 mm. The opening width of the clip-
pers 9is preset at 28 mm. In some cases it may be necessary to readjust this setting
after a few cuts.
To set the opening width, proceed as follows: (see Fig.F):
1. Pull the grip plate downwards a few centimetres.
2. Firmly hold the tension cable 11 and then slide the grip plate 5back to the top.
You will then be able to see the knot in the tension cable.
3. Loosen the knot in the strap.
− If you wish to shorten the tension cable, tie a new knot above the old knot.
− If you wish to lengthen the tension cable, tie a new knot below the old knot.
4. Pull the grip plate downwards until you hit the knot.
5. Slide the grip plate up to the top again.

Using the tree pruner
14
Using the tree pruner
The tree pruner can be used either with the clippers 9or with the saw blade 1.
With the tree pruner you can:
• cut off dead or diseased branches.
• prune thin branches that obviously carry no blossom or fruit. Those branches are
mainly located in the shaded areas of the plant, directly on the trunk and in the
middle; removing them promotes the growth of the rest of the plant.
• cut overlapping branches that hinder and damage one another to create a good,
strong frame for the plant. This is particularly important for trees (especially apple
trees).
• Thin out fruit trees after the harvest or in spring.
• Ornamental trees should be thinned out in autumn and spring.
Cutting
• Make sure that the safety lock of the telescopic rod is always closed
during use.
• The tree pruner is equipped with an energy-saving bypass blade
system with lever action. The tree pruner should be held at a 45°
angle to cut fresh wood. Dry, thin wood can be cut at a 90° angle.
The tree pruner has a grip plate 5as well as a T-handle 6, which are connected to
the clippers 9via a cable system.
Depending on the distance, you can use the grip plate or the T-handle. Using the
T-handle provides an extended reach.
Cutting with the grip plate
1. Set the telescopic rod 3to the desired length (see chapter ‘Setting the
telescopic rod’).
2. Make sure that the safety lock 4of the telescopic rod is in the closed position.
3. Remove the protective cover 8from the clippers 9.
4. Pull the grip plate 5downwards in order to cut.
5. Slide the grip plate up to the top again in order to re-open the clippers.
Cutting with the T-handle
1. Set the telescopic rod 3to the desired length (see chapter ‘Setting the
telescopic rod’).
2. Make sure that the safety lock 4of the telescopic rod is in the closed position.
3. Slide the grip plate 5up to the stop position.

Using the tree pruner
15
4. Remove the protective cover 8from the clippers 9.
5. Pull the T-handle 6in order to cut.
6. Return the T-handle to its original position in order to re-open the clippers.
Sawing
Use the saw blade 1to cut branches with a diameter greater than 28 mm or for dry,
hard wood.
To saw with the saw blade, proceed as follows:
1. Place the protective cover 8over the clippers 9.
2. Fix the saw blade (see chapter “Fixing the saw blade”).
3. Set the telescopic rod 3to the desired length (see chapter ‘Setting the
telescopic rod’).
4. Make sure that the safety lock 4of the telescopic rod is in the closed position.
5. Remove the protective cover 7from the saw blade.
6. Firmly hold the tree pruner with both hands.
7. With saw blade resting on the section to be cut, move the tree pruner up and
down to saw.
Correct cutting and sawing
In the following, you will find tips on how to cut and saw branches correctly
(see Fig.G):
Ideal angle at 45°
The correct cut should be about 6 mm away from the bud and have an oblique angle
of about 45°.
The angle is too steep
The bud on the stem is weakened.
Too close too the bud
The bud could wither.
Too far away from the bud
A long stump is a target for insects and diseases.

Cleaning and maintenance
16
Cleaning and maintenance
NOTE!
Risk of damage!
Improper handling of the tree pruner may damage it.
− Never use aggressive cleaners, brushes with metal or nylon
bristles, or sharp or metallic cleaning utensils such as knives,
hard scrapers and similar items. They could damage the sur-
faces.
Cleaning the tree pruner
− For heavier soiling, clean the saw blade 1and clippers 9with a damp, soapy
cloth.
− Clean the tree pruner and all accessories with a dry cloth.
Maintaining the tree pruner
− Lubricate the clippers 9, saw blade 1and joints regularly with a few drops of
oil to avoid corrosion.
− Check all parts of the tree pruner for tightness.
− Re-tighten loose screws, nuts, bolts, etc.
Transport
Proceed as follows if the tree pruner is being transported or is not being used:
1. Make sure that the safety lock 4of the telescopic rod 3is in the closed
position.
2. Place the protective cover 8over the clippers 9.
3. Place the protective cover 7over the saw blade 1.
4. Loosen the wing nut 10 of the clippers by turning it clockwise (see Fig. B).
5. Fold the clippers all the way down.
6. Tighten the wing nut of the clippers by turning it anti-clockwise.
7. Secure the tree pruner from moving around during vehicle transport.
Storage
− Clean the tree pruner as described in the chapter “Cleaning and maintenance”.
− Store the tree pruner in a dry place inaccessible to children.

Technical data
17
Technical data
Product code: 97104
Model: FLX-TBS-1
Telescopic rod: 2.29m to 3.63m
Clippers: rotatable up to 180°
Saw blade: detachable
As our products undergo continual development and improvement, technical chang-
es and changes to the product design are possible.
This user manual can also be downloaded as a PDF file from our homepage www.
flexxtrade.de.
Disposal
Disposing of the packaging
Dispose of the packaging separated into single type materials. Dispose of paperboard
and cardboard with wastepaper and plastics with recyclable waste.
Disposing of the tree pruner
− Should the tree pruner no longer be capable of being used at some point in time,
dispose of it in accordance with the regulations in force in your city or county.
− Please ensure your recycling information applies to the local regulations.

support@eurocentra.com.au
AU 1800 269 981
Free of charge, mobile networks may vary
AFTER SALES SUPPORT
Warranty Details
The product is guaranteed to be free from defects in workmanship and parts for
a period of 36 months from the date of purchase. Defects that occur within this
warranty period, under normal use and care, will be repaired, replaced or refunded at
our discretion. The benefits conferred by this warranty are in addition to all rights and
remedies in respect of the product that the consumer has under the Competition
and Consumer Act 2010 and similar state and territory laws.
Our goods come with guarantees that cannot be excluded under the Australian
Consumer Law. You are entitled to a replacement or refund for a major failure and for
compensation for any other reasonably foreseeable loss or damage. You are also
entitled to have the goods repaired or replaced if the goods fail to be of acceptable
quality and the failure does not amount to a major failure.
3
YEAR
WARRANTY
REGISTER YOUR PURCHASE AT www.aldi.com.au/en/about-aldi/product-registration/
TO KEEP UP-TO-DATE WITH IMPORTANT PRODUCT INFORMATION
Telescopic Tree Pruner

Repair and Refurbished Goods
or Parts Notice
Unfortunately, from time to time, faulty products are manufactured which need to be
returned to the Supplier for repair.
Please be aware that if your product is capable of retaining user-generated data
(such as files stored on a computer hard drive, telephone numbers stored on a
mobile telephone, songs stored on a portable media player, games saved on a games
console or files stored on a USB memory stick) during the process of repair, some or all of
your stored data may be lost.
We recommend you save this data elsewhere prior to sending the product for repair.
You should also be aware that rather than repairing goods, we may replace them with
refurbished goods of the same type or use refurbished parts in the repair process.
Please be assured though, refurbished parts or replacements are only used where
they meet ALDI’s stringent quality specifications.
If at any time you feel your repair is being handled unsatisfactorily, you may escalate
your complaint. Please telephone us on 1800 269 981 (Mon–Fri 8.30 am–6.00 pm
AEST) or write to us at:
Euro Centra (Australia) Pty Ltd
c/o Install and Fix Solutions Pty
Unit 7, 210 Robinson Rd East, Geenbung QLD 4034
AUSTRALIA
support@eurocentra.com.au
Telescopic Tree Pruner
AFTER SALES SUPPORT
REGISTER YOUR PURCHASE AT www.aldi.com.au/en/about-aldi/product-registration/
TO KEEP UP-TO-DATE WITH IMPORTANT PRODUCT INFORMATION
support@eurocentra.com.au
AU 1800 269 981
Free of charge, mobile networks may vary
3
YEAR
WARRANTY

YEAR
WARRANTY
3
Made in China
GARDENLINE® is a registered trademark of ALDI Stores
DISTRIBUTED BY:
ALDI STORES
1 SARGENTS ROAD
MINCHINBURY NSW 2770
www.aldi.com.au
AU
ALDI guarantees that our exclusive brand products are developed to our
stringent quality specifications. If you are not entirely satisfied with this
product, please return it to the nearest ALDI store within 60 days from the
date of purchase, for a full refund or replacement, or take advantage of our
after sales support by calling the supplier’s Customer Service Hotline.
MODEL:
FLX-TBS-1
suppor[email protected]
1800 269 981
AFTER SALES SUPPORT
AU
97104
03/2019
Table of contents
Popular Pole Saw manuals by other brands

Black & Decker
Black & Decker GPC1800L Original instructions

pellenc
pellenc SELION T175-225 operating instructions

Echo
Echo POWER PRUNER PPF-2100 TYPE 1/1E Operator's manual

Echo
Echo PPT-260 - PARTS CATALOG SERIAL NUMBERS... parts catalog

Poulan Pro
Poulan Pro PR28PS Operator's manual

Echo
Echo Power Pruner PPT-280 Operator's manual