MENU INSTRUCTIONS:
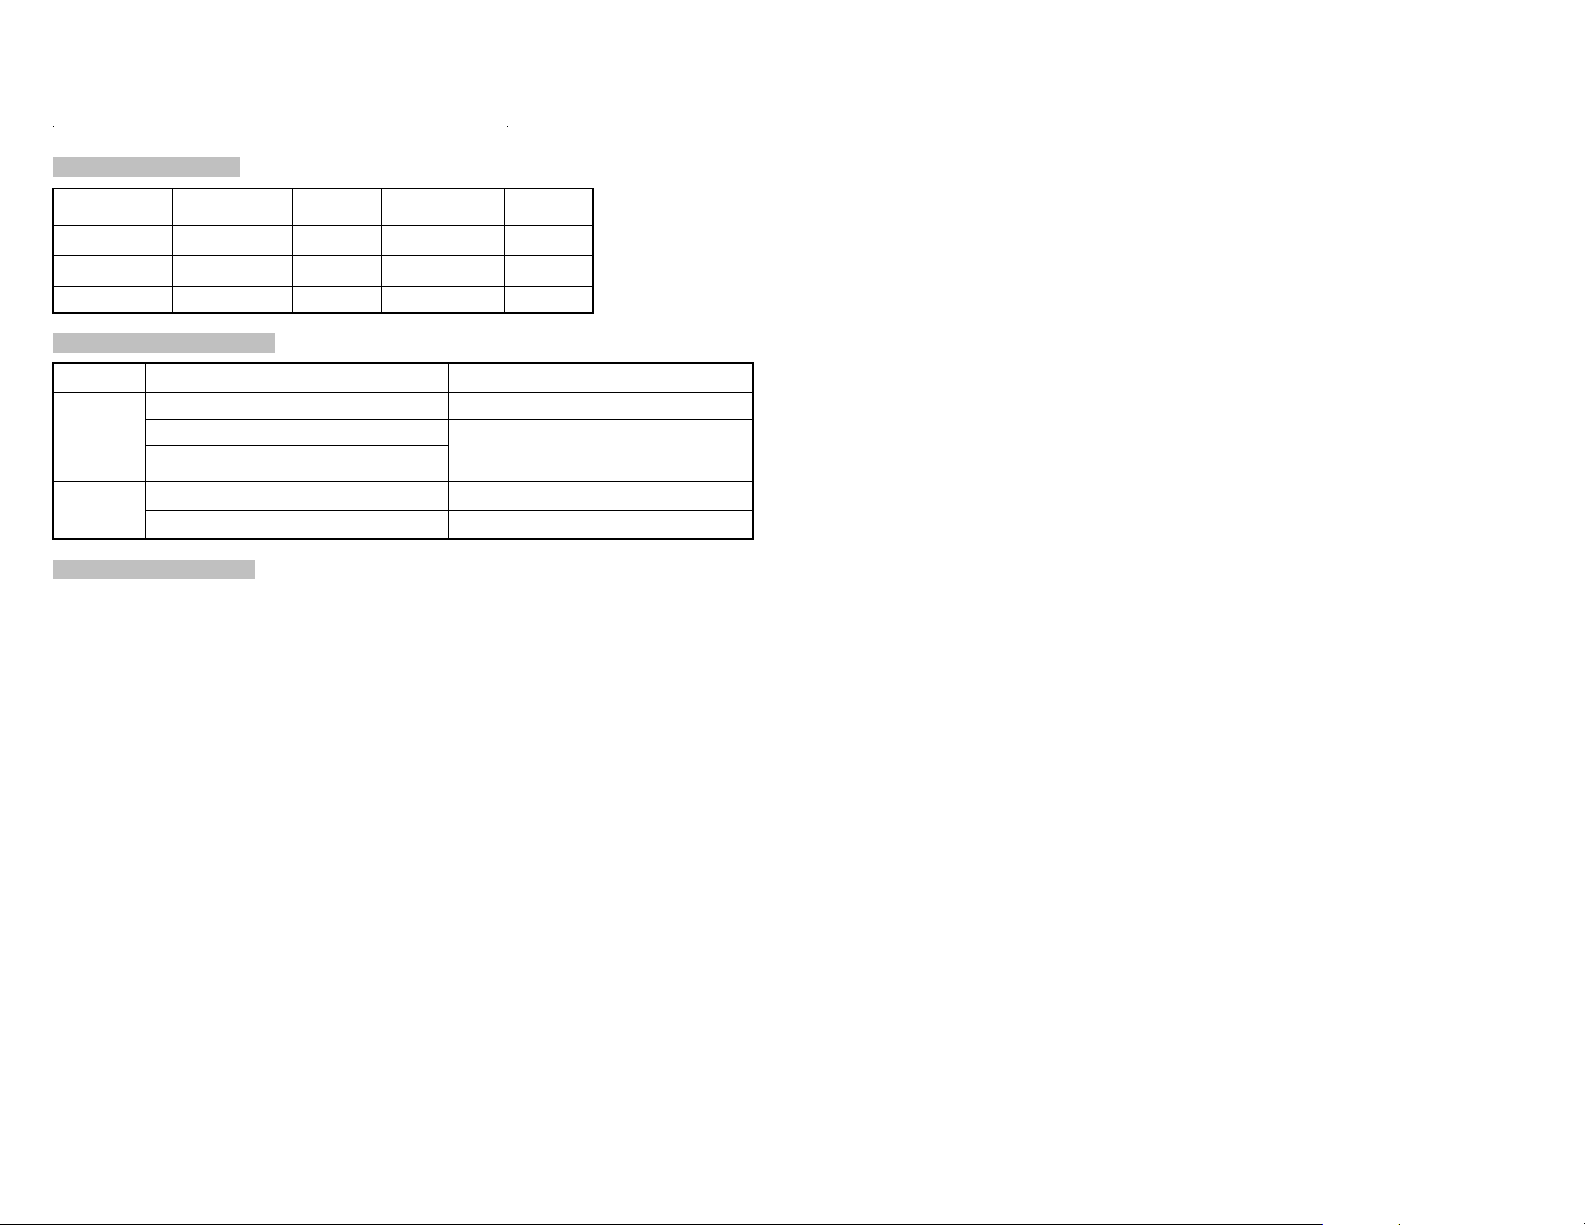
PARAMETER SET RANGE DEFAULT INCREMENT UNIT
Temperature 16.0~40.0 26 0.1 °C
DIFF 0.0~5.0 2.0 0.1 °C
DELAY 0~150 30 1 Second
CONTROLLING FUNCTION:
FUNCTION CONDITIONS OF OUTPUT CONDITIONS OF STOP OUTPUT
COOL
1. In cool mode 1. In cool mode
2. Measuring temp. ≥Stop temp. + DIFF 2. Measuring temp. ≤Stop temp.
3.Time period of first power on or the
previous stop and this start ≥DELAY
HEAT
1. In heat mode 1. In heat mode
2. Measuring temp. ≤Stop temp. - DIFF 2. Measuring temp. ≥Stop temp.
PARAMETERS SETTING:
Parameters would be set according to the following circular mode in the first time. All the
parameters are set and saved instantly.
First of all, make sure the power is on.
1. Choose HEAT/COOL mode:
Press H/C key to switch mode between HEAT and COOL in normal working status.
2. Set DIFF and DELAY (temperature difference and compressor delay):
Press SET key in normal working status to display the default DIFF value while icon DIFF
flashing, then press UP or DOWN key to adjust the ideal temperature difference you want.
Then press SET key to display the default DELAY value while icon DELAY flashing, then
press UP or DOWN key to adjust the ideal compressor delay time you want. Then press
SET to save and exit.
3. Stop temperature setting:
Press UP or Down key in normal working status to display the default stop temperature value
while icon °C/°F flashing, then press UP or DOWN key to adjust the ideal stop temperature
you want.
1 Year Limited Warranty Service
If the product will not work after you have read the troubleshooting guide and practiced the
troubleshooting options, you are advised to return the Hydro Crunch™ product to the retailer
you purchased it from. The dealer will be able to examine the product and test its components.
If they are not able to repair the product, they will return it to us for examination and
repair/replacement. Do not attempt to repair any product on your own, as serious injury or
death may result. If the retailer is not able to help you and the product is still under
manufacturer’s warranty, you may contact us for technical support. In some cases, you will be
issued an RMA# (return merchandise authorization number) to return the unit for factory
repair. Complete the warranty form below and return the product with all original packaging,
your receipt of purchase, and a valid RMA# to the address below. Please pack and ship the
product in its original packaging. If it is damaged in shipment we cannot be responsible and
the warranty may be voided. Once we receive RMA package, it will be repaired or replaced
and shipped back to you. Please note if an additional warranty was purchased and include the
extended warranty sales receipt with your return.
RETURN FORM
Include the following if returning:
Proof of purchase
This completed form
RMA# on the outside of the box
Extended warranty receipt
Return Merchandise Authorization Number (Required): __________________________
Contact Name: ____________________________________________________________
Address: _________________________________________________________________
_________________________________________________________________________
Phone #: _________________________________________________________________
Email Address: ____________________________________________________________
Please give a brief description of your technical issue: ___________________________
__________________________________________________________________________
__________________________________________________________________________
__________________________________________________________________________
SEND TO:
Hydro Crunch
17128 Colima Road Suite 510
Hacienda Heights, CA 91745
714-516-8176


