HYOSUNG TE450 - User manual

TE 450
ATV (Rapier 450)
ServiceManual
Max MC Import AB
Mjölnarevägen 8
330 15 Bor
Sverige
Tel.: 0370-658570
Telefax 0370-658370
Org.nr. 556626-8198
www.maxmc.se
www.hyosung.dk/se

ELECTRICAL SYSTEM
COOLING SYSTEM
GROUP INDEX
GENERAL INFORMATION 1
PERIODIC MAINTENANCE 2
ENGINE 3
FUEL SYSTEM 4
5
6
CHASSIS 7
SERVICING INFORMATION 8
COPYRIGHT HYOSUNG MOTORS & MACHINERY INC. 2007.
FOREWORD
This manual contains an introductory description on
HYOSUNG and procedures for its
inspection/service and overhaul of its main compo-
nents.
Other information considered as generally nown is
not included.
Read GENERAL INFORMATION section to familiar-
ize yourself with outline of the vehicle and MAINTE-
NANCE and other sections to use as a guide for
proper inspection and service.
This manual will help you now the vehicle better so
that you can assure your customers of your optimum
and quic service.
WARNING
This manual is intended for those who have
enough knowledge and skills for servicing
HYOS NG vehicles. Without such knowledge and
skills, you should not attempt servicing by relying
on this manual only.
Instead, please contact your nearby authorized
HYOS NG motorcycle dealer.
This manual has been prepared on the basis of
the latest specification at the time of publication.
If modification has been made since then,
difference may exist between the content of this
manual and the actual vehicle.
Illustrations in this manual are used to show the
basic principles of operation and work proce-
dures.
They may not represent the actual vehicle exact-
ly in detail.

HOW TO SE THIS MAN AL
TO LOCATE WHAT YO ARE LOOKING FOR :
1. The text of this m nu l is divided into sections.
2. As the title of these sections is listed on the previous p ge s
GROUP INDEX, select the section where you re looking for.
3. Holding the m nu l s shown t the right will llow you to find
the first p ge of the section e sily.
4. On the first p ge of e ch section, its contents re listed. Find
the item nd p ge you need.
COMPONENT PARTS
Example : Front wheel

SYMBOL
Listed in the t ble below re the symbols indic ting instructions nd other inform tion necess ry for servicing nd
me ning ssoci ted with them respectively.
Apply THREAD LOCK 1324.
Apply or use br ke fluid.
Me sure in volt ge r nge.
Me sure in resist nce r nge.
Me sure in current r nge.
Use speci l tool.
Use engine cool nt.
Torque control required.
D t beside it indic tes specified torque.
Apply oil.
Use engine oil unless otherwise specified.
Apply SUPER GREASE A.
Apply SILICONE GREASE.
Apply MOLY PASTE.
Apply BOND 1215.
Use fork oil.
DEFINITIONSYMBOL DEFINITIONSYMBOL
Apply SUPER GREASE C.

NOTE
Di erence between photographs and actual vehicles depends on the markets.

GENERAL INFORMATION
INFORMATION LABELS 1- 1
GENERAL PRECAUTIONS 1- 2
SERIAL NUMBER LOCATION 1- 3
FUEL, OIL AND ENGINE COOLANT RECOMMENDATIONS
1- 4
BREAK-IN PROCEDURES 1- 6
EXTERIOR ILLUSTRATION 1- 7
SPECIFICATIONS 1- 8
CONTENTS
1

1-1 GENERAL INFORMATION
Ple se note, however, th t the w rning nd c utions cont ined in this m nu l c nnot possibly cover ll potenti l
h z rds rel ting to the servicing, or l ck of servicing, of the vehicle. In ddition to the WARNING nd CAUTION
st ted, you must use good judgement nd b sic mech nic l s fety principles. If you re unsure bout how to per-
form p rticul r service oper tion, sk more experienced mech nic for dvice.
WARNING / CA TION / NOTE
Ple se re d this m nu l nd follow its instructions c refully.
To emph size speci l inform tion, the symbol nd the words WARNING, CAUTION nd NOTE h ve speci l me nings.
P y speci l ttention to the mess ges highlighted by these sign l words.
CA TION
Indicates a potential hazard that could result in vehicle damage.
WARNING
Indicates a potential hazard that could result in death or injury.
NOTE
Indicates special in ormation to make maintenance easier or instructions cleaner.

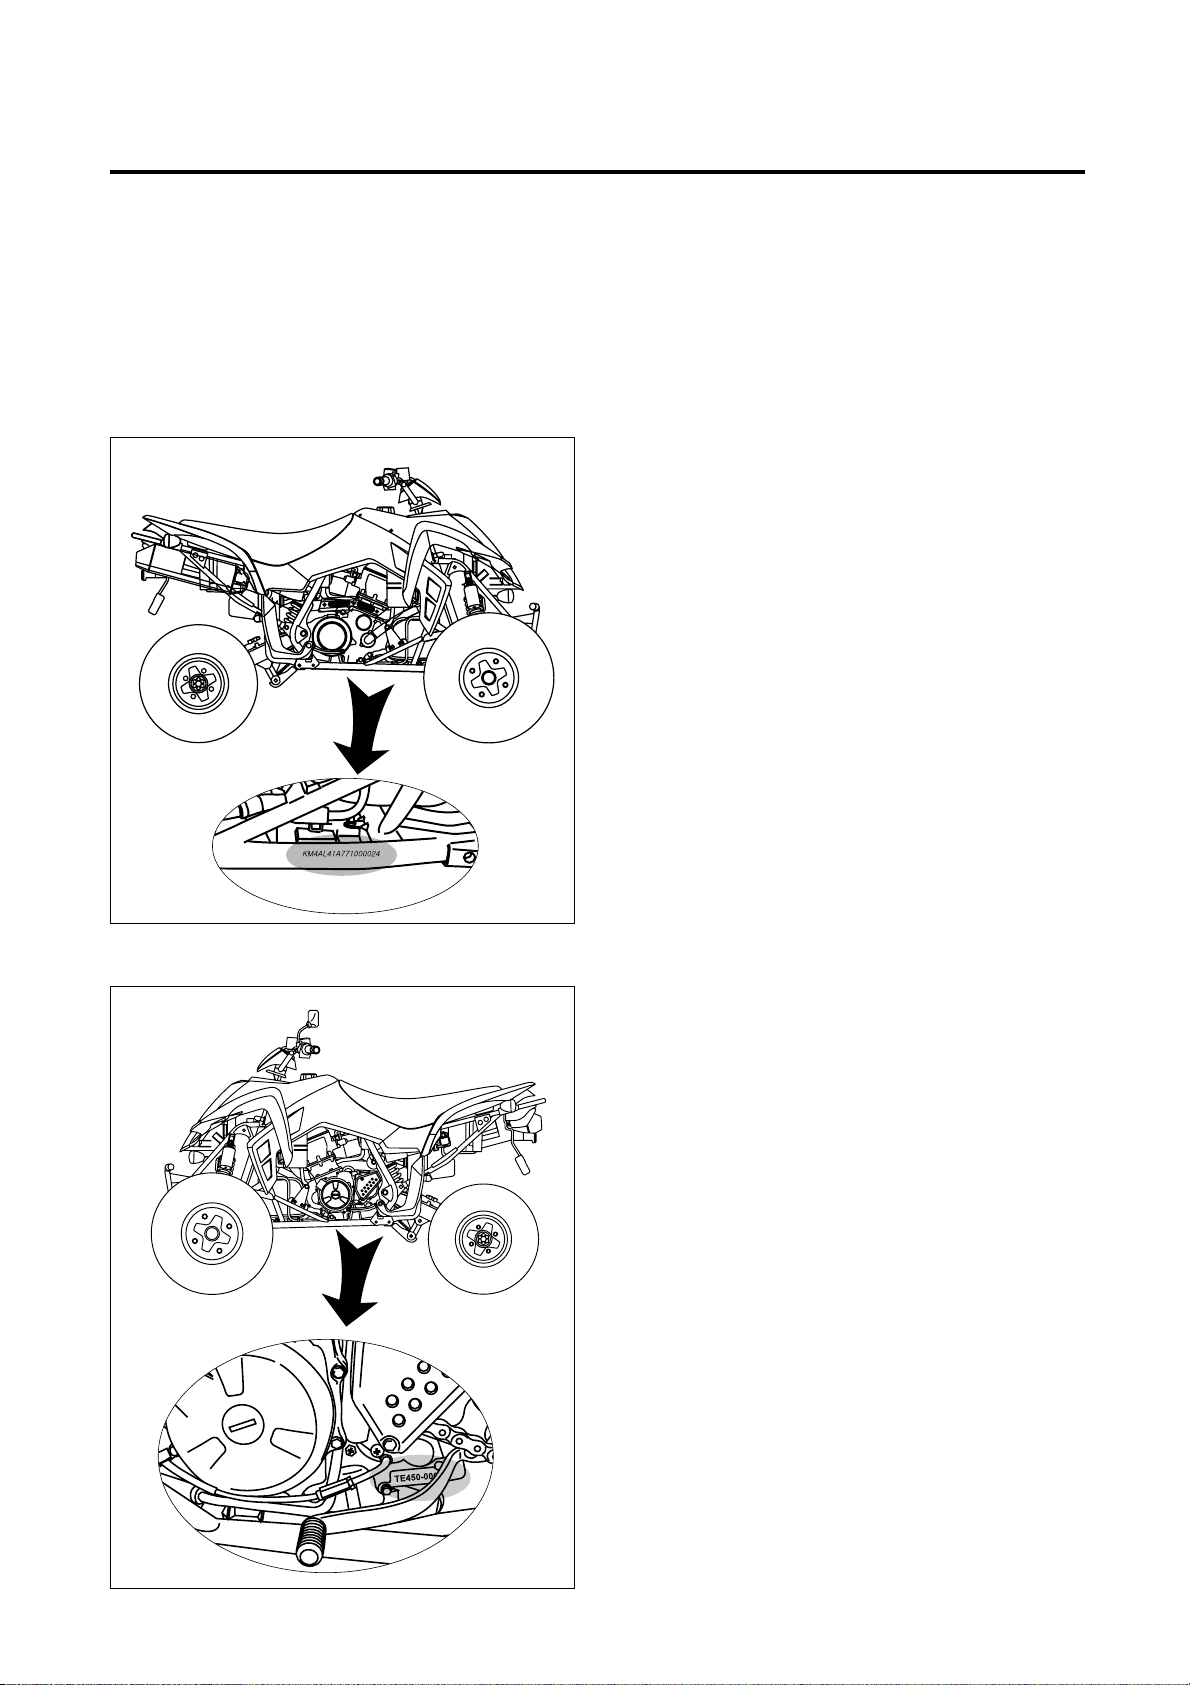
GENERAL INFORMATION 1-2
GENERAL PRECA TIONS
WARNING
Proper service and repair procedures are important for the safety of the service machanic and the safety
and reliability of the vehicle.
When 2 or more persons work together, pay attention to the safety of each other.
When it is necessary to run the engine indoors, make sure that exhaust gas is forced outdoors.
When working with toxic or flammable materials, make sure that the area you work in is well-ventilated and
that you follow all off the material manufacturer
s instructions.
Never use gasoline as a cleaning solvent.
To avoid getting burned, do not touch the engine, engine oil, exhaust system or radiator during or for a
while after engine operation.
After servicing fuel, oil, engine coolant, exhaust or brake systems, check all lines and fittings related to the
system for leaks.
WARNING
If parts replacement is necessary, replace the parts with HYOS NG Genuine Parts or their equivalent.
When removing parts that are to be reused, keep them arranged in an orderly manner so that they may be
reinstalled in the proper order and orientation.
Be sure to use special tools when instructed.
Make sure that all parts used in reassembly are clean, and also lubricated when specified.
When use of a certain type of lubricant, bond, or sealant is specified, be sure to use the specified type.
When removing the battery, disconnect the battery lead wire first and then the battery lead wire.
When reconnecting the battery, connect the battery lead wire first and then the battery lead wire.
Finally, cover the battery terminal with the terminal cover.
When performing service to electrical parts, if the service procedures do not require use of battery power,
diconnect the battery lead wire at the battery.
Tighten cylinder head and case bolts and nuts, beginning with larger diameter and ending with smaller
diameter, from inside to outside diagonally, to the specified tightening torque.
Whenever you remove oil seals, gaskets, packing, O-rings, locking washers, cotter pins, circlips, and cer-
tain other parts as specified, be sure to replace them with new ones. Also, before installing these new
parts, be sure to remove any material left over from the mating surfaces.
Never reuse a circlip. When installing a new circlip, take care not to expand the end gap larger than
required to slip the circlip over the shaft. After installing a circlip, always ensure that it is completely seated
in its groove and securely fitted.
Do not use self-locking nuts a few times over.
se a torque wrench to tighten fasteners to the torque values when specified. Wipe off grease or oil if a
thread is smeared with them.
After reassembly, check parts for tightness and operation.
WARNING
To protect environment, do not unlawfully dispose of used motor oil and other fluids: batteries, and tires.
To protect Earth
s natural resouces, properly dispose of used vehicles and parts.

1-3 GENERAL INFORMATION
SERIAL N MBER LOCATION
The fr me seri l number or V.I.N. (Vehicle Identific tion Number) is st mped on the right side of the fr me pipe.
The engine seri l number is st mped on the left downside of the cr nkc se ssembly.
These numbers re required especi lly for registering the m chine nd ordering sp re p rts.
FRAME SERIAL N MBER
ENGINE SERIAL N MBER

GENERAL INFORMATION 1-4
BRAKE FL ID
Specification and classification (Front brake) : DOT4
(Rear brake) : DOT4
Classification system
API
SAE
I an SAE 10W/40 motor oil is not available, select an
alternative according to the ollowing chart.
Use premium qu lity 4-stroke motor oil to ensure
longer service life of your vehicle.
WARNING
Don
t mix the unrecommended oil. It could damage the engine.
When refilling the oil tank, don
t allow the dust to get inside.
Wipe the spilled oil up immediately.
Don
t put the patch on the cap. It could disturb the oil to be provided and damage the engine.
WARNING
Since the brake system of this vehicle is filled with a glycol-based brake fluid by the manufacturer, do not use
or mix different types of fluid such as silicone-based and petroleum-based fluid for refilling the system,
otherwise serious damage will result.
Do not use any brake fluid taken from old or used or unsealed containers.
Never re-use brake fluid left over from a previous servicing, which has been stored for a long period.
F EL, OIL AND ENGINE COOLANT RECOMMENDATIONS
F EL
G soline used should be gr ded 91 oct ne (Rese rch Method) or higher. An unle ded g soline type is recom-
mended.
ENGINE OIL
ENGINE OIL SPECIFICATION
Grade
Over SL
10W/40
ENGINE OIL
Temper ture
-30
-22
-20
-4
-10
14
0
32
10
50
20
68
30
86
40
104
5W30
10W30
10W40 10W50
15W40 15W50
20W50

1-5 GENERAL INFORMATION
ENGINE COOLANT
Use n nti-freeze/engine cool nt comp tible with n luminum r di tor, mixed with distilled w ter only.
WATER FOR MIXING
Use distilled w ter only. W ter other th n distilled w ter c n corrode nd clog the luminum r di tor.
ANTI-FREEZE/ENGINE COOLANT
The engine cool nt perform s corrosion nd rust inhibitor s well s nti-freeze. Therefore, the engine
cool nt should be used t ll times even though the tmospheric temper ture in your re does not go down to
freezing point.
Hyosung recommends the use of HYOSUNG COOLANT nti-freeze/engine cool nt. If this is not v il ble, use
n equiv lent which is comp tible with n luminum r di tor.
LIQ ID AMO NT OF WATER/ENGINE COOLANT
For engine cool nt mixture inform tion, refer to cooling system section, p ge 5-1.
CA TION
Mixture of anti-freeze/engine coolant should be limited to 60%. Mixing beyond it would reduce its efficiency.
If the anti-freeze/engine coolant mixing ratio is below 50%, rust inhabiting performance is greatly reduced.
Be sure to mix it above 50% even though the atmospheric temperature does not go down to the freezing
point.

GENERAL INFORMATION 1-6
After the engine h s been oper ted for 10 hours the engine to full throttle oper tion, for short periods of time.
Do not m int in const nt engine speed for n extended period during ny portion of the bre k-in.
Try to v ry the throttle position.
BREAK-IN PROCED RES
During m nuf cture only the best possible m teri ls re used nd ll m chined p rts re finished to very high
st nd rd but it is still necess ry to llow the moving p rts to BREAK-INbefore subjecting the engine to m ximum
stresses.
The future perform nce nd reli bility of the engine depends on the c re nd restr int exercised during its
e rly life.
The gener l rules re s follows :
Keep to these bre k-in procedures :
BREAK-IN ENGINE SPEEDS
Less th n 1/2 throttle
Initi l 10 hours

1-7 GENERAL INFORMATION
1,165mm (HEIGHT)
1,160mm (WIDTH)
1,810mm (LENGTH)
1,265mm (WHEEL BASE)
290mm
EXTERIOR ILL STRATION

GENERAL INFORMATION 1-8
1,810 mm (71.3 in)
1,160 mm (45.7 in)
1,165 mm (45.9 in)
1,265 mm (49.8 in)
290 mm (11.4 in)
220 kg (485 lbs)
Over ll length
Over ll width
Over ll height
Wheelb se
Ground cle r nce
Dry m ss
ITEM
ITEM
ITEM
Four-stroke, DOHC, Liquid-cooled
1
96 mm (3.78 in)
62 mm (2.44 in)
448.8 (27.4 in3 )
BDS42 TYPE
Electric st rter
Wet sump
Type
Number of cylinder
Bore
Stroke
Piston displ cement
C rburetor
St rter system
Lubric tion system
Wet multi-pl te type
5-forw rd nd 1-reverse
1 down 4 up, foot oper ted
Foot / h nd oper ted
3.143
2.538
1.684
1.261
1.040
0.885
2.231
RK 520EXW, 102 Links
SPECIFICATIONS
DIMENSIONS AND DRY MASS
ENGINE
TRANSMISSION
Clutch
Tr nsmission
Ge rshift p ttern Forw rd
Reverse
Fin l reduction
1st
2nd
Ge r r tio 3rd
4th
5th
Reverse
Drive ch in

1-9 GENERAL INFORMATION
Independent, double wishbone, coil spring nd oil d mped
Swing rm type, coil spring nd oil d mped
37(right & left)
7.3
34 mm (1.34 in)
0 ~ 5 mm (0 ~ 0.2 in)
0
Disk br ke, twin
Disk br ke
21 7-10
20 11-9
Front suspension
Re r suspension
Steering ngle
C ster
Tr il
Toe-in [when pply to lo d 75 kg (165 lbs)]
C mber
Front br ke
Re r br ke
Front tire size
Re r tire size
ITEM
ITEM
ITEM
“Igniter” type
6B.T.D.C. t 1,500 rpm
CR8E
12V 8Ah (MF)
15A
HI : 55W
LO : 55W
POSITION : 5W
LED type
10W 4
LCD type
5W
Ignition type
Ignition timing
Sp rk plug
B ttery
Fuse
He d l mp
Br ke / T il l mp
Turn sign l l mp
Speedometer l mp
License pl te l mp
Fuel t nk
Engine oil
Oil ch nge
With filter ch nge
Overh ul
Cool nt
8
2,500
2,600
2,700
1.4
NOTE
The speci ications are subject to change without notice.
CHASSIS
ELECTRICAL
CAPACITIES

PERIODIC MAINTENANCE SCHEDULE 2-1
PERIODIC MAINTENANCE CHART 2-1
LUBRICATION POINTS 2-2
MAINTENANCE PROCEDURES 2-3
AIR CLEANER 2-3
EXHAUST PIPE NUTS AND MUFFLER BOLTS 2-4
VALVE CLEARANCE 2-5
SPARK PLUG 2-8
FUEL HOSE 2-9
THROTTLE CABLE PLAY 2-9
ENGINE IDLE SPEED 2-9
ENGINE OIL AND OIL FILTER 2-1
ENGINE OIL HOSES
2-11
ENGINE COOLANT 2-12
RADIATOR HOSES 2-13
SPARK ARRESTER 2-13
CLUTCH 2-13
BRAKES 2-14
BRAKE FLUID
2-16
BRAKE HOSES 2-18
TIRES 2-18
STEERING 2-19
DRIVE CHAIN
2-2
SUSPENSIONS 2-23
CHASSIS BOLTS AND NUTS
2-23
COMPRESSION PRESSURE 2-24
OIL PRESSURE
2-25
CONTENTS
2
PERIODIC MAINTENANCE

2-1 PERIODIC MAINTENANCE
Item Initial 1 month Every 3 months Every 6 months pa e
Interval
Tighten
Inspect
Replace
Inspect
Inspect
Inspect
Inspect
Inspect
Inspect
Replace
Inspect
Inspect
Clean
2-3
2-4
2-5
2-8
2-9
2-10
2-11
2-9
2-9
2-13
2-12
2-13
2-13
Replace every 4 years
Replace every 18months
Replace every 4 years
Replace every 2 years
Item Initial 1 month Every 3 months Every 6 months pa e
Interval
Drive chain
rakes
rake hoses
rake fluid
Tires
Steering
Suspensions
Front and Rear wheel set nuts
Rear axle nut and lock nut
Chassis bolts and nuts
General lubrication
Inspect
Inspect
Tighten
Tighten
Lubricate
Inspect
Inspect
Inspect
Inspect
Tighten
Tighten
Lubricate
Inspect
Inspect
Replace every 4 years
Replace every 2 years
Tighten every time before riding
CHASSIS
2-20
2-14
2-18
2-16
2-18
2-19
2-23
7-12
7-72
2-23
2-2
PERIODIC MAINTENANCE SCHEDULE
The chart below lists the recommended intervals for all the required periodic service work necessary to keep the
vehicle operating at peak performance and economy.
Clean
Tighten
Inspect
Inspect
Inspect
Inspect
CAUTION
Usin poor quality replacement parts can cause your vehicle to wear more quickly and shorten its useful life.
Use only enuine Hyoun replacement parts or their equivalent.
CAUTION
More frequent servicin should be performed on vehicles that are used under severe conditions.
PERIODIC MAINTENANCE CHART
ENGINE
Air cleaner element
Exhaust pipe nuts and muffler bolts
Valve clearance
Spark plug
Fuel hose
Engine oil and oil filter
Engine oil hoses
Throttle cable
Idle speed
Clutch
Engine coolant
Radiator hoses
Spark arrester
Inspect every time before riding

PERIODIC MAINTENANCE 2-2
LUBRICATION POINTS
Proper lubrication is important for smooth operation and long life of each working part of the vehicle.
Major lubrication points are indicated below.
Clutch lever holder
Steering shaft holder
Throttle lever
Front brake lever holder
Rear brake pedal and rod link
Drive shaft joint spline
O- Motor oil, G- Grease
NOTE
Before lubricating each part, clean off any rusty spots and wipe off any grease, oil, dirt or grime.
Lubricate exposed parts which are subject to rust, with either motor oil or grease whenever the vehicle
has been operated under wet or rainy condition.

2-3 PERIODIC MAINTENANCE
MAINTENANCE PROCE-
DURES
This section describes the servicing procedures for
each item mentioned in the Periodic Maintenance
chart.
AIR CLEANER
If the air cleaner is clogged with dust, intake resis-
tance will be increased, with a resultant decrease in
power output and an increase in fuel consumption.
Check and clean the air cleaner element in the fol-
lowing manner :
Remove the seat. (Refer to page 7-3)
Remove the air cleaner case cover .
Remove the air cleaner element .
Separate the polyurethane foam element , ele-
ment frame and element trap stopper .
Fill a wash pan of a proper size with a non-
flammable cleaning solvent . Immerse the air
cleaner element in the cleaning solvent and wash
it.
Press the air cleaner element between the palms
of both hands to remove the excess solvent : do
not twist or wring the element or it will tear.
Immerse the element in HYOSUNG genuine oil
, and then squeeze out the excess oil leaving
the element slightly wet.
Inspect Interval
Clean Every 3 months.

PERIODIC MAINTENANCE 2-4
Remove the drain cap of the air cleaner case to
allow any water to drain out.
Tighten the exhaust pipe nuts , muffler connect-
ing bolt , and muffler mounting bolts to the
specified torque.
EXHAUST PIPE NUTS AND MUF-
FLER BOLTS
CAUTION
Inspect the air cleaner element for tears. A torn
element must be replaced.
If drivin under dusty conditions, clean the air
cleaner element more frequently. The surest
way to accelerate en ine wear is to operate the
en ine without the element or with torn ele-
ment. Make sure that the air cleaner element is
in ood condition at all times. Life of the
en ine depends lar ely on this component!
Inspect Interval
Tighten Initially at 1 month and Every 3 months
thereafter.
Exhaust pipe nut : 23 Nm (2.3 k fm)
Muffler connectin bolt
: 23 Nm (2.3 k fm)
Muffler mountin bolt
: 23 Nm (2.3 k fm)
Other manuals for TE450 -
2
Table of contents
Other HYOSUNG Offroad Vehicle manuals
Popular Offroad Vehicle manuals by other brands

Ski-Doo
Ski-Doo Legend Operator's guide

Yamaha
Yamaha BEARTRACKER YFM250XN owner's manual

Polaris
Polaris Sportsman Touring 550 EPS 2013 Owner's manual for maintenance and safety

Fisher-Price
Fisher-Price Power Wheels B9273 Owner's manual with assembly instructions

Polaris
Polaris Sportsman 570 6X6 2018 Owner's manual for maintenance and safety

Yamaha
Yamaha ET300G Service manual