manuals.online logo
Brands
  1. Home
  2. •
  3. Brands
  4. •
  5. Hypertherm
  6. •
  7. Music Mixer
  8. •
  9. Hypertherm HyDefinition Quick guide

Hypertherm HyDefinition Quick guide

Popular Music Mixer manuals by other brands

Denon DN-HC5000 - Serato ITCH Hardware/Software... Service manual

Denon

Denon DN-HC5000 - Serato ITCH Hardware/Software... Service manual

Yamaha WC42260 owner's manual

Yamaha

Yamaha WC42260 owner's manual

Vertiv KMMLED156 Quick installation guide

Vertiv

Vertiv KMMLED156 Quick installation guide

Yamaha EMX3000 user manual

Yamaha

Yamaha EMX3000 user manual

Mackie Onyx Analogue Mixer brochure

Mackie

Mackie Onyx Analogue Mixer brochure

Peavey S-32 Sanctuary Series Operation guide

Peavey

Peavey S-32 Sanctuary Series Operation guide

Rane MP 4 Operator's manual

Rane

Rane MP 4 Operator's manual

True T9 Touchscreen Console owner's manual

True

True T9 Touchscreen Console owner's manual

Studiomaster Air Pro 24 instruction manual

Studiomaster

Studiomaster Air Pro 24 instruction manual

Yamaha MV802 owner's manual

Yamaha

Yamaha MV802 owner's manual

Roland SoundCanvas SC-8820 owner's manual

Roland

Roland SoundCanvas SC-8820 owner's manual

Roland M-160 owner's manual

Roland

Roland M-160 owner's manual

Yamaha MR1642 Operation manual

Yamaha

Yamaha MR1642 Operation manual

Pioneer DJM 909 - Battle Mixer W/Effects operating instructions

Pioneer

Pioneer DJM 909 - Battle Mixer W/Effects operating instructions

Veeder-Root TLS-350 Series System setup manual

Veeder-Root

Veeder-Root TLS-350 Series System setup manual

Alto APM80.QUAD user manual

Alto

Alto APM80.QUAD user manual

Omnitronic PM-211 user manual

Omnitronic

Omnitronic PM-211 user manual

SoundCraft B400 user guide

SoundCraft

SoundCraft B400 user guide

manuals.online logo
manuals.online logoBrands
  • About & Mission
  • Contact us
  • Privacy Policy
  • Terms and Conditions

Copyright 2025 Manuals.Online. All Rights Reserved.

HyDefinition
RHF Console
Setup Configuration
For Systems
with Short Torch Leads
(20'/6m or less)
Field Service Bulletin
803490 - Revision 0
®
© Copyright 1998 Hypertherm, Inc.
All Rights Reserved
Hypertherm, HyDefinition, HT and LongLife are trademarks of Hypertherm, Inc.
and may be registered in the United States and/or other countries
HyDefinition RHF Console
Setup Configuration
for
Systems with Short Torch Leads
(20'/6m or less)
Field Service Bulletin
IM-349
(P/N 803490)
Revision 0 December, 1998
HYPERTHERM, Inc.
P.O. Box 5010
Hanover, New Hampshire 03755-5010
Tel.: (603) 643-3441
Fax: (603) 643-5352
http://www.hypertherm.com
email:[email protected]
1
FIELD SERVICE BULLETIN
HyDefinition RHF Console Setup Configuration
In this bulletin:
Introduction .......................................................................................... 2
Purpose ........................................................................................... 2
General............................................................................................ 2
Applicability...................................................................................... 2
Identifying Effected RHF Consoles.................................................. 3
RHF Console Modification ................................................................... 4
Power Supply Modification................................................................... 6
2
HyDefinition RHF Console Setup Configuration
FIELD SERVICE BULLETIN
INTRODUCTION
Purpose
This field service bulletin provides instructions for configuring HyDefinition systems to
improve starting reliability, when using short torch leads (20 feet or less).
General
HyDefinition systems that use short torch leads and have an RHF console containing a three-
capacitor spark gap assembly may experience decreased starting reliability. This bulletin
includes instructions for modifying effected power supplies and RHF consoles to improve the
reliability of the starting cycle.
Applicability
This field service bulletin applies to HyDefinition systems (HD1070 and HD3070) that use
short torch leads (20 feet or less) and have an RHF console containing a three-capacitor
spark gap assembly.
If your HyDefinition system does not use short torch leads (20 feet or less)
disregard this bulletin.
WARNING
All work must be performed only by qualified personnel!
3
FIELD SERVICE BULLETIN
HyDefinition RHF Console Setup Configuration
Identifying Effected RHF Consoles
To determine if your system is equipped with a RHF console containing a three-capacitor
spark gap assembly:
Turn off power to the power supply and wait 5 minutes before
opening the RHF console.
Open the RHF console and examine the capacitors secured to
the spark gap assembly.
Turn off the power, unplug the power cord and wait 5 minutes before opening RHF con-
sole. If the power supply is directly connected to a line disconnect switch, place switch
in the OFF position. In the U.S., use a "lock-out / tag-out" procedure until the service or
maintenance work is complete. In other countries, follow appropriate local or national
safety procedures.
WARNING
ELECTRIC SHOCK CAN KILL
Two capacitors.
No action required. Three capacitors.
Modification recommended.
4
HyDefinition RHF Console Setup Configuration
FIELD SERVICE BULLETIN
RHF CONSOLE MODIFICATION
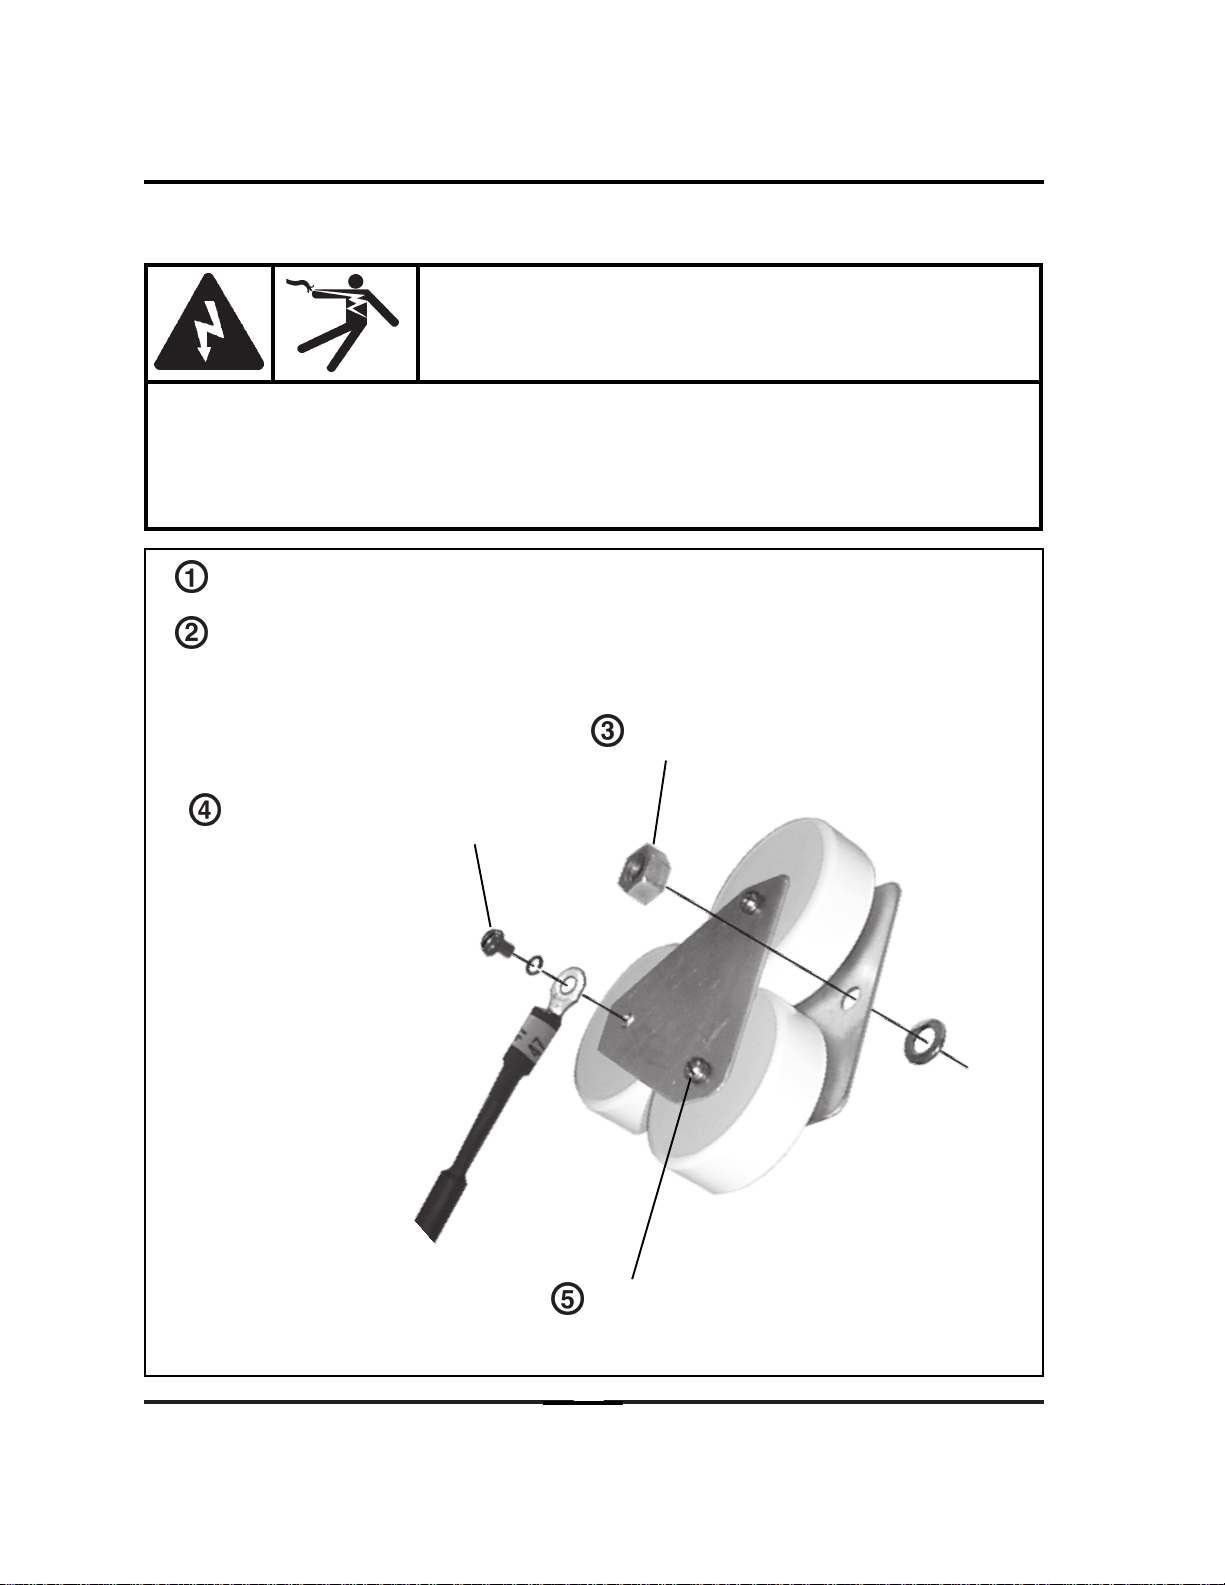
Remove nut and separate the capacitor
assembly from the spark gap.
Remove the screw and lock washer
securing wire to the capacitor link plate.
Remove the two screws and lock
washers securing the link plate.
Remove the link plate.
Turn off the power, unplug the power cord and wait 5 minutes before opening RHF con-
sole. If the power supply is directly connected to a line disconnect switch, place switch
in the OFF position. In the U.S., use a "lock-out / tag-out" procedure until the service or
maintenance work is complete. In other countries, follow appropriate local or national
safety procedures.
WARNING
ELECTRIC SHOCK CAN KILL
Turn off power to the power supply and wait 5 minutes before opening RHF console.
Open the RHF console and locate the capacitors secured to the spark gap assembly.
5
FIELD SERVICE BULLETIN
HyDefinition RHF Console Setup Configuration
Install the screw and lock washer to
secure wire to the capacitor.
Install the nut to secure the capacitor
assembly to the spark gap. Make sure
washer is installed as shown.
Washer
Close and secure the RHF console.
6
HyDefinition RHF Console Setup Configuration
FIELD SERVICE BULLETIN
Locate relay CR4.
Remove the right side
panel of the power supply.
Turn off the power, unplug the power cord and wait 5 minutes before removing any power
supply cover. If the power supply is directly connected to a line disconnect switch, place
switch in the OFF position. In the U.S., use a "lock-out / tag-out" procedure until the
service or maintenance work is complete. In other countries, follow appropriate local or
national safety procedures.
WARNING
ELECTRIC SHOCK CAN KILL
POWER SUPPLY MODIFICATION
Turn off power to the power supply and wait 5 minutes before removing power supply panel.
7
FIELD SERVICE BULLETIN
HyDefinition RHF Console Setup Configuration
Remove wire 66 from relay CR4.
Attach wire 66 along with wire 67
to the lower terminal of relay CR4.
Relay CR4.
Replace the right side pane to the
power supply and secure in place.
8
HyDefinition RHF Console Setup Configuration
FIELD SERVICE BULLETIN
Blank