Hyundai HELP20V User manual

CORDLESS POLE SAW
HELP20V

CAREFULLY READ THESE INSTRUCTIONS BEFORE USE THIS MACHINE
KEEP THIS MANUAL FOR FUTURE REFERENCES
1. SECURITY INSTRUCTIONS
WARNING Read all safety warnings and all instructions. Failure to follow the warnings and
instructions may result in electric shock, fire and/or serious injury.
Save all warnings and instructions for future reference. The term "power tool" in the warnings
refers to your mains-operated (corded) power tool or battery-operated (cordless) power tool.
1) Work area safety
a) Keep work area clean and well lit.Cluttered or dark areas invite accidents.
b) Do not operate power tools in explosive atmospheres, such as in the presence of
flammable liquids, gases or dust. Power tools create sparks which may ignite the dust or fumes.
c) Keep children and bystanders away while operating a power tool. Distractions can cause you
to lose control.
2) Electrical safety
a) Power tool plugs must match the outlet. Never modify the plug in any way. Do not use any
adapter plugs with earthed (grounded) power tools. Unmodified plugs and matching outlets will
reduce risk of electric shock.
b) Avoid body contact with earthed or grounded surfaces, such as pipes, radiators, ranges
and refrigerators. There is an increased risk of electric shock if your body is earthed or grounded.
c) Do not expose power tools to rain or wet conditions. Water entering a power tool will increase
the risk of electric shock.
d) Do not abuse the cord. Never use the cord for carrying, pulling or unplugging the power
tool. Keep cord away from heat, oil, sharp edges or moving parts. Damaged or entangled cords
increase the risk of electric shock.
e) When operating a power tool outdoors, use an extension cord suitable for outdoor use. Use
of a cord suitable for outdoor use reduces the risk of electric shock.
f) If operating a power tool in a damp location is unavoidable, use a residual current device
(RCD) protected supply. Use of an RCD reduces the risk of electric shock.
3) Personal safety
a) Stay alert, watch what you are doing and use common sense when operating a power tool.
Do not use a power tool while you are tired or under the influence of drugs, alcohol or
medication. A moment of inattention while operating power tools may result in serious personal
injury.
b) Use personal protective equipment. Always wear eye protection. Protective equipment such
as dust mask, non-skid safety shoes, hard hat, or hearing protection used for appropriate conditions
will reduce personal injuries.
c) Prevent unintentional starting. Ensure the switch is in the off-position connecting to power
source and/or battery pack, picking up or carrying the tool. Carrying power tools with your finger
on the switch or energizing power tools that have the switch on invites accidents.
d) Remove any adjusting key or wrench before turning the power tool on. A wrench or a key left
attached to a rotating part of the power tool may result in personal injury.
e) Do not overreach. Keep proper footing and balance at all times. This enables better control of
the power tool in unexpected situations.
f) Dress properly. Do not wear loose clothing or jeweller. Keep your hair, clothing and gloves
away from moving parts. Loose clothes, jewellery or long hair can be caught in moving parts.
g) If devices are provided for the connection of dust extraction and collection facilities, ensure
these are connected and properly used. Use of dust collection can reduce dust-related hazards.
4) Power tool use and care
a) Do not force the power tool. Use the correct power tool for your application. The correct
power tool will do the job better and safer at the rate for which it was designed.
b) Do not use the power tool if the switch does not turn it on and off. Any power tool that cannot
be controlled with the switch is dangerous and must be repaired.
c) Disconnect the plug from the power source and/or the battery pack from the power tool
before making any adjustments, changing accessories, or storing power tools. Such preventive
safety measures reduce the risk of starting the power tool accidentally.
d) Store idle power tools out of the reach of children and do not allow persons unfamiliar with
the power tool or these instructions to operate the power tool. Power tools are dangerous in the

hands of untrained users.
e) Maintain power tools. Check for misalignment or binding of moving parts, breakage of parts
and any other condition that may affect the power tool’s operation. If damaged, have the
power tool repaired before use. Many accidents are caused by poorly maintained power tools.
f) Keep cutting tools sharp and clean. Properly maintained cutting tools with sharp cutting edges
are less likely to bind and are easier to control.
g) Use the power tool, accessories and tool bits etc. in accordance with these instructions,
taking into account the working conditions and the work to be performed. Use of the power tool
for operations different from those intended could result in a hazardous situation.
5) Battery tool use and care
a) Recharge only with the charger specified by the manufacturer. A charger that is suitable for
one type of battery pack may create a risk of fire when used with another battery pack.
b) Use power tools only with specifically designated battery packs. Use of any other battery
packs may create a risk of injury and fire.
c) When battery pack is not in use, keep it away from other metal objects, like paper clips,
coins, keys, nails, screws or other small metal objects that can make a connection from one
terminal to another. Shorting the battery terminals together may cause burns or a fire.
d) Under abusive conditions, liquid may be ejected from the battery; avoid contact. If contact
accidentally occurs, flush with water.If liquid contacts eyes, additionally seek medical help. Liquid
ejected from the battery may cause irritation or bur
ns.
6) Service
a) Have your power tool serviced by a qualified repair person using only identical replacement
parts.This will ensure that the safety of the power tool is maintained.
Pole saw warnings
-Respect the capacity of the tool. Use the tool as described in this manual and for its intended use,
safely and safely.
-Do not use the tool if the switch is defective. In the event of a malfunction, do not use the tool and
take it to a qualified service for repairs.
-Remove the battery before making adjustments, changing the accessories or storing the tool.
-Keep the tool out of the reach of children. People who are not familiar with the tool or who have
not read these instructions should not use it. Power tools are dangerous when used by untrained
people.
-The tool must be regularly maintained. Regular tool maintenance reduces malfunctions and
improves work efficiency.
-Check that the moving parts are working properly and that they are not jammed. Check that there
are no broken or damaged parts that could impair the functioning of the tool. If the tool is
damaged or faulty, do not use the tool anymore and bring it to a qualified service for repairs.
-Keep cutting tools sharp and clean. Carefully maintained tools with sharp, sharp edges are
wedged less frequently and can be guided more easily.
-Never touch any part of the body of the cutting chain when the tool is operating. Before starting
the tool, make sure that the cutting chain is not in contact with anything. A moment of inattention
while using the tool may cause your garment or part of the body to stick to the cutting chain.
-Wear safety glasses and hearing protection. Additional protective equipment is recommended
such as helmets, protective gloves and safety shoes.
-Do not place yourself on the path of falling branches.
-Before felling, check where the trees or branches are going to fall. Make sure that there are no
obstacles to prevent or hinder travel.
-Do not work in areas where the grass is wet and where the soil is slippery.
-Do not use this tool in a tree, on an unstable ladder or surface.
-Adopt a stable position and keep your balance constantly.
-Hold the tool firmly with both hands when the engine is running.
-When the chain is moving, it must not touch objects, materials or persons.
-Start cutting only with a chain at full speed.
-Do not attempt to insert the saw into a pre-existing notch. Always make a new notch.

-Pay attention to moving branches or other forces that could close a notch and pinch or hinder the
chain.
-Do not attempt to cut a branch with a diameter greater than the cutting length of the chain saw.
-Always switch off the tool, let the chain stop and remove the battery before making any
adjustments, maintenance or repairs. Always remove the battery always install the blade guard to
store the tool or transport it.
-The chain must remain sharp and taut. Regularly check the tension of the chain.
-Only use replacement parts and original accessories.
-Use only the manufacturers specified replacement guides and chains. Incorrect replacement
guides and chains may cause chain breakage and / or rebound.
-Remove the battery before servicing, cleaning or cleaning the appliance.
-Always hold the appliance firmly with both hands.
-Check that there are no obstacles or electrical wires hidden in the work area.
-Check the general condition of the appliance before each use. Do not use a device with a
damaged battery or other parts. Do not touch a damaged cable. In case of any damage, have the
appliance repaired by an authorized repairer.
-Immediately stop the device if an abnormal level of vibration has been detected. In case of
damage to the blade, it is necessary to change the complete set of blades.
-Use the device only if all protective devices are mounted. Do not use the device with faulty
protective equipment. Do not modify the unit.
-Keep the cable away from the work area.
-Do not work with the tool when it rains, in bad weather or in a damp environment. Do not use the
machine when there is a risk of thunderstorms and storms.
-Only work outdoors, under daylight or under artificial lighting.
-Always carry the appliance by its handle
-Tie long hair in a way to prevent them from coming into contact with the blades. Do not wear
jewelry and loose clothing when operating the machine.
-The appliance should never be used near people, especially children and pets. Stop the
operation immediately if this condition is not met. In all cases, ensure a safe area of at least
15 meters around the work area.
-The operator is responsible for accidents caused to others.
-Always take a stable working position. Make sure you step on the slopes. Take extreme caution
when working on slopes.
-Do not use the tool when you are tired, sick or under the influence of alcohol or drugs.
-Take regular breaks to reduce the risk of fatigue.
-Never leave the machine unattended. Switch off and remove the battery and put it out of the
reach of people if you are away from work.
-Remove the battery when transporting it. Put the guard on the blade when it is being transported.
-This device is not intended for use by persons (including children) whose physical, sensory or
mental capacities are reduced, or by persons without experience or knowledge, unless they have
been able to benefit, By means of a person responsible for their safety, supervision or prior
instructions concerning the use of the appliance. Children should be supervised to ensure that
they do not play with the appliance
-Always keep this manual at hand.
-The device must always be used fully assembled and secured.
-Store the tool with its blade guard and out of the reach of children
-Never use an incomplete or unauthorized tool.
-Local laws may restrict the use of this tool.
-Check the tool regularly and before each use to observe any impact or damage.
-Always use the tool with the supplied harness.

Residual risks
Even if you use this product in compliance with all safety requirements, the potential risks of injury
and damage remain. The following hazards may arise in the structure and design of this product:
-There are harmful health consequences resulting from the emission of vibrations if the product is
used for long periods of time or not properly managed and properly maintained.
-There is risk of injury and property damage due to attachments or broken the sudden impact of
hidden objects when using cutting.
-Risk of injury to persons and property caused by flying objects.
-Prolonged use of this product exposes the operator to vibration and can produce so-called "white
finger" disease. To reduce the risk, wear gloves and keep your hands warm.
-If any of the symptoms of "white finger syndrome" occur, seek immediate medical attention.
Symptoms of the "white finger" include numbness, loss of sensitivity, tingling, tingling, and pain,
loss of strength, color changes or skin condition. These symptoms usually appear on the fingers,
hands or wrists. Risk increases at low temperatures.
Warning symbol
Risk of projections. Keep bystanders away. Risks de projection.
Do not use the tool under rain and by moist weather.
Wear gloves of protection
Wear hearing protections and glasses of protection
Read the instruction manual
Keep the pole pruner a sufficient distance away from electrical power lines at least 10 m
Wear head protection.

Immediately remove the battery if the battery or tool is damaged. Remove the battery
before maintenance and storage.
Wear safety footwear
Caution about the cutting element!
Guarantee sound power level
Intended use
This machine has been specially designed to cut the twigs at the top of the trees. This tool is
intended for exclusively domestic use. Any other use not expressly permitted in this manual may
result in damage to the device, posing a serious hazard to the user and is not permitted. This
cordless pruning machine must NEVER be used intensively, for professional use (including rental) or
agriculture or for public gardens or forests.
This tool is provided without charger and battery. It is designed to work only with Hyundai range
battery and charger. Please ask advice to your dealer. Do not buy others kind of batteries.

7
2. YOUR PRODUCT
a. Description
1. Cutting head pole
2. Oil lever indicator
3. Cutter bar with Saw chain
4. Telescopic tube
5. Telescopic tube locking lever
6. Shoulder harness
7. Cutter guard
8. ON/OFF trigger
9. Locking lever
10. Oil cap
11. Harness connection point 1
12. Handle pole
13. Harness connection point 2
14. ON/OFF trigger lock-out button

8
b. Technical data
Voltage
20Vd.c.
Cutting capacity
165mm
Sound power level
91.8dB(A) K=3dB(A)
Sound pressure level
82dB(A) K=3dB(A)
Vibration value
2,109m/s² K=1,5m/s²
Mass (empty tool, without cutting
attachment, harness, oil and battery)
3,5 kg
Volume of oil tank
50 ml
Information:
The declared vibration total value has been measured in accordance with a
standard test method and may be used for comparing one tool with another;
The declared vibration total value may also be used in a preliminary assessment
of exposure.
Warning:
that the vibration emission during actual use of the power tool can differ from the
declared total value depending on the ways in which the tool is used; and
of the need to identify safety measures to protect the operator that are based on
an estimation of exposure in the actual conditions of use (taking account of all
parts of the operating cycle such as the times when the tool is switched off and
when it is running idle in addition to the trigger time).
Wear hearing protection.

9
3. USE
10
NOTE: Supplied without battery or charger

11
a. Charging (Attention: Charger and battery not included in this model)
1) Take the battery pack out of the equipment. Do this by pressing the push lock button.
2) Check that your mains voltage is the same as that marked on the rating plate of the battery
charger. Insert the power plug of the charger into the socket outlet. The RED LED will then
begin to light.
3) Insert the battery pack into the battery charger .then the red LED on charger will begin to
Green flash light.
4) You will find a label with “Charger indicator” of the LED indicator on the charger.
The battery pack can become a little warm during the charging. This is normal.
If the battery pack fails to charge, check:

12
Voltage at the power socket
Whether there is good contact at the charging contacts.
Whether the battery pack is warm or not. The battery protection system will not allow the
battery to be charged if the battery temperature is over 40℃after use. Allow the battery
pack to cool to room temperature before commencing with the charging.
If the battery pack still fails to charge, send the charging unit and the battery pack to our
customer service center.
To ensure that the battery pack provides long service, you should take care to recharge it
promptly. You must recharge the battery pack when you notice that the power drops. Never
allow the battery pack to become fully discharged. This will cause it to develop a defect.
Battery capacity indicator
Press the switch for the battery capacity indicator . The battery capacity indicator shows the
charge status of the battery using 4 LEDs as following:
All 4 LEDs are lit:
The battery is fully charged.
3 LED(s) are lit:
The battery has approx. 75% remaining charge.
2 LED(s) are lit:
The battery has approx. 50% remaining charge.
1 LED is lit:
The battery will be empty soon, please recharge the battery.
Charger indicator
Indicator status
Explanations and actions
Ready for use
The charger is connected to the mains and is ready for use; there is no
battery pack in the charger.
Charging
The charger is charging the battery pack in charge mode.
Battery pack is full of charge.
Charging is finished and battery pack in the charger.
The temperature of battery is too high or too low, the charger is under
protection status. The charging function can be recovered after the
temperature is normal.
Unrecoverable battery malfunction.
b. Assembly
Warning! To prevent accidental starting that could cause serious personal injury, always
remove the battery pack from the product when assembling part.
Connecting the pole
Unlock the locking lever on the cutting head pole by lifting upwards, Fig 3. Ensure the
intermediate pole on the locking lever is in the locked position to prevent the intermediate
pole moving whilst being connected. Insert the plug on the intermediate pole into the

13
socket on the cutting head pole and push together until the locking tabs are fully seated,
Fig.4. Lock the poles together by closing the locking lever on the cutting head pole, Fig 5.
NOTE: when assembled correctly, the cutting head pole should not be able to separate
from the intermediate pole when pulled. Repeat above steps if pole can be separated
from the intermediate pole.
Warning! Failure to securely assembly and lock all poles together as directed above
could cause the poles to separate and could result in serious personal injury or death.
Attaching the shoulder harness
Connect the latches on the shoulder harness to the harness connection points, Fig. 6.
Adjust the strap to a comfortable position.
c. Installing the battery pack
Warning! Always remove battery pack from your tool when you are assembling parts,
making adjustments, cleaning, carrying, transporting or when it is not in use. Removing
the battery pack will prevent accidental starting that could cause serious personal injury
NOTE: To avoid serious personal injury, always remove the battery pack and keep hand
clear of the lock out button when carrying or transporting the tool.
Slide battery pack into the pole saw base, Fig 7. Make sure that the battery pack snaps
into place and that the battery is secured in the tool before beginning operation. Improper
installation of the battery pack can cause damage to internal components.
d. Removing battery pack
Locate the battery release catch on the top of the battery and press downwards, Fig 8.
Whilst holding down the battery release catch slide the battery pack away from the tool.
e. Adding bar and chain lubricant
Always use bar and chain lubricant. It is designed for chains and chain oilers, and it is
formulated to perform over a wide temperature range with no dilution required.
The bar and chain lubricant level should be checked after every 20 minutes of use and
refilled as needed.
Remove the oil cap, Fig 9. Carefully pour the bar and chain lubricant into the bar tube
reservoir. Wipe off excess oil.
Check and fill the reservoir when the oil indicator, Fig, is below the second to last
indicator line.
Repeat as needed.
NOTE: Do not use dirty, used or otherwise contaminated oil. Damage may occur to the
bar or chain.
NOTE: It is normal for oil to seep from the saw when not in use. To prevent seepage,
empty the oil tank after each use then run for one minute.
When storing the unit for a long period of time (three months or longer) be sure the chain
is lightly lubricated. This will prevent rust on the chain and bar sprocket.
f. Operation
Danger! Never cut rear power lines, electric cords or other electric sources. If bar and
chain jams on any electrical cord or line, do not touch the bar or chain; they can become
electrically live and very dangerous.
Continue to hold the pole saw by the insulated rear handle or lay it down and away from
you in a safe manner. Disconnect the electrical service to the damaged line or cord before

14
attempting to free the bar and chain from the line or cord. Contact with the live electric
cords or lines will result in death by electrocution or serious injury.
Warning! Do not allow familiarity with this product to make you careless. Remember that
a careless fraction of a second is sufficient to inflict serious injury.
Do not use any attachments or accessories not recommended by the manufacture of this
product. The use of attachments or accessories not recommended can result in serious
personal injury.
g. Applications
You may use this product for the purposes listed below:
-Limbing
-Pruning
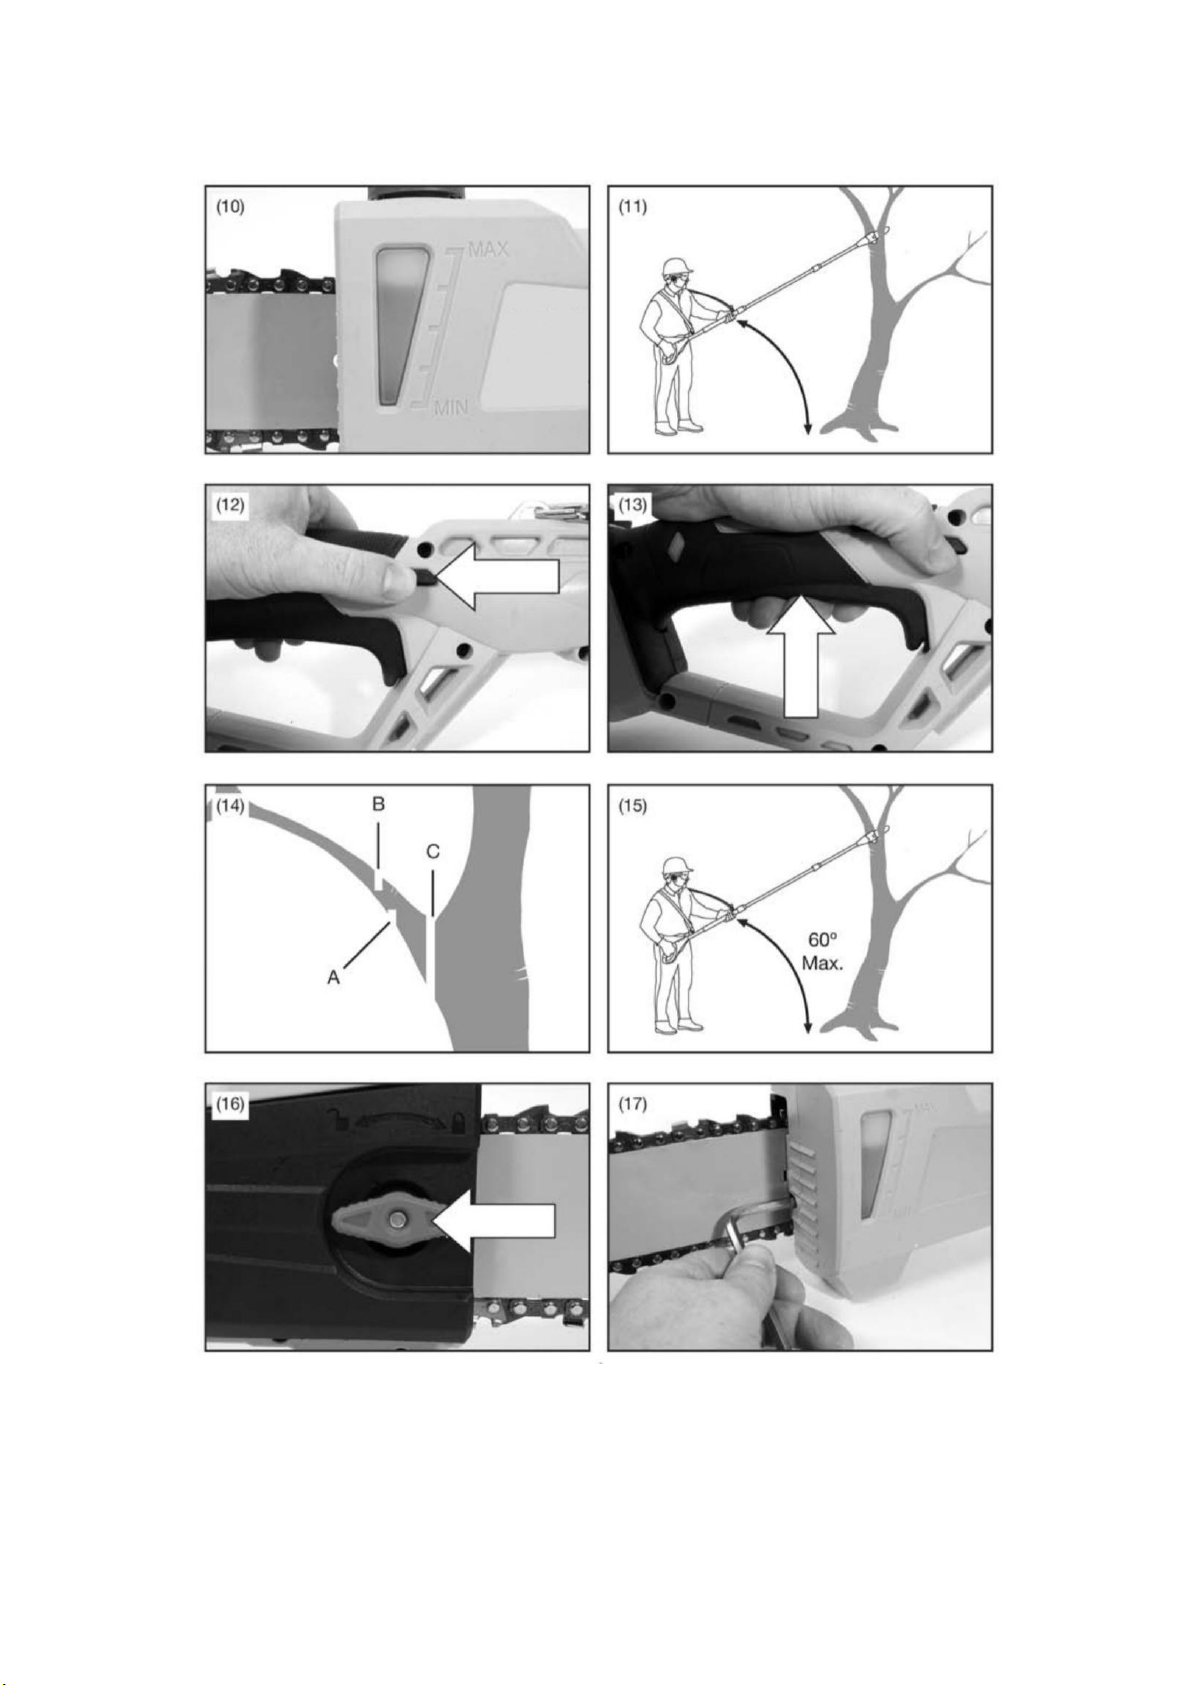
h. Starting and stopping
Hold the pole saw as shown in Fig 11 and ensure that you are well away from anything
that may contact the blade.
Press and hold the ON/OFF trigger lock out button, Fig 12.
Depress the ON/OFF trigger, Fig 13.
To stop the motor, release the trigger to stop the pole saw. Upon release the trigger, the
ON/OFF trigger lock-out button will automatically reset to the locked position.
i. Preparation for cutting
Wear non-slip gloves for maximum grip and protection. Maintain a proper grip on the unit
whenever the motor is running. Use your right hand to firmly grip the rear handle while
your left hand has firm a grip on the pole shaft.
Hold unit firmly with both hands. Always keep your left hand on the pole shaft and your
right hand on the rear handle, so your body is to the left of the chain line. Never use a left
handed (cross handed) grip, or any stance that places your body or arm across the chain
line.
Never stand directly under the limb you are cutting.
j. Basics cutting guide
Follow the steps below to prevent damage to tree or shrub bark. Do not use a back-and-
forth sawing motion.
Make a shallow first cut (1/4 of limb diameter) in the underside of the limb close to the
main limb or trunk, Fig 14 (A).
Make a second cut, Fig 14 (B), from the top side of the limb outwards from the first cut.
Continue to cut through the limb until the limb separates from the tree. Be prepared to
balance the weight of the tool when the limb fails.
Make a final cut close to trunk, Fig 14 (C).
NOTE: For second and final cuts (from top of limb of branch), hold font cutting guide
against the limb being cut. This will help steady the limb and make it easier to cut. Allow
chain to cut for you. Exert only low downward pressure. If you force the cut, damage to
the bar, chain or motor can result.
Release the trigger as soon as the cut completed.
Failure to follow proper cutting procedures will result in the bar and chain binding and
becoming pinched or trapped in the limb. If this should happen:
-Stop the motor and remove the battery pack.

15
-If the limb can be reached from the ground, lift the limb while holding the saw. This should
release the “pinch” and free the saw.
If the saw is still trapped, call a professional for assistance.
k. Limbing and pruning
This unit designed for trimming small branches and limbs up to 100mm diameter. For best
results, observe the following precautions.
Plan the cut carefully. Be aware of the direction in which the branch will fall. Never stand
directly under the limb you are cutting. Always position yourself out of the path of falling
debris.
The most typical cutting application is to position the unit at an angle of 60º or less, Fig
15, depending on the specific situation. As the angle of the pole saw shaft to ground
increases, the difficulty of making the first cut (from the underside of limb) increases.
Remove the long branches in several stages.
Cut lower branches first to allow the top branches more room to fall.
Work slowly. Keep both hands on the saw with a firm grip. Maintain secure footing and
balance.
Keep the tree between you and the chain while limbing. Cut from side of tree opposite
branch you are cutting.
Never stand on a ladder or other unstable support while using the pole saw. Always avoid
any position which can cause you to loose your balance and cause severe injury.
Do not make the flush cut next to the main limb or trunk until you have cut off the limb
further out to reduce the weight. Following proper cutting procedures will prevent stripping
the bark from the main member.
Keep others persons at least 50 feet (15m) from the work area. Distractions can cause
you to lose control.
Risk of electrocution hazard. To prevent shock, do not operate within 50 (15m) of
overhead electrical lines. Always check surrounding area for hidden electrical lines.
Do not overreach. Make sure your footing is firm. Keep feet apart. Divide your weight
evenly on both feet.
4. MAINTENANCE AND STORAGE
Before inspecting, cleaning or servincing the unit, stop the motor, wait for all moving
parts to stop, and remove the battery pack. Failure to follow these instructions can
result in serious personal injury or properly damage.
a. General maintenance
Avoid using solvents when cleaning plastic parts. Most plastics are susceptible to damage
from various types of commercial solvents and may be damaged by their use. Use celan
cloths to remove dirt, dust, oil, grase, etc.
Do not at anytime let brake fluids, gasolline, petroleum-based products, prenetrating oils,
etc come in contact with plastic parts. Chemical can damage, weaken or destroy plastic,
which could resul in serious personal injury.
All pole saw service, other than the items listed in these maintenance instructions, should
be performed by competent pole service personnel.

16
b. Chain tension
Never touch or adjust the chain while the motor is running. The saw chain is very sharp;
always wear protective gloves when performing maintenance to the chain
Stop the motor and remove the battery pack before setting the chain tension.
Make sure the chain cover knob, Fig 16, is loose to finger tight. Use a hex key to turn the
chain tensioning allen screw clockwise to tension the chain, Fig 17.
Do not over-tension the chain as this will lead to excessive wear and will reduce the life of
the bar and bar chain. Overtensionning also reduces the amount of cuts you will get per
battery charge.
NOTE: A cold chain is correctly tensioned when there is no slack on the underside of the
guide bar, the chain is snug, but it can be turned by hand without binding.
The chain must be re-tensioned whenever the flats, Fig 18 (A) on the drive links hang out
of the bar groove as shown in Fig 18.
During normal operation, the temperature of the chain will increase. The drive links of a
correctly tensioned warm chain will hang approximately 0.050 in. out of the bar groove, as
shown in Fig 19.
c. Replacing the bar and chain
Remove the battery pack before replacing the bar, chain to avoid possible serious injury.
Remove the chain cover knob, Fig 16, by turning it in an anticlockwise direction. Place the
chain cover knob to one side and then remove the chain cover from the chainsaw.
The bar contains a slot, Fig 20 (A) that fits over the mounting post, Fig 20 (B). The bar
also contains a chain tensioning pin hole, Fig 20 (C) which fits over the chain tensioning
pin, Fig 20 (D).
Place the bar onto the mounting post so that the chain tensioning pin fits into the chain
tensioning pin hole.
NOTE: if necessary, rotate the chain tensioning Allen screw counter clockwise until the
pin and hole can be aligned, Fig 17
Fit the chain, Fig 20 (E) over the sprocket, Fig 20 (F) and into the bar groove. The cutters
on the top of the bar should face toward the bar tip, in the direction of the chain rotation.
Replace the chain cover and tighten the chain cover knob finger tight only.
Remove all slack from chain by turning the chain tensioning Allen screw clockwise that
the chain seats into the bar groove during tensioning.
Tighten the chain cover knob securely
NOTE: Chain is correctly tensioned when here is no slack on the underside of the bar, the
chain is snug, but it can be turned by hand without binding. If chain is too tight, it will not
rotate. Loosen the chain cover screw slightly and turn chain tensioning screw ¼ turn
clockwise. Retighten chain cover screw securely.
d. Guide bar
Most guide bar problems can be avoided by keeping the product well maintained.
Incorrect filing and non-uniform cutter and depth gauge settings because most guide bar
problems, primarily resulting in uneven bar wear. As the bar wears unevenly, the rails

17
widen, which may cause chain clatter and difficulty in making straight cuts. Insufficient
guide bar lubrication and operating the product with a chain this is too tight will contribute
to rapid bar wear. To help minimise bar wear, the guide bar maintenance is recommended.
When the guide bar is dismounted, remove any sawdust from the “GROOVE” in the guide
bar rail.
Dissemble the saw chain and guide bar in reversed order of assembly.
The circular groove of the guide bar will wear particularly on the lower edge with time.
When replacing the chain turn the chain bar 180º to allow even wear, thus extending
guide bar life.
Rotate the guide bar occasionally to prevent uneven wear. The guide bar rail should
always have a square edge.
To check the guide bar “RAIL” for wear: Hold a ruler (straight edge) against the side of the
guide bar and “CUTTER SIDE PLATES”.
If there is a gap between the ruler and guide bar the guide bar “RAIL” is normal. If there is
no gap (ruler flush against the side of the guide bar) the guide bar “RAIL” is worn and
needs to be replaced (See Fig 21 and 22).
Assemble the guide bar and saw chain as described under “Replacing the bar and chain”.
e. Sharpening the chain
WARNING! Only sharpen the saw chain yourself if you are trained and have experience!
Use proper tools to sharpen the saw chain!
It is highly recommended that, once the chain loses the ability to cut cleanly and safely, it
must be replaced. Sharpening is possible if possible if done carefully.
Have your saw chain sharpened professionally at an authorised service centre or sharpen
the chain yourself using a proper sharpening kit. Follow the sharpening instructions
supplied with a sharpening kit.
To sharpen the chain proceeds as follows:
Tighten the chain tension enough that the chain does not wobble. Do all your filing at the
midpoint of the bar. Wear gloves for protection.
Use a round file, whose diameter is 1.1 times the cutting tooth doeth. Make sure that 20%
of the file diameter is above the cutters’ top plate.
A file guide is available from most reputable tool merchants and is the easiest way the
hold the file at the correct position (Fig 23).
File at an angle perpendicular to the bar and at an angle of 25º to the direction of travel
(Fig 24).
File each tooth from the inside towards outside only.
File one side of the chain first than turn the product around and repeat the process.
Sharpen each tooth equally by using the same number of strokes.
Keep all cutter lengths equal.
Check the safety depth gauge height every 5 sharpening.

18
If the depth gauges are also trimmed it is essential that the original profile be restored.
Use a depth gauge measuring instrument to check the height of the depth gauge.
Depth gauge measuring jigs are available from most reputable tool merchants.
NOTE: Dull or improperly sharpened chain can cause excessive motor speed during
cutting which may result in severe motor damage.
f. Storage
Clean all foreign material from the product. Store idle unit indoor in a dry, well-ventilated
area that is inaccessible to children. Keep away from corrosive agents such as garden
chemicals and de-icing salts.
Always place the blade guard on the saw bar when transporting or storing the pole saw.
The black guard is a snug fit and must be attached very carefully due to the sharp teeth
on the saw chain. This is best done by grasping the blade guard at one end, in the center
portion of the guard, and carefully sliding it over the chain. Use caution to avoid the sharp
teeth of the chain.
NOTE: The saw chain is very sharp. Always wear protective glove when handling the
chain.
5. DISPOSAL
Electrical products should not be discarded with household products. According to the
European Directive 2012/19/EU on waste electrical and electronic equipment and its
implementation into national law, electrical products used must be collected separately and
disposed of at collection points provided for this purpose. Talk with your local authorities or
dealer for advice on recycling.

19
6. EC DECLARATION
EC Declaration of conformity
BUILDER SAS
ZI, 32 rue Aristide Bergès – 31270 Cugnaux – France
Declares that the following machine:
CORDLESS POLE SAW
HELP20V
Serial number: 20200813245-20200813544
Is in conformity with the Directive Machine 2006/42/EC and with the regulations
transposing it.
Also in conformity with the following Directives:
EMC Directive 2014/30/UE
RoHS Directive (EU)2015/863 amending 2011/65/EU
Noise emission 2000/14/CE Annex V + 2005/88/CE
Guarantee sound power level: LwA: 95 dB (A)
Measured sound power level: LwA: 91.8 dB (A)
Notified body: 0905
Certification EC-type:
Also in conformity with the following standards
EN60745-1:2009+A11:2010
EN ISO 11680-1:2011
EN55014-1:2017
EN55014-2:2015
Responsible of the technical file: Mr Patriarca
Cugnaux, 30/06/2020
Philippe MARIE / PDG

WARRANTY
The manufacturer guarantees the product against defects in material and workmanship for a period of 2
years from the date of the original purchase. The warranty only applies if the product is for household use.
The warranty does not cover breakdowns due to normal wear and tear.
The manufacturer agrees to replace parts identied as defective by the designated distributor. The
manufacturer does not accept responsibility for the replacement of the machine, in whole or in part , and/or
ensuing damage.
The warranty does not cover breakdowns due to:
• insucient maintenance.
• abnormal assembly, adjustment or operations of the product.
• parts subject to normal wear and tear.
The warranty does not extend to:
• shipping and packaging costs.
• using the tool for a purpose other than that for which it was designed.
• the use and maintenance of the machine done in a manner not described in the user manual.
Due to our policy of continuous product improvement, we reserve the right to alter or change specications
without notice. Consequently, the product may be dierent from the information contained therein, but a
modication will be undertaken without notice if it is recognized as an improvement of the preceding
characteristic.
READ THE MANUAL CAREFULLY BEFORE USING THE MACHINE.
When ordering spare parts, please indicate the part number or code, you can nd this in the spare parts list
in this manual. Keep the purchase receipt; without it, the warranty is invalid. To help you with your product,
we invite you to contact us by phone or via our website:
• +33 (0)9.70.75.30.30
• https://services.swap-europe.com/contact
You must create a "ticket" via the web platform.
• Register or create your account.
• Indicate the reference of the tool.
• Choose the subject of your request.
• Describe your problem.
• Attach these les: invoice or sales receipt, photo
of the identication plate (serial number), photo
of the part you need (for example: pins on the
transformer plug which are broken).
7. WARRANTY
20
Table of contents
Other Hyundai Pole Saw manuals


